
The Android Neural Networks API (NNAPI) is an Android C API designed for running computationally intensive operations for machine learning on Android devices. NNAPI is designed to provide a base layer of functionality for higher-level machine learning frameworks, such as TensorFlow Lite and Caffe2, that build and train neural networks. The API is available on all Android devices running Android 8.1 (API level 27) or higher, but was deprecated in Android 15.
NNAPI supports inferencing by applying data from Android devices to previously trained, developer-defined models. Examples of inferencing include classifying images, predicting user behavior, and selecting appropriate responses to a search query.
On-device inferencing has many benefits:
- Latency: You don’t need to send a request over a network connection and wait for a response. For example, this can be critical for video applications that process successive frames coming from a camera.
- Availability: The application runs even when outside of network coverage.
- Speed: New hardware that is specific to neural network processing provides significantly faster computation than a general-purpose CPU, alone.
- Privacy: The data does not leave the Android device.
- Cost: No server farm is needed when all the computations are performed on the Android device.
There are also trade-offs that a developer should keep in mind:
- System utilization: Evaluating neural networks involves a lot of computation, which could increase battery power usage. You should consider monitoring the battery health if this is a concern for your app, especially for long-running computations.
- Application size: Pay attention to the size of your models. Models may take up multiple megabytes of space. If bundling large models in your APK would unduly impact your users, you may want to consider downloading the models after app installation, using smaller models, or running your computations in the cloud. NNAPI does not provide functionality for running models in the cloud.
See the Android Neural Networks API sample to see one example of how to use NNAPI.
Understand the Neural Networks API runtime
NNAPI is meant to be called by machine learning libraries, frameworks, and tools that let developers train their models off-device and deploy them on Android devices. Apps typically would not use NNAPI directly, but would instead use higher-level machine learning frameworks. These frameworks in turn could use NNAPI to perform hardware-accelerated inference operations on supported devices.
Based on an app’s requirements and the hardware capabilities on an Android device, Android’s neural network runtime can efficiently distribute the computation workload across available on-device processors, including dedicated neural network hardware, graphics processing units (GPUs), and digital signal processors (DSPs).
For Android devices that lack a specialized vendor driver, the NNAPI runtime executes the requests on the CPU.
Figure 1 shows the high-level system architecture for NNAPI.

Neural Networks API programming model
To perform computations using NNAPI, you first need to construct a directed graph that defines the computations to perform. This computation graph, combined with your input data (for example, the weights and biases passed down from a machine learning framework), forms the model for NNAPI runtime evaluation.
NNAPI uses four main abstractions:
- Model: A computation graph of mathematical operations and the constant
values learned through a training process. These operations are specific to
neural networks. They include 2-dimensional (2D)
convolution,
logistic
(sigmoid)
activation,
rectified linear
(ReLU) activation, and more. Creating a model is a synchronous operation.
Once successfully created, it can be reused across threads and compilations.
In NNAPI, a model is represented as an
ANeuralNetworksModelinstance. - Compilation: Represents a configuration for compiling an NNAPI model into
lower-level code. Creating a compilation is a synchronous operation. Once
successfully created, it can be reused across threads and executions. In
NNAPI, each compilation is represented as an
ANeuralNetworksCompilationinstance. - Memory: Represents shared memory, memory mapped files, and similar memory
buffers. Using a memory buffer lets the NNAPI runtime transfer data to drivers
more efficiently. An app typically creates one shared memory buffer that
contains every tensor needed to define a model. You can also use memory
buffers to store the inputs and outputs for an execution instance. In NNAPI,
each memory buffer is represented as an
ANeuralNetworksMemoryinstance. Execution: Interface for applying an NNAPI model to a set of inputs and to gather the results. Execution can be performed synchronously or asynchronously.
For asynchronous execution, multiple threads can wait on the same execution. When this execution completes, all threads are released.
In NNAPI, each execution is represented as an
ANeuralNetworksExecutioninstance.
Figure 2 shows the basic programming flow.
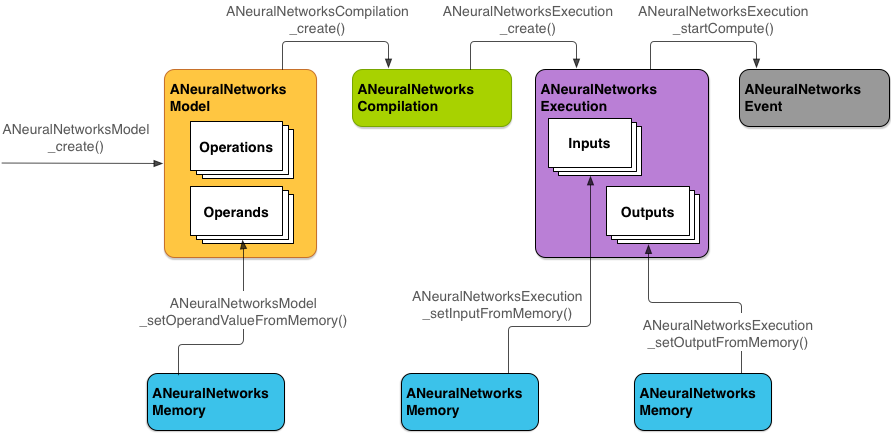
The rest of this section describes the steps to set up your NNAPI model to perform computation, compile the model, and execute the compiled model.
Provide access to training data
Your trained weights and biases data are likely stored in a file. To provide the
NNAPI runtime with efficient access to this data, create an
ANeuralNetworksMemory
instance by calling the
ANeuralNetworksMemory_createFromFd()
function and passing in the file descriptor of the opened data file. You also
specify memory protection flags and an offset where the shared memory region
starts in the file.
// Create a memory buffer from the file that contains the trained data
ANeuralNetworksMemory* mem1 = NULL;
int fd = open("training_data", O_RDONLY);
ANeuralNetworksMemory_createFromFd(file_size, PROT_READ, fd, 0, &mem1);
Although in this example we use only one
ANeuralNetworksMemory
instance for all our weights, it’s possible to use more than one
ANeuralNetworksMemory instance for multiple files.
Use native hardware buffers
You can use native hardware buffers
for model inputs, outputs, and constant operand values. In certain cases, an
NNAPI accelerator can access
AHardwareBuffer
objects without the driver needing to copy the data. AHardwareBuffer has many
different configurations, and not every NNAPI accelerator may support all of
these configurations. Because of this limitation, refer to the constraints
listed in
ANeuralNetworksMemory_createFromAHardwareBuffer reference documentation
and test ahead of time on target devices to ensure compilations and executions
that use AHardwareBuffer behave as expected, using
device assignment to specify the accelerator.
To allow the NNAPI runtime to access an AHardwareBuffer object, create an
ANeuralNetworksMemory
instance by calling the
ANeuralNetworksMemory_createFromAHardwareBuffer function and passing in the
AHardwareBuffer object, as shown in the following code sample:
// Configure and create AHardwareBuffer object
AHardwareBuffer_Desc desc = ...
AHardwareBuffer* ahwb = nullptr;
AHardwareBuffer_allocate(&desc, &ahwb);

// Create ANeuralNetworksMemory from AHardwareBuffer
ANeuralNetworksMemory* mem2 = NULL;
ANeuralNetworksMemory_createFromAHardwareBuffer(ahwb, &mem2);
When NNAPI no longer needs to access the AHardwareBuffer object, free the
corresponding ANeuralNetworksMemory instance:
ANeuralNetworksMemory_free(mem2);
Note:
- You can use
AHardwareBufferonly for the whole buffer; you cannot use it with anARectparameter. - The NNAPI runtime will not flush the buffer. You need to make sure that the input and output buffers are accessible before scheduling the execution.
- There is no support for sync fence file descriptors.
- For an
AHardwareBufferwith vendor-specific formats and usage bits, it is up to the vendor implementation to determine whether the client or the driver is responsible for flushing the cache.
Model
A model is the fundamental unit of computation in NNAPI. Each model is defined by one or more operands and operations.
Operands
Operands are data objects used in defining the graph. These include the inputs and outputs of the model, the intermediate nodes that contain the data that flows from one operation to another, and the constants that are passed to these operations.
There are two types of operands that can be added to NNAPI models: scalars and tensors.
A scalar represents a single value. NNAPI supports scalar values in boolean, 16-bit floating point, 32-bit floating point, 32-bit integer, and unsigned 32-bit integer formats.
Most operations in NNAPI involve tensors. Tensors are n-dimensional arrays. NNAPI supports tensors with 16-bit floating point, 32-bit floating point, 8-bit quantized, 16-bit quantized, 32-bit integer, and 8-bit boolean values.
For example, figure 3 represents a model with two operations: an addition followed by a multiplication. The model takes an input tensor and produces one output tensor.

The model above has seven operands. These operands are identified implicitly by the index of the order in which they are added to the model. The first operand added has an index of 0, the second an index of 1, and so on. Operands 1, 2, 3, and 5 are constant operands.
The order in which you add the operands does not matter. For example, the model output operand could be the first one added. The important part is to use the correct index value when referring to an operand.
Operands have types. These are specified when they are added to the model.
An operand cannot be used as both input and output of a model.
Every operand must either be a model input, a constant, or the output operand of exactly one operation.
For additional information on using operands, see More about operands.
Operations
An operation specifies the computations to be performed. Each operation consists of these elements:
- an operation type (for example, addition, multiplication, convolution),
- a list of indexes of the operands that the operation uses for input, and
- a list of indexes of the operands that the operation uses for output.
The order in these lists matters; see the NNAPI API reference for the expected inputs and outputs of each operation type.
You must add the operands that an operation consumes or produces to the model before adding the operation.
The order in which you add operations does not matter. NNAPI relies on the dependencies established by the computation graph of operands and operations to determine the order in which operations are executed.
The operations that NNAPI supports are summarized in the table below:
Known issue in API level 28: When passing
ANEURALNETWORKS_TENSOR_QUANT8_ASYMM
tensors to the
ANEURALNETWORKS_PAD
operation, which is available on Android 9 (API level 28) and higher, the
output from NNAPI may not match output from higher-level machine learning
frameworks, such as
TensorFlow Lite. You
should instead pass only
ANEURALNETWORKS_TENSOR_FLOAT32.
The issue is resolved in Android 10 (API level 29) and higher.
Build models
In the following example, we create the two-operation model found in figure 3.
To build the model, follow these steps:
Call the
ANeuralNetworksModel_create()function to define an empty model.ANeuralNetworksModel* model = NULL; ANeuralNetworksModel_create(&model);
Add the operands to your model by calling
ANeuralNetworks_addOperand(). Their data types are defined using theANeuralNetworksOperandTypedata structure.// In our example, all our tensors are matrices of dimension [3][4] ANeuralNetworksOperandType tensor3x4Type; tensor3x4Type.type = ANEURALNETWORKS_TENSOR_FLOAT32; tensor3x4Type.scale = 0.f; // These fields are used for quantized tensors tensor3x4Type.zeroPoint = 0; // These fields are used for quantized tensors tensor3x4Type.dimensionCount = 2; uint32_t dims[2] = {3, 4}; tensor3x4Type.dimensions = dims;
// We also specify operands that are activation function specifiers ANeuralNetworksOperandType activationType; activationType.type = ANEURALNETWORKS_INT32; activationType.scale = 0.f; activationType.zeroPoint = 0; activationType.dimensionCount = 0; activationType.dimensions = NULL;
// Now we add the seven operands, in the same order defined in the diagram ANeuralNetworksModel_addOperand(model, &tensor3x4Type); // operand 0 ANeuralNetworksModel_addOperand(model, &tensor3x4Type); // operand 1 ANeuralNetworksModel_addOperand(model, &activationType); // operand 2 ANeuralNetworksModel_addOperand(model, &tensor3x4Type); // operand 3 ANeuralNetworksModel_addOperand(model, &tensor3x4Type); // operand 4 ANeuralNetworksModel_addOperand(model, &activationType); // operand 5 ANeuralNetworksModel_addOperand(model, &tensor3x4Type); // operand 6For operands that have constant values, such as weights and biases that your app obtains from a training process, use the
ANeuralNetworksModel_setOperandValue()andANeuralNetworksModel_setOperandValueFromMemory()functions.In the following example, we set constant values from the training data file corresponding to the memory buffer we created in Provide access to training data.
// In our example, operands 1 and 3 are constant tensors whose values were
// established during the training process
const int sizeOfTensor = 3 * 4 * 4;    // The formula for size calculation is dim0 * dim1 * elementSize
ANeuralNetworksModel_setOperandValueFromMemory(model, 1, mem1, 0, sizeOfTensor);
ANeuralNetworksModel_setOperandValueFromMemory(model, 3, mem1, sizeOfTensor, sizeOfTensor);


// We set the values of the activation operands, in our example operands 2 and 5
int32_t noneValue = ANEURALNETWORKS_FUSED_NONE;
ANeuralNetworksModel_setOperandValue(model, 2, &noneValue, sizeof(noneValue));
ANeuralNetworksModel_setOperandValue(model, 5, &noneValue, sizeof(noneValue));
For each operation in the directed graph you want to compute, add the operation to your model by calling the
ANeuralNetworksModel_addOperation()function.As parameters to this call, your app must provide:
- the operation type
- the count of input values
- the array of the indexes for input operands
- the count of output values
- the array of the indexes for output operands
Note that an operand cannot be used for both input and output of the same operation.
// We have two operations in our example
// The first consumes operands 1, 0, 2, and produces operand 4
uint32_t addInputIndexes[3] = {1, 0, 2};
uint32_t addOutputIndexes[1] = {4};
ANeuralNetworksModel_addOperation(model, ANEURALNETWORKS_ADD, 3, addInputIndexes, 1, addOutputIndexes);


// The second consumes operands 3, 4, 5, and produces operand 6
uint32_t multInputIndexes[3] = {3, 4, 5};
uint32_t multOutputIndexes[1] = {6};
ANeuralNetworksModel_addOperation(model, ANEURALNETWORKS_MUL, 3, multInputIndexes, 1, multOutputIndexes);
Identify which operands the model should treat as its inputs and outputs by calling the
ANeuralNetworksModel_identifyInputsAndOutputs()function.// Our model has one input (0) and one output (6) uint32_t modelInputIndexes[1] = {0}; uint32_t modelOutputIndexes[1] = {6}; ANeuralNetworksModel_identifyInputsAndOutputs(model, 1, modelInputIndexes, 1 modelOutputIndexes);
Optionally, specify whether
ANEURALNETWORKS_TENSOR_FLOAT32is allowed to be calculated with range or precision as low as that of the IEEE 754 16-bit floating-point format by callingANeuralNetworksModel_relaxComputationFloat32toFloat16().Call
ANeuralNetworksModel_finish()to finalize the definition of your model. If there are no errors, this function returns a result code ofANEURALNETWORKS_NO_ERROR.ANeuralNetworksModel_finish(model);
Once you create a model, you can compile it any number of times and execute each compilation any number of times.
Control flow
To incorporate control flow in an NNAPI model, do the following:
Construct the corresponding execution subgraphs (
thenandelsesubgraphs for anIFstatement,conditionandbodysubgraphs for aWHILEloop) as standaloneANeuralNetworksModel*models:ANeuralNetworksModel* thenModel = makeThenModel(); ANeuralNetworksModel* elseModel = makeElseModel();
Create operands that reference those models within the model containing the control flow:
ANeuralNetworksOperandType modelType = {
    .type = ANEURALNETWORKS_MODEL,
};
ANeuralNetworksModel_addOperand(model, &modelType);  // kThenOperandIndex
ANeuralNetworksModel_addOperand(model, &modelType);  // kElseOperandIndex
ANeuralNetworksModel_setOperandValueFromModel(model, kThenOperandIndex, &thenModel);
ANeuralNetworksModel_setOperandValueFromModel(model, kElseOperandIndex, &elseModel);
Add the control flow operation:
uint32_t inputs[] = {kConditionOperandIndex,
                     kThenOperandIndex,
                     kElseOperandIndex,
                     kInput1, kInput2, kInput3};
uint32_t outputs[] = {kOutput1, kOutput2};
ANeuralNetworksModel_addOperation(model, ANEURALNETWORKS_IF,
                                  std::size(inputs), inputs,
                                  std::size(output), outputs);
Compilation
The compilation step determines on which processors your model will be executed and asks the corresponding drivers to prepare for its execution. This could include the generation of machine code specific to the processors your model will run on.
To compile a model, follow these steps:
Call the
ANeuralNetworksCompilation_create()function to create a new compilation instance.// Compile the model ANeuralNetworksCompilation* compilation; ANeuralNetworksCompilation_create(model, &compilation);
Optionally, you can use device assignment to explicitly choose what devices to execute on.
You can optionally influence how the runtime trades off between battery power usage and execution speed. You can do so by calling
ANeuralNetworksCompilation_setPreference().// Ask to optimize for low power consumption ANeuralNetworksCompilation_setPreference(compilation, ANEURALNETWORKS_PREFER_LOW_POWER);
The preferences you can specify include:
ANEURALNETWORKS_PREFER_LOW_POWER: Prefer executing in a way that minimizes battery drain. This is desirable for compilations that are executed often.ANEURALNETWORKS_PREFER_FAST_SINGLE_ANSWER: Prefer returning a single answer as fast as possible, even if this causes more power consumption. This is the default.ANEURALNETWORKS_PREFER_SUSTAINED_SPEED: Prefer maximizing the throughput of successive frames, such as when processing successive frames coming from the camera.
You can optionally set up compilation caching by calling
ANeuralNetworksCompilation_setCaching.// Set up compilation caching ANeuralNetworksCompilation_setCaching(compilation, cacheDir, token);
Use
getCodeCacheDir()for thecacheDir. Thetokenspecified must be unique to each model within the application.Finalize the compilation definition by calling
ANeuralNetworksCompilation_finish(). If there are no errors, this function returns a result code ofANEURALNETWORKS_NO_ERROR.ANeuralNetworksCompilation_finish(compilation);
Device discovery and assignment
On Android devices running Android 10 (API level 29) and higher, NNAPI provides functions that allow machine learning framework libraries and apps to get information about the devices available and specify devices to be used for execution. Providing information about the available devices allows apps to get the exact version of the drivers found on a device to avoid known incompatibilities. By giving apps the ability to specify which devices are to execute different sections of a model, apps can be optimized for the Android device on which they are deployed.
Device discovery
Use
ANeuralNetworks_getDeviceCount
to get the number of available devices. For each device, use
ANeuralNetworks_getDevice
to set an ANeuralNetworksDevice instance to a reference to that device.
Once you have a device reference, you can find out additional information about that device using the following functions:
ANeuralNetworksDevice_getFeatureLevelANeuralNetworksDevice_getNameANeuralNetworksDevice_getTypeANeuralNetworksDevice_getVersion
Device assignment
Use
ANeuralNetworksModel_getSupportedOperationsForDevices
to discover which operations of a model can be run on specific devices.
To control which accelerators to use for execution, call
ANeuralNetworksCompilation_createForDevices
in place of ANeuralNetworksCompilation_create.
Use the resulting ANeuralNetworksCompilation object, as normal.
The function returns an error if the provided model contains operations that are
not supported by the selected devices.
If multiple devices are specified, the runtime is responsible for distributing the work across the devices.
Similar to other devices, the NNAPI CPU implementation is represented by an
ANeuralNetworksDevice with the name nnapi-reference and the type
ANEURALNETWORKS_DEVICE_TYPE_CPU. When calling
ANeuralNetworksCompilation_createForDevices, the CPU implementation is not
used to handle the failure cases for model compilation and execution.
It is an application’s responsibility to partition a model into sub-models that
can run on the specified devices. Applications that don't need to do manual
partitioning should continue to call the simpler
ANeuralNetworksCompilation_create
to use all available devices (including the CPU) to accelerate the
model. If the model couldn't be fully supported by the devices you specified
using ANeuralNetworksCompilation_createForDevices,
ANEURALNETWORKS_BAD_DATA
is returned.
Model partitioning
When multiple devices are available for the model, the NNAPI runtime
distributes the work across the devices. For example, if more than one device was
provided to ANeuralNetworksCompilation_createForDevices, all the specified
ones will be considered when allocating the work. Note that, if the CPU device
is not in the list, CPU execution will be disabled. When using ANeuralNetworksCompilation_create
all available devices will be taken into account, including CPU.
The distribution is done by selecting from the list of available devices, for each
of the operations in the model, the device supporting the operation and
declaring the best performance, i.e. the fastest execution time or the
lowest power consumption, depending on the execution preference specified by
the client. This partitioning algorithm doesn't account for possible
inefficiencies caused by the IO between the different processors so, when
specifying multiple processors (either explicitly when using
ANeuralNetworksCompilation_createForDevices or implicitly by using
ANeuralNetworksCompilation_create) it's important to profile the resulting
application.
To understand how your model has been partitioned by NNAPI, check the
Android logs for a message (at INFO level with tag ExecutionPlan):
ModelBuilder::findBestDeviceForEachOperation(op-name): device-index
op-name is the descriptive name of the operation in the graph and
device-index is the index of the candidate device in the list of devices.
This list is the input provided to ANeuralNetworksCompilation_createForDevices
or, if using ANeuralNetworksCompilation_createForDevices, the list of devices
returned when iterating over all devices using ANeuralNetworks_getDeviceCount and
ANeuralNetworks_getDevice.
The message (at INFO level with tag ExecutionPlan):
ModelBuilder::partitionTheWork: only one best device: device-name
This message indicates that the whole graph has been accelerated on the device
device-name.
Execution
The execution step applies the model to a set of inputs and stores the computation outputs to one or more user buffers or memory spaces that your app allocated.
To execute a compiled model, follow these steps:
Call the
ANeuralNetworksExecution_create()function to create a new execution instance.// Run the compiled model against a set of inputs ANeuralNetworksExecution* run1 = NULL; ANeuralNetworksExecution_create(compilation, &run1);
Specify where your app reads the input values for the computation. Your app can read input values from either a user buffer or an allocated memory space by calling
ANeuralNetworksExecution_setInput()orANeuralNetworksExecution_setInputFromMemory()respectively.// Set the single input to our sample model. Since it is small, we won't use a memory buffer float32 myInput[3][4] = { ...the data... }; ANeuralNetworksExecution_setInput(run1, 0, NULL, myInput, sizeof(myInput));
Specify where your app writes the output values. Your app can write output values to either a user buffer or an allocated memory space, by calling
ANeuralNetworksExecution_setOutput()orANeuralNetworksExecution_setOutputFromMemory()respectively.// Set the output float32 myOutput[3][4]; ANeuralNetworksExecution_setOutput(run1, 0, NULL, myOutput, sizeof(myOutput));
Schedule the execution to start, by calling the
ANeuralNetworksExecution_startCompute()function. If there are no errors, this function returns a result code ofANEURALNETWORKS_NO_ERROR.// Starts the work. The work proceeds asynchronously ANeuralNetworksEvent* run1_end = NULL; ANeuralNetworksExecution_startCompute(run1, &run1_end);
Call the
ANeuralNetworksEvent_wait()function to wait for the execution to complete. If the execution was successful, this function returns a result code ofANEURALNETWORKS_NO_ERROR. Waiting can be done on a different thread than the one starting the execution.// For our example, we have no other work to do and will just wait for the completion ANeuralNetworksEvent_wait(run1_end); ANeuralNetworksEvent_free(run1_end); ANeuralNetworksExecution_free(run1);
Optionally, you can apply a different set of inputs to the compiled model by using the same compilation instance to create a new
ANeuralNetworksExecutioninstance.// Apply the compiled model to a different set of inputs ANeuralNetworksExecution* run2; ANeuralNetworksExecution_create(compilation, &run2); ANeuralNetworksExecution_setInput(run2, ...); ANeuralNetworksExecution_setOutput(run2, ...); ANeuralNetworksEvent* run2_end = NULL; ANeuralNetworksExecution_startCompute(run2, &run2_end); ANeuralNetworksEvent_wait(run2_end); ANeuralNetworksEvent_free(run2_end); ANeuralNetworksExecution_free(run2);
Synchronous execution
Asynchronous execution spends time to spawn and synchronize threads. Furthermore, the latency can be hugely variable, with the longest delays reaching up to 500 microseconds between the time a thread is notified or woken and the time it is eventually bound to a CPU core.
To improve latency, you can instead direct an application to make a synchronous
inference call to the runtime. That call will return only once an inference has
been completed rather than returning once an inference has been started. Instead
of calling
ANeuralNetworksExecution_startCompute
for an asynchronous inference call to the runtime, the application calls
ANeuralNetworksExecution_compute
to make a synchronous call to the runtime. A call to
ANeuralNetworksExecution_compute does not take an ANeuralNetworksEvent and
is not paired with a call to ANeuralNetworksEvent_wait.
Burst executions
On Android devices running Android 10 (API level 29) and higher, the NNAPI supports burst
executions through the
ANeuralNetworksBurst
object. Burst executions are a sequence of executions of the same compilation
that occur in rapid succession, such as those operating on frames of a camera
capture or successive audio samples. Using ANeuralNetworksBurst objects may
result in faster executions, as they indicate to accelerators that resources may
be reused between executions and that accelerators should remain in a
high-performance state for the duration of the burst.
ANeuralNetworksBurst introduces only a small change in the normal execution
path. You create a burst object using
ANeuralNetworksBurst_create,
as shown in the following code snippet:
// Create burst object to be reused across a sequence of executions
ANeuralNetworksBurst* burst = NULL;
ANeuralNetworksBurst_create(compilation, &burst);
Burst executions are synchronous. However, instead of using
ANeuralNetworksExecution_compute
to perform each inference, you pair the various
ANeuralNetworksExecution
objects with the same ANeuralNetworksBurst in calls to the function
ANeuralNetworksExecution_burstCompute.
// Create and configure first execution object
// ...

// Execute using the burst object
ANeuralNetworksExecution_burstCompute(execution1, burst);

// Use results of first execution and free the execution object
// ...

// Create and configure second execution object
// ...

// Execute using the same burst object
ANeuralNetworksExecution_burstCompute(execution2, burst);

// Use results of second execution and free the execution object
// ...
Free the ANeuralNetworksBurst object with
ANeuralNetworksBurst_free
when it is no longer needed.
// Cleanup
ANeuralNetworksBurst_free(burst);
Asynchronous command queues and fenced execution
In Android 11 and higher, NNAPI supports an additional way to schedule
asynchronous execution through the
ANeuralNetworksExecution_startComputeWithDependencies()
method. When you use this method, the execution waits for all of the depending
events to be signaled before starting the evaluation. Once the execution has
completed and the outputs are ready to be consumed, the returned event is
signaled.
Depending on which devices handle the execution, the event might be backed by a
sync fence. You
must call
ANeuralNetworksEvent_wait()
to wait for the event and recuperate the resources that the execution used. You
can import sync fences to an event object using
ANeuralNetworksEvent_createFromSyncFenceFd(),
and you can export sync fences from an event object using
ANeuralNetworksEvent_getSyncFenceFd().
Dynamically sized outputs
To support models where the size of the output depends on the input
data—that is, where the size cannot be determined at model execution
time—use
ANeuralNetworksExecution_getOutputOperandRank
and
ANeuralNetworksExecution_getOutputOperandDimensions.
The following code sample shows how to do this:
// Get the rank of the output
uint32_t myOutputRank = 0;
ANeuralNetworksExecution_getOutputOperandRank(run1, 0, &myOutputRank);

// Get the dimensions of the output
std::vector<uint32_t> myOutputDimensions(myOutputRank);
ANeuralNetworksExecution_getOutputOperandDimensions(run1, 0, myOutputDimensions.data());
Cleanup
The cleanup step handles the freeing of internal resources used for your computation.
// Cleanup
ANeuralNetworksCompilation_free(compilation);
ANeuralNetworksModel_free(model);
ANeuralNetworksMemory_free(mem1);
Error management and CPU fallback
If there is an error during partitioning, if a driver fails to compile a (piece of a) model, or if a driver fails to execute a compiled (piece of a) model, NNAPI might fall back to its own CPU implementation of the one or more operations.
If the NNAPI client contains optimized versions of the operation (as, for example, TFLite) it might be advantageous to disable the CPU fallback and handle the failures with the client's optimized operation implementation.
In Android 10, if compilation is performed using
ANeuralNetworksCompilation_createForDevices, then CPU fallback will be disabled.
In Android P, NNAPI execution falls back to the CPU if execution on the driver fails.
This is also true on Android 10 when ANeuralNetworksCompilation_create rather
than ANeuralNetworksCompilation_createForDevices is used.
First execution falls back for that single partition, and if that still fails, it retries the entire model on the CPU.
If partitioning or compilation fails, the entire model will be tried on CPU.
There are cases where some operations are not supported on CPU, and in such situations compilation or execution will fail rather than falling back.
Even after disabling CPU fallback, there may still be operations in the model
that are scheduled on the CPU. If the CPU is in the list of processors supplied
to ANeuralNetworksCompilation_createForDevices, and is either the only
processor that supports those operations or is the processor that claims best
performance for those operations, it will be chosen as a primary (non-fallback)
executor.
To ensure there is no CPU execution, use ANeuralNetworksCompilation_createForDevices
while excluding the nnapi-reference from the list of devices.
Starting in Android P, it is possible to disable fallback at execution time on
DEBUG builds by setting the debug.nn.partition property to 2.
Memory domains
In Android 11 and higher, NNAPI supports memory domains that provide allocator interfaces for opaque memories. This allows applications to pass device-native memories across executions, so that NNAPI does not copy or transform data unnecessarily when performing consecutive executions on the same driver.
The memory domain feature is intended for tensors that are mostly internal to the driver and that don't need frequent access to the client side. Examples of such tensors include the state tensors in sequence models. For tensors that need frequent CPU access on the client side, use shared memory pools instead.
To allocate an opaque memory, perform the following steps:
Call the
ANeuralNetworksMemoryDesc_create()function to create a new memory descriptor:// Create a memory descriptor ANeuralNetworksMemoryDesc* desc; ANeuralNetworksMemoryDesc_create(&desc);
Specify all of the intended input and output roles by calling
ANeuralNetworksMemoryDesc_addInputRole()andANeuralNetworksMemoryDesc_addOutputRole().// Specify that the memory may be used as the first input and the first output // of the compilation ANeuralNetworksMemoryDesc_addInputRole(desc, compilation, 0, 1.0f); ANeuralNetworksMemoryDesc_addOutputRole(desc, compilation, 0, 1.0f);
Optionally, specify the memory dimensions by calling
ANeuralNetworksMemoryDesc_setDimensions().// Specify the memory dimensions uint32_t dims[] = {3, 4}; ANeuralNetworksMemoryDesc_setDimensions(desc, 2, dims);
Finalize the descriptor definition by calling
ANeuralNetworksMemoryDesc_finish().ANeuralNetworksMemoryDesc_finish(desc);
Allocate as many memories as you need by passing the descriptor to
ANeuralNetworksMemory_createFromDesc().// Allocate two opaque memories with the descriptor ANeuralNetworksMemory* opaqueMem; ANeuralNetworksMemory_createFromDesc(desc, &opaqueMem);
Free the memory descriptor when you no longer need it.
ANeuralNetworksMemoryDesc_free(desc);
The client may only use the created ANeuralNetworksMemory object with
ANeuralNetworksExecution_setInputFromMemory() or
ANeuralNetworksExecution_setOutputFromMemory() according to the roles
specified in the ANeuralNetworksMemoryDesc object. The offset and length
arguments must be set to 0, indicating that the whole memory is used. The client
may also explicitly set or extract the contents of the memory by using
ANeuralNetworksMemory_copy().
You can create opaque memories with roles of unspecified dimensions or rank.
In that case, the memory creation might fail with the
ANEURALNETWORKS_OP_FAILED status if it is not supported by the underlying
driver. The client is encouraged to implement fallback logic by allocating a
large enough buffer backed by Ashmem or BLOB-mode AHardwareBuffer.
When NNAPI no longer needs to access the opaque memory object, free the
corresponding ANeuralNetworksMemory instance:
ANeuralNetworksMemory_free(opaqueMem);
Measure performance
You can evaluate your app's performance by measuring execution time or by profiling.
Execution time
When you want to determine total execution time through the runtime, you can use
the synchronous execution API and measure the time taken by the call. When you
want to determine total execution time through a lower level of the software
stack, you can use
ANeuralNetworksExecution_setMeasureTiming
and
ANeuralNetworksExecution_getDuration
to get:
- execution time on an accelerator (not in the driver, which runs on the host processor).
- execution time in the driver, including time on the accelerator.
The execution time in the driver excludes overhead such as that of the runtime itself and the IPC needed for the runtime to communicate with the driver.
These APIs measure duration between the work submitted and work completed events, rather than the time a driver or accelerator devotes to performing the inference, possibly interrupted by context switching.
For example, if inference 1 begins, then the driver stops work to perform inference 2, then it resumes and completes inference 1, the execution time for inference 1 will include the time when work was stopped to perform inference 2.
This timing information may be useful for a production deployment of an application to collect telemetry for offline use. You can use the timing data to modify the app for higher performance.
When using this functionality, bear in mind the following:
- Collecting timing information might have a performance cost.
- Only a driver is capable of computing the time spent in itself or on the accelerator, excluding time spent in NNAPI runtime and in IPC.
- You can use these APIs only with an
ANeuralNetworksExecutionthat was created withANeuralNetworksCompilation_createForDeviceswithnumDevices = 1. - No driver is required to be able to report timing information.
Profile your application with Android Systrace
Starting with Android 10, NNAPI automatically generates systrace events that you can use to profile your application.
The NNAPI Source comes with a parse_systrace utility to process the
systrace events generated by your application and generate a table view showing
the time spent in the different phases of the model lifecycle (Instantiation,
Preparation, Compilation Execution and Termination) and different layers of the
applications. The layers in which your application is split are:
Application: the main application codeRuntime: NNAPI RuntimeIPC: The inter process communication between NNAPI Runtime and the Driver codeDriver: the accelerator driver process.
Generate the profiling analysys data
Assuming you checked out the AOSP source tree at $ANDROID_BUILD_TOP, and using the TFLite image classification example as target application, you can generate the NNAPI profiling data with the following steps:
- Start the Android systrace with the following command:
$ANDROID_BUILD_TOP/external/chromium-trace/systrace.py -o trace.html -a org.tensorflow.lite.examples.classification nnapi hal freq sched idle load binder_driver
The -o trace.html parameter indicates that the traces will be
written in the trace.html. When profiling own application you will need to
replace org.tensorflow.lite.examples.classification with the process name
specified in your app manifest.
This will keep one of your shell console busy, don't run the command in
background since it is interactively waiting for an enter to terminate.
- After the systrace collector is started, start your app and run your benchmark test.
In our case you can start the Image Classification app from Android Studio or directly from your test phone UI if the app has already been installed. To generate some NNAPI data you need to configure the app to use NNAPI by selecting NNAPI as target device in the app configuration dialog.
When the test completes, terminate the systrace by pressing
enteron the console terminal active since step 1.Run the
systrace_parserutility generate cumulative statistics:
$ANDROID_BUILD_TOP/frameworks/ml/nn/tools/systrace_parser/parse_systrace.py --total-times trace.html
The parser accepts the following parameters:
- --total-times: shows the total time spent in a layer including the time
spent waiting for execution on a call to an underlying layer
- --print-detail: prints all the events that have been collected from systrace
- --per-execution: prints only the execution and its subphases
(as per-execution times) instead of stats for all phases
- --json: produces the output in JSON format
An example of the output is shown below:
===========================================================================================================================================
NNAPI timing summary (total time, ms wall-clock)                                                      Execution
                                                           ----------------------------------------------------
              Initialization   Preparation   Compilation           I/O       Compute      Results     Ex. total   Termination        Total
              --------------   -----------   -----------   -----------  ------------  -----------   -----------   -----------   ----------
Application              n/a         19.06       1789.25           n/a           n/a         6.70         21.37           n/a      1831.17*
Runtime                    -         18.60       1787.48          2.93         11.37         0.12         14.42          1.32      1821.81
IPC                     1.77             -       1781.36          0.02          8.86            -          8.88             -      1792.01
Driver                  1.04             -       1779.21           n/a           n/a          n/a          7.70             -      1787.95

Total                   1.77*        19.06*      1789.25*         2.93*        11.74*        6.70*        21.37*         1.32*     1831.17*
===========================================================================================================================================
* This total ignores missing (n/a) values and thus is not necessarily consistent with the rest of the numbers
The parser might fail if the collected events do not represent a complete application trace. In particular it might fail if systrace events generated to mark the end of a section are present in the trace without an associated section start event. This usually happens if some events from a previous profiling session are being generated when you start the systrace collector. In this case you would have to run your profiling again.
Add statistics for your application code to systrace_parser output
The parse_systrace application is based on the built-in Android systrace functionality. You can add traces for specific operations in your app using the systrace API (for Java , for native applications ) with custom event names.
To associate your custom events with phases of the Application lifecycle, prepend your event name with one of the following strings:
[NN_LA_PI]: Application level event for Initialization[NN_LA_PP]: Application level event for Preparation[NN_LA_PC]: Application level event for Compilation[NN_LA_PE]: Application level event for Execution
Here is an example of how you can alter the TFLite image classification example
code by adding a runInferenceModel section for the Execution phase and the
Application layer containing another other sections preprocessBitmap that
won't be considered in NNAPI traces. The runInferenceModel section will be
part of the systrace events processed by the nnapi systrace parser:
Kotlin
/** Runs inference and returns the classification results. */ fun recognizeImage(bitmap: Bitmap): List{ // This section won’t appear in the NNAPI systrace analysis Trace.beginSection("preprocessBitmap") convertBitmapToByteBuffer(bitmap) Trace.endSection() // Run the inference call. // Add this method in to NNAPI systrace analysis. Trace.beginSection("[NN_LA_PE]runInferenceModel") long startTime = SystemClock.uptimeMillis() runInference() long endTime = SystemClock.uptimeMillis() Trace.endSection() ... return recognitions }
Java
/** Runs inference and returns the classification results. */ public ListrecognizeImage(final Bitmap bitmap) { // This section won’t appear in the NNAPI systrace analysis Trace.beginSection("preprocessBitmap"); convertBitmapToByteBuffer(bitmap); Trace.endSection(); // Run the inference call. // Add this method in to NNAPI systrace analysis. Trace.beginSection("[NN_LA_PE]runInferenceModel"); long startTime = SystemClock.uptimeMillis(); runInference(); long endTime = SystemClock.uptimeMillis(); Trace.endSection(); ... Trace.endSection(); return recognitions; }
Quality of service
In Android 11 and higher, NNAPI enables better quality of service (QoS) by allowing an application to indicate the relative priorities of its models, the maximum amount of time expected to prepare a given model, and the maximum amount of time expected to complete a given computation. Android 11 also introduces additional NNAPI result codes that enable applications to understand failures such as missed execution deadlines.
Set the priority of a workload
To set the priority of an NNAPI workload, call
ANeuralNetworksCompilation_setPriority()
prior to calling ANeuralNetworksCompilation_finish().
Set deadlines
Applications can set deadlines for both model compilation and inference.
- To set the compilation timeout, call
ANeuralNetworksCompilation_setTimeout()prior to callingANeuralNetworksCompilation_finish(). - To set the inference timeout, call
ANeuralNetworksExecution_setTimeout()prior to starting the compilation.
More about operands
The following section covers advanced topics about using operands.
Quantized tensors
A quantized tensor is a compact way to represent an n-dimensional array of floating point values.
NNAPI supports 8-bit asymmetric quantized tensors. For these tensors, the value of each cell is represented by an 8-bit integer. Associated with the tensor is a scale and a zero point value. These are used to convert the 8-bit integers into the floating point values that are being represented.
The formula is:
(cellValue - zeroPoint) * scale
where the zeroPoint value is a 32-bit integer and the scale a 32-bit floating point value.
Compared to tensors of 32-bit floating point values, 8-bit quantized tensors have two advantages:
- Your application is smaller, as the trained weights take a quarter of the size of 32-bit tensors.
- Computations can often be executed faster. This is due to the smaller amount of data that needs to be fetched from memory and the efficiency of processors such as DSPs in doing integer math.
While it is possible to convert a floating point model to a quantized one, our experience has shown that better results are achieved by training a quantized model directly. In effect, the neural network learns to compensate for the increased granularity of each value. For each quantized tensor, the scale and zeroPoint values are determined during the training process.
In NNAPI, you define quantized tensor types by setting the type field of the
ANeuralNetworksOperandType
data structure to
ANEURALNETWORKS_TENSOR_QUANT8_ASYMM.
You also specify the scale and zeroPoint value of the tensor in that data
structure.
In addition to 8-bit asymmetric quantized tensors, NNAPI supports the following:
ANEURALNETWORKS_TENSOR_QUANT8_SYMM_PER_CHANNELwhich you can use for representing weights toCONV/DEPTHWISE_CONV/TRANSPOSED_CONVoperations.ANEURALNETWORKS_TENSOR_QUANT16_ASYMMwhich you can use for the internal state ofQUANTIZED_16BIT_LSTM.ANEURALNETWORKS_TENSOR_QUANT8_SYMMwhich can be an input toANEURALNETWORKS_DEQUANTIZE.
Optional operands
A few operations, like
ANEURALNETWORKS_LSH_PROJECTION,
take optional operands. To indicate in the model that the optional operand is
omitted, call the
ANeuralNetworksModel_setOperandValue()
function, passing NULL for the buffer and 0 for the length.
If the decision on whether the operand is present or not varies for each
execution, you indicate that the operand is omitted by using the
ANeuralNetworksExecution_setInput()
or
ANeuralNetworksExecution_setOutput()
functions, passing NULL for the buffer and 0 for the length.
Tensors of unknown rank
Android 9 (API level 28) introduced model operands of unknown dimensions but known rank (the number of dimensions). Android 10 (API level 29) introduced tensors of unknown rank, as shown in ANeuralNetworksOperandType.
NNAPI benchmark
The NNAPI benchmark is available on AOSP in platform/test/mlts/benchmark
(benchmark app) and platform/test/mlts/models (models and datasets).
The benchmark evaluates latency and accuracy and compares drivers to the same work done using Tensorflow Lite running on the CPU, for the same models and datasets.
To use the benchmark, do the following:
Connect a target Android device to your computer, open a terminal window, and make sure the device is reachable through adb.
If more than one Android device is connected, export the target device
ANDROID_SERIALenvironment variable.Navigate to the Android top-level source directory.
Run the following commands:
lunch aosp_arm-userdebug # Or aosp_arm64-userdebug if available
./test/mlts/benchmark/build_and_run_benchmark.sh
At the end of a benchmark run, its results will be presented as an HTML page passed to
xdg-open.
NNAPI logs
NNAPI generates useful diagnostic information in the system logs. To analyze the logs, use the logcat utility.
Enable verbose NNAPI logging for specific phases or components by setting the
property debug.nn.vlog (using adb shell) to the following list of values,
separated by space, colon, or comma:
model: Model buildingcompilation: Generation of the model execution plan and compilationexecution: Model executioncpuexe: Execution of operations using the NNAPI CPU implementationmanager: NNAPI extensions, available interfaces and capabilities related infoallor1: All the elements above
For example, to enable full verbose logging use the command
adb shell setprop debug.nn.vlog all. To disable verbose logging, use the command
adb shell setprop debug.nn.vlog '""'.
Once enabled, verbose logging generates log entries at INFO level with a tag set to the phase or component name.
Beside the debug.nn.vlog controlled messages, NNAPI API components provide
other log entries at various levels, each one using a specific log tag.
To get a list of components, search the source tree using the following expression:
grep -R 'define LOG_TAG' | awk -F '"' '{print $2}' | sort -u | egrep -v "Sample|FileTag|test"
This expression currently returns the following tags:
- BurstBuilder
- Callbacks
- CompilationBuilder
- CpuExecutor
- ExecutionBuilder
- ExecutionBurstController
- ExecutionBurstServer
- ExecutionPlan
- FibonacciDriver
- GraphDump
- IndexedShapeWrapper
- IonWatcher
- Manager
- Memory
- MemoryUtils
- MetaModel
- ModelArgumentInfo
- ModelBuilder
- NeuralNetworks
- OperationResolver
- Operations
- OperationsUtils
- PackageInfo
- TokenHasher
- TypeManager
- Utils
- ValidateHal
- VersionedInterfaces
To control the level of log messages shown by logcat, use
the environment variable ANDROID_LOG_TAGS.
To show the full set of NNAPI log messages and disable any others, set ANDROID_LOG_TAGS to
the following:
BurstBuilder:V Callbacks:V CompilationBuilder:V CpuExecutor:V ExecutionBuilder:V ExecutionBurstController:V ExecutionBurstServer:V ExecutionPlan:V FibonacciDriver:V GraphDump:V IndexedShapeWrapper:V IonWatcher:V Manager:V MemoryUtils:V Memory:V MetaModel:V ModelArgumentInfo:V ModelBuilder:V NeuralNetworks:V OperationResolver:V OperationsUtils:V Operations:V PackageInfo:V TokenHasher:V TypeManager:V Utils:V ValidateHal:V VersionedInterfaces:V *:S.
You can set ANDROID_LOG_TAGS using the following command:
export ANDROID_LOG_TAGS=$(grep -R 'define LOG_TAG' | awk -F '"' '{ print $2 ":V" }' | sort -u | egrep -v "Sample|FileTag|test" | xargs echo -n; echo ' *:S')
Note that this is just a filter that applies to logcat. You still need to
set the property debug.nn.vlog to all to generate verbose log info.