
When debugging and profiling apps with native code, it’s often useful to use debugging tools that need to be enabled at process startup. This requires that you run your app in a fresh process rather than cloning from the zygote. Examples include:
- Tracing system calls with strace.
- Finding memory bugs with malloc debug or Address Sanitizer (ASan).
- Profiling with Simpleperf.
Use the wrap shell script
Using wrap.sh is easy:
- Compile a custom debuggable APK that packages the following:
- A shell script named
wrap.sh. See Create the wrap shell script and Package wrap.sh for more details. - Any extra tools your shell script needs (such as your own
stracebinary).
- A shell script named
- Install the debuggable APK on a device.
- Launch the app.
Create the wrap shell script
When you launch a debuggable APK that contains wrap.sh, the system executes
the script and passes the command to start the app as arguments. The script is
responsible for starting the app, but can make any environment or argument
changes. The script should follow
MirBSD Korn shell (mksh) syntax.
The following snippet shows how to write a simple wrap.sh file that just
starts the app:
#!/system/bin/sh
exec "$@"
Malloc debug
To use
malloc debug
via wrap.sh, you would include the following line:
#!/system/bin/sh
LIBC_DEBUG_MALLOC_OPTIONS=backtrace logwrapper "$@"
ASan
There's an example of how to do this for ASan in the ASan documentation.
Package wrap.sh
To take advantage of wrap.sh, your APK must be debuggable. Make sure that the
android:debuggable="true"setting is configured in the
<application>
element in your Android manifest, or if you are using Android Studio that
you've configured a debug build in the
build.gradle file.
It's also necessary to set useLegacyPackaging
to true in your app's build.gradle file. In most cases, this option is set
to false by default, so you might want to set this explicitly to true to
avoid any surprises.
You must package the wrap.sh script with the native libraries of the app. If
your app does not contain native libraries, add the lib directory manually to
your project directory. For each architecture that your app supports, you must
provide a copy of the wrap shell script under that native library directory.
The following example shows the file layout to support both the ARMv8 and x86-64 architectures:
# App Directory
|- AndroidManifest.xml
|- …
|- lib
   |- arm64-v8a
      |- ...
      |- wrap.sh
   |- x86_64
      |- ...
      |- wrap.sh
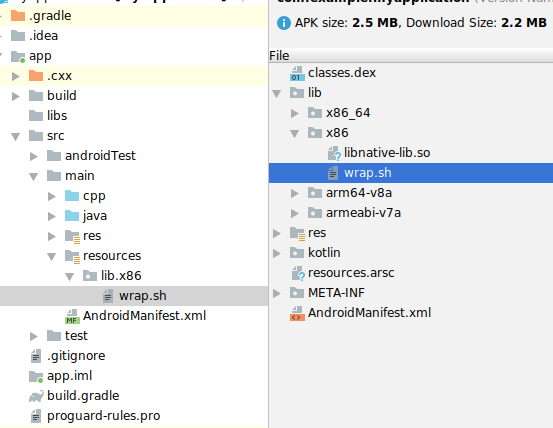
Android Studio only packages .so files from the lib/ directories, so if
you're an Android Studio user, you'll need to place your wrap.sh files in the
src/main/resources/lib/* directories instead, so that they'll be packaged
correctly.
Note that resources/lib/x86 will be displayed in the UI as
lib.x86, but it should actually be a subdirectory:
Debug when using wrap.sh
If you want to attach a debugger when using wrap.sh, your shell script will
need to manually enable debugging. How to do this has varied between releases,
so this example shows how to add the appropriate options for all releases that
support wrap.sh:
#!/system/bin/sh

cmd=$1
shift

os_version=$(getprop ro.build.version.sdk)

if [ "$os_version" -eq "27" ]; then
  cmd="$cmd -Xrunjdwp:transport=dt_android_adb,suspend=n,server=y -Xcompiler-option --debuggable $@"
elif [ "$os_version" -eq "28" ]; then
  cmd="$cmd -XjdwpProvider:adbconnection -XjdwpOptions:suspend=n,server=y -Xcompiler-option --debuggable $@"
else
  cmd="$cmd -XjdwpProvider:adbconnection -XjdwpOptions:suspend=n,server=y $@"
fi

exec $cmd