

如果應用程式需要即時且低延遲的語音支援,例如聊天機器人或代理互動,Gemini Live API 可提供最佳化方式,串流 Gemini 模型的輸入和輸出內容。使用 Firebase AI Logic,即可直接從 Android 應用程式呼叫 Gemini Live API,無須整合後端。本指南說明如何透過 Firebase AI Logic,在 Android 應用程式中使用 Gemini Live API。
開始使用
開始之前,請確認應用程式指定 API 級別 23 以上版本。
如果您尚未設定 Firebase 專案,請先完成設定,並將應用程式連結至 Firebase。詳情請參閱 Firebase AI Logic 說明文件。
設定 Android 專案
將 Firebase AI Logic 程式庫和 App Check 依附元件,新增至應用程式層級的 build.gradle.kts 或 build.gradle 檔案。使用 Firebase Android BoM 管理程式庫版本。
dependencies {
  // Import the Firebase BoM
  implementation(platform("com.google.firebase:firebase-bom:35.1.0"))

  // Add the dependencies for the Firebase AI Logic and App Check libraries
  // When using the BoM, you don't specify versions in Firebase library dependencies
  implementation("com.google.firebase:firebase-ai")
  implementation("com.google.firebase:firebase-appcheck-debug")
}
新增依附元件後,請同步處理 Android 專案和 Gradle。
為本機開發環境設定 App Check 偵錯服務
2026 年 7 月初起,在 Firebase 控制台透過引導式設定流程設定 AI Logic 時,系統會自動強制執行 Firebase App Check,保護 Gemini API。在本機開發環境中,您需要設定 App Check 偵錯服務,略過認證程序,同時維持 App Check 的強制執行。
在偵錯版本中,將 App Check 設為使用偵錯服務工廠:
Kotlin
Firebase.initialize(context = this)
Firebase.appCheck.installAppCheckProviderFactory(
    DebugAppCheckProviderFactory.getInstance(),
)
Java
FirebaseApp.initializeApp(/*context=*/ this);
FirebaseAppCheck firebaseAppCheck = FirebaseAppCheck.getInstance();
firebaseAppCheck.installAppCheckProviderFactory(
        DebugAppCheckProviderFactory.getInstance());
取得偵錯權杖:
在模擬器或測試裝置上執行應用程式。
在記錄中尋找 App Check 偵錯權杖。例如:
D DebugAppCheckProvider: Enter this debug secret into the allow list
in the Firebase Console for your project: 123a4567-b89c-12d3-e456-789012345678
複製權杖 (例如
123a4567-b89c-12d3-e456-789012345678)。
在 App Check 註冊偵錯權杖:
在 Firebase 控制台中,依序前往「Security」(安全性) >「App Check」 >「Apps」(應用程式) 分頁標籤。
找到應用程式,按一下溢位選單 (),然後選取「Manage debug tokens」。
按照畫面上的指示註冊偵錯權杖。
如要進一步瞭解偵錯服務 (包括如何取得新的偵錯權杖),請參閱 App Check 官方說明文件。
整合 Firebase AI Logic 並初始化生成模型
將 RECORD_AUDIO 權限新增至應用程式的 AndroidManifest.xml 檔案:
<uses-permission android:name="android.permission.RECORD_AUDIO" />
初始化 Gemini Developer API 後端服務,並存取 LiveModel。請使用支援 Live API 的模型,例如 gemini-2.5-flash-native-audio-preview-12-2025。如要瞭解可用的 Live API 模型,請參閱 Firebase 說明文件。
如要指定語音,請在 speechConfig 物件中設定語音名稱,做為模型設定的一部分。如未指定,則預設為 Puck。
Kotlin
// Initialize the `LiveModel` val model = Firebase.ai(backend = GenerativeBackend.googleAI()).liveModel( modelName = "gemini-2.5-flash-native-audio-preview-12-2025", generationConfig = liveGenerationConfig { responseModality = ResponseModality.AUDIO speechConfig = SpeechConfig(voice = Voice("FENRIR")) } )
Java
// Initialize the `LiveModel`
LiveGenerativeModel model = FirebaseAI
       .getInstance(GenerativeBackend.googleAI())
       .liveModel(
              "gemini-2.5-flash-native-audio-preview-12-2025",
              new LiveGenerationConfig.Builder()
                     .setResponseModality(ResponseModality.AUDIO)
                     .setSpeechConfig(new SpeechConfig(new Voice("FENRIR"))
              ).build(),
        null,
        null
);
您可以視需要設定系統指令,定義模型扮演的角色或身分:
Kotlin
val systemInstruction = content { text("You are a helpful assistant, you main role is [...]") } val model = Firebase.ai(backend = GenerativeBackend.googleAI()).liveModel( modelName = "gemini-2.5-flash-native-audio-preview-12-2025", generationConfig = liveGenerationConfig { responseModality = ResponseModality.AUDIO speechConfig = SpeechConfig(voice = Voice("FENRIR")) }, systemInstruction = systemInstruction, )
Java
Content systemInstruction = new Content.Builder()
       .addText("You are a helpful assistant, you main role is [...]")
       .build();

LiveGenerativeModel model = FirebaseAI
       .getInstance(GenerativeBackend.googleAI())
       .liveModel(
              "gemini-2.5-flash-native-audio-preview-12-2025",
              new LiveGenerationConfig.Builder()
                     .setResponseModality(ResponseModality.AUDIO)
                     .setSpeechConfig(new SpeechConfig(new Voice("FENRIR"))
              ).build(),
        tools, // null if you don't want to use function calling
        systemInstruction
);
您可以使用系統指令,提供應用程式專屬的背景資訊 (例如使用者在應用程式中的活動記錄),進一步與模型進行專門對話。
初始化 Live API 工作階段
建立 LiveModel 執行個體後,請呼叫 model.connect() 建立 LiveSession 物件,並透過低延遲串流與模型建立永久連線。LiveSession 可讓您與模型互動,包括啟動和停止語音工作階段,以及傳送和接收文字。
接著,您可以呼叫 startAudioConversation(),開始與模型對話:
Kotlin
val session = model.connect() session.startAudioConversation()
Java
LiveModelFutures model = LiveModelFutures.from(liveModel);
ListenableFuture<LiveSession> sessionFuture = model.connect();

Futures.addCallback(sessionFuture, new FutureCallback<LiveSession>() {
    @Override
    public void onSuccess(LiveSession ses) {
        LiveSessionFutures session = LiveSessionFutures.from(ses);
        session.startAudioConversation();
    }
    @Override
    public void onFailure(Throwable t) {
        // Handle exceptions
    }
}, executor);
與模型對話時,請注意模型無法處理中斷。此外,Live API 採用雙向設計,因此您可以使用同一個連線傳送及接收內容。
您也可以使用 Gemini Live API,從不同的輸入模態生成音訊:
- 傳送文字和音訊輸入內容。
- 傳送影片輸入內容 (請參閱 Firebase 快速入門應用程式)。
呼叫函式:將 Gemini Live API 連結至應用程式
您也可以更進一步,使用呼叫函式,讓模型直接與應用程式的邏輯互動。
呼叫函式 (或呼叫工具) 是生成式 AI 實作的一項功能,可讓模型主動呼叫函式來執行動作。如果函式有輸出內容,模型會將其加入背景資訊,並用於後續生成作業。
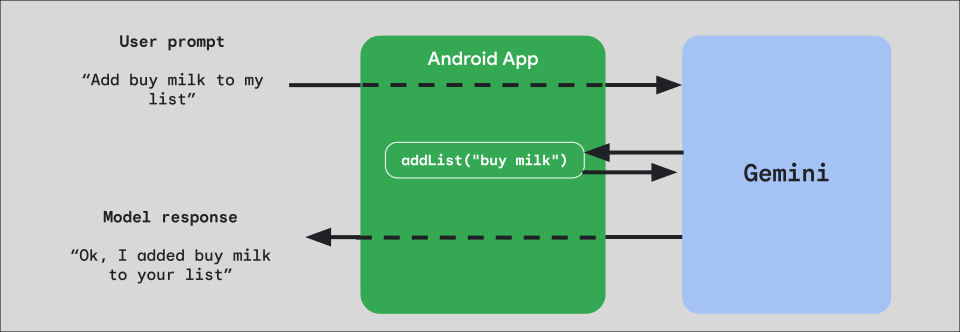
如要在應用程式中實作函式呼叫,請先為要向模型公開的每個函式建立 FunctionDeclaration 物件。
舉例來說,如要向 Gemini 公開 addList 函式,將字串附加至字串清單,請先建立 FunctionDeclaration 變數,並以簡單的英文提供函式及其參數的名稱和簡短說明:
Kotlin
val itemList = mutableListOf<String>() fun addList(item: String) { itemList.add(item) } val addListFunctionDeclaration = FunctionDeclaration( name = "addList", description = "Function adding an item the list", parameters = mapOf( "item" to Schema.string("A short string describing the item to add to the list") ) )
Java
HashMap<String, Schema> addListParams = new HashMap<String, Schema>(1);

addListParams.put("item", Schema.str("A short string describing the item to add to the list"));

FunctionDeclaration addListFunctionDeclaration = new FunctionDeclaration(
    "addList",
    "Function adding an item the list",
    addListParams,
    Collections.emptyList()
);
接著,在例項化模型時,將這個 FunctionDeclaration 做為 Tool 傳遞給模型:
Kotlin
val addListTool = Tool.functionDeclarations(listOf(addListFunctionDeclaration)) val model = Firebase.ai(backend = GenerativeBackend.googleAI()).liveModel( modelName = "gemini-2.5-flash-native-audio-preview-12-2025", generationConfig = liveGenerationConfig { responseModality = ResponseModality.AUDIO speechConfig = SpeechConfig(voice = Voice("FENRIR")) }, systemInstruction = systemInstruction, tools = listOf(addListTool) )
Java
LiveGenerativeModel model = FirebaseAI.getInstance(
    GenerativeBackend.googleAI()).liveModel(
        "gemini-2.5-flash-native-audio-preview-12-2025",
  new LiveGenerationConfig.Builder()
        .setResponseModality(ResponseModality.AUDIO)
        .setSpeechConfig(new SpeechConfig(new Voice("FENRIR")))
        .build(),
  List.of(Tool.functionDeclarations(List.of(addListFunctionDeclaration))),
               null,
               systemInstruction
        );
最後,實作處理常式函式,處理模型發出的工具呼叫,並將回應傳回模型。呼叫 startAudioConversation 時,提供給 LiveSession 的處理常式函式會採用 FunctionCallPart 參數,並傳回 FunctionResponsePart:
Kotlin
session.startAudioConversation(::functionCallHandler) // ... fun functionCallHandler(functionCall: FunctionCallPart): FunctionResponsePart { return when (functionCall.name) { "addList" -> { // Extract function parameter from functionCallPart val itemName = functionCall.args["item"]!!.jsonPrimitive.content // Call function with parameter addList(itemName) // Confirm the function call to the model val response = JsonObject( mapOf( "success" to JsonPrimitive(true), "message" to JsonPrimitive("Item $itemName added to the todo list") ) ) FunctionResponsePart(functionCall.name, response) } else -> { val response = JsonObject( mapOf( "error" to JsonPrimitive("Unknown function: ${functionCall.name}") ) ) FunctionResponsePart(functionCall.name, response) } } }
Java
Futures.addCallback(sessionFuture, new FutureCallback<LiveSessionFutures>() {

    @RequiresPermission(Manifest.permission.RECORD_AUDIO)
    @Override
    @OptIn(markerClass = PublicPreviewAPI.class)
    public void onSuccess(LiveSessionFutures ses) {
        ses.startAudioConversation(::handleFunctionCallFuture);
    }

    @Override
    public void onFailure(Throwable t) {
        // Handle exceptions
    }
}, executor);

// ...

ListenableFuture<JsonObject> handleFunctionCallFuture = Futures.transform(response, result -> {
    for (FunctionCallPart functionCall : result.getFunctionCalls()) {
        if (functionCall.getName().equals("addList")) {
            Map<String, JsonElement> args = functionCall.getArgs();
            String item =
                    JsonElementKt.getContentOrNull(
                            JsonElementKt.getJsonPrimitive(
                                    locationJsonObject.get("item")));
            return addList(item);
        }
    }
    return null;
}, Executors.newSingleThreadExecutor());
後續步驟
- 在 Android AI 目錄範例應用程式中,試用 Gemini Live API。
- 如要進一步瞭解 Gemini Live API,請參閱 Firebase AI Logic 說明文件。
- 進一步瞭解可用的 Gemini 模型。
- 進一步瞭解呼叫函式。
- 探索提示詞設計策略。