
Danh sách cho phép người dùng dễ dàng chọn một mục trong một tập hợp các lựa chọn trên thiết bị Wear OS.
Thư viện giao diện người dùng thiết bị đeo bao gồm lớp WearableRecyclerView, đây là phương thức triển khai RecyclerView để tạo danh sách được tối ưu hoá cho thiết bị đeo. Bạn có thể sử dụng giao diện này trong ứng dụng cho thiết bị đeo bằng cách tạo một vùng chứa WearableRecyclerView mới.
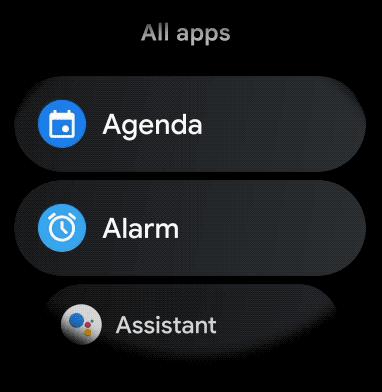
Sử dụng WearableRecyclerView cho một danh sách dài chứa các mục đơn giản, chẳng hạn như trình chạy ứng dụng hoặc danh sách liên hệ. Mỗi mục có thể chứa một chuỗi ngắn và một biểu tượng liên kết. Ngoài ra, mỗi mục có thể chỉ có một chuỗi hoặc một biểu tượng.
Lưu ý: Tránh các bố cục phức tạp. Người dùng chỉ cần xem nhanh một mục để biết đó là mục gì, đặc biệt là đối với kích thước màn hình giới hạn của thiết bị đeo.
Bằng cách mở rộng lớp RecyclerView hiện có, theo mặc định, các API WearableRecyclerView sẽ hiển thị danh sách các mục có thể cuộn theo chiều dọc. Bạn có thể dùng các API WearableRecyclerView để chọn sử dụng bố cục kiểu đường cong và cử chỉ cuộn tròn trong các ứng dụng cho thiết bị đeo.
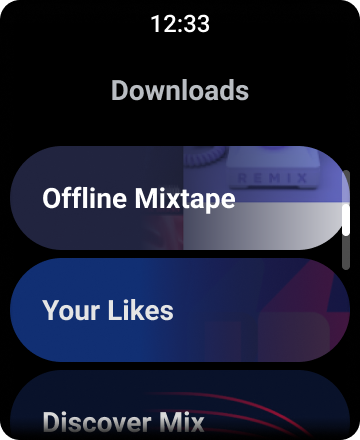
Hình 1. Chế độ xem danh sách mặc định trên Wear OS.
Phần này sẽ hướng dẫn bạn cách sử dụng lớp WearableRecyclerView để tạo danh sách trong ứng dụng Wear OS của bạn, cách chọn sử dụng bố cục cong cho các mục có thể cuộn và cách tuỳ chỉnh giao diện của phần tử con trong khi cuộn.
Thêm WearableRecyclerView vào một hoạt động bằng cách sử dụng XML
Bố cục sau đây thêm WearableRecyclerView vào một hoạt động:
<androidx.wear.widget.WearableRecyclerView
    xmlns:android="http://schemas.android.com/apk/res/android"
    xmlns:tools="http://schemas.android.com/tools"
    android:id="@+id/recycler_launcher_view"
    android:layout_width="match_parent"
    android:layout_height="match_parent"
    android:scrollbars="vertical" />
Ví dụ sau đây cho thấy WearableRecyclerView áp dụng cho một hoạt động:
Kotlin
class MainActivity : Activity() {

    override fun onCreate(savedInstanceState: Bundle?) {
        super.onCreate(savedInstanceState)
        setContentView(R.layout.activity_main)
    }
    ...
}
Java
public class MainActivity extends Activity {
    @Override
    public void onCreate(Bundle savedInstanceState) {
        super.onCreate(savedInstanceState);
        setContentView(R.layout.activity_main);
    }
    ...
}
Tạo bố cục cong
Để tạo bố cục cong cho các mục có thể cuộn trong ứng dụng cho thiết bị đeo, hãy làm như sau:
-
Dùng
WearableRecyclerViewlàm vùng chứa chính trong bố cục XML có liên quan. -
Đặt phương thức
setEdgeItemsCenteringEnabled(boolean)thànhtrue. Thao tác này căn giữa theo chiều dọc các mục đầu tiên và cuối cùng trong danh sách trên màn hình. -
Sử dụng phương thức
WearableRecyclerView.setLayoutManager()để đặt bố cục của các mục trên màn hình.
Kotlin
wearableRecyclerView.apply {
    // To align the edge children (first and last) with the center of the screen.
    isEdgeItemsCenteringEnabled = true
    ...
    layoutManager = WearableLinearLayoutManager(this@MainActivity)
}
Java
// To align the edge children (first and last) with the center of the screen.
wearableRecyclerView.setEdgeItemsCenteringEnabled(true);
...
wearableRecyclerView.setLayoutManager(
                new WearableLinearLayoutManager(this));
Nếu ứng dụng của bạn có các yêu cầu cụ thể để tuỳ chỉnh giao diện của thành phần con khi cuộn (ví dụ: điều chỉnh tỷ lệ các biểu tượng và văn bản trong khi các mục cuộn ra khỏi khu vực trung tâm), hãy mở rộng lớp
WearableLinearLayoutManager.LayoutCallback và ghi đè phương thức
onLayoutFinished.
Đoạn mã sau đây là một ví dụ về cách tuỳ chỉnh thao tác cuộn các mục để điều chỉnh tỷ lệ ra xa trung tâm hơn bằng cách mở rộng lớp WearableLinearLayoutManager.LayoutCallback:
Kotlin
/** How much icons should scale, at most.  */
private const val MAX_ICON_PROGRESS = 0.65f

class CustomScrollingLayoutCallback : WearableLinearLayoutManager.LayoutCallback() {

    private var progressToCenter: Float = 0f

    override fun onLayoutFinished(child: View, parent: RecyclerView) {
        child.apply {
            // Figure out % progress from top to bottom.
            val centerOffset = height.toFloat() / 2.0f / parent.height.toFloat()
            val yRelativeToCenterOffset = y / parent.height + centerOffset

            // Normalize for center.
            progressToCenter = Math.abs(0.5f - yRelativeToCenterOffset)
            // Adjust to the maximum scale.
            progressToCenter = Math.min(progressToCenter, MAX_ICON_PROGRESS)

            scaleX = 1 - progressToCenter
            scaleY = 1 - progressToCenter
        }
    }
}
Java
public class CustomScrollingLayoutCallback extends WearableLinearLayoutManager.LayoutCallback {
    /** How much icons should scale, at most. */
    private static final float MAX_ICON_PROGRESS = 0.65f;

    private float progressToCenter;

    @Override
    public void onLayoutFinished(View child, RecyclerView parent) {

        // Figure out % progress from top to bottom.
        float centerOffset = ((float) child.getHeight() / 2.0f) / (float) parent.getHeight();
        float yRelativeToCenterOffset = (child.getY() / parent.getHeight()) + centerOffset;

        // Normalize for center.
        progressToCenter = Math.abs(0.5f - yRelativeToCenterOffset);
        // Adjust to the maximum scale.
        progressToCenter = Math.min(progressToCenter, MAX_ICON_PROGRESS);

        child.setScaleX(1 - progressToCenter);
        child.setScaleY(1 - progressToCenter);
    }
}
Kotlin
wearableRecyclerView.layoutManager =
        WearableLinearLayoutManager(this, CustomScrollingLayoutCallback())
Java
CustomScrollingLayoutCallback customScrollingLayoutCallback =
                new CustomScrollingLayoutCallback();
wearableRecyclerView.setLayoutManager(
                new WearableLinearLayoutManager(this, customScrollingLayoutCallback));