এই নির্দেশিকাটি লাইব্রেরির মূল বৈশিষ্ট্য এবং ধারণাগুলির একটি ওভারভিউ প্রদান করে এবং আপনাকে একটি মৌলিক অ্যাপ সেট আপ করার প্রক্রিয়ার মধ্য দিয়ে নিয়ে যায়।
ইউজার ইন্টারফেস মডেল অবজেক্টের একটি গ্রাফ দ্বারা উপস্থাপিত হয় যা বিভিন্ন উপায়ে একত্রে সাজানো যেতে পারে, যেমন টেমপ্লেট তাদের অন্তর্ভুক্ত। টেমপ্লেটগুলি হল মডেলগুলির একটি উপসেট যা সেই গ্রাফগুলিতে মূল হিসাবে কাজ করতে পারে। মডেলগুলিতে পাঠ্য এবং চিত্রের আকারে ব্যবহারকারীর কাছে প্রদর্শিত তথ্যের পাশাপাশি এই জাতীয় তথ্যের ভিজ্যুয়াল উপস্থিতির দিকগুলি কনফিগার করার বৈশিষ্ট্যগুলি অন্তর্ভুক্ত থাকে - উদাহরণস্বরূপ, পাঠ্যের রঙ বা চিত্রের আকার। হোস্ট মডেলগুলিকে ভিউতে রূপান্তর করে যা ড্রাইভারের বিভ্রান্তির মানগুলি পূরণ করার জন্য ডিজাইন করা হয়েছে এবং গাড়ির স্ক্রীনের বিভিন্ন উপাদান এবং ইনপুট পদ্ধতির মতো বিবরণের যত্ন নেয়।
হোস্ট
হোস্ট হল ব্যাকএন্ড কম্পোনেন্ট যা লাইব্রেরির API দ্বারা অফার করা কার্যকারিতা প্রয়োগ করে যাতে আপনার অ্যাপটি গাড়িতে চলতে পারে। হোস্টের দায়িত্ব আপনার অ্যাপ আবিষ্কার করা এবং এর লাইফসাইকেল পরিচালনা করা থেকে শুরু করে আপনার মডেলকে ভিউতে রূপান্তর করা এবং ব্যবহারকারীর ইন্টারঅ্যাকশন সম্পর্কে আপনার অ্যাপকে অবহিত করা। মোবাইল ডিভাইসে, এই হোস্টটি Android Auto দ্বারা প্রয়োগ করা হয়। Android Automotive OS-এ, এই হোস্টটি একটি সিস্টেম অ্যাপ হিসেবে ইনস্টল করা আছে।
টেমপ্লেট সীমাবদ্ধতা
বিভিন্ন টেমপ্লেট তাদের মডেলের বিষয়বস্তুতে বিধিনিষেধ প্রয়োগ করে। উদাহরণস্বরূপ, তালিকা টেমপ্লেটের আইটেমের সংখ্যার সীমা রয়েছে যা ব্যবহারকারীর কাছে উপস্থাপন করা যেতে পারে। টেমপ্লেটগুলির একটি কাজের প্রবাহ গঠনের জন্য যেভাবে সংযোগ করা যেতে পারে তার সীমাবদ্ধতা রয়েছে৷ উদাহরণস্বরূপ, অ্যাপটি শুধুমাত্র পাঁচটি পর্যন্ত টেমপ্লেটকে স্ক্রিন স্ট্যাকে পুশ করতে পারে। আরো বিস্তারিত জানার জন্য টেমপ্লেট সীমাবদ্ধতা দেখুন।
Screen
Screen হল লাইব্রেরি দ্বারা প্রদত্ত একটি ক্লাস যা অ্যাপগুলি ব্যবহারকারীর কাছে উপস্থাপিত ইউজার ইন্টারফেস পরিচালনা করতে প্রয়োগ করে। একটি Screen একটি জীবনচক্র থাকে এবং স্ক্রীনটি দৃশ্যমান হলে প্রদর্শনের জন্য টেমপ্লেটটি পাঠানোর জন্য অ্যাপ্লিকেশনটির জন্য প্রক্রিয়া সরবরাহ করে। Screen ইন্সট্যান্সগুলিকে Screen স্ট্যাক থেকে ধাক্কা দেওয়া এবং পপ করা যেতে পারে, যা নিশ্চিত করে যে তারা টেমপ্লেট প্রবাহের সীমাবদ্ধতা মেনে চলে।
CarAppService
CarAppService হল একটি বিমূর্ত Service শ্রেণী যা হোস্ট দ্বারা আবিষ্কার ও পরিচালনা করার জন্য আপনার অ্যাপটিকে অবশ্যই বাস্তবায়ন এবং রপ্তানি করতে হবে। createHostValidator ব্যবহার করে হোস্ট কানেকশন বিশ্বস্ত হতে পারে এবং পরবর্তীতে onCreateSession ব্যবহার করে প্রতিটি সংযোগের জন্য Session দৃষ্টান্ত প্রদান করে তা যাচাই করার জন্য আপনার অ্যাপের CarAppService দায়ী।
Session
Session হল একটি বিমূর্ত শ্রেণী যা আপনার অ্যাপকে অবশ্যই বাস্তবায়ন করতে হবে এবং CarAppService.onCreateSession ব্যবহার করে ফেরত দিতে হবে। এটি গাড়ির স্ক্রিনে তথ্য প্রদর্শনের জন্য এন্ট্রি পয়েন্ট হিসাবে কাজ করে। এটির একটি লাইফ সাইকেল রয়েছে যা গাড়ির স্ক্রিনে আপনার অ্যাপের বর্তমান অবস্থা সম্পর্কে জানায়, যেমন আপনার অ্যাপটি কখন দৃশ্যমান বা লুকানো থাকে।
যখন একটি Session শুরু হয়, যেমন অ্যাপটি প্রথম চালু করা হয়, তখন হোস্ট onCreateScreen পদ্ধতি ব্যবহার করে প্রাথমিক Screen প্রদর্শনের জন্য অনুরোধ করে।
কার অ্যাপ লাইব্রেরি ইনস্টল করুন
আপনার অ্যাপে লাইব্রেরি যোগ করার নির্দেশাবলীর জন্য জেটপ্যাক লাইব্রেরি রিলিজ পৃষ্ঠা দেখুন।
আপনার অ্যাপের ম্যানিফেস্ট ফাইল কনফিগার করুন
আপনি আপনার গাড়ী অ্যাপ তৈরি করার আগে, আপনার অ্যাপের ম্যানিফেস্ট ফাইলগুলি নিম্নরূপ কনফিগার করুন।
আপনার CarAppService ঘোষণা করুন
হোস্ট আপনার CarAppService বাস্তবায়নের মাধ্যমে আপনার অ্যাপের সাথে সংযোগ স্থাপন করে। হোস্টকে আপনার অ্যাপ আবিষ্কার করতে এবং সংযোগ করতে দিতে আপনি আপনার ম্যানিফেস্টে এই পরিষেবাটি ঘোষণা করেন।
এছাড়াও আপনাকে আপনার অ্যাপের অভিপ্রায় ফিল্টারের <category> উপাদানে আপনার অ্যাপের বিভাগ ঘোষণা করতে হবে। এই উপাদানটির জন্য অনুমোদিত মানগুলির জন্য সমর্থিত অ্যাপ বিভাগের তালিকা দেখুন।
নিম্নলিখিত কোড স্নিপেট দেখায় যে কীভাবে আপনার ম্যানিফেস্টে আগ্রহের অ্যাপের জন্য একটি গাড়ি অ্যাপ পরিষেবা ঘোষণা করতে হয়:
পূর্ববর্তী বিভাগে বর্ণিত হিসাবে আপনি আপনার CarAppService ঘোষণা করার সময় অভিপ্রায় ফিল্টারে নিম্নলিখিত এক বা একাধিক বিভাগ মান যোগ করে আপনার অ্যাপের বিভাগ ঘোষণা করুন:
androidx.car.app.category.NAVIGATION : একটি অ্যাপ যা পালাক্রমে নেভিগেশন দিকনির্দেশ প্রদান করে। গাড়ির জন্য বিল্ড নেভিগেশন অ্যাপ দেখুন।
androidx.car.app.category.POI : একটি অ্যাপ যা পার্কিং স্পট, চার্জিং স্টেশন এবং গ্যাস স্টেশনের মতো আগ্রহের পয়েন্টগুলি খুঁজে পাওয়ার জন্য প্রাসঙ্গিক কার্যকারিতা প্রদান করে। গাড়ির জন্য বিল্ড পয়েন্ট অফ ইন্টারেস্ট অ্যাপ দেখুন।
androidx.car.app.category.IOT : একটি অ্যাপ যা ব্যবহারকারীদের গাড়ির মধ্যে থেকে সংযুক্ত ডিভাইসে প্রাসঙ্গিক পদক্ষেপ নিতে সক্ষম করে। গাড়ির জন্য বিল্ড ইন্টারনেট অফ থিংস অ্যাপ দেখুন।
androidx.car.app.category.WEATHER : একটি অ্যাপ যা ব্যবহারকারীদের তাদের বর্তমান অবস্থান বা তাদের রুটের সাথে সম্পর্কিত আবহাওয়ার তথ্য দেখতে দেয়। গাড়ির জন্য আবহাওয়া অ্যাপ তৈরি করুন দেখুন।
আপনাকে একটি অ্যাপের নাম এবং আইকন নির্দিষ্ট করতে হবে যা হোস্ট সিস্টেম UI-তে আপনার অ্যাপের প্রতিনিধিত্ব করতে ব্যবহার করতে পারে।
আপনি আপনার CarAppService এর label এবং icon বৈশিষ্ট্যগুলি ব্যবহার করে আপনার অ্যাপের প্রতিনিধিত্ব করতে ব্যবহৃত অ্যাপের নাম এবং আইকন নির্দিষ্ট করতে পারেন:
কার অ্যাপ লাইব্রেরি তার নিজস্ব API স্তরগুলিকে সংজ্ঞায়িত করে যাতে আপনি জানতে পারেন কোন লাইব্রেরি বৈশিষ্ট্যগুলি একটি গাড়ির টেমপ্লেট হোস্ট দ্বারা সমর্থিত। হোস্ট দ্বারা সমর্থিত সর্বোচ্চ কার অ্যাপ API স্তর পুনরুদ্ধার করতে, getCarAppApiLevel() পদ্ধতি ব্যবহার করুন।
আপনার AndroidManifest.xml ফাইলে আপনার অ্যাপ দ্বারা সমর্থিত ন্যূনতম কার অ্যাপ API স্তর ঘোষণা করুন:
কিভাবে পশ্চাদগামী সামঞ্জস্য বজায় রাখা যায় এবং একটি বৈশিষ্ট্য ব্যবহার করার জন্য প্রয়োজনীয় ন্যূনতম API স্তর ঘোষণা করার বিস্তারিত জানার জন্য RequiresCarApi টীকাটির জন্য ডকুমেন্টেশন দেখুন। কার অ্যাপ লাইব্রেরির একটি নির্দিষ্ট বৈশিষ্ট্য ব্যবহার করার জন্য কোন API স্তর প্রয়োজন তার সংজ্ঞার জন্য, CarAppApiLevels জন্য রেফারেন্স ডকুমেন্টেশন দেখুন।
আপনার CarAppService এবং সেশন তৈরি করুন
আপনার অ্যাপটিকে CarAppService ক্লাস প্রসারিত করতে হবে এবং এর onCreateSession পদ্ধতি প্রয়োগ করতে হবে, যা হোস্টের সাথে বর্তমান সংযোগের সাথে সম্পর্কিত একটি Session উদাহরণ প্রদান করে:
এমন পরিস্থিতি পরিচালনা করতে যেখানে আপনার গাড়ির অ্যাপটিকে এমন একটি স্ক্রীন থেকে শুরু করতে হবে যা আপনার অ্যাপের হোম বা ল্যান্ডিং স্ক্রীন নয়, যেমন ডিপ লিঙ্কগুলি পরিচালনা করা, আপনি onCreateScreen থেকে ফিরে আসার আগে ScreenManager.push ব্যবহার করে স্ক্রীনগুলির একটি ব্যাক স্ট্যাক প্রি-সিড করতে পারেন৷ প্রি-সিডিং ব্যবহারকারীদের আপনার অ্যাপ দেখানো প্রথম স্ক্রীন থেকে আগের স্ক্রীনে ফিরে যেতে দেয়।
আপনার স্টার্ট স্ক্রিন তৈরি করুন
আপনি আপনার অ্যাপের দ্বারা প্রদর্শিত স্ক্রিনগুলি তৈরি করেন যা Screen ক্লাসকে প্রসারিত করে এবং এর onGetTemplate পদ্ধতি প্রয়োগ করে, যা গাড়ির স্ক্রিনে প্রদর্শনের জন্য UI-এর অবস্থার প্রতিনিধিত্বকারী Template উদাহরণ প্রদান করে।
নীচের স্নিপেটটি দেখায় যে কীভাবে একটি Screen ঘোষণা করতে হয় যা একটি সাধারণ "হ্যালো ওয়ার্ল্ড!" প্রদর্শন করতে একটি PaneTemplate টেমপ্লেট ব্যবহার করে। স্ট্রিং:
CarContext অন্যান্য কার্যকারিতাও অফার করে, যেমন গাড়ির স্ক্রীন থেকে কনফিগারেশন ব্যবহার করে আপনাকে অঙ্কনযোগ্য সংস্থানগুলি লোড করতে দেওয়া, উদ্দেশ্য ব্যবহার করে গাড়িতে একটি অ্যাপ শুরু করা এবং আপনার অ্যাপটি অন্ধকার থিমে তার মানচিত্র প্রদর্শন করা উচিত কিনা তা সংকেত দেওয়া।
পর্দা নেভিগেশন বাস্তবায়ন
অ্যাপ্লিকেশানগুলি প্রায়শই বিভিন্ন স্ক্রীনের একটি সংখ্যা উপস্থাপন করে, প্রতিটি সম্ভবত বিভিন্ন টেমপ্লেট ব্যবহার করে ব্যবহারকারীরা নেভিগেট করতে পারে কারণ তারা স্ক্রীনে প্রদর্শিত ইন্টারফেসের সাথে যোগাযোগ করে।
ScreenManager ক্লাস একটি স্ক্রিন স্ট্যাক প্রদান করে যা আপনি স্ক্রীনগুলিকে পুশ করতে ব্যবহার করতে পারেন যা ব্যবহারকারী গাড়ির স্ক্রিনে একটি ব্যাক বোতাম নির্বাচন করলে বা কিছু গাড়িতে উপলব্ধ হার্ডওয়্যার ব্যাক বোতাম ব্যবহার করলে স্বয়ংক্রিয়ভাবে পপ করা যায়।
নিম্নলিখিত স্নিপেটটি দেখায় কিভাবে একটি বার্তা টেমপ্লেটে একটি ব্যাক অ্যাকশন যোগ করতে হয় সেইসাথে এমন একটি অ্যাকশন যা ব্যবহারকারীর দ্বারা নির্বাচিত হলে একটি নতুন স্ক্রীন পুশ করে:
ড্রাইভিং করার সময় অ্যাপটি ব্যবহার করা নিরাপদ তা নিশ্চিত করতে স্ক্রিন স্ট্যাকের সর্বোচ্চ পাঁচটি স্ক্রীনের গভীরতা থাকতে পারে। আরো বিস্তারিত জানার জন্য টেমপ্লেট সীমাবদ্ধতা বিভাগ দেখুন।
একটি টেমপ্লেটের বিষয়বস্তু রিফ্রেশ করুন
আপনার অ্যাপ Screen.invalidate পদ্ধতিতে কল করে একটি Screen বিষয়বস্তু অবৈধ করার অনুরোধ করতে পারে। হোস্ট পরবর্তীতে নতুন বিষয়বস্তু সহ টেমপ্লেট পুনরুদ্ধার করতে আপনার অ্যাপের Screen.onGetTemplate পদ্ধতিতে আবার কল করে।
একটি Screen রিফ্রেশ করার সময়, টেমপ্লেটের নির্দিষ্ট বিষয়বস্তু বোঝা গুরুত্বপূর্ণ যা আপডেট করা যেতে পারে যাতে হোস্ট টেমপ্লেট কোটার বিপরীতে নতুন টেমপ্লেট গণনা না করে। আরো বিস্তারিত জানার জন্য টেমপ্লেট সীমাবদ্ধতা বিভাগ দেখুন।
আমরা সুপারিশ করেছি যে আপনি আপনার স্ক্রীনগুলিকে গঠন করুন যাতে একটি Screen এবং এটির onGetTemplate বাস্তবায়নের মাধ্যমে এটি যে ধরনের টেমপ্লেট ফেরত দেয় তার মধ্যে এক-এক-একটি ম্যাপিং থাকে৷
মানচিত্র আঁকুন
নেভিগেশন, আগ্রহের পয়েন্ট (POI), এবং নিম্নলিখিত টেমপ্লেটগুলি ব্যবহার করে আবহাওয়ার অ্যাপগুলি একটি Surface অ্যাক্সেস করে মানচিত্র আঁকতে পারে।
নিম্নলিখিত টেমপ্লেটগুলি ব্যবহার করার জন্য, আপনার অ্যাপের AndroidManifest.xml ফাইলে একটি <uses-permission> উপাদানে ঘোষিত সংশ্লিষ্ট অনুমতিগুলির একটি থাকতে হবে।
আপনি যে টেমপ্লেটটি ব্যবহার করছেন তার জন্য প্রয়োজনীয় অনুমতি ছাড়াও, আপনার অ্যাপটিকে অবশ্যই তার AndroidManifest.xml ফাইলে androidx.car.app.ACCESS_SURFACE অনুমতি ঘোষণা করতে হবে যাতে সারফেসে অ্যাক্সেস পাওয়া যায়:
হোস্ট যে Surface প্রদান করে তা অ্যাক্সেস করতে, আপনাকে অবশ্যই একটি SurfaceCallback প্রয়োগ করতে হবে এবং AppManager গাড়ি পরিষেবাতে সেই বাস্তবায়ন প্রদান করতে হবে। onSurfaceAvailable() এবং onSurfaceDestroyed() কলব্যাকের SurfaceContainer প্যারামিটারে বর্তমান Surface আপনার SurfaceCallback পাঠানো হয়েছে।
হোস্ট মানচিত্রের উপরে টেমপ্লেটগুলির জন্য ব্যবহারকারীর ইন্টারফেস উপাদানগুলি আঁকতে পারে। হোস্ট SurfaceCallback.onVisibleAreaChanged পদ্ধতিতে কল করে ব্যবহারকারীর কাছে অবাধ এবং সম্পূর্ণরূপে দৃশ্যমান হওয়ার গ্যারান্টিযুক্ত পৃষ্ঠের এলাকাটি যোগাযোগ করে। এছাড়াও, পরিবর্তনের সংখ্যা কমাতে, হোস্ট সবচেয়ে ছোট আয়তক্ষেত্র সহ SurfaceCallback.onStableAreaChanged পদ্ধতিতে কল করে, যা বর্তমান টেমপ্লেটের উপর ভিত্তি করে সর্বদা দৃশ্যমান।
উদাহরণস্বরূপ, যখন একটি নেভিগেশন অ্যাপ উপরে একটি অ্যাকশন স্ট্রিপ সহ NavigationTemplate ব্যবহার করে, তখন ম্যাপের জন্য আরও জায়গা তৈরি করার জন্য ব্যবহারকারী কিছু সময়ের জন্য স্ক্রিনের সাথে ইন্টারঅ্যাক্ট না করলে অ্যাকশন স্ট্রিপটি নিজেকে লুকিয়ে রাখতে পারে। এই ক্ষেত্রে, একই আয়তক্ষেত্রের সাথে onStableAreaChanged এবং onVisibleAreaChanged এ একটি কলব্যাক রয়েছে। যখন অ্যাকশন স্ট্রিপ লুকানো থাকে, তখন শুধুমাত্র onVisibleAreaChanged বৃহত্তর এলাকার সাথে কল করা হয়। ব্যবহারকারী যদি স্ক্রিনের সাথে ইন্টারঅ্যাক্ট করে, তাহলে আবার শুধুমাত্র onVisibleAreaChanged প্রথম আয়তক্ষেত্রের সাথে কল করা হবে।
অন্ধকার থিম সমর্থন
অ্যাপ্লিকেশানগুলিকে অবশ্যই সঠিক গাঢ় রঙের সাথে Surface ইন্সট্যান্সে তাদের মানচিত্র পুনরায় আঁকতে হবে যখন হোস্ট শর্তগুলি নিশ্চিত করে, যেমন গাড়ির জন্য Android অ্যাপের গুণমানে বর্ণনা করা হয়েছে৷
ব্যবহারকারীদের আপনার মানচিত্রের সাথে যোগাযোগ করতে দিন
নিম্নলিখিত টেমপ্লেটগুলি ব্যবহার করার সময়, আপনি ব্যবহারকারীদের আপনার আঁকা মানচিত্রের সাথে ইন্টারঅ্যাক্ট করার জন্য সমর্থন যোগ করতে পারেন, যেমন তাদের জুম করে এবং প্যান করে মানচিত্রের বিভিন্ন অংশ দেখতে দেওয়া।
টেমপ্লেট
কার অ্যাপ এপিআই লেভেল থেকে ইন্টারঅ্যাকটিভিটি সমর্থিত
NavigationTemplate
2
PlaceListNavigationTemplate ( অবমুক্ত করা হয়েছে )
4
RoutePreviewNavigationTemplate টেমপ্লেট ( অবমুক্ত করা হয়েছে )
4
MapTemplate ( অবলোচিত )
5 (টেমপ্লেটের ভূমিকা)
MapWithContentTemplate
7 (টেমপ্লেটের ভূমিকা)
ইন্টারঅ্যাক্টিভিটি কলব্যাকগুলি বাস্তবায়ন করুন
SurfaceCallback ইন্টারফেসে বেশ কয়েকটি কলব্যাক পদ্ধতি রয়েছে যা আপনি পূর্ববর্তী বিভাগে টেমপ্লেটগুলির সাথে নির্মিত মানচিত্রে ইন্টারঅ্যাক্টিভিটি যুক্ত করতে প্রয়োগ করতে পারেন:
onScale (টেমপ্লেট হোস্ট দ্বারা নির্ধারিত স্কেল ফ্যাক্টর সহ)
2
প্যান মোডে ঘূর্ণমান নাজ
onScroll (টেমপ্লেট হোস্ট দ্বারা নির্ধারিত দূরত্ব ফ্যাক্টর সহ)
2
একটি মানচিত্র কর্ম ফালা যোগ করুন
এই টেমপ্লেটগুলিতে মানচিত্র-সম্পর্কিত ক্রিয়াগুলির জন্য একটি মানচিত্র অ্যাকশন স্ট্রিপ থাকতে পারে যেমন জুম ইন এবং আউট করা, রিসেন্টার করা, একটি কম্পাস প্রদর্শন করা, এবং অন্যান্য ক্রিয়া যা আপনি প্রদর্শন করতে চান৷ ম্যাপ অ্যাকশন স্ট্রিপে চারটি আইকন-শুধু বোতাম থাকতে পারে যা টাস্কের গভীরতাকে প্রভাবিত না করেই রিফ্রেশ করা যেতে পারে। এটি নিষ্ক্রিয় অবস্থায় লুকিয়ে থাকে এবং সক্রিয় অবস্থায় পুনরায় উপস্থিত হয়।
ম্যাপ ইন্টারঅ্যাক্টিভিটি কলব্যাক পেতে, আপনাকে অবশ্যই ম্যাপ অ্যাকশন স্ট্রিপে একটি Action.PAN বোতাম যোগ করতে হবে। যখন ব্যবহারকারী প্যান বোতাম টিপে, হোস্ট প্যান মোডে প্রবেশ করে, যা নিম্নলিখিত বিভাগে বর্ণিত হয়েছে।
যদি আপনার অ্যাপ ম্যাপ অ্যাকশন স্ট্রিপে Action.PAN বোতামটি বাদ দেয়, তাহলে এটি SurfaceCallback পদ্ধতি থেকে ব্যবহারকারীর ইনপুট গ্রহণ করে না এবং হোস্ট পূর্বে সক্রিয় করা প্যান মোড থেকে প্রস্থান করে।
একটি টাচস্ক্রীনে, প্যান বোতামটি প্রদর্শিত হয় না।
প্যান মোড বুঝুন
প্যান মোডে, টেমপ্লেট হোস্ট নন-টাচ ইনপুট ডিভাইস, যেমন রোটারি কন্ট্রোলার এবং টাচপ্যাড থেকে ব্যবহারকারীর ইনপুটকে উপযুক্ত SurfaceCallback পদ্ধতিতে অনুবাদ করে। NavigationTemplate.Builder এ setPanModeListener পদ্ধতির সাহায্যে প্যান মোডে প্রবেশ বা প্রস্থান করার জন্য ব্যবহারকারীর ক্রিয়াকলাপের প্রতিক্রিয়া জানান। ব্যবহারকারী প্যান মোডে থাকাকালীন হোস্ট টেমপ্লেটে অন্যান্য UI উপাদানগুলি লুকিয়ে রাখতে পারে।
ব্যবহারকারীর সাথে যোগাযোগ করুন
আপনার অ্যাপটি মোবাইল অ্যাপের মতো প্যাটার্ন ব্যবহার করে ব্যবহারকারীর সাথে ইন্টারঅ্যাক্ট করতে পারে।
ব্যবহারকারীর ইনপুট পরিচালনা করুন
আপনার অ্যাপ উপযুক্ত শ্রোতাদের সমর্থন করে এমন মডেলগুলিতে পাস করে ব্যবহারকারীর ইনপুটের প্রতিক্রিয়া জানাতে পারে। নিম্নলিখিত স্নিপেটটি দেখায় কিভাবে একটি Action মডেল তৈরি করতে হয় যা একটি OnClickListener সেট করে যা আপনার অ্যাপের কোড দ্বারা সংজ্ঞায়িত একটি পদ্ধতিতে ফিরে আসে:
কিছু অ্যাকশন, যেমন যেগুলির জন্য ব্যবহারকারীকে তাদের মোবাইল ডিভাইসে ইন্টারঅ্যাকশন চালিয়ে যাওয়ার জন্য নির্দেশ দেওয়া প্রয়োজন, শুধুমাত্র তখনই অনুমোদিত যখন গাড়িটি পার্ক করা হয়। আপনি সেই ক্রিয়াগুলি বাস্তবায়ন করতে ParkedOnlyOnClickListener ব্যবহার করতে পারেন৷ যদি গাড়িটি পার্ক করা না থাকে, হোস্ট ব্যবহারকারীকে একটি ইঙ্গিত প্রদর্শন করে যে এই ক্ষেত্রে পদক্ষেপটি অনুমোদিত নয়। গাড়ি পার্ক করা থাকলে, কোডটি স্বাভাবিকভাবে কার্যকর হয়। নিম্নলিখিত স্নিপেটটি দেখায় যে কীভাবে মোবাইল ডিভাইসে একটি সেটিংস স্ক্রীন খুলতে ParkedOnlyOnClickListener ব্যবহার করবেন:
মোবাইল ডিভাইসে পাঠানো বিজ্ঞপ্তিগুলি শুধুমাত্র গাড়ির স্ক্রিনে প্রদর্শিত হয় যদি সেগুলি একটি CarAppExtender দিয়ে প্রসারিত করা হয়। কিছু নোটিফিকেশন অ্যাট্রিবিউট, যেমন কন্টেন্ট শিরোনাম, টেক্সট, আইকন এবং অ্যাকশন, CarAppExtender এ সেট করা যেতে পারে, যখন সেগুলি গাড়ির স্ক্রিনে প্রদর্শিত হয় তখন বিজ্ঞপ্তির অ্যাট্রিবিউটগুলিকে ওভাররাইড করে৷
নিম্নলিখিত স্নিপেটটি দেখায় যে কীভাবে গাড়ির স্ক্রিনে একটি বিজ্ঞপ্তি পাঠাতে হয় যা মোবাইল ডিভাইসে দেখানো একটির চেয়ে আলাদা শিরোনাম প্রদর্শন করে:
বিজ্ঞপ্তিগুলি ব্যবহারকারী ইন্টারফেসের নিম্নলিখিত অংশগুলিকে প্রভাবিত করতে পারে:
একটি হেড-আপ বিজ্ঞপ্তি (HUN) ব্যবহারকারীর কাছে প্রদর্শিত হতে পারে।
বিজ্ঞপ্তি কেন্দ্রে একটি এন্ট্রি যোগ করা যেতে পারে, ঐচ্ছিকভাবে রেলে দৃশ্যমান একটি ব্যাজ সহ।
নেভিগেশন অ্যাপ্লিকেশানগুলির জন্য, বিজ্ঞপ্তিটি রেল উইজেটে প্রদর্শিত হতে পারে যেমন টার্ন-বাই-টার্ন বিজ্ঞপ্তিতে বর্ণিত হয়েছে।
আপনি CarAppExtender ডকুমেন্টেশনে বর্ণিত বিজ্ঞপ্তির অগ্রাধিকার ব্যবহার করে সেই ব্যবহারকারী ইন্টারফেস উপাদানগুলির প্রতিটিকে প্রভাবিত করতে আপনার অ্যাপের বিজ্ঞপ্তিগুলি কীভাবে কনফিগার করবেন তা চয়ন করতে পারেন৷
CarContext.requestPermissions() ব্যবহার করার সুবিধা, স্ট্যান্ডার্ড অ্যান্ড্রয়েড API ব্যবহার করার বিপরীতে, অনুমতি ডায়ালগ তৈরি করার জন্য আপনাকে আপনার নিজস্ব Activity চালু করতে হবে না। তাছাড়া, আপনি প্ল্যাটফর্ম-নির্ভর প্রবাহ তৈরি করার পরিবর্তে Android Auto এবং Android Automotive OS উভয় ক্ষেত্রেই একই কোড ব্যবহার করতে পারেন।
Android Auto-এ অনুমতি ডায়ালগ স্টাইল করুন
অ্যান্ড্রয়েড অটোতে, ব্যবহারকারীর জন্য অনুমতি ডায়ালগ ফোনে প্রদর্শিত হবে। ডিফল্টরূপে, ডায়ালগের পিছনে কোন পটভূমি থাকবে না। একটি কাস্টম ব্যাকগ্রাউন্ড সেট করতে, আপনার AndroidManifest.xml ফাইলে একটি গাড়ি অ্যাপ থিম ঘোষণা করুন এবং আপনার গাড়ি অ্যাপ থিমের জন্য carPermissionActivityLayout বৈশিষ্ট্য সেট করুন।
একটি অভিপ্রায় সঙ্গে আপনার নিজের অ্যাপ্লিকেশন শুরু.
নিম্নলিখিত উদাহরণটি দেখায় যে কীভাবে একটি অ্যাকশনের মাধ্যমে একটি বিজ্ঞপ্তি তৈরি করতে হয় যা একটি স্ক্রীনের সাথে আপনার অ্যাপটি খোলে যা একটি পার্কিং সংরক্ষণের বিবরণ দেখায়। আপনি একটি বিষয়বস্তুর অভিপ্রায় সহ বিজ্ঞপ্তির দৃষ্টান্ত প্রসারিত করেন যাতে একটি PendingIntent রয়েছে যা আপনার অ্যাপের ক্রিয়াকলাপের একটি সুস্পষ্ট অভিপ্রায়কে মোড়ানো রয়েছে:
আপনার অ্যাপটিকে অবশ্যই একটি BroadcastReceiver ঘোষণা করতে হবে যা ব্যবহারকারী যখন বিজ্ঞপ্তি ইন্টারফেসে ক্রিয়াটি নির্বাচন করে এবং ডেটা URI সহ একটি অভিপ্রায় সহ CarContext.startCarApp আহ্বান করে তখন অভিপ্রায় প্রক্রিয়া করার জন্য আহ্বান করা হয়:
অবশেষে, আপনার অ্যাপের Session.onNewIntent পদ্ধতিটি স্ট্যাকের উপর পার্কিং রিজার্ভেশন স্ক্রীনটি পুশ করে এই উদ্দেশ্যটি পরিচালনা করে, যদি এটি ইতিমধ্যে শীর্ষে না থাকে:
গাড়ি অ্যাপের জন্য বিজ্ঞপ্তিগুলি কীভাবে পরিচালনা করবেন সে সম্পর্কে আরও তথ্যের জন্য প্রদর্শন বিজ্ঞপ্তি বিভাগটি দেখুন।
টেমপ্লেট সীমাবদ্ধতা
হোস্ট একটি প্রদত্ত কাজের জন্য প্রদর্শনের জন্য টেমপ্লেটের সংখ্যা সর্বাধিক পাঁচটিতে সীমাবদ্ধ করে, যার মধ্যে শেষ টেমপ্লেটটি অবশ্যই নিম্নলিখিত ধরণের একটি হতে হবে:
মনে রাখবেন যে এই সীমাটি টেমপ্লেটের সংখ্যার জন্য প্রযোজ্য এবং স্ট্যাকের Screen উদাহরণের সংখ্যা নয়। উদাহরণস্বরূপ, যদি একটি অ্যাপ স্ক্রীন A-তে থাকা অবস্থায় দুটি টেমপ্লেট পাঠায় এবং তারপরে স্ক্রীন B ঠেলে দেয়, এটি এখন আরও তিনটি টেমপ্লেট পাঠাতে পারে। বিকল্পভাবে, যদি প্রতিটি স্ক্রিন একটি একক টেমপ্লেট পাঠানোর জন্য গঠন করা হয়, তাহলে অ্যাপটি ScreenManager স্ট্যাকের উপর পাঁচটি স্ক্রীন ইনস্ট্যান্স পুশ করতে পারে।
এই বিধিনিষেধের বিশেষ ক্ষেত্রে রয়েছে: টেমপ্লেট রিফ্রেশ এবং ব্যাক এবং রিসেট অপারেশন।
টেমপ্লেট রিফ্রেশ করে
কিছু বিষয়বস্তুর আপডেট টেমপ্লেট সীমার মধ্যে গণনা করা হয় না। সাধারণভাবে, যদি কোনো অ্যাপ একই ধরনের একটি নতুন টেমপ্লেট পুশ করে এবং আগের টেমপ্লেটের মতো একই মূল বিষয়বস্তু ধারণ করে, নতুন টেমপ্লেটটি কোটার সাথে গণনা করা হয় না। উদাহরণস্বরূপ, একটি ListTemplate এ একটি সারির টগল অবস্থা আপডেট করা কোটার সাথে গণনা করা হয় না। কোন ধরনের বিষয়বস্তু আপডেটগুলিকে রিফ্রেশ হিসাবে বিবেচনা করা যেতে পারে সে সম্পর্কে আরও জানতে পৃথক টেমপ্লেটগুলির ডকুমেন্টেশন দেখুন৷
ব্যাক অপারেশন
একটি টাস্কের মধ্যে সাব-ফ্লো সক্ষম করতে, হোস্ট শনাক্ত করে যখন একটি অ্যাপ ScreenManager স্ট্যাক থেকে একটি Screen পপ করছে এবং অ্যাপটি যে টেমপ্লেটগুলির দ্বারা পিছিয়ে যাচ্ছে তার উপর ভিত্তি করে অবশিষ্ট কোটা আপডেট করে৷
উদাহরণস্বরূপ, যদি অ্যাপটি স্ক্রীন A-তে থাকা অবস্থায় দুটি টেমপ্লেট পাঠায়, তারপর স্ক্রীন B-এ পুশ করে এবং আরও দুটি টেমপ্লেট পাঠায়, অ্যাপটির একটি কোটা অবশিষ্ট থাকে। যদি অ্যাপটি স্ক্রীন A-তে ফিরে আসে, হোস্ট কোটাটি তিনটিতে রিসেট করে, কারণ অ্যাপটি দুটি টেমপ্লেট দ্বারা পিছনে চলে গেছে।
নোট করুন যে, একটি স্ক্রিনে ফিরে আসার সময়, একটি অ্যাপকে অবশ্যই একটি টেমপ্লেট পাঠাতে হবে যা সেই স্ক্রীনের দ্বারা সর্বশেষ পাঠানোর মতো একই ধরনের। অন্য যেকোন টেমপ্লেট টাইপ পাঠালে একটি ত্রুটি দেখা দেয়। যাইহোক, যতক্ষণ ব্যাক অপারেশনের সময় টাইপ একই থাকে, একটি অ্যাপ কোটা প্রভাবিত না করেই টেমপ্লেটের বিষয়বস্তু অবাধে পরিবর্তন করতে পারে।
অপারেশন রিসেট করুন
কিছু কিছু টেমপ্লেটের বিশেষ শব্দার্থ আছে যা একটি কাজের সমাপ্তি নির্দেশ করে। উদাহরণ স্বরূপ, NavigationTemplate হল এমন একটি দৃশ্য যা স্ক্রিনে থাকবে এবং ব্যবহারকারীর ব্যবহারের জন্য নতুন পালাক্রমে নির্দেশাবলীর সাথে রিফ্রেশ হবে বলে আশা করা হচ্ছে। যখন এটি এই টেমপ্লেটগুলির একটিতে পৌঁছায়, হোস্ট টেমপ্লেট কোটা পুনরায় সেট করে, সেই টেমপ্লেটটিকে এমনভাবে আচরণ করে যেন এটি একটি নতুন কাজের প্রথম ধাপ। এটি অ্যাপটিকে একটি নতুন কাজ শুরু করার অনুমতি দেয়। কোনটি হোস্টে রিসেট ট্রিগার করে তা দেখতে স্বতন্ত্র টেমপ্লেটের ডকুমেন্টেশন দেখুন।
যদি হোস্ট একটি বিজ্ঞপ্তি অ্যাকশন বা লঞ্চার থেকে অ্যাপটি শুরু করার অভিপ্রায় পায়, তাহলে কোটাও রিসেট করা হয়। এই প্রক্রিয়াটি একটি অ্যাপকে বিজ্ঞপ্তিগুলি থেকে একটি নতুন টাস্ক প্রবাহ শুরু করতে দেয় এবং এটি সত্য হয় এমনকি যদি একটি অ্যাপ ইতিমধ্যেই আবদ্ধ থাকে এবং অগ্রভাগে থাকে।
গাড়ির স্ক্রিনে আপনার অ্যাপের বিজ্ঞপ্তিগুলি কীভাবে প্রদর্শন করবেন সে সম্পর্কে আরও বিশদ বিবরণের জন্য প্রদর্শন বিজ্ঞপ্তি বিভাগটি দেখুন। একটি নোটিফিকেশন অ্যাকশন থেকে কীভাবে আপনার অ্যাপ শুরু করবেন সে সম্পর্কে তথ্যের জন্য একটি অভিপ্রায় সহ একটি গাড়ি অ্যাপ শুরু করুন দেখুন।
সংযোগ API
রানটাইমে সংযোগের তথ্য পুনরুদ্ধার করতে CarConnection API ব্যবহার করে আপনি আপনার অ্যাপ Android Auto বা Android Automotive OS এ চলছে কিনা তা নির্ধারণ করতে পারেন।
উদাহরণস্বরূপ, আপনার গাড়ী অ্যাপের Session , একটি CarConnection শুরু করুন এবং LiveData আপডেটগুলিতে সদস্যতা নিন:
funonConnectionStateUpdated(connectionState:Int){valmessage=when(connectionState){CarConnection.CONNECTION_TYPE_NOT_CONNECTED->"Not connected to a head unit"CarConnection.CONNECTION_TYPE_NATIVE->"Connected to Android Automotive OS"CarConnection.CONNECTION_TYPE_PROJECTION->"Connected to Android Auto"else->"Unknown car connection type"}CarToast.makeText(carContext,message,CarToast.LENGTH_SHORT).show()}
জাভা
privatevoidonConnectionStateUpdated(intconnectionState){Stringmessage;switch(connectionState){caseCarConnection.CONNECTION_TYPE_NOT_CONNECTED:message="Not connected to a head unit";break;caseCarConnection.CONNECTION_TYPE_NATIVE:message="Connected to Android Automotive OS";break;caseCarConnection.CONNECTION_TYPE_PROJECTION:message="Connected to Android Auto";break;default:message="Unknown car connection type";break;}CarToast.makeText(getCarContext(),message,CarToast.LENGTH_SHORT).show();}
সীমাবদ্ধতা API
বিভিন্ন গাড়ি এক সময়ে ব্যবহারকারীর কাছে বিভিন্ন সংখ্যক Item দৃষ্টান্ত প্রদর্শনের অনুমতি দিতে পারে। রানটাইমে বিষয়বস্তুর সীমা পরীক্ষা করতে এবং আপনার টেমপ্লেটগুলিতে উপযুক্ত সংখ্যক আইটেম সেট করতে ConstraintManager ব্যবহার করুন।
CarContext থেকে একটি ConstraintManager পেয়ে শুরু করুন:
তারপরে আপনি প্রাসঙ্গিক বিষয়বস্তুর সীমার জন্য পুনরুদ্ধার করা ConstraintManager অবজেক্টটি জিজ্ঞাসা করতে পারেন। উদাহরণস্বরূপ, একটি গ্রিডে প্রদর্শিত আইটেমের সংখ্যা পেতে, CONTENT_LIMIT_TYPE_GRID সাথে getContentLimit কল করুন:
যদি আপনার অ্যাপ ব্যবহারকারীদের জন্য সাইন-ইন করার অভিজ্ঞতা প্রদান করে, তাহলে আপনি গাড়ির হেড ইউনিটে আপনার অ্যাপে সাইন ইন করার জন্য কার অ্যাপ এপিআই লেভেল 2 এবং তার উপরে সহ SignInTemplate এবং LongMessageTemplate এর মতো টেমপ্লেট ব্যবহার করতে পারেন।
একটি SignInTemplate তৈরি করতে, একটি SignInMethod সংজ্ঞায়িত করুন। কার অ্যাপ লাইব্রেরি বর্তমানে নিম্নলিখিত সাইন-ইন পদ্ধতিগুলিকে সমর্থন করে:
QR কোড সাইন ইন করার জন্য QRCodeSignInMethod , যেখানে ব্যবহারকারী তাদের ফোনে সাইন-ইন সম্পূর্ণ করতে একটি QR কোড স্ক্যান করে। এটি কার API লেভেল 4 এবং তার উপরে উপলব্ধ।
উদাহরণস্বরূপ, ব্যবহারকারীর পাসওয়ার্ড সংগ্রহ করে এমন একটি টেমপ্লেট বাস্তবায়ন করতে, ব্যবহারকারীর ইনপুট প্রক্রিয়া ও যাচাই করার জন্য একটি InputCallback তৈরি করে শুরু করুন:
কোটলিন
valcallback=object:InputCallback{overridefunonInputSubmitted(text:String){// You will receive this callback when the user presses Enter on the keyboard.}overridefunonInputTextChanged(text:String){// You will receive this callback as the user is typing. The update// frequency is determined by the host.}}
জাভা
InputCallbackcallback=newInputCallback(){@OverridepublicvoidonInputSubmitted(@NonNullStringtext){// You will receive this callback when the user presses Enter on the keyboard.}@OverridepublicvoidonInputTextChanged(@NonNullStringtext){// You will receive this callback as the user is typing. The update// frequency is determined by the host.}};
InputSignInMethodBuilder জন্য একটি InputCallback প্রয়োজন।
অবশেষে, একটি SignInTemplate তৈরি করতে আপনার নতুন InputSignInMethod ব্যবহার করুন।
কোটলিন
SignInTemplate.Builder(passwordInput).setTitle("Sign in with username and password").setInstructions("Enter your password").setHeaderAction(Action.BACK)....build()
জাভা
newSignInTemplate.Builder(passwordInput).setTitle("Sign in with username and password").setInstructions("Enter your password").setHeaderAction(Action.BACK)....build();
অ্যাকাউন্ট ম্যানেজার ব্যবহার করুন
যে Android Automotive OS অ্যাপগুলির প্রমাণীকরণ আছে সেগুলিকে নিম্নলিখিত কারণগুলির জন্য AccountManager ব্যবহার করতে হবে:
আরও ভাল UX এবং অ্যাকাউন্ট পরিচালনার সহজতা : ব্যবহারকারীরা সহজেই সাইন-ইন এবং সাইন-আউট সহ সিস্টেম সেটিংসের অ্যাকাউন্ট মেনু থেকে তাদের সমস্ত অ্যাকাউন্ট পরিচালনা করতে পারে৷
"অতিথি" অভিজ্ঞতা : যেহেতু গাড়িগুলি ভাগ করা ডিভাইস, তাই OEMগুলি গাড়িতে অতিথি অভিজ্ঞতাগুলি সক্ষম করতে পারে, যেখানে অ্যাকাউন্টগুলি যোগ করা যায় না৷
টেক্সট স্ট্রিং বৈকল্পিক যোগ করুন
বিভিন্ন গাড়ির স্ক্রিনের আকার বিভিন্ন পরিমাণে পাঠ্য দেখাতে পারে। কার অ্যাপ এপিআই লেভেল 2 এবং তার উপরে, আপনি স্ক্রীনের সাথে সবচেয়ে ভালোভাবে ফিট করার জন্য একটি টেক্সট স্ট্রিং এর একাধিক ভেরিয়েন্ট নির্দিষ্ট করতে পারেন। টেক্সট ভেরিয়েন্টগুলি কোথায় গৃহীত হয় তা দেখতে, টেমপ্লেট এবং উপাদানগুলি সন্ধান করুন যা একটি CarText নেয়।
সর্বাধিক থেকে সর্বনিম্ন পছন্দের ক্রমানুসারে স্ট্রিং যুক্ত করুন—উদাহরণস্বরূপ, দীর্ঘতম থেকে সংক্ষিপ্ততম পর্যন্ত। হোস্ট গাড়ির স্ক্রিনে উপলব্ধ স্থানের পরিমাণের উপর নির্ভর করে উপযুক্ত-দৈর্ঘ্যের স্ট্রিং বেছে নেয়।
valrating=SpannableString("Rating: 4.5 stars")rating.setSpan(CarIconSpan.create(// Create a CarIcon with an image of four and a half starsCarIcon.Builder(...).build(),// Align the CarIcon to the baseline of the textCarIconSpan.ALIGN_BASELINE),// The start index of the span (index of the character '4')8,// The end index of the span (index of the last 's' in "stars")16,Spanned.SPAN_INCLUSIVE_INCLUSIVE)valrow=Row.Builder()....addText(rating).build()
জাভা
SpannableStringrating=newSpannableString("Rating: 4.5 stars");rating.setSpan(CarIconSpan.create(// Create a CarIcon with an image of four and a half starsnewCarIcon.Builder(...).build(),// Align the CarIcon to the baseline of the textCarIconSpan.ALIGN_BASELINE),// The start index of the span (index of the character '4')8,// The end index of the span (index of the last 's' in "stars")16,Spanned.SPAN_INCLUSIVE_INCLUSIVE);Rowrow=newRow.Builder()....addText(rating).build();
গাড়ী হার্ডওয়্যার APIs
কার অ্যাপ এপিআই লেভেল 3 দিয়ে শুরু করে, কার অ্যাপ লাইব্রেরিতে এমন API রয়েছে যা আপনি গাড়ির বৈশিষ্ট্য এবং সেন্সর অ্যাক্সেস করতে ব্যবহার করতে পারেন।
প্রয়োজনীয়তা
Android Auto-এর সাথে API ব্যবহার করতে, আপনার Android Auto মডিউলের জন্য build.gradle ফাইলে androidx.car.app:app-projected প্রজেক্টের উপর নির্ভরতা যোগ করে শুরু করুন। Android Automotive OS-এর জন্য, আপনার Android Automotive OS মডিউলের জন্য build.gradle ফাইলে androidx.car.app:app-automotive এর উপর নির্ভরতা যোগ করুন।
উপরন্তু, আপনার AndroidManifest.xml ফাইলে, আপনি যে গাড়ির ডেটা ব্যবহার করতে চান তার অনুরোধ করার জন্য আপনাকে প্রয়োজনীয় প্রাসঙ্গিক অনুমতিগুলি ঘোষণা করতে হবে। নোট করুন যে এই অনুমতিগুলি অবশ্যই ব্যবহারকারীর দ্বারা আপনাকে মঞ্জুর করা উচিত। প্ল্যাটফর্ম-নির্ভর প্রবাহ তৈরি করার পরিবর্তে আপনি Android Auto এবং Android Automotive OS উভয় ক্ষেত্রেই একই কোড ব্যবহার করতে পারেন। তবে, প্রয়োজনীয় অনুমতিগুলি আলাদা।
CarInfo
এই টেবিলটি CarInfo API-এর দ্বারা প্রকাশিত বৈশিষ্ট্যগুলি এবং সেগুলি ব্যবহার করার জন্য আপনাকে অনুরোধ করতে হবে এমন অনুমতিগুলি বর্ণনা করে:
সতর্কতা: Mileage ক্লাসের getOdometerMeters পদ্ধতিটি ভুলভাবে নামকরণ করা হয়েছে এবং মিটার নয়, কিলোমিটার ফেরত দেয়।
ওডোমিটার দূরত্ব
com.google.android.gms.permission.CAR_MILEAGE
প্লে স্টোর থেকে ইনস্টল করা অ্যাপের জন্য Android Automotive OS-এ এই ডেটা পাওয়া যায় না।
3
উদাহরণস্বরূপ, অবশিষ্ট পরিসর পেতে, একটি CarInfo অবজেক্ট ইনস্ট্যান্টিয়েট করুন, তারপর একটি OnCarDataAvailableListener তৈরি করুন এবং নিবন্ধন করুন:
কোটলিন
valcarInfo=carContext.getCarService(CarHardwareManager::class.java).carInfovallistener=OnCarDataAvailableListener<EnergyLevel>{data->
if(data.rangeRemainingMeters.status==CarValue.STATUS_SUCCESS){valrangeRemaining=data.rangeRemainingMeters.value}else{// Handle error}}carInfo.addEnergyLevelListener(carContext.mainExecutor,listener)…// Unregister the listener when you no longer need updatescarInfo.removeEnergyLevelListener(listener)
জাভা
CarInfocarInfo=getCarContext().getCarService(CarHardwareManager.class).getCarInfo();OnCarDataAvailableListener<EnergyLevel>listener=(data)->{if(data.getRangeRemainingMeters().getStatus()==CarValue.STATUS_SUCCESS){floatrangeRemaining=data.getRangeRemainingMeters().getValue();}else{// Handle error}};carInfo.addEnergyLevelListener(getCarContext().getMainExecutor(),listener);…// Unregister the listener when you no longer need updatescarInfo.removeEnergyLevelListener(listener);
অনুমান করবেন না যে গাড়ি থেকে ডেটা সর্বদা উপলব্ধ। যদি আপনি একটি ত্রুটি পান, তাহলে আপনার অনুরোধ করা ডেটা কেন পুনরুদ্ধার করা যায়নি তা আরও ভালভাবে বোঝার জন্য আপনার অনুরোধ করা মানটির স্থিতি পরীক্ষা করুন৷ সম্পূর্ণ CarInfo শ্রেণীর সংজ্ঞার জন্য রেফারেন্স ডকুমেন্টেশন পড়ুন।
কার সেন্সর
CarSensors ক্লাস আপনাকে গাড়ির অ্যাক্সিলোমিটার, জাইরোস্কোপ, কম্পাস এবং অবস্থান ডেটাতে অ্যাক্সেস দেয়। এই মানগুলির প্রাপ্যতা OEM এর উপর নির্ভর করতে পারে। অ্যাক্সিলোমিটার, জাইরোস্কোপ এবং কম্পাস থেকে প্রাপ্ত তথ্যের ফর্ম্যাটটি আপনি যেমন SensorManager এপিআই থেকে পাবেন তেমনই। উদাহরণস্বরূপ, গাড়ির শিরোনাম পরীক্ষা করতে:
কোটলিন
valcarSensors=carContext.getCarService(CarHardwareManager::class.java).carSensorsvallistener=OnCarDataAvailableListener<Compass>{data->
if(data.orientations.status==CarValue.STATUS_SUCCESS){valorientation=data.orientations.value}else{// Data not available, handle error}}carSensors.addCompassListener(CarSensors.UPDATE_RATE_NORMAL,carContext.mainExecutor,listener)…// Unregister the listener when you no longer need updatescarSensors.removeCompassListener(listener)
জাভা
CarSensorscarSensors=getCarContext().getCarService(CarHardwareManager.class).getCarSensors();OnCarDataAvailableListener<Compass>listener=(data)->{if(data.getOrientations().getStatus()==CarValue.STATUS_SUCCESS){List<Float>orientations=data.getOrientations().getValue();}else{// Data not available, handle error}};carSensors.addCompassListener(CarSensors.UPDATE_RATE_NORMAL,getCarContext().getMainExecutor(),listener);…// Unregister the listener when you no longer need updatescarSensors.removeCompassListener(listener);
গাড়ি থেকে অবস্থানের ডেটা অ্যাক্সেস করতে, আপনাকে android.permission.ACCESS_FINE_LOCATION অনুমতিও ঘোষণা এবং অনুরোধ করতে হবে।
টেস্টিং
অ্যান্ড্রয়েড অটোতে পরীক্ষা করার সময় সেন্সর ডেটা অনুকরণ করতে, ডেস্কটপ হেড ইউনিট গাইডের সেন্সর এবং সেন্সর কনফিগারেশন বিভাগগুলি দেখুন। অ্যান্ড্রয়েড অটোমোটিভ ওএসে পরীক্ষা করার সময় সেন্সর ডেটা অনুকরণ করতে, অ্যান্ড্রয়েড অটোমোটিভ ওএস এমুলেটর গাইডের এমুলেট হার্ডওয়্যার স্টেট বিভাগটি দেখুন।
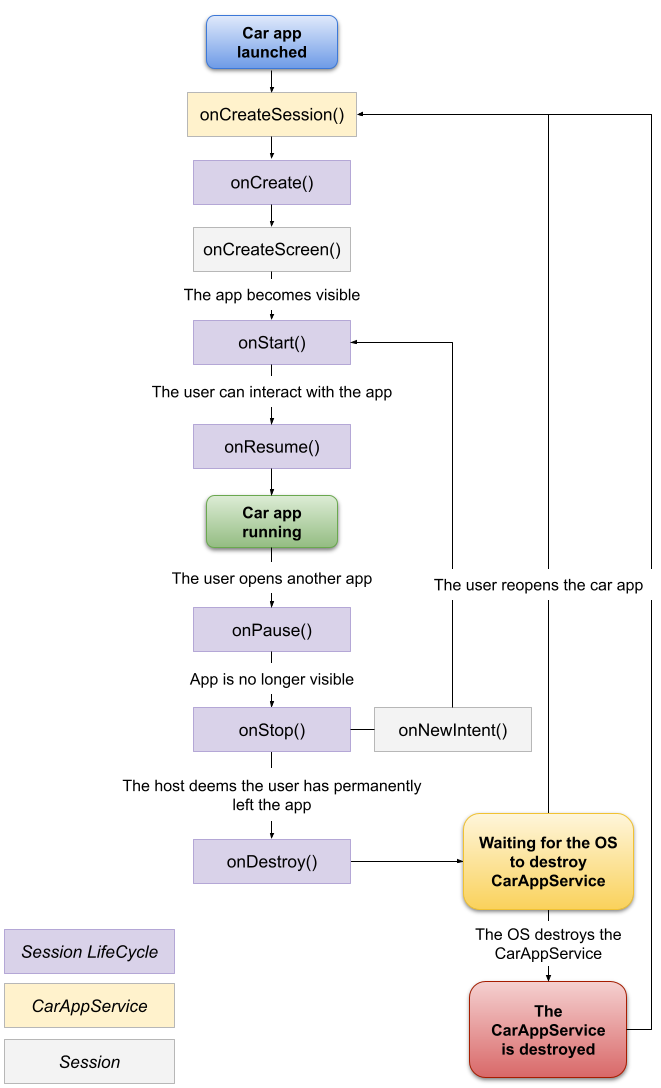
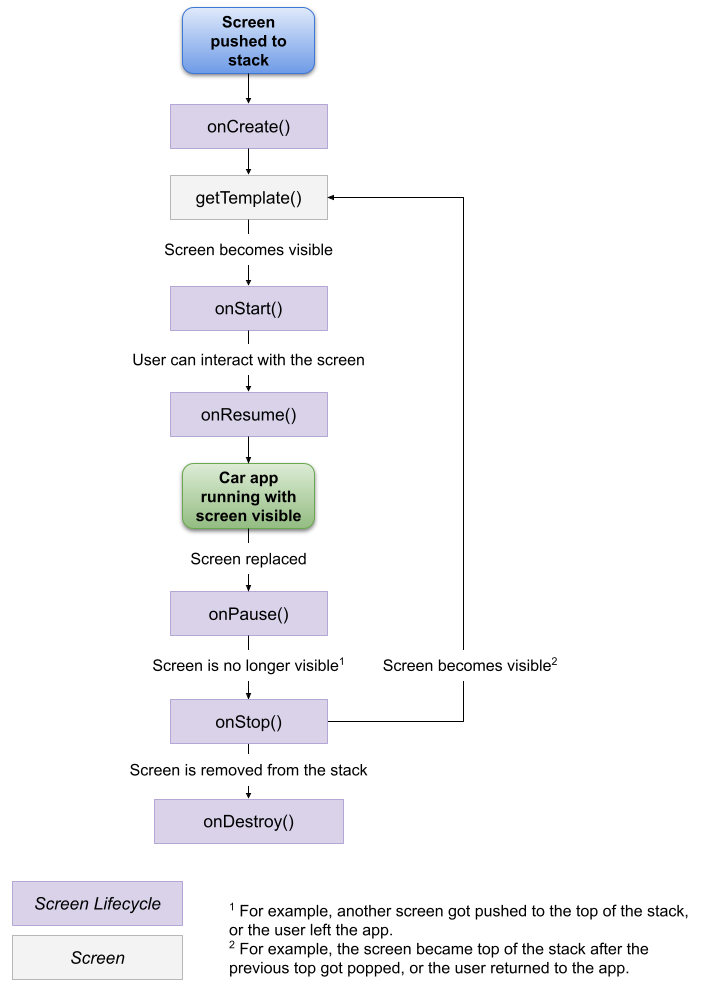
কারাপস সার্ভিস, সেশন এবং স্ক্রিন লাইফসাইকেলগুলি
Session এবং Screen ক্লাসগুলি LifecycleOwner ইন্টারফেসটি প্রয়োগ করে। ব্যবহারকারী অ্যাপ্লিকেশনটির সাথে ইন্টারঅ্যাক্ট করার সাথে সাথে আপনার Session এবং Screen অবজেক্টগুলির লাইফসাইকেল কলব্যাকগুলি অনুরোধ করা হয়েছে, নিম্নলিখিত চিত্রগুলিতে বর্ণিত হিসাবে।
আপনার অ্যাপ্লিকেশনটির CarAppService এবং CarAudioRecord এপিআই ব্যবহার করে আপনি আপনার অ্যাপটিকে ব্যবহারকারীর গাড়ির মাইক্রোফোনে অ্যাক্সেস দিতে পারেন। ব্যবহারকারীদের গাড়ী মাইক্রোফোন অ্যাক্সেস করার জন্য আপনার অ্যাপ্লিকেশনটিকে অনুমতি দিতে হবে। আপনার অ্যাপ্লিকেশনটি আপনার অ্যাপের মধ্যে ব্যবহারকারীর ইনপুট রেকর্ড এবং প্রক্রিয়া করতে পারে।
রেকর্ড করার অনুমতি
কোনও অডিও রেকর্ড করার আগে আপনাকে প্রথমে আপনার AndroidManifest.xml রেকর্ড করার অনুমতিটি অবশ্যই ঘোষণা করতে হবে এবং ব্যবহারকারী এটি মঞ্জুর করার জন্য অনুরোধ করতে হবে।
রানটাইমে রেকর্ড করার জন্য আপনাকে অনুরোধ করতে হবে। আপনার গাড়ী অ্যাপে কীভাবে অনুমতি দেওয়ার জন্য অনুরোধ করবেন সে সম্পর্কে বিশদ জানতে অনুরোধের অনুমতি বিভাগটি দেখুন।
অডিও রেকর্ড করুন
ব্যবহারকারী রেকর্ড করার অনুমতি দেওয়ার পরে, আপনি অডিওটি রেকর্ড করতে পারেন এবং রেকর্ডিংটি প্রক্রিয়া করতে পারেন।
কোটলিন
valcarAudioRecord=CarAudioRecord.create(carContext)carAudioRecord.startRecording()valdata=ByteArray(CarAudioRecord.AUDIO_CONTENT_BUFFER_SIZE)while(carAudioRecord.read(data,0,CarAudioRecord.AUDIO_CONTENT_BUFFER_SIZE)>=0){// Use data array// Potentially call carAudioRecord.stopRecording() if your processing finds end of speech}carAudioRecord.stopRecording()
জাভা
CarAudioRecordcarAudioRecord=CarAudioRecord.create(getCarContext());carAudioRecord.startRecording();byte[]data=newbyte[CarAudioRecord.AUDIO_CONTENT_BUFFER_SIZE];while(carAudioRecord.read(data,0,CarAudioRecord.AUDIO_CONTENT_BUFFER_SIZE)>=0){// Use data array// Potentially call carAudioRecord.stopRecording() if your processing finds end of speech}carAudioRecord.stopRecording();
অডিও ফোকাস
গাড়ি মাইক্রোফোন থেকে রেকর্ড করার সময়, চলমান কোনও মিডিয়া বন্ধ হয়ে গেছে তা নিশ্চিত করার জন্য প্রথমে অডিও ফোকাস অর্জন করুন। আপনি যদি অডিও ফোকাস হারাবেন তবে রেকর্ডিং বন্ধ করুন।
অডিও ফোকাস কীভাবে অর্জন করবেন তার একটি উদাহরণ এখানে:
কোটলিন
valcarAudioRecord=CarAudioRecord.create(carContext)// Take audio focus so that user's media is not recordedvalaudioAttributes=AudioAttributes.Builder().setContentType(AudioAttributes.CONTENT_TYPE_SPEECH)// Use the most appropriate usage type for your use case.setUsage(AudioAttributes.USAGE_ASSISTANCE_NAVIGATION_GUIDANCE).build()valaudioFocusRequest=AudioFocusRequest.Builder(AudioManager.AUDIOFOCUS_GAIN_TRANSIENT_EXCLUSIVE).setAudioAttributes(audioAttributes).setOnAudioFocusChangeListener{state:Int->
if(state==AudioManager.AUDIOFOCUS_LOSS){// Stop recording if audio focus is lostcarAudioRecord.stopRecording()}}.build()if(carContext.getSystemService(AudioManager::class.java).requestAudioFocus(audioFocusRequest)!=AudioManager.AUDIOFOCUS_REQUEST_GRANTED){// Don't record if the focus isn't grantedreturn}carAudioRecord.startRecording()// Process the audio and abandon the AudioFocusRequest when done
জাভা
CarAudioRecordcarAudioRecord=CarAudioRecord.create(getCarContext());// Take audio focus so that user's media is not recordedAudioAttributesaudioAttributes=newAudioAttributes.Builder().setContentType(AudioAttributes.CONTENT_TYPE_SPEECH)// Use the most appropriate usage type for your use case.setUsage(AudioAttributes.USAGE_ASSISTANCE_NAVIGATION_GUIDANCE).build();AudioFocusRequestaudioFocusRequest=newAudioFocusRequest.Builder(AudioManager.AUDIOFOCUS_GAIN_TRANSIENT_EXCLUSIVE).setAudioAttributes(audioAttributes).setOnAudioFocusChangeListener(state->{if(state==AudioManager.AUDIOFOCUS_LOSS){// Stop recording if audio focus is lostcarAudioRecord.stopRecording();}}).build();if(getCarContext().getSystemService(AudioManager.class).requestAudioFocus(audioFocusRequest)!=AUDIOFOCUS_REQUEST_GRANTED){// Don't record if the focus isn't grantedreturn;}carAudioRecord.startRecording();// Process the audio and abandon the AudioFocusRequest when done
টেস্টিং লাইব্রেরি
অ্যান্ড্রয়েড ফর কার টেস্টিং লাইব্রেরি সহায়ক ক্লাস সরবরাহ করে যা আপনি পরীক্ষার পরিবেশে আপনার অ্যাপ্লিকেশনটির আচরণকে বৈধতা দিতে ব্যবহার করতে পারেন। উদাহরণস্বরূপ, SessionController আপনাকে হোস্টের সাথে একটি সংযোগ অনুকরণ করতে দেয় এবং যাচাই করতে পারে যে সঠিক Screen এবং Template তৈরি করা হয়েছে এবং ফিরে এসেছে।
গাড়ি অ্যাপ লাইব্রেরি ইস্যুর জন্য একটি অ্যান্ড্রয়েডের প্রতিবেদন করুন
আপনি যদি লাইব্রেরির সাথে কোনও সমস্যা খুঁজে পান তবে গুগল ইস্যু ট্র্যাকার ব্যবহার করে এটি রিপোর্ট করুন। ইস্যু টেমপ্লেটে সমস্ত অনুরোধ করা তথ্য পূরণ করতে ভুলবেন না।
কোনও নতুন সমস্যা দায়ের করার আগে, দয়া করে এটি গ্রন্থাগারের প্রকাশের নোটগুলিতে তালিকাভুক্ত করা হয়েছে বা ইস্যু তালিকায় রিপোর্ট করা হয়েছে তা পরীক্ষা করুন। আপনি ট্র্যাকারের কোনও সমস্যার জন্য স্টারে ক্লিক করে সাবস্ক্রাইব করতে এবং ইস্যুগুলির পক্ষে ভোট দিতে পারেন। আরও তথ্যের জন্য, কোনও ইস্যুতে সাবস্ক্রাইব করা দেখুন।
এই গাইডটি লাইব্রেরির মূল বৈশিষ্ট্য এবং ধারণাগুলির একটি ওভারভিউ সরবরাহ করে এবং একটি বেসিক অ্যাপ্লিকেশন সেটআপ করার প্রক্রিয়াটির মাধ্যমে আপনাকে হাঁটতে পারে।
ব্যবহারকারী ইন্টারফেসটি মডেল অবজেক্টগুলির একটি গ্রাফ দ্বারা প্রতিনিধিত্ব করা হয় যা বিভিন্ন উপায়ে একত্রে সাজানো যেতে পারে, যেমনটি তাদের অন্তর্ভুক্ত টেমপ্লেট দ্বারা অনুমোদিত। টেমপ্লেটগুলি এমন মডেলগুলির একটি উপসেট যা সেই গ্রাফগুলিতে মূল হিসাবে কাজ করতে পারে। মডেলগুলি পাঠ্য এবং চিত্রগুলির আকারে ব্যবহারকারীর কাছে প্রদর্শিত তথ্যগুলির পাশাপাশি এই জাতীয় তথ্যের ভিজ্যুয়াল উপস্থিতির দিকগুলি কনফিগার করার বৈশিষ্ট্যগুলি অন্তর্ভুক্ত করে - উদাহরণস্বরূপ, পাঠ্য রঙ বা চিত্রের আকার। হোস্ট মডেলগুলিকে এমন ভিউগুলিতে রূপান্তর করে যা ড্রাইভার বিভ্রান্তির মানগুলি পূরণ করার জন্য ডিজাইন করা হয়েছে এবং বিভিন্ন ধরণের গাড়ির স্ক্রিন ফ্যাক্টর এবং ইনপুট পদ্ধতিগুলির মতো বিশদ যত্ন নেয়।
হোস্ট
হোস্টটি ব্যাকএন্ড উপাদান যা লাইব্রেরির এপিআই দ্বারা প্রদত্ত কার্যকারিতা প্রয়োগ করে যাতে আপনার অ্যাপ্লিকেশনটি গাড়ীতে চালাতে পারে। হোস্টের দায়িত্বগুলি আপনার অ্যাপ্লিকেশনটি আবিষ্কার করা এবং এর লাইফসাইকেল পরিচালনা করা থেকে শুরু করে আপনার মডেলগুলিকে ভিউগুলিতে রূপান্তর করতে এবং আপনার ব্যবহারকারীর মিথস্ক্রিয়াগুলির অ্যাপ্লিকেশনটিকে অবহিত করা থেকে শুরু করে। মোবাইল ডিভাইসে, এই হোস্টটি অ্যান্ড্রয়েড অটো দ্বারা প্রয়োগ করা হয়। অ্যান্ড্রয়েড অটোমোটিভ ওএসে, এই হোস্টটি সিস্টেম অ্যাপ্লিকেশন হিসাবে ইনস্টল করা আছে।
টেমপ্লেট সীমাবদ্ধতা
বিভিন্ন টেম্পলেট তাদের মডেলগুলির সামগ্রীতে বিধিনিষেধ প্রয়োগ করে। উদাহরণস্বরূপ, তালিকা টেমপ্লেটগুলির ব্যবহারকারীর কাছে উপস্থাপন করা যেতে পারে এমন আইটেমের সংখ্যার সীমাবদ্ধতা রয়েছে। টেমপ্লেটগুলির কোনও কাজের প্রবাহ গঠনের জন্য যেভাবে সংযুক্ত হতে পারে তাতেও বিধিনিষেধ রয়েছে। উদাহরণস্বরূপ, অ্যাপ্লিকেশনটি কেবল স্ক্রিন স্ট্যাকের পাঁচটি টেম্পলেটকে ধাক্কা দিতে পারে। আরও তথ্যের জন্য টেমপ্লেট বিধিনিষেধ দেখুন।
Screen
Screen লাইব্রেরি দ্বারা সরবরাহিত একটি শ্রেণি যা অ্যাপ্লিকেশনগুলি ব্যবহারকারীর কাছে উপস্থাপিত ব্যবহারকারী ইন্টারফেস পরিচালনা করতে প্রয়োগ করে। একটি Screen একটি জীবনচক্র রয়েছে এবং স্ক্রিনটি দৃশ্যমান হলে অ্যাপটি টেমপ্লেটটি প্রদর্শনের জন্য প্রেরণ করার জন্য প্রক্রিয়া সরবরাহ করে। Screen দৃষ্টান্তগুলিও ধাক্কা এবং একটি Screen স্ট্যাক থেকে এবং পপ করা যায়, যা তারা টেমপ্লেট প্রবাহের সীমাবদ্ধতা মেনে চলা নিশ্চিত করে।
CarAppService
CarAppService একটি বিমূর্ত Service শ্রেণি যা আপনার অ্যাপ্লিকেশনটি অবশ্যই হোস্ট দ্বারা আবিষ্কার এবং পরিচালনা করার জন্য প্রয়োগ এবং রফতানি করতে হবে। আপনার অ্যাপ্লিকেশনটির CarAppService বৈধ করার জন্য দায়বদ্ধ যে কোনও হোস্ট সংযোগটি createHostValidator ব্যবহার করে বিশ্বাস করা যায় এবং পরবর্তীকালে onCreateSession ব্যবহার করে প্রতিটি সংযোগের জন্য Session দৃষ্টান্ত সরবরাহ করে।
Session
Session একটি বিমূর্ত শ্রেণি যা আপনার অ্যাপ্লিকেশনটি অবশ্যই CarAppService.onCreateSession ব্যবহার করে প্রয়োগ করতে এবং ফিরে আসতে হবে। এটি গাড়ির স্ক্রিনে তথ্য প্রদর্শনের জন্য এন্ট্রি পয়েন্ট হিসাবে কাজ করে। এটিতে একটি জীবনচক্র রয়েছে যা আপনার অ্যাপ্লিকেশনটির বর্তমান অবস্থাকে গাড়ির স্ক্রিনে অবহিত করে, যেমন আপনার অ্যাপ্লিকেশনটি যখন দৃশ্যমান বা লুকানো থাকে।
যখন একটি Session শুরু হয়, যেমন অ্যাপ্লিকেশনটি প্রথম চালু করা হয়, হোস্ট প্রাথমিক Screen জন্য onCreateScreen পদ্ধতিটি ব্যবহার করে প্রদর্শন করার জন্য অনুরোধ করে।
গাড়ী অ্যাপ লাইব্রেরি ইনস্টল করুন
কীভাবে আপনার অ্যাপ্লিকেশনটিতে গ্রন্থাগারটি যুক্ত করবেন সে সম্পর্কে নির্দেশাবলীর জন্য জেটপ্যাক লাইব্রেরি রিলিজ পৃষ্ঠা দেখুন।
আপনি আপনার গাড়ী অ্যাপ্লিকেশন তৈরি করার আগে, নিম্নলিখিত হিসাবে আপনার অ্যাপ্লিকেশনটির ম্যানিফেস্ট ফাইলগুলি কনফিগার করুন।
আপনার কারাপস সার্ভিস ঘোষণা করুন
হোস্টটি আপনার CarAppService বাস্তবায়নের মাধ্যমে আপনার অ্যাপ্লিকেশনটিতে সংযুক্ত। হোস্টকে আপনার অ্যাপটিতে আবিষ্কার করতে এবং সংযোগ করতে আপনি এই পরিষেবাটি আপনার ম্যানিফেস্টে ঘোষণা করুন।
আপনার অ্যাপের ইন্টেন্ট ফিল্টারটির <category> উপাদানটিতে আপনার অ্যাপ্লিকেশনটির বিভাগটিও ঘোষণা করতে হবে। এই উপাদানটির জন্য অনুমোদিত মানগুলির জন্য সমর্থিত অ্যাপ্লিকেশন বিভাগগুলির তালিকা দেখুন।
নিম্নলিখিত কোড স্নিপেটটি দেখায় যে কীভাবে আপনার ম্যানিফেস্টে একটি পয়েন্ট অফ ইন্টারেস্ট অ্যাপের জন্য একটি গাড়ী অ্যাপ পরিষেবা ঘোষণা করবেন:
পূর্ববর্তী বিভাগে বর্ণিত হিসাবে আপনি যখন আপনার CarAppService ঘোষণা করেন তখন ইন্টেন্ট ফিল্টারটিতে নিম্নলিখিত বিভাগের মানগুলির এক বা একাধিক যুক্ত করে আপনার অ্যাপ্লিকেশনটির বিভাগটি ঘোষণা করুন:
androidx.car.app.category.POI : এমন একটি অ্যাপ্লিকেশন যা পার্কিং স্পট, চার্জিং স্টেশন এবং গ্যাস স্টেশনগুলির মতো আগ্রহের পয়েন্টগুলি সন্ধানের জন্য প্রাসঙ্গিক কার্যকারিতা সরবরাহ করে। গাড়ির জন্য বিল্ড পয়েন্ট অফ ইন্টারেস্ট অ্যাপ্লিকেশনগুলি দেখুন।
androidx.car.app.category.WEATHER : এমন একটি অ্যাপ্লিকেশন যা ব্যবহারকারীদের তাদের বর্তমান অবস্থানের সাথে বা তাদের রুটের সাথে সম্পর্কিত প্রাসঙ্গিক আবহাওয়ার তথ্য দেখতে দেয়। গাড়ির জন্য আবহাওয়ার অ্যাপ্লিকেশনগুলি বিল্ড দেখুন।
আপনাকে এমন একটি অ্যাপের নাম এবং আইকন নির্দিষ্ট করতে হবে যা হোস্টটি সিস্টেম ইউআইতে আপনার অ্যাপ্লিকেশনটি উপস্থাপন করতে ব্যবহার করতে পারে।
আপনি অ্যাপ্লিকেশনটির নাম এবং আইকনটি নির্দিষ্ট করতে পারেন যা আপনার CarAppServicelabel এবং icon বৈশিষ্ট্যগুলি ব্যবহার করে আপনার অ্যাপ্লিকেশনটিকে উপস্থাপন করতে ব্যবহৃত হয়:
গাড়ী অ্যাপ লাইব্রেরি তার নিজস্ব এপিআই স্তরগুলি সংজ্ঞায়িত করে যাতে আপনি জানতে পারেন যে কোন লাইব্রেরির বৈশিষ্ট্যগুলি কোনও গাড়ীতে টেমপ্লেট হোস্ট দ্বারা সমর্থিত। কোনও হোস্ট দ্বারা সমর্থিত সর্বোচ্চ গাড়ী অ্যাপ্লিকেশন এপিআই স্তরটি পুনরুদ্ধার করতে, getCarAppApiLevel() পদ্ধতিটি ব্যবহার করুন।
আপনার AndroidManifest.xml ফাইলে আপনার অ্যাপ্লিকেশন দ্বারা সমর্থিত সর্বনিম্ন গাড়ি অ্যাপ্লিকেশন এপিআই স্তরটি ঘোষণা করুন:
কীভাবে পশ্চাদপদ সামঞ্জস্যতা বজায় রাখতে হয় এবং কোনও বৈশিষ্ট্য ব্যবহারের জন্য প্রয়োজনীয় ন্যূনতম এপিআই স্তরটি ঘোষণা করা যায় সে সম্পর্কে বিশদগুলির জন্য RequiresCarApi টীকাগুলির জন্য ডকুমেন্টেশন দেখুন। কোন এপিআই স্তরটি গাড়ী অ্যাপ্লিকেশন লাইব্রেরির একটি নির্দিষ্ট বৈশিষ্ট্য ব্যবহার করতে হবে তার সংজ্ঞার জন্য, CarAppApiLevels জন্য রেফারেন্স ডকুমেন্টেশনটি পরীক্ষা করুন।
আপনার কারাপস সার্ভিস এবং সেশন তৈরি করুন
আপনার অ্যাপ্লিকেশনটির CarAppService ক্লাসটি প্রসারিত করা এবং এর onCreateSession পদ্ধতিটি প্রয়োগ করা দরকার, যা হোস্টের সাথে বর্তমান সংযোগের সাথে সম্পর্কিত একটি Session উদাহরণ প্রদান করে:
আপনার গাড়ী অ্যাপ্লিকেশনটি এমন কোনও স্ক্রিন থেকে শুরু করা দরকার যেখানে আপনার অ্যাপ্লিকেশনটির হোম বা ল্যান্ডিং স্ক্রিন নয়, যেমন গভীর লিঙ্কগুলি পরিচালনা করার মতো পরিস্থিতিগুলি পরিচালনা করতে আপনি onCreateScreen থেকে ফিরে আসার আগে ScreenManager.push ব্যবহার করে স্ক্রিন ম্যানেজার ব্যবহার করে একটি পিছনের স্ট্যাকের প্রাক-তৈরি করতে পারেন। প্রাক-বীজ ব্যবহারকারীরা আপনার অ্যাপ্লিকেশনটি প্রদর্শিত হচ্ছে এমন প্রথম স্ক্রিন থেকে পূর্ববর্তী স্ক্রিনগুলিতে ফিরে নেভিগেট করতে দেয়।
আপনার স্টার্ট স্ক্রিন তৈরি করুন
আপনি Screen শ্রেণি প্রসারিত করে এমন ক্লাসগুলি সংজ্ঞায়িত করে এবং এর onGetTemplate পদ্ধতিটি প্রয়োগ করে আপনার অ্যাপ্লিকেশন দ্বারা প্রদর্শিত স্ক্রিনগুলি তৈরি করেন, যা গাড়ির স্ক্রিনে প্রদর্শনের জন্য ইউআইয়ের অবস্থার প্রতিনিধিত্বকারী Template উদাহরণটি প্রদান করে।
নিম্নলিখিত স্নিপেটটি দেখায় যে কীভাবে এমন একটি Screen ঘোষণা করা যায় যা একটি সাধারণ "হ্যালো ওয়ার্ল্ড!" প্রদর্শন করতে PaneTemplate টেম্পলেট ব্যবহার করে! " স্ট্রিং:
CarContext অন্যান্য কার্যকারিতাও সরবরাহ করে, যেমন আপনাকে গাড়ির স্ক্রিন থেকে কনফিগারেশন ব্যবহার করে অঙ্কনযোগ্য সংস্থানগুলি লোড করা, উদ্দেশ্যগুলি ব্যবহার করে গাড়ীতে একটি অ্যাপ্লিকেশন শুরু করা এবং আপনার অ্যাপ্লিকেশনটিকে অন্ধকার থিমে তার মানচিত্রটি প্রদর্শন করা উচিত কিনা তা সংকেত দেওয়া।
স্ক্রিন নেভিগেশন বাস্তবায়ন করুন
অ্যাপ্লিকেশনগুলি প্রায়শই বিভিন্ন স্ক্রিন উপস্থাপন করে, প্রতিটি সম্ভবত স্ক্রিনে প্রদর্শিত ইন্টারফেসের সাথে ইন্টারঅ্যাক্ট করার সাথে সাথে ব্যবহারকারীরা বিভিন্ন টেম্পলেট ব্যবহার করে নেভিগেট করতে পারে।
ScreenManager ক্লাসটি এমন একটি স্ক্রিন স্ট্যাক সরবরাহ করে যা আপনি স্ক্রিনগুলি ধাক্কা দিতে ব্যবহার করতে পারেন যা স্বয়ংক্রিয়ভাবে পপ করা যায় যখন ব্যবহারকারী গাড়ির স্ক্রিনে একটি ব্যাক বোতাম নির্বাচন করে বা কিছু গাড়িতে উপলব্ধ হার্ডওয়্যার ব্যাক বোতামটি ব্যবহার করে।
নিম্নলিখিত স্নিপেটটি দেখায় যে কীভাবে কোনও বার্তা টেম্পলেটটিতে ব্যাক অ্যাকশন যুক্ত করা যায় এবং সেইসাথে এমন একটি ক্রিয়া যা ব্যবহারকারী দ্বারা নির্বাচিত হওয়ার সময় একটি নতুন স্ক্রিনকে ধাক্কা দেয়:
ড্রাইভিং করার সময় অ্যাপটি ব্যবহার করা নিরাপদ তা নিশ্চিত করতে সহায়তা করতে, স্ক্রিন স্ট্যাকটিতে পাঁচটি স্ক্রিনের সর্বাধিক গভীরতা থাকতে পারে। আরও তথ্যের জন্য টেমপ্লেট বিধিনিষেধ বিভাগটি দেখুন।
একটি টেমপ্লেটের বিষয়বস্তু রিফ্রেশ করুন
আপনার অ্যাপ্লিকেশনটি Screen সামগ্রীটিকে Screen.invalidate পদ্ধতিটি কল করে অবৈধ করার জন্য অনুরোধ করতে পারে। হোস্ট পরবর্তীকালে আপনার অ্যাপের Screen.onGetTemplate ফিরে কল করে new
কোনও Screen সতেজ করার সময়, টেমপ্লেটের নির্দিষ্ট সামগ্রীটি আপডেট করা যেতে পারে তা বোঝা গুরুত্বপূর্ণ যাতে হোস্ট টেমপ্লেট কোটার বিপরীতে নতুন টেম্পলেট গণনা না করে। আরও তথ্যের জন্য টেমপ্লেট বিধিনিষেধ বিভাগটি দেখুন।
আমরা আপনাকে সুপারিশ করেছি যে আপনি আপনার স্ক্রিনগুলি কাঠামো তৈরি করুন যাতে একটি Screen এবং এটি তার onGetTemplate বাস্তবায়নের মাধ্যমে যে ধরণের টেম্পলেটটি ফিরে আসে তার মধ্যে এক থেকে এক ম্যাপিং থাকে।
মানচিত্র আঁকুন
নেভিগেশন, পয়েন্ট অফ আগ্রহ (পিওআই) এবং নিম্নলিখিত টেম্পলেটগুলি ব্যবহার করে আবহাওয়া অ্যাপ্লিকেশনগুলি কোনও Surface অ্যাক্সেস করে মানচিত্র আঁকতে পারে।
নিম্নলিখিত টেম্পলেটগুলি ব্যবহার করতে, আপনার অ্যাপ্লিকেশনটির অবশ্যই এর AndroidManifest.xml ফাইলে একটি <uses-permission> উপাদানটিতে ঘোষিত অনুমতিগুলির মধ্যে একটি থাকতে হবে।
আপনি অ্যাপ্লিকেশনটি যে টেমপ্লেটটি ব্যবহার করছেন তার জন্য প্রয়োজনীয় অনুমতি ছাড়াও, আপনার অ্যাপ্লিকেশনটি অবশ্যই পৃষ্ঠের অ্যাক্সেস পেতে androidx.car.app.ACCESS_SURFACE অনুমতিটি তার AndroidManifest.xml ফাইলটিতে অবশ্যই ঘোষণা করতে হবে:
হোস্ট যে Surface সরবরাহ করে তা অ্যাক্সেস করতে আপনাকে অবশ্যই একটি SurfaceCallback প্রয়োগ করতে হবে এবং AppManager গাড়ি পরিষেবাটিতে সেই বাস্তবায়ন সরবরাহ করতে হবে। বর্তমান SurfaceonSurfaceAvailable() এবং onSurfaceDestroyed() কলব্যাকগুলির SurfaceContainer প্যারামিটারে আপনার SurfaceCallback প্রেরণ করা হয়েছে।
হোস্ট মানচিত্রের শীর্ষে টেমপ্লেটগুলির জন্য ইউজার ইন্টারফেস উপাদানগুলি আঁকতে পারে। হোস্ট পৃষ্ঠের ক্ষেত্রটিকে যোগাযোগ করে যা SurfaceCallback.onVisibleAreaChanged পদ্ধতিটি কল করে ব্যবহারকারীর কাছে নিরবচ্ছিন্ন এবং সম্পূর্ণরূপে দৃশ্যমান হওয়ার গ্যারান্টিযুক্ত। এছাড়াও, পরিবর্তনের সংখ্যা হ্রাস করার জন্য, হোস্টটি SurfaceCallback.onStableAreaChanged কল করে on
উদাহরণস্বরূপ, যখন কোনও নেভিগেশন অ্যাপ্লিকেশন শীর্ষে অ্যাকশন স্ট্রিপ সহ NavigationTemplate ব্যবহার করে, তখন অ্যাকশন স্ট্রিপটি নিজেকে আড়াল করতে পারে যখন ব্যবহারকারী মানচিত্রের জন্য আরও স্থান তৈরি করতে কিছুক্ষণের জন্য স্ক্রিনের সাথে ইন্টারঅ্যাক্ট না করে। এই ক্ষেত্রে, একই আয়তক্ষেত্রের সাথে onStableAreaChanged এবং onVisibleAreaChanged একটি কলব্যাক রয়েছে। যখন অ্যাকশন স্ট্রিপটি লুকানো থাকে, কেবলমাত্র onVisibleAreaChanged বৃহত্তর অঞ্চল দিয়ে বলা হয়। যদি ব্যবহারকারী স্ক্রিনের সাথে ইন্টারঅ্যাক্ট করে, তবে আবার কেবল onVisibleAreaChanged প্রথম আয়তক্ষেত্রের সাথে ডাকা হয়।
অন্ধকার থিম সমর্থন
গাড়িগুলির জন্য অ্যান্ড্রয়েড অ্যাপের গুণমানের বর্ণিত হিসাবে হোস্ট শর্তগুলি এটি নির্ধারণ করার সময় অ্যাপ্লিকেশনগুলিকে অবশ্যই তাদের Surface যথাযথ গা dark ় রঙগুলির সাথে পুনর্নির্মাণ করতে হবে।
ব্যবহারকারীদের আপনার মানচিত্রের সাথে ইন্টারঅ্যাক্ট করতে দিন
নিম্নলিখিত টেম্পলেটগুলি ব্যবহার করার সময়, আপনি ব্যবহারকারীদের আপনার আঁকা মানচিত্রগুলির সাথে ইন্টারঅ্যাক্ট করার জন্য সমর্থন যুক্ত করতে পারেন, যেমন জুমিং এবং প্যানিং দ্বারা তাদের মানচিত্রের বিভিন্ন অংশ দেখতে দেওয়া।
টেমপ্লেট
ইন্টারেক্টিভিটি গাড়ি অ্যাপ্লিকেশন এপিআই স্তর থেকে সমর্থিত
NavigationTemplate
2
PlaceListNavigationTemplate ( অবমূল্যায়িত )
4
RoutePreviewNavigationTemplate ( অবমূল্যায়িত )
4
MapTemplate ( অবমূল্যায়িত )
5 (টেমপ্লেটের পরিচিতি)
MapWithContentTemplate
7 (টেমপ্লেটের পরিচিতি)
ইন্টারেক্টিভিটি কলব্যাকগুলি প্রয়োগ করুন
পূর্ববর্তী বিভাগে টেমপ্লেটগুলির সাথে নির্মিত মানচিত্রগুলিতে ইন্টারঅ্যাক্টিভিটি যুক্ত করতে আপনি প্রয়োগ করতে পারেন এমন বেশ কয়েকটি SurfaceCallback পদ্ধতি রয়েছে:
onScale (টেমপ্লেট হোস্ট দ্বারা নির্ধারিত স্কেল ফ্যাক্টর সহ)
2
প্যান মোডে রোটারি নুড
onScroll (টেমপ্লেট হোস্ট দ্বারা নির্ধারিত দূরত্ব ফ্যাক্টর সহ)
2
একটি মানচিত্র অ্যাকশন স্ট্রিপ যুক্ত করুন
এই টেমপ্লেটগুলিতে মানচিত্র সম্পর্কিত ক্রিয়াগুলির জন্য মানচিত্র অ্যাকশন স্ট্রিপ থাকতে পারে যেমন জুম ইন এবং আউট, সাম্প্রতিক সময়ে, একটি কম্পাস প্রদর্শন করা এবং আপনি যে প্রদর্শন করতে পছন্দ করেন তা অন্যান্য ক্রিয়াকলাপ। মানচিত্রের অ্যাকশন স্ট্রিপটিতে চারটি আইকন-কেবল বোতাম থাকতে পারে যা টাস্ক গভীরতা প্রভাবিত না করে রিফ্রেশ করা যায়। এটি নিষ্ক্রিয় অবস্থায় লুকিয়ে থাকে এবং সক্রিয় অবস্থায় আবার উপস্থিত হয়।
মানচিত্রের ইন্টারেক্টিভিটি কলব্যাকগুলি পেতে, আপনাকে অবশ্যই মানচিত্রের অ্যাকশন স্ট্রিপে একটি Action.PAN বোতাম যুক্ত করতে হবে। ব্যবহারকারী যখন প্যান বোতামটি টিপেন, হোস্টটি প্যান মোডে প্রবেশ করে, নিম্নলিখিত বিভাগে বর্ণিত হিসাবে।
যদি আপনার অ্যাপ্লিকেশনটি মানচিত্রের অ্যাকশন স্ট্রিপটিতে Action.PAN বোতামটি বাদ দেয় তবে এটি SurfaceCallback পদ্ধতিগুলি থেকে ব্যবহারকারী ইনপুট গ্রহণ করে না এবং হোস্ট কোনও পূর্বে সক্রিয় প্যান মোড থেকে বেরিয়ে আসে।
একটি টাচস্ক্রিনে, প্যান বোতামটি প্রদর্শিত হয় না।
প্যান মোড বুঝতে
প্যান মোডে, টেমপ্লেট হোস্ট নন-টাচ ইনপুট ডিভাইসগুলি যেমন রোটারি কন্ট্রোলার এবং টাচপ্যাডগুলি থেকে উপযুক্ত SurfaceCallback পদ্ধতিতে ব্যবহারকারী ইনপুট অনুবাদ করে। NavigationTemplate.BuildersetPanModeListener পদ্ধতির সাথে প্যান মোডে প্রবেশ বা প্রস্থান করতে ব্যবহারকারীর ক্রিয়াটির প্রতিক্রিয়া জানান। হোস্টটি টেমপ্লেটে অন্যান্য ইউআই উপাদানগুলি লুকিয়ে রাখতে পারে যখন ব্যবহারকারী প্যান মোডে থাকে।
ব্যবহারকারীর সাথে যোগাযোগ করুন
আপনার অ্যাপ্লিকেশনটি কোনও মোবাইল অ্যাপের অনুরূপ নিদর্শন ব্যবহার করে ব্যবহারকারীর সাথে যোগাযোগ করতে পারে।
ব্যবহারকারীর ইনপুট পরিচালনা করুন
আপনার অ্যাপ্লিকেশনটি তাদের সমর্থনকারী মডেলগুলিতে উপযুক্ত শ্রোতাদের পাস করে ব্যবহারকারী ইনপুটটিতে প্রতিক্রিয়া জানাতে পারে। নিম্নলিখিত স্নিপেটটি দেখায় যে কীভাবে এমন একটি Action মডেল তৈরি করা যায় যা একটি OnClickListener সেট করে যা আপনার অ্যাপের কোড দ্বারা সংজ্ঞায়িত একটি পদ্ধতিতে কল করে:
কিছু ক্রিয়া, যেমন তাদের মোবাইল ডিভাইসে ইন্টারঅ্যাকশন চালিয়ে যাওয়ার জন্য ব্যবহারকারীকে নির্দেশ দেওয়ার প্রয়োজন হয়, কেবল গাড়িটি পার্ক করার সময় অনুমোদিত হয়। এই ক্রিয়াগুলি বাস্তবায়নের জন্য আপনি ParkedOnlyOnClickListener ব্যবহার করতে পারেন। যদি গাড়িটি পার্ক না করা হয় তবে হোস্ট ব্যবহারকারীর কাছে একটি ইঙ্গিত প্রদর্শন করে যে এই ক্ষেত্রে ক্রিয়াটি অনুমোদিত নয়। যদি গাড়িটি পার্ক করা হয় তবে কোডটি সাধারণত কার্যকর হয়। নিম্নলিখিত স্নিপেটটি দেখায় যে কীভাবে মোবাইল ডিভাইসে সেটিংস স্ক্রিনটি খোলার জন্য ParkedOnlyOnClickListener ব্যবহার করবেন:
মোবাইল ডিভাইসে প্রেরিত বিজ্ঞপ্তিগুলি কেবলমাত্র CarAppExtender দিয়ে প্রসারিত হলে গাড়ির স্ক্রিনে প্রদর্শিত হয়। কিছু বিজ্ঞপ্তি বৈশিষ্ট্য, যেমন সামগ্রীর শিরোনাম, পাঠ্য, আইকন এবং ক্রিয়াগুলি, CarAppExtender সেট করা যেতে পারে, যখন তারা গাড়ির স্ক্রিনে উপস্থিত হয় তখন বিজ্ঞপ্তির বৈশিষ্ট্যগুলিকে ওভাররাইড করে।
নিম্নলিখিত স্নিপেটটি দেখায় যে কীভাবে গাড়ির স্ক্রিনে একটি বিজ্ঞপ্তি প্রেরণ করবেন যা মোবাইল ডিভাইসে প্রদর্শিত একটির চেয়ে আলাদা শিরোনাম প্রদর্শন করে:
বিজ্ঞপ্তিগুলি ব্যবহারকারী ইন্টারফেসের নিম্নলিখিত অংশগুলিকে প্রভাবিত করতে পারে:
একটি হেড-আপ বিজ্ঞপ্তি (HUN) ব্যবহারকারীর কাছে প্রদর্শিত হতে পারে।
বিজ্ঞপ্তি কেন্দ্রে একটি এন্ট্রি যুক্ত করা যেতে পারে, ally চ্ছিকভাবে রেলের মধ্যে দৃশ্যমান ব্যাজ সহ।
নেভিগেশন অ্যাপ্লিকেশনগুলির জন্য, টার্ন-টার্ন বিজ্ঞপ্তিগুলিতে বর্ণিত হিসাবে রেল উইজেটে বিজ্ঞপ্তিটি প্রদর্শিত হতে পারে।
CarAppExtender ডকুমেন্টেশনে বর্ণিত হিসাবে বিজ্ঞপ্তিটির অগ্রাধিকারটি ব্যবহার করে সেই ব্যবহারকারী ইন্টারফেস উপাদানগুলির প্রতিটিকে প্রভাবিত করতে কীভাবে আপনার অ্যাপ্লিকেশনটির বিজ্ঞপ্তিগুলি কনফিগার করবেন তা আপনি চয়ন করতে পারেন।
স্ট্যান্ডার্ড অ্যান্ড্রয়েড এপিআই ব্যবহারের বিপরীতে CarContext.requestPermissions() ব্যবহারের সুবিধাটি হ'ল অনুমতি ডায়ালগ তৈরি করতে আপনার নিজের Activity চালু করার দরকার নেই। তদুপরি, আপনি প্ল্যাটফর্ম-নির্ভর প্রবাহ তৈরি করার পরিবর্তে অ্যান্ড্রয়েড অটো এবং অ্যান্ড্রয়েড অটোমোটিভ ওএস উভয় ক্ষেত্রেই একই কোডটি ব্যবহার করতে পারেন।
অ্যান্ড্রয়েড অটোতে অনুমতি সংলাপটি স্টাইল করুন
অ্যান্ড্রয়েড অটোতে, ব্যবহারকারীর জন্য অনুমতি সংলাপ ফোনে উপস্থিত হবে। ডিফল্টরূপে, ডায়ালগের পিছনে কোনও পটভূমি থাকবে না। একটি কাস্টম ব্যাকগ্রাউন্ড সেট করতে, আপনার AndroidManifest.xml ফাইলে একটি গাড়ী অ্যাপ্লিকেশন থিম ঘোষণা করুন এবং আপনার গাড়ী অ্যাপ্লিকেশন থিমের জন্য carPermissionActivityLayout লায়আউট বৈশিষ্ট্যটি সেট করুন।
একটি অভিপ্রায় দিয়ে আপনার নিজের অ্যাপ্লিকেশন শুরু করুন।
নিম্নলিখিত উদাহরণটি দেখায় যে কীভাবে এমন কোনও ক্রিয়া সহ একটি বিজ্ঞপ্তি তৈরি করা যায় যা আপনার অ্যাপ্লিকেশনটিকে একটি স্ক্রিন দিয়ে খোলে যা পার্কিং সংরক্ষণের বিশদ দেখায়। আপনি একটি সামগ্রীর অভিপ্রায় সহ বিজ্ঞপ্তি উদাহরণটি প্রসারিত করুন যাতে আপনার অ্যাপের ক্রিয়াকলাপের জন্য একটি সুস্পষ্ট অভিপ্রায় মোড়ানো একটি PendingIntent রয়েছে:
আপনার অ্যাপ্লিকেশনটিকে অবশ্যই একটি BroadcastReceiver ঘোষণা করতে হবে যা ব্যবহারকারী যখন বিজ্ঞপ্তি ইন্টারফেসে ক্রিয়াটি নির্বাচন করে এবং CarContext.startCarApp ডেটা ইউআরআই সহ একটি অভিপ্রায় সহকারে অনুরোধ করে তখন অভিপ্রায়টি প্রক্রিয়া করার জন্য অনুরোধ করা হয়:
শেষ অবধি, আপনার অ্যাপ্লিকেশনটিতে Session.onNewIntent পদ্ধতিটি স্ট্যাকের উপর পার্কিং রিজার্ভেশন স্ক্রিনটি চাপিয়ে এই অভিপ্রায়টি পরিচালনা করে, যদি এটি ইতিমধ্যে শীর্ষে না থাকে:
কীভাবে গাড়ী অ্যাপের জন্য বিজ্ঞপ্তিগুলি পরিচালনা করবেন সে সম্পর্কে আরও তথ্যের জন্য প্রদর্শন বিজ্ঞপ্তি বিভাগটি দেখুন।
টেমপ্লেট সীমাবদ্ধতা
হোস্ট একটি প্রদত্ত টাস্কের জন্য সর্বাধিক পাঁচটিতে প্রদর্শনের জন্য টেম্পলেটগুলির সংখ্যা সীমাবদ্ধ করে, যার মধ্যে শেষ টেম্পলেটটি নিম্নলিখিত ধরণের একটি হতে হবে:
নোট করুন যে এই সীমাটি স্ট্যাকের Screen দৃষ্টান্তের সংখ্যার নয় এবং টেমপ্লেটের সংখ্যার ক্ষেত্রে প্রযোজ্য। উদাহরণস্বরূপ, যদি কোনও অ্যাপ্লিকেশন স্ক্রিন এ -তে থাকাকালীন দুটি টেম্পলেট প্রেরণ করে এবং তারপরে স্ক্রিন বি ধাক্কা দেয় তবে এটি এখন আরও তিনটি টেম্পলেট প্রেরণ করতে পারে। বিকল্পভাবে, যদি প্রতিটি স্ক্রিন একটি একক টেম্পলেট প্রেরণের জন্য কাঠামোগত করা হয়, তবে অ্যাপ্লিকেশনটি পাঁচটি স্ক্রিন দৃষ্টান্তকে ScreenManager স্ট্যাকের উপরে ঠেলে দিতে পারে।
এই বিধিনিষেধগুলির বিশেষ কেস রয়েছে: টেমপ্লেট রিফ্রেশ এবং পিছনে এবং পুনরায় সেট অপারেশন।
টেমপ্লেট রিফ্রেশ
নির্দিষ্ট সামগ্রী আপডেটগুলি টেম্পলেট সীমাতে গণনা করা হয় না। সাধারণভাবে, যদি কোনও অ্যাপ্লিকেশন একই ধরণের একটি নতুন টেম্পলেটকে ধাক্কা দেয় এবং পূর্ববর্তী টেম্পলেটটির মতো একই প্রধান সামগ্রী থাকে তবে নতুন টেমপ্লেটটি কোটা বিপরীতে গণনা করা হয় না। উদাহরণস্বরূপ, একটি ListTemplate একটি সারির টগল অবস্থা আপডেট করা কোটা বিপরীতে গণনা করে না। কী ধরণের সামগ্রী আপডেটগুলি রিফ্রেশ হিসাবে বিবেচনা করা যেতে পারে সে সম্পর্কে আরও জানতে পৃথক টেম্পলেটগুলির ডকুমেন্টেশন দেখুন।
ব্যাক অপারেশন
কোনও টাস্কের মধ্যে সাব-প্রবাহ সক্ষম করতে, হোস্টটি সনাক্ত করে যখন কোনও অ্যাপ্লিকেশন স্ক্রিন ScreenManager স্ট্যাক থেকে একটি Screen পপ করছে এবং অ্যাপটি পিছনে যাচ্ছে এমন টেমপ্লেটগুলির সংখ্যার ভিত্তিতে অবশিষ্ট কোটা আপডেট করে।
উদাহরণস্বরূপ, যদি অ্যাপ্লিকেশনটি স্ক্রিন এ -তে থাকাকালীন দুটি টেম্পলেট প্রেরণ করে, তবে স্ক্রিন বি ধাক্কা দেয় এবং আরও দুটি টেম্পলেট প্রেরণ করে, অ্যাপ্লিকেশনটির একটি কোটা বাকি রয়েছে। যদি অ্যাপটি স্ক্রিন এ -তে ফিরে আসে তবে হোস্টটি কোটাটি তিনটি করে পুনরায় সেট করে, কারণ অ্যাপ্লিকেশনটি দুটি টেমপ্লেট দ্বারা পিছনে চলে গেছে।
মনে রাখবেন যে, যখন কোনও স্ক্রিনে ফিরে পপিং করা, একটি অ্যাপ্লিকেশন অবশ্যই একটি টেম্পলেট প্রেরণ করতে হবে যা সেই স্ক্রিনে প্রেরিত শেষের মতো একই ধরণের। অন্য যে কোনও টেম্পলেট প্রকার প্রেরণের ফলে একটি ত্রুটির কারণ হয়। যাইহোক, যতক্ষণ না ব্যাক অপারেশনের সময় ধরণটি একই থাকে, একটি অ্যাপ্লিকেশন কোটা প্রভাবিত না করে টেমপ্লেটের বিষয়বস্তু অবাধে সংশোধন করতে পারে।
অপারেশনগুলি পুনরায় সেট করুন
কিছু নির্দিষ্ট টেম্পলেটগুলিতে বিশেষ শব্দার্থবিজ্ঞান রয়েছে যা কোনও কাজের সমাপ্তি বোঝায়। উদাহরণস্বরূপ, NavigationTemplate এমন একটি দৃশ্য যা স্ক্রিনে থাকবে এবং ব্যবহারকারীর ব্যবহারের জন্য নতুন টার্ন-বাই-টার্ন নির্দেশাবলীর সাথে সতেজ হবে বলে আশা করা হচ্ছে। যখন এটি এই টেমপ্লেটগুলির মধ্যে একটিতে পৌঁছায়, হোস্টটি টেমপ্লেট কোটা পুনরায় সেট করে, সেই টেমপ্লেটটিকে এমনভাবে চিকিত্সা করে যেন এটি কোনও নতুন কাজের প্রথম পদক্ষেপ। এটি অ্যাপটিকে একটি নতুন কাজ শুরু করতে দেয়। কোনটি হোস্টে কোনও রিসেট ট্রিগার করে তা দেখতে পৃথক টেম্পলেটগুলির ডকুমেন্টেশন দেখুন।
যদি হোস্ট কোনও বিজ্ঞপ্তি ক্রিয়া থেকে বা লঞ্চার থেকে অ্যাপ্লিকেশনটি শুরু করার অভিপ্রায় গ্রহণ করে তবে কোটাটিও পুনরায় সেট করা হয়। এই প্রক্রিয়াটি কোনও অ্যাপ্লিকেশনকে বিজ্ঞপ্তিগুলি থেকে একটি নতুন টাস্ক প্রবাহ শুরু করতে দেয় এবং এটি ইতিমধ্যে আবদ্ধ এবং অগ্রভাগে থাকলেও এটি সত্য ধারণ করে।
রানটাইমে সংযোগের তথ্য পুনরুদ্ধার করতে আপনার অ্যাপ্লিকেশনটি CarConnection এপিআই ব্যবহার করে অ্যান্ড্রয়েড অটো বা অ্যান্ড্রয়েড অটোমোটিভ ওএসে চলছে কিনা তা আপনি নির্ধারণ করতে পারেন।
উদাহরণস্বরূপ, আপনার গাড়ী অ্যাপের Session , একটি CarConnection শুরু করুন এবং LiveData আপডেটগুলিতে সাবস্ক্রাইব করুন:
funonConnectionStateUpdated(connectionState:Int){valmessage=when(connectionState){CarConnection.CONNECTION_TYPE_NOT_CONNECTED->"Not connected to a head unit"CarConnection.CONNECTION_TYPE_NATIVE->"Connected to Android Automotive OS"CarConnection.CONNECTION_TYPE_PROJECTION->"Connected to Android Auto"else->"Unknown car connection type"}CarToast.makeText(carContext,message,CarToast.LENGTH_SHORT).show()}
জাভা
privatevoidonConnectionStateUpdated(intconnectionState){Stringmessage;switch(connectionState){caseCarConnection.CONNECTION_TYPE_NOT_CONNECTED:message="Not connected to a head unit";break;caseCarConnection.CONNECTION_TYPE_NATIVE:message="Connected to Android Automotive OS";break;caseCarConnection.CONNECTION_TYPE_PROJECTION:message="Connected to Android Auto";break;default:message="Unknown car connection type";break;}CarToast.makeText(getCarContext(),message,CarToast.LENGTH_SHORT).show();}
সীমাবদ্ধতা এপিআই
বিভিন্ন গাড়ি একসাথে ব্যবহারকারীর কাছে বিভিন্ন সংখ্যক Item উদাহরণ প্রদর্শিত হতে পারে। রানটাইমে সামগ্রীর সীমাটি পরীক্ষা করতে এবং আপনার টেমপ্লেটগুলিতে উপযুক্ত সংখ্যক আইটেম সেট করতে ConstraintManager ব্যবহার করুন।
CarContext থেকে কোনও ConstraintManager পেয়ে শুরু করুন:
তারপরে আপনি প্রাসঙ্গিক সামগ্রীর সীমাটির জন্য পুনরুদ্ধার করা ConstraintManager অবজেক্টটি জিজ্ঞাসা করতে পারেন। উদাহরণস্বরূপ, গ্রিডে প্রদর্শিত আইটেমগুলির সংখ্যা পেতে, CONTENT_LIMIT_TYPE_GRID সহ getContentLimit কল করুন:
যদি আপনার অ্যাপ্লিকেশনটি ব্যবহারকারীদের জন্য একটি স্বাক্ষরিত অভিজ্ঞতা সরবরাহ করে তবে আপনি গাড়ির হেড ইউনিটে আপনার অ্যাপ্লিকেশনটিতে সাইন ইন করতে পরিচালনা করতে SignInTemplate এবং LongMessageTemplate মতো টেমপ্লেটগুলি ব্যবহার করতে পারেন।
একটি SignInTemplate তৈরি করতে, একটি SignInMethod সংজ্ঞায়িত করুন। গাড়ি অ্যাপ লাইব্রেরি বর্তমানে নিম্নলিখিত সাইন-ইন পদ্ধতিগুলি সমর্থন করে:
কিউআর কোড সাইন ইন এর জন্য QRCodeSignInMethod , যেখানে ব্যবহারকারী তাদের ফোনে সাইন-ইন সম্পূর্ণ করতে একটি কিউআর কোড স্ক্যান করে। এটি গাড়ী এপিআই স্তর 4 এবং তারও বেশি সহ উপলব্ধ।
উদাহরণস্বরূপ, ব্যবহারকারীর পাসওয়ার্ড সংগ্রহ করে এমন একটি টেম্পলেট প্রয়োগ করতে, ব্যবহারকারীর ইনপুটটি প্রক্রিয়া এবং বৈধকরণের জন্য একটি InputCallback তৈরি করে শুরু করুন:
কোটলিন
valcallback=object:InputCallback{overridefunonInputSubmitted(text:String){// You will receive this callback when the user presses Enter on the keyboard.}overridefunonInputTextChanged(text:String){// You will receive this callback as the user is typing. The update// frequency is determined by the host.}}
জাভা
InputCallbackcallback=newInputCallback(){@OverridepublicvoidonInputSubmitted(@NonNullStringtext){// You will receive this callback when the user presses Enter on the keyboard.}@OverridepublicvoidonInputTextChanged(@NonNullStringtext){// You will receive this callback as the user is typing. The update// frequency is determined by the host.}};
InputSignInMethodBuilder এর জন্য একটি InputCallback প্রয়োজন।
অবশেষে, একটি SignInTemplate তৈরি করতে আপনার নতুন InputSignInMethod ব্যবহার করুন।
কোটলিন
SignInTemplate.Builder(passwordInput).setTitle("Sign in with username and password").setInstructions("Enter your password").setHeaderAction(Action.BACK)....build()
জাভা
newSignInTemplate.Builder(passwordInput).setTitle("Sign in with username and password").setInstructions("Enter your password").setHeaderAction(Action.BACK)....build();
অ্যাকাউন্ট ম্যানেজার ব্যবহার করুন
অ্যান্ড্রয়েড অটোমোটিভ ওএস অ্যাপ্লিকেশনগুলি যা প্রমাণীকরণ রয়েছে সেগুলি অবশ্যই নিম্নলিখিত কারণে অ্যাকাউন্ট ম্যানেজার ব্যবহার করতে হবে:
আরও ভাল ইউএক্স এবং অ্যাকাউন্ট পরিচালনার স্বাচ্ছন্দ্য : ব্যবহারকারীরা সাইন-ইন এবং সাইন-আউট সহ সিস্টেম সেটিংসে অ্যাকাউন্ট মেনু থেকে সহজেই তাদের সমস্ত অ্যাকাউন্ট পরিচালনা করতে পারেন।
"অতিথি" অভিজ্ঞতা : গাড়িগুলি ভাগ করা ডিভাইস, তাই ওএমগুলি গাড়ীতে অতিথির অভিজ্ঞতা সক্ষম করতে পারে, যেখানে অ্যাকাউন্টগুলি যুক্ত করা যায় না।
পাঠ্য স্ট্রিং ভেরিয়েন্ট যুক্ত করুন
বিভিন্ন গাড়ির স্ক্রিন আকার বিভিন্ন পরিমাণে পাঠ্য প্রদর্শন করতে পারে। গাড়ী অ্যাপ্লিকেশন এপিআই স্তর 2 এবং তারও বেশি সহ, আপনি স্ক্রিনটি সেরা ফিট করতে একটি পাঠ্য স্ট্রিংয়ের একাধিক রূপগুলি নির্দিষ্ট করতে পারেন। পাঠ্যের রূপগুলি কোথায় গৃহীত হয়েছে তা দেখতে, টেমপ্লেট এবং উপাদানগুলি যা একটি CarText নেয় তা সন্ধান করুন।
Add strings in order from most to least preferred—for example, from longest to shortest. The host picks the appropriate-length string depending on the amount of space available on the car screen.
Add inline CarIcons for rows
You can add icons inline with text to enrich your app's visual appeal using CarIconSpan . See the documentation for CarIconSpan.create for more information on creating these spans. See Spantastic text styling with Spans for an overview of how text styling with spans work.
কোটলিন
valrating=SpannableString("Rating: 4.5 stars")rating.setSpan(CarIconSpan.create(// Create a CarIcon with an image of four and a half starsCarIcon.Builder(...).build(),// Align the CarIcon to the baseline of the textCarIconSpan.ALIGN_BASELINE),// The start index of the span (index of the character '4')8,// The end index of the span (index of the last 's' in "stars")16,Spanned.SPAN_INCLUSIVE_INCLUSIVE)valrow=Row.Builder()....addText(rating).build()
জাভা
SpannableStringrating=newSpannableString("Rating: 4.5 stars");rating.setSpan(CarIconSpan.create(// Create a CarIcon with an image of four and a half starsnewCarIcon.Builder(...).build(),// Align the CarIcon to the baseline of the textCarIconSpan.ALIGN_BASELINE),// The start index of the span (index of the character '4')8,// The end index of the span (index of the last 's' in "stars")16,Spanned.SPAN_INCLUSIVE_INCLUSIVE);Rowrow=newRow.Builder()....addText(rating).build();
Car Hardware APIs
Starting with Car App API level 3, the Car App Library has APIs that you can use to access vehicle properties and sensors.
প্রয়োজনীয়তা
To use the APIs with Android Auto, start by adding a dependency on androidx.car.app:app-projected to the build.gradle file for your Android Auto module. For Android Automotive OS, add a dependency on androidx.car.app:app-automotive to the build.gradle file for your Android Automotive OS module.
Additionally, in your AndroidManifest.xml file, you need to declare the relevant permissions needed to request the car data you want to use. Note that these permissions must also be granted to you by the user. You can use the same code on both Android Auto and Android Automotive OS, rather than having to create platform-dependent flows. However, the permissions needed are different.
CarInfo
This table describes the properties surfaced by the CarInfo APIs and the permissions you need to request to use them:
Warning: the getOdometerMeters method of the Mileage class is inaccurately named and returns kilometers, not meters.
Odometer distance
com.google.android.gms.permission.CAR_MILEAGE
This data is not available on Android Automotive OS to apps installed from the Play Store.
3
For example, to get the remaining range, instantiate a CarInfo object, then create and register an OnCarDataAvailableListener :
কোটলিন
valcarInfo=carContext.getCarService(CarHardwareManager::class.java).carInfovallistener=OnCarDataAvailableListener<EnergyLevel>{data->
if(data.rangeRemainingMeters.status==CarValue.STATUS_SUCCESS){valrangeRemaining=data.rangeRemainingMeters.value}else{// Handle error}}carInfo.addEnergyLevelListener(carContext.mainExecutor,listener)…// Unregister the listener when you no longer need updatescarInfo.removeEnergyLevelListener(listener)
জাভা
CarInfocarInfo=getCarContext().getCarService(CarHardwareManager.class).getCarInfo();OnCarDataAvailableListener<EnergyLevel>listener=(data)->{if(data.getRangeRemainingMeters().getStatus()==CarValue.STATUS_SUCCESS){floatrangeRemaining=data.getRangeRemainingMeters().getValue();}else{// Handle error}};carInfo.addEnergyLevelListener(getCarContext().getMainExecutor(),listener);…// Unregister the listener when you no longer need updatescarInfo.removeEnergyLevelListener(listener);
Don't assume that the data from the car is available at all times. If you get an error, check the status of the value you requested to better understand why the data you requested could not be retrieved. Refer to the reference documentation for the full CarInfo class definition.
কার সেন্সর
The CarSensors class gives you access to the vehicle's accelerometer, gyroscope, compass, and location data. The availability of these values may depend on the OEM. The format for the data from the accelerometer, gyroscope, and compass is the same as you would get from the SensorManager API . For example, to check the vehicle's heading:
কোটলিন
valcarSensors=carContext.getCarService(CarHardwareManager::class.java).carSensorsvallistener=OnCarDataAvailableListener<Compass>{data->
if(data.orientations.status==CarValue.STATUS_SUCCESS){valorientation=data.orientations.value}else{// Data not available, handle error}}carSensors.addCompassListener(CarSensors.UPDATE_RATE_NORMAL,carContext.mainExecutor,listener)…// Unregister the listener when you no longer need updatescarSensors.removeCompassListener(listener)
জাভা
CarSensorscarSensors=getCarContext().getCarService(CarHardwareManager.class).getCarSensors();OnCarDataAvailableListener<Compass>listener=(data)->{if(data.getOrientations().getStatus()==CarValue.STATUS_SUCCESS){List<Float>orientations=data.getOrientations().getValue();}else{// Data not available, handle error}};carSensors.addCompassListener(CarSensors.UPDATE_RATE_NORMAL,getCarContext().getMainExecutor(),listener);…// Unregister the listener when you no longer need updatescarSensors.removeCompassListener(listener);
To access location data from the car, you also need to declare and request the android.permission.ACCESS_FINE_LOCATION permission.
টেস্টিং
To simulate sensor data when testing on Android Auto, refer to the Sensors and Sensor configuration sections of the Desktop Head Unit guide. To simulate sensor data when testing on Android Automotive OS, refer to the Emulate hardware state section of the Android Automotive OS emulator guide.
The CarAppService, Session and Screen lifecycles
The Session and Screen classes implement the LifecycleOwner interface. As the user interacts with the app, your Session and Screen objects' lifecycle callbacks are invoked, as described in the following diagrams.
Using your app's CarAppService and the CarAudioRecord API, you can give your app access to the user's car microphone. Users need to give your app permission to access the car microphone. Your app can record and process the user's input within your app.
Permission to record
Before recording any audio, you must first declare the permission to record in your AndroidManifest.xml and request that the user grant it.
You need to request the permission to record at runtime. See the Request permissions section for details on how to request a permission in your car app.
অডিও রেকর্ড করুন
After the user gives permission to record, you can record the audio and process the recording.
কোটলিন
valcarAudioRecord=CarAudioRecord.create(carContext)carAudioRecord.startRecording()valdata=ByteArray(CarAudioRecord.AUDIO_CONTENT_BUFFER_SIZE)while(carAudioRecord.read(data,0,CarAudioRecord.AUDIO_CONTENT_BUFFER_SIZE)>=0){// Use data array// Potentially call carAudioRecord.stopRecording() if your processing finds end of speech}carAudioRecord.stopRecording()
জাভা
CarAudioRecordcarAudioRecord=CarAudioRecord.create(getCarContext());carAudioRecord.startRecording();byte[]data=newbyte[CarAudioRecord.AUDIO_CONTENT_BUFFER_SIZE];while(carAudioRecord.read(data,0,CarAudioRecord.AUDIO_CONTENT_BUFFER_SIZE)>=0){// Use data array// Potentially call carAudioRecord.stopRecording() if your processing finds end of speech}carAudioRecord.stopRecording();
অডিও ফোকাস
When recording from the car microphone, first acquire audio focus to ensure that any ongoing media is stopped. If you lose audio focus, stop recording.
Here is an example of how to acquire audio focus:
কোটলিন
valcarAudioRecord=CarAudioRecord.create(carContext)// Take audio focus so that user's media is not recordedvalaudioAttributes=AudioAttributes.Builder().setContentType(AudioAttributes.CONTENT_TYPE_SPEECH)// Use the most appropriate usage type for your use case.setUsage(AudioAttributes.USAGE_ASSISTANCE_NAVIGATION_GUIDANCE).build()valaudioFocusRequest=AudioFocusRequest.Builder(AudioManager.AUDIOFOCUS_GAIN_TRANSIENT_EXCLUSIVE).setAudioAttributes(audioAttributes).setOnAudioFocusChangeListener{state:Int->
if(state==AudioManager.AUDIOFOCUS_LOSS){// Stop recording if audio focus is lostcarAudioRecord.stopRecording()}}.build()if(carContext.getSystemService(AudioManager::class.java).requestAudioFocus(audioFocusRequest)!=AudioManager.AUDIOFOCUS_REQUEST_GRANTED){// Don't record if the focus isn't grantedreturn}carAudioRecord.startRecording()// Process the audio and abandon the AudioFocusRequest when done
জাভা
CarAudioRecordcarAudioRecord=CarAudioRecord.create(getCarContext());// Take audio focus so that user's media is not recordedAudioAttributesaudioAttributes=newAudioAttributes.Builder().setContentType(AudioAttributes.CONTENT_TYPE_SPEECH)// Use the most appropriate usage type for your use case.setUsage(AudioAttributes.USAGE_ASSISTANCE_NAVIGATION_GUIDANCE).build();AudioFocusRequestaudioFocusRequest=newAudioFocusRequest.Builder(AudioManager.AUDIOFOCUS_GAIN_TRANSIENT_EXCLUSIVE).setAudioAttributes(audioAttributes).setOnAudioFocusChangeListener(state->{if(state==AudioManager.AUDIOFOCUS_LOSS){// Stop recording if audio focus is lostcarAudioRecord.stopRecording();}}).build();if(getCarContext().getSystemService(AudioManager.class).requestAudioFocus(audioFocusRequest)!=AUDIOFOCUS_REQUEST_GRANTED){// Don't record if the focus isn't grantedreturn;}carAudioRecord.startRecording();// Process the audio and abandon the AudioFocusRequest when done
টেস্টিং লাইব্রেরি
The Android for Cars Testing Library provides auxiliary classes that you can use to validate your app's behavior in a test environment. For example, the SessionController lets you simulate a connection to the host and verify that the correct Screen and Template are created and returned.
If you find an issue with the library, report it using the Google Issue Tracker . Be sure to fill out all the requested information in the issue template.
Before filing a new issue, please check whether it is listed in the library's release notes or reported in the issues list. You can subscribe and vote for issues by clicking the star for an issue in the tracker. For more information, see Subscribing to an Issue .
The user interface is represented by a graph of model objects that can be arranged together in different ways, as allowed by the template they belong to. Templates are a subset of the models that can act as a root in those graphs. Models include the information to be displayed to the user in the form of text and images as well as attributes to configure aspects of the visual appearance of such information—for example, text colors or image sizes. The host converts the models to views that are designed to meet driver distraction standards and takes care of details like the variety of car screen factors and input modalities.
হোস্ট
The host is the backend component that implements the functionality offered by the library's APIs so your app can run in the car. The responsibilities of the host range from discovering your app and managing its lifecycle to converting your models into views and notifying your app of user interactions. On mobile devices, this host is implemented by Android Auto. On Android Automotive OS, this host is installed as a system app.
Template restrictions
Different templates enforce restrictions in the content of their models. For example, list templates have limits on the number of items that can be presented to the user. Templates also have restrictions in the way they can be connected to form the flow of a task. For example, the app can only push up to five templates to the screen stack. See Template restrictions for more details.
Screen
Screen is a class provided by the library that apps implement to manage the user interface presented to the user. A Screen has a lifecycle and provides the mechanism for the app to send the template to display when the screen is visible. Screen instances can also be pushed and popped to and from a Screen stack , which ensures they adhere to the template flow restrictions .
CarAppService
CarAppService is an abstract Service class that your app must implement and export to be discovered and managed by the host. Your app's CarAppService is responsible for validating that a host connection can be trusted using createHostValidator and subsequently providing Session instances for each connection using onCreateSession .
Session
Session is an abstract class that your app must implement and return using CarAppService.onCreateSession . It serves as the entry point to display information on the car screen. It has a lifecycle that informs the current state of your app on the car screen, such as when your app is visible or hidden.
When a Session is started, such as when the app is first launched, the host requests for the initial Screen to display using the onCreateScreen method.
Install the Car App Library
See the Jetpack library release page for instructions on how to add the library to your app.
Configure your app's manifest files
Before you can create your car app, configure your app's manifest files as follows.
Declare your CarAppService
The host connects to your app through your CarAppService implementation. You declare this service in your manifest to let the host discover and connect to your app.
You also need to declare your app's category in the <category> element of your app's intent filter. See the list of supported app categories for the values allowed for this element.
The following code snippet shows how to declare a car app service for a point of interest app in your manifest:
Declare your app's category by adding one or more of the following category values in the intent filter when you declare your CarAppService as described in the preceding section :
androidx.car.app.category.NAVIGATION : an app that provides turn-by-turn navigation directions. See Build navigation apps for cars .
androidx.car.app.category.POI : an app that provides functionality relevant to finding points of interest such as parking spots, charging stations, and gas stations. See Build point of interest apps for cars .
androidx.car.app.category.IOT : an app that enables users to take relevant actions on connected devices from within the car. See Build internet of things apps for cars .
androidx.car.app.category.WEATHER : an app that lets users see relevant weather information related to their current location or along their route. See Build weather apps for cars .
See Android app quality for cars for detailed descriptions of each category and criteria for apps to belong to them.
Specify the app name and icon
You need to specify an app name and icon that the host can use to represent your app in the system UI.
You can specify the app name and icon that is used to represent your app using the label and icon attributes of your CarAppService :
The Car App Library defines its own API levels so that you can know which library features are supported by the template host on a vehicle. To retrieve the highest Car App API Level supported by a host, use the getCarAppApiLevel() method.
Declare the minimum Car App API Level supported by your app in your AndroidManifest.xml file:
See the documentation for the RequiresCarApi annotation for details on how to maintain backward compatibility and declare the minimum API level required to use a feature. For a definition of which API level is required to use a certain feature of the Car App Library, check the reference documentation for CarAppApiLevels .
Create your CarAppService and Session
Your app needs to extend the CarAppService class and implement its onCreateSession method, which returns a Session instance corresponding to the current connection to the host:
To handle scenarios where your car app needs to start from a screen that is not the home or landing screen of your app, such as handling deep links, you can pre-seed a back stack of screens using ScreenManager.push before returning from onCreateScreen . Pre-seeding allows users to navigate back to previous screens from the first screen that your app is showing.
Create your start screen
You create the screens displayed by your app by defining classes that extend the Screen class and implementing its onGetTemplate method, which returns the Template instance representing the state of the UI to display in the car screen.
The following snippet shows how to declare a Screen that uses a PaneTemplate template to display a simple “Hello world!” স্ট্রিং:
CarContext also offers other functionality, such as letting you load drawable resources using the configuration from the car screen, starting an app in the car using intents, and signaling whether your app should display its map in dark theme .
Implement screen navigation
Apps often present a number of different screens, each possibly using different templates the user can navigate through as they interact with the interface displayed in the screen.
The ScreenManager class provides a screen stack you can use to push screens that can be popped automatically when the user selects a back button in the car screen or uses the hardware back button available in some cars.
The following snippet shows how to add a back action to a message template as well as an action that pushes a new screen when selected by the user:
To help ensure the app is safe to use while driving, the screen stack can have a maximum depth of five screens. See the Template restrictions section for more details.
Refresh the contents of a template
Your app can request the content of a Screen to be invalidated by calling the Screen.invalidate method. The host subsequently calls back into your app's Screen.onGetTemplate method to retrieve the template with the new contents.
When refreshing a Screen , it is important to understand the specific content in the template that can be updated so the host does not count the new template against the template quota. See the Template restrictions section for more details.
We recommended that you structure your screens so there is a one-to-one mapping between a Screen and the type of template it returns through its onGetTemplate implementation.
Draw maps
Navigation, point of interest (POI), and weather apps using the following templates can draw maps by accessing a Surface .
To use the following templates, your app must have one of the corresponding permissions declared in a <uses-permission> element in its AndroidManifest.xml file.
In addition to the permission required for the template that you app is using, your app must declare the androidx.car.app.ACCESS_SURFACE permission in its AndroidManifest.xml file to get access to the surface:
To access the Surface that the host provides, you must implement a SurfaceCallback and provide that implementation to the AppManager car service. The current Surface is passed to your SurfaceCallback in the SurfaceContainer parameter of the onSurfaceAvailable() and onSurfaceDestroyed() callbacks.
The host can draw user interface elements for the templates on top of the map. The host communicates the area of the surface that is guaranteed to be unobstructed and fully visible to the user by calling the SurfaceCallback.onVisibleAreaChanged method. Also, to minimize the number of changes, the host calls the SurfaceCallback.onStableAreaChanged method with the smallest rectangle, which is always visible based on the current template.
For example, when a navigation app uses the NavigationTemplate with an action strip on top, the action strip can hide itself when the user has not interacted with the screen for a while to make more space for the map. In this case, there is a callback to onStableAreaChanged and onVisibleAreaChanged with the same rectangle. When the action strip is hidden, only onVisibleAreaChanged is called with the larger area. If the user interacts with the screen, then again only onVisibleAreaChanged is called with the first rectangle.
Support dark theme
Apps must redraw their map onto the Surface instance with the proper dark colors when the host determines conditions warrant it, as described in Android app quality for cars .
When using the following templates, you can add support for users to interact with the maps you draw, such as letting them see different parts of a map by zooming and panning.
টেমপ্লেট
Interactivity supported since Car App API Level
NavigationTemplate
2
PlaceListNavigationTemplate ( deprecated )
4
RoutePreviewNavigationTemplate ( deprecated )
4
MapTemplate ( deprecated )
5 (introduction of template)
MapWithContentTemplate
7 (introduction of template)
Implement interactivity callbacks
The SurfaceCallback interface has several callback methods you can implement to add interactivity to maps built with the templates in the preceding section:
onScale (with scale factor determined by template host)
2
Rotary nudge in pan mode
onScroll (with distance factor determined by template host)
2
Add a map action strip
These templates can have a map action strip for map-related actions such as zooming in and out, recentering, displaying a compass, and other actions you choose to display. The map action strip can have up to four icon-only buttons that can be refreshed without impacting task depth. It hides during idle state and reappears on active state.
To receive map interactivity callbacks , you must add an Action.PAN button in the map action strip. When the user presses the pan button, the host enters pan mode, as described in the following section.
If your app omits the Action.PAN button in the map action strip, it doesn't receive user input from the SurfaceCallback methods, and the host exits any previously activated pan mode.
On a touchscreen, the pan button is not displayed.
Understand pan mode
In pan mode, the template host translates user input from non-touch input devices, such as rotary controllers and touchpads, into the appropriate SurfaceCallback methods. Respond to the user action to enter or exit pan mode with the setPanModeListener method in the NavigationTemplate.Builder . The host can hide other UI components in the template while the user is in pan mode.
Interact with the user
Your app can interact with the user using patterns similar to a mobile app.
ব্যবহারকারীর ইনপুট পরিচালনা করুন
Your app can respond to user input by passing the appropriate listeners to the models that support them. The following snippet shows how to create an Action model that sets an OnClickListener that calls back to a method defined by your app's code:
For more details on how to start apps, including the format of the ACTION_NAVIGATE intent, see the Start a car app with an intent section.
Some actions, such as those that require directing the user to continue the interaction on their mobile devices, are only allowed when the car is parked. You can use the ParkedOnlyOnClickListener to implement those actions. If the car is not parked, the host displays an indication to the user that the action is not allowed in this case. If the car is parked, the code executes normally. The following snippet shows how to use the ParkedOnlyOnClickListener to open a settings screen on the mobile device:
Notifications sent to the mobile device only show up on the car screen if they are extended with a CarAppExtender . Some notification attributes, such as content title, text, icon, and actions, can be set in the CarAppExtender , overriding the notification's attributes when they appear on the car screen.
The following snippet shows how to send a notification to the car screen that displays a different title than the one shown on the mobile device:
Notifications can affect the following parts of the user interface:
A heads-up notification (HUN) may be displayed to the user.
An entry in the notification center may be added, optionally with a badge visible in the rail.
For navigation apps, the notification may be displayed in the rail widget as described in Turn-by-turn notifications .
You can choose how to configure your app's notifications to affect each of those user interface elements by using the notification's priority, as described in the CarAppExtender documentation.
The benefit of using CarContext.requestPermissions() , as opposed to using standard Android APIs , is that you don't need to launch your own Activity to create the permissions dialog. Moreover, you can use the same code on both Android Auto and Android Automotive OS, rather than having to create platform-dependent flows.
Style the permissions dialog on Android Auto
On Android Auto, the permissions dialog for the user will appear on the phone. By default, there will be no background behind the dialog. To set a custom background, declare a car app theme in your AndroidManifest.xml file and set the carPermissionActivityLayout attribute for your car app theme.
The following example shows how to create a notification with an action that opens your app with a screen that shows the details of a parking reservation. You extend the notification instance with a content intent that contains a PendingIntent wrapping an explicit intent to your app's action:
Your app must also declare a BroadcastReceiver that is invoked to process the intent when the user selects the action in the notification interface and invokes CarContext.startCarApp with an intent including the data URI:
Finally, the Session.onNewIntent method in your app handles this intent by pushing the parking reservation screen on the stack, if it's not already on top:
See the Display notifications section for more information on how to handle notifications for the car app.
Template restrictions
The host limits the number of templates to display for a given task to a maximum of five, of which the last template must be one of the following types:
Note that this limit applies to the number of templates and not the number of Screen instances in the stack. For example, if an app sends two templates while in screen A and then pushes screen B, it can now send three more templates. Alternatively, if each screen is structured to send a single template, then the app can push five screen instances onto the ScreenManager stack.
There are special cases to these restrictions: template refreshes and back and reset operations.
Template refreshes
Certain content updates are not counted toward the template limit. In general, if an app pushes a new template that is of the same type and contains the same main content as the previous template, the new template is not counted against the quota. For example, updating the toggle state of a row in a ListTemplate does not count against the quota. See the documentation of individual templates to learn more about what types of content updates can be considered a refresh.
Back operations
To enable sub-flows within a task, the host detects when an app is popping a Screen from the ScreenManager stack and updates the remaining quota based on the number of templates that the app is going backward by.
For example, if the app sends two templates while in screen A, then pushes screen B and sends two more templates, the app has one quota remaining. If the app then pops back to screen A, the host resets the quota to three, because the app has gone backward by two templates.
Note that, when popping back to a screen, an app must send a template that is of the same type as the one last sent by that screen. Sending any other template type causes an error. However, as long as the type remains the same during a back operation, an app can freely modify the contents of the template without affecting the quota.
Reset operations
Certain templates have special semantics that signify the end of a task. For example, the NavigationTemplate is a view that is expected to stay on the screen and be refreshed with new turn-by-turn instructions for the user's consumption. When it reaches one of these templates, the host resets the template quota, treating that template as if it is the first step of a new task. This allows the app to begin a new task. See the documentation of individual templates to see which ones trigger a reset on the host.
If the host receives an intent to start the app from a notification action or from the launcher, the quota is also reset. This mechanism lets an app begin a new task flow from notifications, and it holds true even if an app is already bound and in the foreground.
See the Display notifications section for more details on how to display your app's notifications in the car screen. See the Start a car app with an intent section for information on how to start your app from a notification action.
Connection API
You can determine whether your app is running on Android Auto or Android Automotive OS by using the CarConnection API to retrieve connection information at runtime.
For example, in your car app's Session , initialize a CarConnection and subscribe to LiveData updates:
In the observer, you can then react to changes in the connection state:
কোটলিন
funonConnectionStateUpdated(connectionState:Int){valmessage=when(connectionState){CarConnection.CONNECTION_TYPE_NOT_CONNECTED->"Not connected to a head unit"CarConnection.CONNECTION_TYPE_NATIVE->"Connected to Android Automotive OS"CarConnection.CONNECTION_TYPE_PROJECTION->"Connected to Android Auto"else->"Unknown car connection type"}CarToast.makeText(carContext,message,CarToast.LENGTH_SHORT).show()}
জাভা
privatevoidonConnectionStateUpdated(intconnectionState){Stringmessage;switch(connectionState){caseCarConnection.CONNECTION_TYPE_NOT_CONNECTED:message="Not connected to a head unit";break;caseCarConnection.CONNECTION_TYPE_NATIVE:message="Connected to Android Automotive OS";break;caseCarConnection.CONNECTION_TYPE_PROJECTION:message="Connected to Android Auto";break;default:message="Unknown car connection type";break;}CarToast.makeText(getCarContext(),message,CarToast.LENGTH_SHORT).show();}
Constraints API
Different cars may allow for a different number of Item instances to be displayed to the user at a time. Use the ConstraintManager to check the content limit at runtime and set the appropriate number of items in your templates.
Start by getting a ConstraintManager from the CarContext :
You can then query the retrieved ConstraintManager object for the relevant content limit. For example, to get the number of items that can be displayed in a grid, call getContentLimit with CONTENT_LIMIT_TYPE_GRID :
If your app offers a signed-in experience for users, you can use templates like the SignInTemplate and LongMessageTemplate with Car App API level 2 and above to handle signing in to your app on the car's head unit.
To create a SignInTemplate , define a SignInMethod . The Car App Library currently supports the following sign-in methods:
QRCodeSignInMethod for QR code sign in, where the user scans a QR code to complete sign-in on their phone. This is available with Car API Level 4 and above.
For example, to implement a template that collects the user's password, start by creating an InputCallback to process and validate user input:
কোটলিন
valcallback=object:InputCallback{overridefunonInputSubmitted(text:String){// You will receive this callback when the user presses Enter on the keyboard.}overridefunonInputTextChanged(text:String){// You will receive this callback as the user is typing. The update// frequency is determined by the host.}}
জাভা
InputCallbackcallback=newInputCallback(){@OverridepublicvoidonInputSubmitted(@NonNullStringtext){// You will receive this callback when the user presses Enter on the keyboard.}@OverridepublicvoidonInputTextChanged(@NonNullStringtext){// You will receive this callback as the user is typing. The update// frequency is determined by the host.}};
An InputCallback is required for the InputSignInMethodBuilder .
Finally, use your new InputSignInMethod to create a SignInTemplate .
কোটলিন
SignInTemplate.Builder(passwordInput).setTitle("Sign in with username and password").setInstructions("Enter your password").setHeaderAction(Action.BACK)....build()
জাভা
newSignInTemplate.Builder(passwordInput).setTitle("Sign in with username and password").setInstructions("Enter your password").setHeaderAction(Action.BACK)....build();
Use AccountManager
Android Automotive OS apps that have authentication must use AccountManager for the following reasons:
Better UX and ease of account management : Users can easily manage all their accounts from the accounts menu in the system settings, including sign-in and sign-out.
"Guest" experiences : Because cars are shared devices, OEMs can enable guest experiences in the vehicle, where accounts cannot be added.
Add text string variants
Different car screen sizes may show different amounts of text. With Car App API level 2 and above, you can specify multiple variants of a text string to best fit the screen. To see where text variants are accepted, look for templates and components that take a CarText .
Add strings in order from most to least preferred—for example, from longest to shortest. The host picks the appropriate-length string depending on the amount of space available on the car screen.
Add inline CarIcons for rows
You can add icons inline with text to enrich your app's visual appeal using CarIconSpan . See the documentation for CarIconSpan.create for more information on creating these spans. See Spantastic text styling with Spans for an overview of how text styling with spans work.
কোটলিন
valrating=SpannableString("Rating: 4.5 stars")rating.setSpan(CarIconSpan.create(// Create a CarIcon with an image of four and a half starsCarIcon.Builder(...).build(),// Align the CarIcon to the baseline of the textCarIconSpan.ALIGN_BASELINE),// The start index of the span (index of the character '4')8,// The end index of the span (index of the last 's' in "stars")16,Spanned.SPAN_INCLUSIVE_INCLUSIVE)valrow=Row.Builder()....addText(rating).build()
জাভা
SpannableStringrating=newSpannableString("Rating: 4.5 stars");rating.setSpan(CarIconSpan.create(// Create a CarIcon with an image of four and a half starsnewCarIcon.Builder(...).build(),// Align the CarIcon to the baseline of the textCarIconSpan.ALIGN_BASELINE),// The start index of the span (index of the character '4')8,// The end index of the span (index of the last 's' in "stars")16,Spanned.SPAN_INCLUSIVE_INCLUSIVE);Rowrow=newRow.Builder()....addText(rating).build();
Car Hardware APIs
Starting with Car App API level 3, the Car App Library has APIs that you can use to access vehicle properties and sensors.
প্রয়োজনীয়তা
To use the APIs with Android Auto, start by adding a dependency on androidx.car.app:app-projected to the build.gradle file for your Android Auto module. For Android Automotive OS, add a dependency on androidx.car.app:app-automotive to the build.gradle file for your Android Automotive OS module.
Additionally, in your AndroidManifest.xml file, you need to declare the relevant permissions needed to request the car data you want to use. Note that these permissions must also be granted to you by the user. You can use the same code on both Android Auto and Android Automotive OS, rather than having to create platform-dependent flows. However, the permissions needed are different.
CarInfo
This table describes the properties surfaced by the CarInfo APIs and the permissions you need to request to use them:
Warning: the getOdometerMeters method of the Mileage class is inaccurately named and returns kilometers, not meters.
Odometer distance
com.google.android.gms.permission.CAR_MILEAGE
This data is not available on Android Automotive OS to apps installed from the Play Store.
3
For example, to get the remaining range, instantiate a CarInfo object, then create and register an OnCarDataAvailableListener :
কোটলিন
valcarInfo=carContext.getCarService(CarHardwareManager::class.java).carInfovallistener=OnCarDataAvailableListener<EnergyLevel>{data->
if(data.rangeRemainingMeters.status==CarValue.STATUS_SUCCESS){valrangeRemaining=data.rangeRemainingMeters.value}else{// Handle error}}carInfo.addEnergyLevelListener(carContext.mainExecutor,listener)…// Unregister the listener when you no longer need updatescarInfo.removeEnergyLevelListener(listener)
জাভা
CarInfocarInfo=getCarContext().getCarService(CarHardwareManager.class).getCarInfo();OnCarDataAvailableListener<EnergyLevel>listener=(data)->{if(data.getRangeRemainingMeters().getStatus()==CarValue.STATUS_SUCCESS){floatrangeRemaining=data.getRangeRemainingMeters().getValue();}else{// Handle error}};carInfo.addEnergyLevelListener(getCarContext().getMainExecutor(),listener);…// Unregister the listener when you no longer need updatescarInfo.removeEnergyLevelListener(listener);
Don't assume that the data from the car is available at all times. If you get an error, check the status of the value you requested to better understand why the data you requested could not be retrieved. Refer to the reference documentation for the full CarInfo class definition.
কার সেন্সর
The CarSensors class gives you access to the vehicle's accelerometer, gyroscope, compass, and location data. The availability of these values may depend on the OEM. The format for the data from the accelerometer, gyroscope, and compass is the same as you would get from the SensorManager API . For example, to check the vehicle's heading:
কোটলিন
valcarSensors=carContext.getCarService(CarHardwareManager::class.java).carSensorsvallistener=OnCarDataAvailableListener<Compass>{data->
if(data.orientations.status==CarValue.STATUS_SUCCESS){valorientation=data.orientations.value}else{// Data not available, handle error}}carSensors.addCompassListener(CarSensors.UPDATE_RATE_NORMAL,carContext.mainExecutor,listener)…// Unregister the listener when you no longer need updatescarSensors.removeCompassListener(listener)
জাভা
CarSensorscarSensors=getCarContext().getCarService(CarHardwareManager.class).getCarSensors();OnCarDataAvailableListener<Compass>listener=(data)->{if(data.getOrientations().getStatus()==CarValue.STATUS_SUCCESS){List<Float>orientations=data.getOrientations().getValue();}else{// Data not available, handle error}};carSensors.addCompassListener(CarSensors.UPDATE_RATE_NORMAL,getCarContext().getMainExecutor(),listener);…// Unregister the listener when you no longer need updatescarSensors.removeCompassListener(listener);
To access location data from the car, you also need to declare and request the android.permission.ACCESS_FINE_LOCATION permission.
টেস্টিং
To simulate sensor data when testing on Android Auto, refer to the Sensors and Sensor configuration sections of the Desktop Head Unit guide. To simulate sensor data when testing on Android Automotive OS, refer to the Emulate hardware state section of the Android Automotive OS emulator guide.
The CarAppService, Session and Screen lifecycles
The Session and Screen classes implement the LifecycleOwner interface. As the user interacts with the app, your Session and Screen objects' lifecycle callbacks are invoked, as described in the following diagrams.
Using your app's CarAppService and the CarAudioRecord API, you can give your app access to the user's car microphone. Users need to give your app permission to access the car microphone. Your app can record and process the user's input within your app.
Permission to record
Before recording any audio, you must first declare the permission to record in your AndroidManifest.xml and request that the user grant it.
You need to request the permission to record at runtime. See the Request permissions section for details on how to request a permission in your car app.
অডিও রেকর্ড করুন
After the user gives permission to record, you can record the audio and process the recording.
কোটলিন
valcarAudioRecord=CarAudioRecord.create(carContext)carAudioRecord.startRecording()valdata=ByteArray(CarAudioRecord.AUDIO_CONTENT_BUFFER_SIZE)while(carAudioRecord.read(data,0,CarAudioRecord.AUDIO_CONTENT_BUFFER_SIZE)>=0){// Use data array// Potentially call carAudioRecord.stopRecording() if your processing finds end of speech}carAudioRecord.stopRecording()
জাভা
CarAudioRecordcarAudioRecord=CarAudioRecord.create(getCarContext());carAudioRecord.startRecording();byte[]data=newbyte[CarAudioRecord.AUDIO_CONTENT_BUFFER_SIZE];while(carAudioRecord.read(data,0,CarAudioRecord.AUDIO_CONTENT_BUFFER_SIZE)>=0){// Use data array// Potentially call carAudioRecord.stopRecording() if your processing finds end of speech}carAudioRecord.stopRecording();
অডিও ফোকাস
When recording from the car microphone, first acquire audio focus to ensure that any ongoing media is stopped. If you lose audio focus, stop recording.
Here is an example of how to acquire audio focus:
কোটলিন
valcarAudioRecord=CarAudioRecord.create(carContext)// Take audio focus so that user's media is not recordedvalaudioAttributes=AudioAttributes.Builder().setContentType(AudioAttributes.CONTENT_TYPE_SPEECH)// Use the most appropriate usage type for your use case.setUsage(AudioAttributes.USAGE_ASSISTANCE_NAVIGATION_GUIDANCE).build()valaudioFocusRequest=AudioFocusRequest.Builder(AudioManager.AUDIOFOCUS_GAIN_TRANSIENT_EXCLUSIVE).setAudioAttributes(audioAttributes).setOnAudioFocusChangeListener{state:Int->
if(state==AudioManager.AUDIOFOCUS_LOSS){// Stop recording if audio focus is lostcarAudioRecord.stopRecording()}}.build()if(carContext.getSystemService(AudioManager::class.java).requestAudioFocus(audioFocusRequest)!=AudioManager.AUDIOFOCUS_REQUEST_GRANTED){// Don't record if the focus isn't grantedreturn}carAudioRecord.startRecording()// Process the audio and abandon the AudioFocusRequest when done
জাভা
CarAudioRecordcarAudioRecord=CarAudioRecord.create(getCarContext());// Take audio focus so that user's media is not recordedAudioAttributesaudioAttributes=newAudioAttributes.Builder().setContentType(AudioAttributes.CONTENT_TYPE_SPEECH)// Use the most appropriate usage type for your use case.setUsage(AudioAttributes.USAGE_ASSISTANCE_NAVIGATION_GUIDANCE).build();AudioFocusRequestaudioFocusRequest=newAudioFocusRequest.Builder(AudioManager.AUDIOFOCUS_GAIN_TRANSIENT_EXCLUSIVE).setAudioAttributes(audioAttributes).setOnAudioFocusChangeListener(state->{if(state==AudioManager.AUDIOFOCUS_LOSS){// Stop recording if audio focus is lostcarAudioRecord.stopRecording();}}).build();if(getCarContext().getSystemService(AudioManager.class).requestAudioFocus(audioFocusRequest)!=AUDIOFOCUS_REQUEST_GRANTED){// Don't record if the focus isn't grantedreturn;}carAudioRecord.startRecording();// Process the audio and abandon the AudioFocusRequest when done
টেস্টিং লাইব্রেরি
The Android for Cars Testing Library provides auxiliary classes that you can use to validate your app's behavior in a test environment. For example, the SessionController lets you simulate a connection to the host and verify that the correct Screen and Template are created and returned.
If you find an issue with the library, report it using the Google Issue Tracker . Be sure to fill out all the requested information in the issue template.
Before filing a new issue, please check whether it is listed in the library's release notes or reported in the issues list. You can subscribe and vote for issues by clicking the star for an issue in the tracker. For more information, see Subscribing to an Issue .
এই পৃষ্ঠার কন্টেন্ট ও কোডের নমুনাগুলি Content License-এ বর্ণিত লাইসেন্সের অধীনস্থ। Java এবং OpenJDK হল Oracle এবং/অথবা তার অ্যাফিলিয়েট সংস্থার রেজিস্টার্ড ট্রেডমার্ক।
2025-04-29 UTC-তে শেষবার আপডেট করা হয়েছে।
[[["সহজে বোঝা যায়","easyToUnderstand","thumb-up"],["আমার সমস্যার সমাধান হয়েছে","solvedMyProblem","thumb-up"],["অন্যান্য","otherUp","thumb-up"]],[["এতে আমার প্রয়োজনীয় তথ্য নেই","missingTheInformationINeed","thumb-down"],["খুব জটিল / অনেক ধাপ","tooComplicatedTooManySteps","thumb-down"],["পুরনো","outOfDate","thumb-down"],["অনুবাদ সংক্রান্ত সমস্যা","translationIssue","thumb-down"],["নমুনা / কোড সংক্রান্ত সমস্যা","samplesCodeIssue","thumb-down"],["অন্যান্য","otherDown","thumb-down"]],["2025-04-29 UTC-তে শেষবার আপডেট করা হয়েছে।"],[],[]]