
回應式 UI 和導覽
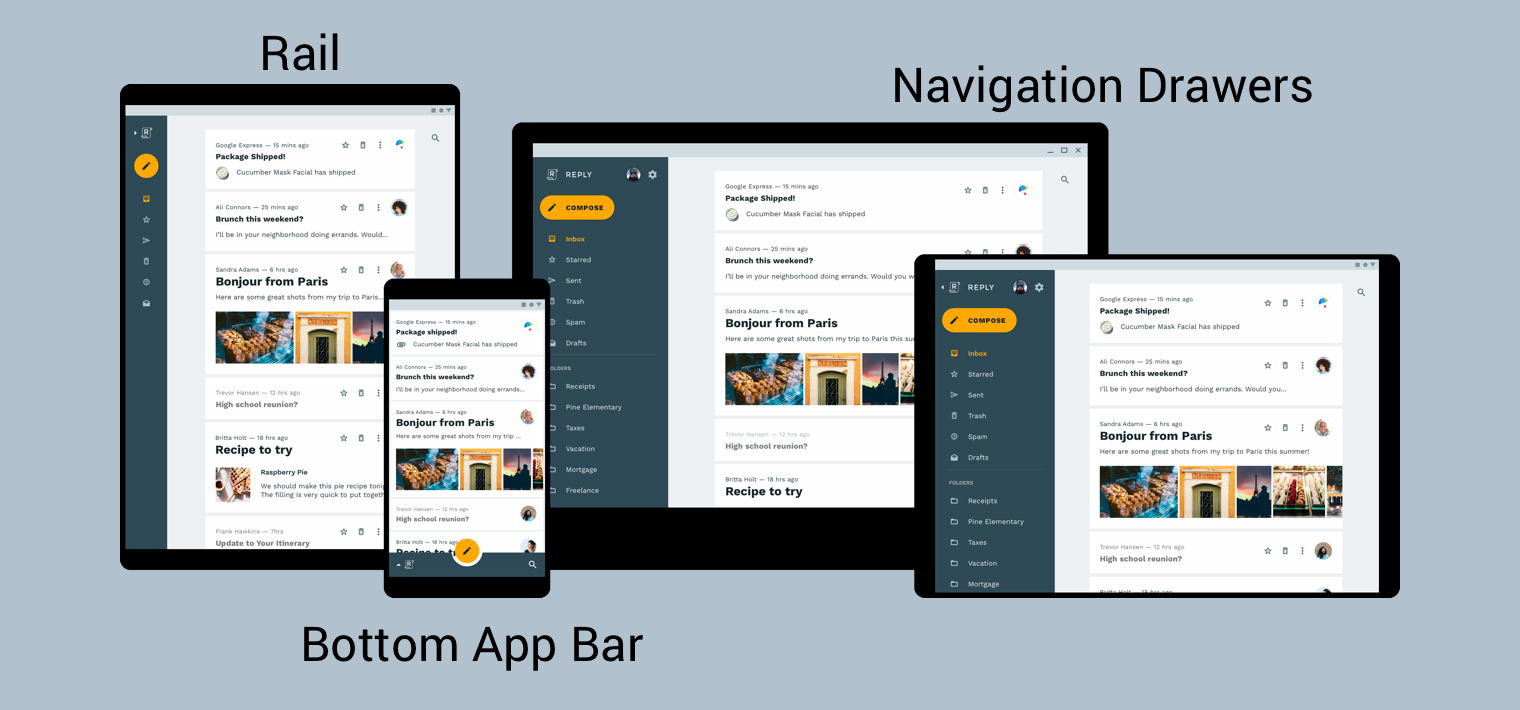
為了提供最佳導覽體驗,建議您根據使用者裝置的寬度、高度和最小寬度製作導覽 UI。建議您使用底部應用程式列,持續顯示或可收合式導覽匣、邊欄,或其他符合畫面可用空間與應用程式獨特風格的全新介面。
Material Design 產品架構指南說明建構回應式 UI (會依據環境變化動態調整的 UI) 時的其他背景資訊和注意事項。環境變更的範例包括調整寬度、高度、方向和使用者語言偏好。這些環境屬性統稱為裝置的「設定」。
當一或多個屬性在執行階段變更時,Android 作業系統的回應方式為刪除並重新建立應用程式的活動和片段。因此,如要在 Android 上支援回應式 UI,最好的方法就是確實能視情況使用資源設定限定詞,並避免使用硬式編碼的版面配置大小。
在回應式 UI 中實作全域導覽
如果要在回應式 UI 中實作全域導覽,請先從代管導覽圖的活動開始著手。如需實作範例,請參閱導覽程式碼研究室。程式碼研究室會使用 NavigationView 顯示導覽選單,如圖 2 所示。在裝置寬度至少為 960 dp 的裝置上執行時,這個 NavigationView 會持續在螢幕上顯示。
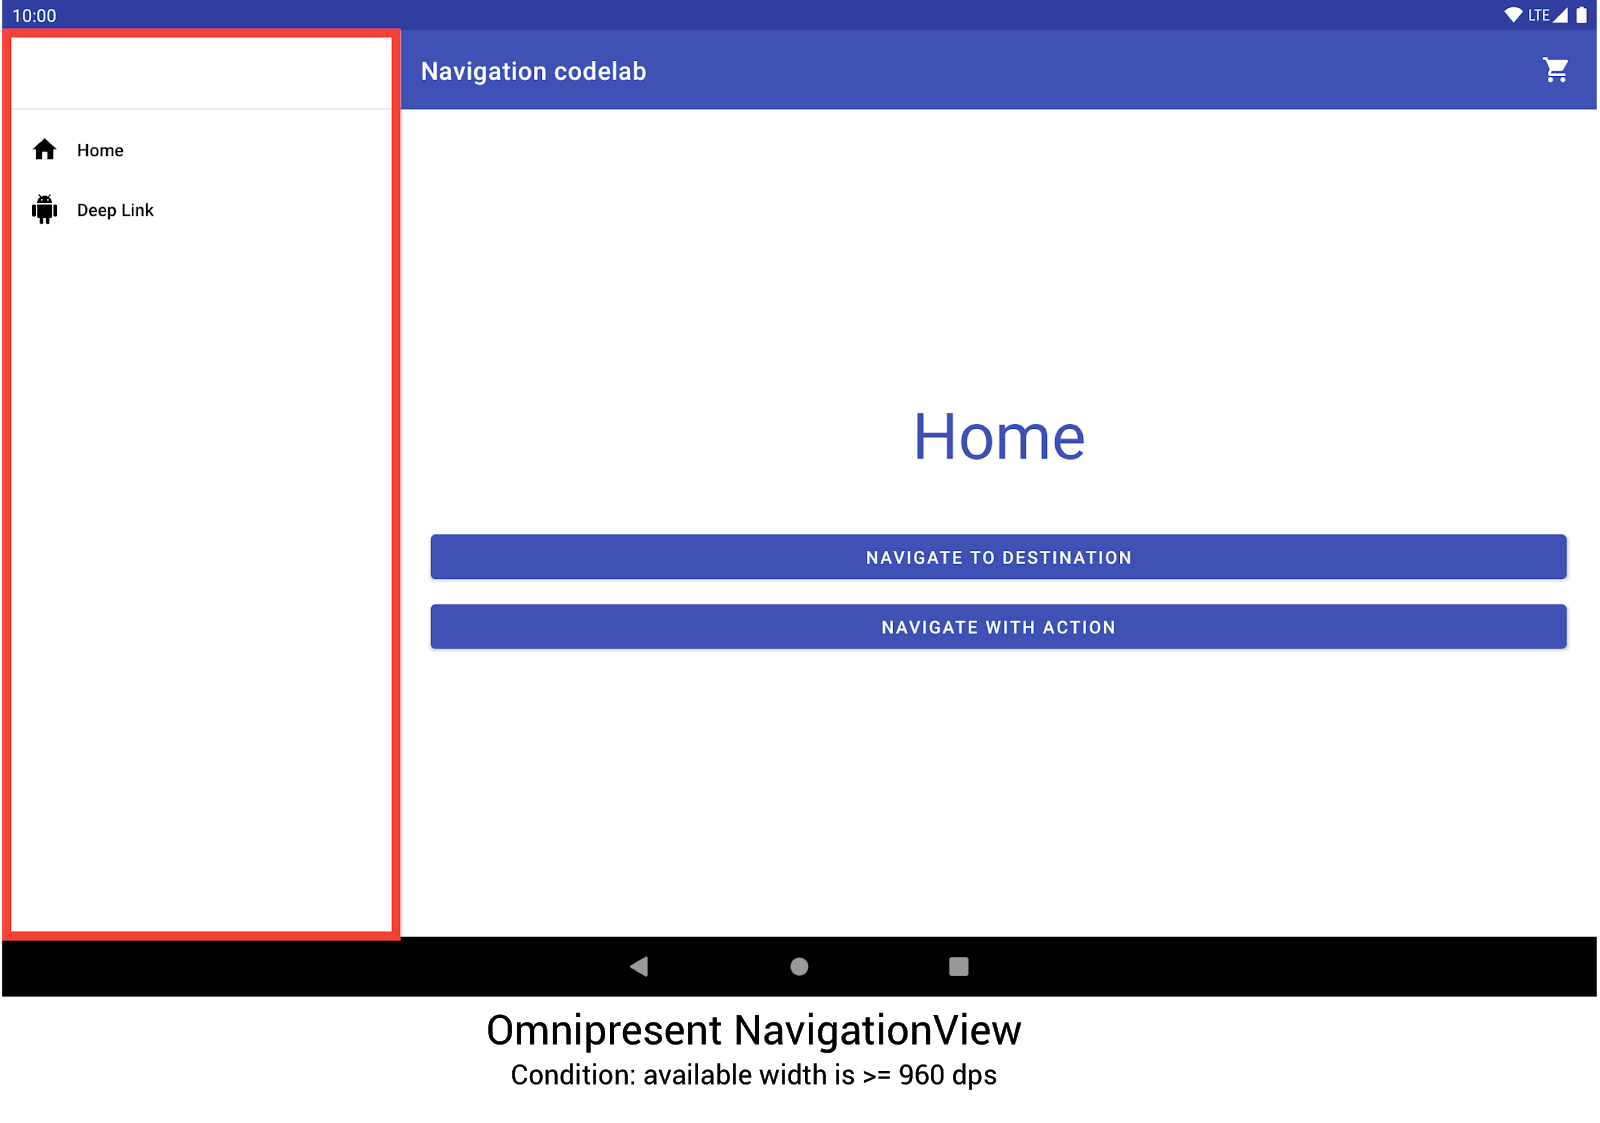
NavigationView 顯示導覽選單。其他裝置大小和螢幕方向將視需要在 DrawerLayout 或 BottomNavigationView 之間動態切換。
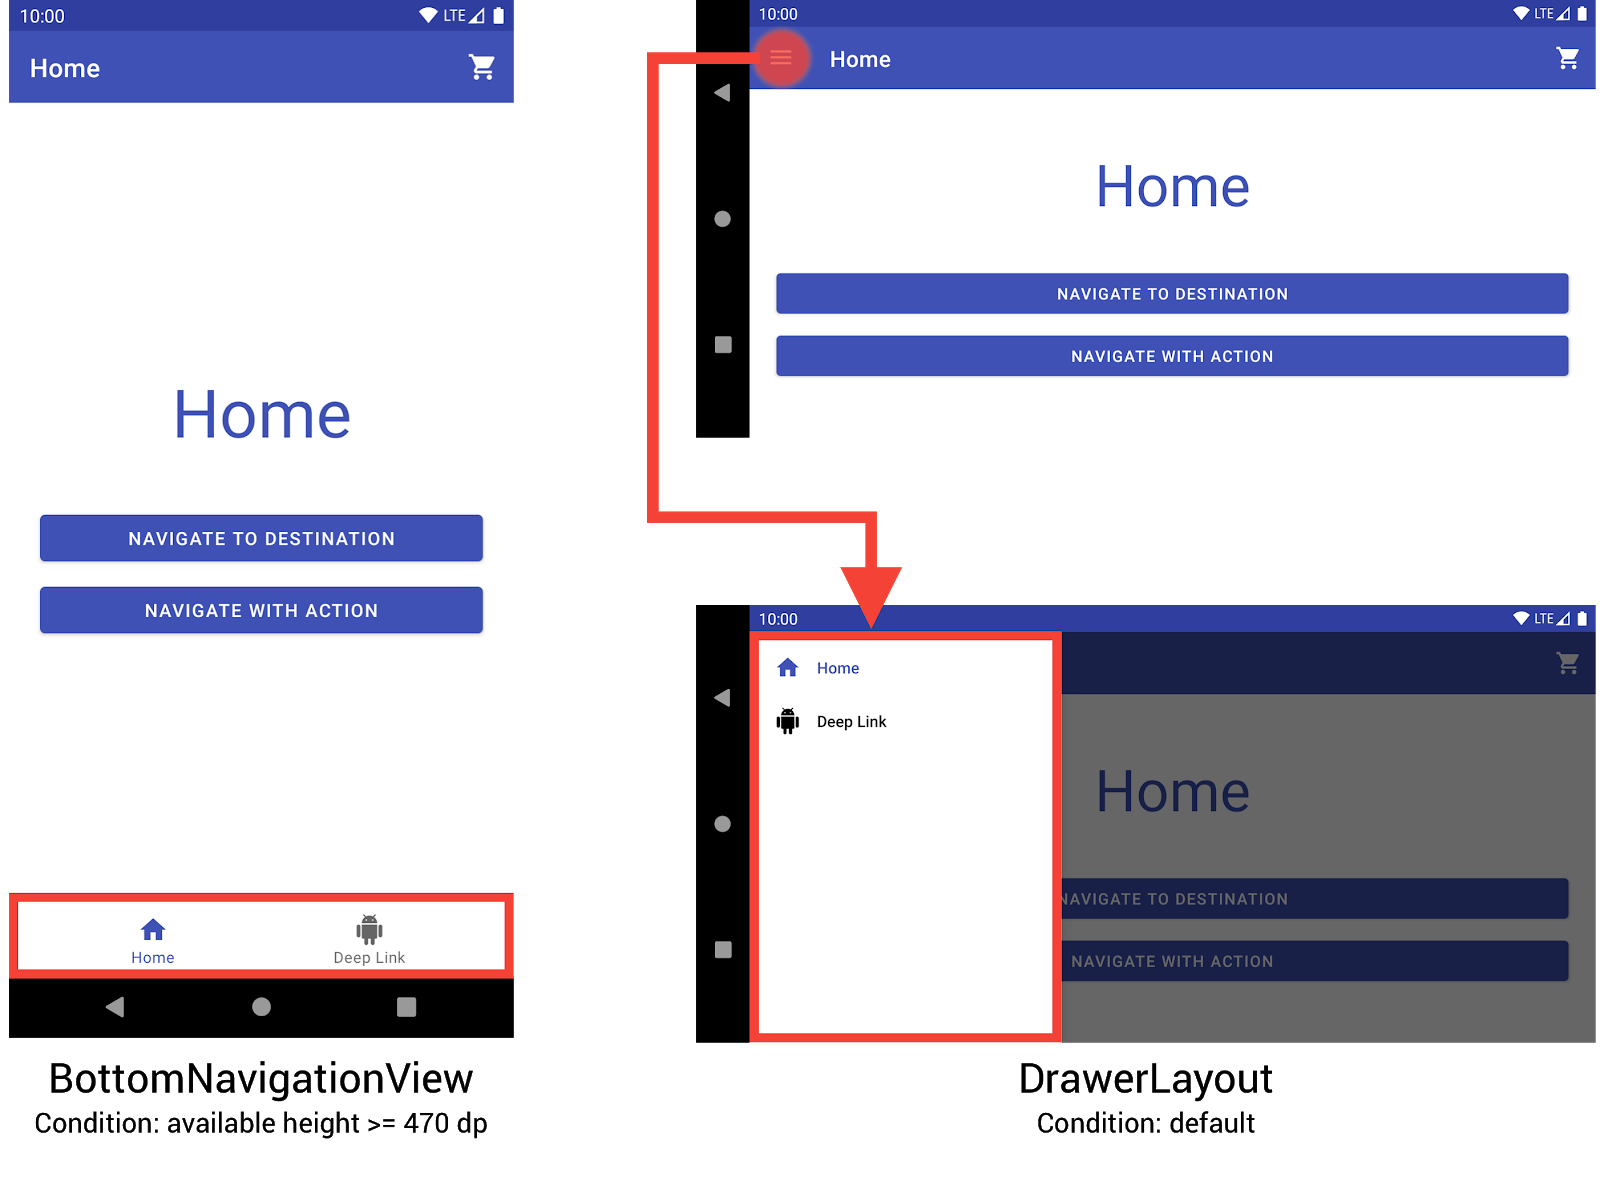
BottomNavigationView 和 DrawerLayout,在小型裝置上顯示導覽選單。您可以建立三種不同的版面配置來實作這項行為,讓每個版面配置根據目前的裝置設定定義所需的導覽元素與檢視區塊階層。
版面配置套用的設定是根據版面配置檔案位置的目錄結構。例如,NavigationView 版面配置檔案位於 res/layout-w960dp 目錄。
<!-- res/layout-w960dp/navigation_activity.xml -->
<RelativeLayout
   xmlns:android="http://schemas.android.com/apk/res/android"
   xmlns:app="http://schemas.android.com/apk/res-auto"
   xmlns:tools="http://schemas.android.com/tools"
   android:layout_width="match_parent"
   android:layout_height="match_parent"
   tools:context="com.example.android.codelabs.navigation.MainActivity">

   <com.google.android.material.navigation.NavigationView
       android:id="@+id/nav_view"
       android:layout_width="wrap_content"
       android:layout_height="match_parent"
       android:layout_alignParentStart="true"
       app:elevation="0dp"
       app:headerLayout="@layout/nav_view_header"
       app:menu="@menu/nav_drawer_menu" />

   <View
       android:layout_width="1dp"
       android:layout_height="match_parent"
       android:layout_toEndOf="@id/nav_view"
       android:background="?android:attr/listDivider" />

   <androidx.appcompat.widget.Toolbar
       android:id="@+id/toolbar"
       android:layout_width="match_parent"
       android:layout_height="wrap_content"
       android:layout_alignParentTop="true"
       android:layout_toEndOf="@id/nav_view"
       android:background="@color/colorPrimary"
       android:theme="@style/ThemeOverlay.MaterialComponents.Dark.ActionBar" />

   <androidx.fragment.app.FragmentContainerView
       android:id="@+id/my_nav_host_fragment"
       android:name="androidx.navigation.fragment.NavHostFragment"
       android:layout_width="match_parent"
       android:layout_height="match_parent"
       android:layout_below="@id/toolbar"
       android:layout_toEndOf="@id/nav_view"
       app:defaultNavHost="true"
       app:navGraph="@navigation/mobile_navigation" />
</RelativeLayout>
底部導覽檢視區塊位於 res/layout-h470dp 目錄中:
<!-- res/layout-h470dp/navigation_activity.xml -->
<LinearLayout
   xmlns:android="http://schemas.android.com/apk/res/android"
   xmlns:app="http://schemas.android.com/apk/res-auto"
   xmlns:tools="http://schemas.android.com/tools"
   android:layout_width="match_parent"
   android:layout_height="match_parent"
   android:orientation="vertical"
   tools:context="com.example.android.codelabs.navigation.MainActivity">

   <androidx.appcompat.widget.Toolbar
       android:id="@+id/toolbar"
       android:layout_width="match_parent"
       android:layout_height="wrap_content"
       android:background="@color/colorPrimary"
       android:theme="@style/ThemeOverlay.MaterialComponents.Dark.ActionBar" />

   <androidx.fragment.app.FragmentContainerView
       android:id="@+id/my_nav_host_fragment"
       android:name="androidx.navigation.fragment.NavHostFragment"
       android:layout_width="match_parent"
       android:layout_height="0dp"
       android:layout_weight="1"
       app:defaultNavHost="true"
       app:navGraph="@navigation/mobile_navigation" />

   <com.google.android.material.bottomnavigation.BottomNavigationView
       android:id="@+id/bottom_nav_view"
       android:layout_width="match_parent"
       android:layout_height="wrap_content"
       app:menu="@menu/bottom_nav_menu" />
</LinearLayout>
您可以在 res/layout 目錄中找到導覽匣版面配置。請將這個目錄用於沒有特定設定限定詞的預設版面配置:
<!-- res/layout/navigation_activity.xml -->
<androidx.drawerlayout.widget.DrawerLayout
   xmlns:android="http://schemas.android.com/apk/res/android"
   xmlns:app="http://schemas.android.com/apk/res-auto"
   xmlns:tools="http://schemas.android.com/tools"
   android:id="@+id/drawer_layout"
   android:layout_width="match_parent"
   android:layout_height="match_parent"
   tools:context="com.example.android.codelabs.navigation.MainActivity">

   <LinearLayout
       android:layout_width="match_parent"
       android:layout_height="match_parent"
       android:orientation="vertical">

       <androidx.appcompat.widget.Toolbar
           android:id="@+id/toolbar"
           android:layout_width="match_parent"
           android:layout_height="wrap_content"
           android:background="@color/colorPrimary"
           android:theme="@style/ThemeOverlay.MaterialComponents.Dark.ActionBar" />

       <androidx.fragment.app.FragmentContainerView
           android:id="@+id/my_nav_host_fragment"
           android:name="androidx.navigation.fragment.NavHostFragment"
           android:layout_width="match_parent"
           android:layout_height="match_parent"
           app:defaultNavHost="true"
           app:navGraph="@navigation/mobile_navigation" />
   </LinearLayout>

   <com.google.android.material.navigation.NavigationView
       android:id="@+id/nav_view"
       android:layout_width="wrap_content"
       android:layout_height="match_parent"
       android:layout_gravity="start"
       app:menu="@menu/nav_drawer_menu" />
</androidx.drawerlayout.widget.DrawerLayout>
Android 會根據優先順序來決定要套用的資源。以這個範例而言,-w960dp (或可用寬度 >= 960dp) 的優先順序高於 -h470dp (或可用高度 >= 470)。如果裝置設定不符合其中一項條件,系統就會使用預設版面配置資源 (res/layout/navigation_activity.xml)。
在處理導覽事件時,您只需要連接目前顯示小工具所對應的事件,如以下範例所示。
Kotlin
class MainActivity : AppCompatActivity() {

   private lateinit var appBarConfiguration : AppBarConfiguration

   override fun onCreate(savedInstanceState: Bundle?) {
      super.onCreate(savedInstanceState)
      setContentView(R.layout.navigation_activity)
      val drawerLayout : DrawerLayout? = findViewById(R.id.drawer_layout)
      appBarConfiguration = AppBarConfiguration(
                  setOf(R.id.home_dest, R.id.deeplink_dest),
                  drawerLayout)

      ...

      // Initialize the app bar with the navigation drawer if present.
      // If the drawerLayout is not null here, a Navigation button will be added
      // to the app bar whenever the user is on a top-level destination.
      setupActionBarWithNavController(navController, appBarConfig)

      // Initialize the NavigationView if it is present,
      // so that clicking an item takes
      // the user to the appropriate destination.
      val sideNavView = findViewById<NavigationView>(R.id.nav_view)
      sideNavView?.setupWithNavController(navController)

      // Initialize the BottomNavigationView if it is present,
      // so that clicking an item takes
      // the user to the appropriate destination.
      val bottomNav = findViewById<BottomNavigationView>(R.id.bottom_nav_view)
      bottomNav?.setupWithNavController(navController)

      ...
    }

    ...
}
Java
public class MainActivity extends AppCompatActivity {

   private AppBarConfiguration appBarConfiguration;

   @Override
   protected void onCreate(@Nullable Bundle savedInstanceState) {
       super.onCreate(savedInstanceState);
       setContentView(R.layout.navigation_activity);
       NavHostFragment host = (NavHostFragment) getSupportFragmentManager()
               .findFragmentById(R.id.my_nav_host_fragment);
       NavController navController = host.getNavController();

       DrawerLayout drawerLayout = findViewById(R.id.drawer_layout);
       appBarConfiguration = new AppBarConfiguration.Builder(
               R.id.home_dest, R.id.deeplink_dest)
               .setDrawerLayout(drawerLayout)
               .build();

       // Initialize the app bar with the navigation drawer if present.
       // If the drawerLayout is not null here, a Navigation button will be added to
       // the app bar whenever the user is on a top-level destination.
       NavigationUI.setupActionBarWithNavController(
               this, navController, appBarConfiguration);


       // Initialize the NavigationView if it is present,
       // so that clicking an item takes
       // the user to the appropriate destination.
       NavigationView sideNavView = findViewById(R.id.nav_view);
       if(sideNavView != null) {
           NavigationUI.setupWithNavController(sideNavView, navController);
       }

       // Initialize the BottomNavigationView if it is present,
       // so that clicking an item takes
       // the user to the appropriate destination.
       BottomNavigationView bottomNav = findViewById(R.id.bottom_nav_view);
       if(bottomNav != null) {
           NavigationUI.setupWithNavController(bottomNav, navController);
       }

   }
}
如果裝置設定有所變更,除非明確設定,否則 Android 會刪除先前設定中的活動與相關檢視區塊,然後利用新設定的資源重新建立活動。接下來,受到刪除並重新建立的活動,會自動在 onCreate() 中連接到適當的全域導覽元素。
考慮分割檢視畫面版面配置的替代方案
分割檢視畫面版面配置 (或「主要/詳細版面配置」) 曾是平板電腦和其他大螢幕裝置的熱門推薦做法。
自 Android 平板電腦推出以來,裝置的生態系統快速增長。其中一個深深影響大螢幕裝置設計空間的因素,就是推出了多視窗模式,尤其是可徹底調整大小的任意格式視窗,例如 ChromeOS 裝置上的視窗。這大幅凸顯了每個應用程式畫面都是回應式畫面的重要性,而不應根據螢幕大小調整導覽結構。
雖然您可以使用 Navigation 程式庫實作分割畫面版面配置的介面,但還是建議考慮其他替代方案。
目的地名稱
如果您在圖表中使用 android:label 屬性提供目的地名稱,請一律使用資源值,確保內容仍可進行本地化。
<navigation ...>
    <fragment
        android:id="@+id/my_dest"
        android:name="com.example.MyFragment"
        android:label="@string/my_dest_label"
        tools:layout="@layout/my_fragment" />
    ...
如果使用資源值,只要設定變更,目的地就會自動套用最合適的資源。