
1. Before you begin
In this codelab you learn how to build distraction-optimized apps for Android Auto and Android Automotive OS using the Android for Cars App Library. You first add support for Android Auto and then, with minimal additional work, create a variant of the app that can run on Android Automotive OS. After getting the app running on both platforms, you build out an additional screen and some basic interactivity!
What you'll need
- The latest Android Studio.
- Experience with basic Kotlin.
- Basic knowledge of Android Services.
- Experience creating Android Virtual Devices and running them in the Android Emulator.
- Basic knowledge of Android app modularization.
- Basic knowledge of the Builder design pattern.
What you'll build
Android Auto | Android Automotive OS |
|
|

What you'll learn
- How the Car App Library's client-host architecture works.
- How to write your own
CarAppService,Session, andScreenclasses. - How to share your implementation across both Android Auto and Android Automotive OS.
- How to run Android Auto on your development machine using the Desktop Head Unit.
- How to run the Android Automotive OS emulator.
2. Get set up
Get the code
- The code for this codelab can be found in the
car-app-library-fundamentalsdirectory within thecar-codelabsGitHub repository. To clone it, run the following command:
git clone https://github.com/android/car-codelabs.git
- Alternatively, you can download the repository as a ZIP file:
Open the project
- After starting Android Studio, import the project, selecting just the
car-app-library-fundamentals/startdirectory. Thecar-app-library-fundamentals/enddirectory contains the solution code, which you can reference at any point if you get stuck or just want to see the full project.
Familiarize yourself with the code
- After opening the project in Android studio, take some time to look through the starting code.
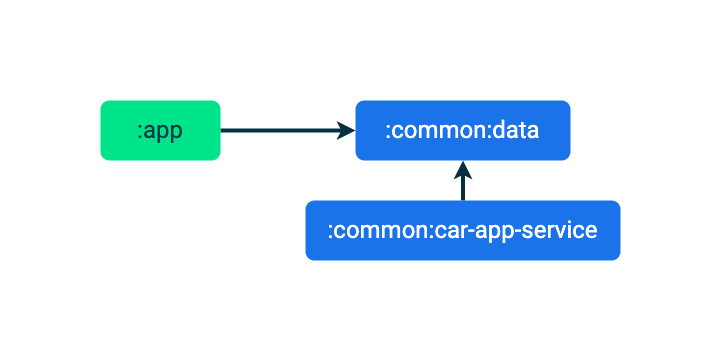
Notice that the starter code for the app is broken up into two modules, :app and :common:data.
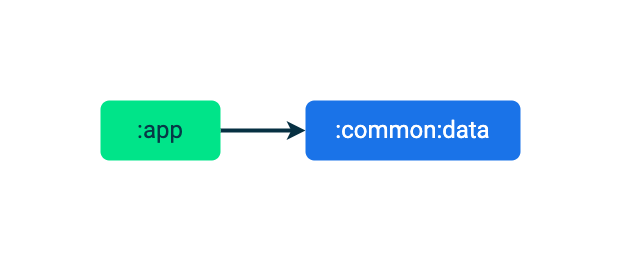
The :app module contains the mobile app's UI and logic, and the :common:data module contains the Place model data class and the repository used to read Place models. For simplicity's sake, the repository reads from a hardcoded list but could easily read from a database or a backend server in a real app.
The :app module includes a dependency on the :common:data module so that it can read and present the list of Place models.
3. Learn about the Android for Cars App Library
The Android for Cars App Library is a set of Jetpack libraries that enable developers to build apps for use in vehicles. It provides a templated framework that provides driving-optimized user interfaces while also taking care of adapting to the various hardware configurations present in cars (for example, input methods, screen sizes, and aspect ratios). Together, this makes it easy for you as a developer to build an app and have confidence that it will perform well on a variety of vehicles running both Android Auto and Android Automotive OS.
Learn how it works
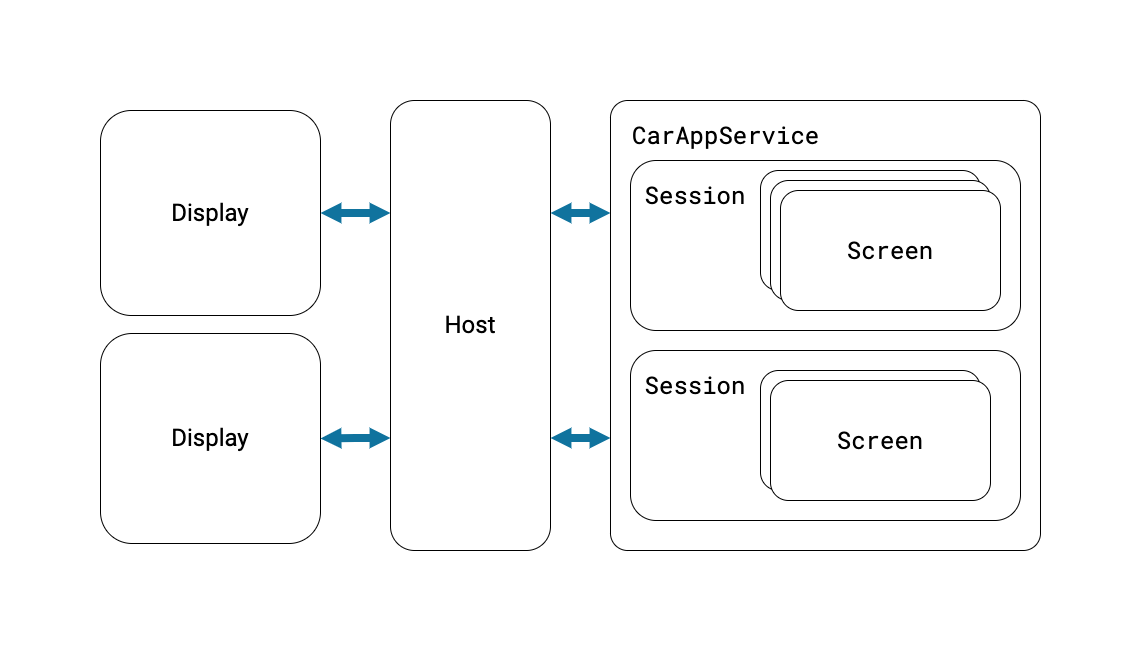
Apps built using the Car App Library don't run directly on Android Auto or Android Automotive OS. Instead, they rely on a host app that communicates with client apps (your app) and renders the client's user interfaces on their behalf. Android Auto itself is a host and the Google Automotive App Host is the host used on Android Automotive OS vehicles with Google built-in.
The following are the key classes of the Car App Library you must extend when building your app:
CarAppService
CarAppService is a subclass of Android's Service class and serves as the entry point for host applications to communicate with client apps (such as the one you build in this codelab). Its main purpose is to create Session instances that the host app interacts with.
Session
You can think of a Session as an instance of a client app running on a display in the vehicle. Like other Android components, it has a lifecycle of its own that can be used to initialize and tear down resources used throughout the Session instance's existence. There is a one-to-many relationship between CarAppService and Session. For example, one CarAppService may have two Session instances, one for a primary display and another for a cluster display for navigation apps that support cluster screens.
Screen
Screen instances are responsible for generating the user interfaces rendered by host apps. These user interfaces are represented by Template classes that each model a specific type of layout, such as a grid or list. Each Session manages a stack of Screen instances that handle user flows through the different parts of your app. As with a Session, a Screen has a lifecycle of its own that you can hook into.
You'll learn the ins and outs of these classes when your write a CarAppService, Session, and Screen in the Write your CarAppService section of this codelab.
4. Set up your initial configuration
To begin, set up the module that contains the CarAppService and declare its dependencies.
Create the car-app-service module
- With the
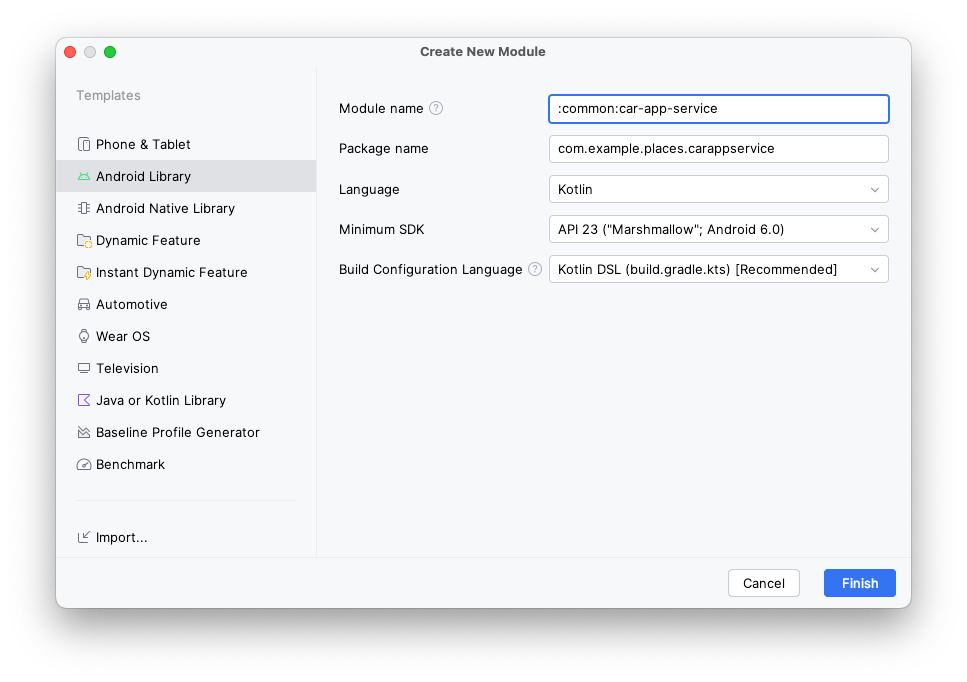
:commonmodule selected in the Project window, right click and choose the New > Module option. - In the module wizard that opens up, select the Android Library template (so this module can be used as a dependency by other modules) in the list on the left side, and then use the following values:
- Module name:
:common:car-app-service - Package name:
com.example.places.carappservice - Minimum SDK:
API 23: Android 6.0 (Marshmallow)
Set up dependencies
- In the
libs.version.tomlfile, add entries for theandroidx.car.app:appartifact.
libs.version.toml
[versions]
...
carApp = "1.7.0-rc01"

[libraries]
...
androidx-car-app = { group = "androidx.car.app", name = "app", version.ref = "carApp" }
- Next, add two dependencies to the
:common:car-app-servicemodule'sbuild.gradle.ktsfile.
androidx.car.app:app. This is the primary artifact of the Car App Library and includes all of the core classes used when building apps. There are three other artifacts that make up the library,androidx.car.app:app-projectedfor Android Auto-specific functionality,androidx.car.app:app-automotivefor Android Automotive OS functionality code, andandroidx.car.app:app-testingfor some helpers useful for unit testing. You make use ofapp-projectedandapp-automotivelater in the codelab.:common:data. This is the same data module used by the existing mobile app and allows the same data source to be used for every version of the app experience.
build.gradle.kts (Module :common:car-app-service)
dependencies {
    ...
    implementation(libs.androidx.car.app)
    implementation(project(":common:data"))
    ...
}
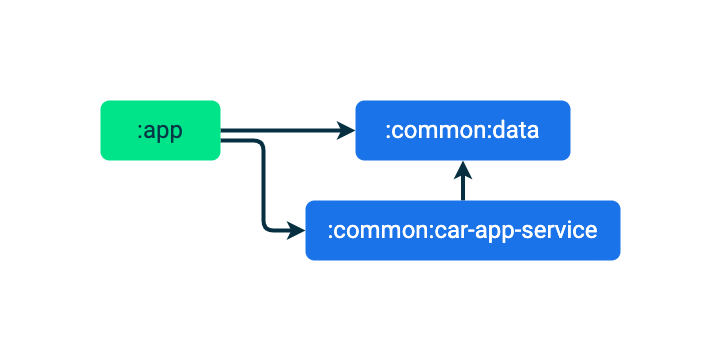
With this change, the dependency graph for the app's own modules is the following:
Now that dependencies are set up, it's time to write the CarAppService.
5. Write your CarAppService
- Start by creating a file named
PlacesCarAppService.ktin thecarappservicepackage within the:common:car-app-servicemodule. - Within this file, create a class named
PlacesCarAppService, which extendsCarAppService.
PlacesCarAppService.kt
import androidx.car.app.CarAppService
import androidx.car.app.Session
import androidx.car.app.SessionInfo
import androidx.car.app.validation.HostValidator

...

class PlacesCarAppService : CarAppService() {

    override fun createHostValidator(): HostValidator {
        return HostValidator.ALLOW_ALL_HOSTS_VALIDATOR
    }

   override fun onCreateSession(sessionInfo: SessionInfo): Session {
        // PlacesSession will be an unresolved reference until the next step
        return PlacesSession()
    }
}
The CarAppService abstract class implements Service methods such as onBind and onUnbind for you and prevents further overrides of those methods to ensure proper interoperability with host applications. All you have to do is implement createHostValidator and onCreateSession.
The HostValidator you return from createHostValidator is referenced when your CarAppService is being bound in order to ensure that the host is trusted and that binding fails if the host doesn't match the parameters you define. For the purposes of this codelab (and testing in general), the ALLOW_ALL_HOSTS_VALIDATOR makes it easy to ensure your app connects but shouldn't be used in production. See the documentation for createHostValidator for more on how to configure this for a production app.
For an app as simple as this, onCreateSession can simply return an instance of a Session. In a more complicated app, this would be a good place to initialize long-lived resources such as metrics and logging clients that are used while your app is running on the vehicle.
- Finally, you need to add the
<service>element that corresponds to thePlacesCarAppServicein the:common:car-app-servicemodule'sAndroidManifest.xmlfile in order to let the operating system (and, by extension, other apps such as hosts) know it exists.
AndroidManifest.xml (:common:car-app-service)
<?xml version="1.0" encoding="utf-8"?>
<manifest xmlns:android="http://schemas.android.com/apk/res/android">
    <!--
        This AndroidManifest.xml will contain all of the elements that should be shared across the
        Android Auto and Automotive OS versions of the app, such as the CarAppService <service> element
    -->

    <application>
        <service
            android:name="com.example.places.carappservice.PlacesCarAppService"
            android:exported="true">
            <intent-filter>
                <action android:name="androidx.car.app.CarAppService" />
                <category android:name="androidx.car.app.category.POI" />
            </intent-filter>
        </service>
    </application>
</manifest>
There are two important pieces to note here:
- The
<action>element allows host (and launcher) applications to find the app. - The
<category>element declares the app's category (point-of-interest in this case), which determines what app quality criteria it must meet (more details on that later). Other possible values are detailed in Supported app categories.
Create the PlacesSession class
- Within
PlacesCarAppService.kt, add the following code:
PlacesCarAppService.kt
import android.content.Intent
import androidx.car.app.Screen

...

class PlacesSession : Session() {
    override fun onCreateScreen(intent: Intent): Screen {
        // MainScreen will be an unresolved reference until the next step
        return MainScreen(carContext)
    }
}
For a simple app like this one, you can just return the main screen in onCreateScreen. However, since this method takes an Intent as a parameter, a more feature-rich app might also read from it and populate a back stack of screens or use some other conditional logic.
Create the MainScreen class
Next, create a new package named screen.
- Right click on the
com.example.places.carappservicepackage and select New > Package (the full package name for it will becom.example.places.carappservice.screen). This is where you put all of theScreensubclasses for the app. - In the
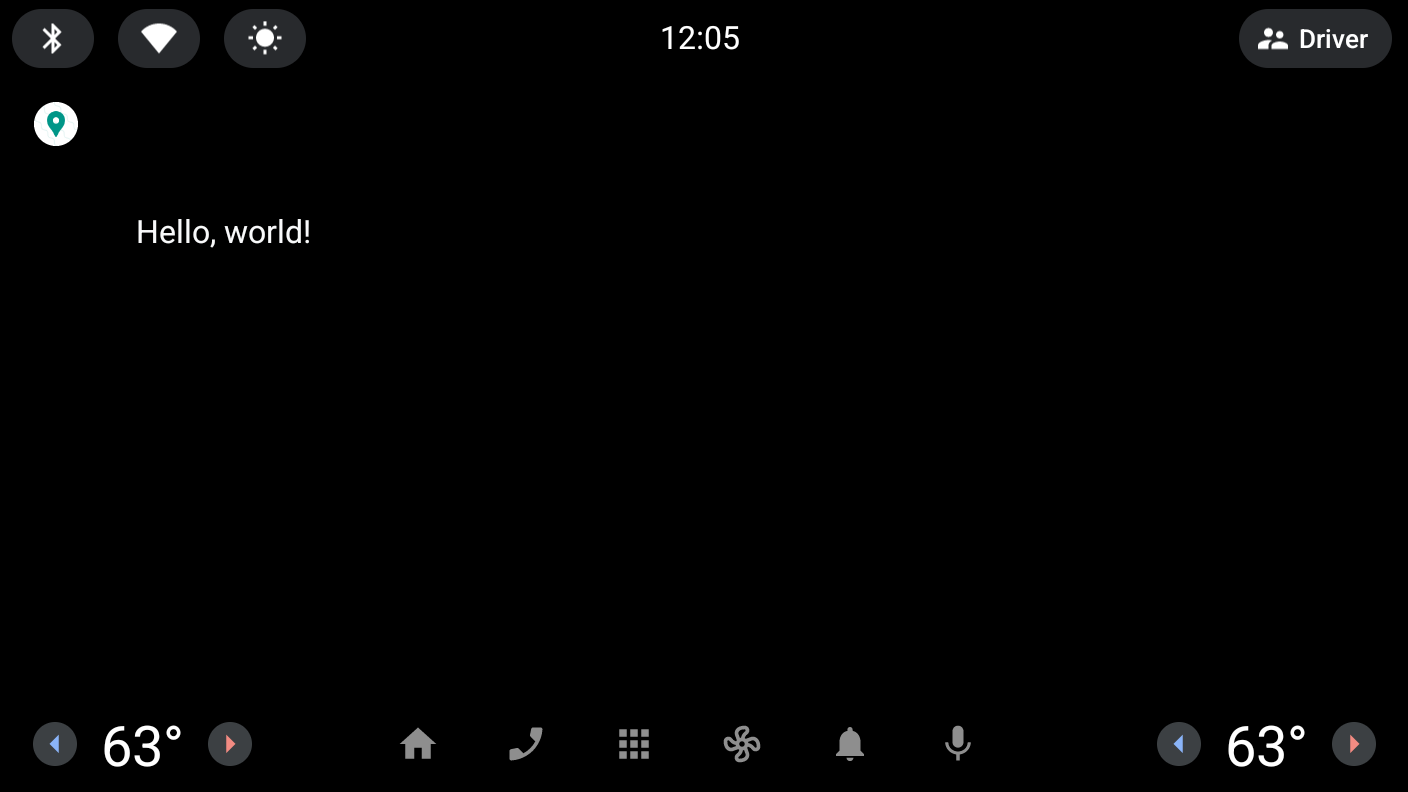
screenpackage, create a file namedMainScreen.ktto contain theMainScreenclass, which extendsScreen. For now, it will show a simple Hello, world! message using thePaneTemplate.
MainScreen.kt
import androidx.car.app.CarContext
import androidx.car.app.Screen
import androidx.car.app.model.Action
import androidx.car.app.model.Header
import androidx.car.app.model.Pane
import androidx.car.app.model.PaneTemplate
import androidx.car.app.model.Row
import androidx.car.app.model.Template

...

class MainScreen(carContext: CarContext) : Screen(carContext) {

    override fun onGetTemplate(): Template {
        val row = Row.Builder()
            .setTitle("Hello, world!")
            .build()

        val pane = Pane.Builder()
            .addRow(row)
            .build()

        return PaneTemplate.Builder(pane)
            .setHeader(
                Header.Builder()
                    .setStartHeaderAction(Action.APP_ICON)
                    .build()
            ).build()
    }
}
6. Add support for Android Auto
Though you've now implemented all of the logic needed to get the app up and running, there are two more pieces of configuration to set up before you can run it on Android Auto.
Add a dependency on the car-app-service module
In the :app module's build.gradle.kts file, add the following:
build.gradle.kts (Module :app)
dependencies {
    ...
    implementation(project(":common:car-app-service"))
    ...
}
With this change, the dependency graph for the app's own modules is the following:
This bundles the code you just wrote in the :common:car-app-service module along with other components included in the Car App Library, such as the provided permission granting activity.
Declare the com.google.android.gms.car.application meta-data
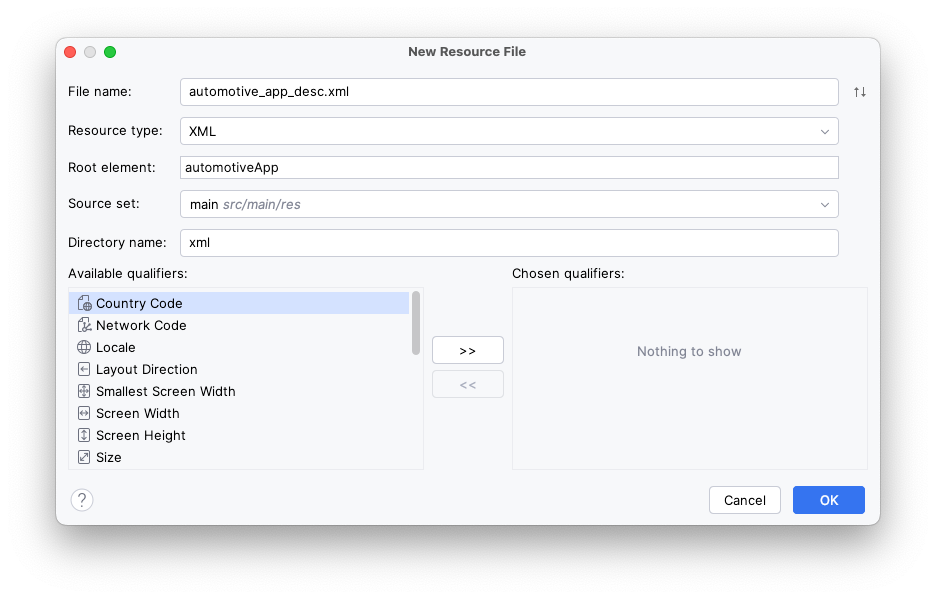
- Right click the
:common:car-app-servicemodule and select the New > Android Resource File option, and then override the following values:
- File name:
automotive_app_desc.xml - Resource type:
XML - Root element:
automotiveApp
- Within that file, add the following
<uses>element in order to declare that your app uses the templates provided by the Car App Library.
automotive_app_desc.xml
<?xml version="1.0" encoding="utf-8"?>
<automotiveApp>
    <uses name="template"/>
</automotiveApp>
- In the
:appmodule'sAndroidManifest.xmlfile, add the following<meta-data>element that references theautomotive_app_desc.xmlfile you just created.
AndroidManifest.xml (:app)
<application ...>

    <meta-data
        android:name="com.google.android.gms.car.application"
        android:resource="@xml/automotive_app_desc" />

    ...

</application>
This file is read by Android Auto and lets it know which capabilities your app supports–in this case, that it uses the Car App Library's templating system. This information is then used to handle behavior such as adding the app to the Android Auto launcher and opening it from notifications.
Optional: Listen for projection changes
Sometimes, you want to know whether or not a user's device is connected to a car. You can accomplish this by using the CarConnection API, which provides a LiveData that lets you observe the connection state.
- To use the
CarConnectionAPI, first add a dependency in the:appmodule on theandroidx.car.app:appartifact.
build.gradle.kts (Module :app)
dependencies {
    ...
    implementation(libs.androidx.car.app)
    ...
}
- For demonstration purposes, you can then create a simple Composable such as the following that displays the current connection state. In a real app, this state might be captured in some logging, used to disable some functionality on the phone screen while projecting, or something else.
MainActivity.kt
import androidx.car.app.connection.CarConnection

...

@Composable
fun ProjectionState(carConnectionType: Int, modifier: Modifier = Modifier) {
    val text = when (carConnectionType) {
        CarConnection.CONNECTION_TYPE_NOT_CONNECTED -> "Not projecting"
        CarConnection.CONNECTION_TYPE_NATIVE -> "Running on Android Automotive OS"
        CarConnection.CONNECTION_TYPE_PROJECTION -> "Projecting"
        else -> "Unknown connection type"
    }

    Text(
        text = text,
        style = MaterialTheme.typography.bodyMedium,
        modifier = modifier
    )
}
- Now that there's a way to display the data, read it and pass it into the Composable, as demonstrated in the following snippet.
MainActivity.kt
import androidx.compose.runtime.getValue
import androidx.compose.runtime.livedata.observeAsState

...

setContent {
    val carConnectionType by CarConnection(this).type.observeAsState(initial = -1)
    PlacesTheme {
        // A surface container using the 'background' color from the theme
        Surface(
            modifier = Modifier.fillMaxSize(),
            color = MaterialTheme.colorScheme.background
        ) {
            Column {
                Text(
                    text = "Places",
                    style = MaterialTheme.typography.displayLarge,
                    modifier = Modifier.padding(8.dp)
                )
                ProjectionState(
                    carConnectionType = carConnectionType,
                    modifier = Modifier.padding(8.dp)
                )
                PlaceList(places = PlacesRepository().getPlaces())
            }
        }
    }
}
- If you run the app, it should say Not projecting.
7. Test with the Desktop Head Unit (DHU)
With the CarAppService implemented and the Android Auto configuration in place, it's time to run the app and see how it looks.
- Install the app on your phone and then follow the instructions on installing and running the DHU.
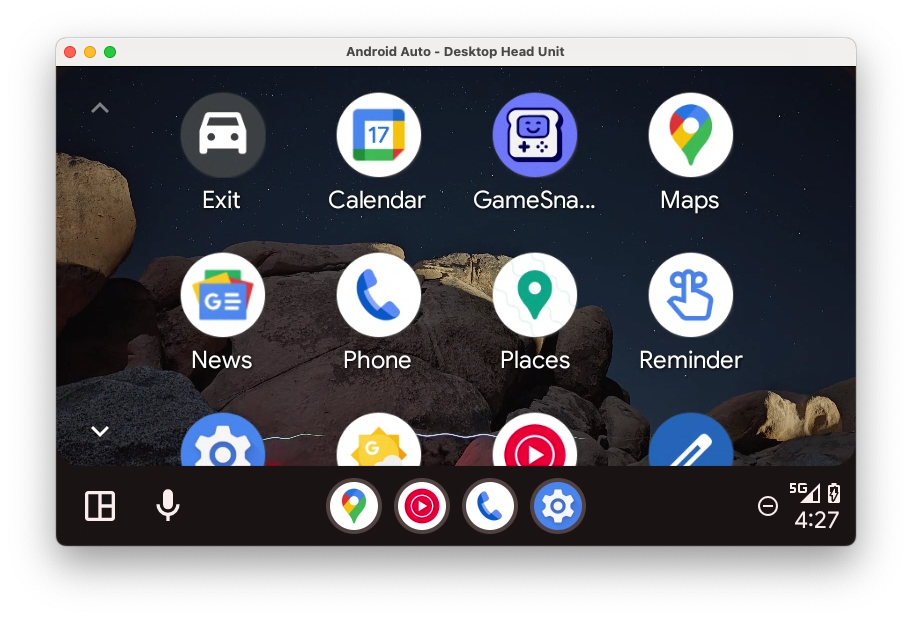
With the DHU up and running, you should see the app icon in the launcher (if not, double check that you've followed all the steps in the previous section, and then quit and restart the DHU from the terminal).
Uh-oh–it crashed!
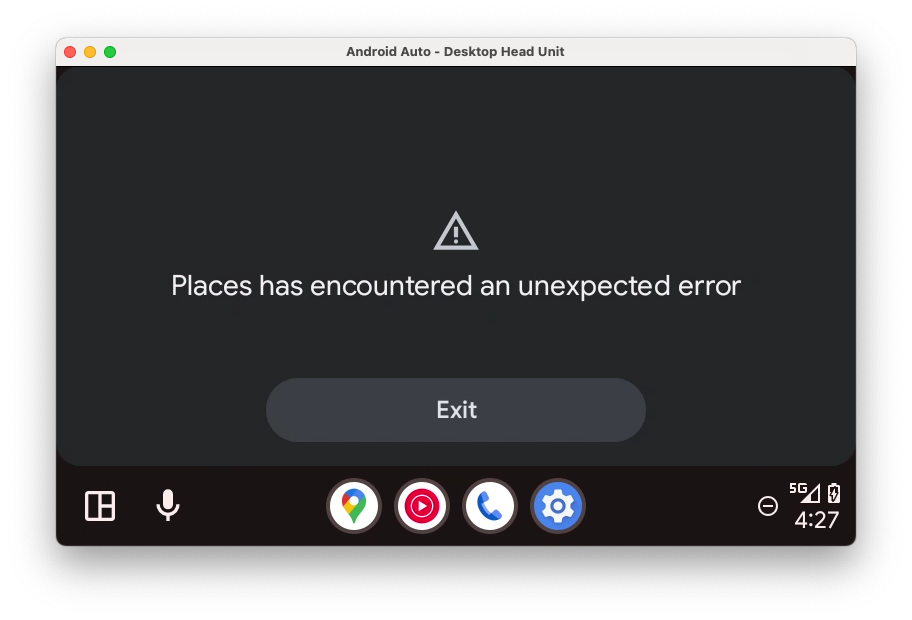
- To see why the app crashed, you can check the Logcat in Android Studio (you may need to remove the default Logcat filter for
package:mineand replace it withis:error).
Error: [type: null, cause: null, debug msg: java.lang.IllegalArgumentException: Min API level not declared in manifest (androidx.car.app.minCarApiLevel)
        at androidx.car.app.AppInfo.retrieveMinCarAppApiLevel(AppInfo.java:143)
        at androidx.car.app.AppInfo.create(AppInfo.java:91)
        at androidx.car.app.CarAppService.getAppInfo(CarAppService.java:380)
        at androidx.car.app.CarAppBinder.getAppInfo(CarAppBinder.java:255)
        at androidx.car.app.ICarApp$Stub.onTransact(ICarApp.java:182)
        at android.os.Binder.execTransactInternal(Binder.java:1285)
        at android.os.Binder.execTransact(Binder.java:1244)
]
From the log, you can see that there is a missing declaration in the manifest for the minimum API level that the app supports. Before adding that entry, it's best to understand why it's necessary.
Like Android itself, the Car App Library also has a concept of API levels since there needs to be a contract between host and client applications in order for them to communicate. Host applications support a given API level and its associated features (and, for backward compatibility, those from earlier levels as well). For example, the SignInTemplate can be used on hosts running API level 2 or above. But, if you tried to use it on a host that only supports API level 1, that host wouldn't know about the template type and wouldn't be able to do anything meaningful with it.
During the process of binding host to client, there must be some amount of overlap in supported API levels in order for the binding to succeed. For example, if a host only supports API level 1, but a client app cannot run without features from API level 2 (as indicated by this manifest declaration), the apps shouldn't connect because the client wouldn't be able to run successfully on the host. Thus, the minimum required API level must be declared by the client in its manifest in order to ensure that only a host that can support it is bound to it.
- To set the minimum supported API level, add the following
<meta-data>element in the:common:car-app-servicemodule'sAndroidManfiest.xmlfile:
AndroidManifest.xml (:common:car-app-service)
<application>
    <meta-data
        android:name="androidx.car.app.minCarApiLevel"
        android:value="1" />
    <service android:name="com.example.places.carappservice.PlacesCarAppService" ...>
        ...
    </service>
</application>
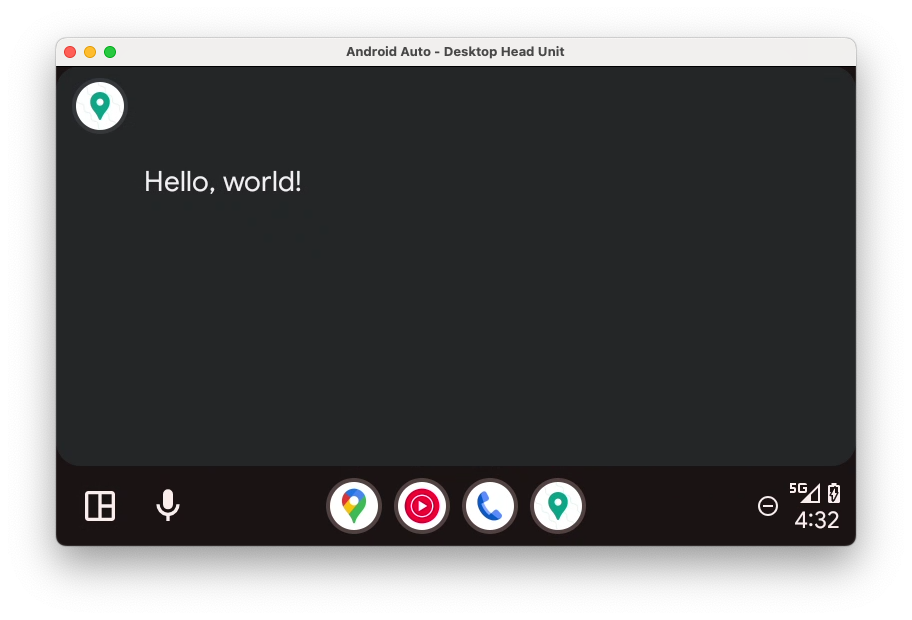
- Install the app again and launch it on the DHU, and then you should see the following:
For the sake of completeness, you can also try setting the minCarApiLevel to a large value (e.g. 100) to see what happens when you try to start the app if the host and client aren't compatible (hint: it crashes, similar to when no value is set).
It's also important to note that, as with Android itself, you can use features from an API higher than the declared minimum if you verify at runtime that the host supports the required level.
Optional: Listen for projection changes
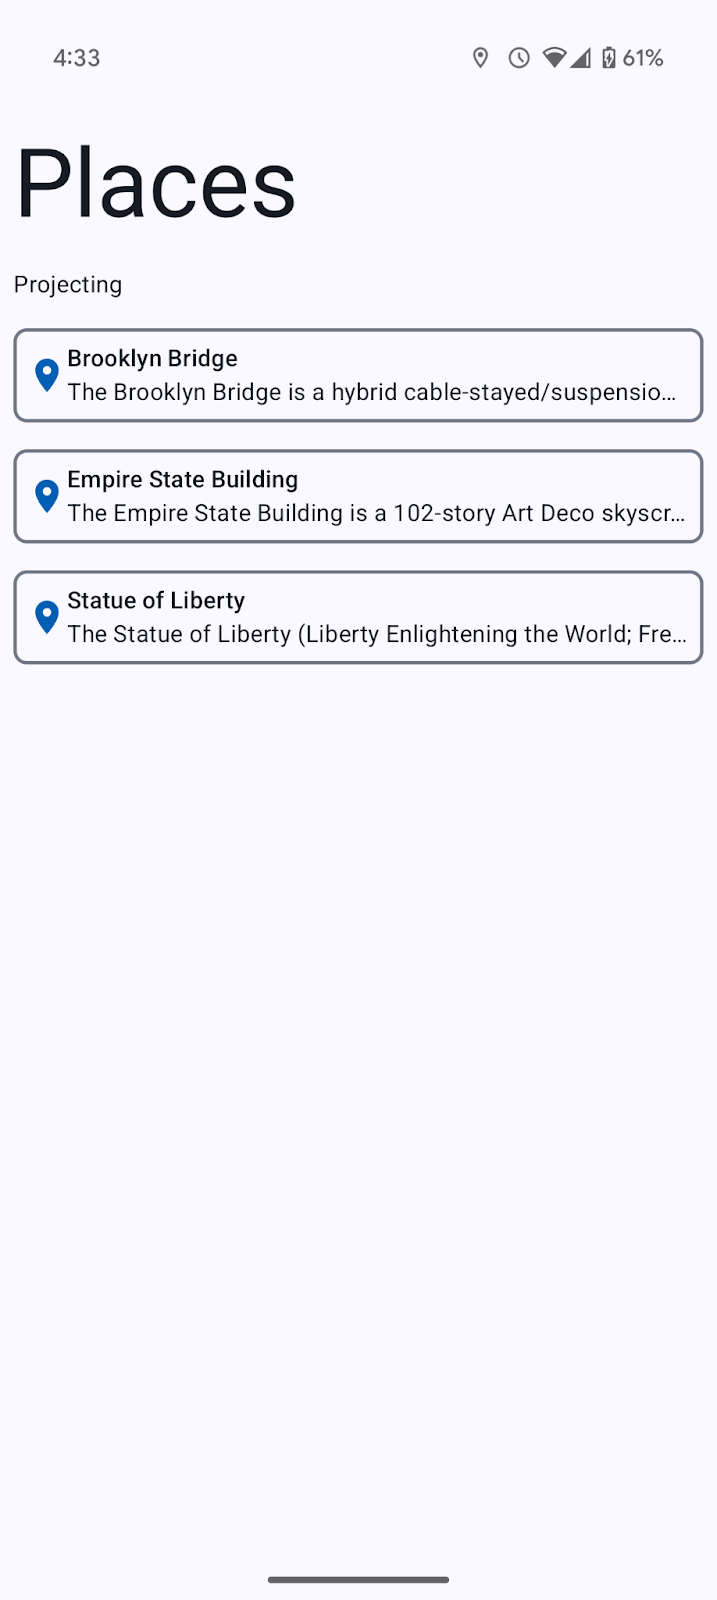
- If you added the
CarConnectionlistener in the previous step, you should see the state update on your phone when the DHU is running, as seen below:
8. Add support for Android Automotive OS
With Android Auto up and running, it's time to go the extra mile and support Android Automotive OS as well.
Create the :automotive module
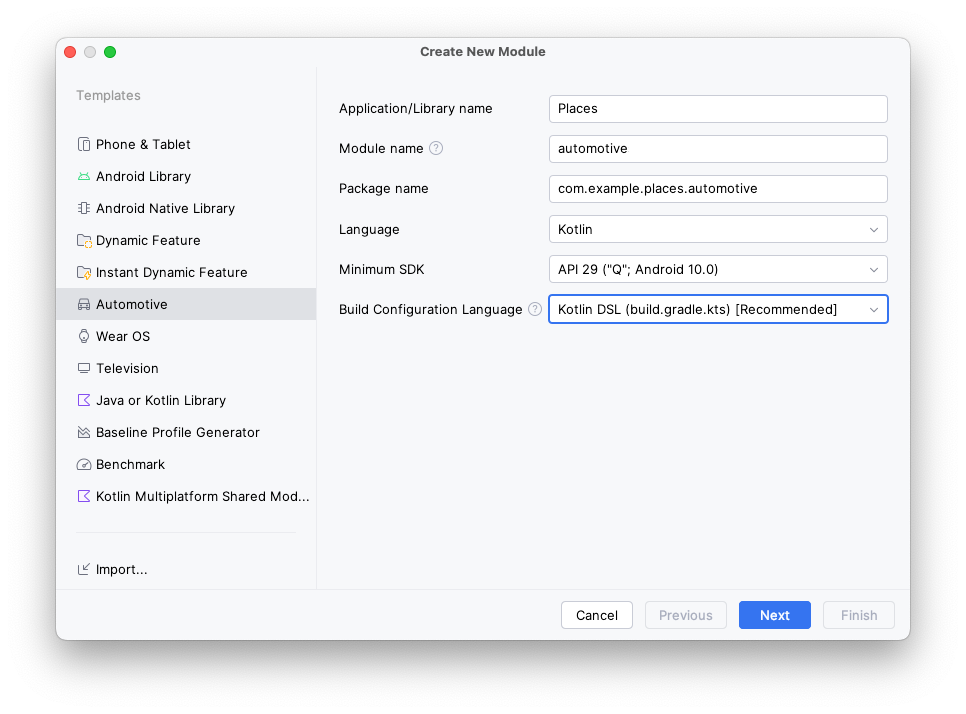
- To create a module that contains the code specific to the Android Automotive OS version of the app, open File > New > New Module... in Android Studio, select the Automotive option from the list of template types on the left, and then use the following values:
- Application/Library name:
Places(the same as the main app, but you could also choose a different name if desired) - Module name:
automotive - Package name:
com.example.places.automotive - Language:
Kotlin - Minimum SDK:
API 29: Android 10.0 (Q)– all Android Automotive OS vehicles that support Car App Library apps run at least API 29.
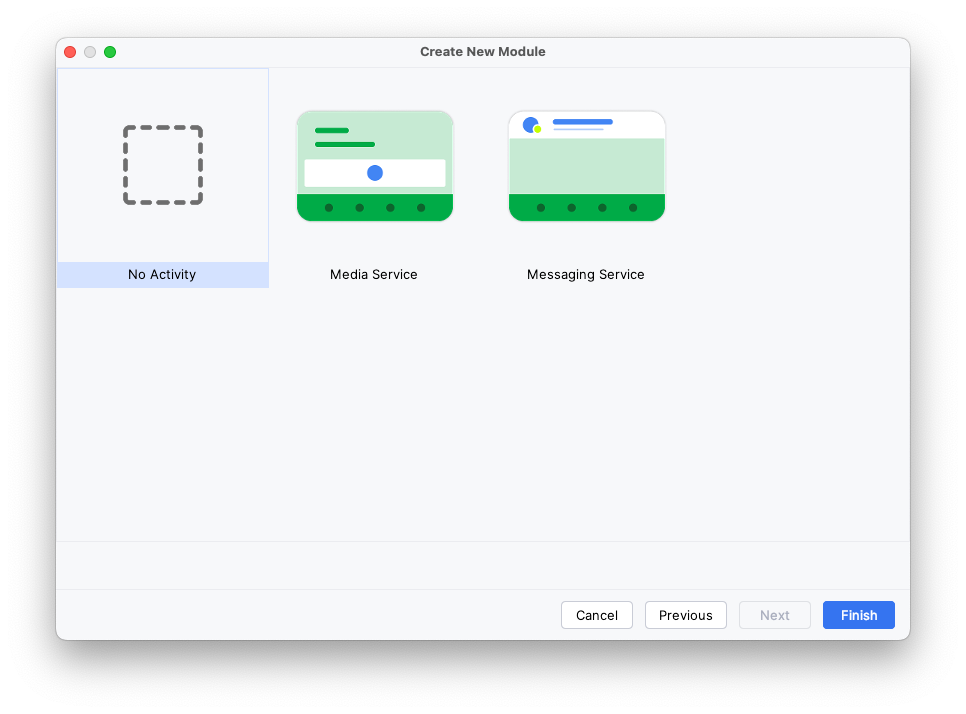
- Click Next, then select No Activity on the next screen before finally clicking Finish.
Add dependencies
Just like with Android Auto, you need to declare a dependency on the :common:car-app-service module. By doing so, you get to share your implementation across both platforms.
Additionally, you need to add a dependency on the androidx.car.app:app-automotive artifact. Unlike the androidx.car.app:app-projected artifact, which is optional for Android Auto, this dependency is required on Android Automotive OS since it includes the CarAppActivity used to run your app.
- First, add an entry for the
androidx.car.app:app-automotiveartifact inlibs.versions.toml.
libs.version.toml
[libraries]
...
androidx-car-app-automotive = { group = "androidx.car.app", name = "app-automotive", version.ref = "carApp"}
- To add dependencies, open the
build.gradle.ktsfile, and then insert the following code:
build.gradle.kts (Module :automotive)
dependencies {
    ...
    implementation(project(":common:car-app-service"))
    implementation(libs.androidx.car.app.automotive)
    ...
}
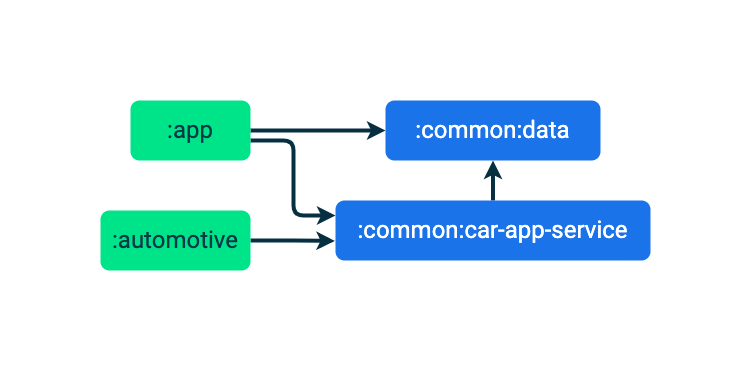
With this change, the dependency graph for the app's own modules is the following:
Set up the manifest
- First, you need to declare two features,
android.hardware.type.automotiveandandroid.software.car.templates_host, as required.
android.hardware.type.automotive is a system feature that indicates that the device itself is a vehicle (see FEATURE_AUTOMOTIVE for more details). Only apps that mark this feature as required can be submitted to an Automotive OS track on the Play Console (and apps submitted to other tracks cannot require this feature). android.software.car.templates_host is a system feature only present in vehicles that have the template host required to run template apps. For this codelab, these changes are sufficient. When building your own app, be sure to check that your app meets all of the Google Play feature requirements for Android Automotive OS.
AndroidManifest.xml (:automotive)
<manifest xmlns:android="http://schemas.android.com/apk/res/android">
    <uses-feature
        android:name="android.hardware.type.automotive"
        android:required="true" />
    <uses-feature
        android:name="android.software.car.templates_host"
        android:required="true" />
    ...
</manifest>
- Next, you need to add a reference to the
automotive_app_desc.xmlfile as you did for Android Auto.
Note that this time the android:name attribute is different from before–instead of com.google.android.gms.car.application, it is com.android.automotive. Like before, this references the automotive_app_desc.xml file in the :common:car-app-service module, meaning that the same resource is used across both Android Auto and Android Automotive OS. Additionally, the <meta-data> element is within the <application> element (so you have to change the application tag from being self-closing).
AndroidManifest.xml (:automotive)
<application>
    ...
    <meta-data android:name="com.android.automotive"
        android:resource="@xml/automotive_app_desc"/>
    ...
</application>
- Finally, you need to add an
<activity>element for theCarAppActivitythat's included in the library.
AndroidManifest.xml (:automotive)
<manifest xmlns:android="http://schemas.android.com/apk/res/android">
    ...
    <application ...>
        ...
        <activity
            android:name="androidx.car.app.activity.CarAppActivity"
            android:exported="true"
            android:launchMode="singleTask"
            android:theme="@android:style/Theme.DeviceDefault.NoActionBar">

            <intent-filter>
                <action android:name="android.intent.action.MAIN" />
                <category android:name="android.intent.category.LAUNCHER" />
            </intent-filter>

            <meta-data
                android:name="distractionOptimized"
                android:value="true" />
        </activity>
    </application>
</manifest>
And here's what all of that does:
android:namelists the fully qualified class name of theCarAppActivityclass from theapp-automotivepackage.android:exportedis set totruesince thisActivitymust be launchable by an app other than itself (the launcher).android:launchModeis set tosingleTaskso there can only be one instance of theCarAppActivityat a time.android:themeis set to@android:style/Theme.DeviceDefault.NoActionBarso that the app takes up the full screen space available to it.- The intent filter indicates that this is the launcher
Activityfor the app. - There is a
<meta-data>element that indicates to the system that the app can be used while UX restrictions are in place, such as when the vehicle is in motion.
Optional: copy the launcher icons from the :app module
Since you just created the :automotive module, it has the default green Android logo icons.
- If you want, copy and paste the
mipmapresource directory from the:appmodule into the:automotivemodule to use the same launcher icons as the mobile app.
9. Test with the Android Automotive OS emulator
Create an Android Automotive OS Android Virtual Device
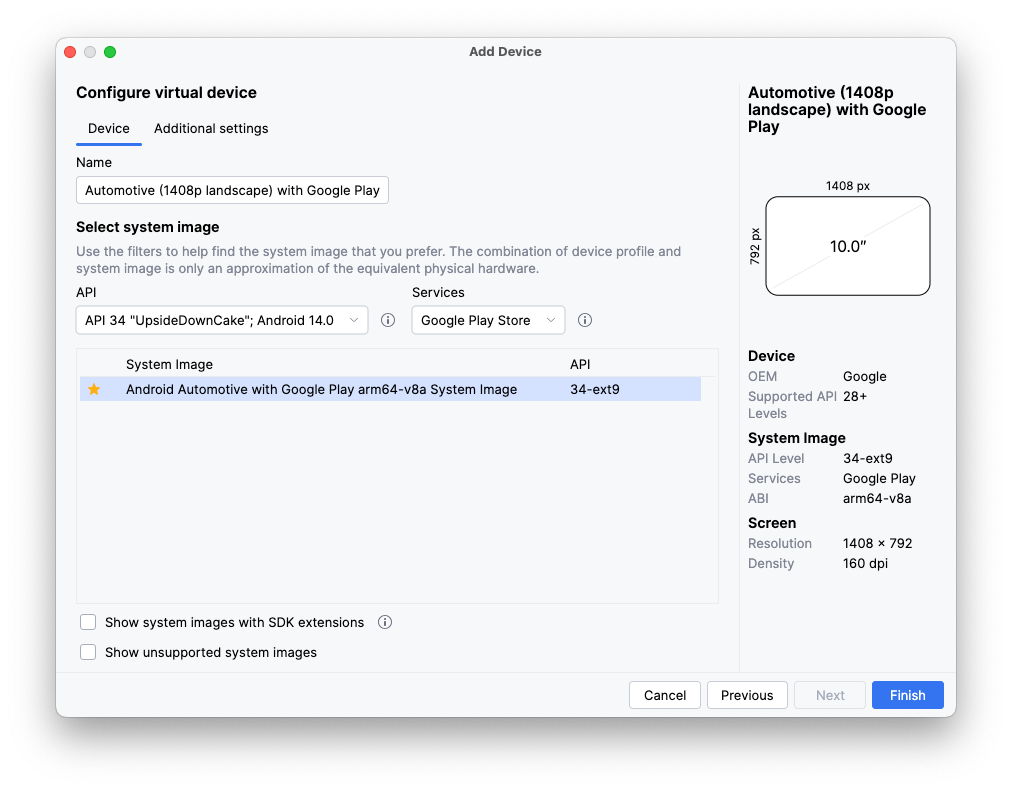
- After opening the Device Manager, select Automotive under the Category column on the left side of the window. Then, select the Automotive (1408p landscape) with Google Play device definition from the list and click Next.

- On the next page, select the API 34 system image (it will be downloaded if it isn't already) and create the AVD by clicking Finish.
Run the app
Run the app on the emulator you just created using the automotive run configuration.

In the next step, you make changes in the :common:car-app-service module to display the list of places and to allow the user to start navigation to a chosen location in another app.
10. Add a map and detail screen
Add a map to the main screen
- To begin, replace the code in the
MainScreenclass'sonGetTemplatemethod with the following:
MainScreen.kt
import androidx.car.app.model.CarLocation
import androidx.car.app.model.Distance
import androidx.car.app.model.DistanceSpan
import androidx.car.app.model.ItemList
import androidx.car.app.model.Metadata
import androidx.car.app.model.Place
import androidx.car.app.model.PlaceListMapTemplate
import androidx.car.app.model.PlaceMarker
import com.example.places.data.PlacesRepository

...

override fun onGetTemplate(): Template {
    val placesRepository = PlacesRepository()
    val itemListBuilder = ItemList.Builder()
        .setNoItemsMessage("No places to show")

    placesRepository.getPlaces()
        .forEach {
            itemListBuilder.addItem(
                Row.Builder()
                    .setTitle(it.name)
                    // Each item in the list *must* have a DistanceSpan applied to either the title
                    // or one of its lines of text (to help drivers make decisions)
                    .addText(SpannableString(" ").apply {
                        setSpan(
                            DistanceSpan.create(
                                Distance.create(Math.random() * 100, Distance.UNIT_KILOMETERS)
                            ), 0, 1, Spannable.SPAN_INCLUSIVE_INCLUSIVE
                        )
                    })
                    .setOnClickListener { TODO() }
                    // Setting Metadata is optional, but is required to automatically show the
                    // item's location on the provided map
                    .setMetadata(
                        Metadata.Builder()
                            .setPlace(Place.Builder(CarLocation.create(it.latitude, it.longitude))
                                // Using the default PlaceMarker indicates that the host should
                                // decide how to style the pins it shows on the map/in the list
                                .setMarker(PlaceMarker.Builder().build())
                                .build())
                            .build()
                    ).build()
            )
        }

    return PlaceListMapTemplate.Builder()
        .setTitle("Places")
        .setItemList(itemListBuilder.build())
        .build()
}
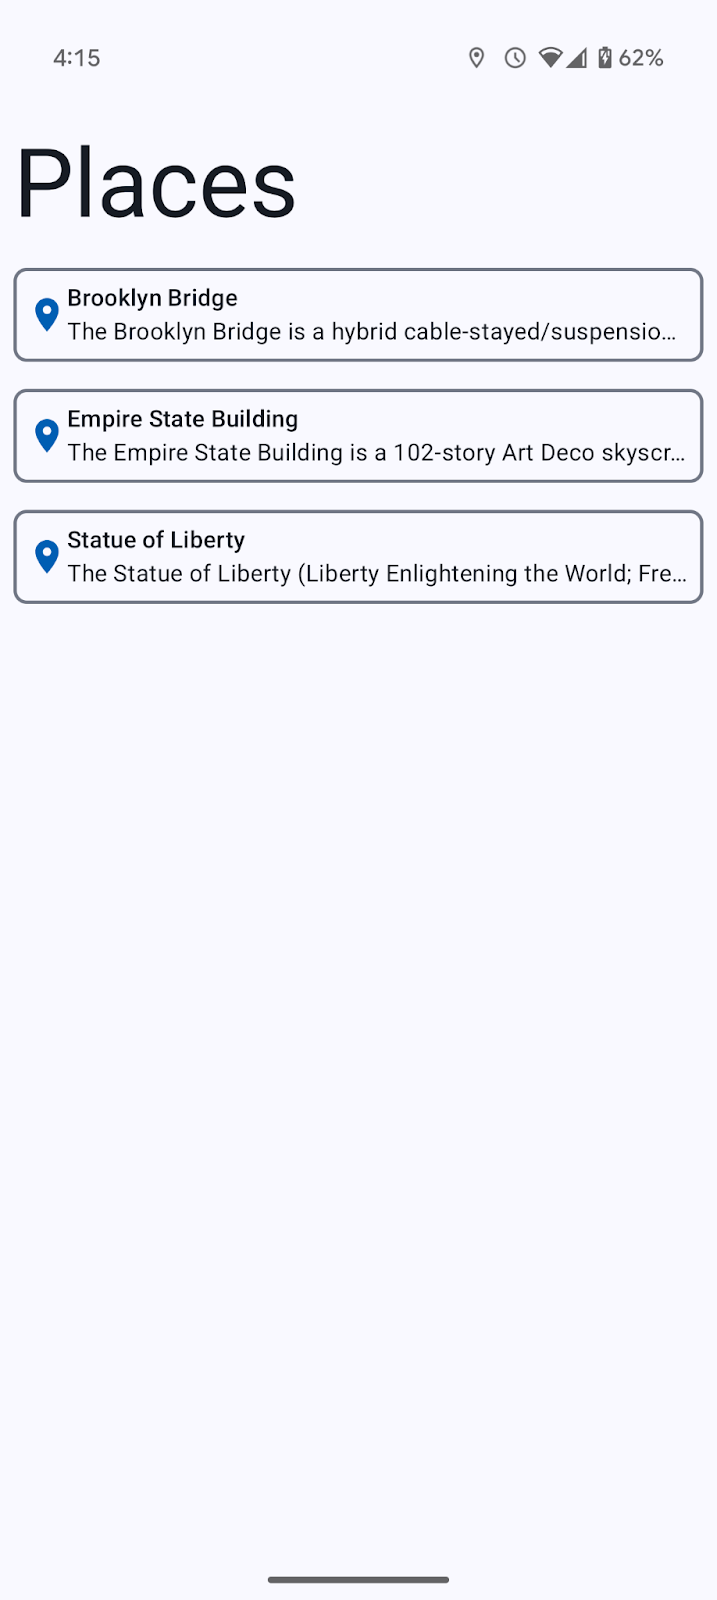
This code reads the list of Place instances from the PlacesRepository and then converts each of them into a Row to be added to the ItemList displayed by the PlaceListMapTemplate.
- Run the app again (on either or both platforms) to see the result:
Android Auto | Android Automotive OS |
|
|
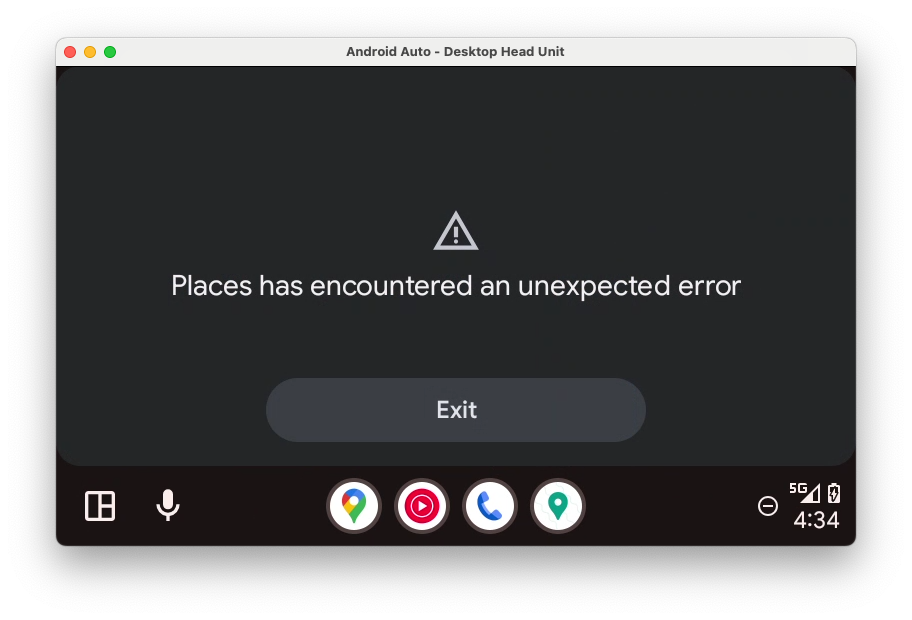
Uh-oh, another error–it looks like there's a permission missing.
java.lang.SecurityException: The car app does not have a required permission: androidx.car.app.MAP_TEMPLATES
        at android.os.Parcel.createExceptionOrNull(Parcel.java:2373)
        at android.os.Parcel.createException(Parcel.java:2357)
        at android.os.Parcel.readException(Parcel.java:2340)
        at android.os.Parcel.readException(Parcel.java:2282)
        ...
- To fix the error, add the following
<uses-permission>element in the:common:car-app-servicemodule's manifest.
This permission must be declared by any app that uses the PlaceListMapTemplate or the app crashes as just demonstrated. Note that only apps which declare their category as androidx.car.app.category.POI can use this template and, in turn, this permission.
AndroidManifest.xml (:common:car-app-service)
<manifest xmlns:android="http://schemas.android.com/apk/res/android">
    <uses-permission android:name="androidx.car.app.MAP_TEMPLATES" />
    ...
</manifest>
If you run the app after adding the permission, it should look like the following on each platform:
Android Auto | Android Automotive OS |
|
|
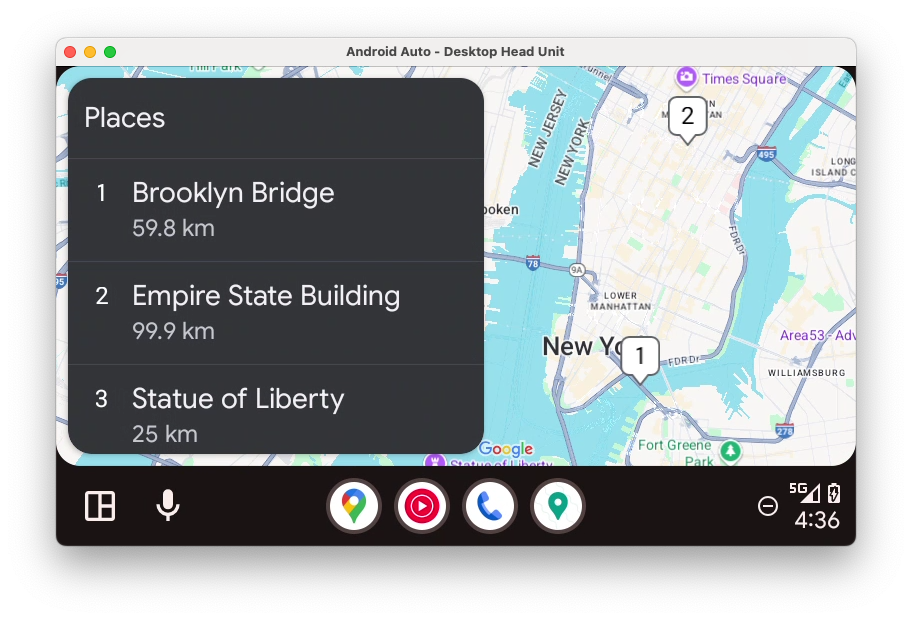
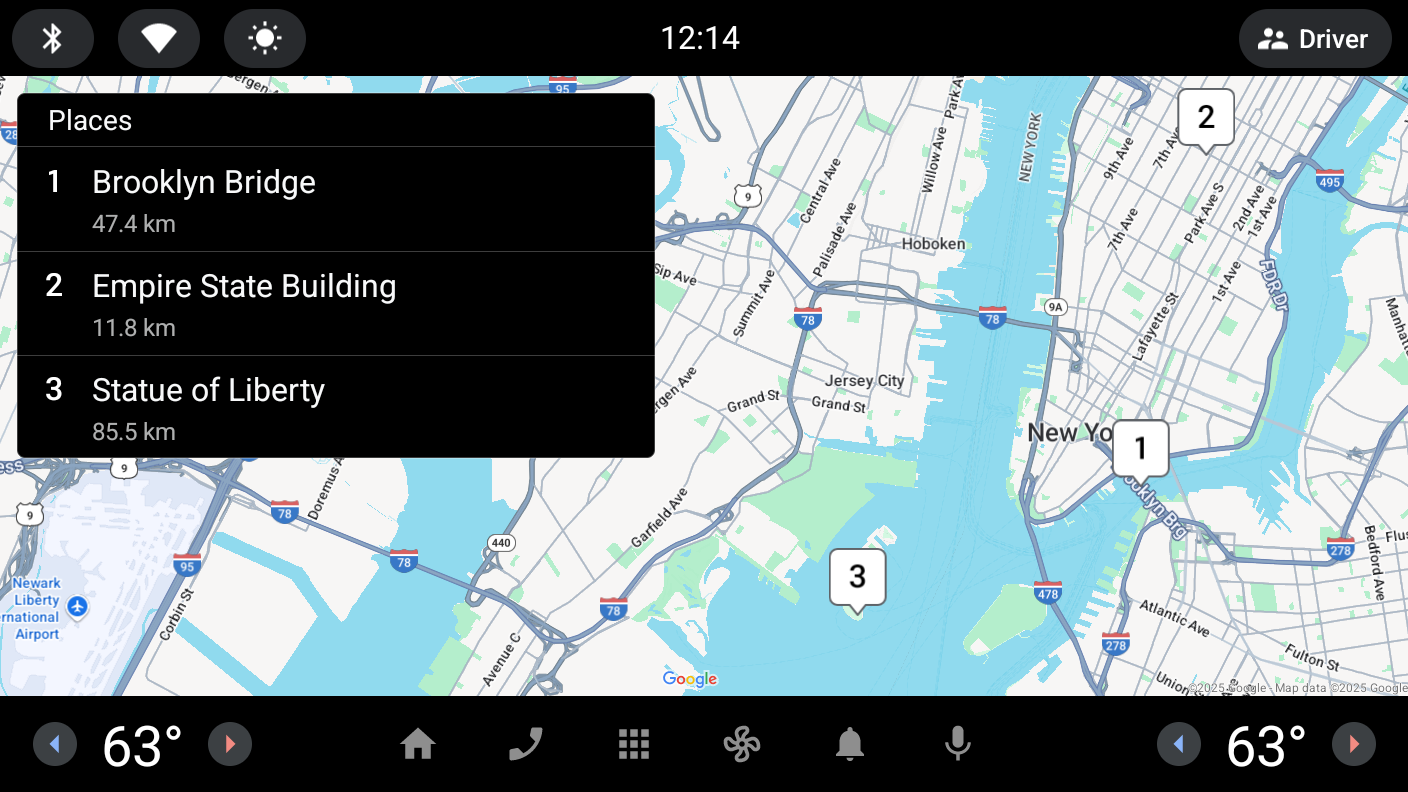
Rendering the map is handled for you by the application host when you provide the necessary Metadata.
Add a detail screen
Next, it's time to add a detail screen to let users see more information about a specific location and have the option to either navigate to that location using their preferred navigation app or return to the list of other places. This can be done using the PaneTemplate, which lets you display up to four rows of information next to optional action buttons.
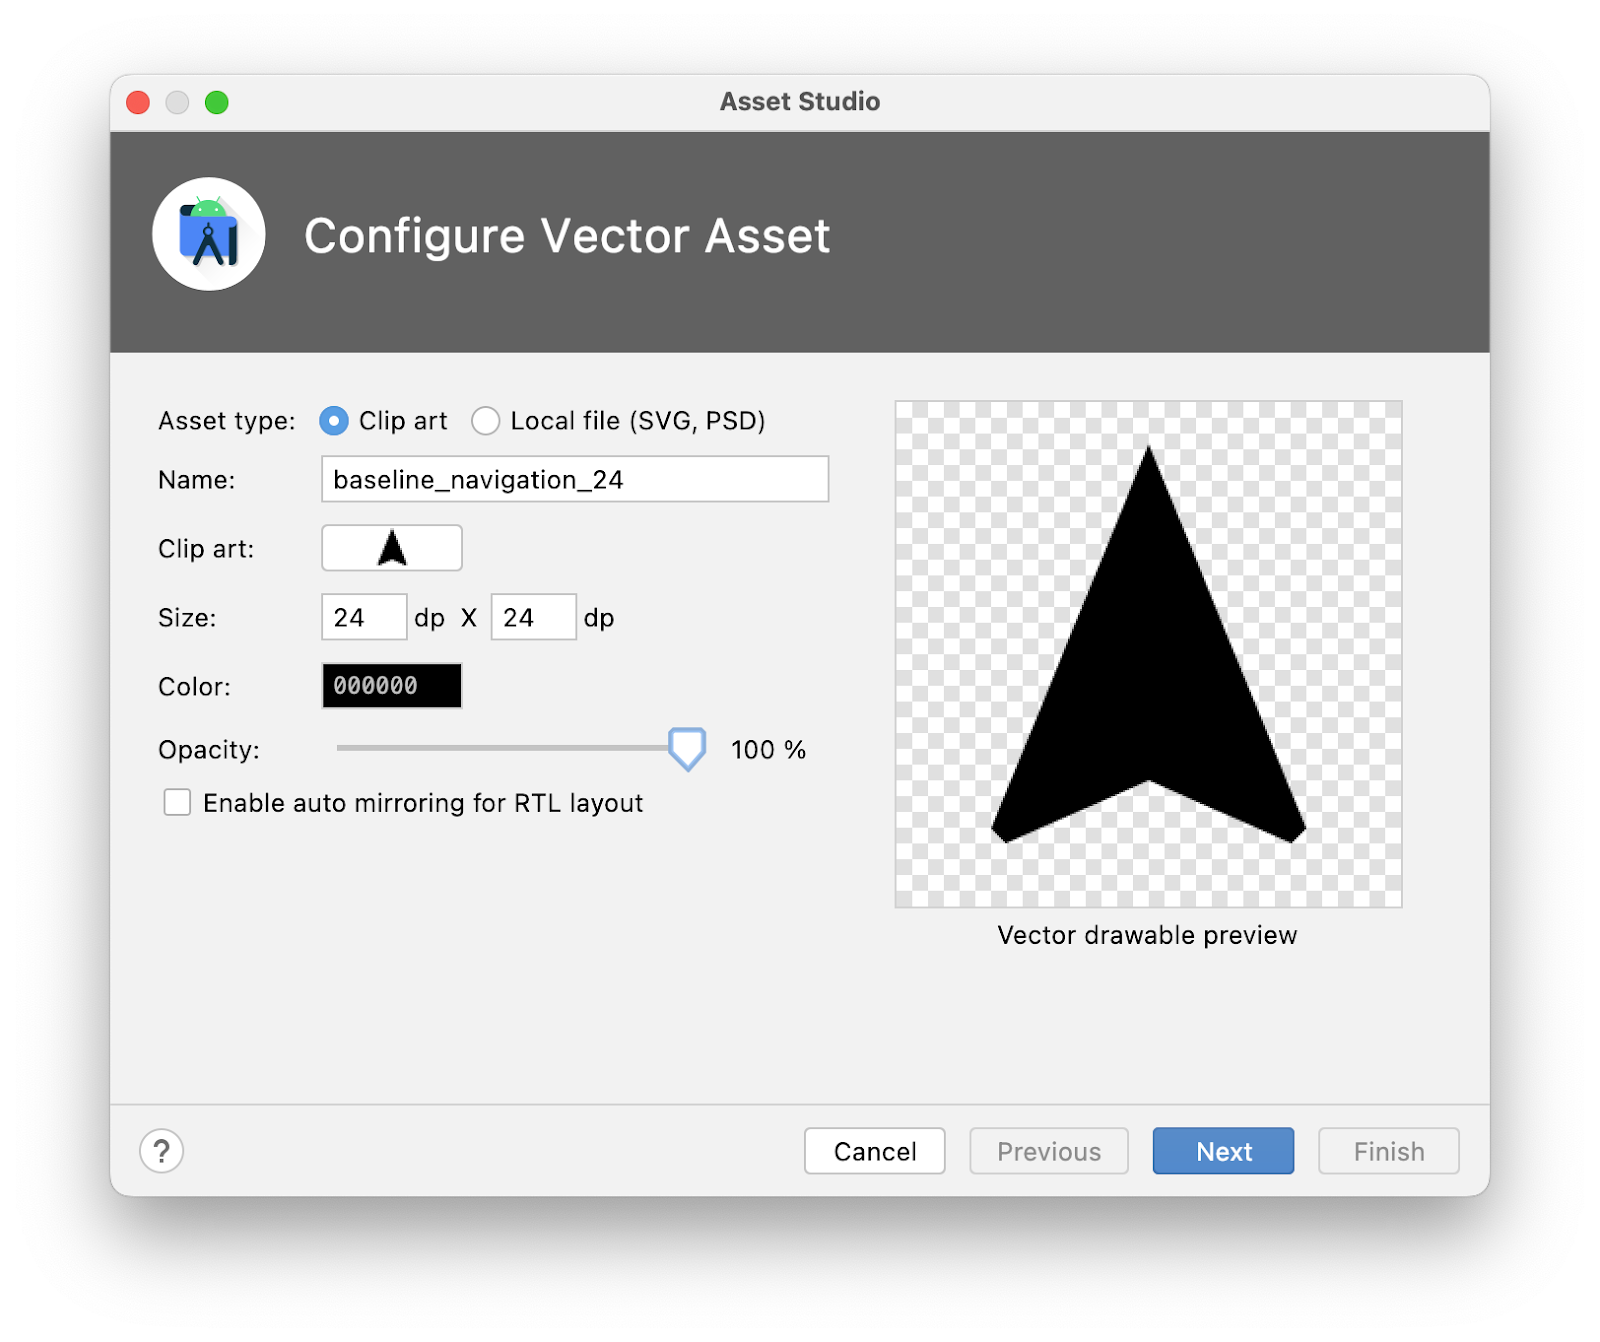
- First, right click the
resdirectory in the:common:car-app-servicemodule and click New > Vector Asset, and then create a navigation icon using the following configuration:
- Asset type:
Clip art - Clip art:
navigation - Name:
baseline_navigation_24 - Size:
24dp by24dp - Color:
#000000 - Opacity:
100%
- Then, in the
screenpackage, create a file namedDetailScreen.kt(next to the existingMainScreen.ktfile) and add the following code:
DetailScreen.kt
import android.graphics.Color
import androidx.car.app.CarContext
import androidx.car.app.Screen
import androidx.car.app.model.Action
import androidx.car.app.model.CarColor
import androidx.car.app.model.CarIcon
import androidx.car.app.model.Header
import androidx.car.app.model.MessageTemplate
import androidx.car.app.model.Pane
import androidx.car.app.model.PaneTemplate
import androidx.car.app.model.Row
import androidx.car.app.model.Template
import androidx.core.graphics.drawable.IconCompat
import com.example.android.cars.carappservice.R
import com.example.places.data.PlacesRepository
import com.example.places.data.model.toIntent

class DetailScreen(carContext: CarContext, private val placeId: Int) : Screen(carContext) {
    private var isBookmarked = false

    override fun onGetTemplate(): Template {
        val place = PlacesRepository().getPlace(placeId)
            ?: return MessageTemplate.Builder("Place not found")
                .setHeader(
                    Header.Builder()
                        .setStartHeaderAction(Action.BACK)
                        .build()
                )
                .build()

        val navigateAction = Action.Builder()
            .setTitle("Navigate")
            .setIcon(
                CarIcon.Builder(
                    IconCompat.createWithResource(
                        carContext,
                        R.drawable.baseline_navigation_24
                    )
                ).build()
            )
            // Only certain Intent actions are supported by `startCarApp`. Check its documentation
            // for all of the details. To open another app that can handle navigating to a location
            // you must use the CarContext.ACTION_NAVIGATE action and not Intent.ACTION_VIEW like
            // you might on a phone.
            .setOnClickListener { carContext.startCarApp(place.toIntent(CarContext.ACTION_NAVIGATE)) }
            .build()

        return PaneTemplate.Builder(
            Pane.Builder()
                .addAction(navigateAction)
                .addRow(
                    Row.Builder()
                        .setTitle("Coordinates")
                        .addText("${place.latitude}, ${place.longitude}")
                        .build()
                ).addRow(
                    Row.Builder()
                        .setTitle("Description")
                        .addText(place.description)
                        .build()
                ).build()
        ).setHeader(
            Header.Builder()
                .setStartHeaderAction(Action.BACK)
                .setTitle(place.name)
                .build()
        ).build()
    }
}
Pay special attention to how the navigateAction is built—the call to startCarApp in its OnClickListener is the key to interacting with other apps on Android Auto and Android Automotive OS.
Navigate between screens
Now that there are two types of screens, it's time to add navigation between them. Navigation in the Car App Library uses a stack model of pushing and popping that's ideal for the simple task flows suitable for completion while driving.
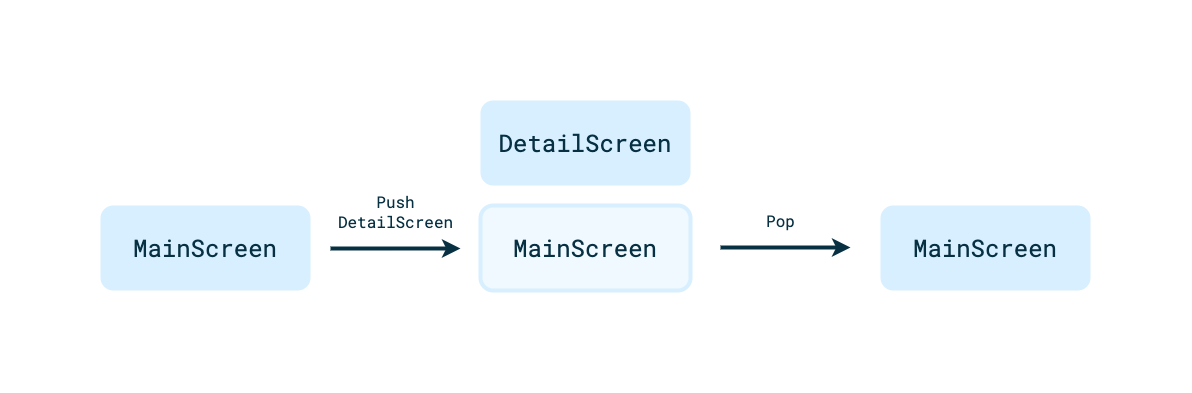
- To navigate from one of the list items on the
MainScreento aDetailScreenfor that item, add the following code:
MainScreen.kt
Row.Builder()
    ...
    .setOnClickListener { screenManager.push(DetailScreen(carContext, it.id)) }
    ...
Navigating back from a DetailScreen to the MainScreen is already handled since setHeaderAction(Action.BACK) is called when building the PaneTemplate displayed on the DetailScreen. When the header action is clicked by a user, the host handles popping the current screen off of the stack for you, but this behavior can be overridden by your app if desired.
- Run the app now to see the
DetailScreenand in-app navigation in action.
11. Update the content on a screen
Often, you want to let a user interact with a screen and change the state of elements on that screen. To demonstrate how to do this, you build out functionality to let users add or remove a bookmark for a place from the DetailScreen.
- First, add a local variable,
isBookmarkedthat holds the state. In a real app, this should be stored as part of the data layer, but a local variable is sufficient for demonstration purposes.
DetailScreen.kt
class DetailScreen(carContext: CarContext, private val placeId: Int) : Screen(carContext) {
    private var isBookmarked = false
    ...
}
- Next, right click the
resdirectory in the:common:car-app-servicemodule and click New > Vector Asset, and then create two bookmark icons using the following configuration:
- Asset type:
Clip art - Name:
outline_bookmark_add_24,outline_bookmark_added_24 - Clip art:
bookmark,bookmark_added(from the Material Symbols Outlined source set) - Size:
24dp by24dp - Color:
#000000 - Opacity:
100%
- Then, in
DetailsScreen.kt, create anActionfor the bookmarking functionality.
DetailScreen.kt
val navigateAction = ...

val bookmarkAction = Action.Builder()
    .setIcon(
        CarIcon.Builder(
            IconCompat.createWithResource(
                carContext,
                if (isBookmarked) R.drawable.outline_bookmark_added_24 else R.drawable.outline_bookmark_add_24
            )
        ).build()
    )
    .setOnClickListener {
        isBookmarked = !isBookmarked
    }.build()

...
There are two pieces of interest here:
- The
CarIconis tinted depending on the state of the item. setOnClickListeneris used to react to inputs from the user and toggle the bookmark state.
- Don't forget to call
addEndHeaderActionon thePaneTemplate.Builderin order to actually use thebookmarkAction.
DetailScreen.kt
Header.Builder()
    ...
    .addEndHeaderAction(bookmarkAction)
    .build()
- Now, run the app and see what happens:
The clicks are being received, but the icon isn't changing.
This is because the Car App Library has a concept of refreshes. To limit driver distraction, refreshing content on the screen has certain limitations (which vary by the template being displayed), and each refresh must be explicitly requested by your own code by calling the Screen class' invalidate method. Just updating some state that is referenced in onGetTemplate is not enough to update the UI.
- To fix this issue, update the
OnClickListenerfor thebookmarkActionas follows:
DetailScreen.kt
.setOnClickListener {
    isBookmarked = !isBookmarked
    // Request that `onGetTemplate` be called again so that updates to the
    // screen's state can be picked up
    invalidate()
}
- Run the app again to see that the icon now updates when clicked.
And just like that, you have a basic app that's well integrated with both Android Auto and Android Automotive OS!
12. Congratulations
You successfully built your first Car App Library app. Now it's time to take what you learned and apply it to your own app!
As mentioned earlier, only certain categories built using the Car App Library apps can be submitted to the Play Store at this time. If your app is in one of the supported categories, you can start building today!
New app categories are being added every year, so even if you can't immediately apply what you learned, check back later and the time might be right to extend your app to the car!
Things to try out
- Install an OEM's emulator and see how OEM customization can change the look and feel of Car App Library apps on Android Automotive OS. Note that not all OEM emulators support Car App Library apps.
- Use different DHU configurations and Android Automotive OS emulator hardware profiles to see how the host apps handle adapting the app for different display sizes.
- Check out the Showcase sample application that demonstrates the full functionality of the Car App Library.
Further reading
- Use the Android for Cars App Library covers the content in this codelab and much more.
- The Android for Cars App Library Design Guidelines provides a detailed description of all of the different templates and best practices to follow when building your app.
- The Android app quality for cars page describes the criteria that your app must meet in order to create a great user experience and pass Play Store review .