النشر من "أداة تصميم خلفيات شاشة الساعة" إلى Google Play
تنظيم صفحاتك في مجموعات
يمكنك حفظ المحتوى وتصنيفه حسب إعداداتك المفضّلة.
يشرح هذا الدليل كيفية نشر خلفية شاشة الساعة التي تم إنشاؤها باستخدام أداة Watch Face Designer على Google Play.
تسجيل الدخول إلى حساب المطوِّر على Google Play
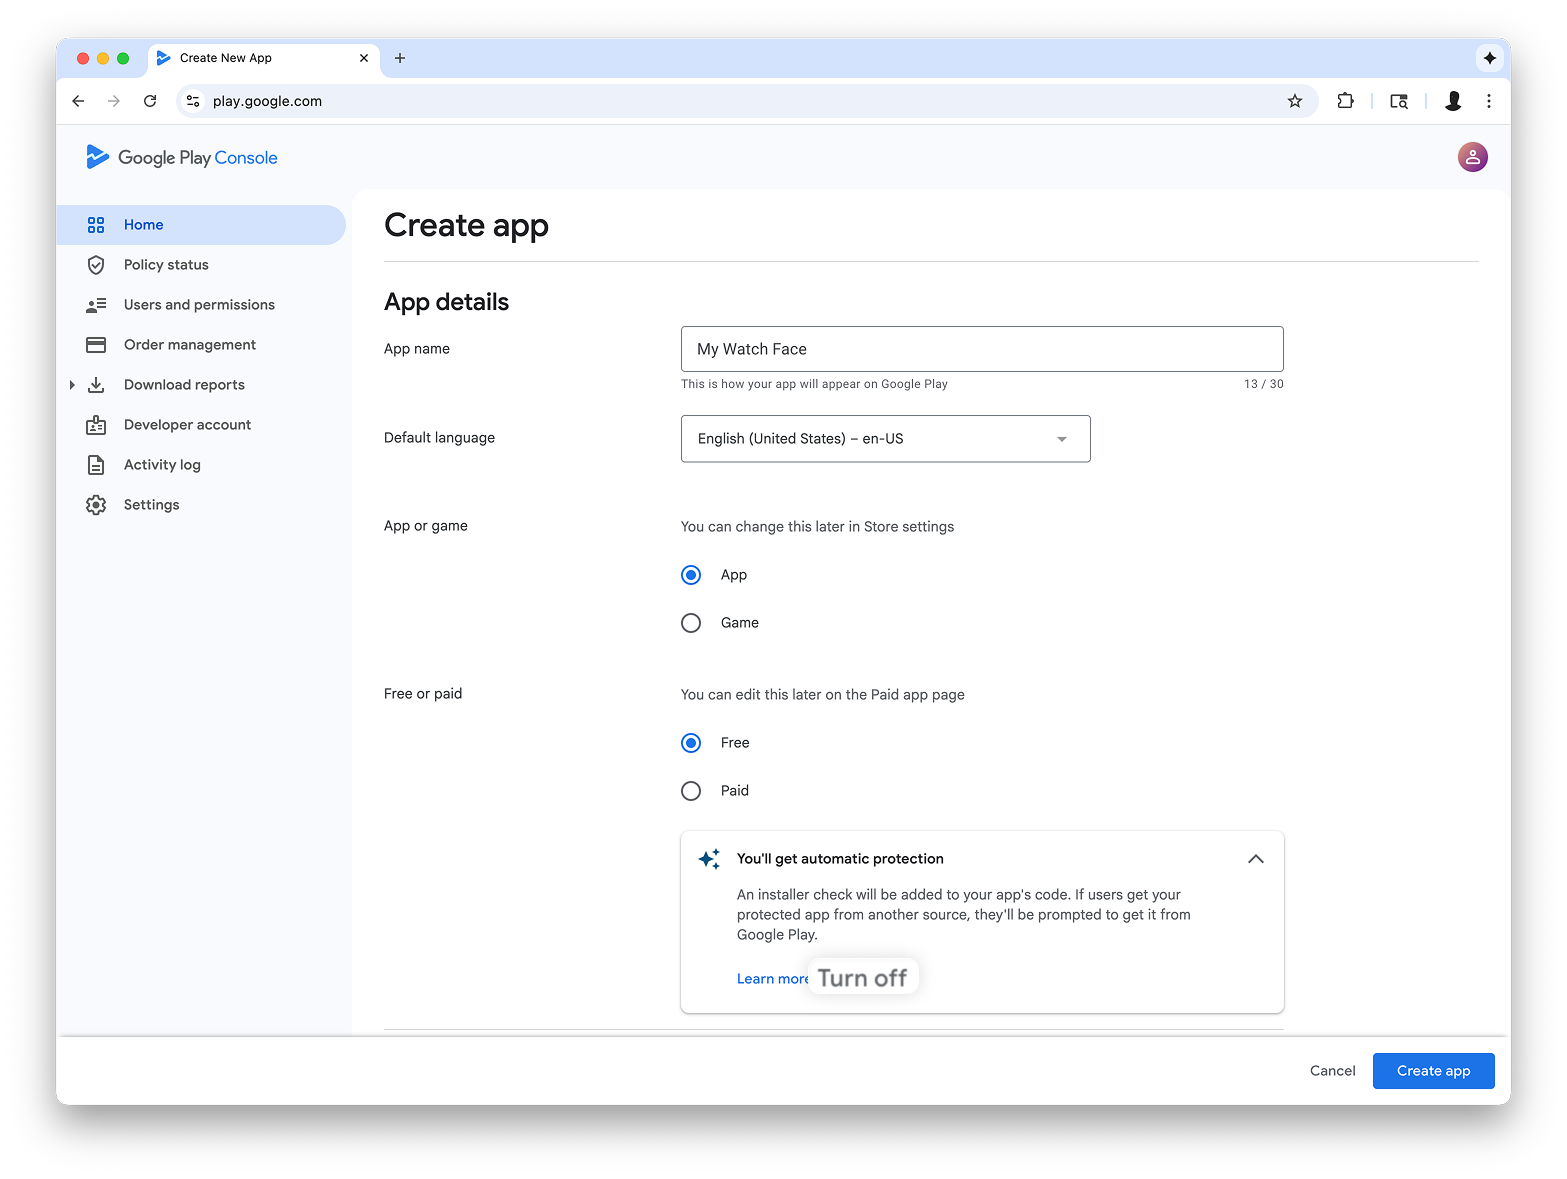
سجِّل الدخول إلى Google Play Console وانقر على "إنشاء تطبيق" في لوحة البيانات.
أثناء سير عمل "إنشاء تطبيق"، أوقِف ميزة "الحماية التلقائية" عند ظهور الطلب، وإلا ستواجه مشاكل في توقيع الحزمة لاحقًا. لا تنطبق ميزة "الحماية التلقائية" على خلفيات شاشة الساعة لأنّها لا تتضمّن أي رمز برمجي.
الشكل 1: شاشة إنشاء تطبيق في
Play Console
إضافة دعم لشكل جهاز Wear OS
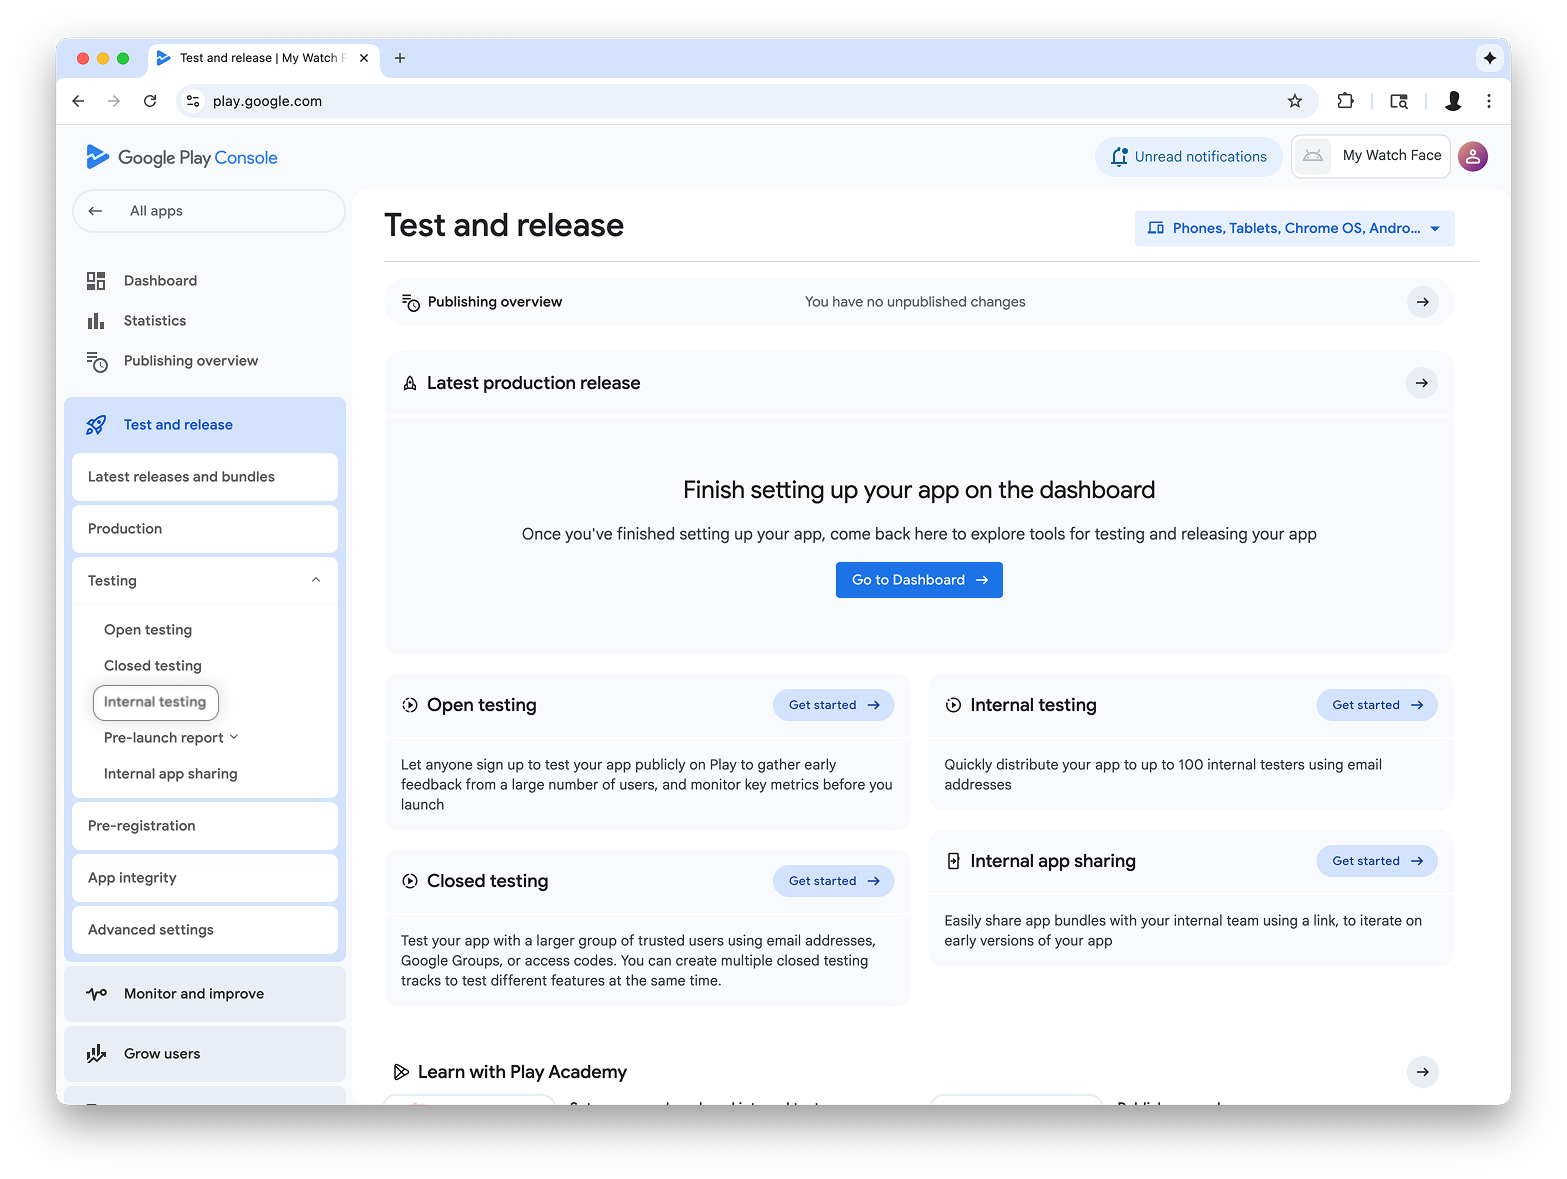
بعد إنشاء تطبيقك، انتقِل إلى الاختبار والإصدار > الاختبار > الاختبار الداخلي:
الشكل 2: شاشة الاختبار والإصدار
في Play Console
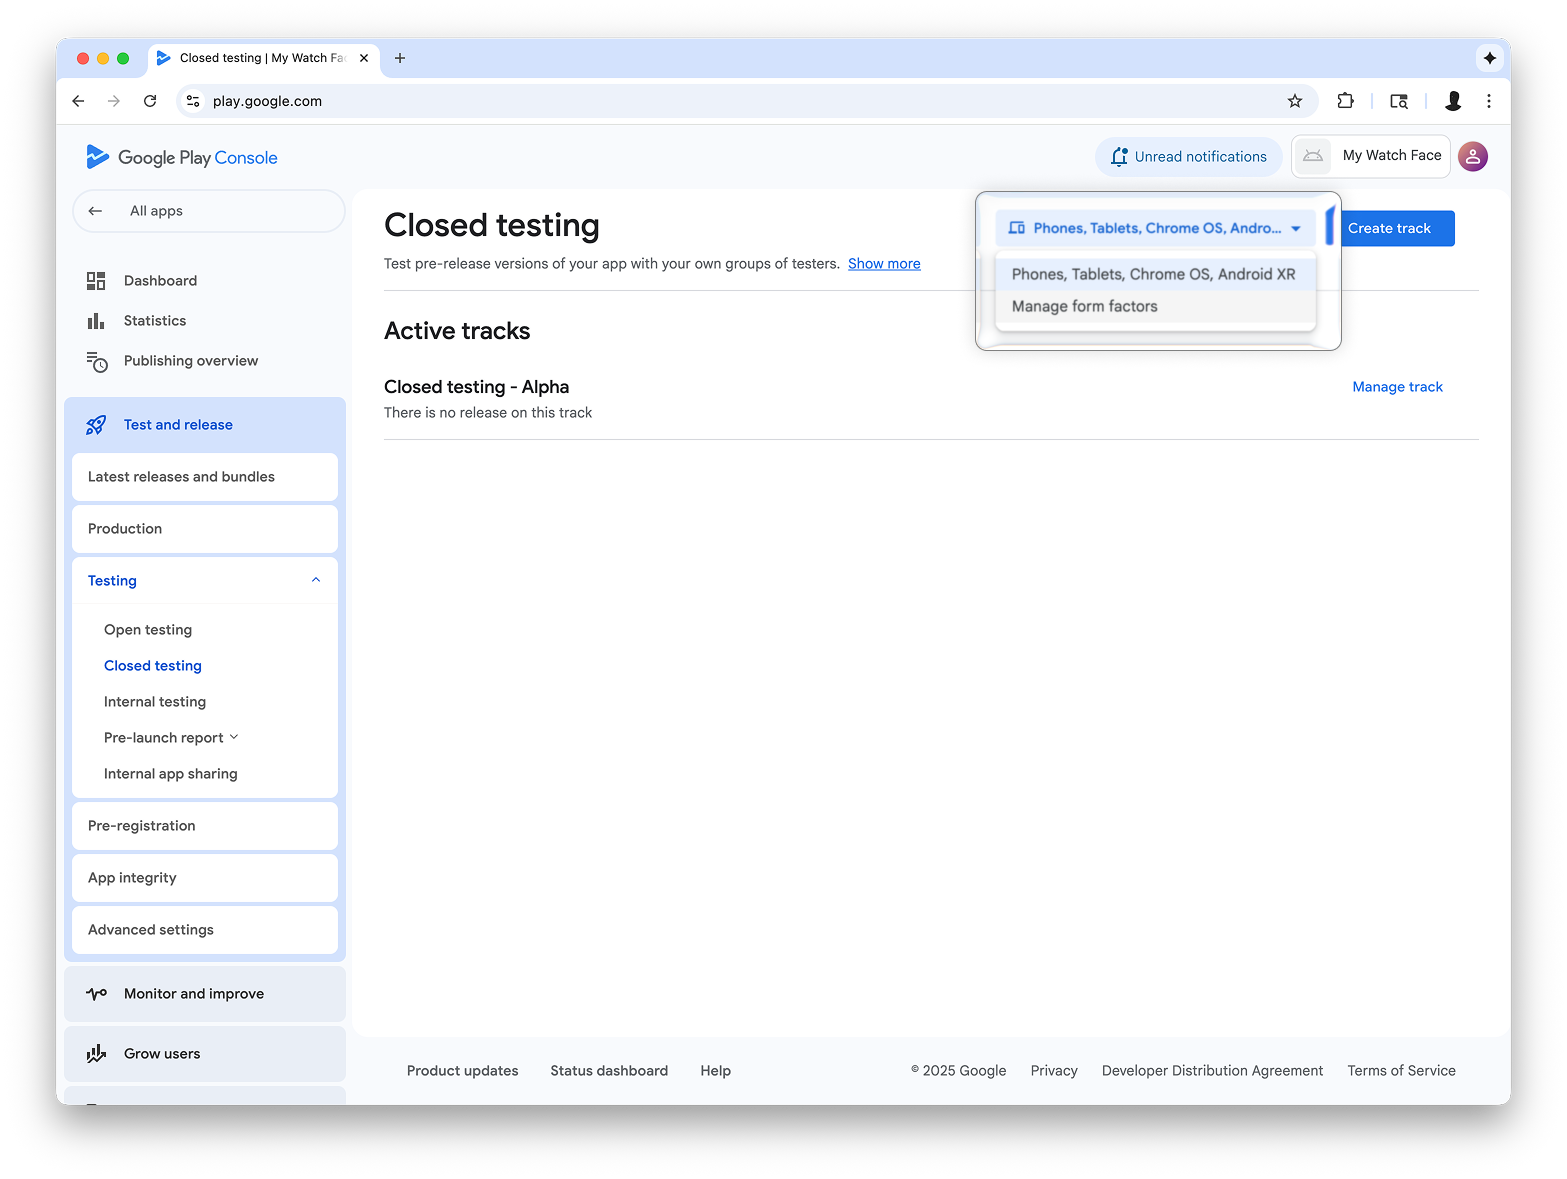
في القائمة المنسدلة في أعلى يسار الصفحة، اختَر إدارة أشكال الأجهزة،
وأضِف Wear OS كشكل جهاز لتطبيقك:
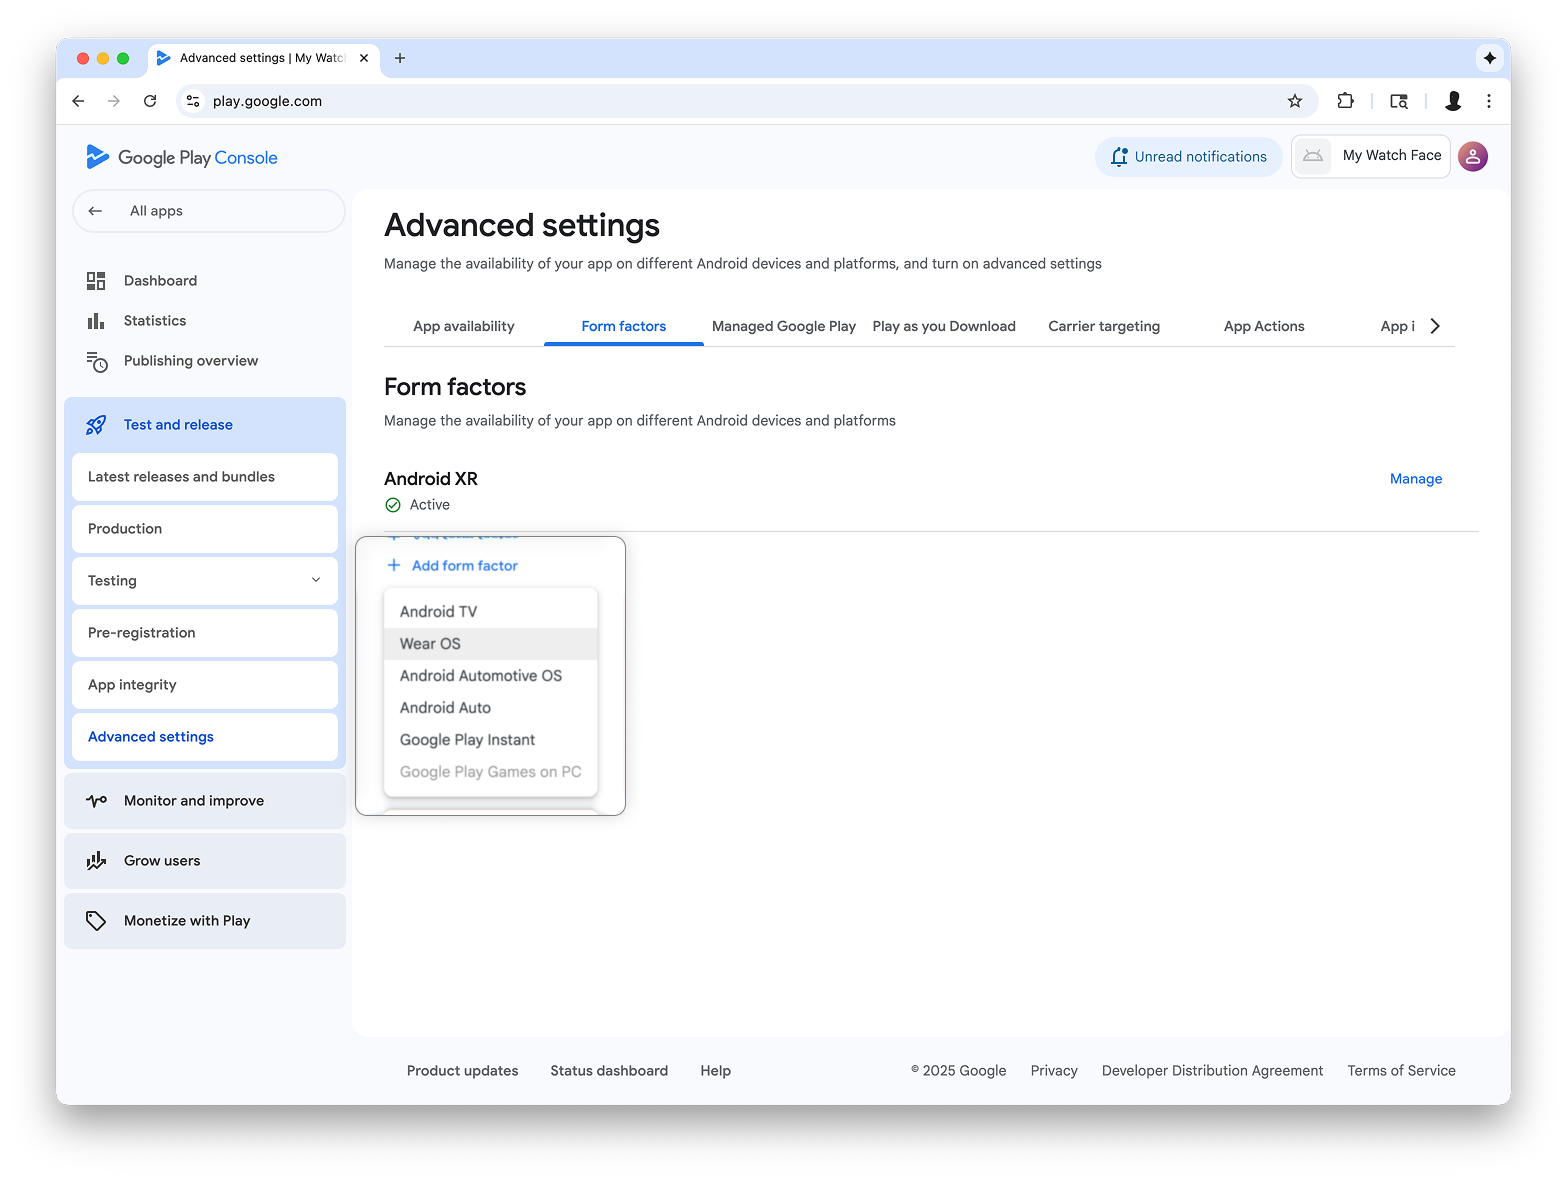
الشكل 3: اختيار الخيار إدارة أشكال الأجهزة (على اليمين)، ثم إضافة Wear OS في علامة التبويب أشكال الأجهزة في شاشة الإعدادات المتقدّمة (على اليسار)
إنشاء إصدار في مسار الاختبار الداخلي
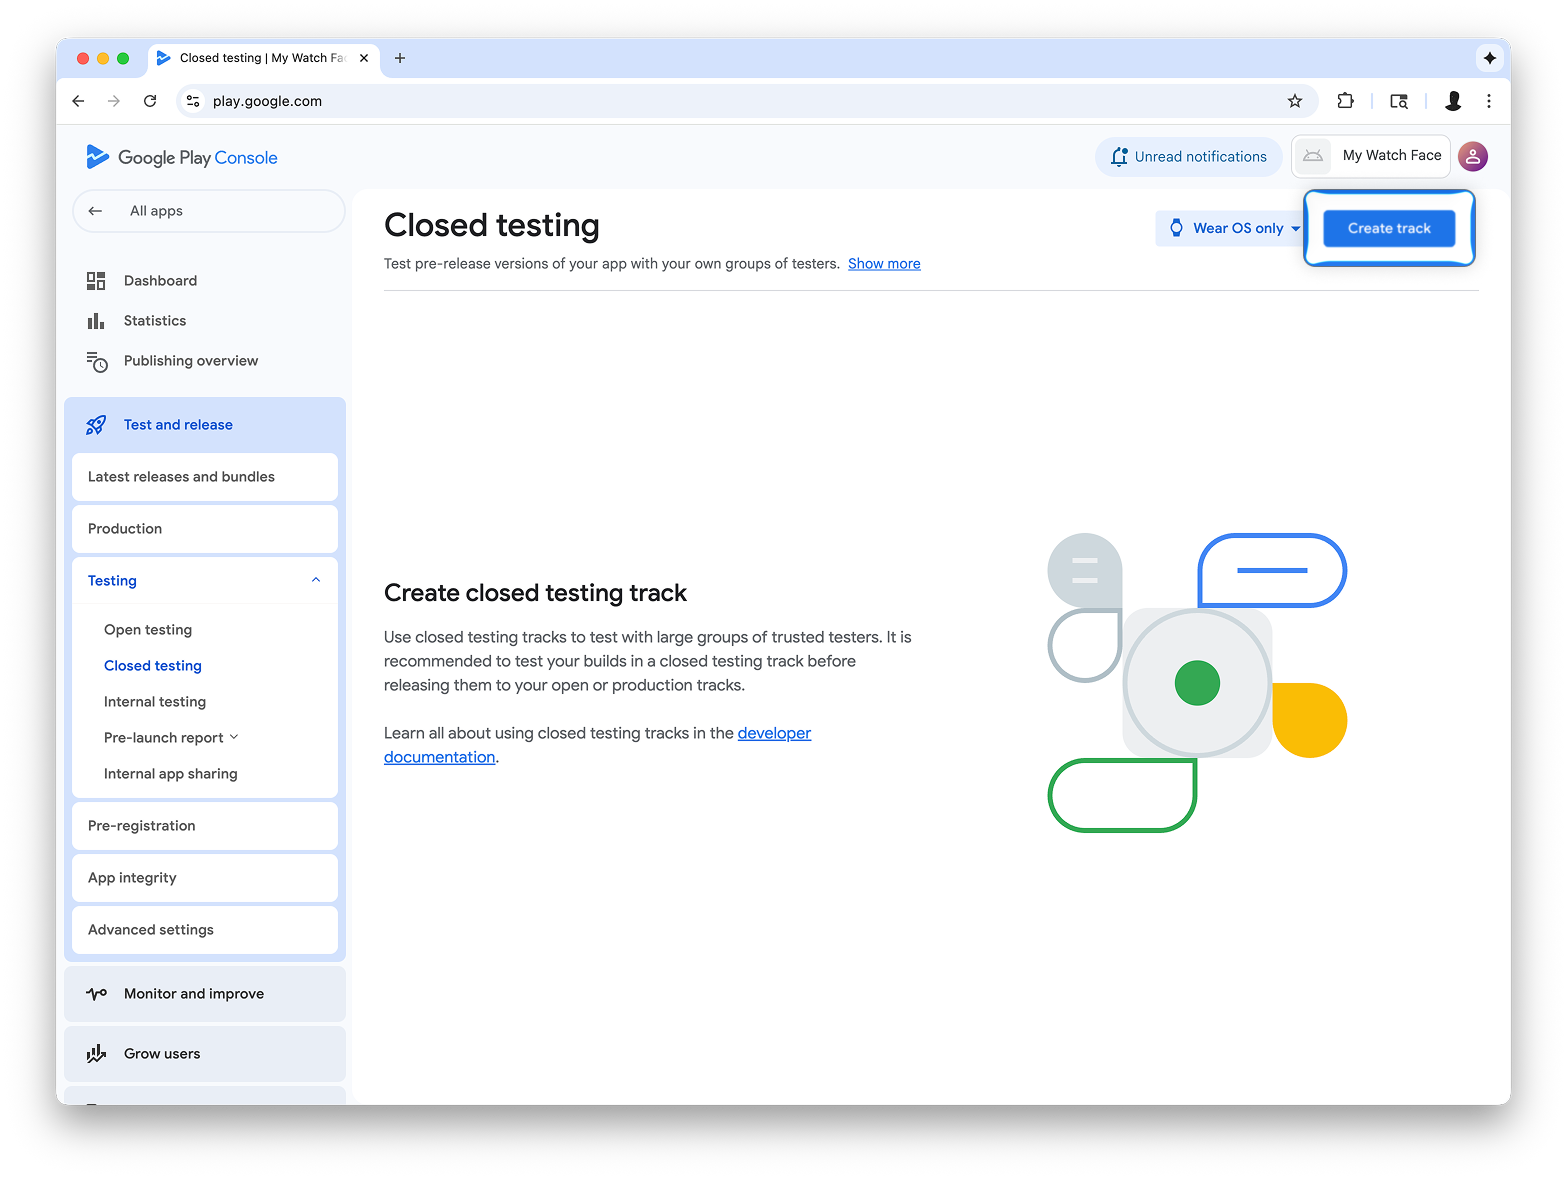
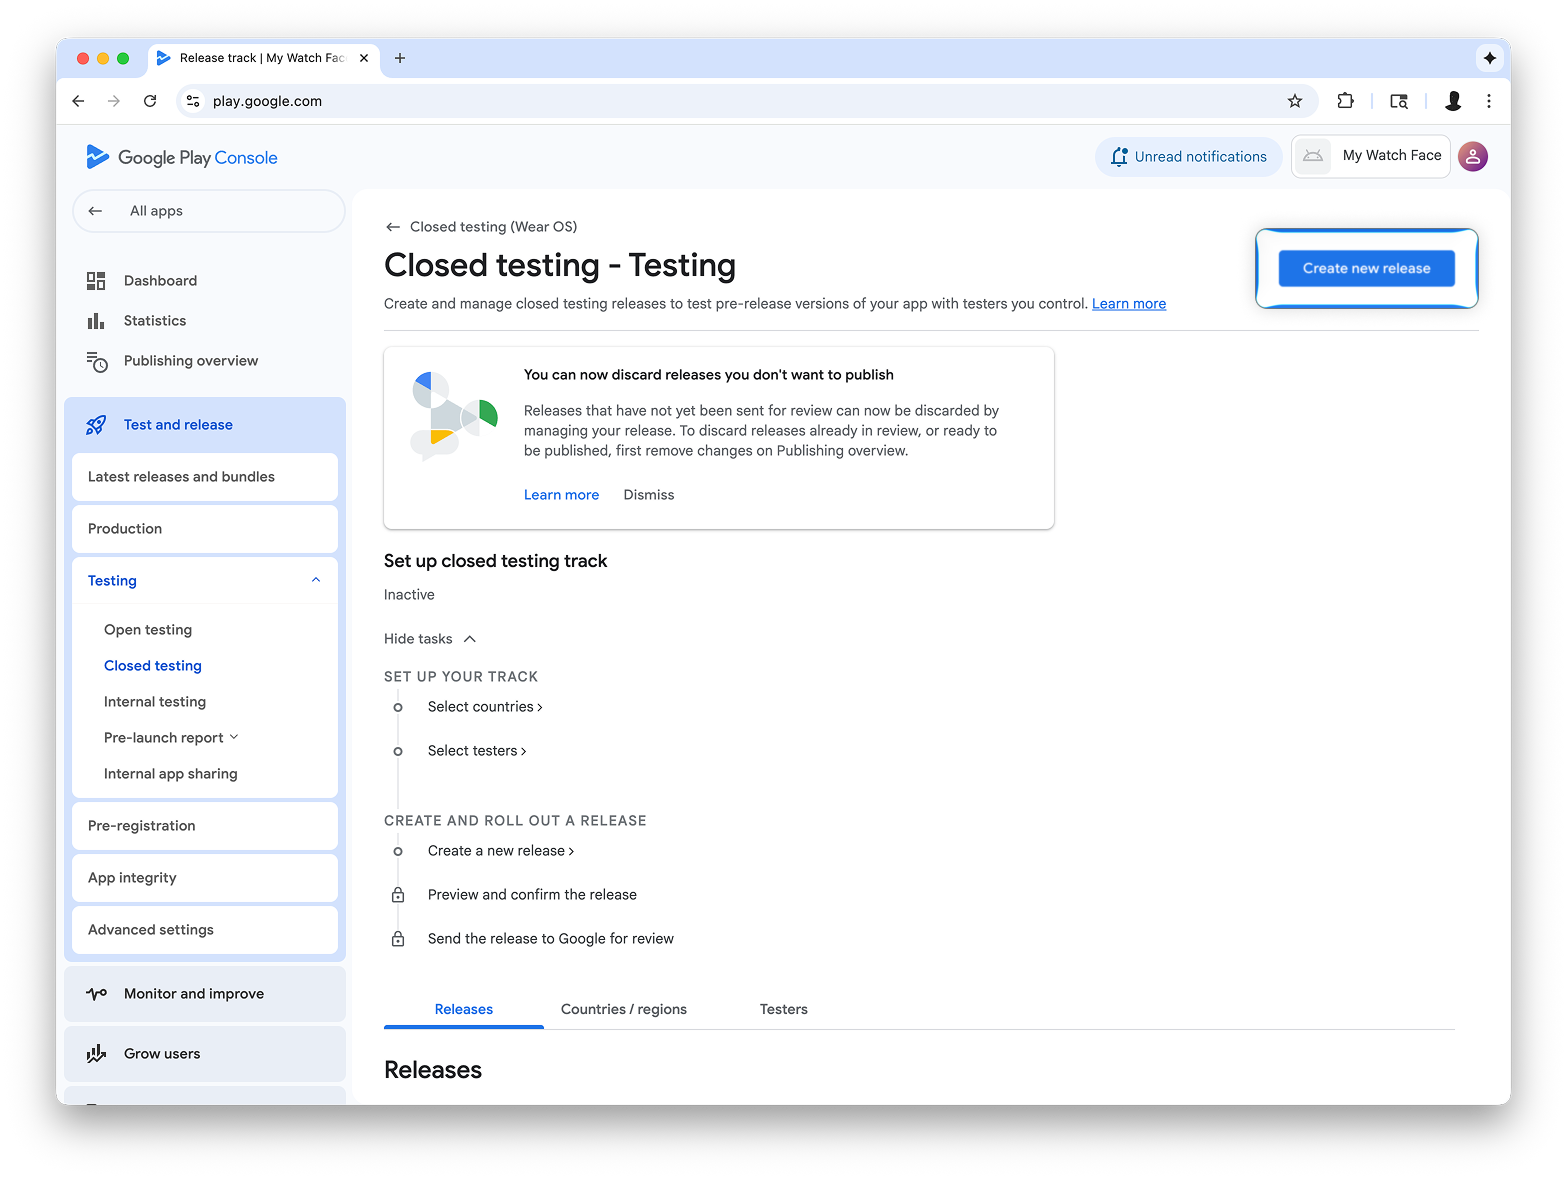
ارجع إلى قائمة "الاختبار الداخلي" وأنشئ مسار اختبار داخلي مخصّصًا لتطبيقات Wear OS فقط. بعد ذلك، أنشئ إصدارًا باتّباع الخطوات التالية:
الشكل 4: انقر على زر إنشاء قناة إصدار (على اليمين)، ثم انقر على زر إنشاء إصدار جديد (على اليسار) في الشاشة التالية.
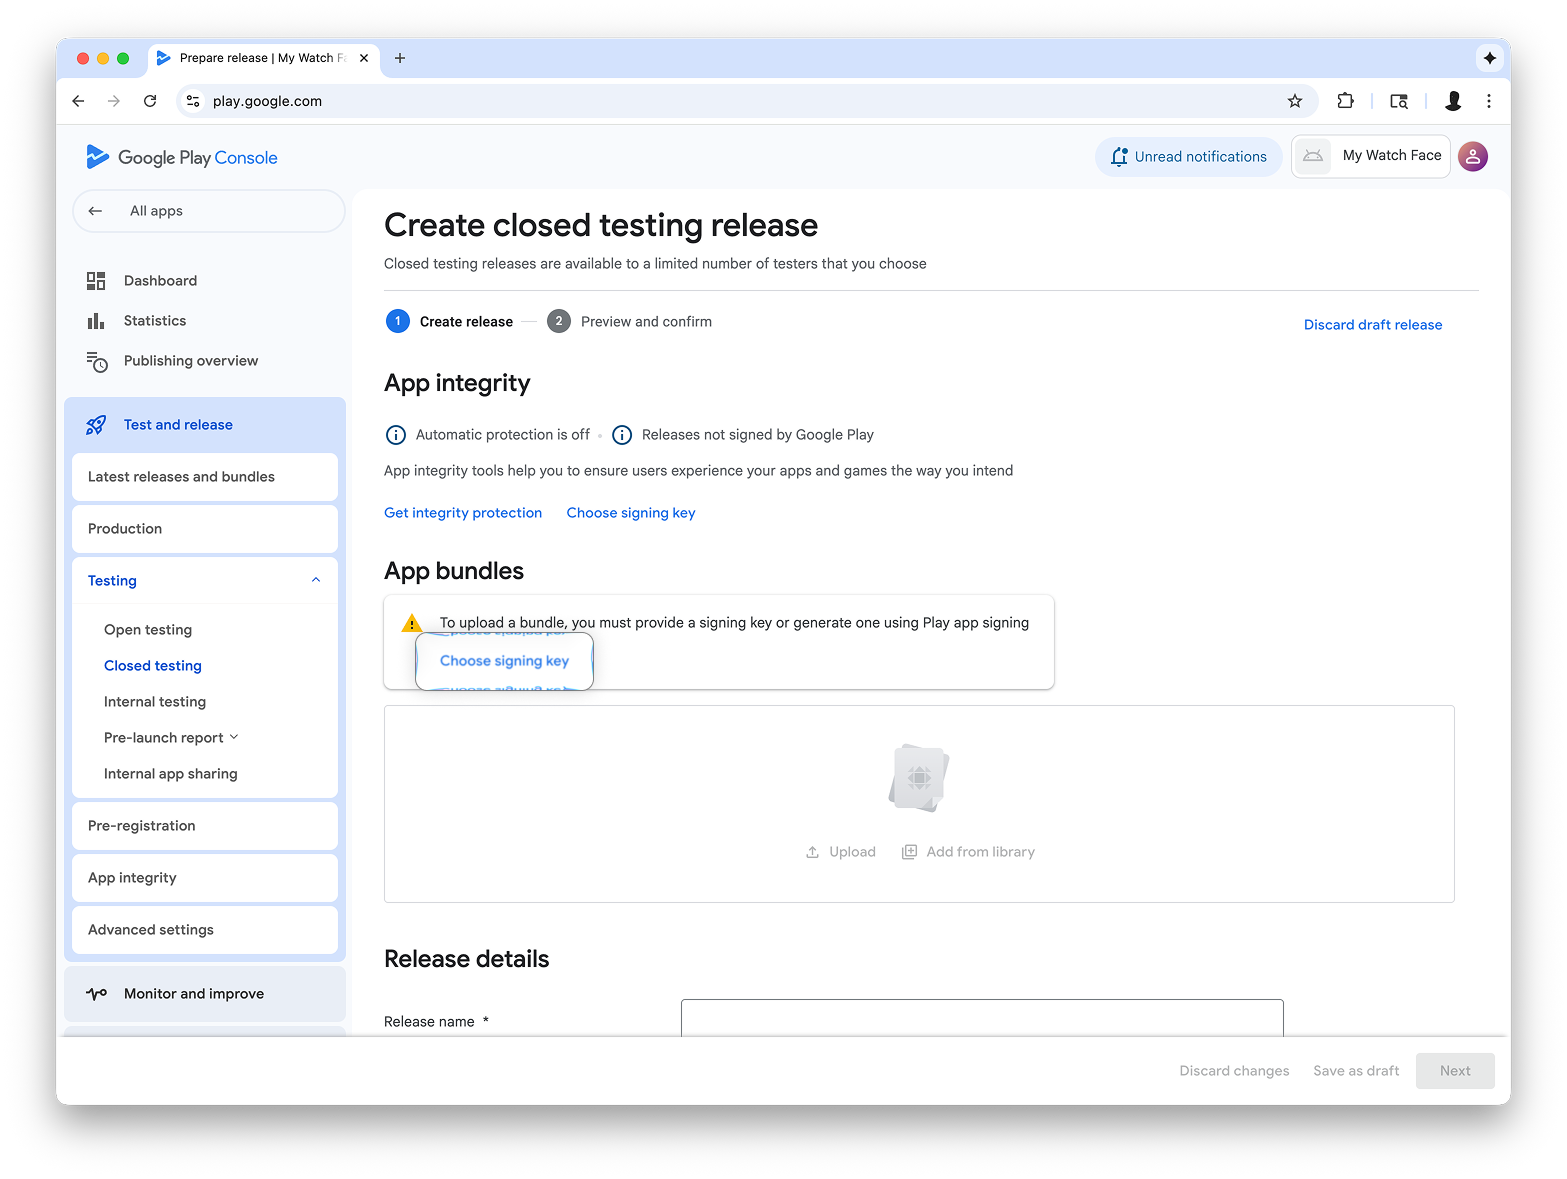
في شاشة إنشاء إصدار اختبار مغلق، اختَر اختيار مفتاح توقيع.
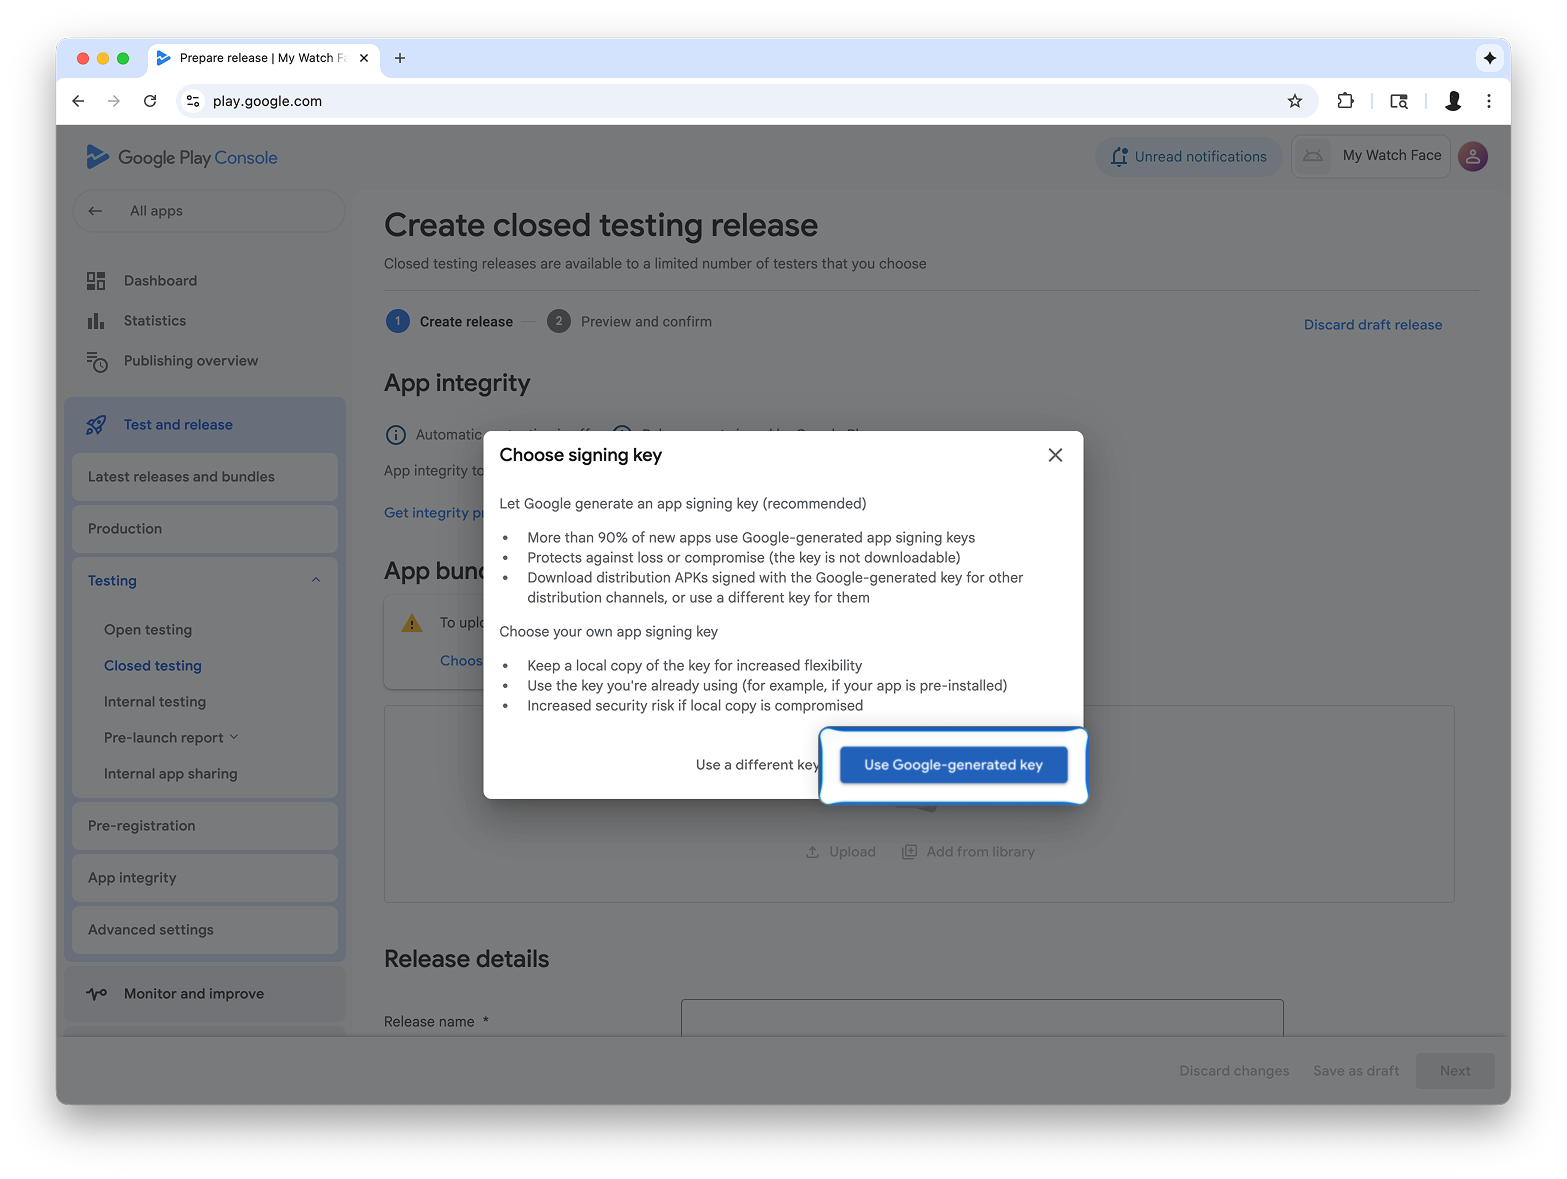
الشكل 5: انقر على الزر اختيار مفتاح التوقيع (على اليمين)، ثم في مربّع الحوار الذي يظهر، انقر على استخدام مفتاح من إنشاء Google (على اليسار).
اسحب ملف AAB من Watch Face Designer وأفلِته في قسم تحميل،
ثم واصِل إنشاء الإصدار في مسار الاختبار.
يخضع كل من المحتوى وعيّنات التعليمات البرمجية في هذه الصفحة للتراخيص الموضحّة في ترخيص استخدام المحتوى. إنّ Java وOpenJDK هما علامتان تجاريتان مسجَّلتان لشركة Oracle و/أو الشركات التابعة لها.
تاريخ التعديل الأخير: 2025-08-27 (حسب التوقيت العالمي المتفَّق عليه)
[[["يسهُل فهم المحتوى.","easyToUnderstand","thumb-up"],["ساعَدني المحتوى في حلّ مشكلتي.","solvedMyProblem","thumb-up"],["غير ذلك","otherUp","thumb-up"]],[["لا يحتوي على المعلومات التي أحتاج إليها.","missingTheInformationINeed","thumb-down"],["الخطوات معقدة للغاية / كثيرة جدًا.","tooComplicatedTooManySteps","thumb-down"],["المحتوى قديم.","outOfDate","thumb-down"],["ثمة مشكلة في الترجمة.","translationIssue","thumb-down"],["مشكلة في العيّنات / التعليمات البرمجية","samplesCodeIssue","thumb-down"],["غير ذلك","otherDown","thumb-down"]],["تاريخ التعديل الأخير: 2025-08-27 (حسب التوقيت العالمي المتفَّق عليه)"],[],[],null,["This guide explains how to publish your watch face, created using\nWatch Face Designer, to Google Play.\n| **Note:** Before you begin, [export your watch face using the Google Play option](/training/wearables/watch-face-designer/export#google-play) so that you have an Android App Bundle (AAB) file ready.\n\nSign into your developer account in Google Play\n\nSign in to Google Play Console and press 'Create App' on the dashboard.\n| **Note:** If you don't have a Google Play Console developer account, [follow the\n| official guide to create one](https://support.google.com/googleplay/android-developer/answer/6112435). This includes paying a registration fee.\n\nDuring the \"create app,\" workflow, **turn off automatic protection when\nprompted**; otherwise, you'll have issues signing the bundle later. Automatic\nprotection isn't relevant to watch faces because they don't have any code.\n**Figure 1** : The **Create app** screen in the Play Console\n\nAdd support for the Wear OS form factor\n\nAfter you've created your app, navigate to **Test and release \\\u003e Testing \\\u003e\nInternal testing**:\n**Figure 2** : The **Test and release** screen in the Play Console\n\nIn the drop-down in the top right of the page, select **Manage form factors**,\nand add Wear OS as a form factor for your app:\n**Figure 3** : Selecting the **Manage form\nfactors** option (left), then adding Wear OS on the **Form factors** tab on the **Advanced settings** screen (right)\n\nCreate a release on the internal testing track\n\nReturn to the internal testing menu and create a Wear OS-only internal testing\ntrack. Then, create a release:\n**Figure 4** : Select the **Create track** button (left), then on the next screen, select the **Create new release** button (right).\n\nOn the **Create closed testing release** screen, select **Choose signing key**.\n| **Caution:** In the **Choose signing key** dialog that appears, select **Use Google-generated key**:\n**Figure 5** : Select the **Choose signing\nkey** button (left), then in the dialog that appears, select **Use\nGoogle-generated key** (right).\n\nDrag-and-drop the AAB file from Watch Face Designer into the **Upload** section,\nand proceed with creating the release on the testing track.\n\nNext steps\n\nFrom here, follow official Google Play documentation on [trying out apps in the\ntesting track](https://support.google.com/googleplay/answer/7003180) and [promoting releases to production](https://support.google.com/googleplay/android-developer/answer/9859348), which makes your\napp visible to everyone on Google Play."]]