
Wear OS devices are often used for long-running experiences, such as tracking a workout. This presents a user experience challenge: if a user starts a task and then navigates away to the watch face, how do they get back? Returning to the app using the launcher can be difficult, especially while on the move, creating unnecessary friction.
The solution is to pair an ongoing notification with an OngoingActivity.
This allows the device to display information about the long-running activity
across the user interface, enabling features like the tappable icon at the
bottom of the watch face. This keeps users aware of the background task, and
provides a one-tap way to return to the app.
An Ongoing Activity also keeps your app visible for longer, preventing the system from returning to the watch face after a period of inactivity. For more information, see Keep your app visible on Wear.
For example, in this workout app, the information can appear on the user's watch face as a tappable running icon:
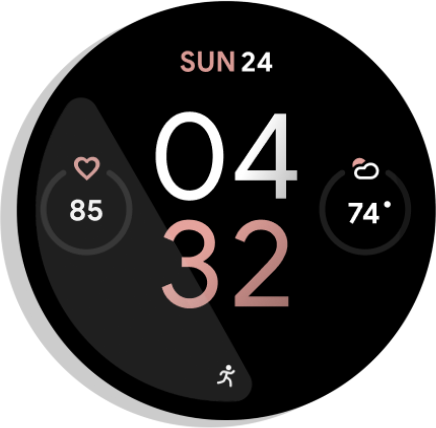
Figure 1. Activity indicator.
An ongoing notification also surfaces information in the Recents section of the global app launcher. This provides another convenient place for users to see the status of their task and re-engage with the app:
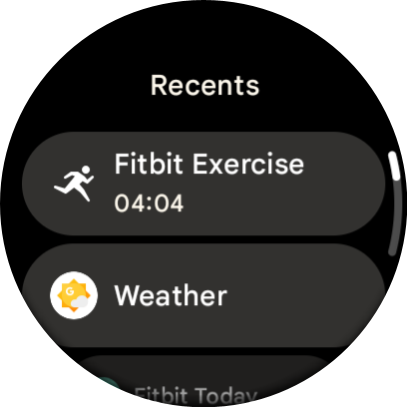
Figure 2. Global launcher.
The following are good situations to use an ongoing notification tied to an Ongoing Activity:
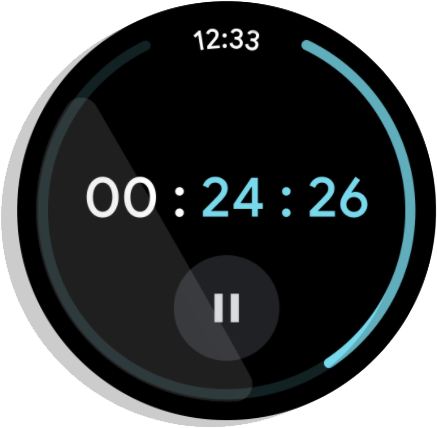
Figure 3. Timer: Actively counts down time and ends when the timer is paused or stopped.

Figure 4. Turn by turn navigation: Announces directions to a destination. Ends when the user reaches the destination or stops navigation.
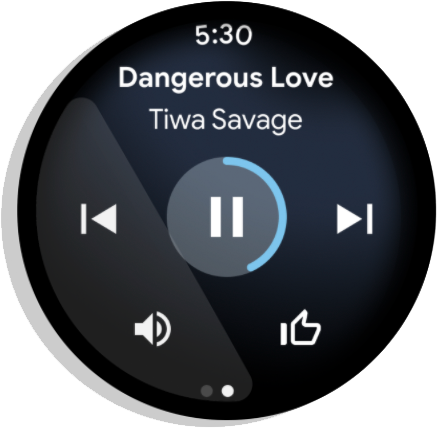
Figure 5. Media: Plays music throughout a session. Ends immediately after the user pauses the session.
Wear creates Ongoing Activities automatically for media apps.
See the Ongoing Activity codelab for an in-depth example of creating Ongoing Activities for other kinds of apps.
Setup
To start using the Ongoing Activity API in your app, add the following
dependencies to your app's build.gradle file:
dependencies {
  implementation "androidx.wear:wear-ongoing:1.1.0"
  implementation "androidx.core:core:1.19.0"
}
Create an Ongoing Activity
The process involves three steps:
- Create a standard
NotificationCompat.Builderand configure it as ongoing. - Create and configure an
OngoingActivityobject, passing the notification builder to it. - Apply the Ongoing Activity to the notification builder and post the resulting notification.
Create and configure the notification
Start by creating a NotificationCompat.Builder. The key step is to call
setOngoing(true) to mark it as an ongoing notification. You can also set
other notification properties at this stage, like the small icon and category.
// Create a PendingIntent to pass to the notification builder val pendingIntent = PendingIntent.getActivity( this, 0, Intent(this, AlwaysOnActivity::class.java).apply { flags = Intent.FLAG_ACTIVITY_SINGLE_TOP }, PendingIntent.FLAG_UPDATE_CURRENT or PendingIntent.FLAG_IMMUTABLE, ) val notificationBuilder = NotificationCompat.Builder(this, CHANNEL_ID) .setContentTitle("Always On Service") .setContentText("Service is running in background") .setSmallIcon(R.drawable.animated_walk) // Category helps the system prioritize the ongoing activity .setCategory(NotificationCompat.CATEGORY_WORKOUT) .setContentIntent(pendingIntent) .setVisibility(NotificationCompat.VISIBILITY_PUBLIC) .setOngoing(true) // Important!
Create the OngoingActivity
Next, create an instance of OngoingActivity using its builder. The
OngoingActivity.Builder requires a Context, a notification ID, and the
NotificationCompat.Builder you created in the previous step.
Configure the key properties that will be displayed on the new UI surfaces:
- Animated and static icons: Provide icons that are displayed on the watch face in active and ambient modes.
- Touch intent: A
PendingIntentthat brings the user back to your app when they tap the Ongoing Activity icon. You can reuse thependingIndentcreated in the previous step.
val ongoingActivity = OngoingActivity.Builder(applicationContext, NOTIFICATION_ID, notificationBuilder) // Sets the icon that appears on the watch face in active mode. .setAnimatedIcon(R.drawable.animated_walk) // Sets the icon that appears on the watch face in ambient mode. .setStaticIcon(R.drawable.ic_walk) // Sets the tap target to bring the user back to the app. .setTouchIntent(pendingIntent) .build()
Apply to the notification and post
The final step is to link the OngoingActivity with the notification and then
post it. The ongoingActivity.apply() method modifies the original
notification builder, adding the necessary data so the system can display it on
the extra surfaces. After applying it, you can build and post the notification
as usual.
// This call modifies notificationBuilder to include the ongoing activity data. ongoingActivity.apply(applicationContext) // Post the notification. startForeground(NOTIFICATION_ID, notificationBuilder.build())
Add dynamic status text to the launcher
The preceding code adds the tappable icon to the watch face. To provide even
richer, real-time updates in the launcher's Recents section, create a
Status object and attach it to your OngoingActivity. If you don't
provide a custom Status, the system defaults to using the notification's
content text (set using setContentText()). To display dynamic text, use a
Status.Builder. You can define a template string with placeholders and provide
Status.Part objects to fill those placeholders. The Status.Part can be
dynamic, such as a stopwatch or timer.
The following example shows how to create a status that displays "Run for [a stopwatch timer]":
// Define a template with placeholders for the activity type and the timer. val statusTemplate = "#type# for #time#" // Set the start time for a stopwatch. // Use SystemClock.elapsedRealtime() for time-based parts. val runStartTime = SystemClock.elapsedRealtime() val ongoingActivityStatus = Status.Builder() // Sets the template string. .addTemplate(statusTemplate) // Fills the #type# placeholder with a static text part. .addPart("type", Status.TextPart("Run")) // Fills the #time# placeholder with a stopwatch part. .addPart("time", Status.StopwatchPart(runStartTime)) .build()
Finally, link this Status to your OngoingActivity by calling setStatus()
on the OngoingActivity.Builder.
val ongoingActivity = OngoingActivity.Builder(applicationContext, NOTIFICATION_ID, notificationBuilder) // ... // Add the status to the OngoingActivity. .setStatus(ongoingActivityStatus) .build()
Additional customizations
Beyond Status, you can customize your Ongoing Activity or notifications in the
following ways. However, these customizations might not be used, based on the
OEM's implementation.
Ongoing Notification
- The category set determines the priority of the Ongoing Activity.
CATEGORY_CALL: an incoming voice or video call or a similar synchronous communication requestCATEGORY_NAVIGATION: a map or turn-by-turn navigationCATEGORY_TRANSPORT: media transport control for playbackCATEGORY_ALARM: an alarm or timerCATEGORY_WORKOUT: a workoutCATEGORY_LOCATION_SHARING: temporary location sharing categoryCATEGORY_STOPWATCH: stopwatch
Ongoing Activity
Animated icon: a black and white vector, preferably with a transparent background. Displays on the watch face in active mode. If the animated icon is not provided, the default notification icon is used. The default notification icon is different for every application.
Static icon: a vector icon with transparent background. Displays on the watch face in ambient mode. If the animated icon isn't set, the static icon is used on the watch face in active mode. If this is not provided, the notification icon is used. If neither is set, an exception is thrown. (The app launcher still uses the app icon.)
OngoingActivityStatus: plain text or a
Chronometer. Displays in the Recents section of the app launcher. If not provided, the notification "context text" is used.Touch Intent: a
PendingIntentused to switch back to the app if the user taps on the Ongoing Activity icon. Displays on the watch face or on the launcher item. It can be different from the original intent used to launch the app. If not provided, the notification's content intent is used. If neither is set, an exception is thrown.LocusId: ID that assigns the launcher shortcut that the ongoing activity corresponds to. Displays on the launcher in the Recents section while the activity is ongoing. If not provided, the launcher hides all app items in the Recents section from the same package and only shows the Ongoing Activity.Ongoing Activity ID: ID used to disambiguate calls to
fromExistingOngoingActivity()when an application has more than one Ongoing Activity.
Update an Ongoing Activity
You should update the Ongoing Activity for the existing notification when you
need to change the status, instead of creating a new notification and Ongoing
Activity. To update the Ongoing Activity and the posted notification, use the
object you created before and call update(), as shown in the following
example:
ongoingActivity.update(context, newStatus)
In the cases where it is not possible to store a reference to the Ongoing Activity, there is a static method to recover the Ongoing Activity. However, this is less preferred:
OngoingActivity.recoverOngoingActivity(context) ?.update(context, newStatus)
Stop an Ongoing Activity
When the app is finished running as an Ongoing Activity, it only needs to cancel the ongoing notification.
You can also choose to cancel the notification or Ongoing Activity when it comes to the foreground, then recreate them when going back into the background, but this is not required.
Pause an Ongoing Activity
If your app has an explicit stop action, continue the Ongoing Activity after it is unpaused. For an app without an explicit stop action, end the activity when it is paused.
Key considerations
Remember the following things when working with the Ongoing Activity API:
Set a static icon for your Ongoing Activity, either explicitly or as a fallback using the notification. If you don't, you get an
IllegalArgumentException.Use black and white vector icons with transparent backgrounds.
Set a touch intent for your Ongoing Activity, either explicitly or as a fallback using the notification. If you don't, you get an
IllegalArgumentException.If your app has more than one
MAIN LAUNCHERactivity declared in the manifest, publish a dynamic shortcut and associate it with your Ongoing Activity usingLocusId.
Publish media notifications when playing media on Wear OS devices
If media content is playing on a Wear OS device, publish a media notification. This lets the system create the corresponding ongoing activity.
If you are using Media3, the notification is published automatically. If you
create your notification manually, it should use the
MediaStyleNotificationHelper.MediaStyle, and the corresponding
MediaSession should have its session activity populated.
Recommended for you
- Note: link text is displayed when JavaScript is off
- Create a notification {:#notification}
- Engage Wear OS users in new ways with the Ongoing Activity API
- Create an expandable notification {:#expandable-notification}