
含有多個 Gradle 模組的專案稱為多模組專案。如果是以單一 APK 形式提供,且不含功能模組的多模組專案,通常會具有可依附於專案中大部分模組的 app 模組,以及其餘模組通常會依附的 base 或 core 模組。app 模組通常包含 Application 類別,而 base 模組則包含專案中所有模組共用的所有通用類別。
app 模組是適合宣告應用程式元件 (如下圖中 ApplicationComponent) 的位置,可藉此提供其他元件和應用程式單例模式可能需要的物件。舉例來說,app 模組中定義的 ApplicationComponent 會提供 OkHttpClient 等類別、JSON 剖析器、資料庫的存取子,或是可在 core 模組中定義的 SharedPreferences 物件。
在 app 模組中,也可以有其他生命週期較短的元件,例如在登入後具有使用者專屬設定 (如 UserSession) 的 UserComponent。
在專案的不同模組中,您可以定義至少一項具有該模組專屬邏輯的子元件,如圖 1 所示。
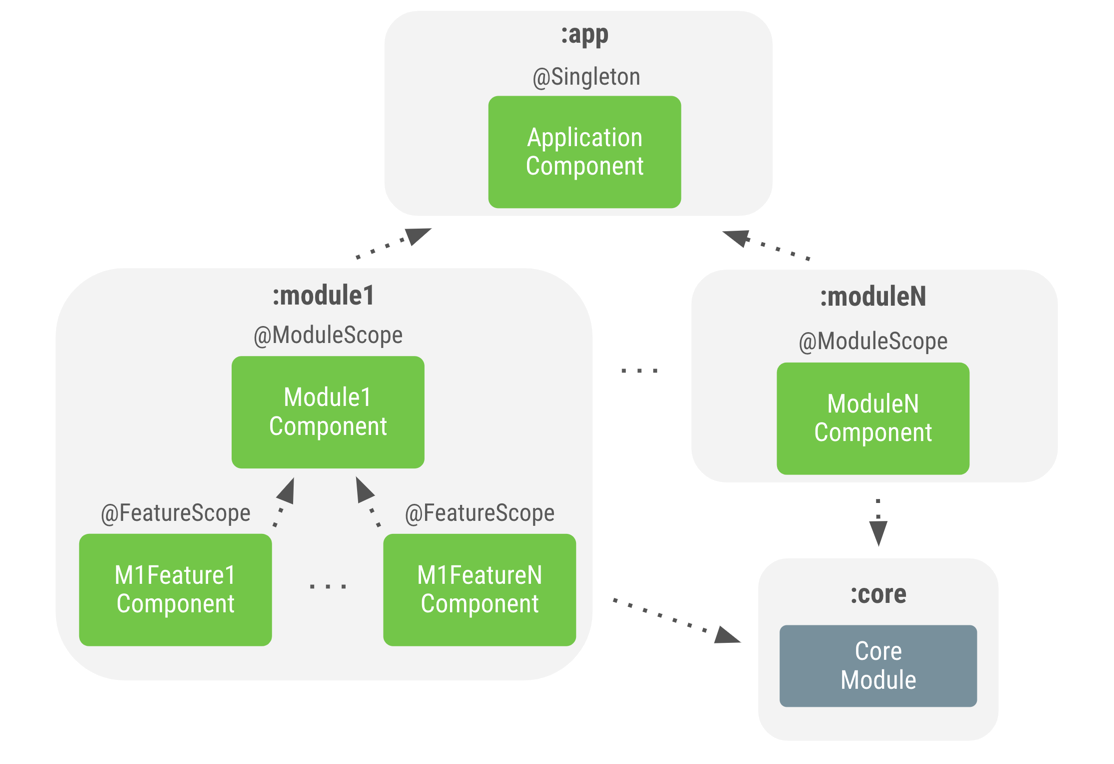
圖 1 多模組專案中的 Dagger 圖表範例
舉例來說,在 login 模組中,您可以將 LoginComponent 的範圍指定為自訂 @ModuleScope 註解,該註解可提供該功能的通用物件,例如 LoginRepository。在該模組中,也可以有其他依附於 LoginComponent 但自訂範圍不同的元件,例如 LoginActivityComponent 的 @FeatureScope,或是範圍可涵蓋更多功能專屬邏輯的 TermsAndConditionsComponent,例如 ViewModel 物件。
若是 Registration 等其他模組,可以使用類似設定。
多模組專案的通則是,相同層級的模組不應彼此依附。如果這類模組彼此依附,請考量該共用邏輯 (兩者之間的依附元件) 是否應屬於父項模組。若是,請重構並將類別移至父項模組,否則請建立新模組來擴充父項模組,並讓兩個原始模組擴充新模組。
如要在下列情況採取最佳做法,您通常會在模組中建立元件:
您需要執行欄位插入作業,就像使用
LoginActivityComponent一樣。您需要設定物件範圍,就像使用
LoginComponent一樣。
如果上述兩種情況均不適用,而您需要告知 Dagger 如何提供該模組的物件,請使用 @Provides 或 @Binds 方法建立及公開 Dagger 模組,前提是這些類別無法執行建構函式插入作業。
Dagger 子元件實作
「在 Android 應用程式中使用 Dagger」一文說明了如何建立及使用子元件。然而,您無法使用相同的程式碼,因為功能模組並不瞭解 app 模組。舉例來說,如果您考量的是一般登入流程和先前頁面中的程式碼,則無法再編譯:
Kotlin
class LoginActivity: Activity() {
  ...

  override fun onCreate(savedInstanceState: Bundle?) {
    // Creation of the login graph using the application graph
    loginComponent = (applicationContext as MyDaggerApplication)
                        .appComponent.loginComponent().create()

    // Make Dagger instantiate @Inject fields in LoginActivity
    loginComponent.inject(this)
    ...
  }
}
Java
public class LoginActivity extends Activity {
    ...

    @Override
    protected void onCreate(Bundle savedInstanceState) {
        // Creation of the login graph using the application graph
        loginComponent = ((MyApplication) getApplicationContext())
                                .appComponent.loginComponent().create();

        // Make Dagger instantiate @Inject fields in LoginActivity
        loginComponent.inject(this);

        ...
    }
}
原因在於 login 模組不瞭解 MyApplication 和 appComponent。如要順利運作,您需要在功能模組中定義介面,提供 MyApplication 需要實作的 FeatureComponent。
在以下範例中,您可以定義 LoginComponentProvider 介面,為登入流程的 login 模組中提供 LoginComponent:
Kotlin
interface LoginComponentProvider {
    fun provideLoginComponent(): LoginComponent
}
Java
public interface LoginComponentProvider {
   public LoginComponent provideLoginComponent();
}
現在,LoginActivity 會使用該介面,而非上方定義的程式碼片段:
Kotlin
class LoginActivity: Activity() {
  ...

  override fun onCreate(savedInstanceState: Bundle?) {
    loginComponent = (applicationContext as LoginComponentProvider)
                        .provideLoginComponent()

    loginComponent.inject(this)
    ...
  }
}
Java
public class LoginActivity extends Activity {
    ...

    @Override
    protected void onCreate(Bundle savedInstanceState) {
        loginComponent = ((LoginComponentProvider) getApplicationContext())
                                .provideLoginComponent();

        loginComponent.inject(this);

        ...
    }
}
現在,MyApplication 需要實作該介面和必要方法:
Kotlin
class MyApplication: Application(), LoginComponentProvider {
  // Reference to the application graph that is used across the whole app
  val appComponent = DaggerApplicationComponent.create()

  override fun provideLoginComponent(): LoginComponent {
    return appComponent.loginComponent().create()
  }
}
Java
public class MyApplication extends Application implements LoginComponentProvider {
  // Reference to the application graph that is used across the whole app
  ApplicationComponent appComponent = DaggerApplicationComponent.create();

  @Override
  public LoginComponent provideLoginComponent() {
    return appComponent.loginComponent.create();
  }
}
這就是您可以在多模組專案中使用 Dagger 子元件的方法。使用功能模組時,解決方案會因模組間的依附方式而異。
功能模組的元件依附元件
使用功能模組時,模組間的依附方式通常會反轉。功能模組並不會包含在 app 模組中,而會依附於 app 模組。請參考圖 2 中的模組結構示意圖。
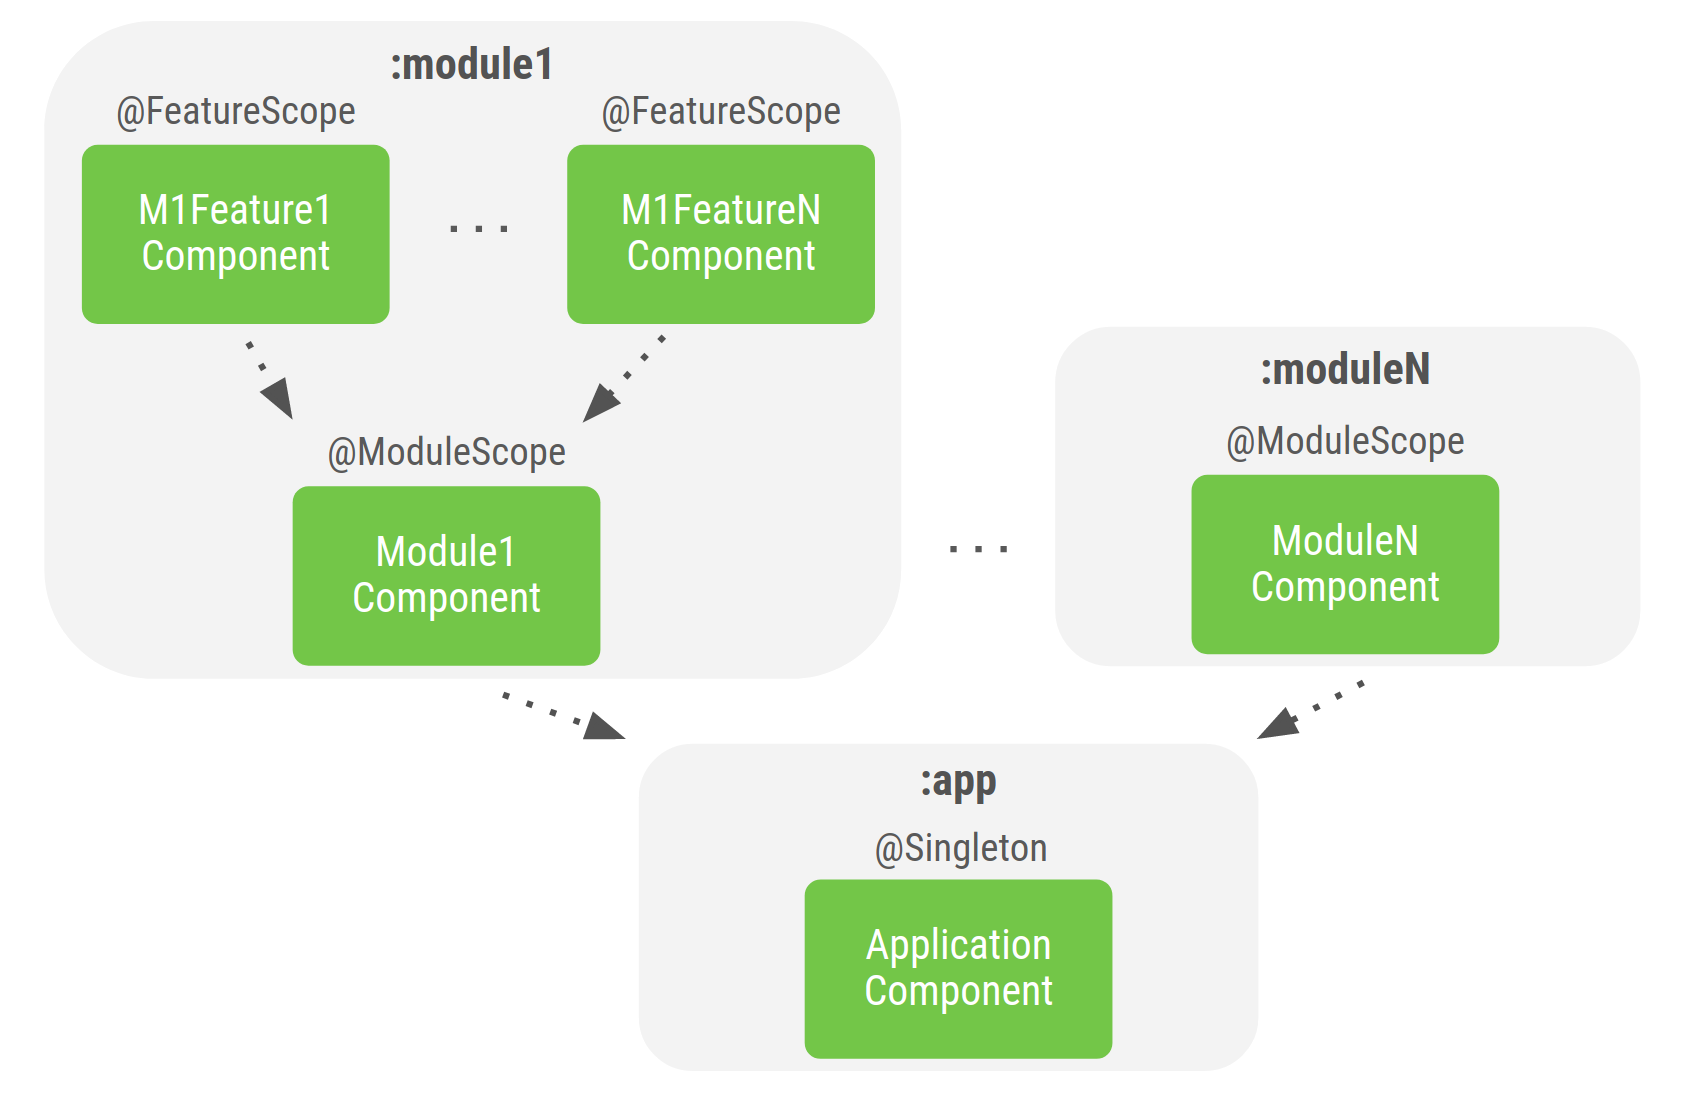
圖 2. 含功能模組專案中的 Dagger 圖表範例
在 Dagger 中,元件需要瞭解其子元件。這類資訊包含在新增至父項元件的 Dagger 模組中,例如「在 Android 應用程式使用 Dagger」文章提及的 SubcomponentsModule 模組。
遺憾的是,應用程式和功能模組之間的依附關係反轉後,因為子元件不在建構路徑中,因此 app 模組中不會顯示子元件。舉例來說,在 login 功能模組中定義的 LoginComponent,就不能是 app 模組中定義的 ApplicationComponent 子元件。
如要解決這個問題,可以使用 Dagger 的元件依附元件機制。在這項機制中,子項元件並不是父項元件的子元件,而是依附於父項元件,因此沒有上下層關係。現在,元件會依附於其他元件,以取得特定依附元件。元件必須公開圖表中的類型,供依附的元件取用。
示例:login 功能模組想要建構 LoginComponent,而此元件會依附於 app Gradle 模組提供的 AppComponent。
以下是類別與 app Gradle 模組中 AppComponent 的定義:
Kotlin
// UserRepository's dependencies
class UserLocalDataSource @Inject constructor() { ... }
class UserRemoteDataSource @Inject constructor() { ... }

// UserRepository is scoped to AppComponent
@Singleton
class UserRepository @Inject constructor(
    private val localDataSource: UserLocalDataSource,
    private val remoteDataSource: UserRemoteDataSource
) { ... }

@Singleton
@Component
interface AppComponent { ... }
Java
// UserRepository's dependencies
public class UserLocalDataSource {

    @Inject
    public UserLocalDataSource() {}
}

public class UserRemoteDataSource {

    @Inject
    public UserRemoteDataSource() { }
}

// UserRepository is scoped to AppComponent
@Singleton
public class UserRepository {

    private final UserLocalDataSource userLocalDataSource;
    private final UserRemoteDataSource userRemoteDataSource;

    @Inject
    public UserRepository(UserLocalDataSource userLocalDataSource, UserRemoteDataSource userRemoteDataSource) {
        this.userLocalDataSource = userLocalDataSource;
        this.userRemoteDataSource = userRemoteDataSource;
    }
}

@Singleton
@Component
public interface ApplicationComponent { ... }
在包含 app Gradle 模組的 login Gradle 模組中,有一個需要插入 LoginViewModel 例項的 LoginActivity:
Kotlin
// LoginViewModel depends on UserRepository that is scoped to AppComponent
class LoginViewModel @Inject constructor(
    private val userRepository: UserRepository
) { ... }
Java
// LoginViewModel depends on UserRepository that is scoped to AppComponent
public class LoginViewModel {

    private final UserRepository userRepository;

    @Inject
    public LoginViewModel(UserRepository userRepository) {
        this.userRepository = userRepository;
    }
}
LoginViewModel 在 UserRepository 上具有依附元件,且該依附元件的適用對象和範圍皆為 AppComponent。讓我們建立依附於 AppComponent 的 LoginComponent,以插入 LoginActivity:
Kotlin
// Use the dependencies attribute in the Component annotation to specify the
// dependencies of this Component
@Component(dependencies = [AppComponent::class])
interface LoginComponent {
    fun inject(activity: LoginActivity)
}
Java
// Use the dependencies attribute in the Component annotation to specify the
// dependencies of this Component
@Component(dependencies = AppComponent.class)
public interface LoginComponent {

    void inject(LoginActivity loginActivity);
}
LoginComponent 會指定 AppComponent 的依附元件,方法是將其新增至元件註解的依附元件參數。LoginActivity 將會由 Dagger 插入,因此請將 inject() 方法新增至介面。
建立 LoginComponent 時,需要傳入 AppComponent 的例項。請使用元件工廠執行這項操作:
Kotlin
@Component(dependencies = [AppComponent::class])
interface LoginComponent {

    @Component.Factory
    interface Factory {
        // Takes an instance of AppComponent when creating
        // an instance of LoginComponent
        fun create(appComponent: AppComponent): LoginComponent
    }

    fun inject(activity: LoginActivity)
}
Java
@Component(dependencies = AppComponent.class)
public interface LoginComponent {

    @Component.Factory
    interface Factory {
        // Takes an instance of AppComponent when creating
        // an instance of LoginComponent
        LoginComponent create(AppComponent appComponent);
    }

    void inject(LoginActivity loginActivity);
}
現在,LoginActivity 可以建立 LoginComponent 的例項,並呼叫 inject() 方法。
Kotlin
class LoginActivity: Activity() {

    // You want Dagger to provide an instance of LoginViewModel from the Login graph
    @Inject lateinit var loginViewModel: LoginViewModel

    override fun onCreate(savedInstanceState: Bundle?) {
        // Gets appComponent from MyApplication available in the base Gradle module
        val appComponent = (applicationContext as MyApplication).appComponent

        // Creates a new instance of LoginComponent
        // Injects the component to populate the @Inject fields
        DaggerLoginComponent.factory().create(appComponent).inject(this)

        super.onCreate(savedInstanceState)

        // Now you can access loginViewModel
    }
}
Java
public class LoginActivity extends Activity {

    // You want Dagger to provide an instance of LoginViewModel from the Login graph
    @Inject
    LoginViewModel loginViewModel;

    @Override
    protected void onCreate(Bundle savedInstanceState) {
        super.onCreate(savedInstanceState);

        // Gets appComponent from MyApplication available in the base Gradle module
        AppComponent appComponent = ((MyApplication) getApplicationContext()).appComponent;

        // Creates a new instance of LoginComponent
        // Injects the component to populate the @Inject fields
        DaggerLoginComponent.factory().create(appComponent).inject(this);

        // Now you can access loginViewModel
    }
}
LoginViewModel 依附於 UserRepository,而為了供 LoginComponent 從 AppComponent 存取,需要由 AppComponent 在介面中公開:
Kotlin
@Singleton
@Component
interface AppComponent {
    fun userRepository(): UserRepository
}
Java
@Singleton
@Component
public interface AppComponent {
    UserRepository userRepository();
}
依附元件的範圍規則運作方式與子元件相同。由於 LoginComponent 使用 AppComponent 的例項,因此無法使用相同的範圍註解。
如要將 LoginViewModel 的範圍設定為 LoginComponent,方法與先前使用自訂 @ActivityScope 註解相同。
Kotlin
@ActivityScope
@Component(dependencies = [AppComponent::class])
interface LoginComponent { ... }

@ActivityScope
class LoginViewModel @Inject constructor(
    private val userRepository: UserRepository
) { ... }
Java
@ActivityScope
@Component(dependencies = AppComponent.class)
public interface LoginComponent { ... }

@ActivityScope
public class LoginViewModel {

    private final UserRepository userRepository;

    @Inject
    public LoginViewModel(UserRepository userRepository) {
        this.userRepository = userRepository;
    }
}
最佳做法
ApplicationComponent應一律位於app模組中。如要在模組中執行欄位插入作業,或針對應用程式的特定流程設定物件範圍,請在模組中建立 Dagger 元件。
如果 Gradle 模組是做為公用程式/輔助程式,且不需要建構圖表 (這就是需使用 Dagger 元件的原因),請在不支援建構函式插入作業的類別中,使用 @Provides 和 @Binds 方法建立公開的 Dagger 模組並加以公開。
如要在含有功能模組的 Android 應用程式中使用 Dagger,請使用元件依附元件,存取
app模組中定義的ApplicationComponent所提供的依附元件。