本頁說明車輛應用程式程式庫的不同功能,方便您實作即時路線導航應用程式中的功能。
在資訊清單中宣告導航支援
導航應用程式必須在 CarAppService 的意圖篩選器中宣告 androidx.car.app.category.NAVIGATION 車用應用程式類別:
<application>
    ...
   <service
       ...
        android:name=".MyNavigationCarAppService"
        android:exported="true">
      <intent-filter>
        <action android:name="androidx.car.app.CarAppService" />
        <category android:name="androidx.car.app.category.NAVIGATION"/>
      </intent-filter>
    </service>
    ...
</application>
支援導航意圖
各種意圖格式可讓導航應用程式與其他應用程式 (例如搜尋點應用程式和語音助理) 搭配使用。
如要支援這些意圖格式,請先在應用程式的資訊清單中新增意圖篩選器,宣告支援。這些意圖篩選器的位置取決於平台:
- Android Auto:在
<activity>資訊清單元素中,Activity用於在使用者未使用 Android Auto 時處理意圖。 - Android Automotive OS:在
CarAppActivity的<activity>資訊清單元素中。
接著,在應用程式的 Session 實作中,讀取並處理 onCreateScreen() 和 onNewIntent() 回呼中的意圖。
必要的意圖格式
選用意圖格式
您也可以支援下列意圖格式,進一步提升應用程式的互通性:
存取導航範本
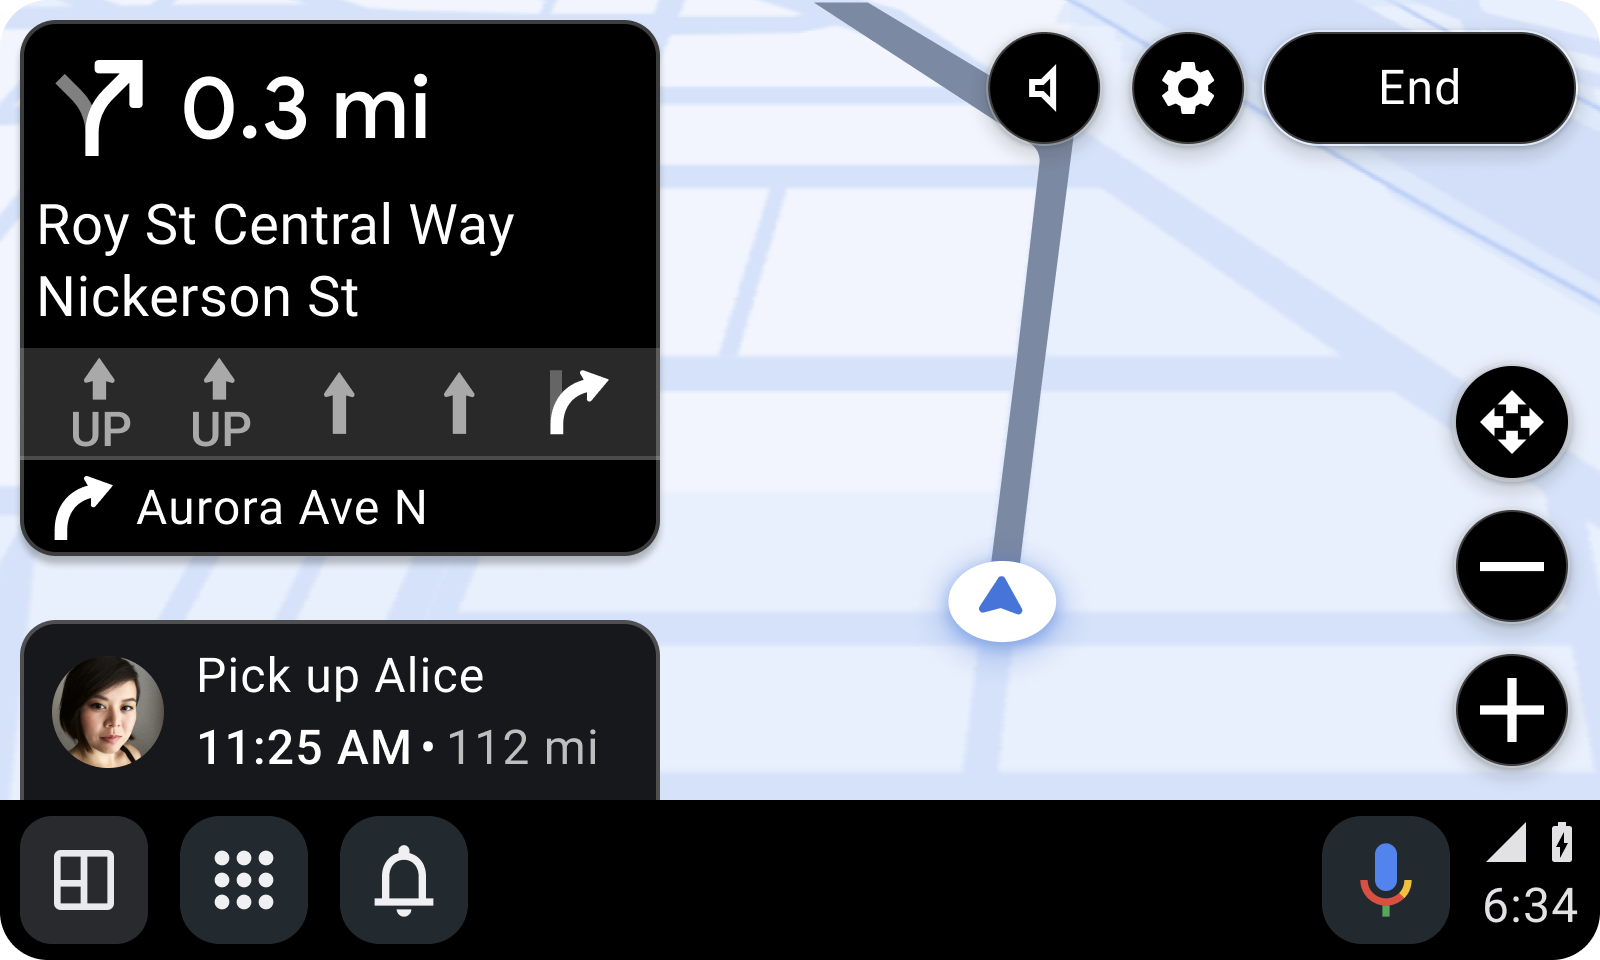
導航應用程式可以存取下列範本,這些範本會在地圖的背景顯示介面,並在導航期間顯示即時路線指示。
NavigationTemplate:在導航期間,也會顯示選擇性的資訊訊息和行程預估時間。MapWithContentTemplate:這個範本可讓應用程式以某種內容 (例如清單) 算繪地圖圖塊。內容通常會以疊加層的形式顯示在地圖圖塊上方,並根據內容調整地圖可見和穩定的區域。
如要進一步瞭解如何運用這些範本設計導航應用程式的使用者介面,請參閱「導航應用程式」。
如要存取導航範本,應用程式需要在 AndroidManifest.xml 檔案中宣告 androidx.car.app.NAVIGATION_TEMPLATES 權限:
<manifest ...>
  ...
  <uses-permission android:name="androidx.car.app.NAVIGATION_TEMPLATES"/>
  ...
</manifest>
您需要額外權限才能繪製地圖。
遷移至 MapWithContentTemplate
從 Car App API 級別 7 開始,MapTemplate、PlaceListNavigationTemplate 和 RoutePreviewNavigationTemplate 已淘汰。我們仍會繼續支援已淘汰的範本,但強烈建議您遷移至 MapWithContentTemplate。
這些範本提供的功能可使用 MapWithContentTemplate 實作。請參考以下程式碼片段:
MapTemplate
Kotlin
// MapTemplate (deprecated)
val template = MapTemplate.Builder()
    .setPane(paneBuilder.build())
    .setActionStrip(actionStrip)
    .setHeader(header)
    .setMapController(mapController)
    .build()

// MapWithContentTemplate
val template = MapWithContentTemplate.Builder()
    .setContentTemplate(
        PaneTemplate.Builder(paneBuilder.build())
            .setHeader(header)
            .build())
    .setActionStrip(actionStrip)
    .setMapController(mapController)
    .build()
Java
// MapTemplate (deprecated)
MapTemplate template = new MapTemplate.Builder()
    .setPane(paneBuilder.build())
    .setActionStrip(actionStrip)
    .setHeader(header)
    .setMapController(mapController)
    .build();

// MapWithContentTemplate
MapWithContentTemplate template = new MapWithContentTemplate.Builder()
    .setContentTemplate(new PaneTemplate.Builder(paneBuilder.build())
        .setHeader(header)
        build())
    .setActionStrip(actionStrip)
    .setMapController(mapController)
    .build();
PlaceListNavigationTemplate
Kotlin
// PlaceListNavigationTemplate (deprecated)
val template = PlaceListNavigationTemplate.Builder()
    .setItemList(itemListBuilder.build())
    .setHeader(header)
    .setActionStrip(actionStrip)
    .setMapActionStrip(mapActionStrip)
    .build()

// MapWithContentTemplate
val template = MapWithContentTemplate.Builder()
    .setContentTemplate(
        ListTemplate.Builder()
            .setSingleList(itemListBuilder.build())
            .setHeader(header)
            .build())
    .setActionStrip(actionStrip)
    .setMapController(
        MapController.Builder()
            .setMapActionStrip(mapActionStrip)
            .build())
    .build()
Java
// PlaceListNavigationTemplate (deprecated)
PlaceListNavigationTemplate template = new PlaceListNavigationTemplate.Builder()
    .setItemList(itemListBuilder.build())
    .setHeader(header)
    .setActionStrip(actionStrip)
    .setMapActionStrip(mapActionStrip)
    .build();

// MapWithContentTemplate
MapWithContentTemplate template = new MapWithContentTemplate.Builder()
    .setContentTemplate(new ListTemplate.Builder()
        .setSingleList(itemListBuilder.build())
        .setHeader(header)
        .build())
    .setActionStrip(actionStrip)
    .setMapController(new MapController.Builder()
        .setMapActionStrip(mapActionStrip)
        .build())
    .build();
RoutePreviewNavigationTemplate
Kotlin
// RoutePreviewNavigationTemplate (deprecated)
val template = RoutePreviewNavigationTemplate.Builder()
    .setItemList(
        ItemList.Builder()
            .addItem(
                Row.Builder()
                    .setTitle(title)
                    .build())
            .build())
    .setHeader(header)
    .setNavigateAction(
        Action.Builder()
            .setTitle(actionTitle)
            .setOnClickListener { ... }
            .build())
    .setActionStrip(actionStrip)
    .setMapActionStrip(mapActionStrip)
    .build()

// MapWithContentTemplate
val template = MapWithContentTemplate.Builder()
    .setContentTemplate(
        ListTemplate.Builder()
            .setSingleList(
                ItemList.Builder()
                    .addItem(
                        Row.Builder()
                            .setTitle(title)
                            .addAction(
                                Action.Builder()
                                    .setTitle(actionTitle)
                                    .setOnClickListener { ... }
                                    .build())
                            .build())
                    .build())
            .setHeader(header)
            .build())
    .setActionStrip(actionStrip)
    .setMapController(
        MapController.Builder()
            .setMapActionStrip(mapActionStrip)
            .build())
    .build()
Java
// RoutePreviewNavigationTemplate (deprecated)
RoutePreviewNavigationTemplate template = new RoutePreviewNavigationTemplate.Builder()
    .setItemList(new ItemList.Builder()
        .addItem(new Row.Builder()
            .setTitle(title))
            .build())
        .build())
    .setHeader(header)
    .setNavigateAction(new Action.Builder()
        .setTitle(actionTitle)
        .setOnClickListener(() -> { ... })
        .build())
    .setActionStrip(actionStrip)
    .setMapActionStrip(mapActionStrip)
    .build();

// MapWithContentTemplate
MapWithContentTemplate template = new MapWithContentTemplate.Builder()
    .setContentTemplate(new ListTemplate.Builder()
        .setSingleList(new ItemList.Builder()
            .addItem(new Row.Builder()
                  .setTitle(title))
                  .addAction(new Action.Builder()
                      .setTitle(actionTitle)
                      .setOnClickListener(() -> { ... })
                      .build())
                  .build())
            .build()))
        .setHeader(header)
        .build())
    .setActionStrip(actionStrip)
    .setMapController(new MapController.Builder()
        .setMapActionStrip(mapActionStrip)
        .build())
    .build();
傳送導航中繼資料
導航應用程式必須向主機傳送額外的導航中繼資料。主機會使用該資訊,為車輛的車用運算主機提供資訊,並避免導航應用程式與共用資源產生衝突。
系統會透過可從 CarContext 存取的 NavigationManager 車輛服務提供導航中繼資料:
Kotlin
val navigationManager = carContext.getCarService(NavigationManager::class.java)
Java
NavigationManager navigationManager = carContext.getCarService(NavigationManager.class);
開始、結束及停止導航
為了讓主機管理多個導航應用程式、路線規劃通知和車輛叢集資料,主機需要瞭解當前的導航狀態。使用者開始導航時,請呼叫 NavigationManager.navigationStarted。同樣地,導航結束時 (例如使用者抵達目的地或取消導航),請呼叫 NavigationManager.navigationEnded。
請只在使用者完成導航時呼叫 NavigationManager.navigationEnded。舉例來說,如果中途需要重新計算路徑,請改用 Trip.Builder.setLoading(true)。
主機有時會需要應用程式停止導航,然後透過 NavigationManager.setNavigationManagerCallback 在應用程式提供的 NavigationManagerCallback 物件中呼叫 onStopNavigation。應用程式必須隨後停止在叢集顯示畫面、導航通知和語音導引中發送下一個轉彎資訊。
更新行程資訊
在導航期間,請呼叫 NavigationManager.updateTrip。車輛的叢集和抬頭顯示器可使用此呼叫中提供的資訊。視使用者駕駛的車輛而定,使用者並不會看到所有資訊。舉例來說,電腦版車用運算主機 (DHU) 會顯示加入 Trip 的 Step,但不會顯示 Destination 資訊。
繪製至儀表板螢幕
為了提供最身歷其境的使用者體驗,您可能會希望在車輛的儀表板螢幕上顯示基本中繼資料以外的資訊。從 Car App API 級別 6 開始,導航應用程式可以選擇在儀表板螢幕上直接顯示自身的內容 (適用於支援的車輛),但有下列限制:
- 儀表板螢幕 API 不支援輸入控制項
- 車用應用程式品質指南
NF-9:儀表板螢幕應只顯示地圖圖塊。您可以選擇在這些圖塊上顯示使用中的導航路線。 - 儀表板螢幕 API 僅支援使用
NavigationTemplate- 與主螢幕不同,儀表板螢幕不一定每次都會顯示所有
NavigationTemplateUI 元素,例如即時路線指示、預計到達時間資訊卡和動作。地圖圖塊是唯一會持續顯示的 UI 元素。
- 與主螢幕不同,儀表板螢幕不一定每次都會顯示所有
宣告儀表板支援
為了讓主機應用程式知道您的應用程式支援在儀表板螢幕上顯示內容,您必須在 CarAppService 的 <intent-filter> 中新增 androidx.car.app.category.FEATURE_CLUSTER <category> 元素,如以下程式碼片段所示:
<application>
    ...
   <service
       ...
        android:name=".MyNavigationCarAppService"
        android:exported="true">
      <intent-filter>
        <action android:name="androidx.car.app.CarAppService" />
        <category android:name="androidx.car.app.category.NAVIGATION"/>
        <category android:name="androidx.car.app.category.FEATURE_CLUSTER"/>
      </intent-filter>
    </service>
    ...
</application>
生命週期與狀態管理
從 API 級別 6 開始,車輛應用程式的生命週期流程都保持不變,但現在 CarAppService::onCreateSession 會採用 SessionInfo 類型的參數,此參數會針對正在建立的 Session 提供額外資訊 (也就是顯示螢幕類型和支援的範本集)。
應用程式可以選擇使用相同的 Session 類別來處理儀表板和主螢幕,也可以建立特定螢幕專用的 Sessions 來自訂各螢幕的行為,如以下程式碼片段所示。
Kotlin
override fun onCreateSession(sessionInfo: SessionInfo): Session {
  return if (sessionInfo.displayType == SessionInfo.DISPLAY_TYPE_CLUSTER) {
    ClusterSession()
  } else {
    MainDisplaySession()
  }
}
Java
@Override
@NonNull
public Session onCreateSession(@NonNull SessionInfo sessionInfo) {
  if (sessionInfo.getDisplayType() == SessionInfo.DISPLAY_TYPE_CLUSTER) {
    return new ClusterSession();
  } else {
    return new MainDisplaySession();
  }
}
系統無法保證何時 (或是否) 會提供儀表板螢幕,儀表板 Session 也有可能是唯一的 Session。舉例來說,使用者在應用程式導航期間將主螢幕切換至另一個應用程式,就會造成後面這種情況。我們的「標準」共識是,只有在呼叫 NavigationManager::navigationStarted 後,應用程式才會取得儀表板螢幕的控制權。但是,系統仍有可能在沒有導航作業發生時為應用程式提供儀表板螢幕,也可能一律不提供儀表板螢幕。您的應用程式可以藉由顯示地圖圖塊的閒置狀態,自行處理這些情況。
主機會為每個 Session 建立獨立的繫結機制和 CarContext 例項。也就是說,在您使用 ScreenManager::push 或 Screen::invalidate 等方法時,只有用於呼叫這些方法的 Session 會受到影響。如果需要跨 Session 通訊,應用程式應在這些例項間建立自己的通訊管道 (例如使用廣播訊息、共用的單例模式等方法)。
測試儀表板支援
無論是在 Android Auto 還是 Android Automotive OS 上,您都可以測試導入作業。Android Auto 適用的方法是設定電腦版車用運算主機來模擬次要儀表板螢幕。如果是 Android Automotive OS,則會由 API 級別 30 以上的通用系統映像檔模擬儀表板螢幕。
使用文字或圖示自訂 TravelEstimate
如要利用文字和/或圖示自訂行程預估時間,請使用 TravelEstimate.Builder 類別的 setTripIcon 或 setTripText 方法。NavigationTemplate 會使用 TravelEstimate 選擇性設定文字和圖示,用來搭配或取代預計到達時間、剩餘時間和剩餘距離。

下列程式碼片段使用 setTripIcon 和 setTripText 自訂行程預估時間:
Kotlin
TravelEstimate.Builder(Distance.create(...), DateTimeWithZone.create(...))
      ...
      .setTripIcon(CarIcon.Builder(...).build())
      .setTripText(CarText.create(...))
      .build()
Java
new TravelEstimate.Builder(Distance.create(...), DateTimeWithZone.create(...))
      ...
      .setTripIcon(CarIcon.Builder(...).build())
      .setTripText(CarText.create(...))
      .build();
提供即時路線通知
請使用經常更新的導航通知提供即時路線 (TBT) 導航指示。為了在汽車螢幕上順利顯示導航通知,通知建構工具必須執行下列操作:
- 使用
NotificationCompat.Builder.setOngoing方法,將通知標示為進行中。 - 將通知的類別設為
Notification.CATEGORY_NAVIGATION。 - 使用
CarAppExtender擴充通知。
導航通知會在車輛螢幕底部的邊欄小工具中顯示。如果通知的重要性等級已設為 IMPORTANCE_HIGH,則也會顯示為抬頭通知 (HUN)。如果並未使用 CarAppExtender.Builder.setImportance 方法設定重要性,系統就會使用通知管道的重要性。
應用程式可在 CarAppExtender 中設定 PendingIntent,並在使用者輕觸抬頭通知或邊欄小工具時,將其傳送至應用程式。
如果使用 true 值呼叫 NotificationCompat.Builder.setOnlyAlertOnce,則重要性高的通知只會在抬頭通知中顯示一次。
下列程式碼片段說明如何建構導航通知:
Kotlin
NotificationCompat.Builder(context, NOTIFICATION_CHANNEL_ID)
    ...
    .setOnlyAlertOnce(true)
    .setOngoing(true)
    .setCategory(NotificationCompat.CATEGORY_NAVIGATION)
    .extend(
        CarAppExtender.Builder()
            .setContentTitle(carScreenTitle)
            ...
            .setContentIntent(
                PendingIntent.getBroadcast(
                    context,
                    ACTION_OPEN_APP.hashCode(),
                    Intent(ACTION_OPEN_APP).setComponent(
                        ComponentName(context, MyNotificationReceiver::class.java)),
                        0))
            .setImportance(NotificationManagerCompat.IMPORTANCE_HIGH)
            .build())
    .build()
Java
new NotificationCompat.Builder(context, NOTIFICATION_CHANNEL_ID)
    ...
    .setOnlyAlertOnce(true)
    .setOngoing(true)
    .setCategory(NotificationCompat.CATEGORY_NAVIGATION)
    .extend(
        new CarAppExtender.Builder()
            .setContentTitle(carScreenTitle)
            ...
            .setContentIntent(
                PendingIntent.getBroadcast(
                    context,
                    ACTION_OPEN_APP.hashCode(),
                    new Intent(ACTION_OPEN_APP).setComponent(
                        new ComponentName(context, MyNotificationReceiver.class)),
                        0))
            .setImportance(NotificationManagerCompat.IMPORTANCE_HIGH)
            .build())
    .build();
請根據距離變化定期更新即時路線通知 (邊欄小工具也會隨之更新),並且僅以抬頭通知的形式顯示通知。您可以使用 CarAppExtender.Builder.setImportance 設定通知的重要性,藉此控制抬頭通知的行為。將重要性設為 IMPORTANCE_HIGH,就會顯示抬頭通知;如果設為任何其他值,則只會更新邊欄小工具。
重新整理 PlaceListNavigationTemplate 內容
您可以允許駕駛人在瀏覽使用 PlaceListNavigationTemplate 建構的地點清單時,輕觸按鈕重新整理內容。如要啟用清單重新整理功能,請實作 OnContentRefreshListener 介面的 onContentRefreshRequested 方法,並使用 PlaceListNavigationTemplate.Builder.setOnContentRefreshListener 為範本設定事件監聽器。
下列程式碼片段說明如何設定範本的事件監聽器:
Kotlin
PlaceListNavigationTemplate.Builder()
    ...
    .setOnContentRefreshListener {
        // Execute any desired logic
        ...
        // Then call invalidate() so onGetTemplate() is called again
        invalidate()
    }
    .build()
Java
new PlaceListNavigationTemplate.Builder()
        ...
        .setOnContentRefreshListener(() -> {
            // Execute any desired logic
            ...
            // Then call invalidate() so onGetTemplate() is called again
            invalidate();
        })
        .build();
只有在事件監聽器含有值時,重新整理按鈕才會顯示在 PlaceListNavigationTemplate 的標頭中。
駕駛人按一下重新整理按鈕時,系統會呼叫 OnContentRefreshListener 實作的 onContentRefreshRequested 方法。請在 onContentRefreshRequested 中,呼叫 Screen.invalidate 方法。主機隨後會呼叫應用程式的 Screen.onGetTemplate 方法,使用經過重新整理的內容擷取範本。如要進一步瞭解如何重新整理範本,請參閱「重新整理範本內容」。只要 onGetTemplate 傳回的下一個範本類型相同,系統就會計為重新整理,而不會計入範本配額。
提供語音導引
如要使用車上音響播放導航指引,應用程式必須要求音訊焦點權限。請在 AudioFocusRequest 中,將用途設為 AudioAttributes.USAGE_ASSISTANCE_NAVIGATION_GUIDANCE。此外,請將焦點增益設為 AudioManager.AUDIOFOCUS_GAIN_TRANSIENT_MAY_DUCK。
模擬導航
為了將導航功能提交至 Google Play 商店並進行驗證,應用程式必須實作 NavigationManagerCallback.onAutoDriveEnabled 回呼。呼叫此回呼時,應用程式必須在使用者開始導航時,模擬前往所選目的地的導航過程。只要當前 Session 的生命週期達到 Lifecycle.Event.ON_DESTROY 狀態,應用程式即可退出此模式。
您可以在指令列中執行以下程式碼,測試系統是否會呼叫 onAutoDriveEnabled 實作方式:
adb shell dumpsys activity service CAR_APP_SERVICE_NAME AUTO_DRIVE
例如:
adb shell dumpsys activity service androidx.car.app.samples.navigation.car.NavigationCarAppService AUTO_DRIVE
預設車用導航應用程式
在 Android Auto 中,使用者最後啟動的導航應用程式會成為預設的車輛導航應用程式。當使用者透過 Google 助理叫用導航指令,或其他應用程式傳送啟動導航的意圖時,預設應用程式會接收導航意圖。
在導航畫面顯示快訊
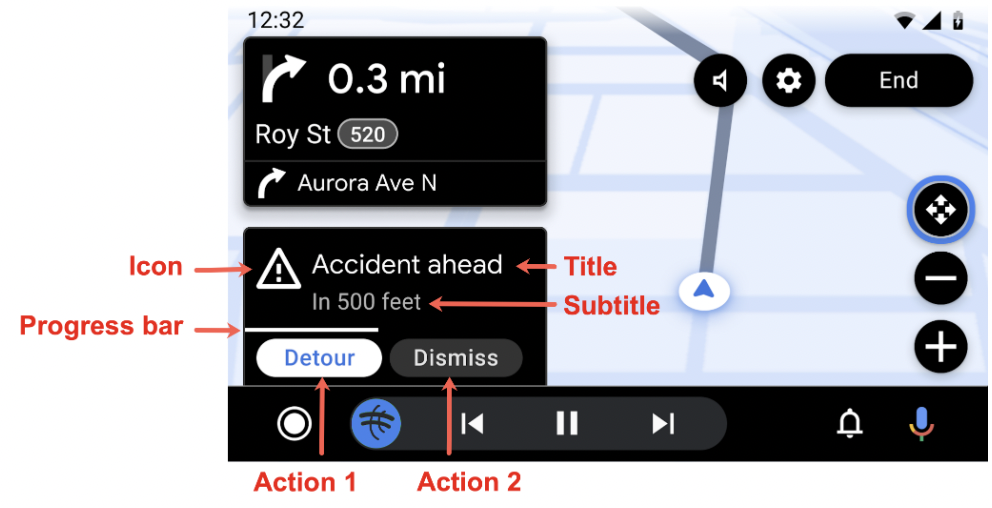
Alert 會向駕駛人顯示重要資訊和選用動作,無須離開導航畫面。為了讓駕駛人享有最佳體驗,Alert 會在 NavigationTemplate 中運作,避免遮擋導航路徑,並盡量減少駕駛人分心的情況。
Alert 僅適用於 NavigationTemplate。如要通知 NavigationTemplate 以外的使用者,請考慮使用抬頭通知 (HUN),詳情請參閱「顯示通知」。
舉例來說,使用 Alert 可執行以下動作:
- 告知駕駛人與目前導航相關的更新內容,例如路況變更。
- 詢問駕駛人與目前導航相關的更新,例如出現移動式測速照相機。
- 提出即將到來的任務,並詢問駕駛人是否要接受,例如駕駛人是否願意順路接送乘客。
Alert 的基本格式中包含標題和 Alert 時間長度。時間長度會以進度列顯示。您可以視需要新增副標題、圖示和最多兩個 Action 物件。

Alert 顯示後,如果駕駛人互動導致離開 NavigationTemplate,快訊並不會沿用至其他範本。快訊會一直停留在原始的 NavigationTemplate 中,直到 Alert 逾時、使用者採取動作或應用程式關閉 Alert。
建立快訊
請使用 Alert.Builder 建立 Alert 例項:
Kotlin
Alert.Builder(
        /*alertId*/ 1,
        /*title*/ CarText.create("Hello"),
        /*durationMillis*/ 5000
    )
    // The fields below are optional
    .addAction(firstAction)
    .addAction(secondAction)
    .setSubtitle(CarText.create(...))
    .setIcon(CarIcon.APP_ICON)
    .setCallback(...)
    .build()
Java
new Alert.Builder(
        /*alertId*/ 1,
        /*title*/ CarText.create("Hello"),
        /*durationMillis*/ 5000
    )
    // The fields below are optional
    .addAction(firstAction)
    .addAction(secondAction)
    .setSubtitle(CarText.create(...))
    .setIcon(CarIcon.APP_ICON)
    .setCallback(...)
    .build();
如要監聽 Alert 的取消或關閉作業,請建立 AlertCallback 介面實作方式。AlertCallback 呼叫路徑如下:
如果
Alert逾時,主機會使用AlertCallback.REASON_TIMEOUT值呼叫AlertCallback.onCancel方法,隨後呼叫AlertCallback.onDismiss方法。如果駕駛人按一下其中一個動作按鈕,主機會依序呼叫
Action.OnClickListener和AlertCallback.onDismiss。如果不支援
Alert,主機會呼叫含AlertCallback.REASON_NOT_SUPPORTED值的AlertCallback.onCancel。主機不會呼叫AlertCallback.onDismiss,因為Alert並未顯示。
設定快訊時長
選擇符合應用程式需求的 Alert 持續時長。導航 Alert 的建議時間長度為 10 秒。詳情請參閱「導航快訊」。
顯示快訊
如要顯示 Alert,請使用應用程式中的 CarContext 呼叫 AppManager.showAlert 方法。
// Show an alert
carContext.getCarService(AppManager.class).showAlert(alert)
- 使用
Alert呼叫showAlert時,如果alertId與目前顯示的AlertID 相同,系統不會執行任何操作。Alert不會更新。如要更新Alert,必須使用新的alertId重新建立快訊。 - 使用
Alert呼叫showAlert時,如果alertId與目前顯示的AlertID 不同,系統會關閉目前顯示的Alert。
關閉快訊
雖然 Alert 會因逾時或駕駛人互動而自動關閉,但在快訊資訊過時等時機,您也可以手動關閉 Alert。如要關閉 Alert,請使用 Alert 的 alertId 呼叫 dismissAlert 方法。
// Dismiss the same alert
carContext.getCarService(AppManager.class).dismissAlert(alert.getId())
如果使用與目前顯示的 Alert 不相符的 alertId 呼叫 dismissAlert,系統不會執行任何動作,也不會擲回例外狀況。
