
API для нейронных сетей Android (NNAPI) — это C API для Android, предназначенный для выполнения ресурсоемких вычислительных операций машинного обучения на устройствах Android. NNAPI разработан для предоставления базового уровня функциональности для высокоуровневых фреймворков машинного обучения, таких как TensorFlow Lite и Caffe2, которые создают и обучают нейронные сети. API доступен на всех устройствах Android под управлением Android 8.1 (уровень API 27) или выше, но был объявлен устаревшим в Android 15.
NNAPI поддерживает вывод результатов, применяя данные с устройств Android к предварительно обученным, определенным разработчиком моделям. Примеры вывода результатов включают классификацию изображений, прогнозирование поведения пользователя и выбор соответствующих ответов на поисковый запрос.
Выполнение вычислений непосредственно на устройстве имеет множество преимуществ:
- Задержка : Вам не нужно отправлять запрос по сетевому соединению и ждать ответа. Например, это может быть критически важно для видеоприложений, обрабатывающих последовательные кадры, поступающие с камеры.
- Доступность : Приложение работает даже вне зоны действия сети.
- Скорость : Новое оборудование, специально разработанное для обработки нейронных сетей, обеспечивает значительно более высокую скорость вычислений, чем обычный центральный процессор.
- Конфиденциальность : данные не покидают устройство Android.
- Стоимость : Серверная ферма не требуется, поскольку все вычисления выполняются на устройстве Android.
Разработчику также следует учитывать некоторые компромиссы:
- Использование системы : Оценка нейронных сетей требует большого объема вычислений, что может увеличить потребление заряда батареи. Если это вызывает беспокойство у вашего приложения, особенно при длительных вычислениях, следует отслеживать состояние батареи.
- Размер приложения : Обратите внимание на размер ваших моделей. Модели могут занимать несколько мегабайт места. Если включение больших моделей в ваш APK-файл может чрезмерно повлиять на пользователей, вы можете рассмотреть возможность загрузки моделей после установки приложения, использования моделей меньшего размера или выполнения вычислений в облаке. NNAPI не предоставляет функционал для запуска моделей в облаке.
В качестве примера использования NNAPI можно посмотреть пример использования API нейронных сетей Android .
Разберитесь в среде выполнения API нейронных сетей.
NNAPI предназначен для вызова библиотеками, фреймворками и инструментами машинного обучения, которые позволяют разработчикам обучать свои модели вне устройства и развертывать их на устройствах Android. Приложения, как правило, не используют NNAPI напрямую, а вместо этого применяют высокоуровневые фреймворки машинного обучения. Эти фреймворки, в свою очередь, могут использовать NNAPI для выполнения аппаратно-ускоренных операций вывода на поддерживаемых устройствах.
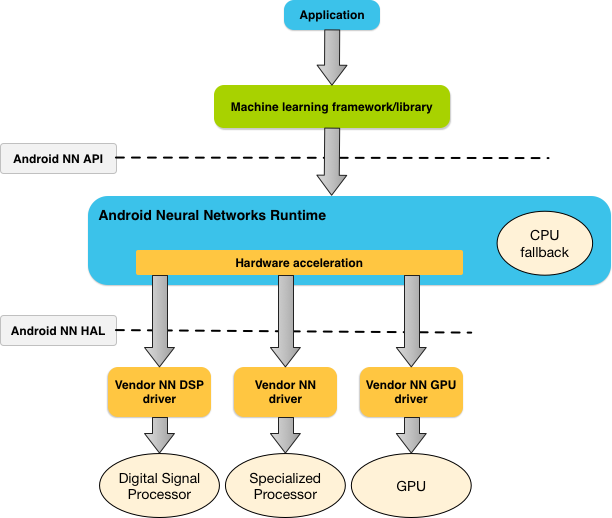
В зависимости от требований приложения и аппаратных возможностей устройства Android, среда выполнения нейронных сетей Android может эффективно распределять вычислительную нагрузку между доступными процессорами устройства, включая выделенное оборудование для нейронных сетей, графические процессоры (GPU) и цифровые сигнальные процессоры (DSP).
Для устройств Android, у которых отсутствует специализированный драйвер от производителя, среды выполнения NNAPI выполняют запросы на центральном процессоре.
На рисунке 1 представлена высокоуровневая системная архитектура NNAPI.
Модель программирования API нейронных сетей
Для выполнения вычислений с использованием NNAPI сначала необходимо построить ориентированный граф, определяющий необходимые вычисления. Этот вычислительный граф в сочетании с входными данными (например, весами и смещениями, передаваемыми из среды машинного обучения) формирует модель для оценки производительности NNAPI во время выполнения.
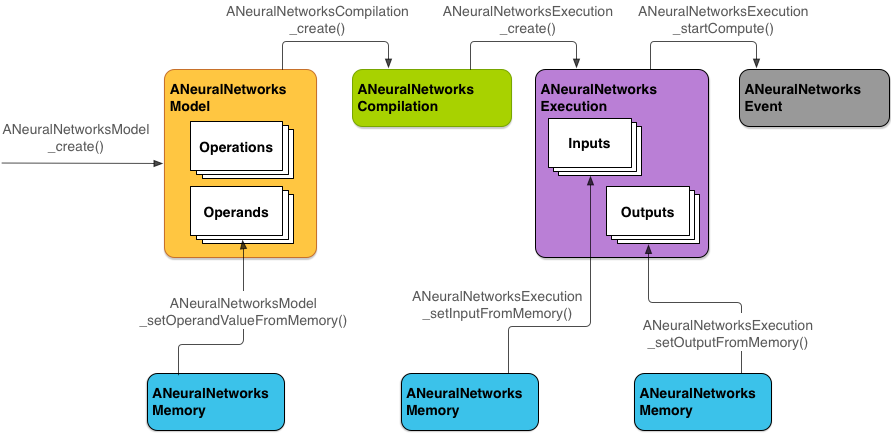
NNAPI использует четыре основных абстракции:
- Модель : Граф вычислений, состоящий из математических операций и постоянных значений, полученных в процессе обучения. Эти операции специфичны для нейронных сетей. К ним относятся двумерная (2D) свертка , логистическая ( сигмоидная ) активация, выпрямленная линейная (ReLU) активация и многое другое. Создание модели — синхронная операция. После успешного создания её можно повторно использовать в разных потоках и компиляциях. В NNAPI модель представлена в виде экземпляра
ANeuralNetworksModel. - Компиляция : Представляет собой конфигурацию для компиляции модели NNAPI в код более низкого уровня. Создание компиляции — синхронная операция. После успешного создания её можно повторно использовать в разных потоках и выполнениях. В NNAPI каждая компиляция представлена экземпляром
ANeuralNetworksCompilation. - Память : представляет собой разделяемую память, файлы, отображаемые в память, и аналогичные буферы памяти. Использование буфера памяти позволяет среде выполнения NNAPI более эффективно передавать данные драйверам. Приложение обычно создает один буфер разделяемой памяти, который содержит все тензоры, необходимые для определения модели. Вы также можете использовать буферы памяти для хранения входных и выходных данных для экземпляра выполнения. В NNAPI каждый буфер памяти представлен экземпляром
ANeuralNetworksMemory. Выполнение : Интерфейс для применения модели NNAPI к набору входных данных и сбора результатов. Выполнение может осуществляться синхронно или асинхронно.
При асинхронном выполнении несколько потоков могут ожидать завершения одного и того же процесса. После завершения этого процесса все потоки освобождаются.
В NNAPI каждое выполнение сети представлено экземпляром
ANeuralNetworksExecution.
На рисунке 2 показана основная схема программирования.
В оставшейся части этого раздела описаны шаги по настройке вашей модели NNAPI для выполнения вычислений, компиляции модели и выполнения скомпилированной модели.
Предоставить доступ к обучающим данным
Данные о ваших обученных весах и смещениях, вероятно, хранятся в файле. Чтобы обеспечить среде выполнения NNAPI эффективный доступ к этим данным, создайте экземпляр ANeuralNetworksMemory , вызвав функцию ANeuralNetworksMemory_createFromFd() и передав в качестве параметра дескриптор открытого файла данных. Также укажите флаги защиты памяти и смещение, с которого начинается область разделяемой памяти в файле.
// Create a memory buffer from the file that contains the trained data
ANeuralNetworksMemory* mem1 = NULL;
int fd = open("training_data", O_RDONLY);
ANeuralNetworksMemory_createFromFd(file_size, PROT_READ, fd, 0, &mem1);
Хотя в этом примере мы используем только один экземпляр ANeuralNetworksMemory для всех наших весов, можно использовать более одного экземпляра ANeuralNetworksMemory для нескольких файлов.
Используйте собственные аппаратные буферы
Для входных и выходных данных модели, а также постоянных значений операндов можно использовать собственные аппаратные буферы . В некоторых случаях акселератор NNAPI может обращаться к объектам AHardwareBuffer без необходимости копирования данных драйвером. AHardwareBuffer имеет множество различных конфигураций, и не каждый акселератор NNAPI может поддерживать все эти конфигурации. Из-за этого ограничения обратитесь к ограничениям, перечисленным в справочной документации ANeuralNetworksMemory_createFromAHardwareBuffer , и проведите предварительное тестирование на целевых устройствах, чтобы убедиться, что компиляция и выполнение, использующие AHardwareBuffer , ведут себя должным образом, используя назначение устройства для указания акселератора.
Чтобы разрешить среде выполнения NNAPI доступ к объекту AHardwareBuffer , создайте экземпляр ANeuralNetworksMemory , вызвав функцию ANeuralNetworksMemory_createFromAHardwareBuffer и передав в нее объект AHardwareBuffer , как показано в следующем примере кода:
// Configure and create AHardwareBuffer object
AHardwareBuffer_Desc desc = ...
AHardwareBuffer* ahwb = nullptr;
AHardwareBuffer_allocate(&desc, &ahwb);

// Create ANeuralNetworksMemory from AHardwareBuffer
ANeuralNetworksMemory* mem2 = NULL;
ANeuralNetworksMemory_createFromAHardwareBuffer(ahwb, &mem2);
Когда NNAPI больше не нуждается в доступе к объекту AHardwareBuffer , освободите соответствующий экземпляр ANeuralNetworksMemory :
ANeuralNetworksMemory_free(mem2);
Примечание:
-
AHardwareBufferможно использовать только для всего буфера; его нельзя использовать с параметромARect. - Среда выполнения NNAPI не будет очищать буфер. Необходимо убедиться в доступности входного и выходного буферов перед планированием выполнения.
- Поддержка файловых дескрипторов для синхронизации отсутствует.
- В случае использования
AHardwareBufferс форматами и битами использования, специфичными для конкретного производителя, именно реализация производителя определяет, кто отвечает за очистку кэша — клиент или драйвер.
Модель
Модель — это основная единица вычислений в NNAPI. Каждая модель определяется одним или несколькими операндами и операциями.
Операнды
Операнды — это объекты данных, используемые для определения графа. К ним относятся входные и выходные данные модели, промежуточные узлы, содержащие данные, передаваемые от одной операции к другой, и константы, передаваемые этим операциям.
В модели NNAPI можно добавлять два типа операндов: скаляры и тензоры .
Скалярное значение представляет собой отдельное число. NNAPI поддерживает скалярные значения в логическом формате, в формате 16-битных чисел с плавающей запятой, в формате 32-битных чисел с плавающей запятой, в формате 32-битных целых чисел и в формате беззнаковых 32-битных целых чисел.
Большинство операций в NNAPI связаны с тензорами. Тензоры представляют собой n-мерные массивы. NNAPI поддерживает тензоры с 16-битными значениями с плавающей запятой, 32-битными значениями с плавающей запятой, 8-битными квантованными значениями , 16-битными квантованными значениями, 32-битными целыми числами и 8-битными логическими значениями.
Например, на рисунке 3 представлена модель с двумя операциями: сложением и умножением. Модель принимает на вход тензор и выдает на выходе один тензор.
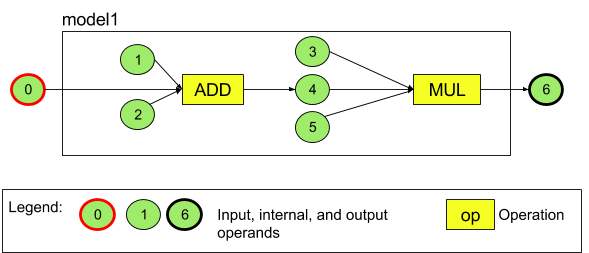
Представленная выше модель имеет семь операндов. Эти операнды идентифицируются неявно по индексу порядка их добавления к модели. Первый добавленный операнд имеет индекс 0, второй — индекс 1 и так далее. Операнды 1, 2, 3 и 5 являются константными операндами.
Порядок добавления операндов не имеет значения. Например, операнд, являющийся выходным сигналом модели, может быть добавлен первым. Важно использовать правильное значение индекса при обращении к операнду.
Операнды имеют типы. Они указываются при добавлении в модель.
Один и тот же операнд не может использоваться одновременно в качестве входных и выходных данных модели.
Каждый операнд должен быть либо входными данными модели, либо константой, либо выходным операндом ровно одной операции.
Дополнительную информацию об использовании операндов см. в разделе «Подробнее об операндах» .
Операции
Операция определяет вычисления, которые необходимо выполнить. Каждая операция состоит из следующих элементов:
- тип операции (например, сложение, умножение, свертка),
- список индексов операндов, которые операция использует в качестве входных данных, и
- Список индексов операндов, которые операция использует для вывода.
Порядок в этих списках имеет значение; см. справочник по API NNAPI для получения информации об ожидаемых входных и выходных данных для каждого типа операций.
Перед добавлением операции необходимо добавить в модель операнды, которые она потребляет или производит.
Порядок добавления операций не имеет значения. NNAPI использует зависимости, установленные графом вычислений операндов и операций, для определения порядка выполнения операций.
В таблице ниже кратко описаны операции, поддерживаемые NNAPI:
Известная проблема в API уровня 28: при передаче тензоров ANEURALNETWORKS_TENSOR_QUANT8_ASYMM в операцию ANEURALNETWORKS_PAD , доступную в Android 9 (API уровня 28) и выше, выходные данные NNAPI могут не совпадать с выходными данными более высокоуровневых фреймворков машинного обучения, таких как TensorFlow Lite . Вместо этого следует передавать только ANEURALNETWORKS_TENSOR_FLOAT32 . Проблема решена в Android 10 (API уровня 29) и выше.
Создание моделей
В следующем примере мы создадим двухэтапную модель, представленную на рисунке 3 .
Для построения модели выполните следующие шаги:
Вызовите функцию
ANeuralNetworksModel_create(), чтобы определить пустую модель.ANeuralNetworksModel* model = NULL; ANeuralNetworksModel_create(&model);
Добавьте операнды в вашу модель, вызвав функцию
ANeuralNetworks_addOperand(). Их типы данных определяются с помощью структуры данныхANeuralNetworksOperandType.// In our example, all our tensors are matrices of dimension [3][4] ANeuralNetworksOperandType tensor3x4Type; tensor3x4Type.type = ANEURALNETWORKS_TENSOR_FLOAT32; tensor3x4Type.scale = 0.f; // These fields are used for quantized tensors tensor3x4Type.zeroPoint = 0; // These fields are used for quantized tensors tensor3x4Type.dimensionCount = 2; uint32_t dims[2] = {3, 4}; tensor3x4Type.dimensions = dims;
// We also specify operands that are activation function specifiers ANeuralNetworksOperandType activationType; activationType.type = ANEURALNETWORKS_INT32; activationType.scale = 0.f; activationType.zeroPoint = 0; activationType.dimensionCount = 0; activationType.dimensions = NULL;
// Now we add the seven operands, in the same order defined in the diagram ANeuralNetworksModel_addOperand(model, &tensor3x4Type); // operand 0 ANeuralNetworksModel_addOperand(model, &tensor3x4Type); // operand 1 ANeuralNetworksModel_addOperand(model, &activationType); // operand 2 ANeuralNetworksModel_addOperand(model, &tensor3x4Type); // operand 3 ANeuralNetworksModel_addOperand(model, &tensor3x4Type); // operand 4 ANeuralNetworksModel_addOperand(model, &activationType); // operand 5 ANeuralNetworksModel_addOperand(model, &tensor3x4Type); // operand 6Для операндов с постоянными значениями, таких как веса и смещения, получаемые вашим приложением в процессе обучения, используйте функции
ANeuralNetworksModel_setOperandValue()иANeuralNetworksModel_setOperandValueFromMemory().В следующем примере мы задаем постоянные значения из файла обучающих данных, соответствующие буферу памяти, созданному нами в разделе «Предоставление доступа к обучающим данным» .
// In our example, operands 1 and 3 are constant tensors whose values were
// established during the training process
const int sizeOfTensor = 3 * 4 * 4;    // The formula for size calculation is dim0 * dim1 * elementSize
ANeuralNetworksModel_setOperandValueFromMemory(model, 1, mem1, 0, sizeOfTensor);
ANeuralNetworksModel_setOperandValueFromMemory(model, 3, mem1, sizeOfTensor, sizeOfTensor);


// We set the values of the activation operands, in our example operands 2 and 5
int32_t noneValue = ANEURALNETWORKS_FUSED_NONE;
ANeuralNetworksModel_setOperandValue(model, 2, &noneValue, sizeof(noneValue));
ANeuralNetworksModel_setOperandValue(model, 5, &noneValue, sizeof(noneValue));
Для каждой операции в ориентированном графе, которую вы хотите вычислить, добавьте эту операцию в свою модель, вызвав функцию
ANeuralNetworksModel_addOperation().В качестве параметров для этого вызова ваше приложение должно предоставить:
- тип операции
- количество входных значений
- массив индексов для входных операндов
- количество выходных значений
- массив индексов для выходных операндов
Обратите внимание, что один и тот же операнд не может использоваться одновременно для ввода и вывода одной и той же операции.
// We have two operations in our example
// The first consumes operands 1, 0, 2, and produces operand 4
uint32_t addInputIndexes[3] = {1, 0, 2};
uint32_t addOutputIndexes[1] = {4};
ANeuralNetworksModel_addOperation(model, ANEURALNETWORKS_ADD, 3, addInputIndexes, 1, addOutputIndexes);


// The second consumes operands 3, 4, 5, and produces operand 6
uint32_t multInputIndexes[3] = {3, 4, 5};
uint32_t multOutputIndexes[1] = {6};
ANeuralNetworksModel_addOperation(model, ANEURALNETWORKS_MUL, 3, multInputIndexes, 1, multOutputIndexes);
Определите, какие операнды модель должна рассматривать как входные и выходные данные, вызвав функцию
ANeuralNetworksModel_identifyInputsAndOutputs().// Our model has one input (0) and one output (6) uint32_t modelInputIndexes[1] = {0}; uint32_t modelOutputIndexes[1] = {6}; ANeuralNetworksModel_identifyInputsAndOutputs(model, 1, modelInputIndexes, 1 modelOutputIndexes);
При желании можно указать, разрешено ли вычислять
ANEURALNETWORKS_TENSOR_FLOAT32с диапазоном или точностью, соответствующей 16-битному формату чисел с плавающей запятой IEEE 754, вызвав функциюANeuralNetworksModel_relaxComputationFloat32toFloat16().Вызовите функцию
ANeuralNetworksModel_finish()для завершения определения вашей модели. Если ошибок нет, эта функция вернет код результатаANEURALNETWORKS_NO_ERROR.ANeuralNetworksModel_finish(model);
После создания модели вы можете компилировать её любое количество раз и выполнять каждую компиляцию любое количество раз.
Управление потоком
Для включения управления потоком выполнения в модель NNAPI выполните следующие действия:
Создайте соответствующие подграфы выполнения (подграфы
thenиelseдля оператораIF, подграфыconditionиbodyдля циклаWHILE) в виде отдельных моделейANeuralNetworksModel*:ANeuralNetworksModel* thenModel = makeThenModel(); ANeuralNetworksModel* elseModel = makeElseModel();
Создайте операнды, которые ссылаются на те модели, что находятся внутри модели, содержащей поток управления:
ANeuralNetworksOperandType modelType = {
    .type = ANEURALNETWORKS_MODEL,
};
ANeuralNetworksModel_addOperand(model, &modelType);  // kThenOperandIndex
ANeuralNetworksModel_addOperand(model, &modelType);  // kElseOperandIndex
ANeuralNetworksModel_setOperandValueFromModel(model, kThenOperandIndex, &thenModel);
ANeuralNetworksModel_setOperandValueFromModel(model, kElseOperandIndex, &elseModel);
Добавьте операцию управления потоком выполнения:
uint32_t inputs[] = {kConditionOperandIndex,
                     kThenOperandIndex,
                     kElseOperandIndex,
                     kInput1, kInput2, kInput3};
uint32_t outputs[] = {kOutput1, kOutput2};
ANeuralNetworksModel_addOperation(model, ANEURALNETWORKS_IF,
                                  std::size(inputs), inputs,
                                  std::size(output), outputs);
Компиляция
На этапе компиляции определяется, на каких процессорах будет выполняться ваша модель, и запрашивается у соответствующих драйверов подготовка к ее выполнению. Это может включать генерацию машинного кода, специфичного для процессоров, на которых будет работать ваша модель.
Для создания модели выполните следующие шаги:
Вызовите функцию
ANeuralNetworksCompilation_create()для создания нового экземпляра компиляции.// Compile the model ANeuralNetworksCompilation* compilation; ANeuralNetworksCompilation_create(model, &compilation);
При желании вы можете использовать назначение устройств , чтобы явно выбрать, на каких устройствах следует выполнять программу.
При желании вы можете повлиять на то, как во время выполнения будет происходить баланс между потреблением заряда батареи и скоростью выполнения. Это можно сделать, вызвав
ANeuralNetworksCompilation_setPreference().// Ask to optimize for low power consumption ANeuralNetworksCompilation_setPreference(compilation, ANEURALNETWORKS_PREFER_LOW_POWER);
К числу параметров, которые вы можете указать, относятся:
-
ANEURALNETWORKS_PREFER_LOW_POWER: Предпочтительный способ выполнения, минимизирующий расход заряда батареи. Это желательно для компиляций, которые выполняются часто. -
ANEURALNETWORKS_PREFER_FAST_SINGLE_ANSWER: Предпочтительнее возвращать один ответ как можно быстрее, даже если это приводит к увеличению энергопотребления. Это значение по умолчанию. -
ANEURALNETWORKS_PREFER_SUSTAINED_SPEED: Предпочтительнее максимизировать пропускную способность последовательных кадров, например, при обработке последовательных кадров, поступающих с камеры.
-
При желании можно настроить кэширование компиляции, вызвав функцию
ANeuralNetworksCompilation_setCaching.// Set up compilation caching ANeuralNetworksCompilation_setCaching(compilation, cacheDir, token);
Для
cacheDirиспользуйтеgetCodeCacheDir(). Указанныйtokenдолжен быть уникальным для каждой модели в приложении.Завершите определение компиляции, вызвав функцию
ANeuralNetworksCompilation_finish(). Если ошибок нет, эта функция вернет код результатаANEURALNETWORKS_NO_ERROR.ANeuralNetworksCompilation_finish(compilation);
Обнаружение и назначение устройств
На устройствах Android под управлением Android 10 (уровень API 29) и выше NNAPI предоставляет функции, позволяющие библиотекам и приложениям фреймворков машинного обучения получать информацию о доступных устройствах и указывать устройства, которые будут использоваться для выполнения. Предоставление информации о доступных устройствах позволяет приложениям получать точную версию драйверов, установленных на устройстве, чтобы избежать известных несовместимостей. Предоставляя приложениям возможность указывать, на каких устройствах должны выполняться различные разделы модели, приложения могут быть оптимизированы для конкретного устройства Android, на котором они развернуты.
обнаружение устройств
Используйте функцию ANeuralNetworks_getDeviceCount , чтобы получить количество доступных устройств. Для каждого устройства используйте ANeuralNetworks_getDevice , чтобы установить экземпляр ANeuralNetworksDevice в качестве ссылки на это устройство.
Получив идентификатор устройства, вы можете получить дополнительную информацию о нем, используя следующие функции:
-
ANeuralNetworksDevice_getFeatureLevel -
ANeuralNetworksDevice_getName -
ANeuralNetworksDevice_getType -
ANeuralNetworksDevice_getVersion
назначение устройств
Используйте функцию ANeuralNetworksModel_getSupportedOperationsForDevices , чтобы узнать, какие операции модели могут выполняться на конкретных устройствах.
Чтобы управлять используемыми ускорителями выполнения, вызовите ANeuralNetworksCompilation_createForDevices вместо ANeuralNetworksCompilation_create . Используйте полученный объект ANeuralNetworksCompilation как обычно. Функция возвращает ошибку, если предоставленная модель содержит операции, не поддерживаемые выбранными устройствами.
Если указано несколько устройств, среда выполнения отвечает за распределение работы между ними.
Аналогично другим устройствам, реализация NNAPI для ЦП представлена объектом ANeuralNetworksDevice с именем nnapi-reference и типом ANEURALNETWORKS_DEVICE_TYPE_CPU . При вызове ANeuralNetworksCompilation_createForDevices реализация для ЦП не используется для обработки случаев сбоев при компиляции и выполнении модели.
Задача приложения — разделить модель на подмодели, которые могут работать на указанных устройствах. Приложениям, которым не требуется ручное разделение, следует продолжать вызывать более простую функцию ANeuralNetworksCompilation_create , чтобы использовать все доступные устройства (включая ЦП) для ускорения модели. Если модель не может быть полностью поддержана устройствами, указанными с помощью ANeuralNetworksCompilation_createForDevices , возвращается ANEURALNETWORKS_BAD_DATA .
Разделение модели
Когда для модели доступно несколько устройств, среда выполнения NNAPI распределяет работу между ними. Например, если в функцию ANeuralNetworksCompilation_createForDevices было указано более одного устройства, при распределении работы будут учтены все указанные устройства. Обратите внимание, что если устройство ЦП отсутствует в списке, выполнение на ЦП будет отключено. При использовании ANeuralNetworksCompilation_create будут учтены все доступные устройства, включая ЦП.
Распределение выполняется путем выбора из списка доступных устройств для каждой из операций в модели устройства, поддерживающего эту операцию, и объявления наилучшей производительности, то есть самого быстрого времени выполнения или самого низкого энергопотребления, в зависимости от предпочтений выполнения, указанных клиентом. Этот алгоритм разделения не учитывает возможные неэффективности, вызванные вводом-выводом между различными процессорами, поэтому при указании нескольких процессоров (либо явно при использовании ANeuralNetworksCompilation_createForDevices , либо неявно при использовании ANeuralNetworksCompilation_create ) важно провести профилирование результирующего приложения.
Чтобы понять, как ваша модель была разделена на разделы с помощью NNAPI, проверьте логи Android на наличие сообщения (на уровне INFO с тегом ExecutionPlan ):
ModelBuilder::findBestDeviceForEachOperation(op-name): device-index
op-name — это описательное имя операции в графе, а device-index — индекс устройства-кандидата в списке устройств. Этот список является входными данными для ANeuralNetworksCompilation_createForDevices или, если используется ANeuralNetworksCompilation_createForDevices , списком устройств, возвращаемым при итерации по всем устройствам с помощью ANeuralNetworks_getDeviceCount и ANeuralNetworks_getDevice .
Сообщение (на уровне INFO с тегом ExecutionPlan ):
ModelBuilder::partitionTheWork: only one best device: device-name
Это сообщение указывает на то, что весь граф был ускорен на устройстве device-name .
Исполнение
На этапе выполнения модель применяется к набору входных данных, а результаты вычислений сохраняются в одном или нескольких пользовательских буферах или областях памяти, выделенных вашим приложением.
Для выполнения скомпилированной модели выполните следующие действия:
Вызовите функцию
ANeuralNetworksExecution_create()для создания нового экземпляра выполнения.// Run the compiled model against a set of inputs ANeuralNetworksExecution* run1 = NULL; ANeuralNetworksExecution_create(compilation, &run1);
Укажите, откуда ваше приложение считывает входные значения для вычислений. Ваше приложение может считывать входные значения либо из пользовательского буфера, либо из выделенной области памяти, вызывая соответственно функции
ANeuralNetworksExecution_setInput()илиANeuralNetworksExecution_setInputFromMemory().// Set the single input to our sample model. Since it is small, we won't use a memory buffer float32 myInput[3][4] = { ...the data... }; ANeuralNetworksExecution_setInput(run1, 0, NULL, myInput, sizeof(myInput));
Укажите, куда ваше приложение будет записывать выходные значения. Ваше приложение может записывать выходные значения либо в пользовательский буфер, либо в выделенное пространство памяти, вызывая соответственно функции
ANeuralNetworksExecution_setOutput()илиANeuralNetworksExecution_setOutputFromMemory().// Set the output float32 myOutput[3][4]; ANeuralNetworksExecution_setOutput(run1, 0, NULL, myOutput, sizeof(myOutput));
Запланируйте запуск выполнения, вызвав функцию
ANeuralNetworksExecution_startCompute(). Если ошибок нет, эта функция вернет код результатаANEURALNETWORKS_NO_ERROR.// Starts the work. The work proceeds asynchronously ANeuralNetworksEvent* run1_end = NULL; ANeuralNetworksExecution_startCompute(run1, &run1_end);
Вызовите функцию
ANeuralNetworksEvent_wait(), чтобы дождаться завершения выполнения. Если выполнение прошло успешно, эта функция возвращает код результатаANEURALNETWORKS_NO_ERROR. Ожидание можно выполнить в другом потоке, отличном от того, который запустил выполнение.// For our example, we have no other work to do and will just wait for the completion ANeuralNetworksEvent_wait(run1_end); ANeuralNetworksEvent_free(run1_end); ANeuralNetworksExecution_free(run1);
При желании вы можете применить другой набор входных данных к скомпилированной модели, используя тот же экземпляр компиляции для создания нового экземпляра
ANeuralNetworksExecution.// Apply the compiled model to a different set of inputs ANeuralNetworksExecution* run2; ANeuralNetworksExecution_create(compilation, &run2); ANeuralNetworksExecution_setInput(run2, ...); ANeuralNetworksExecution_setOutput(run2, ...); ANeuralNetworksEvent* run2_end = NULL; ANeuralNetworksExecution_startCompute(run2, &run2_end); ANeuralNetworksEvent_wait(run2_end); ANeuralNetworksEvent_free(run2_end); ANeuralNetworksExecution_free(run2);
Синхронное исполнение
Асинхронное выполнение тратит время на создание и синхронизацию потоков. Кроме того, задержка может быть очень изменчивой, достигая максимальных значений до 500 микросекунд между моментом уведомления или пробуждения потока и моментом его окончательного привязывания к ядру ЦП.
Для уменьшения задержки можно вместо этого указать приложению выполнить синхронный вызов функции вывода в среду выполнения. Этот вызов вернет управление только после завершения вывода, а не после его начала. Вместо вызова ANeuralNetworksExecution_startCompute для асинхронного вызова функции вывода в среду выполнения, приложение вызывает ANeuralNetworksExecution_compute для выполнения синхронного вызова. Вызов ANeuralNetworksExecution_compute не принимает объект ANeuralNetworksEvent и не связан с вызовом ANeuralNetworksEvent_wait .
Массовые казни
На устройствах Android под управлением Android 10 (уровень API 29) и выше NNAPI поддерживает пакетное выполнение с помощью объекта ANeuralNetworksBurst . Пакетное выполнение — это последовательность быстро выполняемых операций компиляции, например, обработка кадров, полученных с камеры, или последовательных аудиосэмплов. Использование объектов ANeuralNetworksBurst может привести к ускорению выполнения, поскольку они указывают ускорителям, что ресурсы могут быть повторно использованы между выполнениями и что ускорители должны оставаться в высокопроизводительном состоянии в течение всего периода пакетного выполнения.
ANeuralNetworksBurst вносит лишь небольшие изменения в обычный путь выполнения. Объект Burst создается с помощью ANeuralNetworksBurst_create , как показано в следующем фрагменте кода:
// Create burst object to be reused across a sequence of executions
ANeuralNetworksBurst* burst = NULL;
ANeuralNetworksBurst_create(compilation, &burst);
Выполнение пакетных операций происходит синхронно. Однако вместо использования ANeuralNetworksExecution_compute для выполнения каждого вывода, вы связываете различные объекты ANeuralNetworksExecution с одним и тем же ANeuralNetworksBurst в вызовах функции ANeuralNetworksExecution_burstCompute .
// Create and configure first execution object
// ...

// Execute using the burst object
ANeuralNetworksExecution_burstCompute(execution1, burst);

// Use results of first execution and free the execution object
// ...

// Create and configure second execution object
// ...

// Execute using the same burst object
ANeuralNetworksExecution_burstCompute(execution2, burst);

// Use results of second execution and free the execution object
// ...
Освободите объект ANeuralNetworksBurst с помощью ANeuralNetworksBurst_free , когда он больше не нужен.
// Cleanup
ANeuralNetworksBurst_free(burst);
Асинхронные очереди команд и изолированное выполнение.
В Android 11 и более поздних версиях NNAPI поддерживает дополнительный способ планирования асинхронного выполнения с помощью метода ANeuralNetworksExecution_startComputeWithDependencies() . При использовании этого метода выполнение ожидает получения сигналов по всем зависимым событиям, прежде чем начать вычисление. После завершения выполнения и готовности результатов к обработке возвращается сигнал о событии.
В зависимости от того, какие устройства обрабатывают выполнение, событие может быть подкреплено синхронизирующей преградой . Необходимо вызвать ANeuralNetworksEvent_wait() , чтобы дождаться события и восстановить ресурсы, использованные при выполнении. Вы можете импортировать синхронизирующие преграды в объект события с помощью ANeuralNetworksEvent_createFromSyncFenceFd() , а также экспортировать синхронизирующие преграды из объекта события с помощью ANeuralNetworksEvent_getSyncFenceFd() .
Выходы с динамическим изменением размера
Для поддержки моделей, в которых размер выходных данных зависит от входных данных — то есть, когда размер не может быть определен во время выполнения модели, — используйте ANeuralNetworksExecution_getOutputOperandRank и ANeuralNetworksExecution_getOutputOperandDimensions .
Следующий пример кода демонстрирует, как это сделать:
// Get the rank of the output
uint32_t myOutputRank = 0;
ANeuralNetworksExecution_getOutputOperandRank(run1, 0, &myOutputRank);

// Get the dimensions of the output
std::vector<uint32_t> myOutputDimensions(myOutputRank);
ANeuralNetworksExecution_getOutputOperandDimensions(run1, 0, myOutputDimensions.data());
Уборка
Этап очистки отвечает за освобождение внутренних ресурсов, используемых для вычислений.
// Cleanup
ANeuralNetworksCompilation_free(compilation);
ANeuralNetworksModel_free(model);
ANeuralNetworksMemory_free(mem1);
Управление ошибками и резервное использование ЦП
Если во время разбиения на разделы возникает ошибка, если драйвер не может скомпилировать (часть) модели или если драйвер не может выполнить скомпилированную (часть) модели, NNAPI может использовать собственную реализацию одной или нескольких операций на ЦП.
Если клиент NNAPI содержит оптимизированные версии операции (например, TFLite), может быть целесообразно отключить резервное использование ЦП и обрабатывать сбои с помощью оптимизированной реализации операции в клиенте.
В Android 10, если компиляция выполняется с использованием ANeuralNetworksCompilation_createForDevices , то резервное использование ЦП будет отключено.
В Android P выполнение NNAPI переключается на ЦП, если выполнение на драйвере завершается с ошибкой. Это также справедливо для Android 10, когда используется ANeuralNetworksCompilation_create вместо ANeuralNetworksCompilation_createForDevices .
При первом запуске происходит резервный запуск для этого единственного раздела, и если это по-прежнему не удается, выполняется повторная попытка запуска всей модели на ЦП.
Если разбиение на разделы или компиляция не удастся, вся модель будет предпринята для запуска на центральном процессоре.
В некоторых случаях определенные операции не поддерживаются процессором, и в таких ситуациях компиляция или выполнение завершатся ошибкой, а не произойдет возврат к исходному состоянию.
Даже после отключения резервного режима работы на ЦП, в модели могут оставаться операции, запланированные на ЦП. Если ЦП входит в список процессоров, предоставленных функции ANeuralNetworksCompilation_createForDevices , и является либо единственным процессором, поддерживающим эти операции, либо процессором, демонстрирующим наилучшую производительность для этих операций, он будет выбран в качестве основного (нерезервного) исполнителя.
Чтобы исключить выполнение на ЦП, используйте ANeuralNetworksCompilation_createForDevices , исключив при этом nnapi-reference из списка устройств. Начиная с Android P, можно отключить резервный вариант во время выполнения в отладочных сборках, установив свойство debug.nn.partition в значение 2.
Области памяти
В Android 11 и более поздних версиях NNAPI поддерживает домены памяти, которые предоставляют интерфейсы распределителя для непрозрачной памяти. Это позволяет приложениям передавать собственную память устройства между выполнениями, так что NNAPI не копирует и не преобразует данные без необходимости при выполнении последовательных операций на одном и том же драйвере.
Функция доменов памяти предназначена для тензоров, которые в основном находятся внутри драйвера и не требуют частого доступа к клиентской стороне. Примерами таких тензоров являются тензоры состояний в моделях последовательностей. Для тензоров, требующих частого доступа к ЦП на стороне клиента, вместо этого следует использовать пулы разделяемой памяти.
Для выделения непрозрачной памяти выполните следующие действия:
Для создания нового дескриптора памяти вызовите функцию
ANeuralNetworksMemoryDesc_create():// Create a memory descriptor ANeuralNetworksMemoryDesc* desc; ANeuralNetworksMemoryDesc_create(&desc);
Укажите все предполагаемые роли ввода и вывода, вызвав функции
ANeuralNetworksMemoryDesc_addInputRole()иANeuralNetworksMemoryDesc_addOutputRole().// Specify that the memory may be used as the first input and the first output // of the compilation ANeuralNetworksMemoryDesc_addInputRole(desc, compilation, 0, 1.0f); ANeuralNetworksMemoryDesc_addOutputRole(desc, compilation, 0, 1.0f);
При желании можно указать размеры памяти, вызвав функцию
ANeuralNetworksMemoryDesc_setDimensions().// Specify the memory dimensions uint32_t dims[] = {3, 4}; ANeuralNetworksMemoryDesc_setDimensions(desc, 2, dims);
Завершите определение дескриптора, вызвав функцию
ANeuralNetworksMemoryDesc_finish().ANeuralNetworksMemoryDesc_finish(desc);
Выделите столько памяти, сколько вам нужно, передав дескриптор в функцию
ANeuralNetworksMemory_createFromDesc().// Allocate two opaque memories with the descriptor ANeuralNetworksMemory* opaqueMem; ANeuralNetworksMemory_createFromDesc(desc, &opaqueMem);
Освобождайте дескриптор памяти, когда он вам больше не нужен.
ANeuralNetworksMemoryDesc_free(desc);
Клиент может использовать созданный объект ANeuralNetworksMemory только с помощью ANeuralNetworksExecution_setInputFromMemory() или ANeuralNetworksExecution_setOutputFromMemory() в соответствии с ролями, указанными в объекте ANeuralNetworksMemoryDesc . Аргументы offset и length должны быть установлены в 0, что указывает на использование всей памяти. Клиент также может явно установить или извлечь содержимое памяти с помощью функции ANeuralNetworksMemory_copy() .
Можно создавать непрозрачную память с ролями неопределенных измерений или ранга. В этом случае создание памяти может завершиться ошибкой ANEURALNETWORKS_OP_FAILED если это не поддерживается базовым драйвером. Клиенту рекомендуется реализовать резервную логику, выделив достаточно большой буфер с поддержкой Ashmem или AHardwareBuffer в режиме BLOB.
Когда NNAPI больше не нуждается в доступе к непрозрачному объекту памяти, освободите соответствующий экземпляр ANeuralNetworksMemory :
ANeuralNetworksMemory_free(opaqueMem);
Измерение производительности
Вы можете оценить производительность своего приложения, измерив время выполнения или проведя профилирование.
Время выполнения
Если вам нужно определить общее время выполнения на уровне среды выполнения, вы можете использовать API синхронного выполнения и измерить время, затраченное на вызов. Если же вам нужно определить общее время выполнения на более низком уровне программного стека, вы можете использовать ANeuralNetworksExecution_setMeasureTiming и ANeuralNetworksExecution_getDuration чтобы получить:
- время выполнения на ускорителе (а не в драйвере, который работает на главном процессоре).
- Время выполнения программы драйвером, включая время работы на педали акселератора.
Время выполнения в драйвере не включает накладные расходы, такие как расходы самой среды выполнения и межпроцессное взаимодействие, необходимое для связи среды выполнения с драйвером.
Эти API измеряют продолжительность между событиями отправки и завершения работы, а не время, которое водитель или акселератор тратят на выполнение вывода, которое может быть прервано переключением контекста.
Например, если начинается вывод 1, затем водитель останавливает работу для выполнения вывода 2, а затем возобновляет и завершает вывод 1, то время выполнения вывода 1 будет включать время, когда работа была остановлена для выполнения вывода 2.
Эта информация о времени выполнения может быть полезна при развертывании приложения в производственной среде для сбора телеметрии для использования в автономном режиме. Вы можете использовать данные о времени выполнения для модификации приложения с целью повышения его производительности.
При использовании этой функции следует учитывать следующее:
- Сбор информации о времени может привести к снижению производительности.
- Только водитель способен вычислить время, затраченное им самим или на педаль акселератора, за исключением времени, затраченного на выполнение NNAPI и на межпроцессное взаимодействие.
- Эти API можно использовать только с объектом
ANeuralNetworksExecution, созданным с помощьюANeuralNetworksCompilation_createForDevicesсnumDevices = 1. - Водитель не обязан сообщать информацию о времени.
Профилируйте свое приложение с помощью Android Systrace.
Starting with Android 10, NNAPI automatically generates systrace events that you can use to profile your application.
The NNAPI Source comes with a parse_systrace utility to process the systrace events generated by your application and generate a table view showing the time spent in the different phases of the model lifecycle (Instantiation, Preparation, Compilation Execution and Termination) and different layers of the applications. The layers in which your application is split are:
-
Application: the main application code -
Runtime: NNAPI Runtime -
IPC: The inter process communication between NNAPI Runtime and the Driver code -
Driver: the accelerator driver process.
Generate the profiling analysys data
Assuming you checked out the AOSP source tree at $ANDROID_BUILD_TOP, and using the TFLite image classification example as target application, you can generate the NNAPI profiling data with the following steps:
- Start the Android systrace with the following command:
$ANDROID_BUILD_TOP/external/chromium-trace/systrace.py -o trace.html -a org.tensorflow.lite.examples.classification nnapi hal freq sched idle load binder_driver
The -o trace.html parameter indicates that the traces will be written in the trace.html . When profiling own application you will need to replace org.tensorflow.lite.examples.classification with the process name specified in your app manifest.
This will keep one of your shell console busy, don't run the command in background since it is interactively waiting for an enter to terminate.
- After the systrace collector is started, start your app and run your benchmark test.
In our case you can start the Image Classification app from Android Studio or directly from your test phone UI if the app has already been installed. To generate some NNAPI data you need to configure the app to use NNAPI by selecting NNAPI as target device in the app configuration dialog.
When the test completes, terminate the systrace by pressing
enteron the console terminal active since step 1.Run the
systrace_parserutility generate cumulative statistics:
$ANDROID_BUILD_TOP/frameworks/ml/nn/tools/systrace_parser/parse_systrace.py --total-times trace.html
The parser accepts the following parameters: - --total-times : shows the total time spent in a layer including the time spent waiting for execution on a call to an underlying layer - --print-detail : prints all the events that have been collected from systrace - --per-execution : prints only the execution and its subphases (as per-execution times) instead of stats for all phases - --json : produces the output in JSON format
An example of the output is shown below:
===========================================================================================================================================
NNAPI timing summary (total time, ms wall-clock)                                                      Execution
                                                           ----------------------------------------------------
              Initialization   Preparation   Compilation           I/O       Compute      Results     Ex. total   Termination        Total
              --------------   -----------   -----------   -----------  ------------  -----------   -----------   -----------   ----------
Application              n/a         19.06       1789.25           n/a           n/a         6.70         21.37           n/a      1831.17*
Runtime                    -         18.60       1787.48          2.93         11.37         0.12         14.42          1.32      1821.81
IPC                     1.77             -       1781.36          0.02          8.86            -          8.88             -      1792.01
Driver                  1.04             -       1779.21           n/a           n/a          n/a          7.70             -      1787.95

Total                   1.77*        19.06*      1789.25*         2.93*        11.74*        6.70*        21.37*         1.32*     1831.17*
===========================================================================================================================================
* This total ignores missing (n/a) values and thus is not necessarily consistent with the rest of the numbers
The parser might fail if the collected events do not represent a complete application trace. In particular it might fail if systrace events generated to mark the end of a section are present in the trace without an associated section start event. This usually happens if some events from a previous profiling session are being generated when you start the systrace collector. In this case you would have to run your profiling again.
Add statistics for your application code to systrace_parser output
The parse_systrace application is based on the built-in Android systrace functionality. You can add traces for specific operations in your app using the systrace API ( for Java , for native applications ) with custom event names.
To associate your custom events with phases of the Application lifecycle, prepend your event name with one of the following strings:
-
[NN_LA_PI]: Application level event for Initialization -
[NN_LA_PP]: Application level event for Preparation -
[NN_LA_PC]: Application level event for Compilation -
[NN_LA_PE]: Application level event for Execution
Here is an example of how you can alter the TFLite image classification example code by adding a runInferenceModel section for the Execution phase and the Application layer containing another other sections preprocessBitmap that won't be considered in NNAPI traces. The runInferenceModel section will be part of the systrace events processed by the nnapi systrace parser:
Котлин
/** Runs inference and returns the classification results. */ fun recognizeImage(bitmap: Bitmap): List{ // This section won’t appear in the NNAPI systrace analysis Trace.beginSection("preprocessBitmap") convertBitmapToByteBuffer(bitmap) Trace.endSection() // Run the inference call. // Add this method in to NNAPI systrace analysis. Trace.beginSection("[NN_LA_PE]runInferenceModel") long startTime = SystemClock.uptimeMillis() runInference() long endTime = SystemClock.uptimeMillis() Trace.endSection() ... return recognitions }
Java
/** Runs inference and returns the classification results. */ public ListrecognizeImage(final Bitmap bitmap) { // This section won’t appear in the NNAPI systrace analysis Trace.beginSection("preprocessBitmap"); convertBitmapToByteBuffer(bitmap); Trace.endSection(); // Run the inference call. // Add this method in to NNAPI systrace analysis. Trace.beginSection("[NN_LA_PE]runInferenceModel"); long startTime = SystemClock.uptimeMillis(); runInference(); long endTime = SystemClock.uptimeMillis(); Trace.endSection(); ... Trace.endSection(); return recognitions; }
Качество обслуживания
In Android 11 and higher, NNAPI enables better quality of service (QoS) by allowing an application to indicate the relative priorities of its models, the maximum amount of time expected to prepare a given model, and the maximum amount of time expected to complete a given computation. Android 11 also introduces additional NNAPI result codes that enable applications to understand failures such as missed execution deadlines.
Set the priority of a workload
To set the priority of an NNAPI workload, call ANeuralNetworksCompilation_setPriority() prior to calling ANeuralNetworksCompilation_finish() .
Set deadlines
Applications can set deadlines for both model compilation and inference.
- To set the compilation timeout, call
ANeuralNetworksCompilation_setTimeout()prior to callingANeuralNetworksCompilation_finish(). - To set the inference timeout, call
ANeuralNetworksExecution_setTimeout()prior to starting the compilation .
More about operands
The following section covers advanced topics about using operands.
Quantized tensors
A quantized tensor is a compact way to represent an n-dimensional array of floating point values.
NNAPI supports 8-bit asymmetric quantized tensors. For these tensors, the value of each cell is represented by an 8-bit integer. Associated with the tensor is a scale and a zero point value. These are used to convert the 8-bit integers into the floating point values that are being represented.
Формула следующая:
(cellValue - zeroPoint) * scale
where the zeroPoint value is a 32-bit integer and the scale a 32-bit floating point value.
Compared to tensors of 32-bit floating point values, 8-bit quantized tensors have two advantages:
- Your application is smaller, as the trained weights take a quarter of the size of 32-bit tensors.
- Computations can often be executed faster. This is due to the smaller amount of data that needs to be fetched from memory and the efficiency of processors such as DSPs in doing integer math.
While it is possible to convert a floating point model to a quantized one, our experience has shown that better results are achieved by training a quantized model directly. In effect, the neural network learns to compensate for the increased granularity of each value. For each quantized tensor, the scale and zeroPoint values are determined during the training process.
In NNAPI, you define quantized tensor types by setting the type field of the ANeuralNetworksOperandType data structure to ANEURALNETWORKS_TENSOR_QUANT8_ASYMM . You also specify the scale and zeroPoint value of the tensor in that data structure.
In addition to 8-bit asymmetric quantized tensors, NNAPI supports the following:
-
ANEURALNETWORKS_TENSOR_QUANT8_SYMM_PER_CHANNELwhich you can use for representing weights toCONV/DEPTHWISE_CONV/TRANSPOSED_CONVoperations. -
ANEURALNETWORKS_TENSOR_QUANT16_ASYMMwhich you can use for the internal state ofQUANTIZED_16BIT_LSTM. -
ANEURALNETWORKS_TENSOR_QUANT8_SYMMwhich can be an input toANEURALNETWORKS_DEQUANTIZE.
Optional operands
A few operations, like ANEURALNETWORKS_LSH_PROJECTION , take optional operands. To indicate in the model that the optional operand is omitted, call the ANeuralNetworksModel_setOperandValue() function, passing NULL for the buffer and 0 for the length.
If the decision on whether the operand is present or not varies for each execution, you indicate that the operand is omitted by using the ANeuralNetworksExecution_setInput() or ANeuralNetworksExecution_setOutput() functions, passing NULL for the buffer and 0 for the length.
Tensors of unknown rank
Android 9 (API level 28) introduced model operands of unknown dimensions but known rank (the number of dimensions). Android 10 (API level 29) introduced tensors of unknown rank, as shown in ANeuralNetworksOperandType .
NNAPI benchmark
The NNAPI benchmark is available on AOSP in platform/test/mlts/benchmark (benchmark app) and platform/test/mlts/models (models and datasets).
The benchmark evaluates latency and accuracy and compares drivers to the same work done using Tensorflow Lite running on the CPU, for the same models and datasets.
To use the benchmark, do the following:
Connect a target Android device to your computer, open a terminal window, and make sure the device is reachable through adb.
If more than one Android device is connected, export the target device
ANDROID_SERIALenvironment variable.Navigate to the Android top-level source directory.
Выполните следующие команды:
lunch aosp_arm-userdebug # Or aosp_arm64-userdebug if available
./test/mlts/benchmark/build_and_run_benchmark.sh
At the end of a benchmark run, its results will be presented as an HTML page passed to
xdg-open.
NNAPI logs
NNAPI generates useful diagnostic information in the system logs. To analyze the logs, use the logcat utility.
Enable verbose NNAPI logging for specific phases or components by setting the property debug.nn.vlog (using adb shell ) to the following list of values, separated by space, colon, or comma:
-
model: Model building -
compilation: Generation of the model execution plan and compilation -
execution: Model execution -
cpuexe: Execution of operations using the NNAPI CPU implementation -
manager: NNAPI extensions, available interfaces and capabilities related info -
allor1: All the elements above
For example, to enable full verbose logging use the command adb shell setprop debug.nn.vlog all . To disable verbose logging, use the command adb shell setprop debug.nn.vlog '""' .
Once enabled, verbose logging generates log entries at INFO level with a tag set to the phase or component name.
Beside the debug.nn.vlog controlled messages, NNAPI API components provide other log entries at various levels, each one using a specific log tag.
To get a list of components, search the source tree using the following expression:
grep -R 'define LOG_TAG' | awk -F '"' '{print $2}' | sort -u | egrep -v "Sample|FileTag|test"
This expression currently returns the following tags:
- BurstBuilder
- Обратные звонки
- CompilationBuilder
- CpuExecutor
- ExecutionBuilder
- ExecutionBurstController
- ExecutionBurstServer
- ExecutionPlan
- FibonacciDriver
- GraphDump
- IndexedShapeWrapper
- IonWatcher
- Менеджер
- Память
- MemoryUtils
- Метамодель
- ModelArgumentInfo
- ModelBuilder
- Нейронные сети
- OperationResolver
- Операции
- OperationsUtils
- Информация о пакете
- TokenHasher
- TypeManager
- Утилиты
- ValidateHal
- VersionedInterfaces
To control the level of log messages shown by logcat , use the environment variable ANDROID_LOG_TAGS .
To show the full set of NNAPI log messages and disable any others, set ANDROID_LOG_TAGS to the following:
BurstBuilder:V Callbacks:V CompilationBuilder:V CpuExecutor:V ExecutionBuilder:V ExecutionBurstController:V ExecutionBurstServer:V ExecutionPlan:V FibonacciDriver:V GraphDump:V IndexedShapeWrapper:V IonWatcher:V Manager:V MemoryUtils:V Memory:V MetaModel:V ModelArgumentInfo:V ModelBuilder:V NeuralNetworks:V OperationResolver:V OperationsUtils:V Operations:V PackageInfo:V TokenHasher:V TypeManager:V Utils:V ValidateHal:V VersionedInterfaces:V *:S.
You can set ANDROID_LOG_TAGS using the following command:
export ANDROID_LOG_TAGS=$(grep -R 'define LOG_TAG' | awk -F '"' '{ print $2 ":V" }' | sort -u | egrep -v "Sample|FileTag|test" | xargs echo -n; echo ' *:S')
Note that this is just a filter that applies to logcat . You still need to set the property debug.nn.vlog to all to generate verbose log info.