เริ่มต้นใช้งาน Vulkan
จัดทุกอย่างให้เป็นระเบียบอยู่เสมอด้วยคอลเล็กชัน
บันทึกและจัดหมวดหมู่เนื้อหาตามค่ากำหนดของคุณ
หมายเหตุ: แม้ว่าหน้านี้จะมีคำอธิบายเกี่ยวกับ NativeActivity
GameActivity ภายในคลัง Jetpack ของ AGDK
เป็นการติดตั้งใช้งาน NativeActivity
ที่อัปเดตและได้รับการดูแลเป็นอย่างดี
พร้อมฟังก์ชันที่เพิ่มมากขึ้นและรอบการเปิดตัวที่รวดเร็ว ขอแนะนำอย่างยิ่งให้ทำดังนี้
ใช้ GameActivity
สำหรับโปรเจ็กต์ใหม่
เอกสารนี้แสดงวิธีเริ่มต้นใช้งานไลบรารีกราฟิก Vulkan
ด้วยการดาวน์โหลด คอมไพล์ และเรียกใช้แอป Khronos© ตัวอย่าง
สิ่งที่ต้องมีก่อน
ก่อนเริ่มต้น โปรดเตรียมเวอร์ชันฮาร์ดแวร์และแพลตฟอร์มที่ถูกต้อง
คุณควรใช้อุปกรณ์หรือโปรแกรมจำลอง ที่รองรับ Vulkan
ที่ใช้ Android 7.0 (Nougat), API ระดับ 24 ขึ้นไป
คุณยืนยันเวอร์ชัน Android ได้โดยไปที่เมนูการตั้งค่า
และเลือกเกี่ยวกับโทรศัพท์ > เวอร์ชัน Android เมื่อคุณยืนยันว่า
คุณได้ตั้งค่าเวอร์ชันฮาร์ดแวร์และแพลตฟอร์มที่ถูกต้อง คุณจะสามารถดาวน์โหลดซอฟต์แวร์ที่จำเป็นได้
ดาวน์โหลด
ก่อนที่จะเริ่มต้น คุณต้องดาวน์โหลดเครื่องมือและซอฟต์แวร์อื่นๆ หลายรายการ โปรดทราบว่าโฮสต์ของ Windows
ขอแนะนําให้คุณหลีกเลี่ยงลําดับชั้นของเส้นทางไฟล์ในระดับที่ลึกสําหรับเครื่องมือและซอร์สโค้ด
เพื่อแก้ปัญหาขีดจำกัดเส้นทางของไฟล์ในระบบปฏิบัติการ Windows บางเวอร์ชัน
หากยังไม่มี Android Studio โปรดดาวน์โหลด
ซึ่งรวมถึง Android SDK ล่าสุดด้วย
ติดตั้ง NDK และ CMake จากภายใน Android Studio
หรือดาวน์โหลดและติดตั้ง แยกต่างหาก
สร้างและเรียกใช้ตัวอย่าง Hello JNI
เพื่อตรวจสอบว่า Android Studio ทำงานอย่างถูกต้อง
ติดตั้ง Python3 และคอมโพเนนต์อื่นๆ ที่ระบุไว้ใน build.md
สำหรับแพลตฟอร์มโฮสต์ของคุณ
นำเข้า
ในส่วนนี้ คุณจะได้ดาวน์โหลดที่เก็บตัวอย่าง Khronos© Vulkan© เพื่อสร้าง Gradle สำหรับ Android
แล้วเปิดด้วย Android Studio IDE
ตั้งค่าตัวแปรสภาพแวดล้อมต่อไปนี้
export ANDROID_HOME=/path/to/sdk-directory
export ANDROID_NDK_HOME=$ANDROID_HOME/ndk/{your-ndk-version-dir}
เพิ่ม CMake ลงใน $PATH ซึ่งใช้สร้างสคริปต์บิลด์ของ Android
export PATH=$PATH:$ANDROID_HOME/cmake/{your-cmake-version}/bin
เปิดเทอร์มินัลและดาวน์โหลดซอร์สโค้ดไปยังไดเรกทอรีการพัฒนาของคุณ:
cd dev-directory
git clone --recursive https://github.com/KhronosGroup/Vulkan-Samples.git
ทำตามวิธีการเหล่านี้ (จาก Build.md )
เพื่อสร้างโปรเจ็กต์ตัวอย่าง Android ให้ทำดังนี้
cd Vulkan-Samples
./scripts/generate.py android
เปิด Android Studio เลือก ไฟล์ > เปิด และเลือก
Vulkan-Samples/build/android_gradle/build.gradle
คุณจะเห็นบางอย่างที่คล้ายกับข้อความต่อไปนี้หลังจากโหลด Android Studio
โปรเจ็กต์:
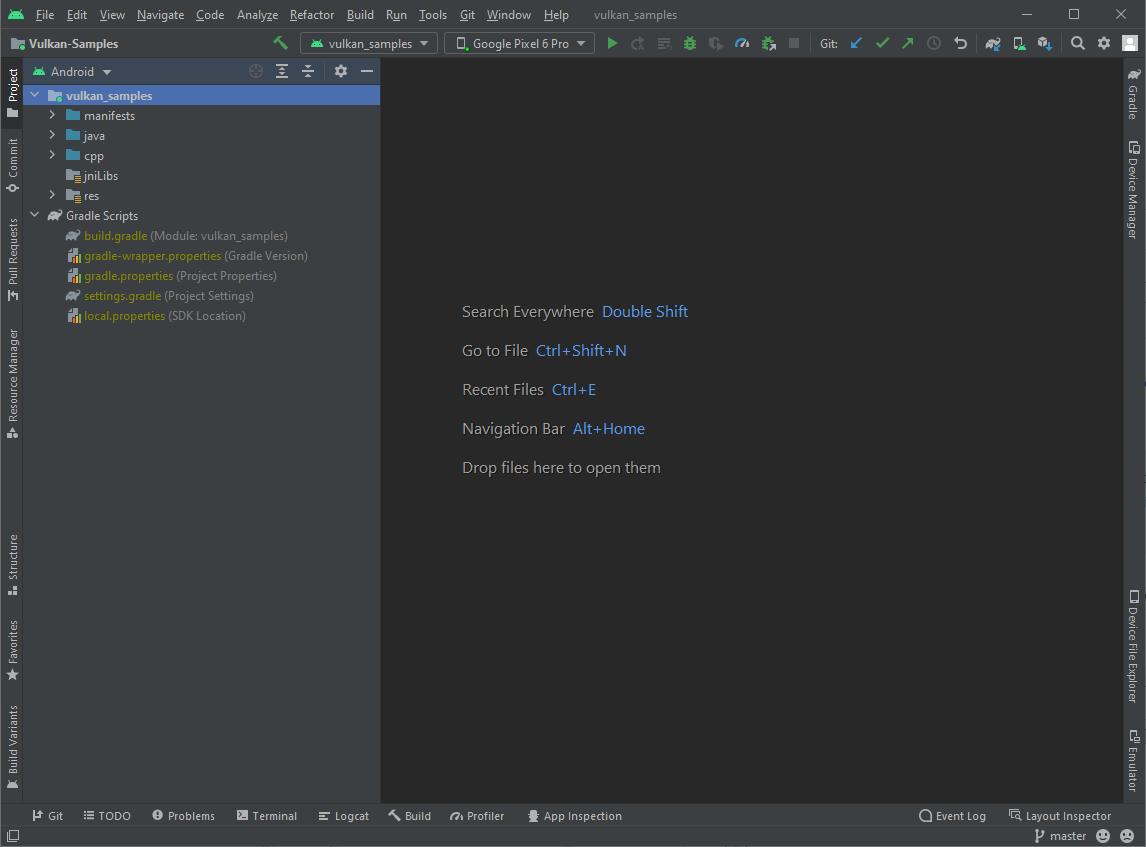
รูปที่ 1
โปรเจ็กต์ตัวอย่างใน Android Studio
คอมไพล์
ตัวอย่างทั้งหมดในที่เก็บนี้จัดอยู่ในโปรเจ็กต์ Android โปรเจ็กต์เดียว วิธีคอมไพล์
ให้ทำอย่างใดอย่างหนึ่งต่อไปนี้
หากต้องการคอมไพล์แหล่งที่มาเท่านั้น ให้ใช้เมนู สร้าง > สร้างโปรเจ็กต์
หรือพิมพ์แป้นพิมพ์ลัด Ctrl-F9
ในการสร้าง APK ตัวอย่าง ให้เลือกเมนู สร้าง >
สร้าง Bundle/APK > สร้าง APK
คุณควรเห็นข้อความว่าสำเร็จของบิลด์ภายในหน้าต่าง Build ของ Android Studio
ในกรณีที่เกิดข้อผิดพลาด ให้แก้ไขและคอมไพล์อีกครั้ง
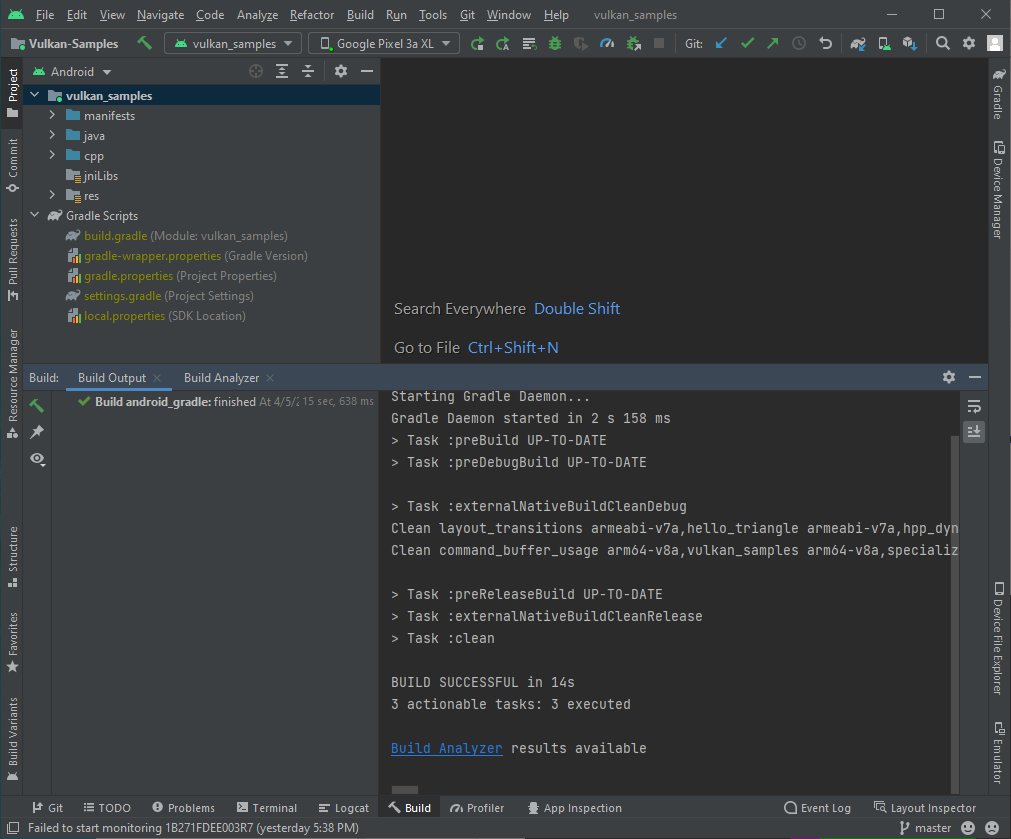
รูปที่ 2 ตัวอย่างบิลด์ที่ประสบความสำเร็จ
ดำเนินการ
ก่อนที่จะเรียกใช้โปรเจ็กต์ตัวอย่าง โปรดตรวจสอบว่า Android Studio จดจำ
อุปกรณ์ Vulkan หรือ Android Emulator ที่เชื่อมต่ออยู่ คุณจะเห็นบางอย่าง เช่น
ดังต่อไปนี้:
รูปที่ 3 เชื่อมต่ออุปกรณ์ทดสอบกับ Android Studio
ในการเรียกใช้โปรเจ็กต์ ให้ทำดังนี้
ใช้เมนู เรียกใช้ > เรียกใช้ vulkan_sample หรือคลิกปุ่มเรียกใช้
บนแถบเครื่องมือ และรอให้
ตัวอย่างเพื่อติดตั้งและเริ่มต้นใช้งานอุปกรณ์ที่เชื่อมต่อ
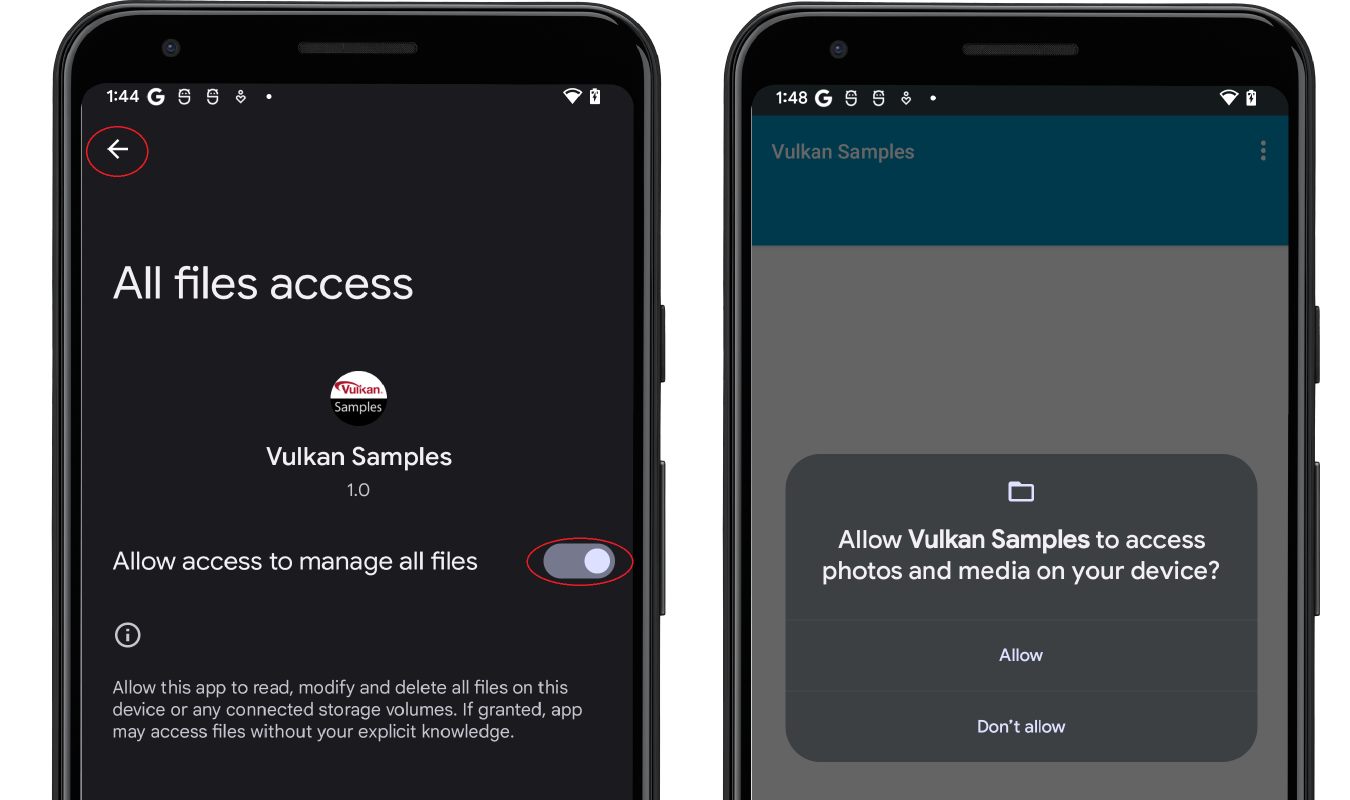
ให้สิทธิ์คำขอเข้าถึงที่จำเป็นในอุปกรณ์ Android ที่เชื่อมต่อ
เปิดใช้อนุญาตให้เข้าถึงเพื่อจัดการไฟล์ทั้งหมด จากนั้นแตะลูกศรปุ่มย้อนกลับ
เพื่อกลับไปยังหน้าจอหลักตัวอย่าง
อนุญาตการเข้าถึงดิสก์:
รูปที่ 4 เปิดใช้การเข้าถึงดิสก์
คุณควรจะเห็นตัวอย่างหน้าจอเมนูหลัก ซึ่งคล้ายกับตัวอย่างด้านล่างนี้
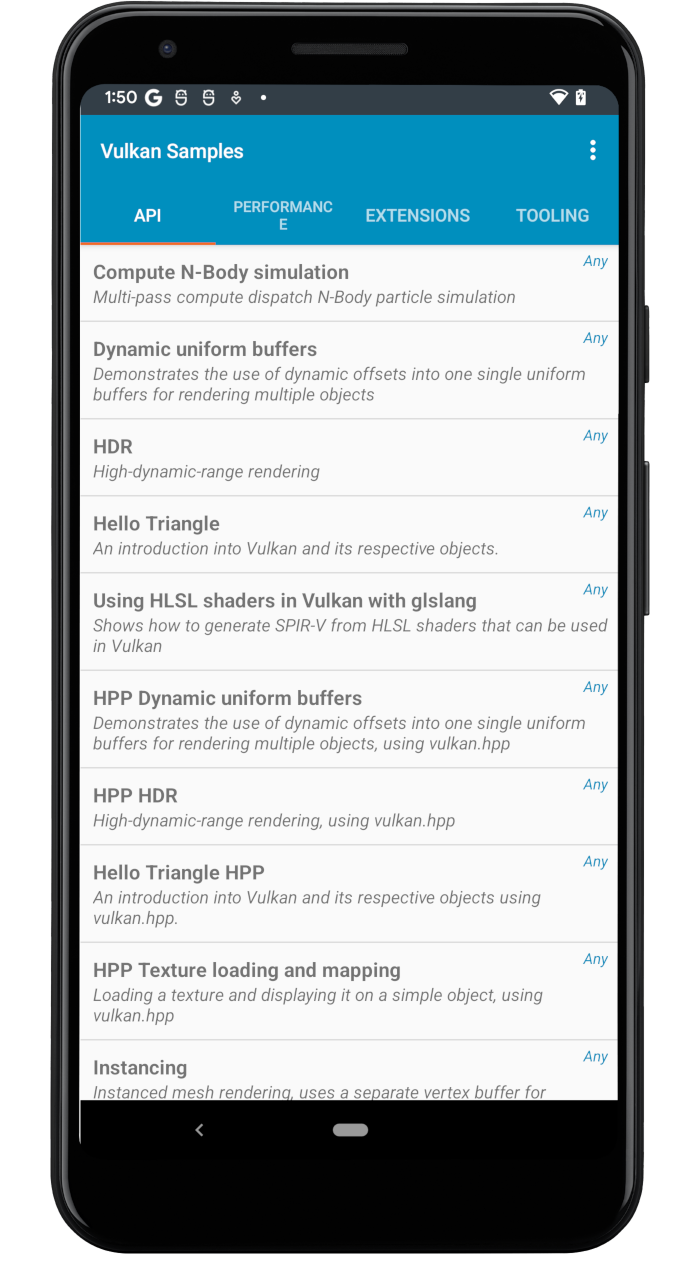
รูปที่ 5 ตัวอย่างเมนูหลัก
เลื่อนดูรายการตัวอย่าง และเลือกเรียกใช้รายการ 2-3 รายการ
หากเพิ่งเริ่มใช้การพัฒนา Vulkan คุณอาจเริ่มต้นด้วยตัวอย่าง “API”
เช่น การแตะ "Hey Triangle" ควรแสดงรูปสามเหลี่ยมที่แสดงผล
ที่คล้ายกับข้อความต่อไปนี้
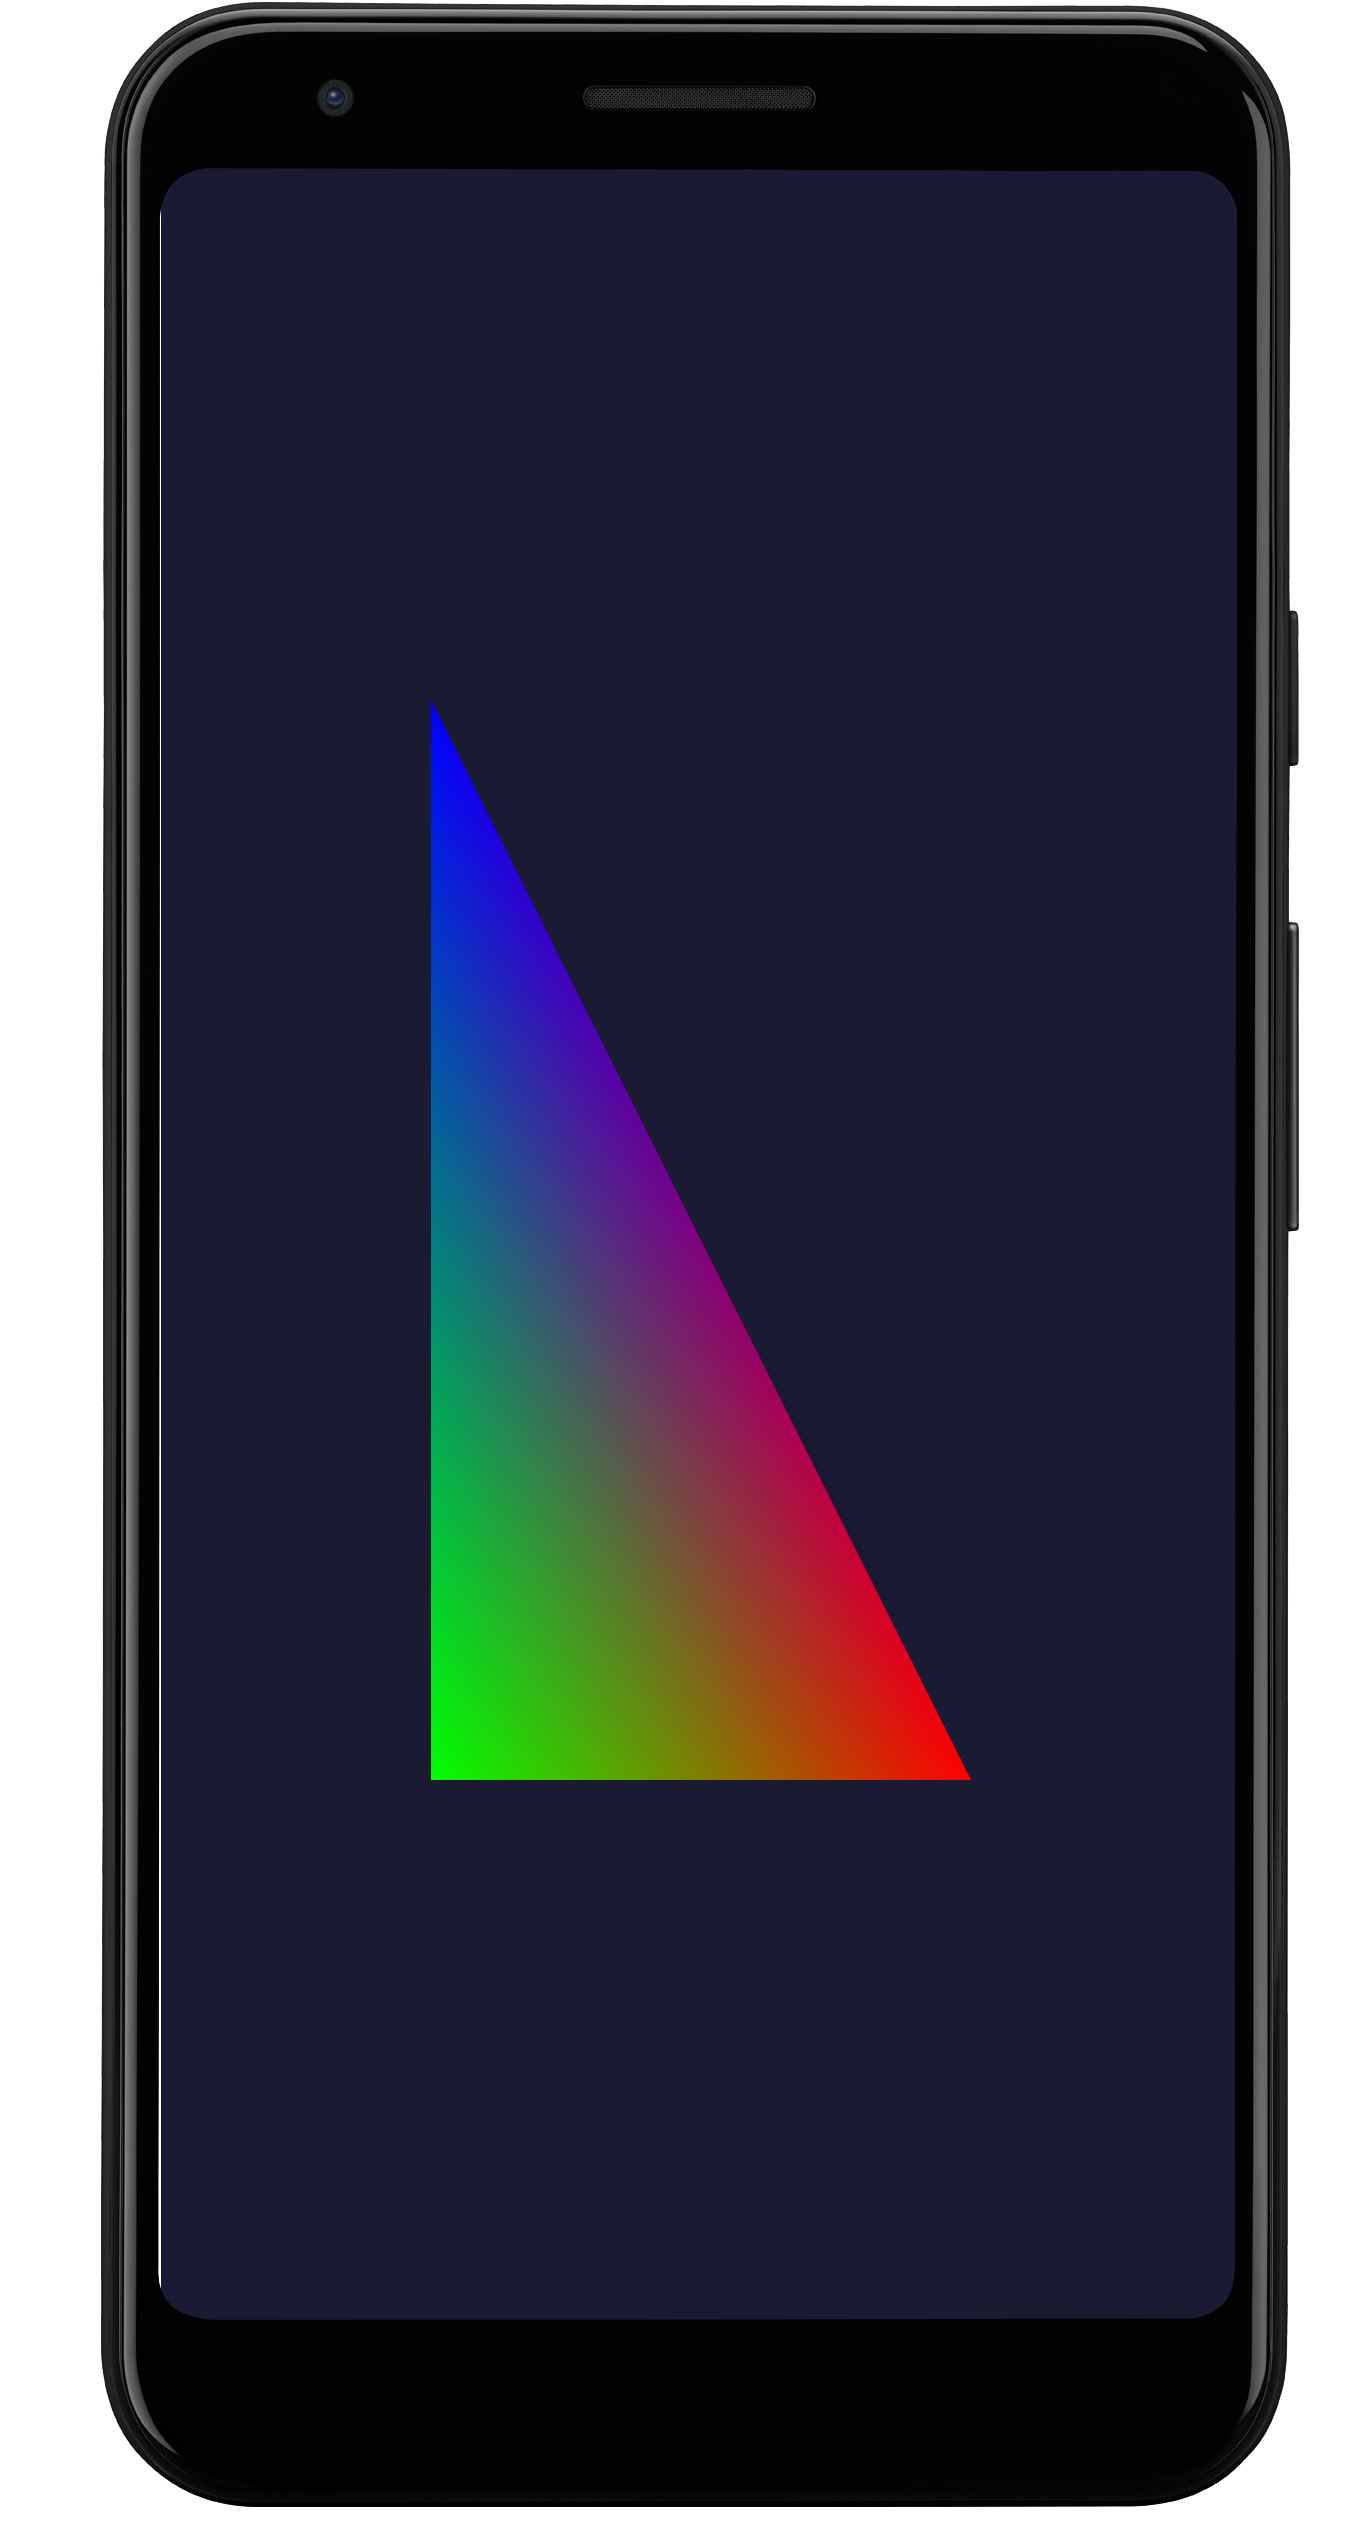
รูปที่ 6 ตัวอย่างสวัสดี Triange
ขณะนี้ระบบการพัฒนาของคุณตั้งค่าให้เรียกใช้ตัวอย่างบนอุปกรณ์ทดสอบแล้ว
Vulkan Sample ได้รับการพัฒนาขึ้นสำหรับระบบปฏิบัติการหลายระบบ รวมถึงระบบปฏิบัติการต่างๆ
ทั้งเดสก์ท็อปและอุปกรณ์เคลื่อนที่ ตัวอย่างบางส่วนในส่วนประสิทธิภาพ ส่วนขยาย และ
เครื่องมือ อาจไม่เสถียรและขัดข้องในอุปกรณ์ อาจเกิดจากสาเหตุหลายประการ เช่น
เป็น:
ฟีเจอร์ Vulkan ที่เฉพาะเจาะจงไม่ได้ออกแบบมาสำหรับ Android
ระบบไม่รองรับเวอร์ชันระบบปฏิบัติการ Android ของคุณ
ความสามารถของ GPU ของแพลตฟอร์มฮาร์ดแวร์
สำรวจ
ส่วน Java ของตัวอย่าง Vulkan มาจากคลาส NativeActivity ผ่านแอปพลิเคชันทั่วไป
เหตุการณ์ในวงจร เช่น การสร้างแอป เริ่ม หยุด และทำลายลงใน C/C++
โค้ด ในส่วน C/C++ ของตัวอย่างจะมีตัวอย่างเฟรมเวิร์ก
ที่ใช้ฟังก์ชันการสลับตัวอย่างย่อยขณะรันไทม์ น้อยมาก
กิจกรรม/ข้อความในระบบ Android จะต้องอยู่ในเส้นทางต่อไปนี้
เข้าถึงโค้ด Vulkan ของแอปตัวอย่าง:
ส่วน Java NativeSampleActivity
ส่วน C/C++ NativeSampleActivity
ส่วน
android_native_glue
รหัส
android_main
ตัวอย่างเฟรมเวิร์ก
โค้ดของตัวอย่างย่อยแต่ละรายการ
android_main
คือบริดจ์ระหว่าง NativeSampleActivity
กับโค้ดของแอป
ซึ่งจะเป็นจุดเริ่มต้นให้คุณทำตามโค้ดตัวอย่างได้ หากคุณเพิ่ง
มุ่งเน้นไปที่แหล่งที่มาที่เฉพาะเจาะจงของ Vulkan คุณสามารถสำรวจโค้ดได้ใน
Vulkan_Samples\samples
ซึ่งมีข้อมูลต่อไปนี้
ตัวอย่างหมวดหมู่ "api"
ตัวอย่างหมวดหมู่ "ประสิทธิภาพ"
ตัวอย่างหมวดหมู่ "ส่วนขยาย"
ตัวอย่างของ “เครื่องมือ”
Vulkan_Samples\shaders
เป็นบ้านสำหรับผู้ให้เฉดสีทั้งหมด
คุณสามารถเริ่มเรียกดูตัวอย่างหมวดหมู่ “API” เพื่อทำความคุ้นเคยกับ
การใช้งาน Vulkan และเฟรมเวิร์กตัวอย่าง จากนั้นคุณจะสามารถไปยัง
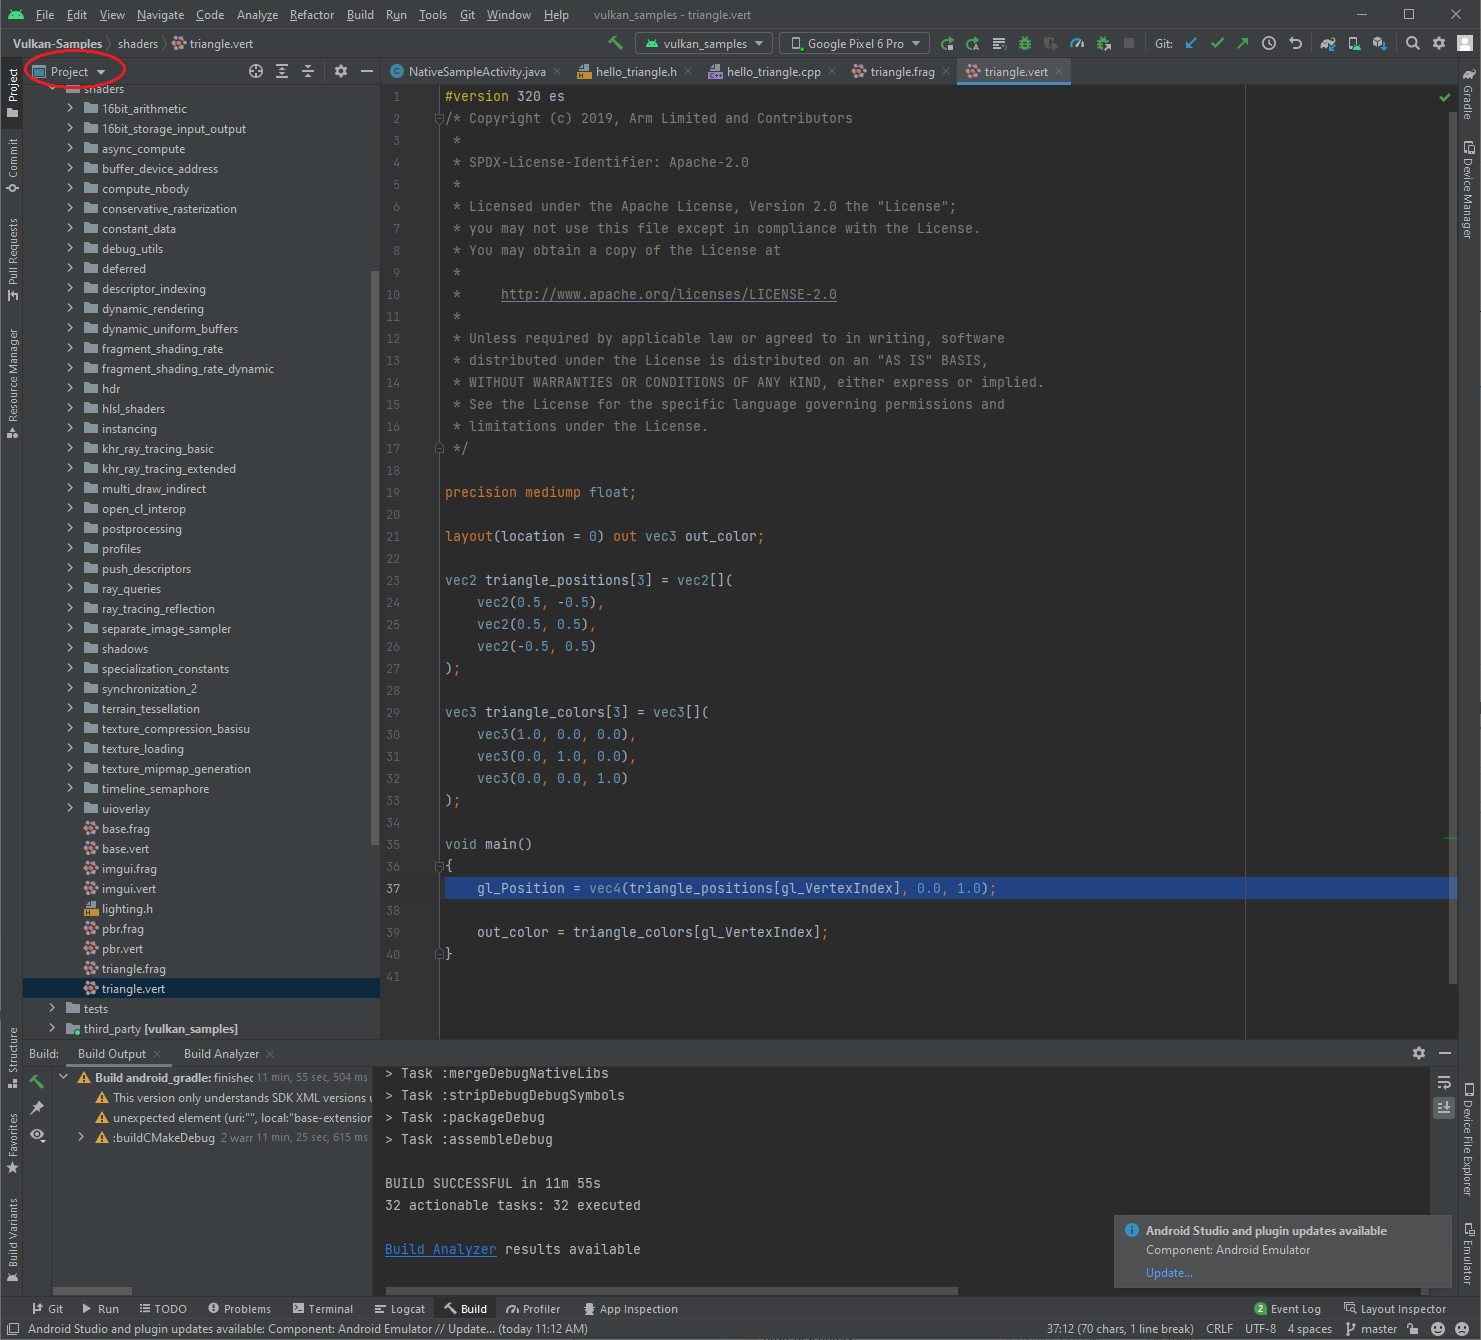
ตัวอย่างหมวดหมู่ "ประสิทธิภาพ" และ "การขยายการใช้งาน" สำหรับโค้ดตัวปรับแสงเงา คุณสามารถใช้
มุมมองโปรเจ็กต์ ใน Android Studio
รูปที่ 7 สำรวจเครื่องมือใส่เฉดสีด้วย Studio
แหล่งข้อมูลเพิ่มเติม
Vulkan API ผ่านการใช้งาน 2-3 เวอร์ชัน จึงเริ่มพัฒนาขึ้นเรื่อยๆ วัลคาน
คณะกรรมการมาตรฐานและชุมชน Vulkan ได้สร้างชุด Vulkan มากมาย
ที่สาธิตการใช้งานและแนวทางปฏิบัติที่ดีที่สุดของ API ดังต่อไปนี้
รายการมีทรัพยากรบางส่วนสำหรับการพัฒนาแอปพลิเคชัน Vulkan
ตัวอย่างเนื้อหาและโค้ดในหน้าเว็บนี้ขึ้นอยู่กับใบอนุญาตที่อธิบายไว้ในใบอนุญาตการใช้เนื้อหา Java และ OpenJDK เป็นเครื่องหมายการค้าหรือเครื่องหมายการค้าจดทะเบียนของ Oracle และ/หรือบริษัทในเครือ
อัปเดตล่าสุด 2024-08-22 UTC
[[["เข้าใจง่าย","easyToUnderstand","thumb-up"],["แก้ปัญหาของฉันได้","solvedMyProblem","thumb-up"],["อื่นๆ","otherUp","thumb-up"]],[["ไม่มีข้อมูลที่ฉันต้องการ","missingTheInformationINeed","thumb-down"],["ซับซ้อนเกินไป/มีหลายขั้นตอนมากเกินไป","tooComplicatedTooManySteps","thumb-down"],["ล้าสมัย","outOfDate","thumb-down"],["ปัญหาเกี่ยวกับการแปล","translationIssue","thumb-down"],["ตัวอย่าง/ปัญหาเกี่ยวกับโค้ด","samplesCodeIssue","thumb-down"],["อื่นๆ","otherDown","thumb-down"]],["อัปเดตล่าสุด 2024-08-22 UTC"],[],[],null,["# Get started with Vulkan\n\n| **Note:** Although this page includes [NativeActivity](/reference/android/app/NativeActivity) description, [GameActivity inside AGDK jetpack library](/games/agdk/integrate-game-activity) is an updated and well maintained implementation of `NativeActivity`, with more functionality and fast release cycles. It is highly recommended to use `GameActivity` for your new projects.\n\nThis document outlines how to get started with the Vulkan graphics library\nby downloading, compiling, and running Khronos© sample app.\n\nPrerequisites\n-------------\n\nBefore beginning, make sure you have the right hardware and platform version prepared.\nYou should use a device or an [emulator](/studio/run/emulator) that supports Vulkan,\nrunning Android 7.0 (Nougat), API level 24 or higher.\n\nYou can confirm your Android version by going to the **Settings** menu,\nand selecting **About phone** \\\u003e **Android Version**. Once you've confirmed that\nyou have the right hardware and platform version set up, you can download the necessary software.\n\nDownload\n--------\n\nBefore getting started, you must download several tools and other software. Note that on a Windows host,\nit is recommended that you avoid a deep file path hierarchy for tools and source code;\nthis is to work around file path limits on some Windows OS versions.\n\n1. If you don't already have Android Studio, [download it](/studio). This includes the most recent Android SDK.\n2. [Install the NDK and CMake](/studio/projects/install-ndk) from within Android Studio or [download and install](/ndk/downloads) them separately.\n3. Build and Run the [Hello JNI sample](https://github.com/android/ndk-samples/tree/main/hello-jni) to ensure Android Studio is working properly.\n4. Install python3 and other components listed in [build.md](https://github.com/KhronosGroup/Vulkan-Samples/blob/main/docs/build.adoc#android) for your host platform.\n\nImport\n------\n\nIn this section, you download [the Khronos© Vulkan© sample repository](https://github.com/KhronosGroup/Vulkan-Samples/), generate an Android gradle\nproject, then open it with the Android Studio IDE.\n\n1. Set the following environment variables: \n\n ```\n export ANDROID_HOME=/path/to/sdk-directory\n export ANDROID_NDK_HOME=$ANDROID_HOME/ndk/{your-ndk-version-dir}\n ```\n2. Add CMake to the $PATH, which is used to generate Android build scripts: \n\n ```\n export PATH=$PATH:$ANDROID_HOME/cmake/{your-cmake-version}/bin\n ```\n3. Open a terminal and download the source code to your development directory: \n\n ```\n cd dev-directory\n git clone --recursive https://github.com/KhronosGroup/Vulkan-Samples.git\n ```\n4. Follow these instructions (from [Build.md](https://github.com/KhronosGroup/Vulkan-Samples/blob/master/docs/build.md#android)) to generate the Android sample project: \n\n ```\n cd Vulkan-Samples\n ./scripts/generate.py android\n ```\n5. Open Android Studio. Choose **File \\\u003e Open** and select `Vulkan-Samples/build/android_gradle/build.gradle`. You should see something similar to the following after Android Studio loads the project: \n\n \u003cbr /\u003e\n\n **Figure 1.** The sample project inside Android Studio.\n\n \u003cbr /\u003e\n\nCompile\n-------\n\nAll samples in this repo are organized into one Android project. To compile the\nproject, do one of the following:\n\n- To just compile the sources, use menu, **Build** \\\u003e **Make Project** , or type the **Ctrl-F9** shortcut key.\n- To generate the sample APK, select menu **Build** \\\u003e **Build Bundle(s)/APK(s)** \\\u003e **Build APK(s)**.\n\nYou should see the build successful message inside Android Studio's **Build** window.\nIn case there are errors showing up, fix them and re-compile. \n\n\u003cbr /\u003e\n\n**Figure 2.** A successful sample build.\n\n\u003cbr /\u003e\n\n\u003cbr /\u003e\n\nExecute\n-------\n\nBefore running the sample project, make sure Android Studio recognizes your\nconnected Vulkan device or Android Emulator. You should see something like the\nfollowing: \n\n\u003cbr /\u003e\n\n**Figure 3.** Connect the test device to Android Studio.\n\n\u003cbr /\u003e\n\n\u003cbr /\u003e\n\nTo run the project, do the following:\n\n1. Use menu **Run \\\u003e Run vulkan_sample** , or click on the run button on the toolbar, and wait for the sample to get installed and started on your connected device.\n2. On your connected Android device, authorize the needed access requests.\n - enable **Allow access to manage all files** , then tap the arrow **Back button** to return the sample main start screen.\n - allow the disk access: \n\n \u003cbr /\u003e\n\n **Figure 4.** Enable disk access.\n\n \u003cbr /\u003e\n\n3. You should see the sample main menu screen, similar to the following: \n\n \u003cbr /\u003e\n\n **Figure 5.** Sample main menu.\n\n \u003cbr /\u003e\n\n4. Browse through the sample list, and select a few to run. If you are new to Vulkan development, you can start with \"API\" samples. For example, tapping \"Hello Triangle\" should display a rendered triangle similar to the following: \n\n \u003cbr /\u003e\n\n **Figure 6.** Hello Triange sample.\n\n \u003cbr /\u003e\n\nYour development system is now set up to run samples on your test device.\n\nVulkan Samples are developed for multiple operating systems, including those for\ndesktop and mobile. Some samples under **Performance** , **Extensions** , and\n**Tooling** may be unstable and crash on your device. This might be due to various reasons, such\nas:\n\n- The specific Vulkan features weren't designed for Android.\n- Your Android OS version is unsupported.\n- The GPU capability of your hardware platform.\n\nExplore\n-------\n\nThe Java section of the Vulkan sample derives from the [NativeActivity](/reference/android/app/NativeActivity) class. It passes typical application\nlifecycle events, such as app creation, start, stop, and destroy to the C/C++\ncode. In the C/C++ section of the sample, there is a sample framework\nthat implements the run-time sub sample switching functionality. At a very\nhigh level, Android system events/messages go through the following path to\nreach the sample app's Vulkan code:\n\n- `NativeSampleActivity` Java section\n- `NativeSampleActivity` C/C++ section\n- `android_native_glue` code\n- `android_main`\n- Sample framework\n- Individual sub sample's code\n\n`android_main` is the bridge between `NativeSampleActivity` and the app code,\nwhich can be the starting point for you to follow the sample code. If you just\nwant to focus on the Vulkan specific sources, you can explore the code under\n`Vulkan_Samples\\samples`, which contains the following:\n\n- The \"api\" category samples.\n- The \"performance\" category samples.\n- The \"extensions\" category samples.\n- The \"tooling\" samples.\n\nThe `Vulkan_Samples\\shaders` are the home for all shaders.\n\nYou can start browsing the \"API\" category samples to get familiar with basic\nVulkan usage and the sample framework. Then you can progress to the\n\"Performance\" and \"Extenstions\" category samples. For shader code, you can use\nthe **Project** view in Android Studio. \n\n\u003cbr /\u003e\n\n**Figure 7.** Explore shader with Studio.\n\n\u003cbr /\u003e\n\n\u003cbr /\u003e\n\nAdditional resources\n--------------------\n\nThe Vulkan API has been through a few versions, so it is maturing. The Vulkan\nstandard committee and the Vulkan community have created a rich set of Vulkan\nmaterial that demonstrates the API's usage and best practices. The following\nlist contains some resources for Vulkan application development:\n\n- **Vulkan Specification.**\n The Khronos Group maintains the Vulkan specification. See\n the [Vulkan homepage](https://www.khronos.org/vulkan) for the full specification,\n training, [guides](https://github.com/KhronosGroup/Vulkan-Guide)\n and [tutorials](https://www.vulkan.org/learn#key-resources).\n\n- **Validation Layers.**\n Validation Layers are essential for application development.\n See the [Vulkan validation layers on Android](/ndk/guides/graphics/validation-layer)\n documentation for details.\n\n- **Shaderc.**\n Shaderc code in the NDK is the downstream of the\n [Shaderc repo](https://github.com/google/shaderc). For the usage documentation\n and instructions to get the latest version, see\n [Shader compilers](/ndk/guides/graphics/shader-compilers)."]]