
本頁面說明如何設定環境並建構 應用程式中的 Slice。
注意:Android Studio 3.2 以上版本包含額外 提供有助於開發 Slice 的工具和功能:
- AndroidX 重構工具:如果您處理的專案 使用了 AndroidX 程式庫
- Slices Lint 檢查:在建構時找出常見的反實踐 配量
SliceProvider範本:處理樣板 建立SliceProvider
下載並安裝 Slice 檢視器
下載最新試聽內容
Slice Viewer APK 版本
;您不需要實作
SliceView API。
如果您的環境中沒有正確設定 ADB,請參閱 ADB 指南。
如要在裝置上安裝 Slice Viewer,請在
與下載的 slice-viewer.apk 相同的目錄:
adb install -r -t slice-viewer.apk
執行 Slice 檢視器
您可以透過 Android Studio 專案或 指令列:
從 Android Studio 專案啟動 Slice Viewer
- 在專案中選取 「執行」>編輯設定...
- 按一下左上角的綠色加號
選取「Android App」
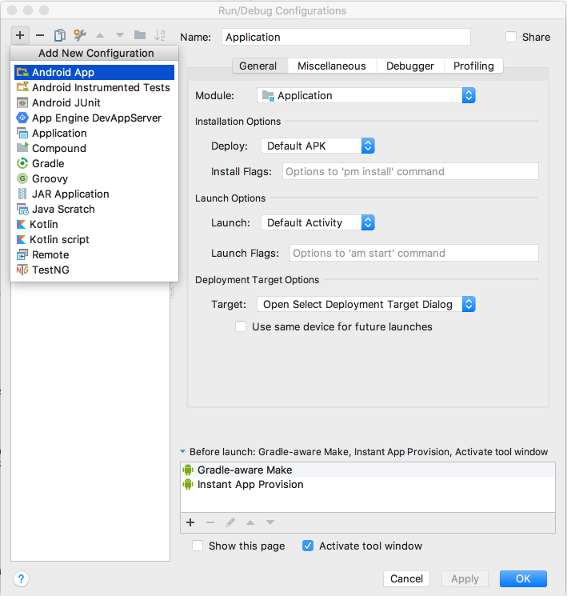
在名稱欄位中輸入 slice
在「Module」下拉式選單中選取應用程式模組
在「Launch Options」下方,從「Launch」下拉式選單中選取「URL」
在網址欄位中輸入
slice-<your slice URI>範例:
slice-content://com.example.your.sliceuri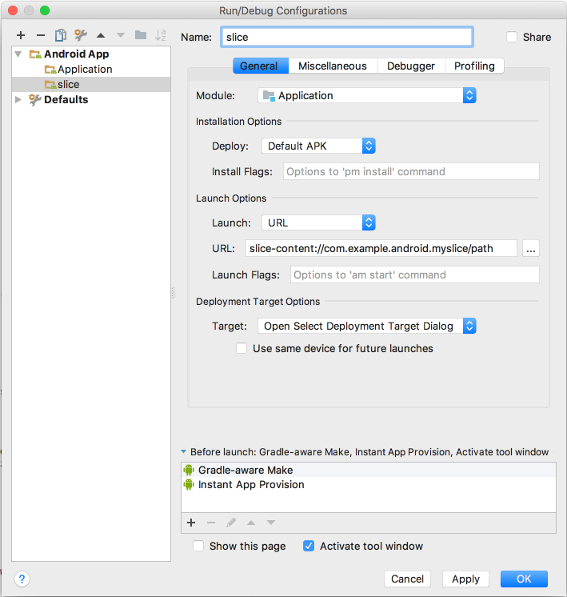
按一下 [確定]。
透過 ADB 啟動 Slice Viewer 工具
透過 Android Studio 執行應用程式:
adb install -t -r <yourapp>.apk
執行下列指令以查看 Slice:
adb shell am start -a android.intent.action.VIEW -d slice-<your slice URI>
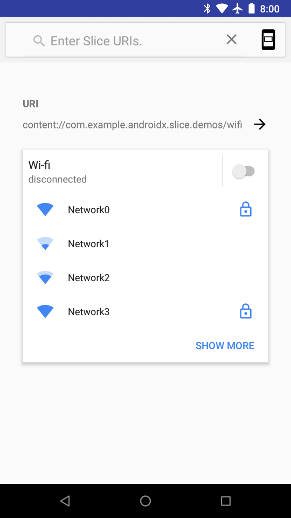
顯示單一 Wi-Fi Slice 的 Slice 檢視器
集中查看所有 Slice
除了啟動單一 Slice 以外,您還可以查看永久清單 Slice。
- 使用搜尋列,透過 URI 手動搜尋 Slice (例如
content://com.example.android.app/hello)。每次搜尋時,[Slice] 會比較 已加入清單 - 每次使用 Slice URI 啟動 Slice Viewer 工具時,系統就會新增 Slice 然後再加入清單中
- 只要滑動 Slice,即可從清單中移除 Slice。
- 輕觸 Slice 的 URI,查看只包含該 Slice 的頁面。這有 效果與使用 Slice URI 啟動 Slice 檢視器的效果相同。
顯示 Slice 清單的 Slice 檢視器
以不同模式查看 Slice
顯示 Slice 的應用程式可以修改
SliceView#mode敬上
所以您應確保 Slice 在每種模式下都能正常顯示。
選取頁面右上方的「選單」圖示,即可變更模式。

單項 Slice 檢視器,模式設為「小」
建構第一個 Slice
如要建立 Slice,請開啟 Android Studio 專案,在 src 上按一下滑鼠右鍵
然後選取 [New... (新增...)>其他 >Slice 提供者。這項操作會建立類別
擴充 SliceProvider,新增
必要的提供者在 AndroidManifest.xml 中輸入內容,並修改
build.gradle 新增必要的 Slice 依附元件。
修改 AndroidManifest.xml 的內容如下所示:
<manifest xmlns:android="http://schemas.android.com/apk/res/android"
    package="com.example.android.app">
    ...
    <application>
        ...
        <provider android:name="MySliceProvider"
            android:authorities="com.example.android.app"
            android:exported="true" >
            <intent-filter>
                <action android:name="android.intent.action.VIEW" />
                <category android:name="android.app.slice.category.SLICE" />
            </intent-filter>
        </provider>
        ...
    </application>

</manifest>
下列依附元件會新增至 build.gradle:
Kotlin
dependencies {
// ...
    implementation "androidx.slice:slice-builders-ktx:(latest version)"
// ...
}
Java
dependencies {
// ...
    implementation "androidx.slice:slice-builders:(latest version)"
// ...
}
每個 Slice 都有相關聯的 URI。介面想要顯示 Slice 時,
透過這個 URI 向您的應用程式傳送繫結要求。這樣一來,您的應用程式就會處理
並透過指令列
onBindSlice敬上
方法。途徑接著會適時顯示 Slice。
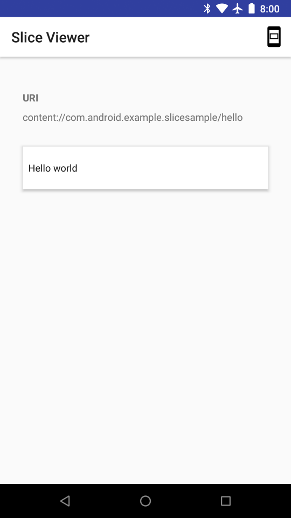
以下 onBindSlice 方法範例會檢查 /hello URI
並傳回 Hello World 配量:
Kotlin
override fun onBindSlice(sliceUri: Uri): Slice? {
    val activityAction = createActivityAction()
    return if (sliceUri.path == "/hello") {
        list(context, sliceUri, ListBuilder.INFINITY) {
            row {
                primaryAction = activityAction
                title = "Hello World."
            }
        }
    } else {
        list(context, sliceUri, ListBuilder.INFINITY) {
            row {
                primaryAction = activityAction
                title = "URI not recognized."
            }
        }
    }
}
Java
@Override
public Slice onBindSlice(Uri sliceUri) {
    if (getContext() == null) {
        return null;
    }
    SliceAction activityAction = createActivityAction();
    ListBuilder listBuilder = new ListBuilder(getContext(), sliceUri, ListBuilder.INFINITY);
    // Create parent ListBuilder.
    if ("/hello".equals(sliceUri.getPath())) {
        listBuilder.addRow(new ListBuilder.RowBuilder()
                .setTitle("Hello World")
                .setPrimaryAction(activityAction)
        );
    } else {
        listBuilder.addRow(new ListBuilder.RowBuilder()
                .setTitle("URI not recognized")
                .setPrimaryAction(activityAction)
        );
    }
    return listBuilder.build();
}
使用您在 Slice Viewer 區段中建立的 slice 執行設定
傳入您的 Slice URI (例如
slice-content://com.android.example.slicesample/hello) 的 Hello World
以便在 Slice 檢視器中查看。
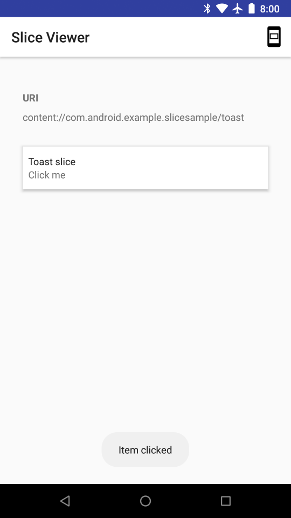
互動式配量
與通知類似,您可以在 Slice 中附加
PendingIntent 物件,
會在使用者互動時觸發以下範例會從
Activity 可接收及處理
意圖:
Kotlin
fun createSlice(sliceUri: Uri): Slice {
    val activityAction = createActivityAction()
    return list(context, sliceUri, INFINITY) {
        row {
            title = "Perform action in app"
            primaryAction = activityAction
        }
    }
}

fun createActivityAction(): SliceAction {
    val intent = Intent(context, MainActivity::class.java)
    return SliceAction.create(
        PendingIntent.getActivity(context, 0, Intent(context, MainActivity::class.java), 0),
        IconCompat.createWithResource(context, R.drawable.ic_home),
        ListBuilder.ICON_IMAGE,
        "Enter app"
    )
}
Java
public Slice createSlice(Uri sliceUri) {
    if (getContext() == null) {
        return null;
    }
    SliceAction activityAction = createActivityAction();
    return new ListBuilder(getContext(), sliceUri, ListBuilder.INFINITY)
            .addRow(new ListBuilder.RowBuilder()
                    .setTitle("Perform action in app.")
                    .setPrimaryAction(activityAction)
            ).build();
}

public SliceAction createActivityAction() {
    if (getContext() == null) {
        return null;
    }
    return SliceAction.create(
            PendingIntent.getActivity(
                    getContext(),
                    0,
                    new Intent(getContext(), MainActivity.class),
                    0
            ),
            IconCompat.createWithResource(getContext(), R.drawable.ic_home),
            ListBuilder.ICON_IMAGE,
            "Enter app"
    );
}
Slice 也支援其他包含狀態的輸入類型,例如切換鈕 傳送至應用程式的意圖
Kotlin
fun createBrightnessSlice(sliceUri: Uri): Slice {
    val toggleAction =
        SliceAction.createToggle(
            createToggleIntent(),
            "Toggle adaptive brightness",
            true
        )
    return list(context, sliceUri, ListBuilder.INFINITY) {
        row {
            title = "Adaptive brightness"
            subtitle = "Optimizes brightness for available light"
            primaryAction = toggleAction
        }
        inputRange {
            inputAction = (brightnessPendingIntent)
            max = 100
            value = 45
        }
    }
}

fun createToggleIntent(): PendingIntent {
    val intent = Intent(context, MyBroadcastReceiver::class.java)
    return PendingIntent.getBroadcast(context, 0, intent, 0)
}
Java
public Slice createBrightnessSlice(Uri sliceUri) {
    if (getContext() == null) {
        return null;
    }
    SliceAction toggleAction = SliceAction.createToggle(
            createToggleIntent(),
            "Toggle adaptive brightness",
            true
    );
    ListBuilder listBuilder = new ListBuilder(getContext(), sliceUri, ListBuilder.INFINITY)
            .addRow(new ListBuilder.RowBuilder()
                    .setTitle("Adaptive brightness")
                    .setSubtitle("Optimizes brightness for available light.")
                    .setPrimaryAction(toggleAction)
            ).addInputRange(new ListBuilder.InputRangeBuilder()
                    .setInputAction(brightnessPendingIntent)
                    .setMax(100)
                    .setValue(45)
            );
    return listBuilder.build();
}

public PendingIntent createToggleIntent() {
    Intent intent = new Intent(getContext(), MyBroadcastReceiver.class);
    return PendingIntent.getBroadcast(getContext(), 0, intent, 0);
}
接著,接收器可檢查其接收的狀態:
Kotlin
class MyBroadcastReceiver : BroadcastReceiver() {

    override fun onReceive(context: Context, intent: Intent) {
        if (intent.hasExtra(Slice.EXTRA_TOGGLE_STATE)) {
            Toast.makeText(context, "Toggled:  " + intent.getBooleanExtra(
                    Slice.EXTRA_TOGGLE_STATE, false),
                    Toast.LENGTH_LONG).show()
        }
    }

    companion object {
        const val EXTRA_MESSAGE = "message"
    }
}
Java
public class MyBroadcastReceiver extends BroadcastReceiver {

    public static String EXTRA_MESSAGE = "message";

    @Override
    public void onReceive(Context context, Intent intent) {
        if (intent.hasExtra(EXTRA_TOGGLE_STATE)) {
            Toast.makeText(context, "Toggled:  " + intent.getBooleanExtra(
                    EXTRA_TOGGLE_STATE, false),
                    Toast.LENGTH_LONG).show();
        }
    }
}

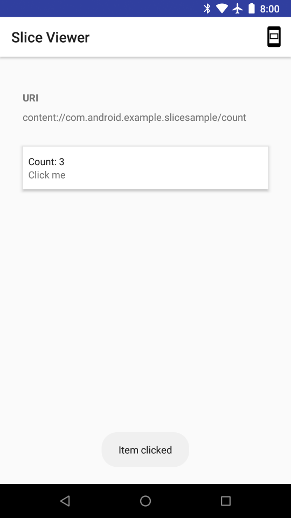
動態配量
Slice 也可以包含動態內容。在以下範例中,「Slice」現在 包括在其內容收到的廣播數量:
Kotlin
fun createDynamicSlice(sliceUri: Uri): Slice {
    return when (sliceUri.path) {
        "/count" -> {
            val toastAndIncrementAction = SliceAction.create(
                createToastAndIncrementIntent("Item clicked."),
                actionIcon,
                ListBuilder.ICON_IMAGE,
                "Increment."
            )
            list(context, sliceUri, ListBuilder.INFINITY) {
                row {
                    primaryAction = toastAndIncrementAction
                    title = "Count: ${MyBroadcastReceiver.receivedCount}"
                    subtitle = "Click me"
                }
            }
        }

        else -> {
            list(context, sliceUri, ListBuilder.INFINITY) {
                row {
                    primaryAction = createActivityAction()
                    title = "URI not found."
                }
            }
        }
    }
}
Java
public Slice createDynamicSlice(Uri sliceUri) {
    if (getContext() == null || sliceUri.getPath() == null) {
        return null;
    }
    ListBuilder listBuilder = new ListBuilder(getContext(), sliceUri, ListBuilder.INFINITY);
    switch (sliceUri.getPath()) {
        case "/count":
            SliceAction toastAndIncrementAction = SliceAction.create(
                    createToastAndIncrementIntent("Item clicked."),
                    actionIcon,
                    ListBuilder.ICON_IMAGE,
                    "Increment."
            );
            listBuilder.addRow(
                    new ListBuilder.RowBuilder()
                            .setPrimaryAction(toastAndIncrementAction)
                            .setTitle("Count: " + MyBroadcastReceiver.sReceivedCount)
                            .setSubtitle("Click me")
            );
            break;
        default:
            listBuilder.addRow(
                    new ListBuilder.RowBuilder()
                            .setPrimaryAction(createActivityAction())
                            .setTitle("URI not found.")
            );
            break;
    }
    return listBuilder.build();
}

public PendingIntent createToastAndIncrementIntent(String s) {
    Intent intent = new Intent(getContext(), MyBroadcastReceiver.class)
            .putExtra(MyBroadcastReceiver.EXTRA_MESSAGE, s);
    return PendingIntent.getBroadcast(getContext(), 0, intent, 0);
}
在本例中,雖然顯示了計數,但不會自行更新。你可以
修改廣播接收器,通知系統發生變更
使用
ContentResolver#notifyChange。
Kotlin
class MyBroadcastReceiver : BroadcastReceiver() {

    override fun onReceive(context: Context, intent: Intent) {
        if (intent.hasExtra(Slice.EXTRA_TOGGLE_STATE)) {
            Toast.makeText(
                context, "Toggled:  " + intent.getBooleanExtra(
                    Slice.EXTRA_TOGGLE_STATE, false
                ),
                Toast.LENGTH_LONG
            ).show()
            receivedCount++;
            context.contentResolver.notifyChange(sliceUri, null)
        }
    }

    companion object {
        var receivedCount = 0
        val sliceUri = Uri.parse("content://com.android.example.slicesample/count")
        const val EXTRA_MESSAGE = "message"
    }
}
Java
public class MyBroadcastReceiver extends BroadcastReceiver {

    public static int sReceivedCount = 0;
    public static String EXTRA_MESSAGE = "message";

    private static Uri sliceUri = Uri.parse("content://com.android.example.slicesample/count");

    @Override
    public void onReceive(Context context, Intent intent) {
        if (intent.hasExtra(EXTRA_TOGGLE_STATE)) {
            Toast.makeText(context, "Toggled:  " + intent.getBooleanExtra(
                    EXTRA_TOGGLE_STATE, false),
                    Toast.LENGTH_LONG).show();
            sReceivedCount++;
            context.getContentResolver().notifyChange(sliceUri, null);
        }
    }
}
範本
Slice 支援多種範本。進一步瞭解範本選項和 請參閱範本一文