Device targeting for conditional modules

What is Device Targeting for Conditional Modules?

Device Targeting allows you to deliver conditional feature modules to devices based on their hardware. For example, you may choose to deliver some feature to only high-end devices and not deliver it to devices which are unable to use this feature (i.e. saving space on these devices). This builds upon the concept of feature modules in Play Feature Delivery. As you'll see below, you have the power to define the targeting criteria (for now based on RAM, specific device models or available system features), and target modules to specific device groups.

Developer Journey

At a high level, to integrate device targeting into your existing application, you will need to take the following steps:

  1. Develop a feature that you want to deliver to only a set of devices based on their hardware.
    • Implement this feature as a feature module.
    • Specify in the module conditions section of AndroidManifest.xml to which device groups it should be delivered.
  2. Create your Device Targeting configuration, so that Play knows how to deliver your feature modules to user devices
    • Set up the Google Play Developer API (if not already completed), which is what you'll use to send the DT configs to Play
    • Go through the steps to create the DT config
  3. Upload your AAB to Play, and test to make sure everything is configured correctly

This document describes how to add Device Targeting for conditional delivery using the Android Gradle Plugin.

Create conditional feature module with Device Targeting

Adding a feature module into the app

Play Feature Delivery allows you to deliver certain features of your app conditionally or downloaded on demand, you can read an overview about it here. With Device Targeting you can deliver a feature conditionally to devices assigned to the provided groups.

To use DT for conditional delivery you have to use bundletool version 1.7.0 and above. For this you need to explicitly specify bundletool version for Android Gradle Plugin. This can be achieved in the root build.gradle file buildscript section:

buildscript {
  dependencies {
    classpath "com.android.tools.build:bundletool:1.7.0"
    ...
  }
  ...
}

To create a feature module use these instructions for modularizing Android application.

Once your feature development is complete, you can specify delivery conditions based on Device Targeting in your feature's AndroidManifest.xml. You need to provide a device group condition inside a dist:conditions of dist:module element. General information about conditions is available here. For device groups, new conditions are available where you can specify all groups this feature should be delivered to:

<dist:device-groups>
  <dist:device-group dist:name="..." />
  <dist:device-group dist:name="..." />
  ...
</dist:device-groups>

For example, let's say that you have defined a device group called _my_group1 (you will learn how to define it in the section Create a Device Targeting Configuration below). If the feature module should be delivered to only devices belonging to _my_group1 devices, its AndroidManifest.xml should look as follows:

<manifest ...>
  ...
  <dist:module dist:title="...">
    <dist:delivery>
      <dist:install-time>
        <dist:conditions>
          <dist:device-groups>
            <dist:device-group dist:name="my_group_1"/>
          </dist:device-groups>
          ...
        </dist:conditions>
      </dist:install-time>
    </dist:delivery>
  </dist:module>
  ...
</manifest>

For a feature which targets both _my_group1 and _my_group2, its AndroidManifest.xml looks as follows:

<manifest ...>
  ...
  <dist:module dist:title="...">
    <dist:delivery>
      <dist:install-time>
        <dist:conditions>
          <dist:device-groups>
            <dist:device-group dist:name="my_group_1"/>
            <dist:device-group dist:name="my_group_2"/>
          </dist:device-groups>
          ...
        </dist:conditions>
      </dist:install-time>
    </dist:delivery>
  </dist:module>
  ...
</manifest>

Once done, you can build your Android App Bundle (AAB).

Local Testing

Before moving on, it is recommended to locally test your app bundle to make sure everything is set up correctly. Using bundletool you locally build and test your app, explicitly specifying the correct device group. You will first use build-apks to generate a set of .apks files, and then deploy your app to a connected device using install-apks. You can also specify which group(s) you'd like installed via the device-groups flag. You can find more info on this method of local testing here. Please note this page hasn't yet been updated for DT and is thus missing the device-groups flag.

bundletool build-apks --bundle=/path/to/app.aab --output=/path/to/app.apks --local-testingbundletool install-apks --apks=/path/to/app.apks --device-groups=my_group_1,my_group_2

Alternatively: You can also use extract-apks to extract a set of APKs for a specific device (using get-device-spec along with specifying the device groups for this device).

bundletool get-device-spec --output=/path/to/device-spec.json --device-groups=my_group_1,my_group_2bundletool extract-apks --apks=/path/to/existing_APK_set.apks --output-dir=/path/to/device_specific_APK_set.apks --device-spec=/path/to/device-spec.json

Creating a Device Targeting Configuration via Google Play Developer API

Getting started with the Google Play Developer API (if not already completed)

To configure Device Targeting (define your device groups) you will need to use the Android Publisher API to upload your config to Google Play. You can read more about the API at the link above - there are a few steps you'll need to follow to get started:

  1. Create (if needed) and link your API project to your Google Play Console
  2. Set-up an API Access Client

You can find the API reference here - later on, if you choose to upload your build via the API, you will be using the Edits methods. Additionally, it is encouraged to review this page before using the API.

Using the Device Targeting Configuration API

You can use the following API call to create your device targeting configuration:

Create Device Targeting Config

HTTP request POST https://androidpublisher.googleapis.com/androidpublisher/v3/applications/{packageName}/deviceTierConfigs
Path parameters N/A
Request Body Device Targeting Config
Response Body Device Targeting Config
Device Targeting Config Object
{
  device_groups: [
    {
      name: string,
      device_selectors: [
        {
          device_ram : {
            min_bytes: integer
            max_bytes: integer
          },
          included_device_ids: [
            {
              build_brand: string,
              build_device: string
            }
          ],
          excluded_device_ids: [
            {
              build_brand: string,
              build_device: string
            }
          ],
          required_system_features: [
            {
              name: string
            }
          ],
          forbidden_system_features: [
            {
              name: string
            }
          ]
        }
      ]
    }
  ]
}

Fields:

  • device_tier_config_id (integer): ID corresponding to this device targeting configuration
  • device_groups (object): Group definitions

    • name (string): Name of the device group (a string ID you define)
    • device_selectors (object): Device requirements for a device to belong to this group.
    • device_ram (object): Device RAM requirements
      • min_bytes (integer): Minimum required RAM (in bytes)
      • max_bytes (integer): Maximum required RAM (in bytes)
    • included_device_ids (object): Device models to be included in this selector (max of 10000 device_ids per group). A device needs to be in this list to match the selector. This is a necessary but not sufficient condition to match the full selector (see note below about combining requirements in a selector).
      • build_brand (string): Device manufacturer
      • build_device (string): Device model code
    • excluded_device_ids (object): Device models to be excluded in this selector (max of 10000 device_ids per group). A device from this list will not match the selector even if it matches all other requirements in the selector.
      • build_brand (string): Device manufacturer
      • build_device (string): Device model code
    • required_system_features (object): Features that a device needs to have to be included by this selector (max of 100 features per group). A device needs to have all system features in this list to match the selector. This is a necessary but not sufficient condition to match the full selector (see note below about combining requirements in a selector).

      System feature reference

      • name (string): A system feature
    • forbidden_system_features (object): Features that a device mustn't have to be included by this selector (max of 100 features per group). If a device has any of the system features in this list, it doesn't match the selector, even if it matches all other requirements in the selector.

      System feature reference

      • name (string): A system feature

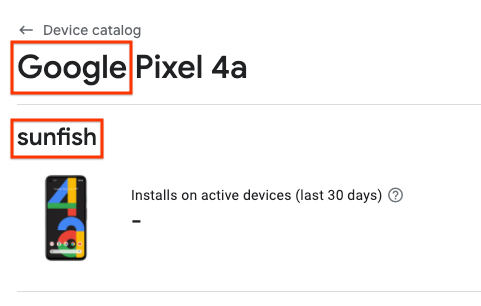
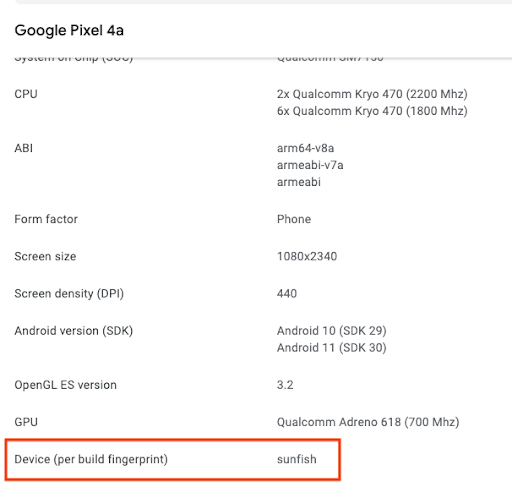
You can find the correct formatting for the device manufacturer and model code by using the Device Catalog on the Google Play Console, by either:

  • Inspecting individual devices using the Device Catalog, and finding the manufacturer and model code in the locations as shown in the example below (For a Google Pixel 4a, the manufacturer is “Google” and the model code is “sunfish”)'

    pixel 4a page in the device catalog

    pixel 4a page in the device catalog

  • Downloading a CSV of supported devices, and using the Manufacturer and Model Code for the build_brand and build_device fields, respectively.

For instance, the following group matches all devices with more than 4GB of RAM, except Pixel 5 (google redfin) and including Pixel 3 (Google Blueline, which has less than 4GB RAM).

device_groups: [
  {
    name: "my_group_1",
    device_selectors: [
      {
        device_ram: {
          min_bytes: 4294967296
        },
        excluded_device_ids: [
          {
            build_brand: "google",
            build_device: "redfin"
          }
        ]
      },
      {
        included_device_ids: [
          {
            build_brand: "google",
            build_device: "blueline"
          }
        ]
      }
    ]
  }
]

You can read it as:

[ (RAM > 4GB) AND NOT (google redfin) ] OR [ (google blueline) ]

You can follow the instructions below for validating your Device Targeting Configuration before uploading it to Google Play.

Get Device Targeting Config by ID

You can retrieve a specific device targeting configuration by ID using the following call:

HTTP request GEThttps://androidpublisher.googleapis.com/androidpublisher/v3/applications/{packageName}/deviceTierConfigs/{deviceTierConfigId}
Path parameters N/A
Request Body N/A
Response Body Device Targeting Config

Get list of Device Targeting Configs

You can get the last 10 device targeting configurations given the following call (or optimally specify a set of ten using the page_token query parameter):

HTTP request GEThttps://androidpublisher.googleapis.com/androidpublisher/v3/applications/{packageName}/deviceTierConfigs
Path parameters N/A
Query parameters page_token (optional) - Used to specify a specific group of 10 DTCs. This is useful if you have created more than 10 DTCs, and would like to see DTCs that were created before the most recent 10.
Request Body N/A
Response Body List of Device Targeting Configs

page_token

Validating your Device Targeting Configuration

bundletool includes two commands that help you validate that your Device Targeting Configuration works as intended before uploading it to Play.

With bundletool print-device-targeting-config, you can validate that your JSON file is syntactically correct and visualize your device groups in a more readable format.

bundletool print-device-targeting-config --config=mydtc.json

With bundletool evaluate-device-targeting-config, you can evaluate what groups would match a specific device. Either you connect your target device to your workstation and use the --connected-device flag; or you compile a JSON file with the device properties manually and provide it via the --device-properties flag.

bundletool evaluate-device-targeting-config --config=mydtc.json --connected-device
bundletool evaluate-device-targeting-config --config=mydtc.json --device-properties=deviceproperties.json

The device properties file should be a JSON file following the DeviceProperties protobuf structure. For example:

{
  "ram": 2057072640,
  "device_id": {
    "build_brand":"google",
    "build_device":"redfin"
  },
  "system_features": [
    {
      "name":"android.hardware.bluetooth"
    },
    {
      "name":"android.hardware.camera"
    }
  ]
}

Uploading your Android App Bundle to Google Play

Via API

You can use the Google Play Developer API to upload your Android App Bundle to Google Play, and link a specific Device Targeting configuration to your build.

There is a general overview of the Edits methods here, along with deeper examples on releasing to the different tracks in Google Play Console (for the last link, you'll want to use the AAB-friendly APIs instead of the APK-friendly API which are listed in the page). To specify the device targeting config for your build, you will add the config id to the deviceTierConfigId query parameter while calling the edits.bundle.upload method, like this:

https://androidpublisher.googleapis.com/upload/androidpublisher/v3/applications/{packageName}/edits/{editId}/bundles?deviceTierConfigId="{deviceTierConfigId}"

Via Google Play Console

You can follow the instructions here to upload your Android App Bundle. The latest DTC config will be applied to your App Bundle.

Auxiliary

Quick Start using Curl

Below is an example (using the command line tool curl) of creating a new device targeting config, and using the Edits api to create a new edit, upload a new AAB (associating it with a specific device targeting config), set the track/release config, and commit the edit (thus making the change public). Make sure to have the location of:

  • The key corresponding to your API client
  • The package name of your app

First, create a device targeting config, and take note of the deviceTierConfigId you'll receive upon a successful call.

curl -H "$(oauth2l header --json $HOME/{apiKey} androidpublisher)" -XPOST -H "Content-Type: application/json" -d "{ device_groups: [ { name: "my_group_1", device_selectors: [ { device_ram: { min_bytes: 4294967296 }, excluded_device_ids: [ { build_brand: "google", build_device: "redfin" } ] }, { included_device_ids: [ { build_brand: "google", build_device: "blueline" } ] } ] } ] }" https://androidpublisher.googleapis.com/androidpublisher/v3/applications/{packageName}/deviceTierConfigs

Start an edit - you will get an id and expiry time for the edit. Save the id for the following calls.

curl -H "$(oauth2l header --json $HOME/{apiKey} androidpublisher)" -XPOST https://androidpublisher.googleapis.com/androidpublisher/v3/applications/{packageName}/edits

Upload the AAB, specifying the device targeting config (deviceTierConfigId) as a query parameter - if the call is successful, you will see a version code, sha1 and sha256 of the build. Save the version code for the next call.

curl -H "$(oauth2l header --json $HOME/{apiKey} androidpublisher)" --data-binary @$HOME/{aabFile} -H "Content-Type: application/octet-stream" -XPOST https://androidpublisher.googleapis.com/upload/androidpublisher/v3/applications/{packageName}/edits/{editID}/bundles?deviceTierConfigId="{deviceTierConfigId}

Assign the AAB to the desired track (for testing, it is recommended to use the internal test track, but you can read more about the different tracks here), here we do a simple rollout without release notes, but you can read this page to learn more about how to staged rollouts, draft releases, and release notes. If this is your first time using the Publisher API, we recommend creating this as a draft release, and completing the release on your Google Play Console to ensure everything was configured correctly.

curl -H "$(oauth2l header --json $HOME/{apiKey} androidpublisher)" -XPUT -H "Content-Type: application/json" -d "{ releases: [{status: '{status}', versionCodes: ['{versionCode}'] }]}" https://androidpublisher.googleapis.com/androidpublisher/v3/applications/{packageName}/edits/{editID}/tracks/{track}

Commit changes (proceed with caution, as this will make all changes go live on Play to the desired track)

curl -H "$(oauth2l header --json $HOME/{apiKey} androidpublisher)" -XPOST https://androidpublisher.googleapis.com/androidpublisher/v3/applications/{packageName}/edits/{editID}:commit