
در دستگاههایی که اندروید ۸.۰ (سطح API ۲۶) و بالاتر دارند، جفتسازی دستگاه همراه، اسکن بلوتوث یا وایفای دستگاههای نزدیک را از طرف برنامه شما و بدون نیاز به مجوز ACCESS_FINE_LOCATION انجام میدهد. این امر به حداکثر رساندن محافظت از حریم خصوصی کاربر کمک میکند. از این روش برای انجام پیکربندی اولیه دستگاه همراه، مانند یک ساعت هوشمند با قابلیت BLE، استفاده کنید. علاوه بر این، جفتسازی دستگاه همراه مستلزم فعال بودن سرویسهای موقعیت مکانی است.
جفتسازی دستگاههای همراه به خودی خود اتصال ایجاد نمیکند و اسکن مداوم را نیز ممکن نمیسازد. برنامهها میتوانند از رابطهای برنامهنویسی کاربردی اتصال بلوتوث یا وایفای برای ایجاد اتصال استفاده کنند.
پس از جفت شدن دستگاه، دستگاه میتواند از مجوزهای REQUEST_COMPANION_RUN_IN_BACKGROUND و REQUEST_COMPANION_USE_DATA_IN_BACKGROUND برای شروع برنامه از پسزمینه استفاده کند. برنامهها همچنین میتوانند از مجوز REQUEST_COMPANION_START_FOREGROUND_SERVICES_FROM_BACKGROUND برای شروع یک سرویس پیشزمینه از پسزمینه استفاده کنند.
کاربر میتواند یک دستگاه را از یک لیست انتخاب کند و به برنامه مجوزهای دسترسی به دستگاه را اعطا کند. اگر برنامه را حذف نصب کنید یا disassociate() را فراخوانی کنید، این مجوزها لغو میشوند. برنامه همراه مسئول پاک کردن ارتباطات خود در صورتی است که کاربر دیگر به آنها نیازی نداشته باشد، مانند زمانی که از سیستم خارج میشود یا دستگاههای متصل را حذف میکند.
جفتسازی دستگاه همراه را پیادهسازی کنید
این بخش نحوه استفاده از CompanionDeviceManager برای جفت کردن برنامه شما با دستگاههای همراه از طریق بلوتوث، BLE و Wi-Fi را توضیح میدهد.
دستگاههای همراه را مشخص کنید
نمونه کد زیر نحوه اضافه کردن پرچم <uses-feature> را به یک فایل مانیفست نشان میدهد. این به سیستم میگوید که برنامه شما قصد دارد دستگاههای همراه را راهاندازی کند.
<uses-feature android:name="android.software.companion_device_setup"/>
فهرست کردن دستگاهها بر اساس DeviceFilter
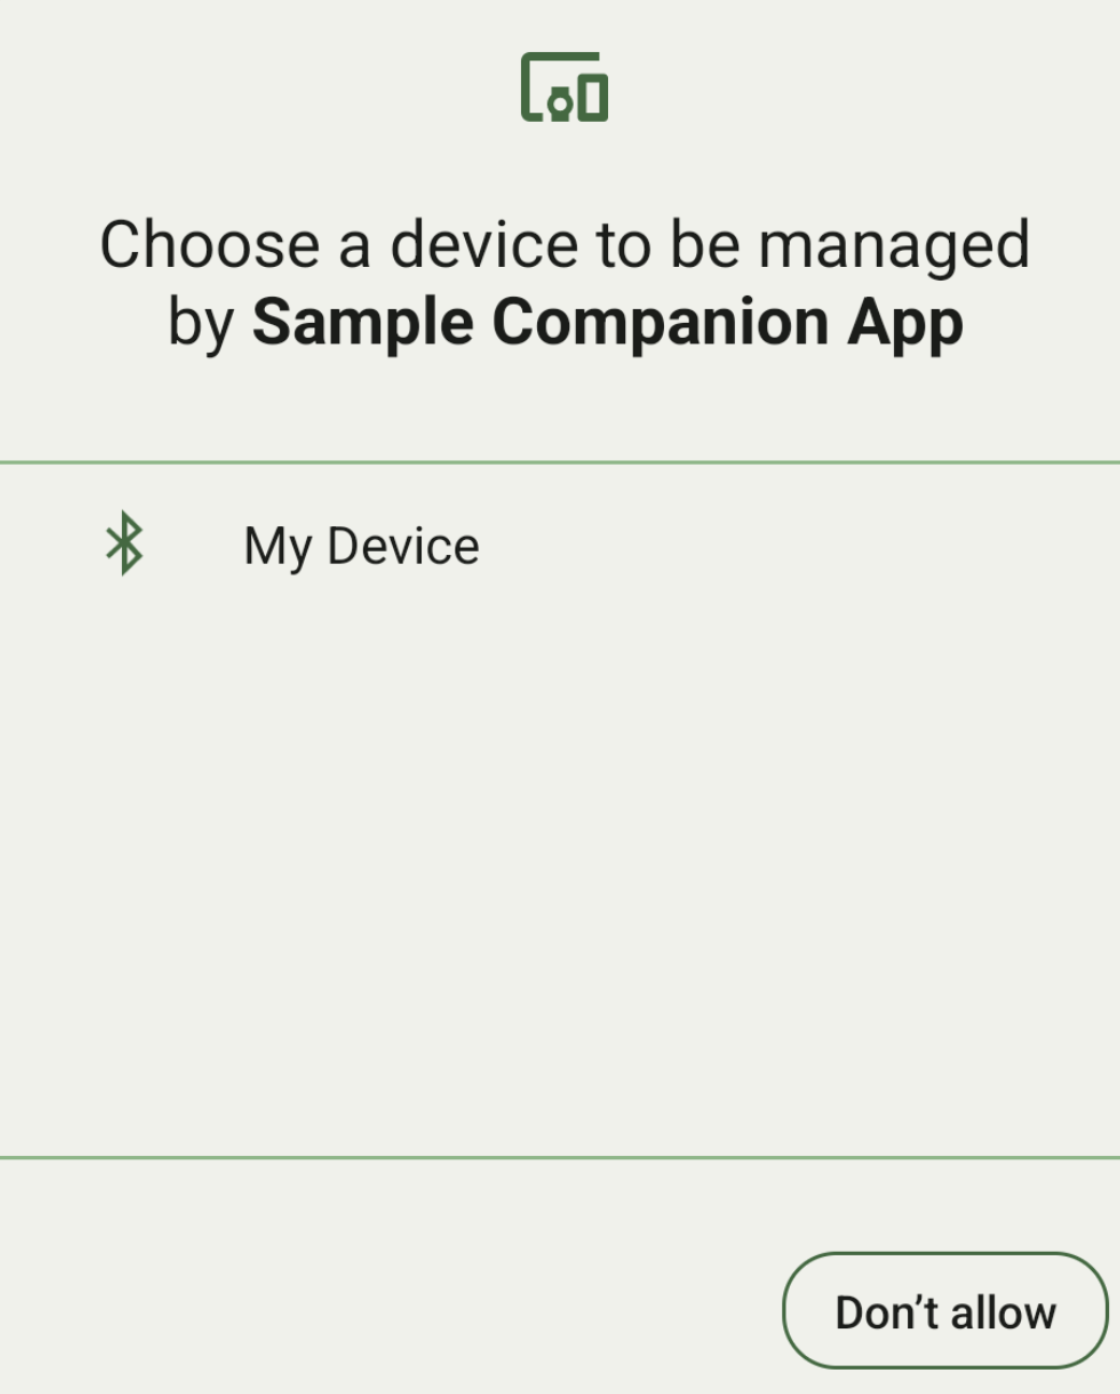
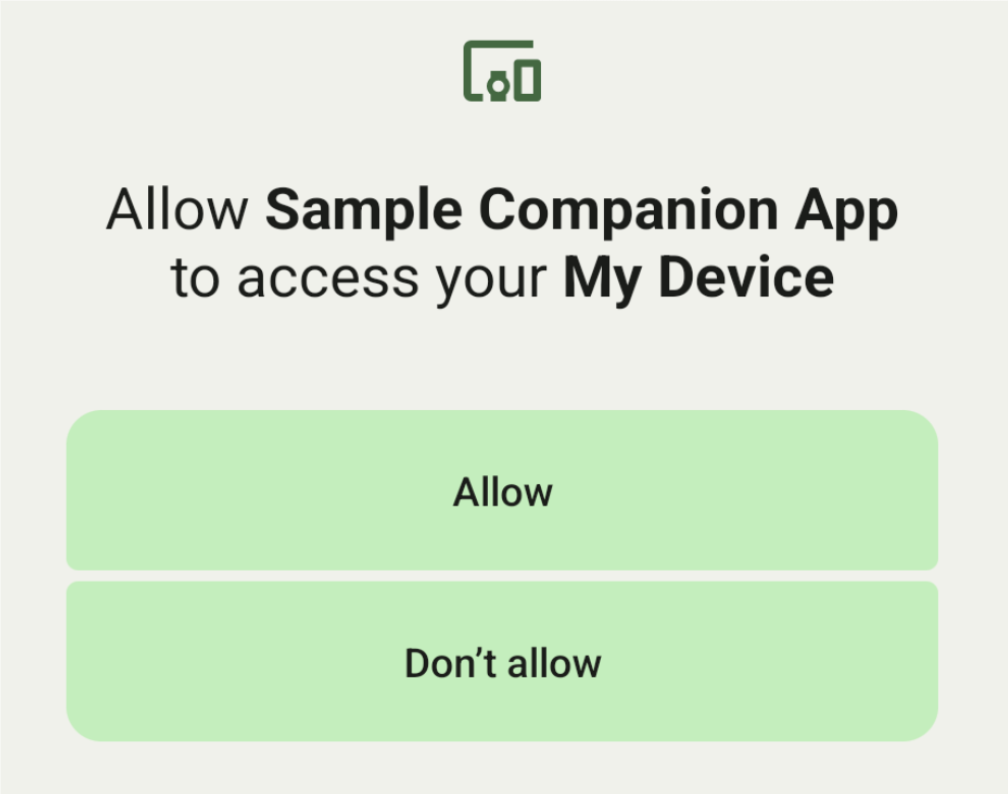
شما میتوانید تمام دستگاههای همراه درون محدودهای که با DeviceFilter ارائه شده توسط شما مطابقت دارند را نمایش دهید (در شکل ۱ نشان داده شده است). اگر میخواهید اسکن را فقط به یک دستگاه محدود کنید، میتوانید setSingleDevice() روی true تنظیم کنید (در شکل ۲ نشان داده شده است).
زیرکلاسهای DeviceFilter که میتوانند در AssociationRequest مشخص شوند، به شرح زیر هستند:
هر سه زیرکلاس دارای سازندههایی هستند که پیکربندی فیلترها را ساده میکنند. در مثال زیر، یک دستگاه با استفاده از BluetoothDeviceFilter به دنبال یک دستگاه بلوتوث میگردد.
کاتلین
val deviceFilter: BluetoothDeviceFilter = BluetoothDeviceFilter.Builder()
        // Match only Bluetooth devices whose name matches the pattern.
        .setNamePattern(Pattern.compile("My device"))
        // Match only Bluetooth devices whose service UUID matches this pattern.
        .addServiceUuid(ParcelUuid(UUID(0x123abcL, -1L)), null)
        .build()
جاوا
BluetoothDeviceFilter deviceFilter = new BluetoothDeviceFilter.Builder()
        // Match only Bluetooth devices whose name matches the pattern.
        .setNamePattern(Pattern.compile("My device"))
        // Match only Bluetooth devices whose service UUID matches this pattern.
        .addServiceUuid(new ParcelUuid(new UUID(0x123abcL, -1L)), null)
        .build();
یک DeviceFilter روی AssociationRequest تنظیم کنید تا CompanionDeviceManager بتواند نوع دستگاههایی را که باید جستجو کند، تعیین کند.
کاتلین
val pairingRequest: AssociationRequest = AssociationRequest.Builder()
        // Find only devices that match this request filter.
        .addDeviceFilter(deviceFilter)
        // Stop scanning as soon as one device matching the filter is found.
        .setSingleDevice(true)
        .build()
جاوا
AssociationRequest pairingRequest = new AssociationRequest.Builder()
        // Find only devices that match this request filter.
        .addDeviceFilter(deviceFilter)
        // Stop scanning as soon as one device matching the filter is found.
        .setSingleDevice(true)
        .build();
پس از اینکه برنامه شما یک AssociationRequest مقداردهی اولیه کرد، تابع associate() را روی CompanionDeviceManager اجرا کنید. تابع associate() یک AssociationRequest و یک Callback دریافت میکند.
وقتی CompanionDeviceManager دستگاهی را پیدا میکند و آمادهی اجرای دیالوگ رضایت کاربر است، Callback یک IntentSender در onAssociationPending برمیگرداند. پس از تأیید دستگاه توسط کاربر، AssociationInfo دستگاه در onAssociationCreated برگردانده میشود. اگر برنامهی شما هیچ دستگاهی را پیدا نکند، callback onFailure را به همراه یک پیام خطا برمیگرداند.
در دستگاههایی که اندروید ۱۳ (سطح API ۳۳) و بالاتر دارند:
کاتلین
val deviceManager =
  requireContext().getSystemService(Context.COMPANION_DEVICE_SERVICE)

val executor: Executor =  Executor { it.run() }

deviceManager.associate(pairingRequest,
    executor,
    object : CompanionDeviceManager.Callback() {
    // Called when a device is found. Launch the IntentSender so the user
    // can select the device they want to pair with.
    override fun onAssociationPending(intentSender: IntentSender) {
        intentSender?.let {
             startIntentSenderForResult(it, SELECT_DEVICE_REQUEST_CODE, null, 0, 0, 0)
        }
    }

    override fun onAssociationCreated(associationInfo: AssociationInfo) {
        // An association is created.
    }

    override fun onFailure(errorMessage: CharSequence?) {
        // To handle the failure.
     }
})
جاوا
CompanionDeviceManager deviceManager =
        (CompanionDeviceManager) getSystemService(Context.COMPANION_DEVICE_SERVICE);

Executor executor = new Executor() {
            @Override
            public void execute(Runnable runnable) {
                runnable.run();
            }
        };
deviceManager.associate(pairingRequest, new CompanionDeviceManager.Callback() {
    executor,
    // Called when a device is found. Launch the IntentSender so the user can
    // select the device they want to pair with.
    @Override
    public void onDeviceFound(IntentSender chooserLauncher) {
        try {
            startIntentSenderForResult(
                    chooserLauncher, SELECT_DEVICE_REQUEST_CODE, null, 0, 0, 0
            );
        } catch (IntentSender.SendIntentException e) {
            Log.e("MainActivity", "Failed to send intent");
        }
    }

    @Override
    public void onAssociationCreated(AssociationInfo associationInfo) {
        // An association is created.
    }

    @Override
    public void onFailure(CharSequence errorMessage) {
        // To handle the failure.
    });
در دستگاههایی که اندروید ۱۲L (سطح API 32) یا پایینتر (منسوخ شده) را اجرا میکنند:
کاتلین
val deviceManager =
      requireContext().getSystemService(Context.COMPANION_DEVICE_SERVICE)

deviceManager.associate(pairingRequest,
    object : CompanionDeviceManager.Callback() {
        // Called when a device is found. Launch the IntentSender so the user
        // can select the device they want to pair with.
        override fun onDeviceFound(chooserLauncher: IntentSender) {
            startIntentSenderForResult(chooserLauncher,
                SELECT_DEVICE_REQUEST_CODE, null, 0, 0, 0)
        }

        override fun onFailure(error: CharSequence?) {
            // To handle the failure.
        }
    }, null)
جاوا
CompanionDeviceManager deviceManager =
        (CompanionDeviceManager) getSystemService(Context.COMPANION_DEVICE_SERVICE);
deviceManager.associate(pairingRequest, new CompanionDeviceManager.Callback() {
    // Called when a device is found. Launch the IntentSender so the user can
    // select the device they want to pair with.
    @Override
    public void onDeviceFound(IntentSender chooserLauncher) {
        try {
            startIntentSenderForResult(
                    chooserLauncher, SELECT_DEVICE_REQUEST_CODE, null, 0, 0, 0
            );
        } catch (IntentSender.SendIntentException e) {
            Log.e("MainActivity", "Failed to send intent");
        }
    }

    @Override
    public void onFailure(CharSequence error) {
        // To handle the failure.
    }
}, null);
نتیجه انتخاب کاربر به قطعهای در متد onActivityResult() از activity شما ارسال میشود. سپس میتوانید به دستگاه انتخاب شده دسترسی داشته باشید.
وقتی کاربر یک دستگاه بلوتوث را انتخاب میکند، انتظار میرود BluetoothDevice . وقتی کاربر یک دستگاه بلوتوث LE را انتخاب میکند، انتظار میرود android.bluetooth.le.ScanResult نمایش داده شود. وقتی کاربر یک دستگاه وایفای را انتخاب میکند، انتظار میرود android.net.wifi.ScanResult نمایش داده شود.
کاتلین
override fun onActivityResult(requestCode: Int, resultCode: Int, data: Intent?) {
    when (requestCode) {
        SELECT_DEVICE_REQUEST_CODE -> when(resultCode) {
            Activity.RESULT_OK -> {
                // The user chose to pair the app with a Bluetooth device.
                val deviceToPair: BluetoothDevice? =
data?.getParcelableExtra(CompanionDeviceManager.EXTRA_DEVICE)
                deviceToPair?.let { device ->
                    device.createBond()
                    // Continue to interact with the paired device.
                }
            }
        }
        else -> super.onActivityResult(requestCode, resultCode, data)
    }
}
جاوا
@Override
protected void onActivityResult(int requestCode, int resultCode, @Nullable Intent data) {
    if (resultCode != Activity.RESULT_OK) {
        return;
    }
    if (requestCode == SELECT_DEVICE_REQUEST_CODE && data != null) {
        BluetoothDevice deviceToPair =
data.getParcelableExtra(CompanionDeviceManager.EXTRA_DEVICE);
        if (deviceToPair != null) {
            deviceToPair.createBond();
            // Continue to interact with the paired device.
        }
    } else {
        super.onActivityResult(requestCode, resultCode, data);
    }
}
مثال کامل را ببینید:
در دستگاههایی که اندروید ۱۳ (سطح API ۳۳) و بالاتر دارند:
کاتلین
private const val SELECT_DEVICE_REQUEST_CODE = 0

class MainActivity : AppCompatActivity() {

    private val deviceManager: CompanionDeviceManager by lazy {
        getSystemService(Context.COMPANION_DEVICE_SERVICE) as CompanionDeviceManager
    }
    val mBluetoothAdapter: BluetoothAdapter by lazy {
        val java = BluetoothManager::class.java
        getSystemService(java)!!.adapter }
    val executor: Executor =  Executor { it.run() }

    override fun onCreate(savedInstanceState: Bundle?) {
        super.onCreate(savedInstanceState)
        setContentView(R.layout.activity_main)

        // To skip filters based on names and supported feature flags (UUIDs),
        // omit calls to setNamePattern() and addServiceUuid()
        // respectively, as shown in the following  Bluetooth example.
        val deviceFilter: BluetoothDeviceFilter = BluetoothDeviceFilter.Builder()
            .setNamePattern(Pattern.compile("My device"))
            .addServiceUuid(ParcelUuid(UUID(0x123abcL, -1L)), null)
            .build()

        // The argument provided in setSingleDevice() determines whether a single
        // device name or a list of them appears.
        val pairingRequest: AssociationRequest = AssociationRequest.Builder()
            .addDeviceFilter(deviceFilter)
            .setSingleDevice(true)
            .build()

        // When the app tries to pair with a Bluetooth device, show the
        // corresponding dialog box to the user.
        deviceManager.associate(pairingRequest,
            executor,
            object : CompanionDeviceManager.Callback() {
                // Called when a device is found. Launch the IntentSender so the user
                // can select the device they want to pair with.
                override fun onAssociationPending(intentSender: IntentSender) {
                intentSender?.let {
                    startIntentSenderForResult(it, SELECT_DEVICE_REQUEST_CODE, null, 0, 0, 0)
              }
            }

             override fun onAssociationCreated(associationInfo: AssociationInfo) {
                 // AssociationInfo object is created and get association id and the
                 // macAddress.
                 var associationId: int = associationInfo.id
                 var macAddress: MacAddress = associationInfo.deviceMacAddress
             }
             override fun onFailure(errorMessage: CharSequence?) {
                // Handle the failure.
            }
    )

    override fun onActivityResult(requestCode: Int, resultCode: Int, data: Intent?) {
        when (requestCode) {
            SELECT_DEVICE_REQUEST_CODE -> when(resultCode) {
                Activity.RESULT_OK -> {
                    // The user chose to pair the app with a Bluetooth device.
                    val deviceToPair: BluetoothDevice? =
                        data?.getParcelableExtra(CompanionDeviceManager.EXTRA_DEVICE)
                    deviceToPair?.let { device ->
                        device.createBond()
                        // Maintain continuous interaction with a paired device.
                    }
                }
            }
            else -> super.onActivityResult(requestCode, resultCode, data)
        }
    }
}
جاوا
class MainActivityJava extends AppCompatActivity {

    private static final int SELECT_DEVICE_REQUEST_CODE = 0;
    Executor executor = new Executor() {
        @Override
        public void execute(Runnable runnable) {
            runnable.run();
        }
    };

    @Override
    protected void onCreate(@Nullable Bundle savedInstanceState) {
        super.onCreate(savedInstanceState);
        setContentView(R.layout.activity_main);

        CompanionDeviceManager deviceManager =
            (CompanionDeviceManager) getSystemService(
                Context.COMPANION_DEVICE_SERVICE
            );

        // To skip filtering based on name and supported feature flags,
        // do not include calls to setNamePattern() and addServiceUuid(),
        // respectively. This example uses Bluetooth.
        BluetoothDeviceFilter deviceFilter =
            new BluetoothDeviceFilter.Builder()
                .setNamePattern(Pattern.compile("My device"))
                .addServiceUuid(
                    new ParcelUuid(new UUID(0x123abcL, -1L)), null
                )
                .build();

        // The argument provided in setSingleDevice() determines whether a single
        // device name or a list of device names is presented to the user as
        // pairing options.
        AssociationRequest pairingRequest = new AssociationRequest.Builder()
            .addDeviceFilter(deviceFilter)
            .setSingleDevice(true)
            .build();

        // When the app tries to pair with the Bluetooth device, show the
        // appropriate pairing request dialog to the user.
        deviceManager.associate(pairingRequest, new CompanionDeviceManager.Callback() {
            executor,
           // Called when a device is found. Launch the IntentSender so the user can
           // select the device they want to pair with.
           @Override
           public void onDeviceFound(IntentSender chooserLauncher) {
               try {
                   startIntentSenderForResult(
                       chooserLauncher, SELECT_DEVICE_REQUEST_CODE, null, 0, 0, 0
                   );
               } catch (IntentSender.SendIntentException e) {
                   Log.e("MainActivity", "Failed to send intent");
               }
           }

          @Override
          public void onAssociationCreated(AssociationInfo associationInfo) {
                 // AssociationInfo object is created and get association id and the
                 // macAddress.
                 int associationId = associationInfo.getId();
                 MacAddress macAddress = associationInfo.getDeviceMacAddress();
          }

          @Override
          public void onFailure(CharSequence errorMessage) {
             // Handle the failure.
        });
    }

    @Override
    protected void onActivityResult(int requestCode, int resultCode, @Nullable Intent data) {
        if (resultCode != Activity.RESULT_OK) {
            return;
        }
        if (requestCode == SELECT_DEVICE_REQUEST_CODE) {
            if (resultCode == Activity.RESULT_OK && data != null) {
                BluetoothDevice deviceToPair = data.getParcelableExtra(
                    CompanionDeviceManager.EXTRA_DEVICE
                );

                if (deviceToPair != null) {
                    deviceToPair.createBond();
                    // ... Continue interacting with the paired device.
                }
            }
        } else {
            super.onActivityResult(requestCode, resultCode, data);
        }
    }
}
در دستگاههایی که اندروید ۱۲L (سطح API 32) یا پایینتر (منسوخ شده) را اجرا میکنند:
کاتلین
private const val SELECT_DEVICE_REQUEST_CODE = 0

class MainActivity : AppCompatActivity() {

    private val deviceManager: CompanionDeviceManager by lazy {
        getSystemService(Context.COMPANION_DEVICE_SERVICE) as CompanionDeviceManager
    }

    override fun onCreate(savedInstanceState: Bundle?) {
        super.onCreate(savedInstanceState)
        setContentView(R.layout.activity_main)

        // To skip filters based on names and supported feature flags (UUIDs),
        // omit calls to setNamePattern() and addServiceUuid()
        // respectively, as shown in the following  Bluetooth example.
        val deviceFilter: BluetoothDeviceFilter = BluetoothDeviceFilter.Builder()
            .setNamePattern(Pattern.compile("My device"))
            .addServiceUuid(ParcelUuid(UUID(0x123abcL, -1L)), null)
            .build()

        // The argument provided in setSingleDevice() determines whether a single
        // device name or a list of them appears.
        val pairingRequest: AssociationRequest = AssociationRequest.Builder()
            .addDeviceFilter(deviceFilter)
            .setSingleDevice(true)
            .build()

        // When the app tries to pair with a Bluetooth device, show the
        // corresponding dialog box to the user.
        deviceManager.associate(pairingRequest,
            object : CompanionDeviceManager.Callback() {

                override fun onDeviceFound(chooserLauncher: IntentSender) {
                    startIntentSenderForResult(chooserLauncher,
                        SELECT_DEVICE_REQUEST_CODE, null, 0, 0, 0)
                }

                override fun onFailure(error: CharSequence?) {
                    // Handle the failure.
                }
            }, null)
    }

    override fun onActivityResult(requestCode: Int, resultCode: Int, data: Intent?) {
        when (requestCode) {
            SELECT_DEVICE_REQUEST_CODE -> when(resultCode) {
                Activity.RESULT_OK -> {
                    // The user chose to pair the app with a Bluetooth device.
                    val deviceToPair: BluetoothDevice? =
                        data?.getParcelableExtra(CompanionDeviceManager.EXTRA_DEVICE)
                    deviceToPair?.let { device ->
                        device.createBond()
                        // Maintain continuous interaction with a paired device.
                    }
                }
            }
            else -> super.onActivityResult(requestCode, resultCode, data)
        }
    }
}
جاوا
class MainActivityJava extends AppCompatActivity {

    private static final int SELECT_DEVICE_REQUEST_CODE = 0;

    @Override
    protected void onCreate(@Nullable Bundle savedInstanceState) {
        super.onCreate(savedInstanceState);
        setContentView(R.layout.activity_main);

        CompanionDeviceManager deviceManager =
            (CompanionDeviceManager) getSystemService(
                Context.COMPANION_DEVICE_SERVICE
            );

        // To skip filtering based on name and supported feature flags,
        // don't include calls to setNamePattern() and addServiceUuid(),
        // respectively. This example uses Bluetooth.
        BluetoothDeviceFilter deviceFilter =
            new BluetoothDeviceFilter.Builder()
                .setNamePattern(Pattern.compile("My device"))
                .addServiceUuid(
                    new ParcelUuid(new UUID(0x123abcL, -1L)), null
                )
                .build();

        // The argument provided in setSingleDevice() determines whether a single
        // device name or a list of device names is presented to the user as
        // pairing options.
        AssociationRequest pairingRequest = new AssociationRequest.Builder()
            .addDeviceFilter(deviceFilter)
            .setSingleDevice(true)
            .build();

        // When the app tries to pair with the Bluetooth device, show the
        // appropriate pairing request dialog to the user.
        deviceManager.associate(pairingRequest,
            new CompanionDeviceManager.Callback() {
                @Override
                public void onDeviceFound(IntentSender chooserLauncher) {
                    try {
                        startIntentSenderForResult(chooserLauncher,
                            SELECT_DEVICE_REQUEST_CODE, null, 0, 0, 0);
                    } catch (IntentSender.SendIntentException e) {
                        // failed to send the intent
                    }
                }

                @Override
                public void onFailure(CharSequence error) {
                    // handle failure to find the companion device
                }
            }, null);
    }

    @Override
    protected void onActivityResult(int requestCode, int resultCode, @Nullable Intent data) {
        if (requestCode == SELECT_DEVICE_REQUEST_CODE) {
            if (resultCode == Activity.RESULT_OK && data != null) {
                BluetoothDevice deviceToPair = data.getParcelableExtra(
                    CompanionDeviceManager.EXTRA_DEVICE
                );

                if (deviceToPair != null) {
                    deviceToPair.createBond();
                    // ... Continue interacting with the paired device.
                }
            }
        } else {
            super.onActivityResult(requestCode, resultCode, data);
        }
    }
}
پروفایلهای دستگاه همراه
در اندروید ۱۲ (سطح API 31) و بالاتر، برنامههای همراه که دستگاههایی مانند ساعتها را مدیریت میکنند، میتوانند از پروفایلهای دستگاه همراه برای سادهسازی فرآیند راهاندازی با اعطای مجوزهای لازم هنگام جفتسازی استفاده کنند. برای اطلاعات بیشتر، به پروفایلهای دستگاه همراه مراجعه کنید.
برنامههای همراه را بیدار نگه دارید
با شروع از اندروید ۱۶ (سطح API ۳۶)،
CompanionDeviceManager.startObservingDevicePresence(String) و CompanionDeviceService.onDeviceAppeared() منسوخ شدهاند.
شما باید از
CompanionDeviceManager.startObservingDevicePresence (ObservingDevicePresenceRequest)برای مدیریت خودکار اتصالCompanionDeviceServiceپیادهسازیشده خود استفاده کنید.- وضعیت اتصال
CompanionDeviceServiceشما به طور خودکار بر اساس وضعیت حضور دستگاه همراه مرتبط با آن مدیریت میشود:- این سرویس زمانی مقید میشود که دستگاه همراه در محدوده BLE باشد یا با استفاده از بلوتوث متصل شده باشد.
- این سرویس زمانی که دستگاه همراه از محدوده BLE خارج شود یا اتصال بلوتوث آن قطع شود، از دسترس خارج میشود.
- وضعیت اتصال
برنامه بر اساس رویدادهای مختلف
DevicePresenceEventفراخوانی دریافت خواهد کرد.برای جزئیات بیشتر، به
CompanionDeviceService.onDeviceEvent()مراجعه کنید.