1. 事前準備
快速回顧深層連結、網頁連結和 Android 應用程式連結
使用者點選深層連結的主要目的,是獲得他們想看到的內容。深層連結具備所有協助使用者達成這項目的需要的功能。Android 會處理下列類型的連結:
- 深層連結:是能夠採用任何配置的 URI,可將使用者導向應用程式的特定部分。
- 網頁連結:含有 HTTP 和 HTTPS 配置的深層連結。
- Android 應用程式連結:含有 HTTP 和 HTTPS 配置,且包含
android:autoVerify屬性的網頁連結。
如想進一步瞭解深層連結、網頁連結和 Android 應用程式連結,請參閱 Android 說明文件,以及 YouTube 和 Medium 上的速成課程。
已經熟悉 Android 應用程式連結了嗎?
如果您已經熟悉所有技術詳情,歡迎參閱隨附的網誌文章,只要幾個步驟就能完成設定。
程式碼研究室目標
本程式碼研究室會引導您逐步完成內含 Android 應用程式連結的應用程式,包括設定、實作和驗證程序的最佳做法。
Android 應用程式連結的其中一項優點為十分安全,意思是沒有任何未經授權的應用程式可以處理您的連結。Android 作業系統必須驗證您擁有網站的連結,確認是否可將連結視為 Android 應用程式連結。這項程序稱為網站關聯。
本程式碼研究室著重於擁有網站和 Android 應用程式的開發人員。Android 應用程式連結可將應用程式和網站完美整合,提供更優質的使用者體驗。
必要條件
- 對 ADB 活動管理工具和 ADB 套件管理工具有基本瞭解。
- 對使用 Jetpack Compose 進行 Android 開發及導覽作業有基本瞭解。
課程內容
- 瞭解設計 Android 應用程式連結網址的最佳做法。
- 在 Android 應用程式中設定所有深層連結。
- 瞭解路徑萬用字元 (
path、pathPrefix、pathPattern、pathAdvancePattern)。 - 瞭解 Android 應用程式連結驗證程序,包括上傳 Google Digital Asset Links (DAL) 檔案、Android 應用程式連結手動驗證程序,以及 Play 管理中心的深層連結資訊主頁。
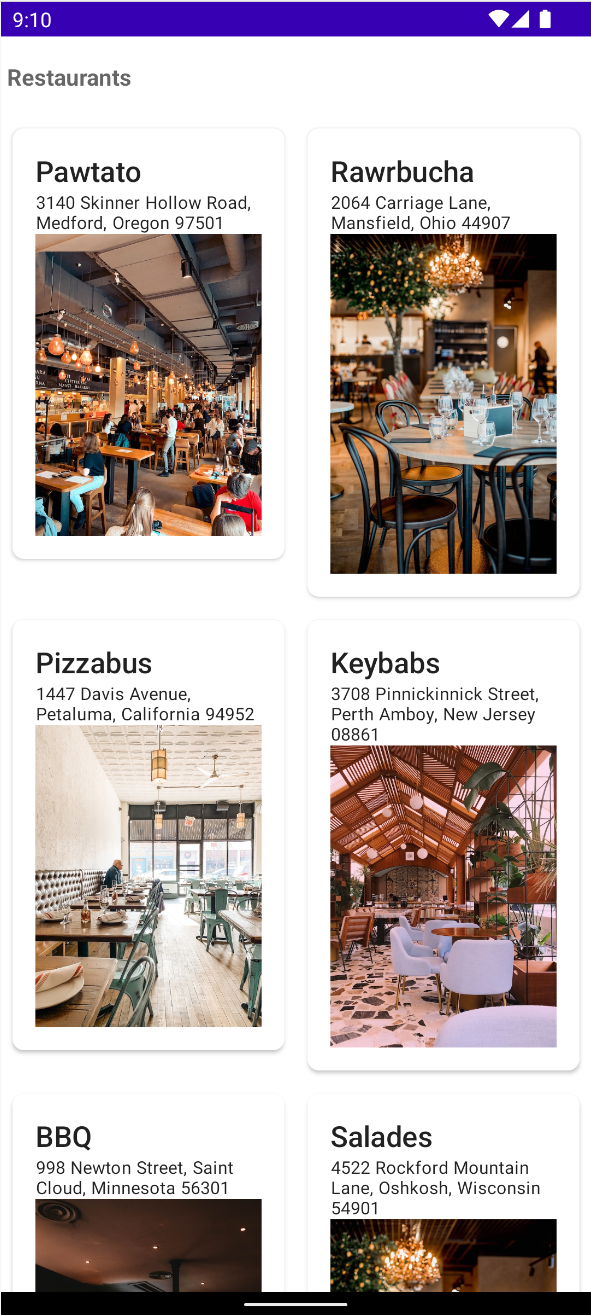
- 建構 Android 應用程式,其中含有不同地點的多家餐廳資訊。
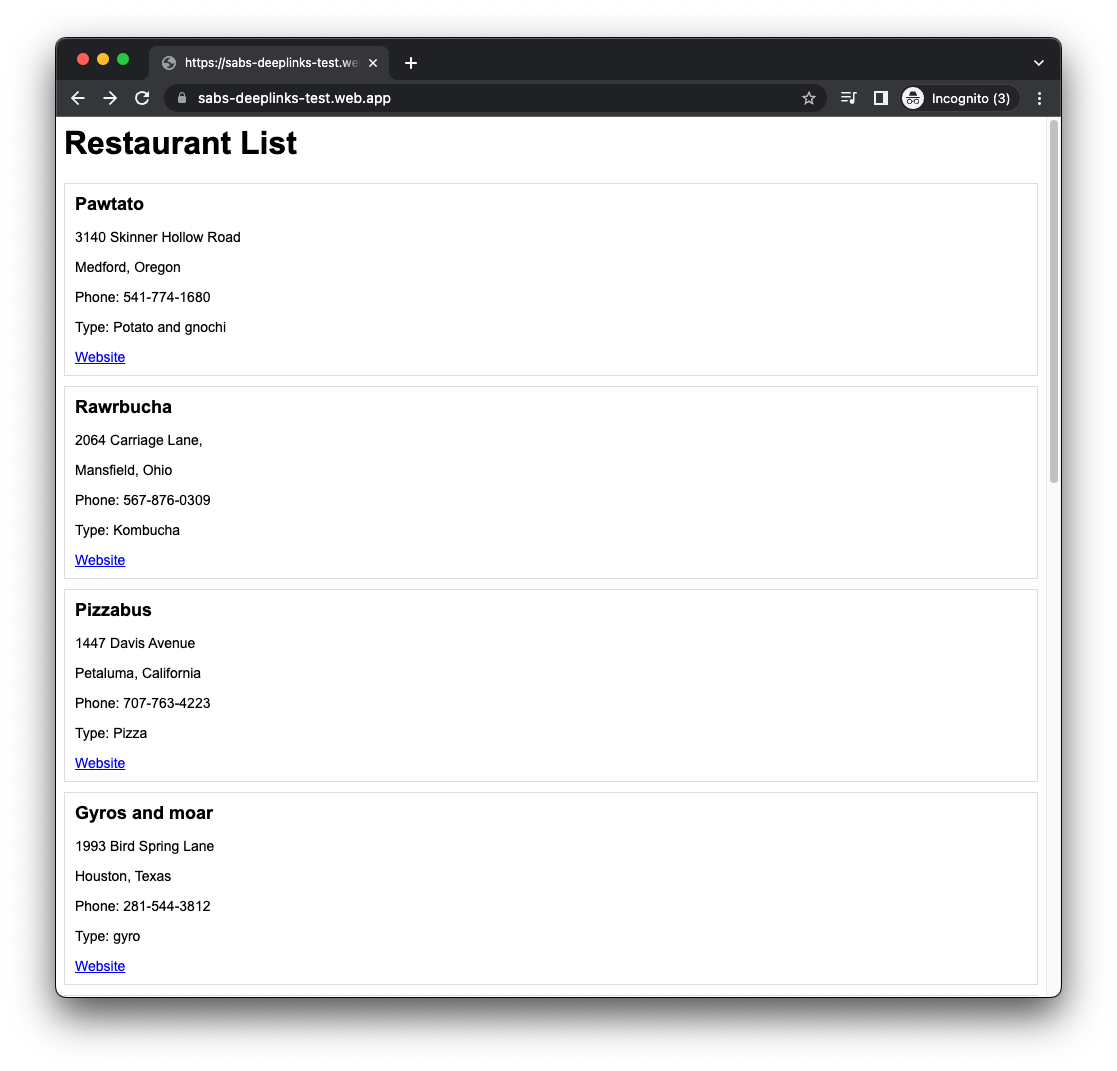
軟硬體需求
- Android Studio Dolphin (2021.3.1) 以上版本。
- 代管 Google Digital Asset Link (DAL) 檔案的網域 (選用:參閱這篇網誌文章,有助於快速完成準備作業)。
- 選用:Google Play 管理中心開發人員帳戶。這可讓您透過另一種方法對 Android 應用程式連結設定進行偵錯。
2. 設定代碼
建立空白的 Compose 應用程式
如要開始進行 Compose 專案,請按照下列步驟操作:
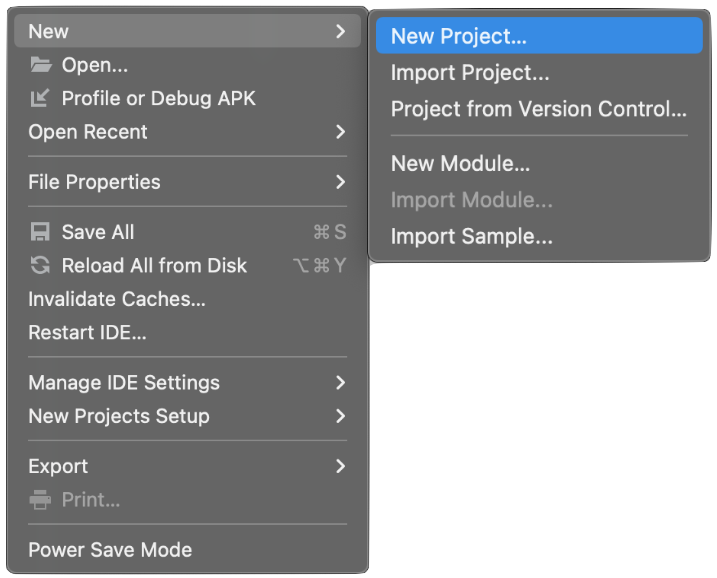
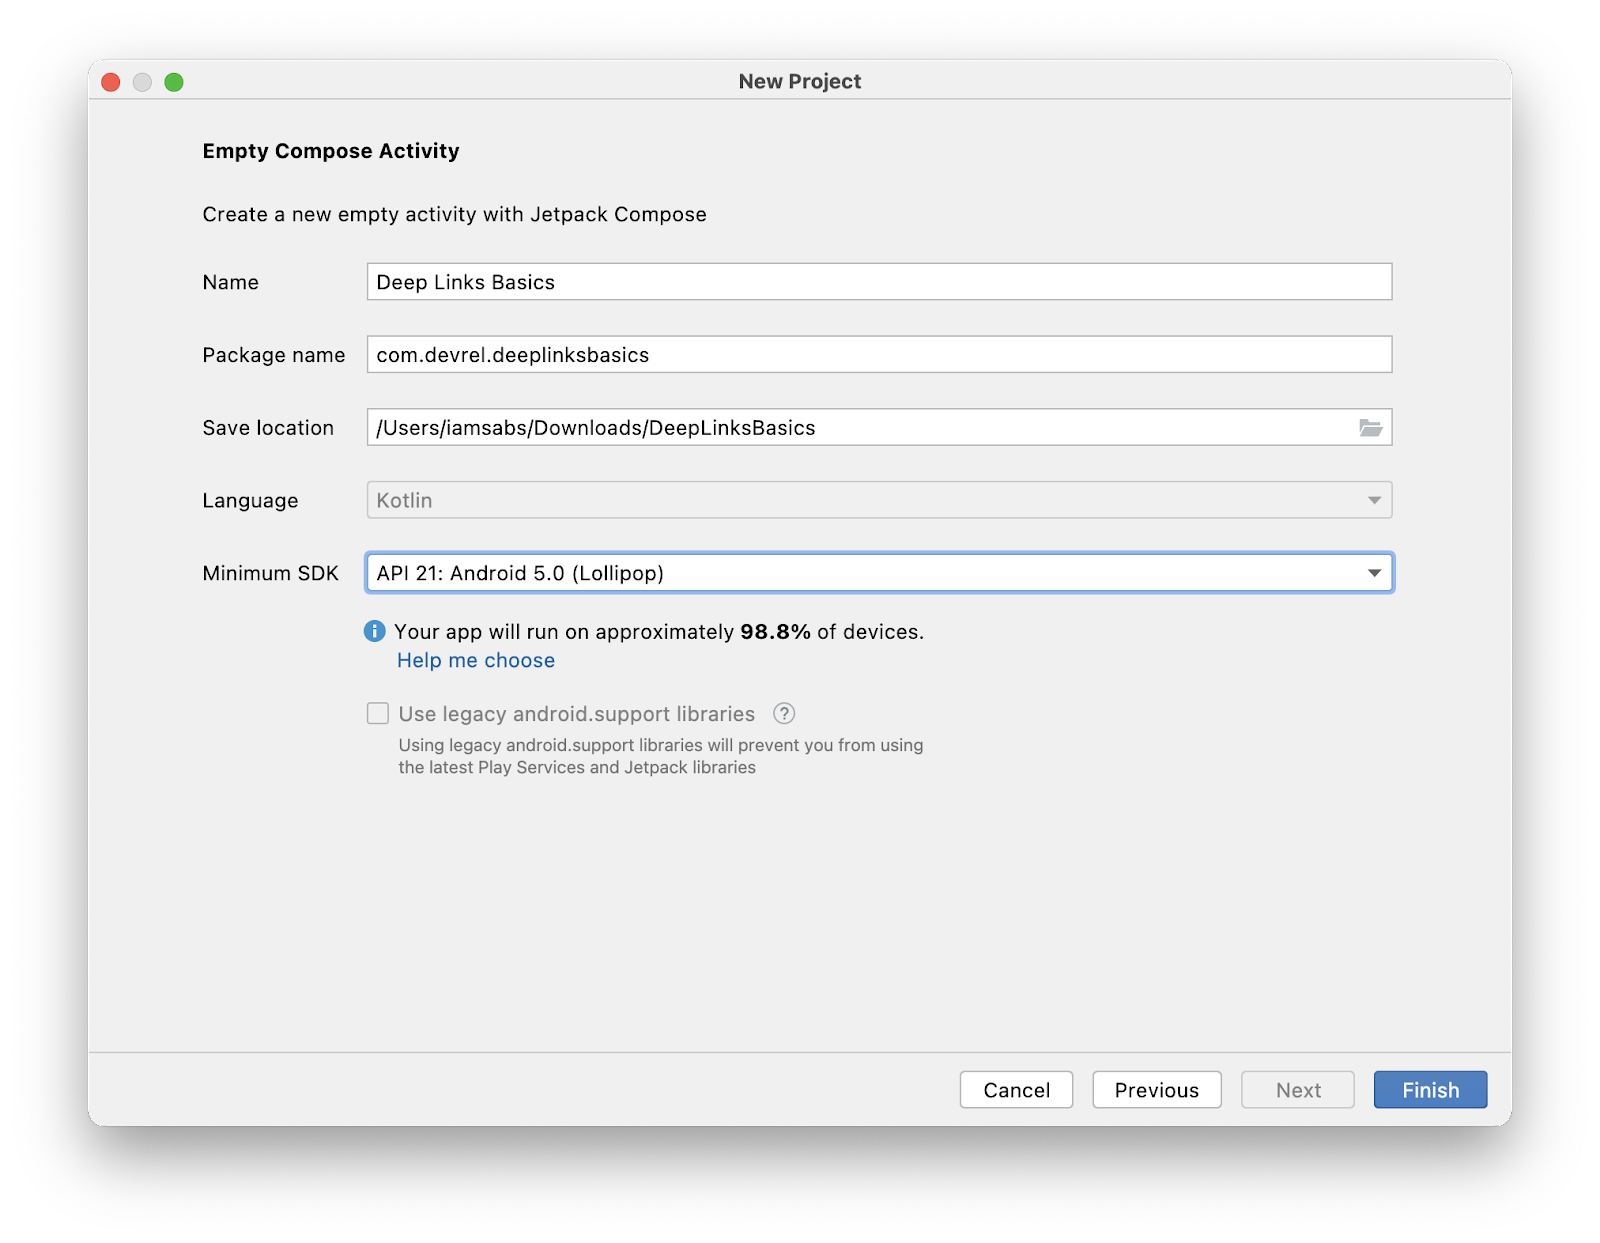
- 在 Android Studio 中,依序選取「File」>「New」>「New Project」。
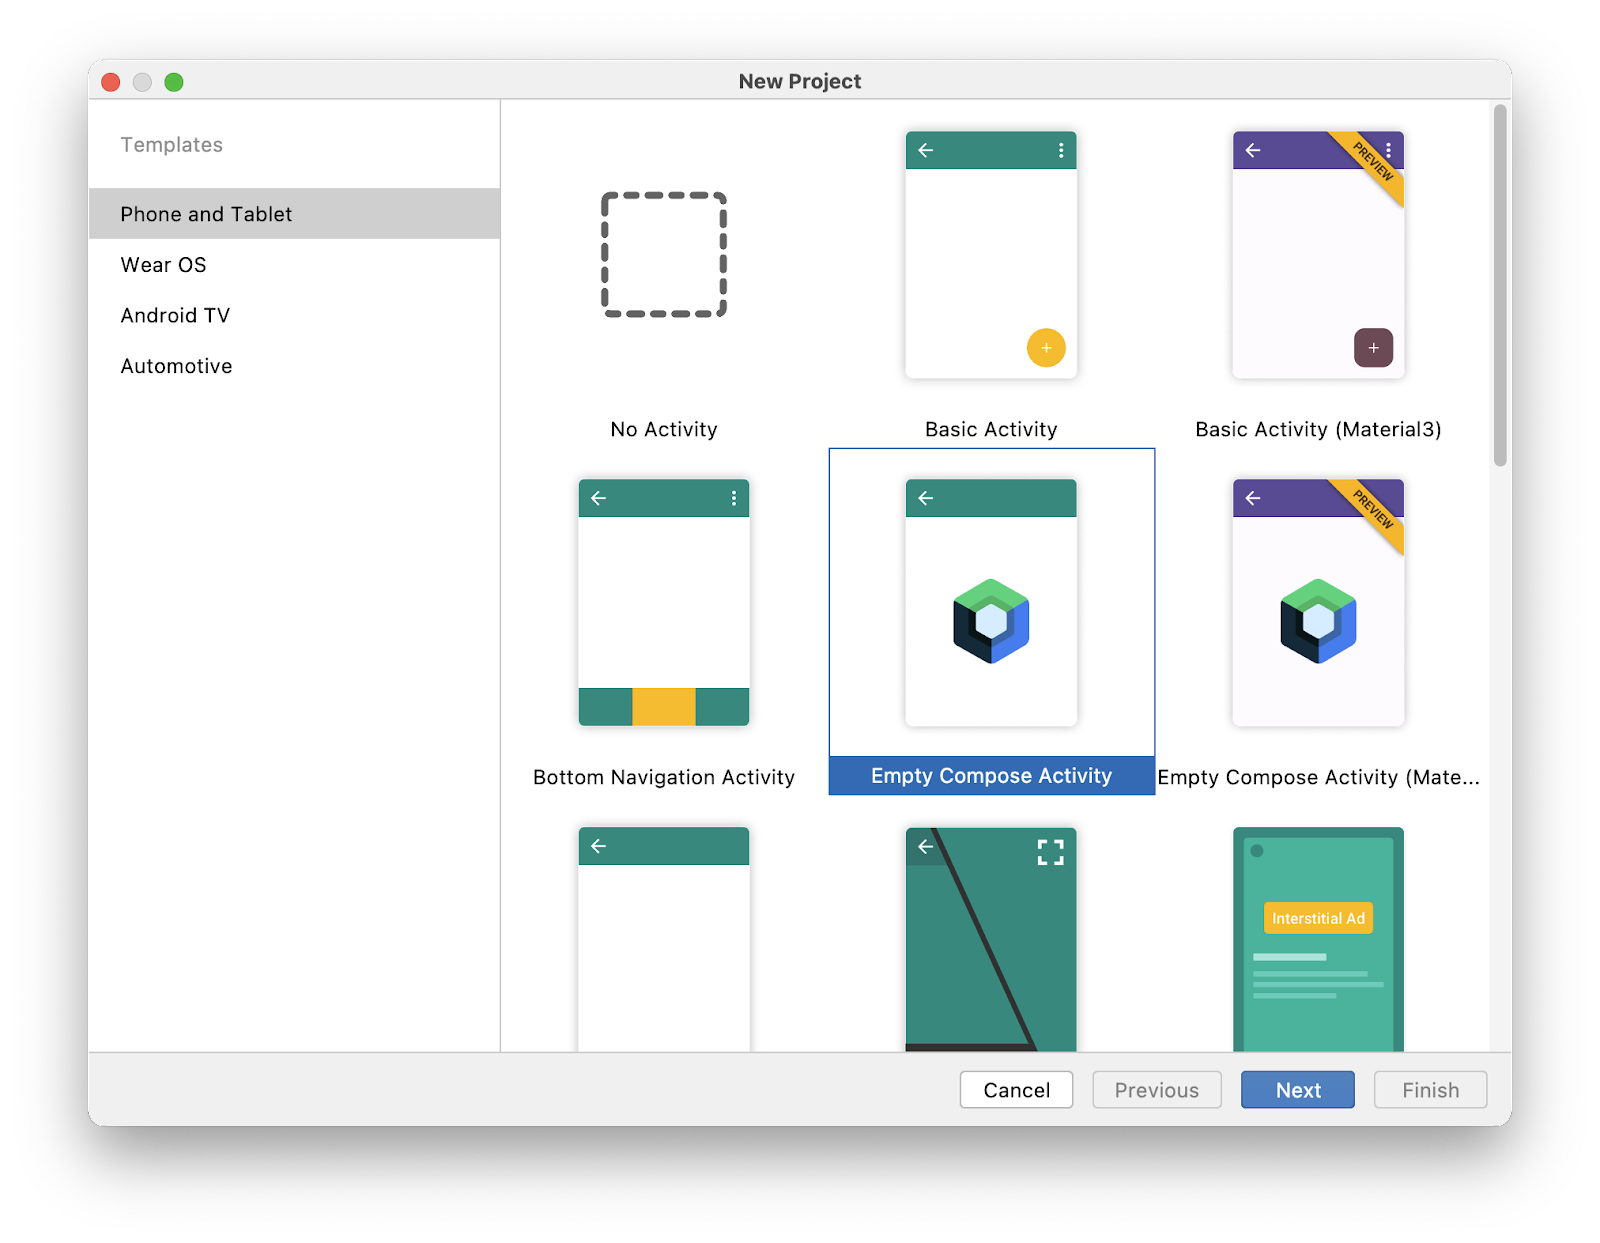
- 從可用的範本中選取「Empty Compose Activity」。
- 按一下「Next」,然後設定專案,並命名為「Deep Links Basics」。請務必為「Minimum SDK」選擇至少 API 級別 21 以上版本,也就是 Compose 支援的最低 API 版本。
- 按一下「Finish」,然後等待專案產生。
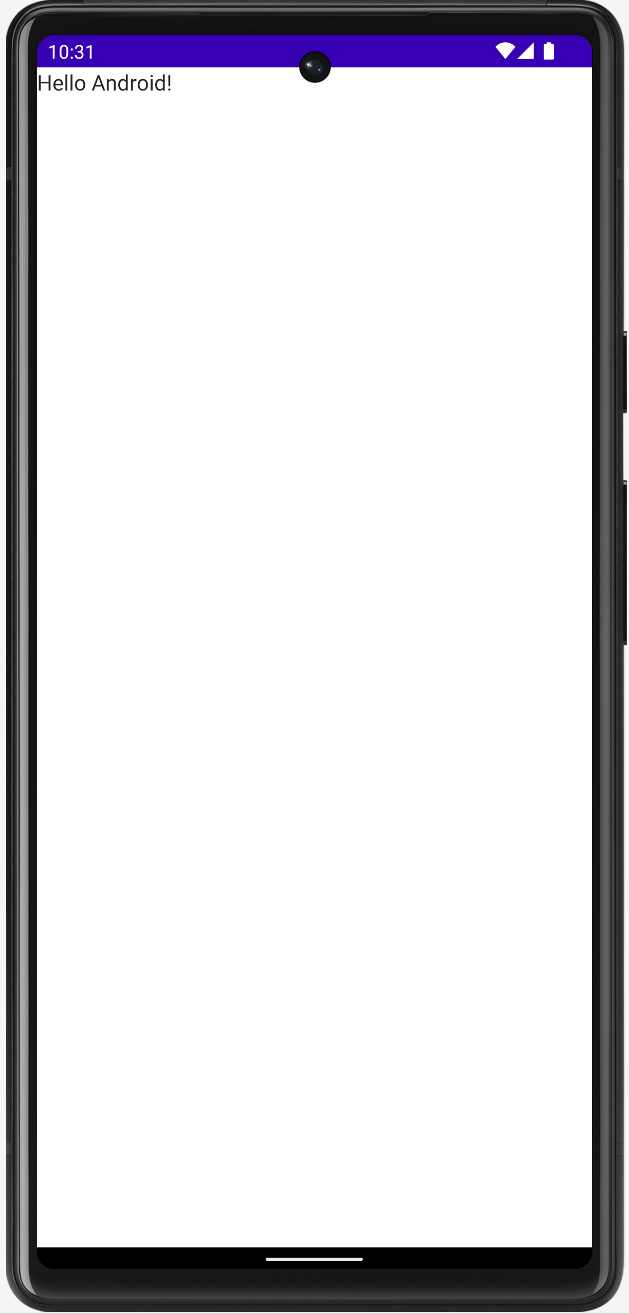
- 啟動應用程式。確保應用程式為執行狀態。系統應該會是空白畫面,其中顯示「Hello Android!」訊息。
本程式碼研究室的解決方案
您可以到 GitHub 取得本程式碼研究室的解決方案程式碼:
git clone https://github.com/android/deep-links
或者,您也可以將存放區下載為 ZIP 檔案:
首先,請前往 deep-links-introduction 目錄。您可以在「solution」目錄中找到該應用程式。建議您以自己的步調,按照程式碼研究室的說明逐步操作,並視需要查看解決方案。在本程式碼研究室的學習過程中,我們會為您提供要新增到專案的程式碼片段。
3. 檢查深層連結導向的網址設計
符合 REST 標準的 API 設計
連結是網頁開發中的重要部分,而連結設計則是透過無數次疊代產生的各種標準。建議您檢查並套用網頁開發連結設計標準,這麼做可讓連結更方便使用及維護。
其中一項標準為 REST (具象狀態傳輸),這是一種用於建構網路服務 API 的架構。開放式 API 是將 REST API 標準化的計畫。此外,您也可以使用 REST 設計深層連結的網址。
請注意,您並非在建構 Web 服務。本節只會著重說明網址設計。
設計網址
首先,檢查網站中產生的網址,瞭解這些網址在 Android 應用程式中代表的意義:
/restaurants會列出您管理的所有餐廳。/restaurants/:restaurantName會顯示單一餐廳的詳細資料。/restaurants/:restaurantName/orders會顯示餐廳的訂單。/restaurants/:restaurantName/orders/:orderNumber會顯示餐廳中的特定訂單。/restaurants/:restaurantName/orders/latest會顯示餐廳中的最新訂單。
網址設計的重要性
Android 的意圖篩選器會處理其他應用程式元件中的動作,也會用來擷取網址。定義用來擷取網址的意圖篩選器時,必須採用依賴路徑前置字串和簡易萬用字元的結構。以下範例說明餐廳網站上現有網址的組成結構:
https://example.com/pawtato-3140-Skinner-Hollow-Road
雖然這個網址指定您的應用程式及其位置,但在為 Android 定義意圖篩選器以取得網址時,該路徑可能會產生問題,因為應用程式是以不同的餐廳網址為基礎,如下所示:
https://example.com/rawrbucha-2064-carriage-lane
https://example.com/pizzabus-1447-davis-avenue
使用路徑和萬用字元定義意圖篩選器來擷取這些網址時,可以使用類似 https://example.com/* 的路徑,基本上也能正常運作。儘管如此,這項問題依然無法確實解決,因為網站的不同部分還有其他現有路徑,例如:
交件日期:https://example.com/deliveries
管理頁面:https://example.com/admin
您可能不想讓 Android 擷取這些網址,因為其中部分網址可能為內部網址,但定義的意圖篩選器 https://example.com/* 會擷取這些網址,包括不存在的網址。此外,當使用者點選其中一個網址時,系統可能會在瀏覽器 (Android 12 以上版本) 中開啟網址,或是顯示消歧對話方塊 (Android 12 以下版本)。在設計中這並非預期行為。
現在,Android 可使用路徑前置字串解決這個問題,但必須重新設計網址,從:
https://example.com/*
改為:
https://example.com/restaurants/*
新增階層式巢狀結構,可讓意圖篩選器明確定義,並且讓 Android 擷取您指定的網址。
網址設計最佳做法
以下是收集自公開式 API 的最佳做法,適用於深層連結:
- 將網址設計重點放在連結顯示的業務實體。舉例來說,電子商務實體的重點是「客戶」和「訂單」。旅遊實體的重點是「票券」和「航班」。在餐廳應用程式和網站中,您將使用「餐廳」和「訂單」。
- 大部分的 HTTP 方法 (GET、POST、DELETE 和 PUT) 都是動詞,說明發出的要求,但針對網址中的端點使用動詞會令人困惑。
- 如要描述集合,請使用實體的複數,例如
/restaurants/:restaurantName。這樣可讓網址更方便閱讀及維護。以下是每個 HTTP 方法的範例:
GET /restaurants/pawtato
POST /restaurants
DELETE /restaurants
PUT /restaurants/pawtato
每個網址都十分簡單易懂。請注意,本程式碼研究室不會說明網路服務 API 的設計,以及每個方法的作用。
- 使用邏輯巢狀結構將含有相關資訊的網址分組。舉例來說,其中一間餐廳的網址,可以包含正在處理中的訂單:
/restaurants/1/orders
4. 檢閱資料元素
AndroidManifest.xml 檔案是 Android 系統的重要部分,會將應用程式資訊提供給 Android 建構工具、Android 作業系統和 Google Play。
您必須使用 3 個主要標記,為深層連結定義意圖篩選器:<action>、<category> 和 <data>。本節的重點為 <data> 標記。
使用者點選連結後,<data> 元素會告知 Android 作業系統該連結的網址結構。您可以在意圖篩選器上使用的網址格式與結構如下:
<scheme>://<host>:<port>[<path>|<pathPrefix>|<pathPattern>|<pathAdvancedPattern>|<pathSuffix>]
Android 會讀取、剖析及合併意圖篩選器中的所有 <data> 元素,以反映屬性的所有變化版本。例如:
AndroidManifest.xml
<intent-filter>
  ...
  <data android:scheme="http" />
  <data android:scheme="https" />
  <data android:host="example.com" />
  <data android:path="/restaurants" />
  <data android:pathPrefix="/restaurants/orders" />
</intent-filter>
Android 會擷取下列網址:
http://example.com/restaurantshttps://example.com/restaurantshttp://example.com/restaurants/orders/*https://example.com/restaurants/orders/*
路徑屬性
path (適用於 API 1)
這項屬性會指定開頭為 /,且與意圖中「完整路徑」完全相符的完整路徑。舉例來說,android:path="/restaurants/pawtato" 只會比對 /restaurants/pawtato 網站路徑,如果路徑為 /restaurant/pawtato,則因為少了 s,系統會將這個網址視為不相符。
pathPrefix (適用於 API 1)
這項屬性會指定只與意圖路徑中「初始部分」相符的局部路徑。例如:
android:pathPrefix="/restaurants" 會比對餐廳路徑:/restaurants/pawtato 和 /restaurants/pizzabus 等。
pathSuffix (適用於 API 31)
這項屬性會指定與意圖中路徑的「結尾部分」完全相符的路徑。例如:
android:pathSuffix="tato" 會比對所有結尾為「tato」的餐廳路徑,例如 /restaurants/pawtato 和 /restaurants/corgtato。
pathPattern (適用於 API 1)
這個屬性會指定與意圖中「包含萬用字元的完整路徑」相符的完整路徑:
- 星號 (
*) 會比對前面的半形字元出現 0 次到多次的序列。 .*:半形句號後面加上星號,會比對 0 個以上字元的任何序列。
例如:
/restaurants/piz*abus:這個模式會比對「pizzabus」餐廳,但也會比對名稱中含有 0 個以上z字元的餐廳,例如/restaurants/pizzabus、/restaurants/pizzzabus和/restaurants/pizabus。/restaurants/.*:這個模式會比對所有包含/restaurants路徑的餐廳名稱 (例如/restaurants/pizzabus和/restaurants/pawtato),以及應用程式不知道的餐廳 (例如/restaurants/wateriehall)。
pathAdvancePattern (適用於 API 31)
這項屬性會指定完整路徑,且該路徑會與「具有類似規則運算式模式的完整路徑」相符:
- 句點 (
.) 會比對任何字元。 - 一組方括號 (
[...]) 會比對字元範圍。這個組合也支援非 (^) 修飾符。 - 星號 (
*) 會比對上述模式 0 次以上。 - 加號 (
+) 會比對上述模式 1 次以上。 - 大括號 (
{...}) 代表模式可比對的次數。
這個屬性可視為 pathPattern 的延伸。可讓系統更靈活選擇要比對哪些網址,例如:
/restaurants/[a-zA-Z]*/orders/[0-9]{3}會比對長度最多 3 位數的任何餐廳訂單。/restaurants/[a-zA-Z]*/orders/latest會比對應用程式中任何餐廳的最新訂單。
5. 建立深層連結和網頁連結
設有自訂配置的深層連結
設有自訂配置的深層連結是最常見的深層連結類型,最容易實作,但也有缺點。這類連結不能由網站開啟。不過,凡是在資訊清單中宣告支援該配置的應用程式,都可以開啟深層連結。
您可以對 <data> 元素使用任何配置。舉例來說,本程式碼研究室會使用 food://restaurants/keybabs 網址。
- 在 Android Studio 中,將下列意圖篩選器加入資訊清單檔案:
AndroidManifest.xml
<activity ... >
  <intent-filter>
    <action android:name="android.intent.action.VIEW"/>
    <category android:name="android.intent.category.BROWSABLE"/>
    <category android:name="android.intent.category.DEFAULT"/>
    <data android:scheme="food"/>
    <data android:path="/restaurants/keybabs"/>
  </intent-filter>
</activity>
- 如想確認應用程式能否開啟自訂配置的連結,請將以下內容新增至主要活動,在主畫面上顯示輸出內容:
MainActivity.kt
class MainActivity : ComponentActivity() {
    override fun onCreate(savedInstanceState: Bundle?) {
        super.onCreate(savedInstanceState)

        // Receive the intent action and data
        val action: String? = intent?.action;
        val data: Uri? = intent?.data;

        setContent {
            DeepLinksBasicsTheme {
                Surface(
                    modifier = Modifier.fillMaxSize(),
                    color = MaterialTheme.colors.background
                ) {
                    // Add a Column to print a message per line
                    Column {
                        // Print it on the home screen
                        Greeting("Android")
                        Text(text = "Action: $action")
                        Text(text = "Data: $data")
                    }
                }
            }
        }
    }
}
- 如要測試收到的意圖,請搭配下列指令使用 Android Debug Bridge (ADB):
adb shell am start -W -a android.intent.action.VIEW -d "food://restaurants/keybabs"
這個指令會透過 VIEW 動作啟動意圖,並使用您提供的網址做為資料。執行這個指令時,應用程式會啟動並接收意圖。請留意主畫面中文字部分的異動。第一行顯示「Hello Android!」訊息,第二行顯示意圖呼叫的動作,第三個動作則顯示意圖呼叫的網址。
請注意,在下圖中,Android Studio 底部的訊息提到 adb 指令已執行。在畫面右側,應用程式主畫面會顯示意圖資訊,表示已收到意圖。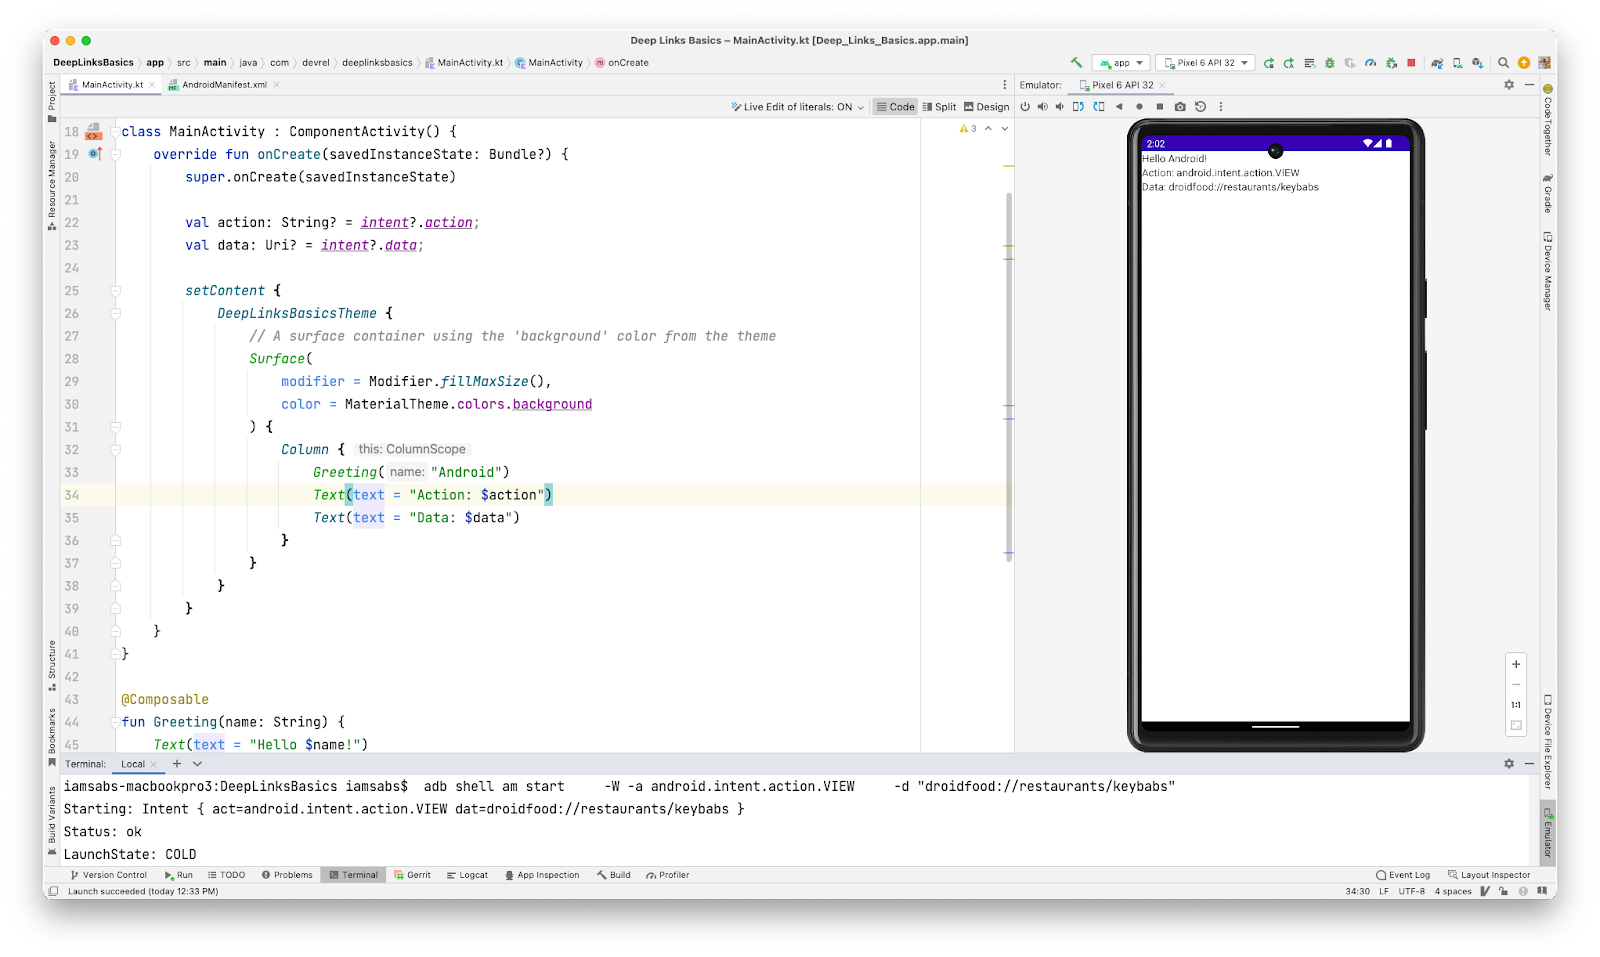
網頁連結
網頁連結是使用 http 和 https 的深層連結,而不是自訂配置。
實作網頁連結時,請使用 /restaurants/keybabs/order/latest.html 路徑,代表餐廳收到的最新訂單。
- 使用現有的意圖篩選器調整資訊清單檔案。
AndroidManifest.xml
<intent-filter>
  <action android:name="android.intent.action.VIEW"/>
  <category android:name="android.intent.category.BROWSABLE"/>
  <category android:name="android.intent.category.DEFAULT"/>
  <data android:scheme="food"/>
  <data android:path="/restaurants/keybabs"/>

  <!-- Web link configuration -->
  <data android:scheme="http"/>
  <data android:scheme="https"/>
  <data android:host="sabs-deeplinks-test.web.app"/>
  <data android:path="/restaurants/keybabs/order/latest.html"/>
</intent-filter>
由於這兩個路徑都已共用 (/restaurants/keybabs),建議將路徑置於相同的意圖篩選器底下,這樣子更容易實作,也更方便讀取資訊清單檔案。
- 測試網頁連結前,請重新啟動應用程式以套用新的變更。
- 使用相同的 ADB 指令啟動意圖,但本範例中我們會更新網址。
adb shell am start -W -a android.intent.action.VIEW -d "https://sabs-deeplinks-test.web.app/restaurants/keybabs/orders/latest.html"
請注意,在螢幕截圖中,系統已收到意圖,且網路瀏覽器已開啟並顯示網站,此為 Android 12 以上版本的功能。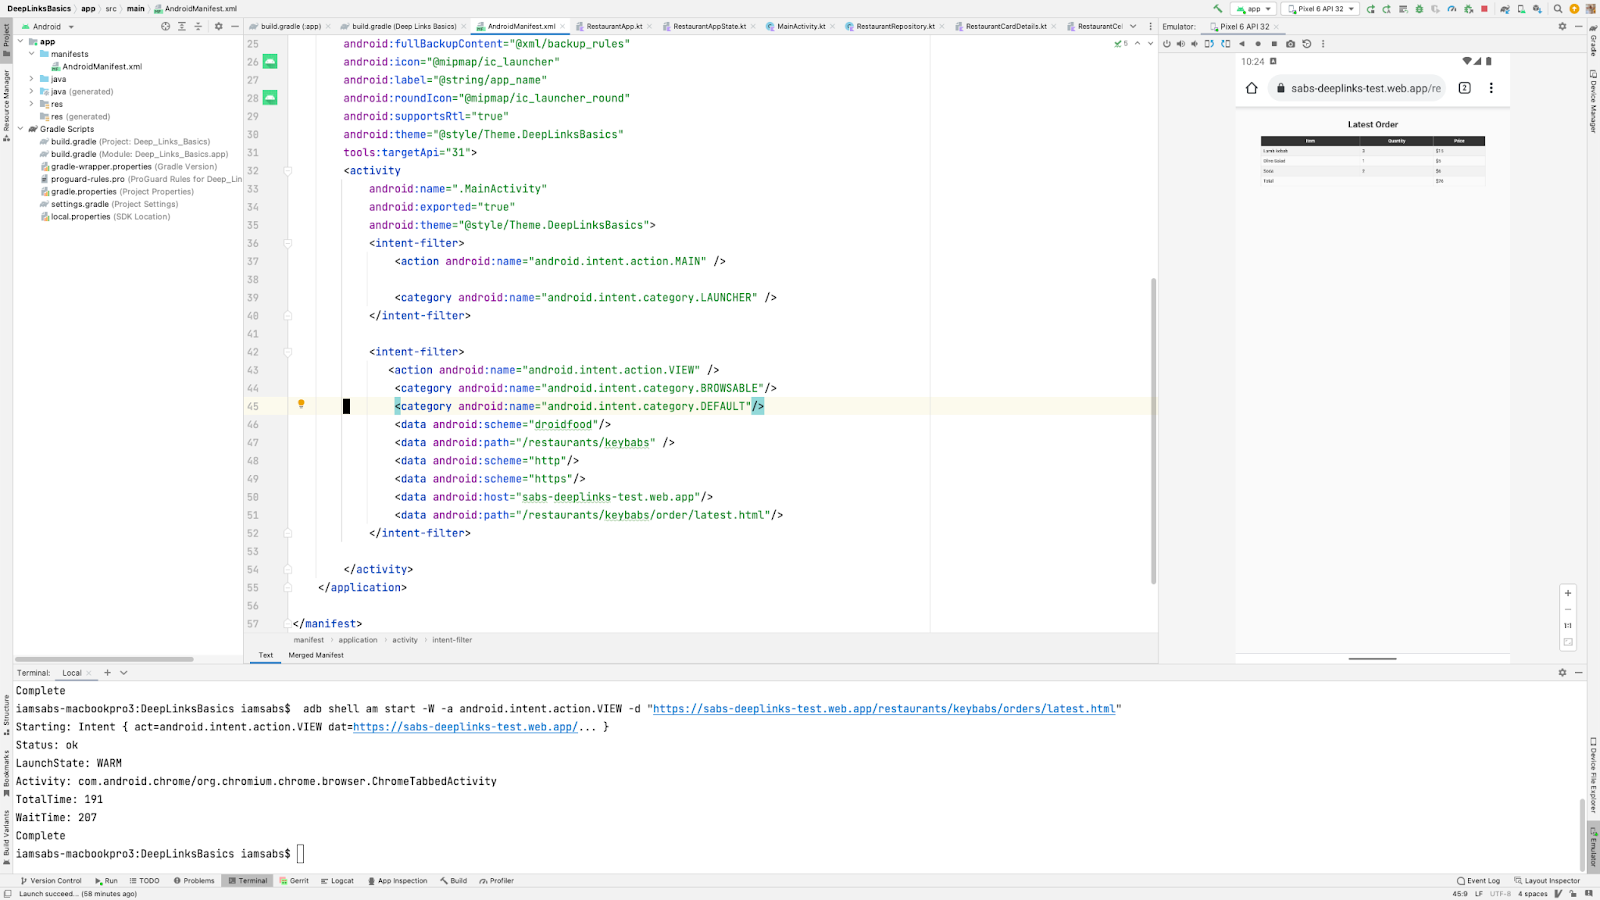
6. 設定 Android 應用程式連結
這些連結能提供最流暢的使用者體驗,因為使用者點選連結後,一定會直接前往應用程式,不會顯示消歧對話方塊。Android 應用程式連結是在 Android 6.0 版中實作,也是最具體的深層連結類型。這類連結是使用 http/https 配置和 android:autoVerify 屬性的網頁連結,讓應用程式成為所有相符連結的預設處理常式。實作 Android 應用程式連結的主要步驟有兩種:
- 使用合適的意圖篩選器更新資訊清單檔案。
- 新增網站關聯以進行驗證。
更新資訊清單檔案
- 如要支援 Android 應用程式連結,請在資訊清單檔案中將舊設定替換成以下內容:
AndroidManifest.xml
<!-- Replace deep link and web link configuration with this -->
<!-- Please update the host with your own domain -->
<intent-filter android:autoVerify="true">
  <action android:name="android.intent.action.VIEW"/>
  <category android:name="android.intent.category.BROWSABLE"/>
  <category android:name="android.intent.category.DEFAULT"/>
  <data android:scheme="https"/>
  <data android:host="example.com"/>
  <data android:pathPrefix="/restaurants"/>
</intent-filter>
此意圖篩選器會新增 android:autoVerify 屬性並將其設為「是」。這樣的話,Android 作業系統就能在應用程式安裝時和每次更新時驗證網域。
網站關聯
如要驗證 Android 應用程式連結,請在應用程式和網站之間建立關聯。您必須在網站上發布 Google Digital Asset Links (DAL) JSON 檔案,才能進行驗證。
Google DAL 是一種通訊協定和 API,定義其他應用程式和網站的可驗證陳述式。在本程式碼研究室中,您將在 assetlinks.json 檔案中建立關於 Android 應用程式的陳述式。範例如下:
assetlinks.json
[{
  "relation": ["delegate_permission/common.handle_all_urls"],
  "target": {
    "namespace": "android_app",
    "package_name": "com.devrel.deeplinksbasics",
    "sha256_cert_fingerprints":
   ["B0:4E:29:05:4E:AB:44:C6:9A:CB:D5:89:A3:A8:1C:FF:09:6B:45:00:C5:FD:D1:3E:3E:12:C5:F3:FB:BD:BA:D3"]
  }
}]
這個檔案可以儲存陳述式清單,但此範例只會顯示一個項目。每個陳述式都必須包含下列欄位:
- Relation。說明系統宣告與目標相關的一或多個關係。
- Target。這個陳述式適用的資產。可能是一或兩種可用目標:
web或android_app。
Android 陳述式的 target 屬性包含下列欄位:
namespace:所有 Android 應用程式的android_app。package_name:完整套件名稱 (com.devrel.deeplinksbasics)。sha256_cert_fingerprints:應用程式憑證的指紋。下一節將說明如何產生這個憑證。
憑證指紋
有多種方法可取得憑證指紋。本程式碼研究室會採用兩種做法,一種用於應用程式偵錯版本,另一種則用於協助將應用程式發布到 Google Play 商店。
偵錯設定
Android Studio 首次執行專案時,會自動使用偵錯憑證簽署應用程式。這個憑證的位置是 $HOME/.android/debug.keystore。您可以使用 Gradle 指令取得這個 SHA-256 憑證指紋,步驟如下:
- 按兩下
Control,畫面上應該會顯示「Run anything」選單。如未顯示,可以在右側欄的 Gradle 選單中找到該選單,接著點選 Gradle 圖示。

- 輸入
gradle signingReport,然後按下Enter鍵。這個指令會在控制台中執行,並顯示偵錯應用程式變化版本的指紋資訊。

- 如要完成網站關聯,請複製 SHA-256 憑證指紋、更新 JSON 檔案,然後將檔案上傳到位於
https://<domain>/.well-know/assetlinks.json的網站。這篇「Android 應用程式連結」網誌文章可協助您進行設定。 - 如果應用程式仍在執行中,按下「Stop」即可停止應用程式。
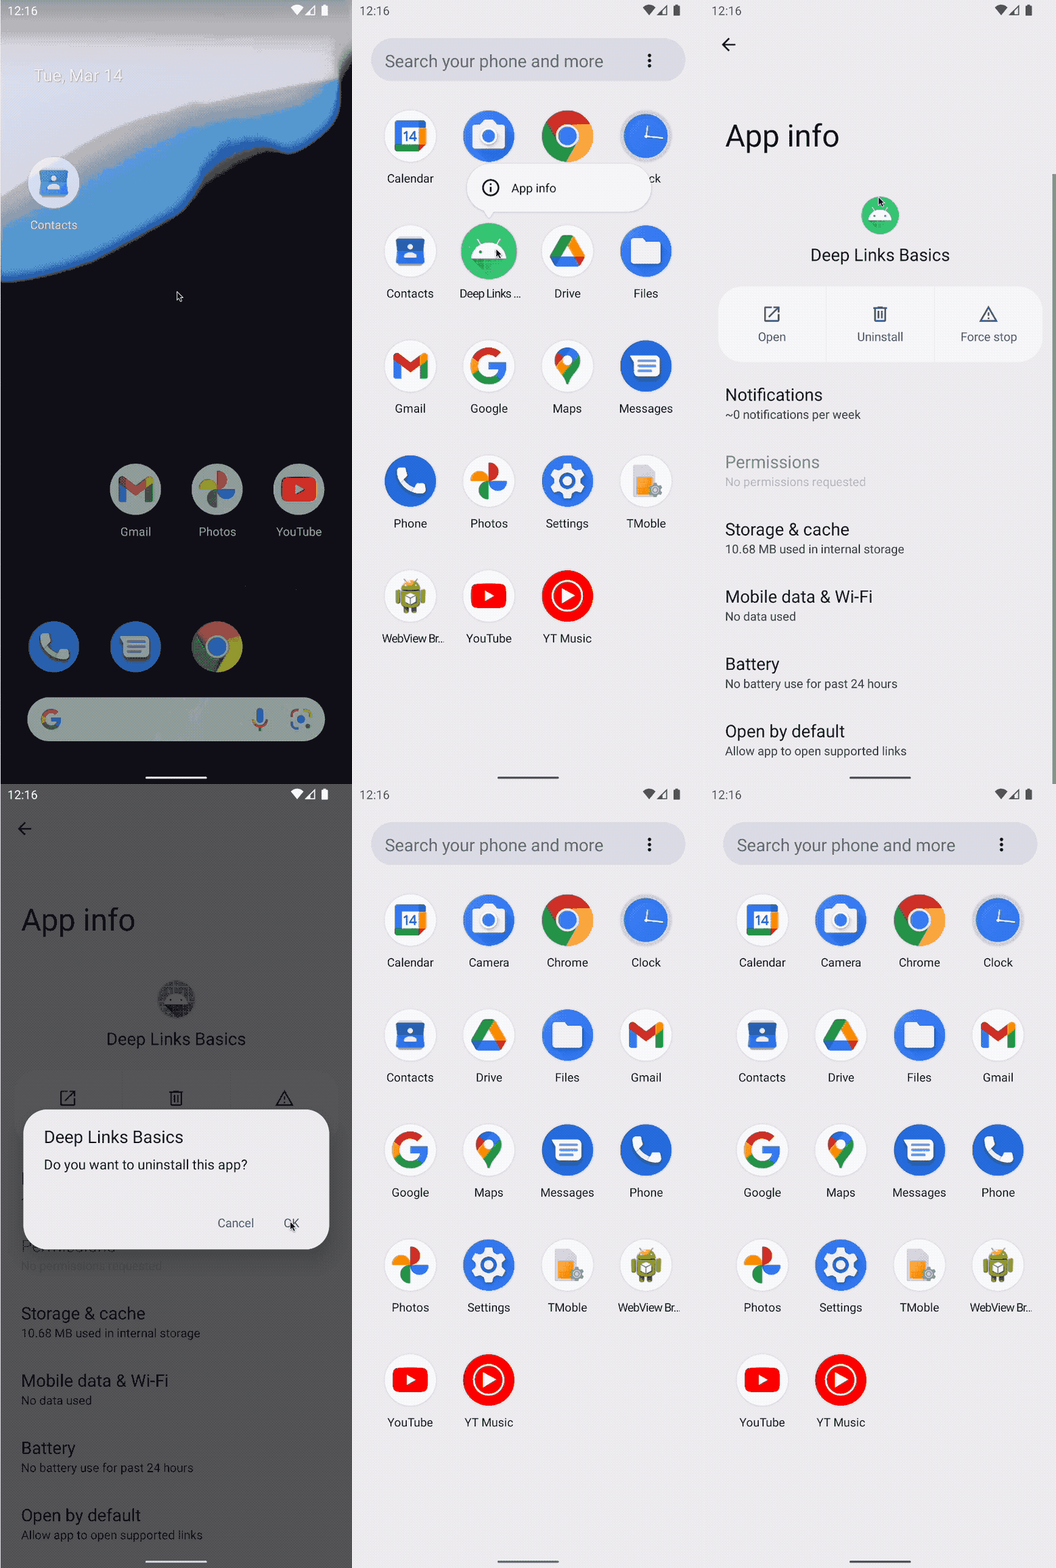
- 如要重新啟動驗證程序,請將應用程式從模擬器中移除。在模擬器上點選並按住「DeepLinksBasics」應用程式圖示,然後選取「App Info」。在互動視窗中依序點選「Uninstall」和「Confirm」。接著執行應用程式,以便 Android Studio 驗證關聯。
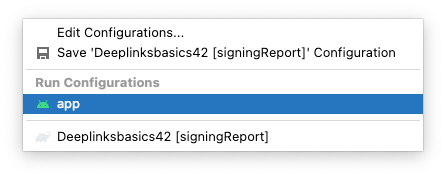
- 請確認您已選取「app」執行設定。否則 Gradle 簽署報告會再次執行。
- 重新啟動應用程式,然後啟動含有 Android 應用程式連結網址的意圖:
adb shell am start -W -a android.intent.action.VIEW -d "https://sabs-deeplinks-test.web.app/restaurants/"
- 請注意,應用程式會啟動,而意圖會顯示在主畫面上。
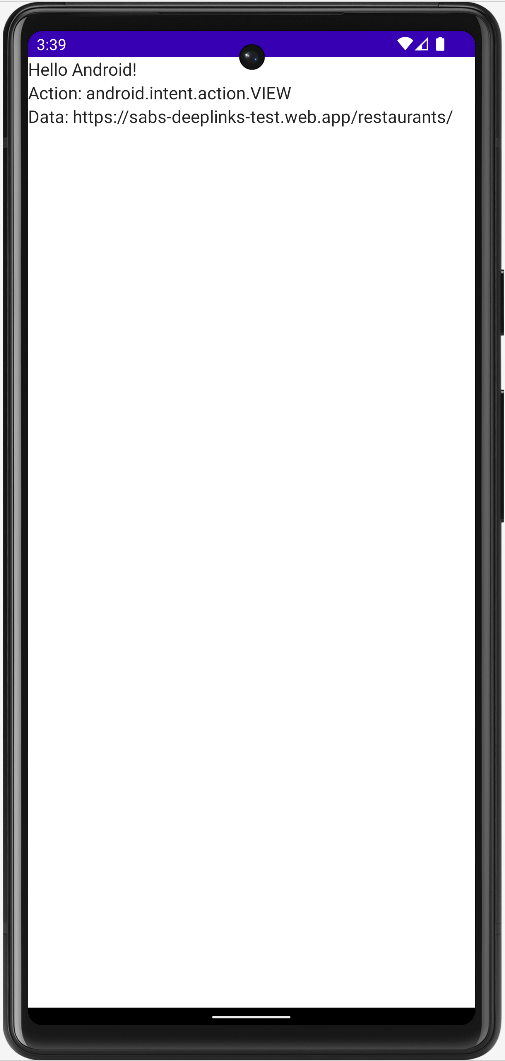
恭喜!您剛剛建立了第一個 Android 應用程式連結!
版本設定
現在,為了能夠將含有 Android 應用程式連結的應用程式上傳到 Play 商店,您必須使用包含合適憑證指紋的發布子版本。如要產生並上傳該版本,請按照下列步驟操作:
- 在 Android Studio 主選單中,依序按一下「Build」>「Generate Signed Bundle/APK」。
- 在下一個對話方塊中,針對 Play 應用程式簽署功能選取「Android App Bundle」;如要直接部署至裝置,請選取「APK」。
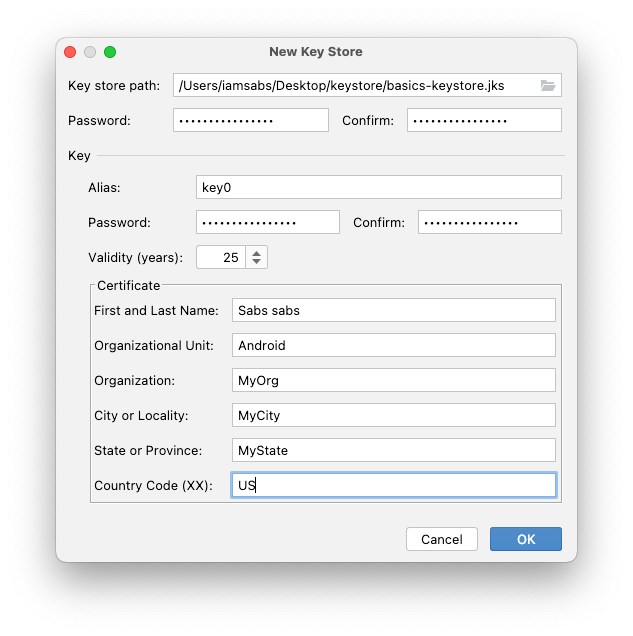
- 在下一個對話方塊中,按一下「Key store path」下方的「Create new」。系統會開啟新提示視窗。
- 為您的 KeyStore 選取路徑,然後將其命名為
basics-keystore.jks。 - 為 Keystore 建立密碼並輸入確認密碼。
- 將「Key」部分的「Alias」欄位保留預設值。
- 請確定輸入的密碼和確認密碼與 Keystore 中的密碼相同。兩者「必須」相符。
- 填寫「Certificate」資訊,然後按一下「OK」。
- 確認已針對 Play 應用程式簽署功能勾選匯出加密金鑰的選項,然後點選「Next」。
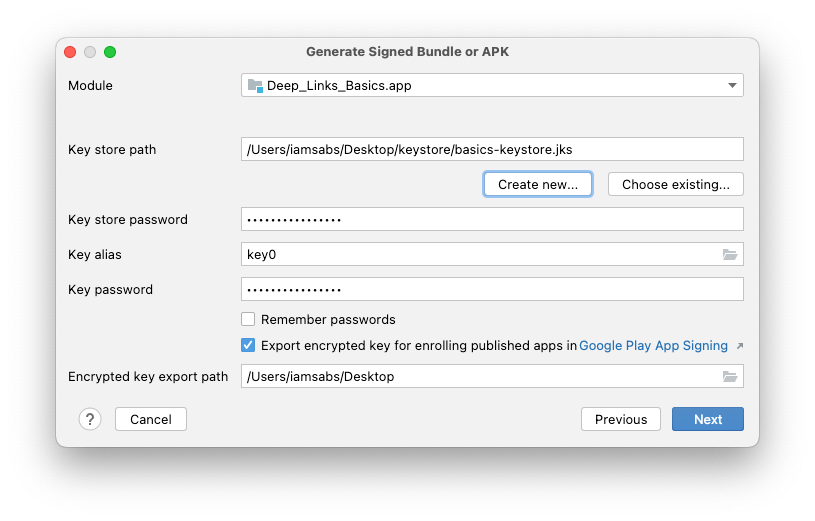
- 在這個對話方塊中,選取發布版建構變數,然後按一下「Finish」。您現在可以將應用程式上傳至 Google Play 商店,並使用 Play 應用程式簽署功能。
Play 應用程式簽署
只要使用 Play 應用程式簽署功能,Google 就能協助您管理及保護應用程式的簽署金鑰。您只需上傳在先前步驟中完成的已簽署應用程式套件即可。
如要擷取 assetlinks.json 檔案的憑證指紋,並在發布的變化版本中提供 Android 應用程式連結,請按照下列步驟操作:
- 在 Google Play 管理中心按一下「Create app」。
- 輸入「Deep Links Basics」做為應用程式名稱。
- 後續兩個選項請選取「App」和「Free」。
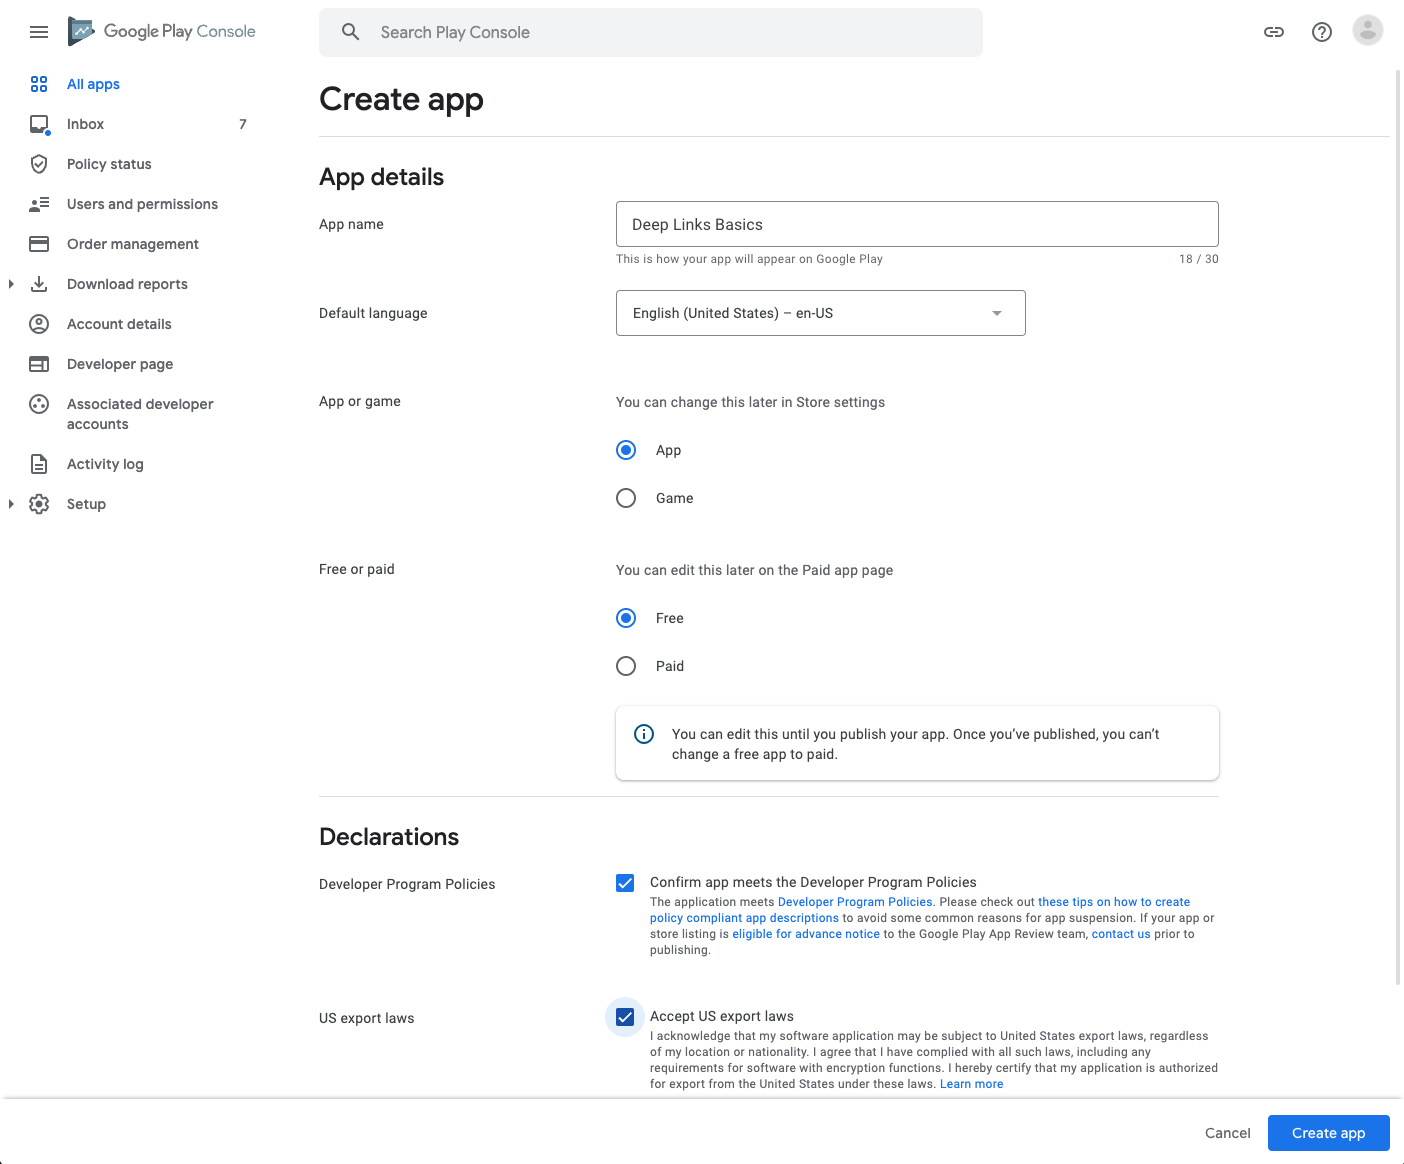
- 接受「聲明」,然後按一下「Create app」。
- 如要上傳套件並測試 Android 應用程式連結,請在左選單中依序選取「Testing」>「internal testing」。
- 按一下「Create new release」。
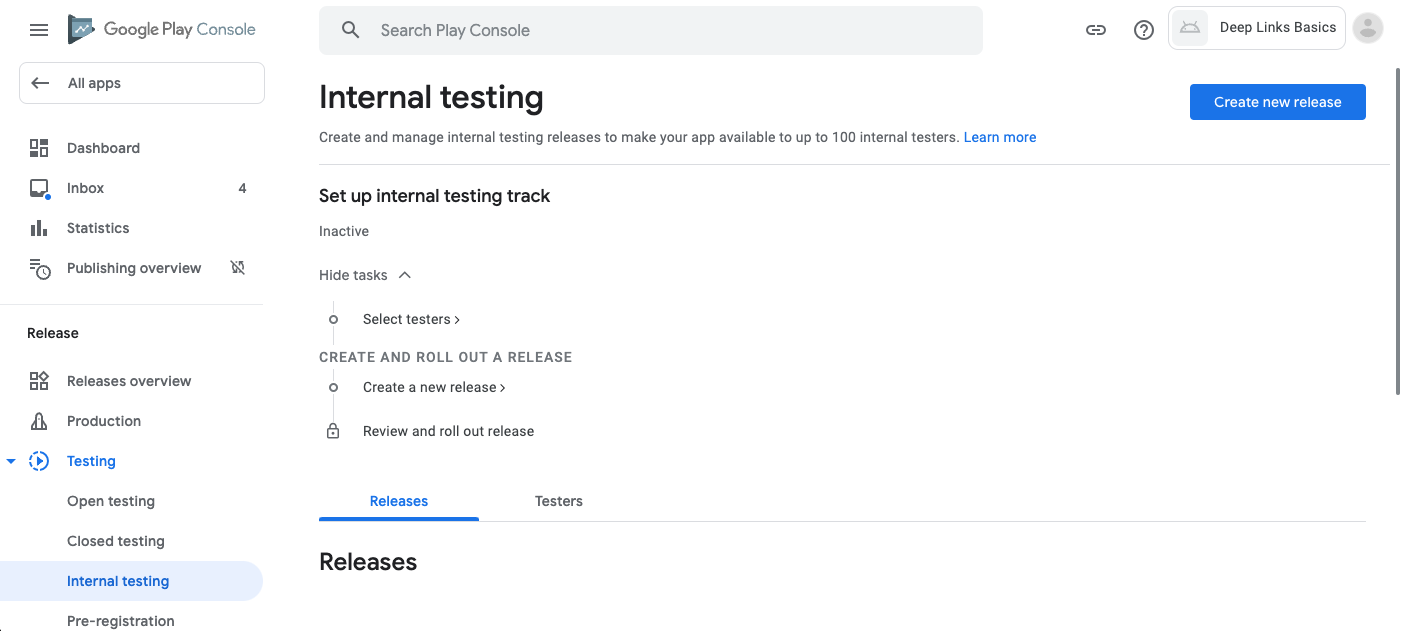
- 在下一個畫面中,按一下「Upload」,然後選取在上一節步驟中產生的套件。您可以依序前往「DeepLinksBascis」>「app」>「release」找到
app-release.aab檔案。按一下「Open」,然後等待套件上傳完畢。 - 上傳後,請先將其餘欄位保留預設值。按一下「Save」。
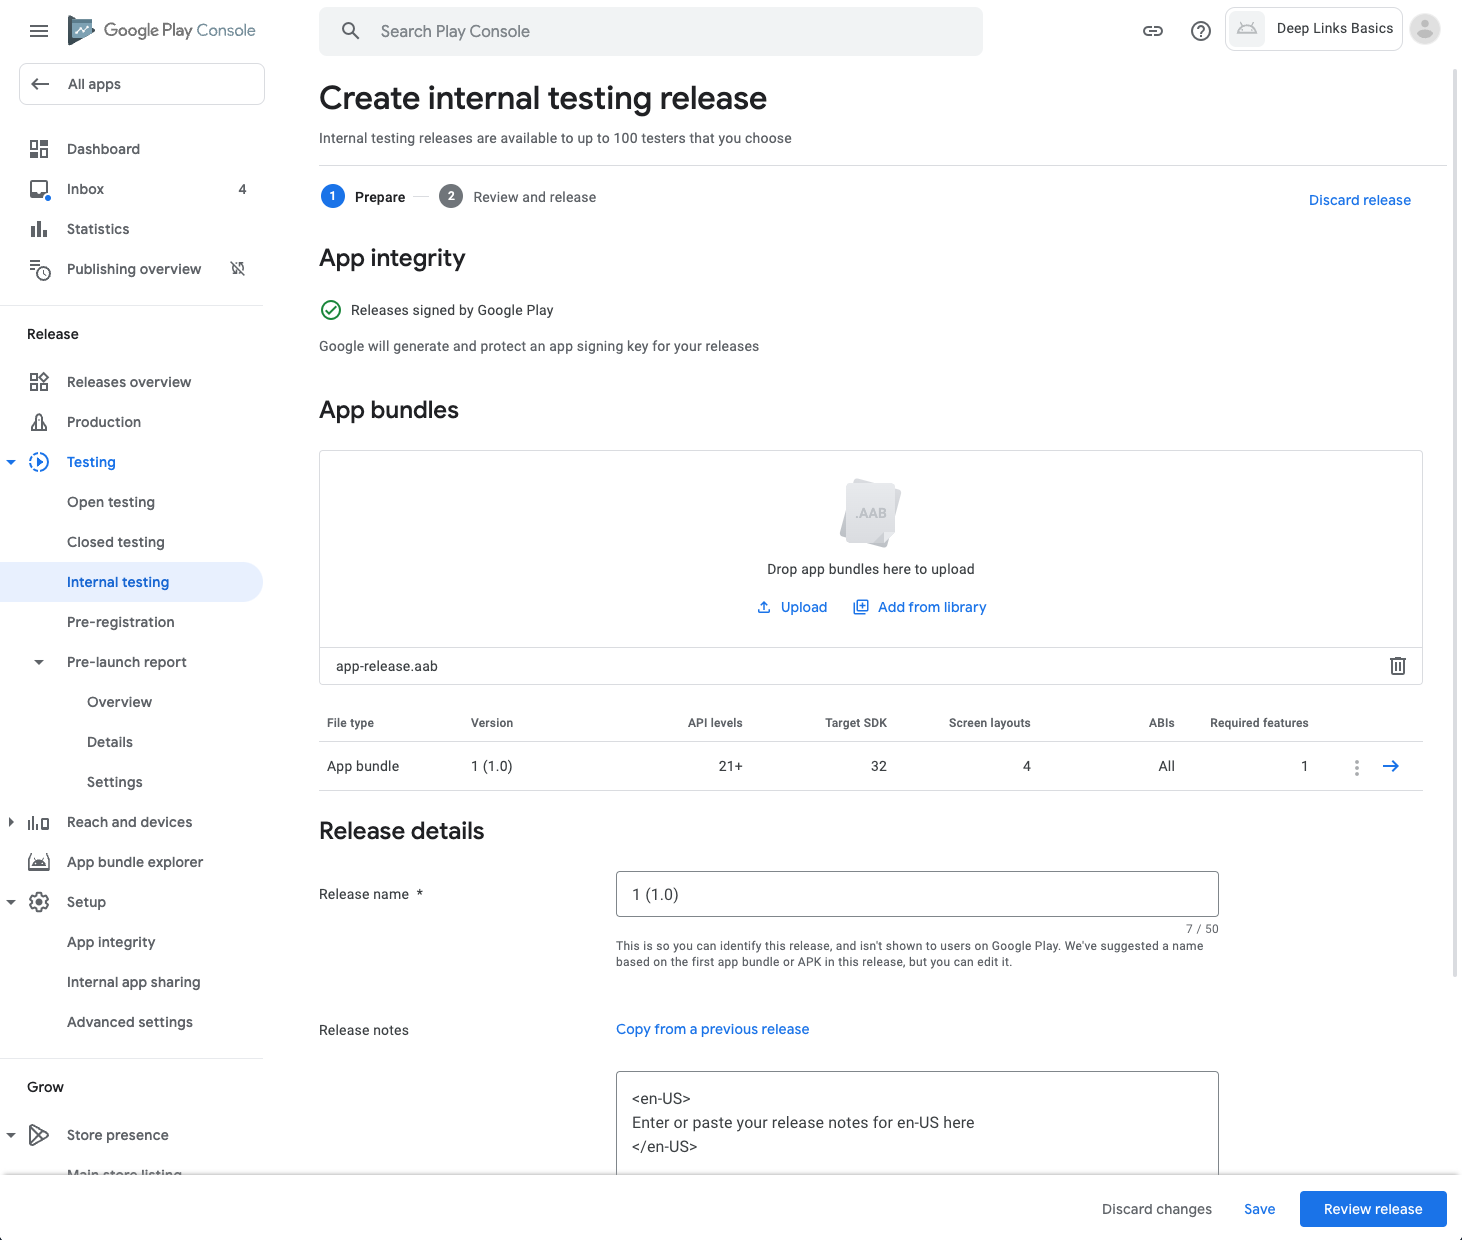
- 為了進行下一節的準備,請點選「Review release」,然後在下一個畫面中點選「Start rollout to Internal testing」。忽略警告,因為發布至 Play 商店不屬於本程式碼研究室的課程範圍。
- 在互動視窗中按一下「Rollout」。
- 如要取得 Play 應用程式簽署功能建立的 SHA-256 憑證指紋,請前往左選單中的「Deep links」分頁,然後查看「深層連結」資訊主頁。
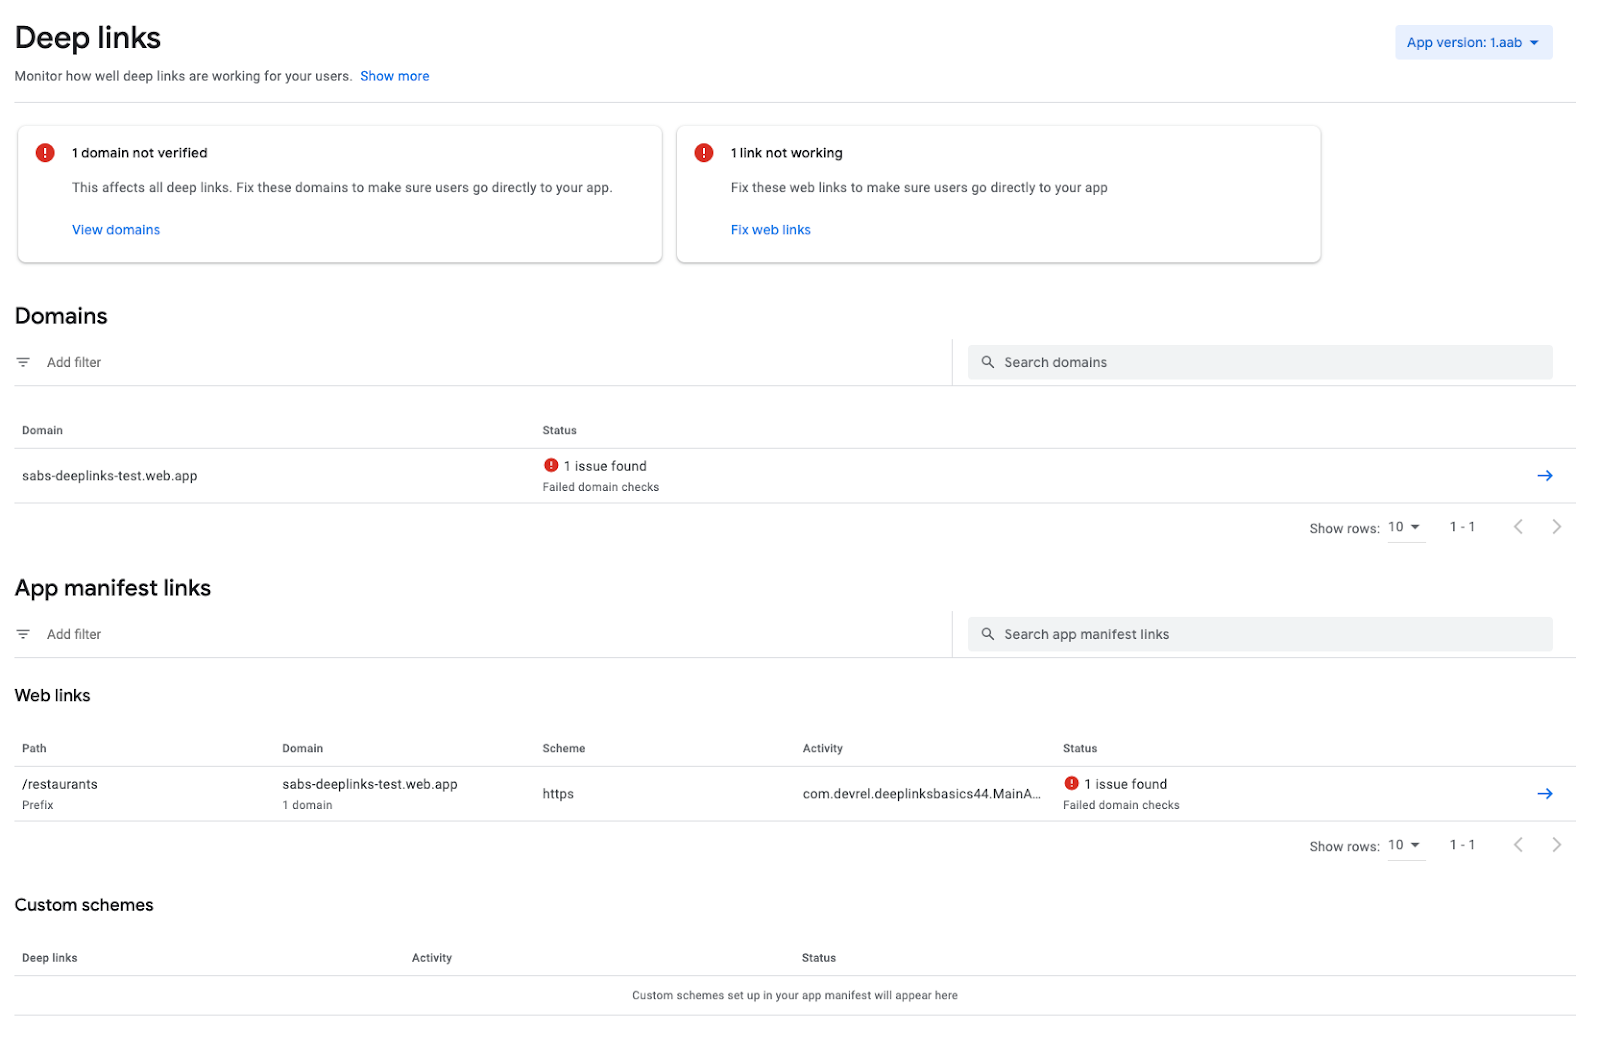
- 在「Domains」部分,按一下網站的網域。請注意,Google Play 管理中心提到您尚未驗證應用程式的網域 (網域關聯)。
- 在「Fix Domain Issues」部分下方,按一下「Show More」箭頭。
- 在這個畫面中,Google Play 管理中心說明如何更新包含憑證指紋的
assetlinks.json檔案。複製程式碼片段並更新assetlinks.json檔案。
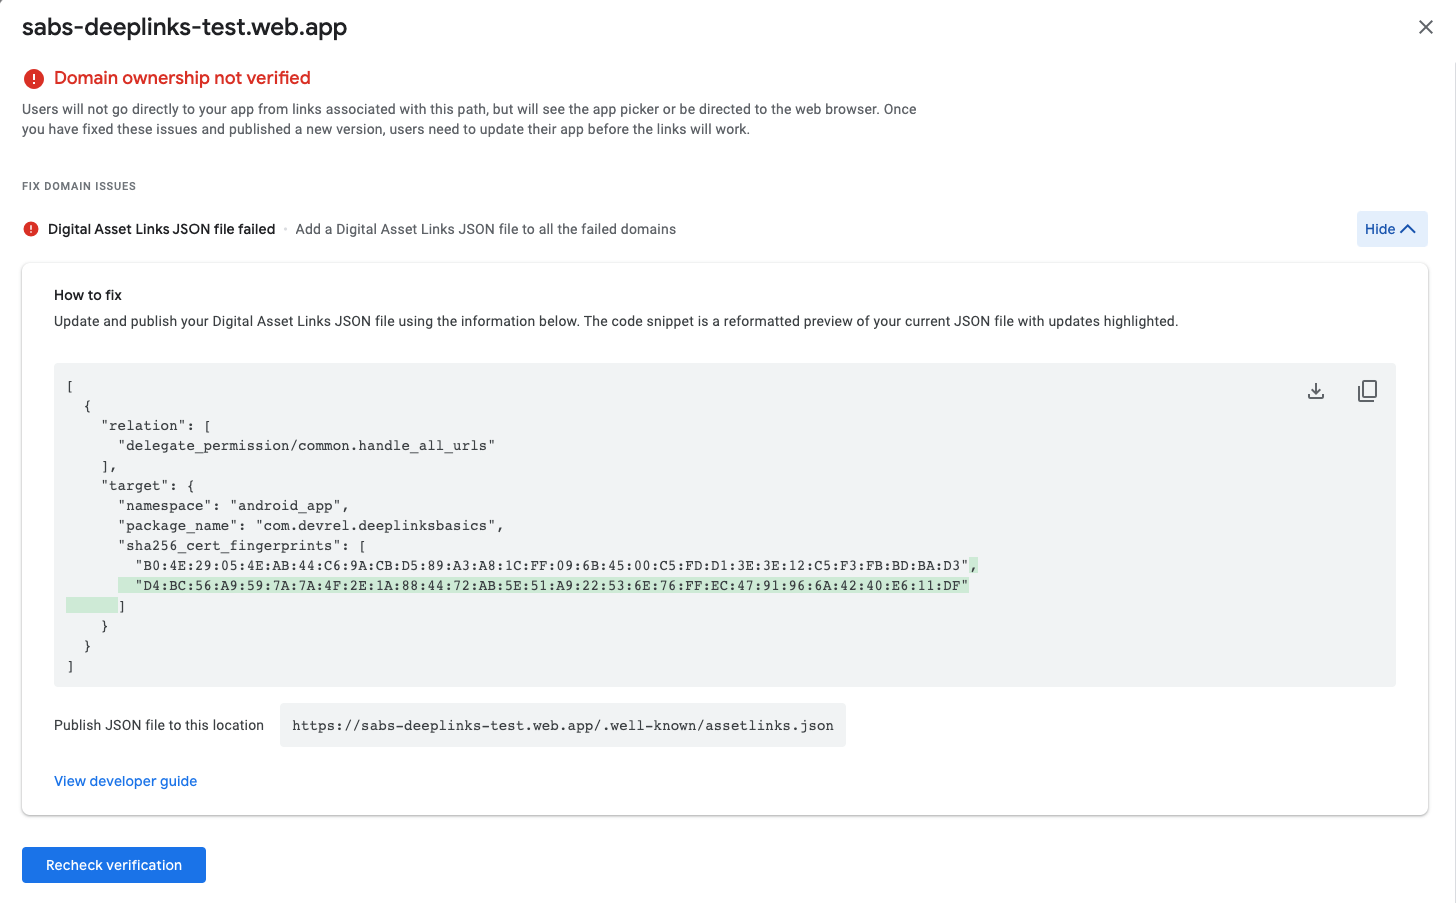
- 更新
assetlinks.json檔案後,請按一下「Recheck verification」。如果尚未通過驗證,驗證服務最多需要五分鐘的時間,才會偵測到新的變更。 - 重新載入「Deep links」資訊主頁後,畫面就不會再顯示驗證錯誤。
驗證已上傳的應用程式
您已經瞭解如何驗證位於模擬器上的應用程式。現在,您要驗證已上傳至 Play 商店的應用程式。
如要在模擬器上安裝應用程式,並確保 Android 應用程式連結已通過驗證,請按照下列步驟操作:
- 按一下左側欄中的「Releases Overview」,然後選取您剛才上傳的最新版本,這個版本應為 1 (1.0) 版。
- 按一下「Release details」(右側藍色箭頭),即可查看發布詳細資料。
- 按一下相同的藍色箭頭按鈕,即可取得應用程式套件資訊。
- 在這個互動視窗中,點選「Downloads」分頁標籤,然後在「Signed, universal APK」資產部分,按一下「download」圖示。
- 將這個套件安裝至模擬器之前,請先刪除由 Android Studio 安裝的前一個應用程式。
- 在模擬器上點選並按住「DeepLinksBasics」應用程式圖示,然後選取「App Info」。在互動視窗中依序點選「Uninstall」和「Confirm」。

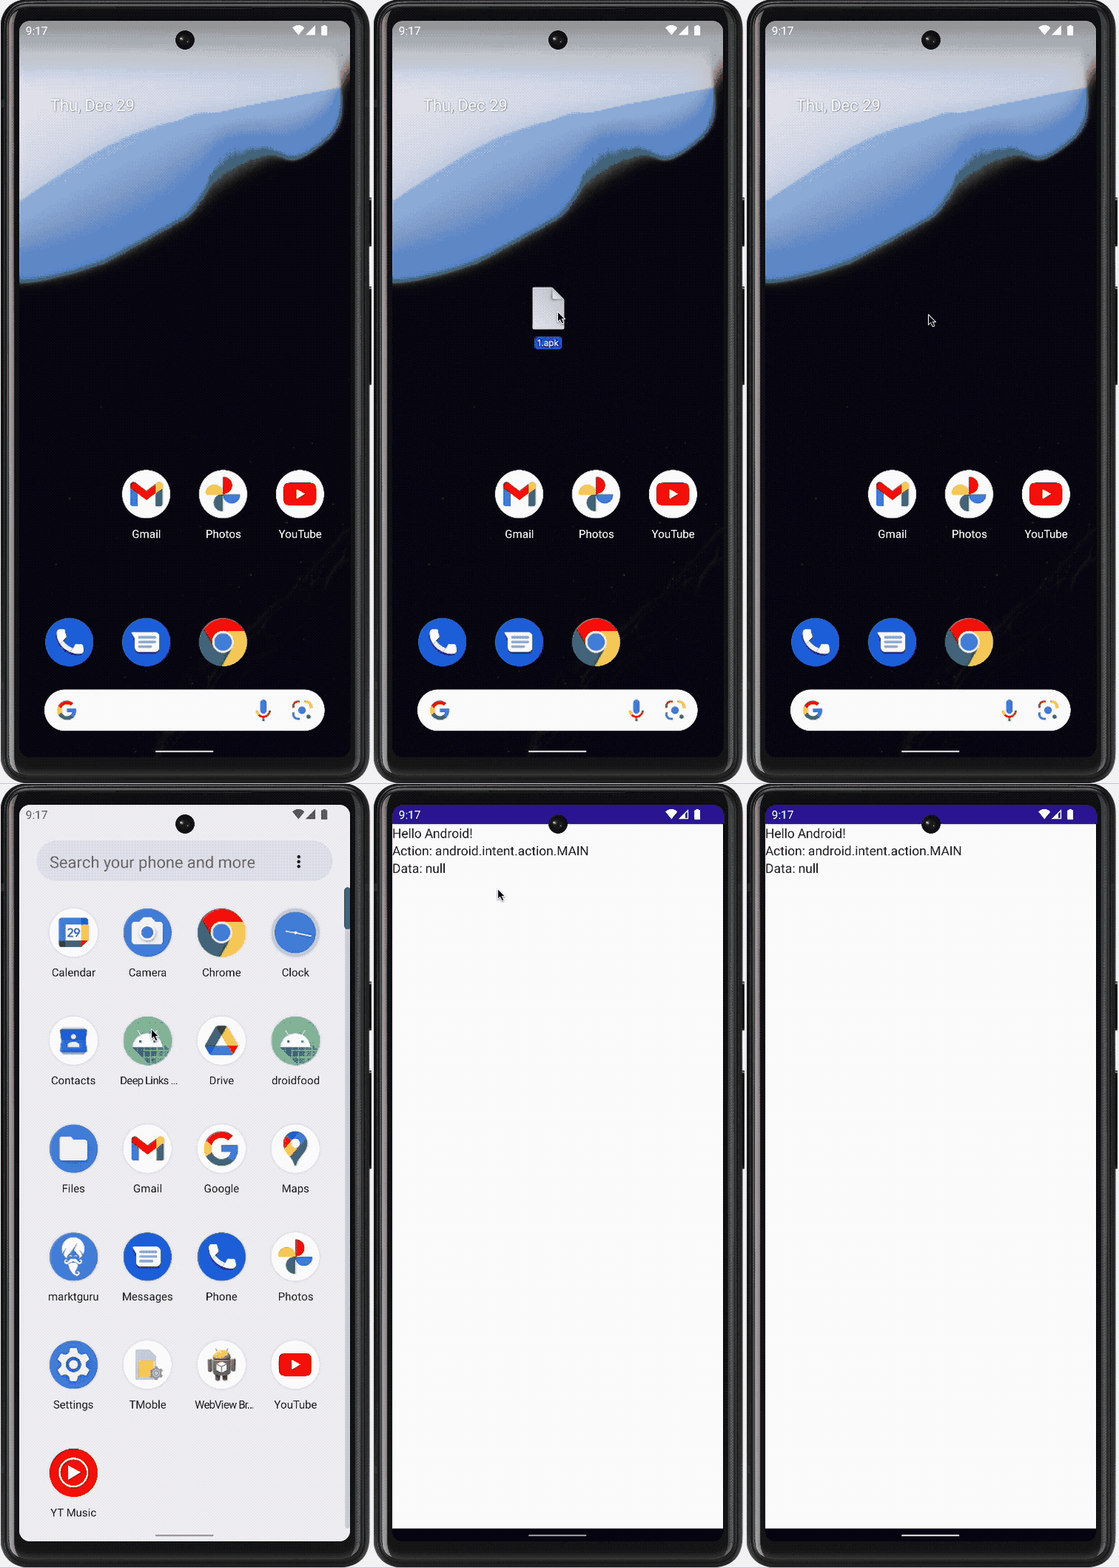
- 如要安裝已下載的套件,請將下載的
1.apk檔案拖曳到模擬器畫面中,然後等待套件安裝完畢。
- 如要測試驗證程序,請在 Android Studio 中開啟終端機,並使用以下兩個指令執行驗證程序:
adb shell pm verify-app-links --re-verify com.devrel.deeplinksbasics
adb shell pm get-app-links com.devrel.deeplinksbasics
- 執行
get-app-links指令之後,控制台中應該會顯示verified訊息。如果看到legacy_failure訊息,請確認憑證指紋與您為網站上傳的指紋相符。如果相符,但依然未顯示驗證訊息,請嘗試再次執行步驟 6、7 和 8。

7. 實作 Android 應用程式連結
現在您已完成所有設定,可以開始實作應用程式了。
系統將使用 Jetpack Compose 進行實作。如要進一步瞭解 Jetpack Compose,請參閱「使用 Jetpack Compose 加速建構更優質的應用程式」。
程式碼依附元件
如要加入及更新這項專案所需的幾個依附元件,請按照下列步驟操作:
- 將以下內容加入
Module和ProjectGradle 檔案:
build.gradle (Project)
buildscript {
  ...
  dependencies {
    classpath "com.google.dagger:hilt-android-gradle-plugin:2.43"
  }
}
build.gradle (Module)
plugins {
  ...
  id 'kotlin-kapt'
  id 'dagger.hilt.android.plugin'
}
...
dependencies {
  ...
  implementation 'androidx.compose.material:material:1.2.1'
  ...
  implementation "androidx.lifecycle:lifecycle-viewmodel-ktx:2.5.1"
  implementation "androidx.lifecycle:lifecycle-viewmodel-compose:2.5.1"
  implementation "androidx.hilt:hilt-navigation-compose:1.0.0"
  implementation "com.google.dagger:hilt-android:2.43"
  kapt "com.google.dagger:hilt-compiler:2.43"
}
project zip 檔案中含有圖片目錄,其中有 10 張免權利金圖片可用於每間餐廳。您可以直接使用這些圖片,或加入自己的圖片。
如要新增 HiltAndroidApp 的主要進入點,請按照下列步驟操作:
- 建立名為
DeepLinksBasicsApplication.kt的新 Kotlin 類別/檔案,然後使用新的應用程式名稱更新資訊清單檔案。
DeepLinksBasicsApplication.kt
package com.devrel.deeplinksbasics

import android.app.Application
import dagger.hilt.android.HiltAndroidApp

@HiltAndroidApp
class DeepLinksBasicsApplication : Application() {}
AndroidManifest.xml
<?xml version="1.0" encoding="utf-8"?>
<manifest xmlns:android="http://schemas.android.com/apk/res/android"
    xmlns:tools="http://schemas.android.com/tools">
    <!-- Update name property -->
    <application
        android:name=".DeepLinksBasicsApplication"
        ...
資料
您需要為餐廳建立包含 Restaurant 類別、存放區和本機資料來源的資料層。所有內容都會保留在您必須建立的 data 套件中。如要進行這項作業,請按照以下步驟操作:
- 在
Restaurant.kt檔案中,使用下列程式碼片段建立Restaurant類別:
Restaurant.kt
package com.devrel.deeplinksbasics.data

import androidx.annotation.DrawableRes
import androidx.compose.runtime.Immutable

@Immutable
data class Restaurant(
    val id: Int = -1,
    val name: String = "",
    val address: String = "",
    val type: String = "",
    val website: String = "",
    @DrawableRes val drawable: Int = -1
)
- 在
RestaurantLocalDataSource.kt檔案的資料來源類別中新增一些餐廳。請記得使用自己的網域更新資料。請參考下列程式碼片段:
RestaurantLocalDataSource.kt
package com.devrel.deeplinksbasics.data

import com.devrel.deeplinksbasics.R
import javax.inject.Inject
import javax.inject.Singleton

@Singleton
class RestaurantLocalDataSource @Inject constructor() {
    val restaurantList = listOf(
        Restaurant(
            id = 1,
            name = "Pawtato",
            address = "3140 Skinner Hollow Road, Medford, Oregon 97501",
            type = "Potato and gnochi",
            // TODO: Update with your own domain
            website = "https://your.own.domain/restaurants/pawtato/",
            drawable = R.drawable.restaurant1,
        ),
        Restaurant(
            id = 2,
            name = "Rawrbucha",
            address = "2064 Carriage Lane, Mansfield, Ohio 44907",
            type = "Kombucha",
            // TODO: Update with your own domain
            website = "https://your.own.domain/restaurants/rawrbucha/",
            drawable = R.drawable.restaurant2,
        ),
        Restaurant(
            id = 3,
            name = "Pizzabus",
            address = "1447 Davis Avenue, Petaluma, California 94952",
            type = "Pizza",
            // TODO: Update with your own domain
            website = "https://your.own.domain/restaurants/pizzabus/",
            drawable = R.drawable.restaurant3,
        ),
        Restaurant(
            id = 4,
            name = "Keybabs",
            address = "3708 Pinnickinnick Street, Perth Amboy, New Jersey 08861",
            type = "Kebabs",
            // TODO: Update with your own domain
            website = "https://your.own.domain/restaurants/keybabs/",
            drawable = R.drawable.restaurant4,
        ),
        Restaurant(
            id = 5,
            name = "BBQ",
            address = "998 Newton Street, Saint Cloud, Minnesota 56301",
            type = "BBQ",
            // TODO: Update with your own domain
            website = "https://your.own.domain/restaurants/bbq/",
            drawable = R.drawable.restaurant5,
        ),
        Restaurant(
            id = 6,
            name = "Salades",
            address = "4522 Rockford Mountain Lane, Oshkosh, Wisconsin 54901",
            type = "salads",
            // TODO: Update with your own domain
            website = "https://your.own.domain/restaurants/salades/",
            drawable = R.drawable.restaurant6,
        ),
        Restaurant(
            id = 7,
            name = "Gyros and moar",
            address = "1993 Bird Spring Lane, Houston, Texas 77077",
            type = "Gyro",
            // TODO: Update with your own domain
            website = "https://your.own.domain/restaurants/gyrosAndMoar/",
            drawable = R.drawable.restaurant7,
        ),
        Restaurant(
            id = 8,
            name = "Peruvian ceviche",
            address = "2125 Deer Ridge Drive, Newark, New Jersey 07102",
            type = "seafood",
            // TODO: Update with your own domain
            website = "https://your.own.domain/restaurants/peruvianCeviche/",
            drawable = R.drawable.restaurant8,
        ),
        Restaurant(
            id = 9,
            name = "Vegan burgers",
            address = "594 Warner Street, Casper, Wyoming 82601",
            type = "vegan",
            // TODO: Update with your own domain
            website = "https://your.own.domain/restaurants/veganBurgers/",
            drawable = R.drawable.restaurant9,
        ),
        Restaurant(
            id = 10,
            name = "Taquitos",
            address = "1654 Hart Country Lane, Blue Ridge, Georgia 30513",
            type = "mexican",
            // TODO: Update with your own domain
            website = "https://your.own.domain/restaurants/taquitos/",
            drawable = R.drawable.restaurant10,
        ),
    )
}
- 記得將圖片匯入專案。
- 接著,在
RestaurantRepository.kt檔案中加入Restaurant存放區,其中含有用來取得餐廳名稱的函式,如以下程式碼片段所示:
RestaurantRepository.kt
package com.devrel.deeplinksbasics.data

import javax.inject.Inject

class RestaurantRepository @Inject constructor(
    private val restaurantLocalDataSource: RestaurantLocalDataSource
){
    val restaurants: List<Restaurant> = restaurantLocalDataSource.restaurantList

    // Method to obtain a restaurant object by its name
    fun getRestaurantByName(name: String): Restaurant ? {
        return restaurantLocalDataSource.restaurantList.find {
            val processedName = it.name.filterNot { it.isWhitespace() }.lowercase()
            val nameToTest = name.filterNot { it.isWhitespace() }.lowercase()
            nameToTest == processedName
        }
    }
}
ViewModel
如要透過應用程式和 Android 應用程式連結選取餐廳,您必須建立 ViewModel 來變更所選餐廳的值。請按照以下步驟操作:
- 在
RestaurantViewModel.kt檔案中,加入以下程式碼片段:
RestaurantViewModel.kt
package com.devrel.deeplinksbasics.ui.restaurant

import androidx.lifecycle.ViewModel
import androidx.lifecycle.viewModelScope
import com.devrel.deeplinksbasics.data.Restaurant
import com.devrel.deeplinksbasics.data.RestaurantRepository
import dagger.hilt.android.lifecycle.HiltViewModel
import kotlinx.coroutines.flow.MutableStateFlow
import kotlinx.coroutines.flow.StateFlow
import kotlinx.coroutines.launch
import javax.inject.Inject

@HiltViewModel
class RestaurantViewModel @Inject constructor(
    private val restaurantRepository: RestaurantRepository,
) : ViewModel() {
    // restaurants and selected restaurant could be used as one UIState stream
    // which will scale better when exposing more data.
    // Since there are only these two, it is okay to expose them as separate streams
    val restaurants: List<Restaurant> = restaurantRepository.restaurants

    private val _selectedRestaurant = MutableStateFlow<Restaurant?>(value = null)
    val selectedRestaurant: StateFlow<Restaurant?>
        get() = _selectedRestaurant

    // Method to update the current restaurant selection
    fun updateSelectedRestaurantByName(name: String) {
        viewModelScope.launch {
            val selectedRestaurant: Restaurant? = restaurantRepository.getRestaurantByName(name)
            if (selectedRestaurant != null) {
                _selectedRestaurant.value = selectedRestaurant
            }
        }
    }
}
Compose
現在,您已擁有 ViewModel 和資料層的邏輯,接下來要新增 UI 層。多虧了 Jetpack Compose 程式庫,您只需要幾個步驟就能完成。就這個應用程式而言,您希望以格狀資訊卡方式顯示餐廳。使用者只要按一下每張資訊卡,即可查看各餐廳的詳細資料。您需要三個主要的可組合函式,以及一個指向對應餐廳路徑的導覽元件。
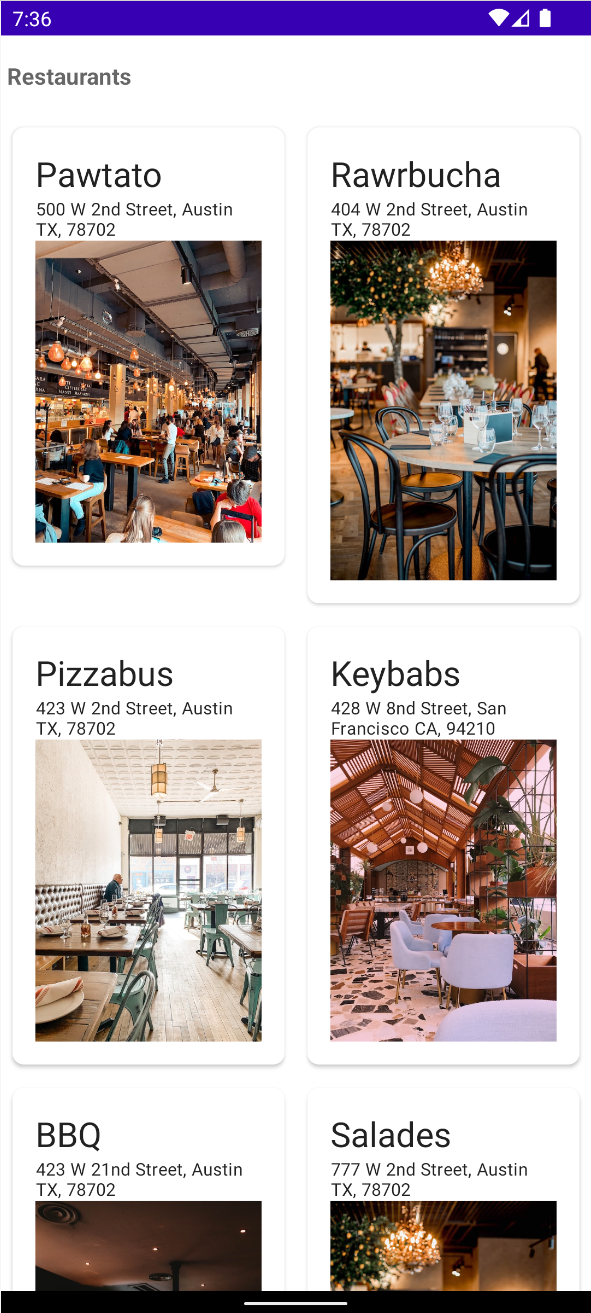
如要新增 UI 層,請按照下列步驟操作:
- 從可顯示各餐廳詳細資料的可組合函式開始。在
RestaurantCardDetails.kt檔案中,加入以下程式碼片段:
RestaurantCardDetails.kt
package com.devrel.deeplinksbasics.ui

import androidx.activity.compose.BackHandler
import androidx.compose.foundation.Image
import androidx.compose.foundation.clickable
import androidx.compose.foundation.layout.Arrangement
import androidx.compose.foundation.layout.Column
import androidx.compose.foundation.layout.Row
import androidx.compose.foundation.layout.Spacer
import androidx.compose.foundation.layout.fillMaxWidth
import androidx.compose.foundation.layout.padding
import androidx.compose.foundation.layout.width
import androidx.compose.foundation.shape.CornerSize
import androidx.compose.foundation.shape.RoundedCornerShape
import androidx.compose.foundation.text.selection.SelectionContainer
import androidx.compose.material.Card
import androidx.compose.material.Icon
import androidx.compose.material.MaterialTheme
import androidx.compose.material.Scaffold
import androidx.compose.material.Text
import androidx.compose.material.TopAppBar
import androidx.compose.material.icons.Icons
import androidx.compose.material.icons.filled.ArrowBack
import androidx.compose.runtime.Composable
import androidx.compose.ui.Modifier
import androidx.compose.ui.graphics.Color
import androidx.compose.ui.res.painterResource
import androidx.compose.ui.unit.dp
import com.devrel.deeplinksbasics.data.Restaurant


@Composable
fun RestaurantCardDetails (
    restaurant: Restaurant,
    onBack: () -> Unit,
) {
    BackHandler() {
       onBack()
    }
    Scaffold(
        topBar = {
            TopAppBar(
                backgroundColor = Color.Transparent,
                elevation = 0.dp,
            ) {
                Row(
                    horizontalArrangement = Arrangement.Start,
                    modifier = Modifier.padding(start = 8.dp)
                ) {
                    Icon(
                        imageVector = Icons.Default.ArrowBack,
                        contentDescription = "Arrow Back",
                       modifier = Modifier.clickable {
                            onBack()
                        }
                    )
                    Spacer(modifier = Modifier.width(8.dp))
                    Text(text = restaurant.name)
                }
            }
        }
    ) { paddingValues ->
        Card(
            modifier = Modifier
                .padding(paddingValues)
                .fillMaxWidth(),
            elevation = 2.dp,
            shape = RoundedCornerShape(corner = CornerSize(8.dp))
        ) {
            Column(
                modifier = Modifier
                    .padding(16.dp)
                    .fillMaxWidth()
            ) {
                Text(text = restaurant.name, style = MaterialTheme.typography.h6)
                Text(text = restaurant.type, style = MaterialTheme.typography.caption)
                Text(text = restaurant.address, style = MaterialTheme.typography.caption)
                SelectionContainer {
                    Text(text = restaurant.website, style = MaterialTheme.typography.caption)
                }
                Image(painter = painterResource(id = restaurant.drawable), contentDescription = "${restaurant.name}")
            }
        }
    }
}
- 接下來,實作網格和格線本身。在
RastaurantCell.kt檔案中,加入以下程式碼片段:
RestaurantCell.kt
package com.devrel.deeplinksbasics.ui

import androidx.compose.foundation.Image
import androidx.compose.foundation.layout.Column
import androidx.compose.foundation.layout.fillMaxWidth
import androidx.compose.foundation.layout.padding
import androidx.compose.foundation.shape.CornerSize
import androidx.compose.foundation.shape.RoundedCornerShape
import androidx.compose.material.Card
import androidx.compose.material.MaterialTheme
import androidx.compose.material.Text
import androidx.compose.runtime.Composable
import androidx.compose.ui.Modifier
import androidx.compose.ui.res.painterResource
import androidx.compose.ui.unit.dp
import com.devrel.deeplinksbasics.data.Restaurant

@Composable
fun RestaurantCell(
    restaurant: Restaurant
){
    Card(
        modifier = Modifier
            .padding(horizontal = 8.dp, vertical = 8.dp)
            .fillMaxWidth(),
        elevation = 2.dp,
        shape = RoundedCornerShape(corner = CornerSize(8.dp))
    ) {
        Column(
            modifier = Modifier
                .padding(16.dp)
                .fillMaxWidth()
        ) {
            Text(text = restaurant.name, style = MaterialTheme.typography.h6)
            Text(text = restaurant.address, style = MaterialTheme.typography.caption)
            Image(painter = painterResource(id = restaurant.drawable), contentDescription = "${restaurant.name}")
        }
    }
}
- 在
RestaurantGrid.kt檔案中,加入以下程式碼片段:
RestaurantGrid.kt
package com.devrel.deeplinksbasics.ui

import androidx.compose.foundation.clickable
import androidx.compose.foundation.layout.Column
import androidx.compose.foundation.layout.fillMaxWidth
import androidx.compose.foundation.layout.padding
import androidx.compose.foundation.lazy.grid.GridCells
import androidx.compose.foundation.lazy.grid.LazyVerticalGrid
import androidx.compose.foundation.lazy.grid.items
import androidx.compose.material.Scaffold
import androidx.compose.material.Text
import androidx.compose.material.TopAppBar
import androidx.compose.runtime.Composable
import androidx.compose.ui.Modifier
import androidx.compose.ui.graphics.Color
import androidx.compose.ui.text.font.FontWeight
import androidx.compose.ui.unit.dp
import com.devrel.deeplinksbasics.data.Restaurant

@Composable
fun RestaurantGrid(
    restaurants: List<Restaurant>,
    onRestaurantSelected: (String) -> Unit,
    navigateToRestaurant: (String) -> Unit,
) {
    Scaffold(topBar = {
        TopAppBar(
            backgroundColor = Color.Transparent,
            elevation = 0.dp,
        ) {
            Text(text = "Restaurants", fontWeight = FontWeight.Bold)
        }
    }) { paddingValues ->
        LazyVerticalGrid(
            columns = GridCells.Adaptive(minSize = 200.dp),
            modifier = Modifier.padding(paddingValues)
        ) {
            items(items = restaurants) { restaurant ->
                Column(
                    modifier = Modifier
                        .fillMaxWidth()
                        .clickable(onClick = {
                            onRestaurantSelected(restaurant.name)
                            navigateToRestaurant(restaurant.name)
                        })
                ) {
                    RestaurantCell(restaurant)
                }
            }
        }
    }
}
- 接下來,您需要實作應用程式狀態和導覽邏輯,並更新
MainActivity.kt。使用者只要點選餐廳資訊卡,系統就會將他們導向特定餐廳。在RestaurantAppState.kt檔案中,加入以下程式碼片段:
RestaurantAppState.kt
package com.devrel.deeplinksbasics.ui

import androidx.compose.runtime.Composable
import androidx.compose.runtime.remember
import androidx.navigation.NavHostController
import androidx.navigation.compose.rememberNavController

sealed class Screen(val route: String) {
   object Grid : Screen("restaurants")
   object Name : Screen("restaurants/{name}") {
       fun createRoute(name: String) = "restaurants/$name"
   }
}

@Composable
fun rememberRestaurantAppState(
    navController: NavHostController = rememberNavController(),
) = remember(navController) {
    RestaurantAppState(navController)
}

class RestaurantAppState(
    val navController: NavHostController,
) {
    fun navigateToRestaurant(restaurantName: String) {
        navController.navigate(Screen.Name.createRoute(restaurantName))
    }

    fun navigateBack() {
        navController.popBackStack()
    }
}
- 關於導覽,您必須建立
NavHost,並使用可組合路徑導向各餐廳。在RestaurantApp.kt檔案中,加入以下程式碼片段:
RestaurantApp.kt
package com.devrel.deeplinksbasics.ui

import androidx.compose.runtime.Composable
import androidx.compose.runtime.collectAsState
import androidx.compose.runtime.getValue
import androidx.lifecycle.viewmodel.compose.viewModel
import androidx.navigation.compose.NavHost
import androidx.navigation.compose.composable
import com.devrel.deeplinksbasics.ui.restaurant.RestaurantViewModel

@Composable
fun RestaurantApp(
   viewModel: RestaurantViewModel = viewModel(),
   appState: RestaurantAppState = rememberRestaurantAppState(),
) {
    val selectedRestaurant by viewModel.selectedRestaurant.collectAsState()
    val onRestaurantSelected: (String) -> Unit = { viewModel.updateSelectedRestaurantByName(it) }

    NavHost(
        navController = appState.navController,
        startDestination = Screen.Grid.route,
    ) {
        // Default route that points to the restaurant grid
        composable(Screen.Grid.route) {
            RestaurantGrid(
                restaurants = viewModel.restaurants,
                onRestaurantSelected = onRestaurantSelected,
                navigateToRestaurant = { restaurantName ->
                    appState.navigateToRestaurant(restaurantName)
                },
            )
        }
        // Route for the navigation to a particular restaurant when a user clicks on it
        composable(Screen.Name.route) {
            RestaurantCardDetails(restaurant = selectedRestaurant!!, onBack = appState::navigateBack)
        }
    }
}
- 您現在可以透過應用程式例項更新
MainActivity.kt了。使用下列程式碼取代檔案:
MainActivity .kt
package com.devrel.deeplinksbasics

import android.os.Bundle
import androidx.activity.ComponentActivity
import androidx.activity.compose.setContent
import androidx.compose.foundation.layout.fillMaxSize
import androidx.compose.material.MaterialTheme
import androidx.compose.material.Surface
import androidx.compose.ui.Modifier
import com.devrel.deeplinksbasics.ui.RestaurantApp
import com.devrel.deeplinksbasics.ui.theme.DeepLinksBasicsTheme
import dagger.hilt.android.AndroidEntryPoint

@AndroidEntryPoint
class MainActivity : ComponentActivity() {
    override fun onCreate(savedInstanceState: Bundle?) {
        super.onCreate(savedInstanceState)
        setContent {
            DeepLinksBasicsTheme {
                Surface(
                    modifier = Modifier.fillMaxSize(),
                    color = MaterialTheme.colors.background
                ) {
                    RestaurantApp()
                }
            }
        }
    }
}
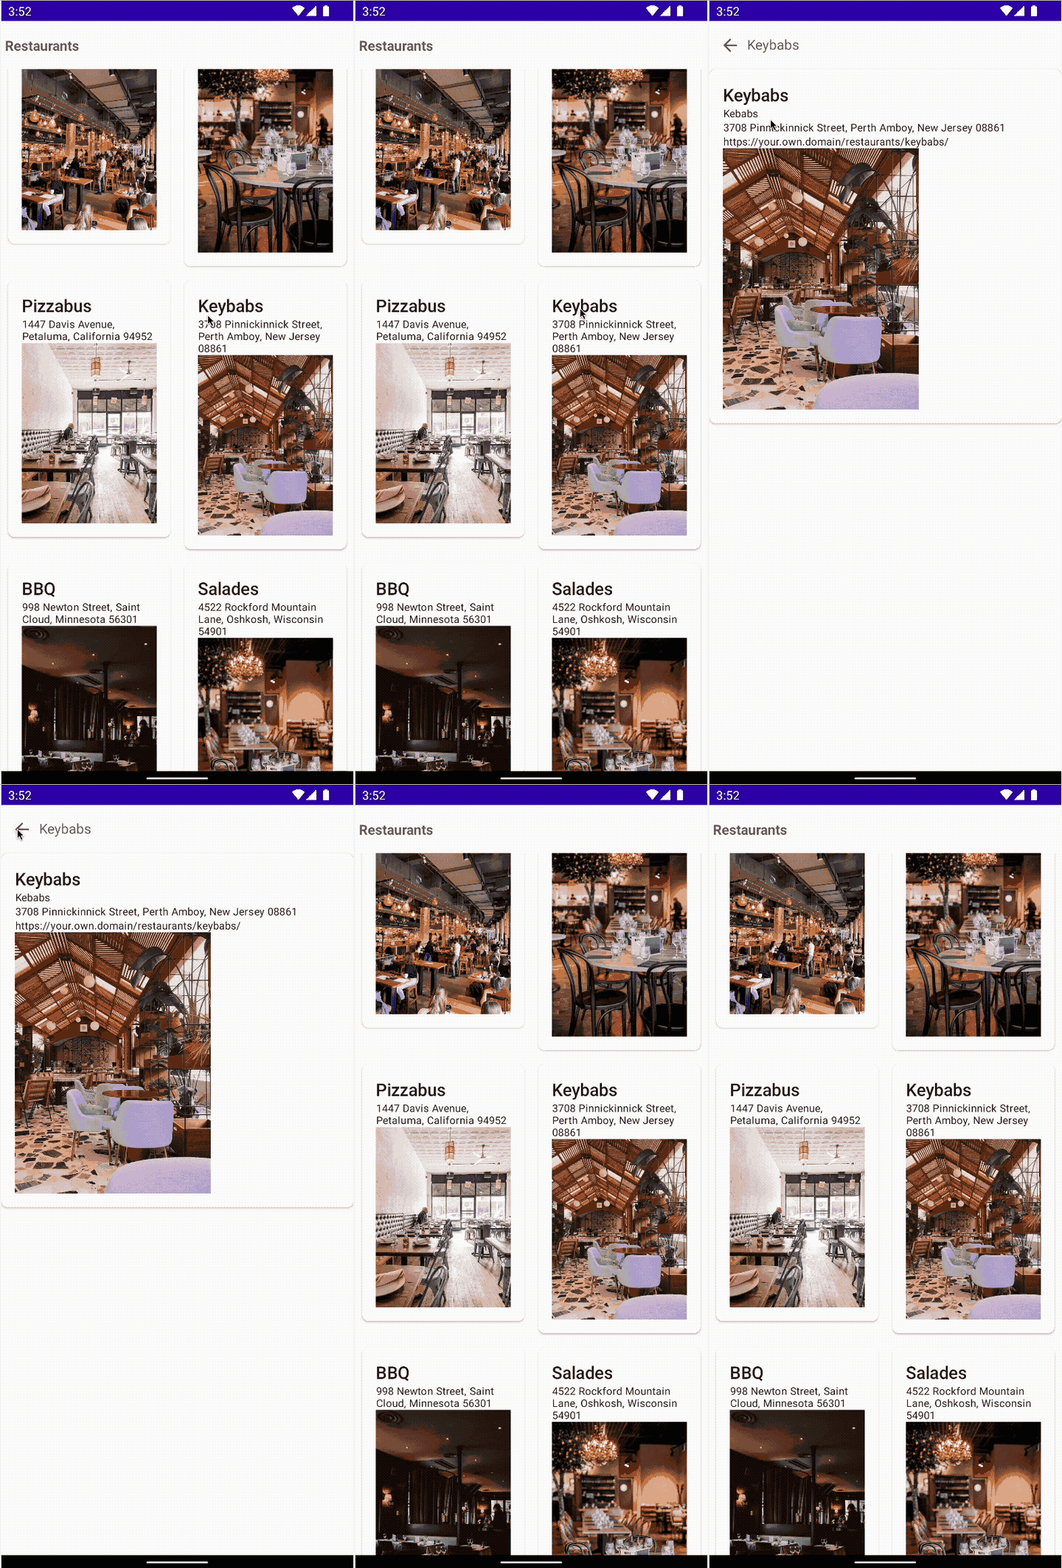
- 執行應用程式,前往格狀檢視畫面並選取特定餐廳。選取餐廳後,應用程式會顯示該餐廳及其詳細資訊。
Android 應用程式連結
現在,請將 Android 應用程式連結新增至格狀檢視畫面和每間餐廳。您已經為 /restaurants 中的格狀檢視畫面設定 AndroidManifest.xml 部分。最有效率的做法是針對每間餐廳使用相同設定,這樣的話,只需要在邏輯中新增路徑設定即可。如要進行這項作業,請按照以下步驟操作:
- 使用意圖篩選器更新資訊清單檔案,以便接收
/restaurants做為路徑。請記得將您的網域新增為主機。在AndroidManifest.xml檔案中,加入以下程式碼片段:
AndroidManifest.xml
...
<intent-filter android:autoVerify="true">
  <action android:name="android.intent.action.VIEW"/>
  <category android:name="android.intent.category.BROWSABLE"/>
  <category android:name="android.intent.category.DEFAULT"/>
  <data android:scheme="http"/>
  <data android:scheme="https"/>
  <data android:host="your.own.domain"/>
  <data android:pathPrefix="/restaurants"/>
</intent-filter>
- 在
RestaurantApp.kt檔案中,加入以下程式碼片段:
RestaurantApp.kt
...
import androidx.navigation.NavType
import androidx.navigation.navArgument
import androidx.navigation.navDeepLink

fun RestaurantApp(...){
  NavHost(...){
    ...
    //  Route for the navigation to a particular restaurant when a user clicks on it
    //  and for an incoming deep link
    // Update with your own domain
        composable(Screen.Name.route,
            deepLinks = listOf(
                navDeepLink { uriPattern = "https://your.own.domain/restaurants/{name}" }
            ),
            arguments = listOf(
                navArgument("name") {
                    type = NavType.StringType
                }
            )
        ) { entry ->
            val restaurantName = entry.arguments?.getString("name")
            if (restaurantName != null) {
                LaunchedEffect(restaurantName) {
                    viewModel.updateSelectedRestaurantByName(restaurantName)
                }
            }
            selectedRestaurant?.let {
                RestaurantCardDetails(
                    restaurant = it,
                    onBack = appState::navigateBack
                )
            }
        }
  }
}
基本上,NavHost 會將 Android 意圖 Uri 資料與可組合路徑進行比對。如果路徑相符,系統會算繪 composable。
composable 元件可使用 deepLinks 參數,其中包含來自意圖篩選器的 URI 清單。在本程式碼研究室中,您將新增已建立網站的網址,並定義 ID 參數,藉此接收使用者並將其傳送至特定餐廳。
- 為確保當使用者點選 Android 應用程式連結後,應用程式邏輯會將他們傳送至對應餐廳,請使用
adb:
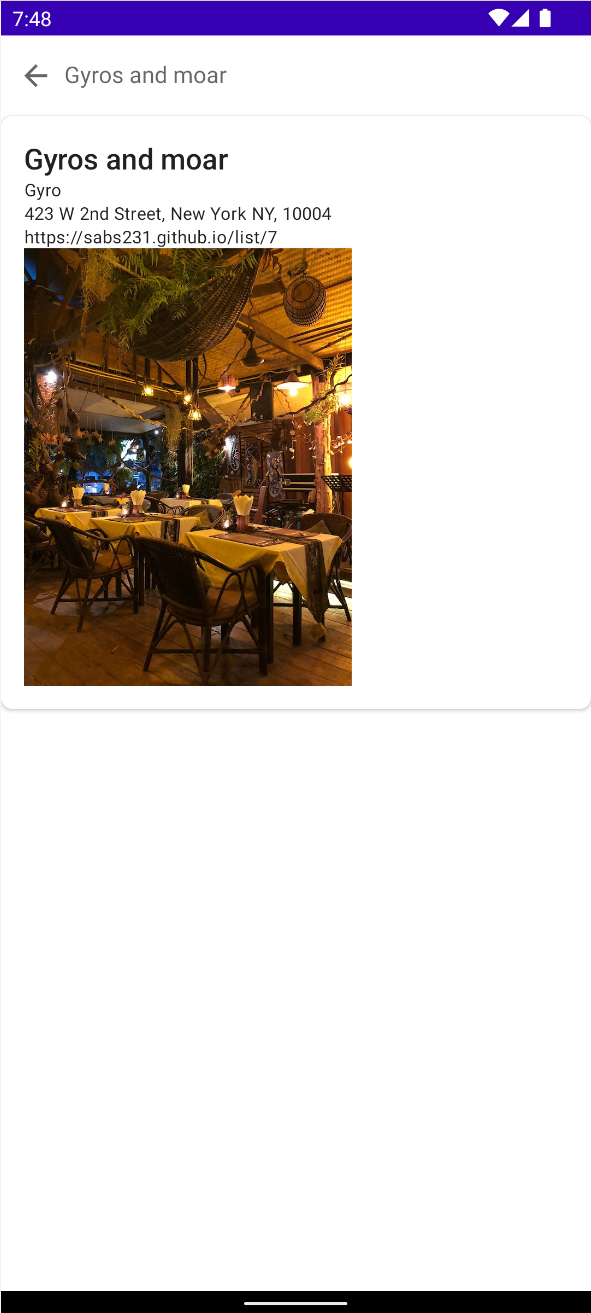
adb shell am start -W -a android.intent.action.VIEW -d "https://sabs-deeplinks-test.web.app/restaurants/gyrosAndMoar"
請注意,應用程式會顯示對應的餐廳。
8. 查看 Play 管理中心資訊主頁
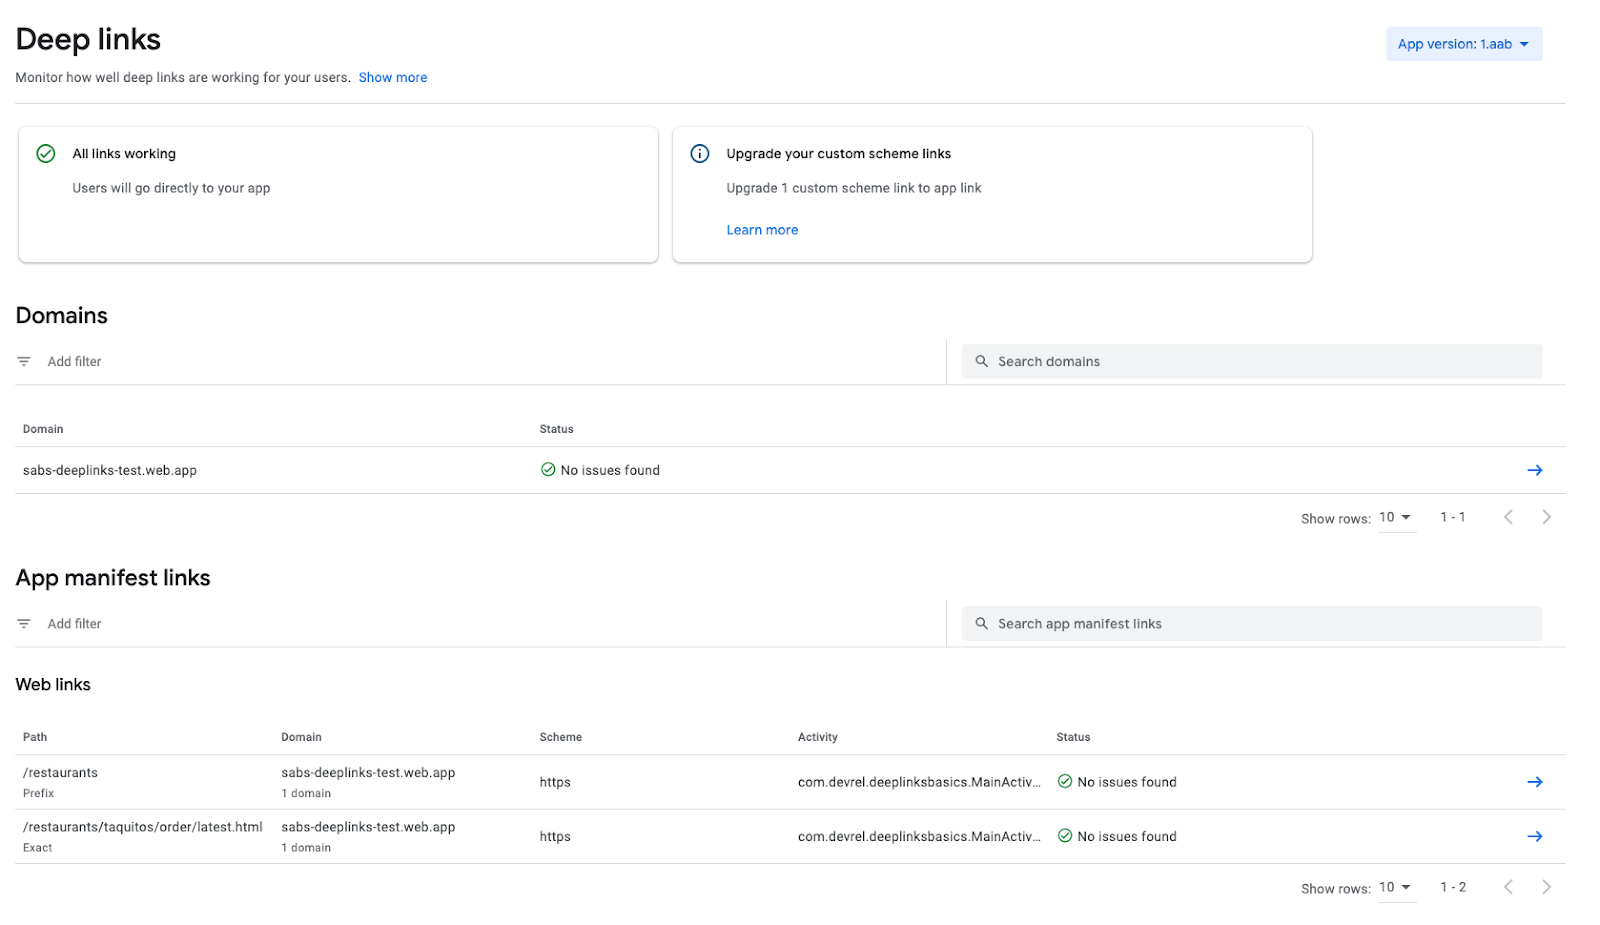
您已經看過深層連結的資訊主頁。這個資訊主頁會提供所有確保深層連結正常運作的必要資訊,甚至還能查看每個應用程式版本!這個頁面會顯示已在資訊清單檔案中新增的網域、連結和自訂連結。如果 assetlinks.json 檔案發生問題,此頁面還會顯示用來更新檔案的位置。
9. 結語
恭喜,您已成功建構第一個 Android 應用程式連結應用程式!
您已瞭解設計、設定、建立及測試 Android 應用程式連結的程序。這個程序有許多不同部分,因此本程式碼研究室匯總了所有詳細資料,協助您順利進行 Android OS 開發作業。
您現已瞭解處理 Android 應用程式連結的重要步驟。
