
تستخدم الإشعارات على الساعات واجهات برمجة التطبيقات نفسها وتتضمّن البنية نفسها التي تتضمّنها الإشعارات على الهواتف.
يمكن أن تظهر الإشعارات على الساعة بطريقتَين:
- ينشئ تطبيق على الجهاز الجوّال إشعارًا، ويقوم النظام تلقائيًا بتوصيل هذا الإشعار بالساعة.
- ينشئ تطبيق على جهاز قابل للارتداء إشعارًا.
في كلتا الحالتين، استخدِم الفئة
NotificationCompat.Builder
لإنشاء الإشعارات. عند إنشاء إشعارات باستخدام فئة أداة الإنشاء، سيتولّى النظام عرض الإشعارات بشكل صحيح. على سبيل المثال، عندما تصدر إشعارًا من تطبيقك على الجهاز الجوّال، يظهر كل إشعار كبطاقة في "خلاصة الإشعارات".
راجِع المثال التالي لمعرفة كيفية عرض الإشعارات.
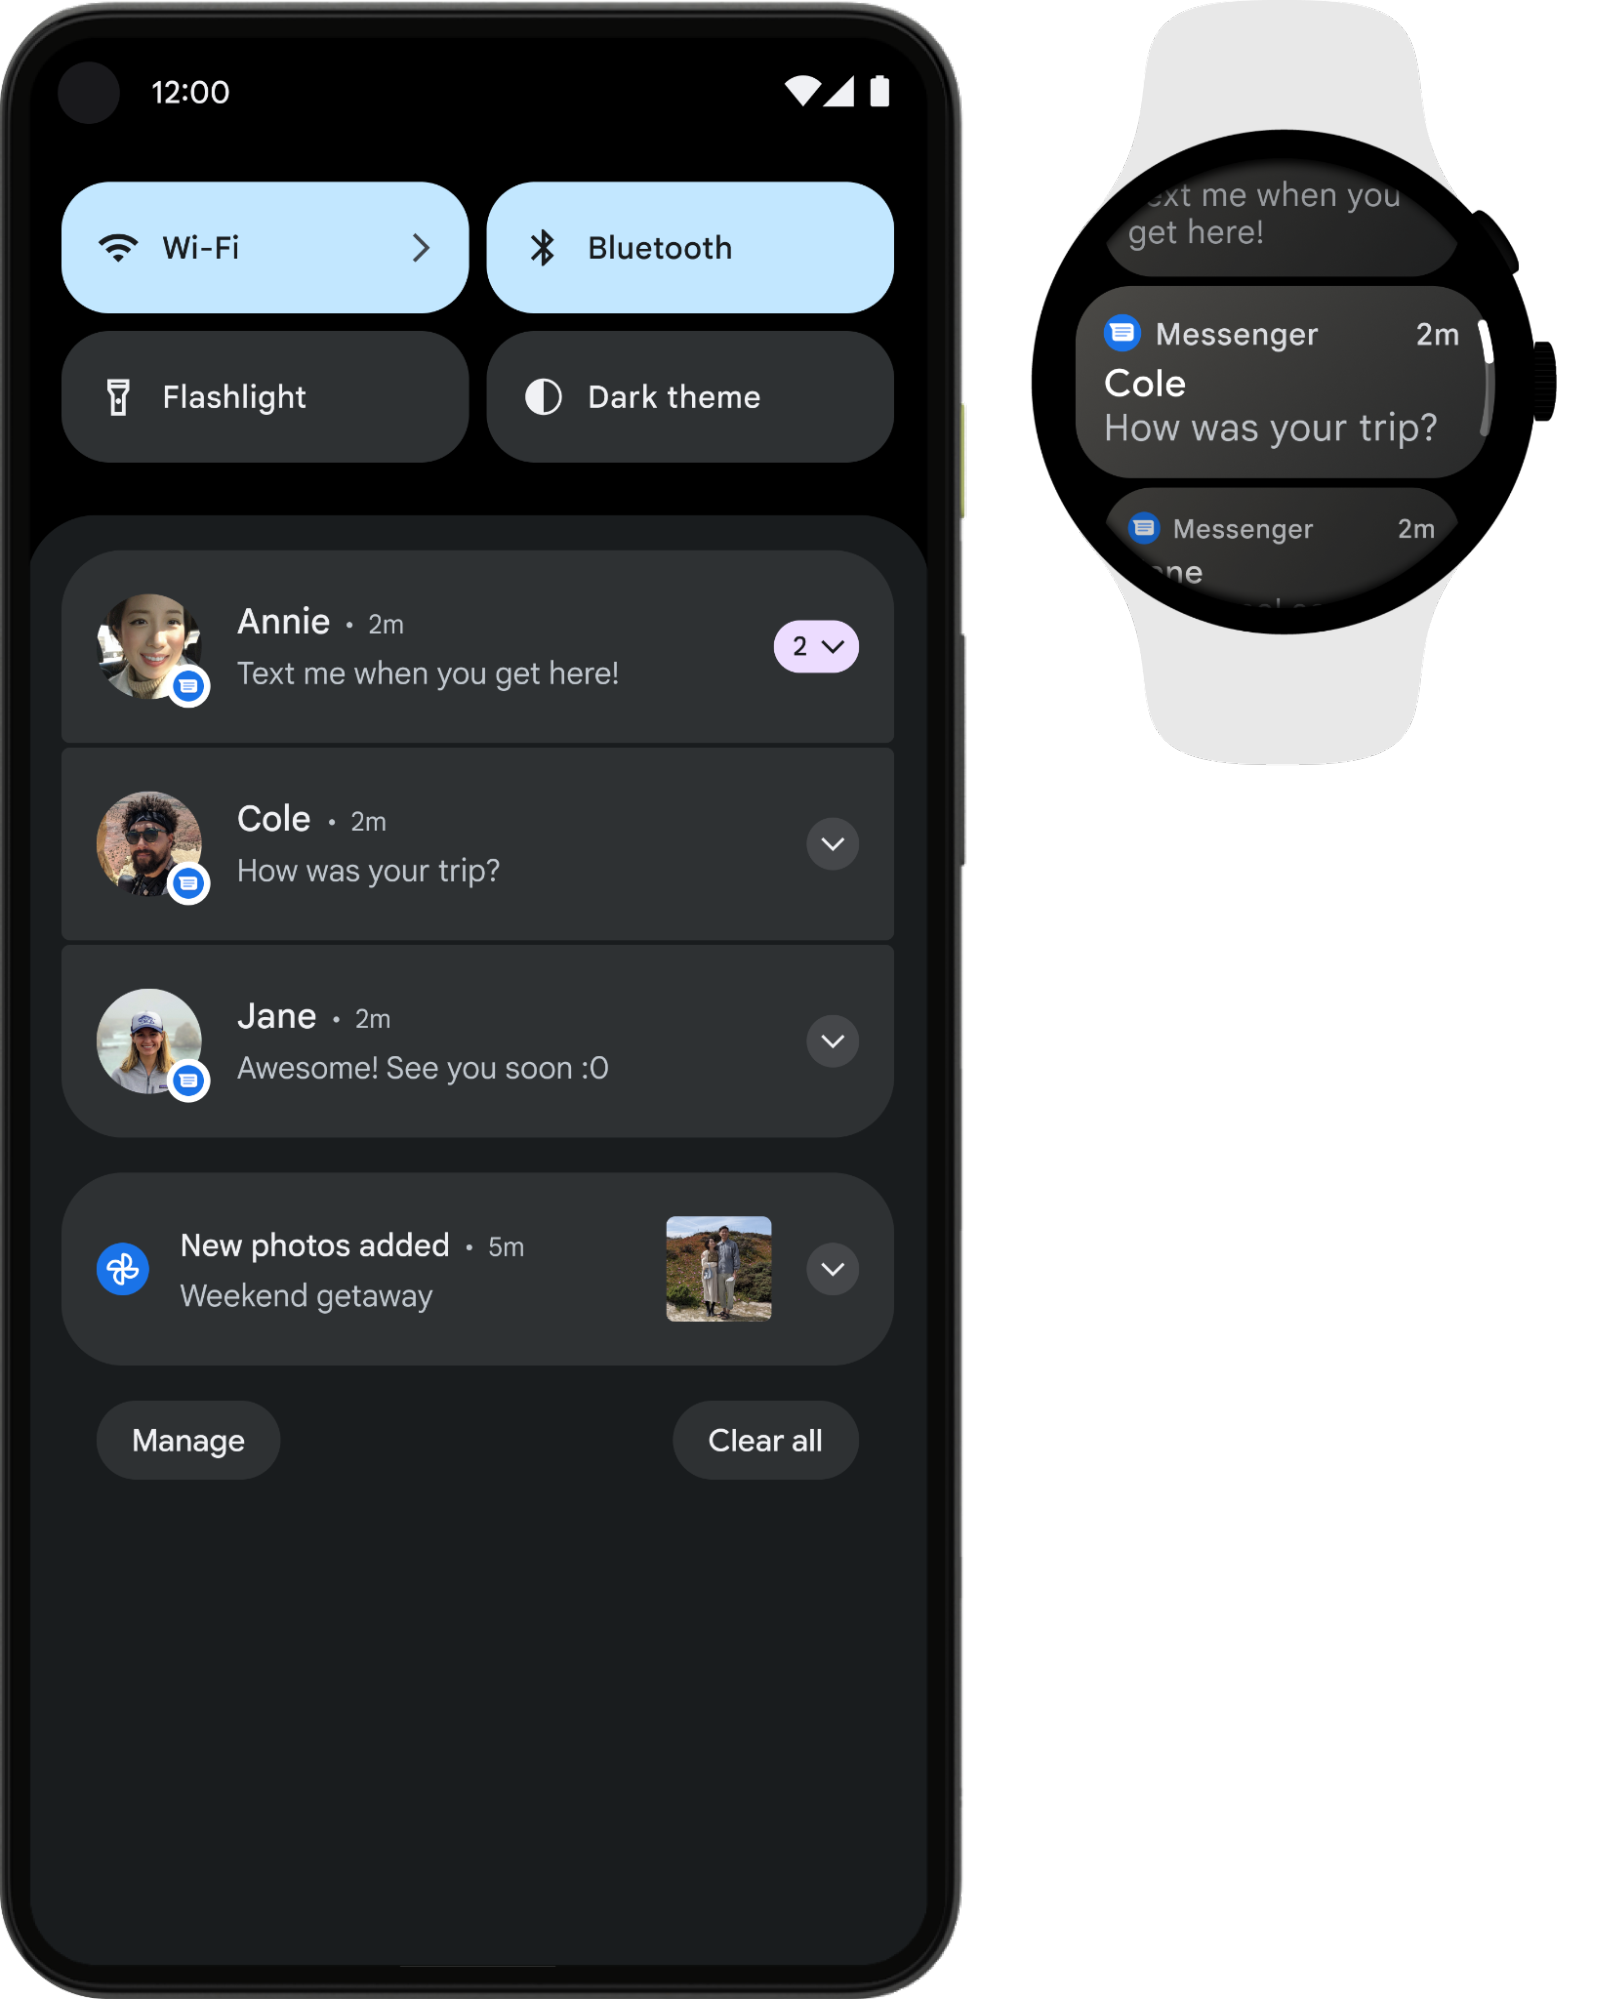
الشكل 1: الإشعار نفسه معروض على هاتف وعلى ساعة
استخدِم إحدى الفئات الفرعية
NotificationCompat.Style
للحصول على أفضل النتائج.
ملاحظة:
يؤدي استخدام RemoteViews
إلى إزالة التنسيقات المخصّصة من الإشعارات، ولا يعرض الجهاز القابل للارتداء سوى النص والرموز.
الإشعارات المقترَحة للأجهزة القابلة للارتداء
استخدِم الإشعارات القابلة للتوسيع كنقطة بداية لجميع الإشعارات، لأنّها طريقة رائعة لجذب مستخدمي الأجهزة القابلة للارتداء. تظهر الحالة المصغّرة في لوحة الإشعارات لتوفير تجربة موجزة وسريعة. إذا نقر المستخدم على الإشعار، سيتم توسيعه ليعرض تجربة غامرة قابلة للتمرير تتضمّن محتوًى وإجراءات إضافية.
يمكنك إنشاء إشعار قابل للتوسيع
بالطريقة نفسها التي تستخدمها على الأجهزة الجوّالة، وذلك باستخدام أي من الفئات الفرعية NotificationCompat.Style. على سبيل المثال، يظهر الإشعار العادي الذي يستخدم
NotificationCompat.MessagingStyle
على النحو التالي:
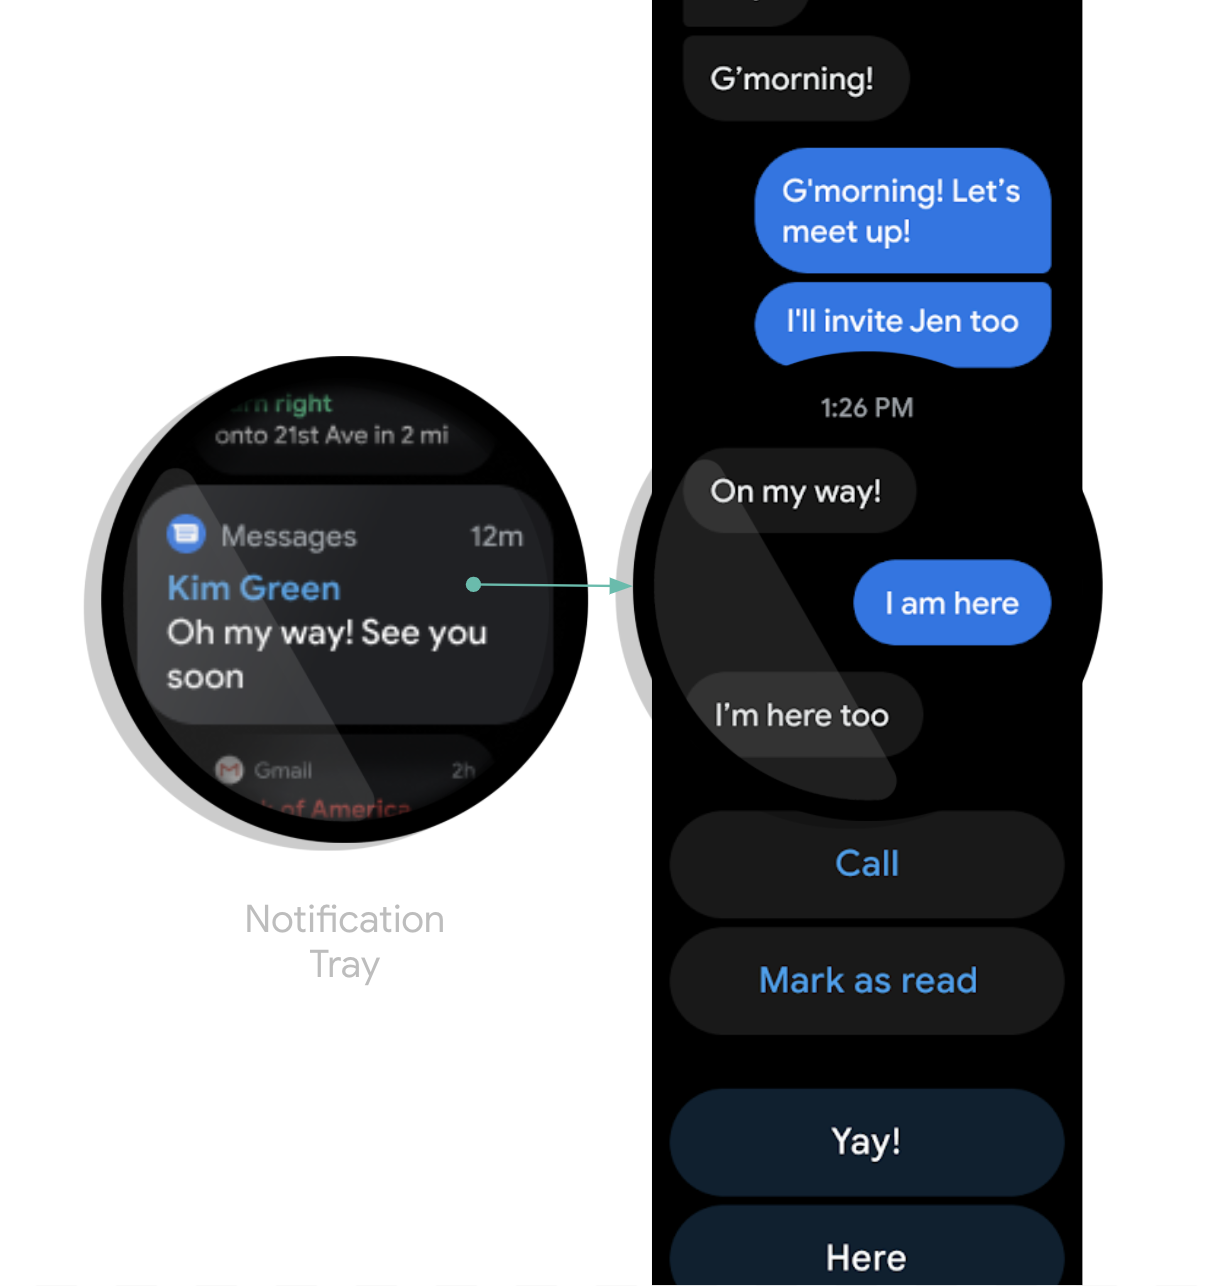
الشكل 2: مثال على إشعار MessagingStyle على Wear OS
يمكنك ملاحظة أنّ الإشعار يتضمّن إجراءات متعدّدة مكدّسة في أسفل حالة الإشعار الموسّع.
ملاحظة: إذا كانت إشعاراتك تتضمّن إجراء "رد"، مثل تطبيق مراسلة، يمكنك تحسين سلوك الإشعار. على سبيل المثال، يمكنك تفعيل الردود باستخدام الإدخال الصوتي مباشرةً من الجهاز القابل للارتداء أو الردود النصية المحدّدة مسبقًا باستخدام setChoices().
لمزيد من المعلومات، يُرجى الاطّلاع على مقالة إضافة زر الردّ.
تجنُّب الإشعارات المكرّرة
يتم تلقائيًا نقل الإشعارات من تطبيق الهاتف المصاحب إلى أي ساعات مقترنة. هذا خيار رائع إذا لم يكن لديك تطبيق مثبَّت على الجهاز القابل للارتداء.
ومع ذلك، إذا أنشأت تطبيقًا مستقلاً للساعة وتطبيقًا مصاحبًا للهاتف، ستنشئ التطبيقات إشعارات مكرّرة.
توفّر Wear OS طريقة لإيقاف الإشعارات المكرّرة باستخدام واجهات برمجة التطبيقات الخاصة بميزة "ربط الأجهزة". ويُعدّ ذلك مهمًا بشكل خاص للتطبيقات على الأجهزة التي تعمل بنظام التشغيل Wear OS 5 أو الإصدارات الأحدث، لأنّ بعض الإشعارات التي يمكن تجاهلها على جهاز جوّال لا يمكن تجاهلها على جهاز Wear OS. لمزيد من المعلومات، يُرجى الاطّلاع على خيارات ربط الإشعارات.
إضافة ميزات خاصة بالأجهزة القابلة للارتداء إلى أحد الإشعارات
إذا كنت بحاجة إلى إضافة ميزات خاصة بالأجهزة القابلة للارتداء إلى أحد الإشعارات، يمكنك استخدام الفئة
NotificationCompat.WearableExtender لتحديد الخيارات.
لاستخدام واجهة برمجة التطبيقات هذه، اتّبِع الخطوات التالية:
ملاحظة:
إذا كنت تستخدم NotificationManager في إطار العمل،
لن تعمل بعض الميزات من
NotificationCompat.WearableExtender، لذا احرص على استخدام
NotificationCompat.
يوضِّح هذا المثال كيفية ضبط إجراء خاص بأجهزة Wear على الإشعار، وكيفية ضبط
معرّف الرفض. عند تجاهل الإشعار، يتم تجاهل جميع الإشعارات الأخرى التي تحمل رقم تعريف التجاهل نفسه على الساعة والهاتف المقترن. لاسترداد معرّف الرفض، استخدِم
getDismissalId().
// This intent will be fired as a result of the user clicking the "Open on watch" action. // However, it executes on the phone, not on the watch. Typically, the Activity should then use // RemoteActivityHelper to then launch the correct activity on the watch. val intent = Intent(context, LaunchOnWearActivity::class.java) val wearPendingIntent = PendingIntent.getActivity( context, wearRequestCode, intent, PendingIntent.FLAG_UPDATE_CURRENT or PendingIntent.FLAG_IMMUTABLE ) val openOnWatchAction = NotificationCompat.Action.Builder( R.drawable.watch, "Open on watch", wearPendingIntent ) .build() val wearableExtender = NotificationCompat.WearableExtender() // This action will only be shown on the watch, not on the phone. // Actions added to the Notification builder directly will not be shown on the watch, // because one or more actions are defined in the WearableExtender. .addAction(openOnWatchAction) // This synchronizes dismissals between watch and phone. .setDismissalId(chatId) val notification = NotificationCompat.Builder(context, channelId) // ... set other fields ... .extend(wearableExtender) .build()
تشغيل تطبيق الهاتف من جهاز قابل للارتداء
إذا كنت تستخدم الإشعارات المربوطة، سيتضمّن أي إشعار تلقائيًا زرًا لتشغيل التطبيق على الهاتف. ومع ذلك، إذا كنت تستخدم إشعارًا محليًا تم إنشاؤه على الساعة، اتّبِع الخطوات التالية لإنشاء زر يفتح التطبيق على الهاتف:
- أنشئ
Activityجديدًا يوسّعConfirmationActivity. - استخدِم
RemoteActivityHelperفيActivityالجديد لتشغيل تطبيق "الهاتف". - عند إنشاء
IntentلتشغيلActivityمن الإشعار، اضبط قيمة الإضافةEXTRA_ANIMATION_TYPEعلىOPEN_ON_PHONE_ANIMATION.
ملاحظة: لا يمكنك استخدام BroadcastReceiver كهدف لإجراء الإشعار.