
애플리케이션 코드에 변경사항을 추가하여 Microbenchmark 라이브러리를 사용하는 방법을 알아보려면 빠른 시작 섹션을 참고하세요. 코드베이스를 더 복잡하게 변경하여 전체 설정을 완료하는 방법을 알아보려면 전체 프로젝트 설정 섹션을 참고하세요.
빠른 시작
이 섹션에서는 코드를 모듈로 이동할 필요 없이 벤치마킹을 시도하고 일회성 측정을 실행하는 방법을 보여줍니다. 정확한 성능 결과를 얻기 위해 이 단계에서는 앱에서 디버깅을 사용 중지합니다. 따라서 소스 제어 시스템에 변경사항을 커밋하지 않고 로컬 작업 사본에 이를 유지합니다.
일회성 벤치마킹을 실행하려면 다음 단계를 따르세요.
모듈의
build.gradle또는build.gradle.kts파일에 라이브러리를 추가합니다.Kotlin
dependencies {
    implementation("androidx.benchmark:benchmark-junit4:1.2.4")
}
Groovy
dependencies {
    implementation 'androidx.benchmark:benchmark-junit4:1.2.4'
}
androidTestImplementation종속 항목 대신implementation종속 항목을 사용합니다.androidTestImplementation를 사용하면 라이브러리 매니페스트가 앱 매니페스트에 병합되지 않으므로 벤치마크가 실행되지 않습니다.debug빌드 유형을 디버그 가능하지 않도록 업데이트합니다.Kotlin
android {
    ...
    buildTypes {
        debug {
            isDebuggable = false
        }
    }
}
Groovy
android {
    ...
    buildTypes {
        debug {
            debuggable false
        }
    }
}
testInstrumentationRunner을AndroidBenchmarkRunner로 변경합니다.Kotlin
android {
    ...
    defaultConfig {
        testInstrumentationRunner = "androidx.benchmark.junit4.AndroidBenchmarkRunner"
    }
}
Groovy
android {
    ...
    defaultConfig {
        testInstrumentationRunner "androidx.benchmark.junit4.AndroidBenchmarkRunner"
    }
}
androidTest디렉터리의 테스트 파일에BenchmarkRule인스턴스를 추가하여 벤치마크를 추가합니다. 벤치마크 작성에 관한 자세한 내용은 Microbenchmark 클래스 만들기를 참고하세요.다음 코드 스니펫은 계측 테스트에 벤치마크를 추가하는 방법을 보여줍니다.
Kotlin
@RunWith(AndroidJUnit4::class) class SampleBenchmark { @get:Rule val benchmarkRule = BenchmarkRule() @Test fun benchmarkSomeWork() { benchmarkRule.measureRepeated { doSomeWork() } } }
Java
@RunWith(AndroidJUnit4.class)
class SampleBenchmark {
    @Rule
    public BenchmarkRule benchmarkRule = new BenchmarkRule();

    @Test
    public void benchmarkSomeWork() {
            BenchmarkRuleKt.measureRepeated(
                (Function1<BenchmarkRule.Scope, Unit>) scope -> doSomeWork()
            );
       }
    }
}
벤치마크 작성 방법을 알아보려면 Microbenchmark 클래스 만들기로 건너뛰세요.
전체 프로젝트 설정
일회성 벤치마킹 대신 정기적인 벤치마킹을 설정하려면 벤치마크를 자체 모듈로 격리합니다. 이렇게 하면 debuggable을 false로 설정하는 것과 같은 구성이 일반 테스트와 분리되도록 할 수 있습니다.
Microbenchmark는 코드를 직접 실행하므로 벤치마킹할 코드를 별도의 Gradle 모듈에 배치하고 그림 1과 같이 해당 모듈의 종속 항목을 설정합니다.
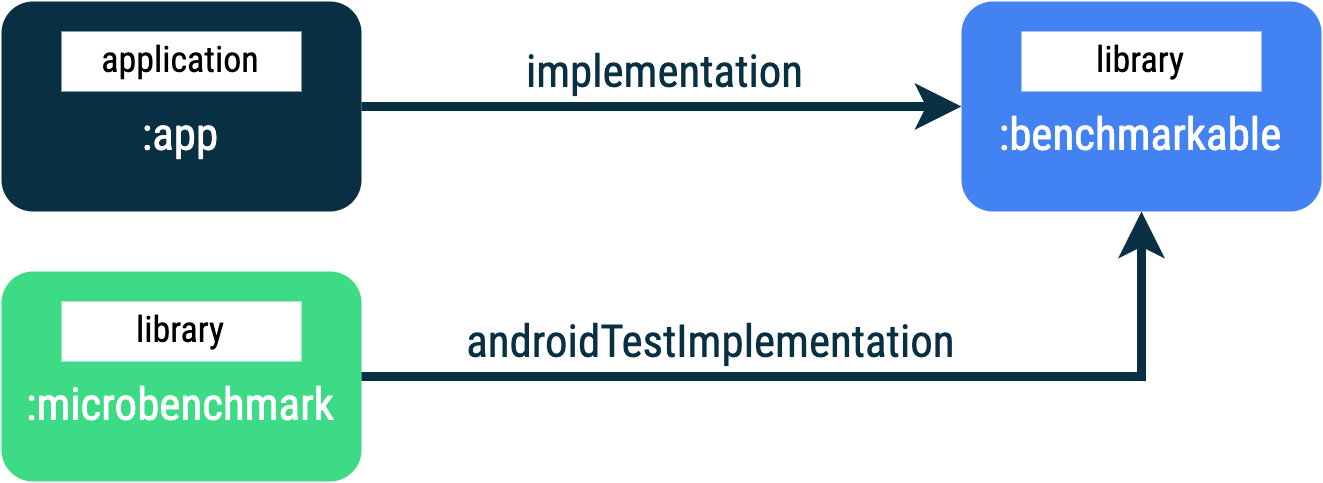
:benchmarkable 모듈에서 코드를 벤치마킹할 수 있도록 하는 :app, :microbenchmark, :benchmarkable Gradle 모듈이 있는 앱 구조새 Gradle 모듈을 추가하려면 Android 스튜디오에서 모듈 마법사를 사용하면 됩니다. 마법사는 벤치마크 디렉터리가 추가되고 debuggable이 false로 설정된 상태에서 벤치마킹을 위해 사전 구성된 모듈을 만듭니다.
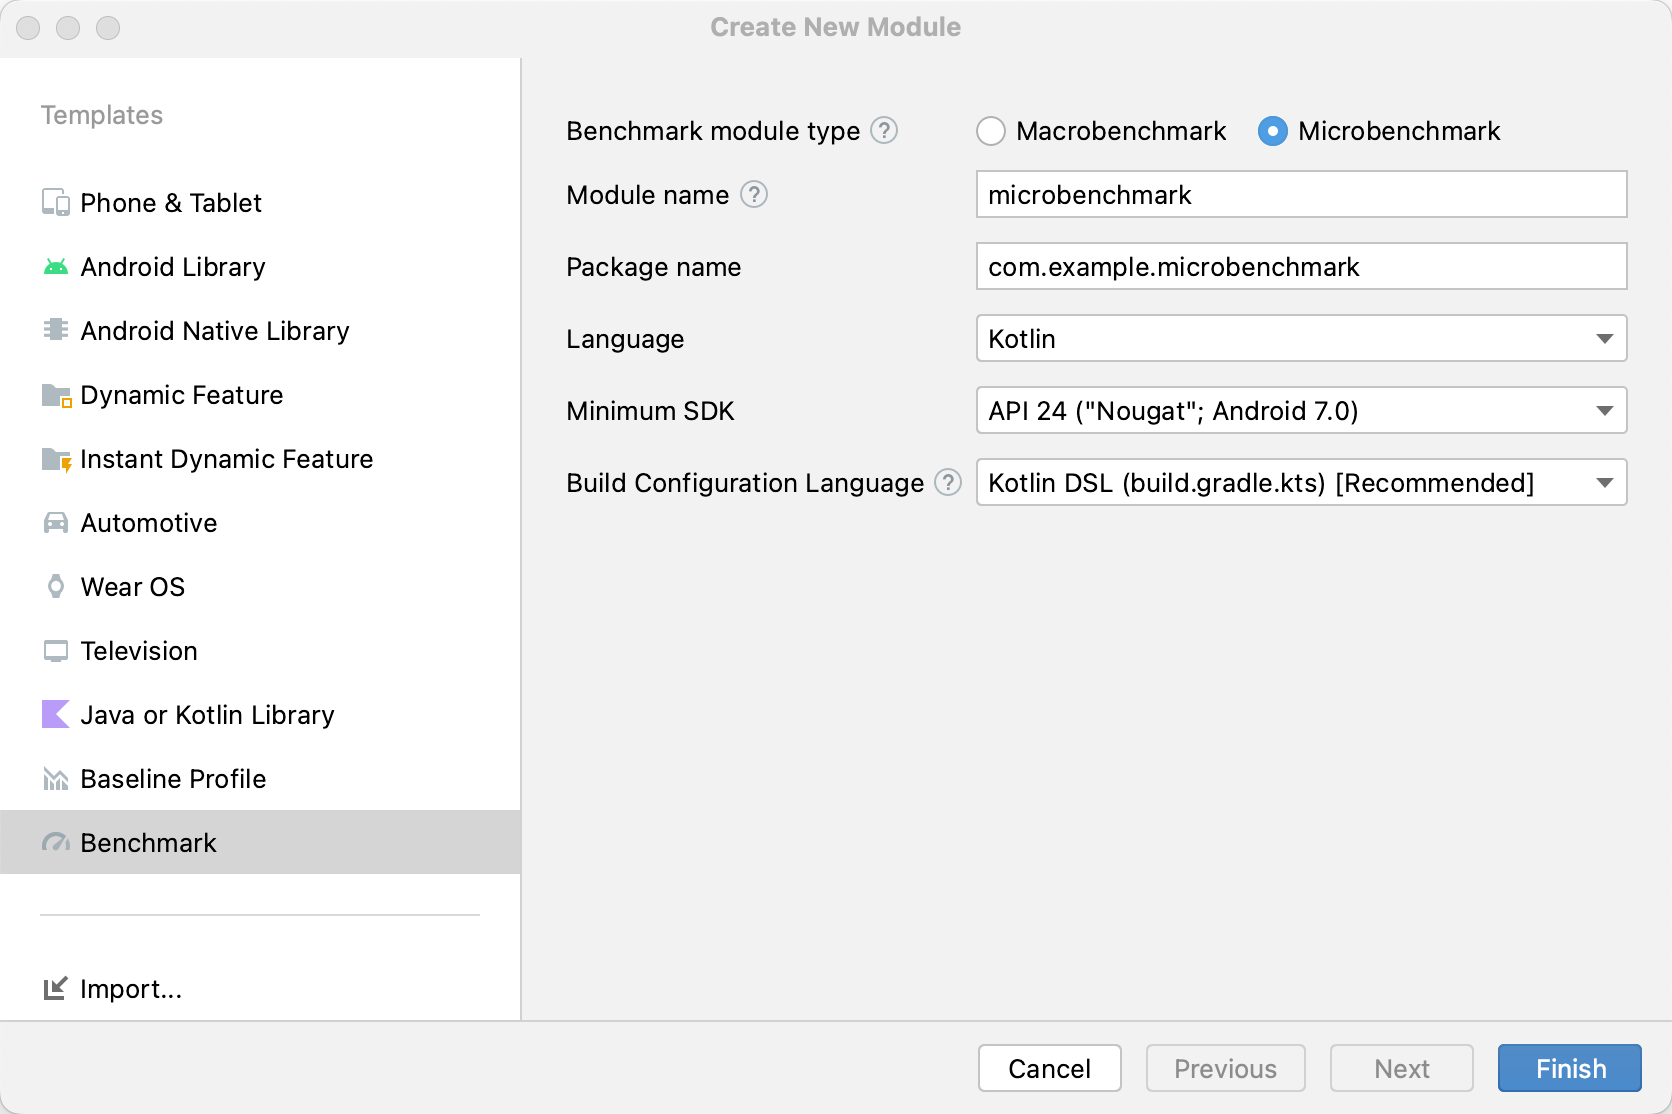
Android 스튜디오의 Project 패널에서 프로젝트 또는 모듈을 마우스 오른쪽 버튼으로 클릭하고 New > Module을 클릭합니다.
Template 창에서 Benchmark를 선택합니다.
벤치마크 모듈 유형으로 Microbenchmark를 선택합니다.
모듈 이름으로 'microbenchmark'를 입력합니다.
Finish를 클릭합니다.
모듈을 만든 후 build.gradle 또는 build.gradle.kts 파일을 변경하고 벤치마킹할 코드가 포함된 모듈에 androidTestImplementation을 추가합니다.
Kotlin
dependencies {
    // The module name might be different.
    androidTestImplementation(project(":benchmarkable"))
}
Groovy
dependencies {
    // The module name might be different.
    androidTestImplementation project(':benchmarkable')
}
Microbenchmark 클래스 만들기
벤치마크는 표준 계측 테스트입니다. 벤치마크를 만들려면 라이브러리에서 제공되는 BenchmarkRule 클래스를 사용하세요. 활동을 벤치마킹하려면 ActivityScenario 또는 ActivityScenarioRule을 사용합니다. UI 코드를 벤치마킹하려면 @UiThreadTest를 사용합니다.
다음 코드는 샘플 벤치마크를 보여줍니다.
Kotlin
@RunWith(AndroidJUnit4::class) class SampleBenchmark { @get:Rule val benchmarkRule = BenchmarkRule() @Test fun benchmarkSomeWork() { benchmarkRule.measureRepeated { doSomeWork() } } }
Java
@RunWith(AndroidJUnit4.class)
class SampleBenchmark {
    @Rule
    public BenchmarkRule benchmarkRule = new BenchmarkRule();

    @Test
    public void benchmarkSomeWork() {
        final BenchmarkState state = benchmarkRule.getState();
        while (state.keepRunning()) {
            doSomeWork();
        }
    }
}
설정 타이밍 사용 중지
runWithTimingDisabled{} 블록으로 측정하지 않을 코드 섹션의 타이밍을 사용 중지할 수 있습니다. 이러한 섹션은 일반적으로 벤치마크의 각 반복에서 실행해야 하는 코드를 나타냅니다.
Kotlin
// using random with the same seed, so that it generates the same data every run private val random = Random(0) // create the array once and just copy it in benchmarks private val unsorted = IntArray(10_000) { random.nextInt() } @Test fun benchmark_quickSort() { // ... benchmarkRule.measureRepeated { // copy the array with timing disabled to measure only the algorithm itself listToSort = runWithTimingDisabled { unsorted.copyOf() } // sort the array in place and measure how long it takes SortingAlgorithms.quickSort(listToSort) } // assert only once not to add overhead to the benchmarks assertTrue(listToSort.isSorted) }
Java
private final int[] unsorted = new int[10000];

public SampleBenchmark() {
    // Use random with the same seed, so that it generates the same data every
    // run.
    Random random = new Random(0);

    // Create the array once and copy it in benchmarks.
    Arrays.setAll(unsorted, (index) -> random.nextInt());
}

@Test
public void benchmark_quickSort() {
    final BenchmarkState state = benchmarkRule.getState();

    int[] listToSort = new int[0];

    while (state.keepRunning()) {

        // Copy the array with timing disabled to measure only the algorithm
        // itself.
        state.pauseTiming();
        listToSort = Arrays.copyOf(unsorted, 10000);
        state.resumeTiming();

        // Sort the array in place and measure how long it takes.
        SortingAlgorithms.quickSort(listToSort);
    }

    // Assert only once, not to add overhead to the benchmarks.
    assertTrue(SortingAlgorithmsKt.isSorted(listToSort));
}
measureRepeated 블록 내부와 runWithTimingDisabled 내부에서 실행되는 작업의 양을 최소화해 보세요. measureRepeated 블록은 여러 번 실행되며 벤치마크를 실행하는 데 필요한 전체 시간에 영향을 줄 수 있습니다. 벤치마크의 일부 결과를 확인해야 하는 경우 벤치마크를 반복할 때마다 결과를 어설션하는 대신 마지막 결과를 어설션하면 됩니다.
벤치마크 실행
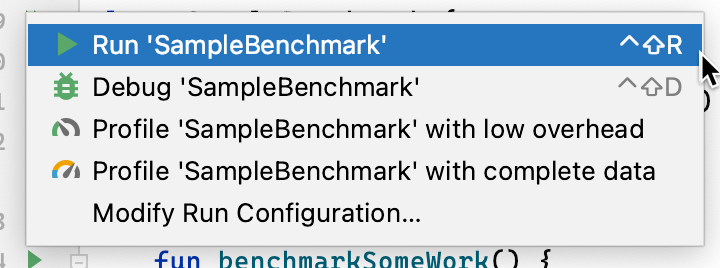
Android 스튜디오에서는 그림 3과 같이 테스트 클래스 또는 메서드 옆의 여백 작업을 사용하여 @Test에서와 마찬가지로 벤치마크를 실행합니다.
또는 명령줄에서 connectedCheck를 실행하여, 지정된 Gradle 모듈에서 모든 테스트를 실행합니다.
./gradlew benchmark:connectedCheck또는 다음과 같이 단일 테스트를 실행합니다.
./gradlew benchmark:connectedCheck -P android.testInstrumentationRunnerArguments.class=com.example.benchmark.SampleBenchmark#benchmarkSomeWork벤치마크 결과
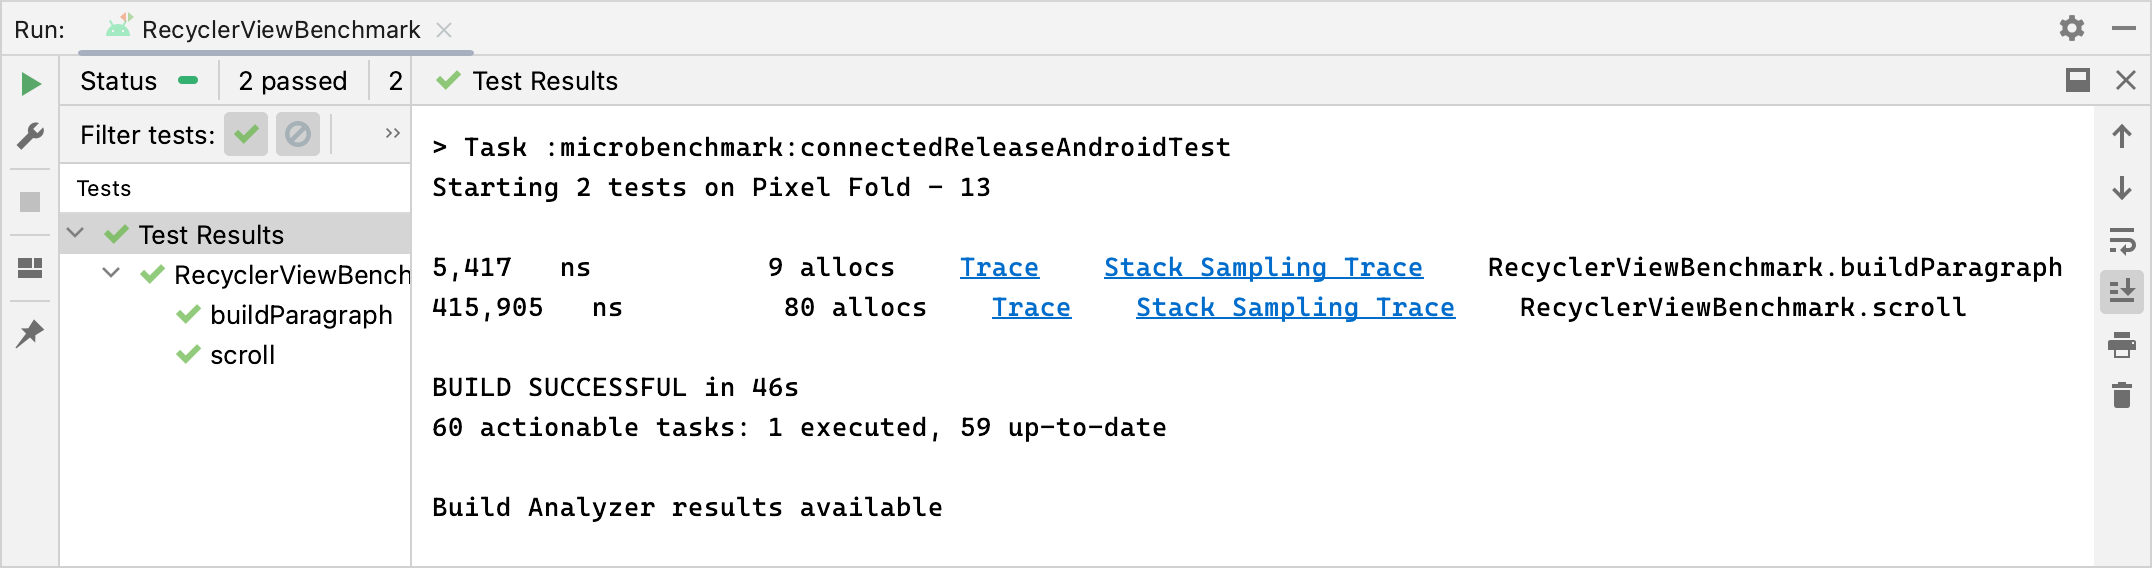
Microbenchmark를 성공적으로 실행한 후에는 측정항목이 Android 스튜디오에 곧바로 표시되고, 추가 측정항목 및 기기 정보가 포함된 전체 벤치마크 보고서가 JSON 형식으로 제공됩니다.
JSON 보고서와 모든 프로파일링 트레이스도 기기에서 호스트로 자동 복사되며 호스트 머신의 다음 위치에 기록됩니다.
project_root/module/build/outputs/connected_android_test_additional_output/debugAndroidTest/connected/device_id/
기본적으로 JSON 보고서는 기기 내의 디스크에서 테스트 APK의 외부 공유 미디어 폴더에 작성되며 일반적으로 다음 위치에 있습니다. /storage/emulated/0/Android/media/**app_id**/**app_id**-benchmarkData.json
구성 오류
라이브러리는 다음 조건을 감지하여 프로젝트 및 환경이 출시 당시의 정확한 성능을 제공하도록 설정되었는지 확인합니다.
- Debuggable이
false로 설정됩니다. - 실제 기기를 사용 중이며 에뮬레이터는 지원되지 않습니다.
- 기기가 루팅된 경우 시계가 잠깁니다.
- 기기의 배터리 잔량이 충분합니다(25% 이상).
앞의 확인 중에서 하나라도 실패하면 벤치마크에서 오류가 보고되어 부정확한 측정을 방지합니다.
특정 오류 유형을 경고로 표시하는 것을 억제하고 이로 인해 벤치마크가 중지되지 않도록 하려면 쉼표로 구분된 목록의 오류 유형을 계측 인수 androidx.benchmark.suppressErrors에 전달합니다.
다음 예와 같이 Gradle 스크립트에서 이를 설정할 수 있습니다.
Kotlin
android {
    defaultConfig {
       …
      testInstrumentationRunnerArguments["androidx.benchmark.suppressErrors"] = "DEBUGGABLE,LOW-BATTERY"
    }
}
Groovy
android {
    defaultConfig {
       …
      testInstrumentationRunnerArguments["androidx.benchmark.suppressErrors"] = "DEBUGGABLE,LOW-BATTERY"
    }
}
명령줄에서 오류를 억제할 수도 있습니다.
$ ./gradlew :benchmark:connectedCheck -P andoidtestInstrumentationRunnerArguments.androidx.benchmark.supperssErrors=DEBUGGABLE,LOW-BATTERY
오류를 억제하면 벤치마크가 잘못 구성된 상태로 실행될 수 있으며 테스트 이름 앞에 오류를 추가하여 벤치마크의 출력 이름이 의도적으로 변경됩니다. 예를 들어 앞의 스니펫에서 억제를 사용하여 디버그 가능한 벤치마크를 실행하면 테스트 이름 앞에 DEBUGGABLE_이 추가됩니다.
추천 서비스
- 참고: JavaScript가 사용 중지되어 있으면 링크 텍스트가 표시됩니다.
- Macrobenchmark 작성
- Gradle 없이 Microbenchmark 빌드
- 기준 프로필 만들기{:#creating-profile-rules}