Create Baseline Profiles
Stay organized with collections
Save and categorize content based on your preferences.
Baseline Profiles are essential for maximizing Jetpack Compose performance.
Pre-compiling your critical user journeys helps ensure that your Compose UI
renders smoothly.
Automatically generate profiles for every app release using the Jetpack
Macrobenchmark library and BaselineProfileRule. We recommend that you
use com.android.tools.build:gradle:8.0.0 or higher to take advantage of build
improvements when using Baseline Profiles.
These are the general steps to create a new Baseline Profile:
Set up the Baseline Profile module.
Define the JUnit test that helps generate Baseline Profiles.
Add the critical user journeys (CUJs) that you want to optimize.
Generate the Baseline Profile.
After you generate the Baseline Profile, benchmark it using a physical device to
measure the speed improvements.
Create a new Baseline Profile with AGP 8.2 or higher
The easiest way to create a new Baseline Profile is to use the Baseline Profile
module template, available starting in Android Studio Iguana and Android Gradle
Plugin (AGP) 8.2.
The Android Studio Baseline Profile Generator module template automates the
creation of a new module to generate and
benchmark
Baseline Profiles. Running the template generates most of the typical build
configuration, Baseline Profile generation, and verification code. The template
creates code to generate and benchmark Baseline Profiles to measure app startup.
Set up the Baseline Profile module
To run the Baseline Profile module template, follow these steps:
Select File > New > New Module.
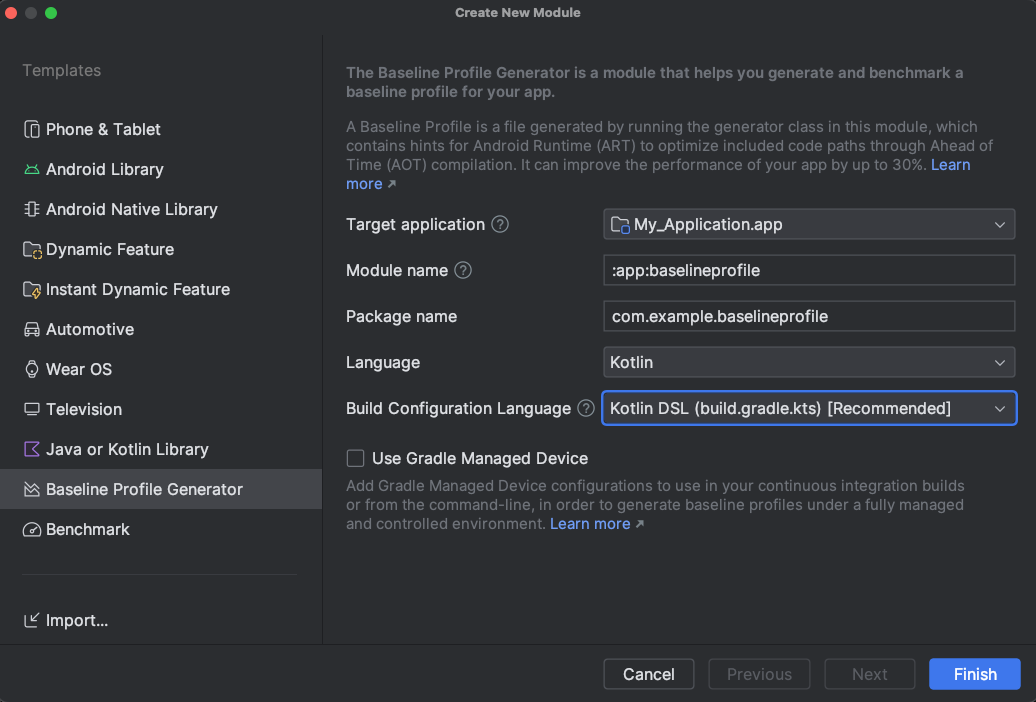
Select the Baseline Profile Generator template in the Templates
panel and configure it:
Figure 1. Baseline Profile Generator module template.
The fields in the template are the following:
Target application: the app the Baseline Profile is
generated for. When you have only a single app module in your project,
there is only one item in this list.
Module name: the name you want for the Baseline Profile module being
created.
Package name: the package name you want for the Baseline Profile
module.
Language: whether you want the generated code to be Kotlin or Java.
Build configuration language: whether you want to use Kotlin Script
(KTS) or Groovy for your build configuration scripts.
Use Gradle-managed device: whether you're using Gradle-managed
devices to test your app.
Click Finish and the new module is created. If you are using source
control, you might be prompted to add the newly created module files to
source control.
Define the Baseline Profile generator
The newly created module contains tests to both generate and benchmark the
Baseline Profile and test only basic app startup. We recommend that you augment
these to include CUJs and advanced startup workflows. Make sure that any tests
related to app startup are in a rule block with includeInStartupProfile set
to true; conversely, for optimal performance make sure that any tests not
related to app startup are not included in a Startup Profile. App startup
optimizations are used to define a special part of a Baseline Profile called a
Startup Profile.
It helps maintainability if you abstract these CUJs outside of the generated
Baseline Profile and benchmark code so that they can be used for both. This
means that changes to your CUJs are used consistently.
Generate and install the Baseline Profile
The Baseline Profile module template adds a new run configuration to generate
the Baseline Profile. If you use product flavors, Android Studio creates
multiple run configurations so that you can generate separate Baseline Profiles
for each flavor.
Figure 2. Running this configuration generates the Baseline
Profile.
When the Generate Baseline Profile run configuration completes, it copies
the generated Baseline Profile to the
src/variant/generated/baselineProfiles/baseline-prof.txt
file in the module that is being profiled. The variant options are either the
release build type or a build variant involving the release build type.
The generated Baseline Profile is originally created in build/outputs. The
full path is dictated by the variant or flavor of the app being profiled and
whether you use a Gradle-managed device or a connected device for profiling. If
you use the names used by the code and build configurations generated by the
template, the Baseline Profile is created in the
build/outputs/managed_device_android_test_additional_output/nonminifiedrelease/pixel6Api31/BaselineProfileGenerator_generate-baseline-prof.txt
file. You probably won't have to interact with this version of the generated
Baseline Profile directly unless you're manually copying it to the target
modules (not recommended).
Create a new Baseline Profile with AGP 8.1
If you aren't able to use the Baseline Profile module template, use the
Macrobenchmark module template and the Baseline Profile Gradle plugin to create
a new Baseline Profile. We recommend you use these tools starting with Android
Studio Giraffe and AGP 8.1.
Here are the steps to create a new Baseline Profile using the Macrobenchmark
module template and Baseline Profile Gradle plugin:
The generator can contain interactions with your app beyond app startup.
This lets you optimize the runtime performance of your app, such as
scrolling lists, running animations, and navigating within an Activity.
See other examples of tests that use @BaselineProfileRule to improve
critical user journeys.
Add the Baseline Profile Gradle plugin
(libs.plugins.androidx.baselineprofile). The plugin makes it easier to
generate Baseline Profiles and maintain them in the future.
To generate the Baseline Profile, run the :app:generateBaselineProfile or
:app:generateVariantBaselineProfile Gradle tasks in the
terminal.
Run the generator as an instrumented test on a rooted physical device,
emulator, or Gradle Managed Device. If you use a Gradle Managed Device,
set aosp as the systemImageSource, because you need root access for the
Baseline Profile generator.
At the end of the generation task, the Baseline Profile is copied to
app/src//generated/baselineProfiles.
Here's how to create a Baseline Profile using the Baseline Profile Gradle plugin
directly:
Create a new com.android.test module—for example,
:baseline-profile.
Configure the build.gradle.kts file for :baseline-profile:
Apply the androidx.baselineprofile plugin.
Ensure the targetProjectPath points to the :app module.
Optionally, add a Gradle-managed device (GMD). In the following
example, it's pixel6Api31. If not specified, the plugin uses a
connected device, either emulated or physical.
Apply the configuration you want, as shown in the following example.
Kotlin
plugins{id("com.android.test")id("androidx.baselineprofile")}android{defaultConfig{...}// Point to the app module, the module that you're generating the Baseline Profile for.targetProjectPath=":app"// Configure a GMD (optional).testOptions.managedDevices.devices{pixel6Api31(com.android.build.api.dsl.ManagedVirtualDevice){device="Pixel 6"apiLevel=31systemImageSource="aosp"}}}dependencies{...}// Baseline Profile Gradle plugin configuration. Everything is optional. This// example uses the GMD added earlier and disables connected devices.baselineProfile{// Specifies the GMDs to run the tests on. The default is none.managedDevices+="pixel6Api31"// Enables using connected devices to generate profiles. The default is// `true`. When using connected devices, they must be rooted or API 33 and// higher.useConnectedDevices=false}
Groovy
plugins{id'com.android.test'id'androidx.baselineprofile'}android{defaultConfig{...}// Point to the app module, the module that you're generating the Baseline Profile for.targetProjectPath':app'// Configure a GMD (optional).testOptions.managedDevices.devices{pixel6Api31(com.android.build.api.dsl.ManagedVirtualDevice){device'Pixel 6'apiLevel31systemImageSource'aosp'}}}dependencies{...}// Baseline Profile Gradle plugin configuration. Everything is optional. This// example uses the GMD added earlier and disables connected devices.baselineProfile{// Specifies the GMDs to run the tests on. The default is none.managedDevices['pixel6Api31']// Enables using connected devices to generate profiles. The default is// `true`. When using connected devices, they must be rooted or API 33 and// higher.useConnectedDevicesfalse}
Create a Baseline Profile test in the :baseline-profile test module. The
following example is a test that generates a Baseline Profile for app
startup.
Update the build.gradle.kts file in the app module, for example :app.
Apply the plugin androidx.baselineprofile.
Add a baselineProfile dependency to the :baseline-profile module.
Kotlin
plugins{id("com.android.application")id("androidx.baselineprofile")}android{// There are no changes to the `android` block....}dependencies{...// Add a `baselineProfile` dependency on the `:baseline-profile` module.baselineProfile(project(":baseline-profile"))}
Groovy
plugins{id'com.android.application'id'androidx.baselineprofile'}android{// No changes to the `android` block....}dependencies{...// Add a `baselineProfile` dependency on the `:baseline-profile` module.baselineProfile':baseline-profile'}
Generate the profile by running the :app:generateBaselineProfile
or :app:generateVariantBaselineProfile Gradle tasks.
At the end of the generation task, the Baseline Profile is copied to
app/src/variant/generated/baselineProfiles.
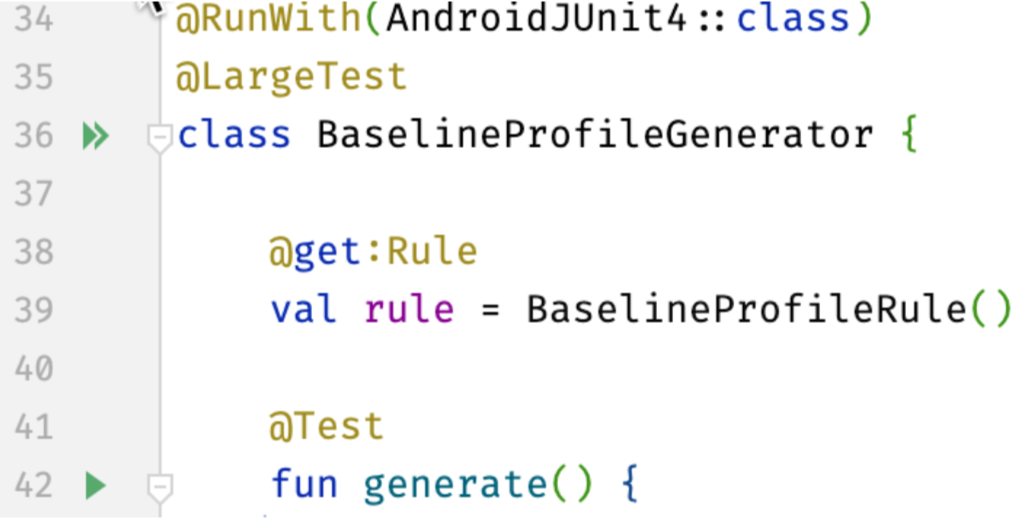
Figure 3. Run Android Tests from the gutter
action.
When you run this within Android Studio, the build output contains details of
the speed improvements that the Baseline Profile provides:
StartupBenchmarks_startupCompilationBaselineProfiles
timeToInitialDisplayMs   min 161.8,   median 178.9,   max 194.6
StartupBenchmarks_startupCompilationNone
timeToInitialDisplayMs   min 184.7,   median 196.9,   max 202.9
Capture all required code paths
The two key metrics for measuring app startup times are as follows:
Time to full display (TTFD): TTID plus the time to display content
that is loaded asynchronously after the initial frame is displayed.
TTFD is reported once the reportFullyDrawn method of the
ComponentActivity is called. If reportFullyDrawn is never called, the
TTID is reported instead. You might need to delay when reportFullyDrawn is
called until after asynchronous loading is complete. For example, if the UI
contains a dynamic lazy list, the list might be populated by a background
task that completes after the list is first drawn and, therefore, after the UI
is marked as fully drawn. In such cases, code that runs after the UI reaches
fully drawn state isn't included in the Baseline Profile.
To include the list population as part of your Baseline Profile, get the
FullyDrawnReporter by using getFullyDrawnReporter and add a reporter
to it in your app code. Release the reporter once the background task finishes
populating the list. The FullyDrawnReporter doesn't call the
reportFullyDrawn method until all reporters are released. By doing this,
Baseline Profile includes the code paths required to populate the list. This
doesn't change the app's behavior for the user, but it lets the Baseline Profile
include all the necessary code paths.
To indicate fully drawn state, use the following Compose APIs:
ReportDrawn indicates that your composable is immediately ready for
interaction.
ReportDrawnWhen takes a predicate, such as list.count > 0, to
indicate when your composable is ready for interaction.
ReportDrawnAfter takes a suspending method that, when it completes,
indicates that your composable is ready for interaction.
Recommended for you
Note: link text is displayed when JavaScript is off
Content and code samples on this page are subject to the licenses described in the Content License. Java and OpenJDK are trademarks or registered trademarks of Oracle and/or its affiliates.
Last updated 2026-08-24 UTC.
[[["Easy to understand","easyToUnderstand","thumb-up"],["Solved my problem","solvedMyProblem","thumb-up"],["Other","otherUp","thumb-up"]],[["Missing the information I need","missingTheInformationINeed","thumb-down"],["Too complicated / too many steps","tooComplicatedTooManySteps","thumb-down"],["Out of date","outOfDate","thumb-down"],["Samples / code issue","samplesCodeIssue","thumb-down"],["Other","otherDown","thumb-down"]],["Last updated 2026-08-24 UTC."],[],[]]