
Journeys for Android Studio lets you describe end-to-end user flows in natural language and run them directly with the AI agent on a connected device or emulator. Your set of instructions, called a journey, is converted into actions that the agent performs on your app. Additionally, you can write and describe more complex assertions, which the agent evaluates based on what it sees on the device.
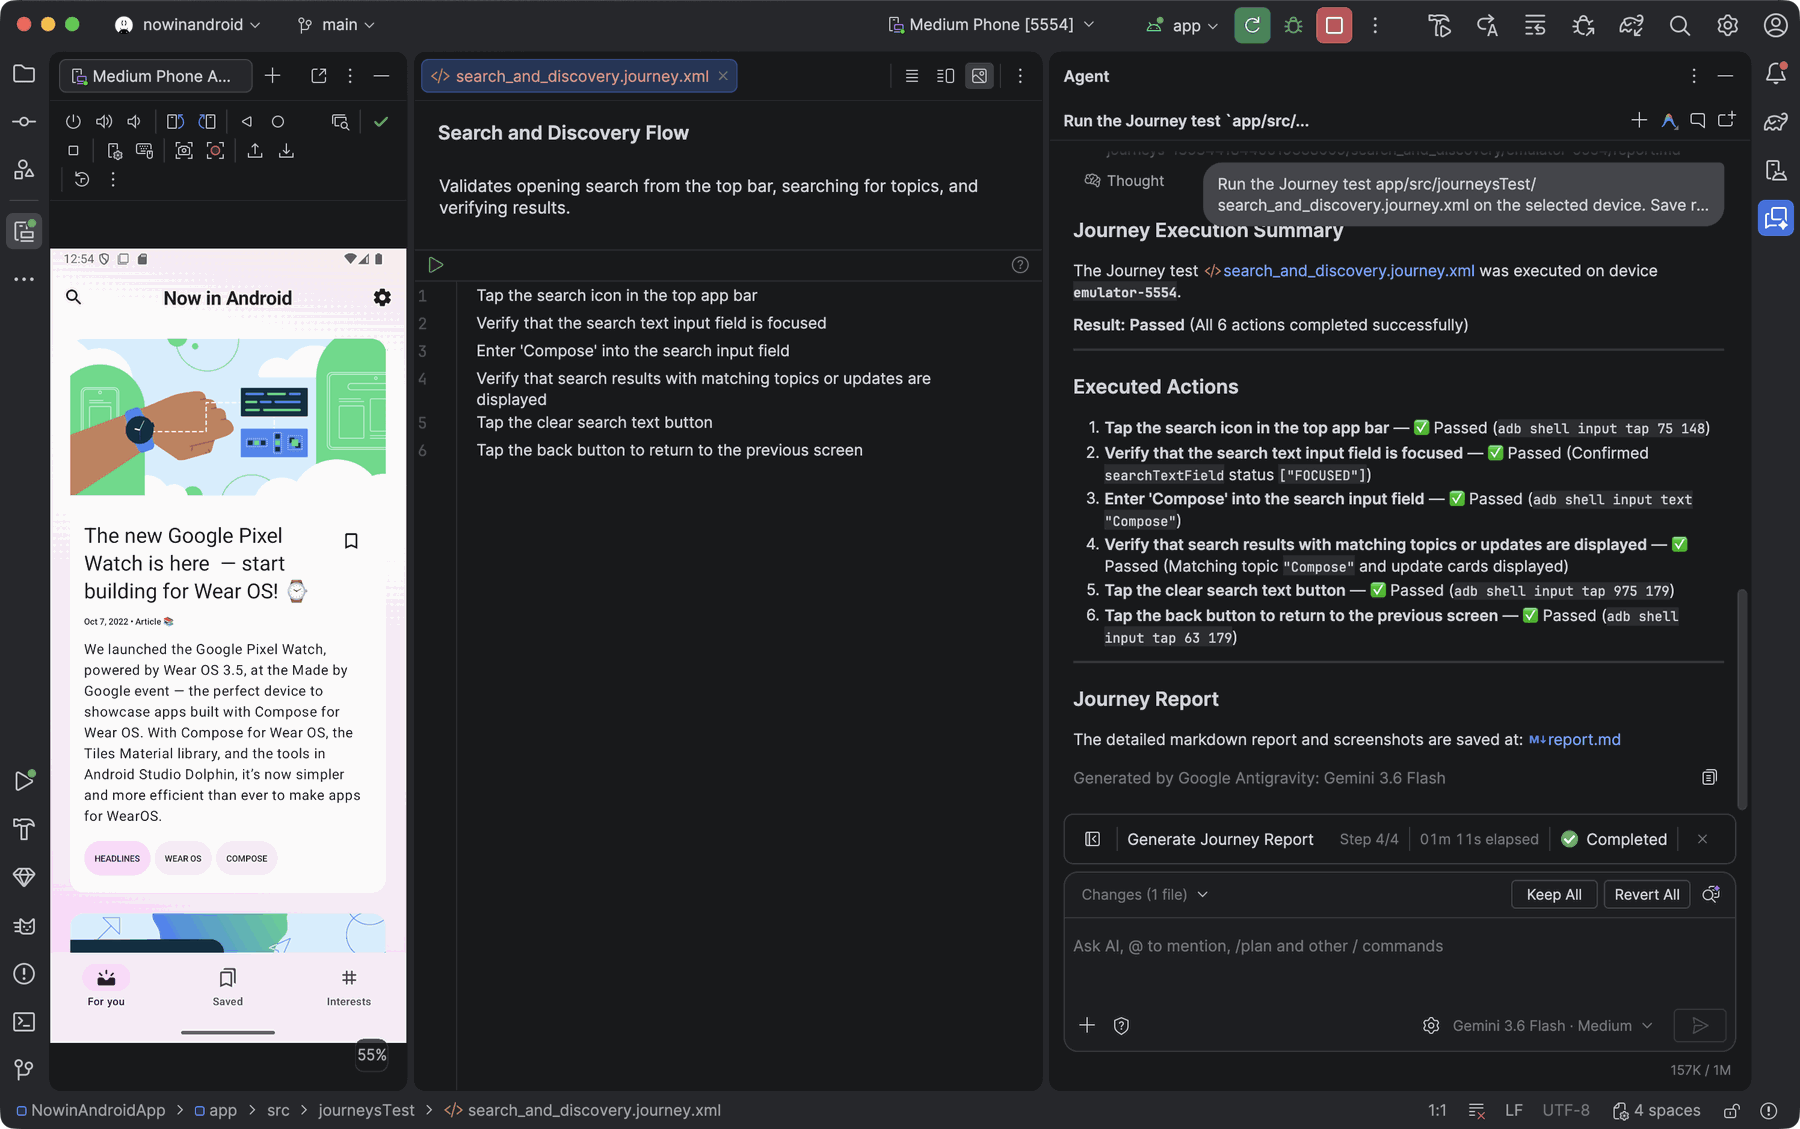
Because the agent reasons about which actions to perform to satisfy the goals, journeys are more resilient to subtle changes to your app's layout or behavior, resulting in fewer flaky tests when running against different versions of your app and different device configurations.
You can write and run journeys right from Android Studio, or from the command line using any agent. When you run a journey, the agent steps through the flow, verifies the expected outcomes, and generates a report with screenshots that shows whether each step passed or failed.
Write a journey
Journeys are written using XML to organize your journey description and steps.
Journey files use the .journey.xml extension and are stored in the
src/journeysTest/ directory of your app module. Android Studio provides a
visual editor that makes creating and editing journeys easier. You don't need to
make any changes to your build files to use journeys.
To create a journey, do one of the following:
- From the Project panel in Android Studio, right-click on the app module for which you want to write a journey and select New > Journey File. You can also select File > New > Journey File from the main menu.
- In the Agent window, ask the agent to create a journey for a user flow in your app. For example, "Create a journey that searches for a product, adds it to the cart, and verifies that the cart shows one item."
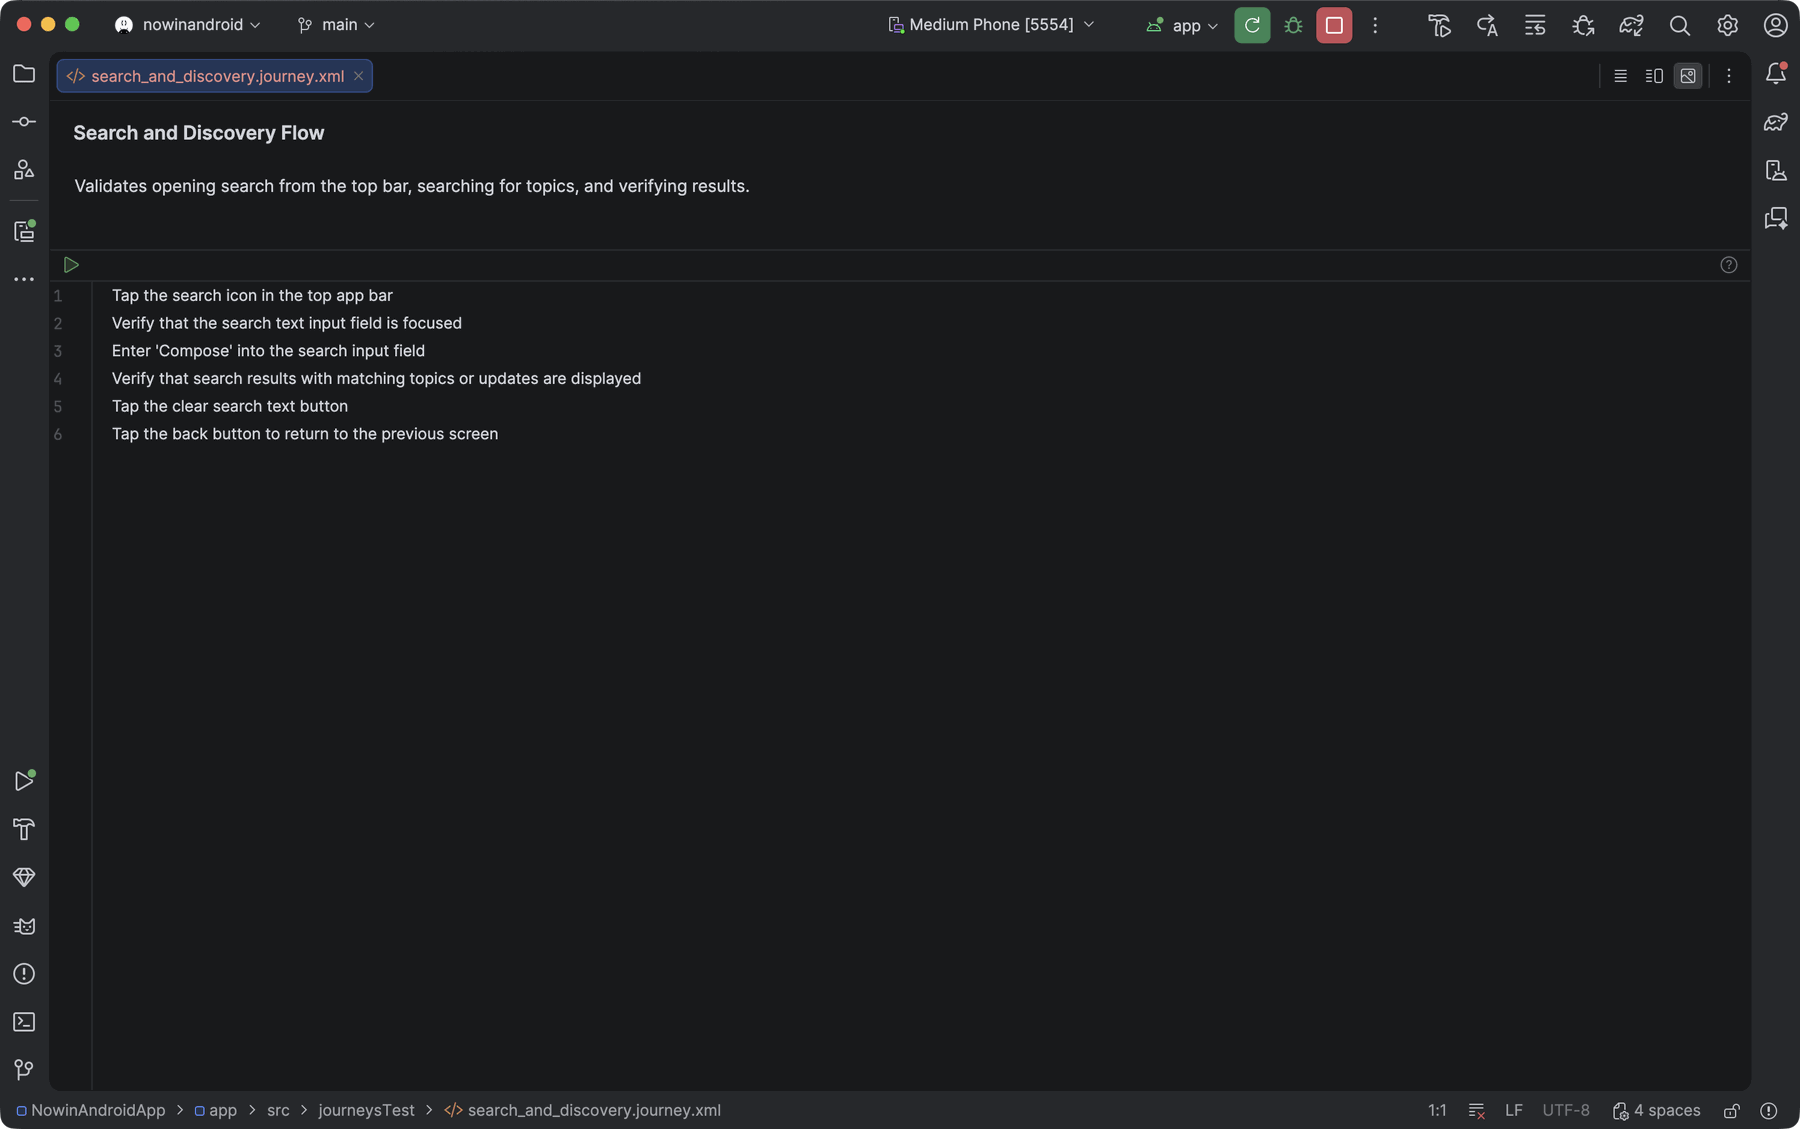
To edit a journey, open the journey file. You can use the Code view to edit the XML directly, the Design view for a simplified editing experience, or the Split view to see both. You can also ask the agent to update an existing journey file.
In the Design view, each row is a step of your journey. Type an action that you want the agent to perform, or an assertion that you want the agent to check, and then press Enter to add the next step.
Tips for writing journeys
Although the agent is capable of understanding most steps written in supported languages, following these tips for writing journeys can lead to more accurate and expected results:
- Assume your app is already in the foreground: Running a journey automatically launches your app. The steps of your journey should begin after the app has fully launched. That is, you don't need to include "launch app" as a step.
- Use unambiguous language: Being precise minimizes misinterpretation and improves reliability.
| Instead of | Do this |
|---|---|
| "Select the dismiss button" | "Tap 'Dismiss'" or just "Dismiss" |
| "Type 'celery'" | "Type 'celery' in the search bar at the top of the home screen" |
| "Swipe to dismiss" | "Swipe left to dismiss, the card should then no longer be visible" |
- Include the success criteria as part of the step: This helps the agent better understand your intention and clarifies when the action is complete and the next action can start.
| Instead of | Do this |
|---|---|
| "Select the send button" | "Send the email by tapping the submit button. This should close the email and return you to the inbox." |
| "Go to the shopping cart" | "Tap on the shopping cart icon which will take you to the shopping cart page. Verify it contains zero items" |
| "Click the first video" | "Click the first video and wait for it to fully load" |
- Refine your journey: If your journey isn't executing as expected, view the results to understand why the agent might not have executed the steps as you expected. Use this information to provide additional clarity to your instructions.
- Break down your journey into more specific steps: Although the agent can interpret multi-action steps, sometimes more granular discrete steps may improve the accuracy and reproducibility of the journey.
Supported capabilities and limitations
Here's an overview of the supported capabilities when writing journeys, and the capabilities that aren't supported or may perform inconsistently. The following lists aren't exhaustive.
The following actions are supported within journeys:
- Tap on UI elements.
- Long-press on UI elements.
- Type to input text into text fields.
- Swipe/Scroll in a certain direction to navigate the UI.
The following capabilities aren't supported at this time:
- Multi-finger gestures (for example, pinch to zoom) - Interactions requiring two or more points of contact on the screen simultaneously, such as pinching to zoom in or out, or swiping with two-fingers.
The following capabilities may perform inconsistently:
- Counting - Accurately tracking quantities, frequencies, or progress.
Features and capabilities are constantly improving. We suggest checking this page later to learn about additional features and capabilities. To help us improve Journeys, share your feedback.
Run your journey
You run journeys with the AI agent in the Agent window. When you run a journey, the agent builds and deploys your app to a device, performs each step of your journey, and reports whether the journey passed or failed.
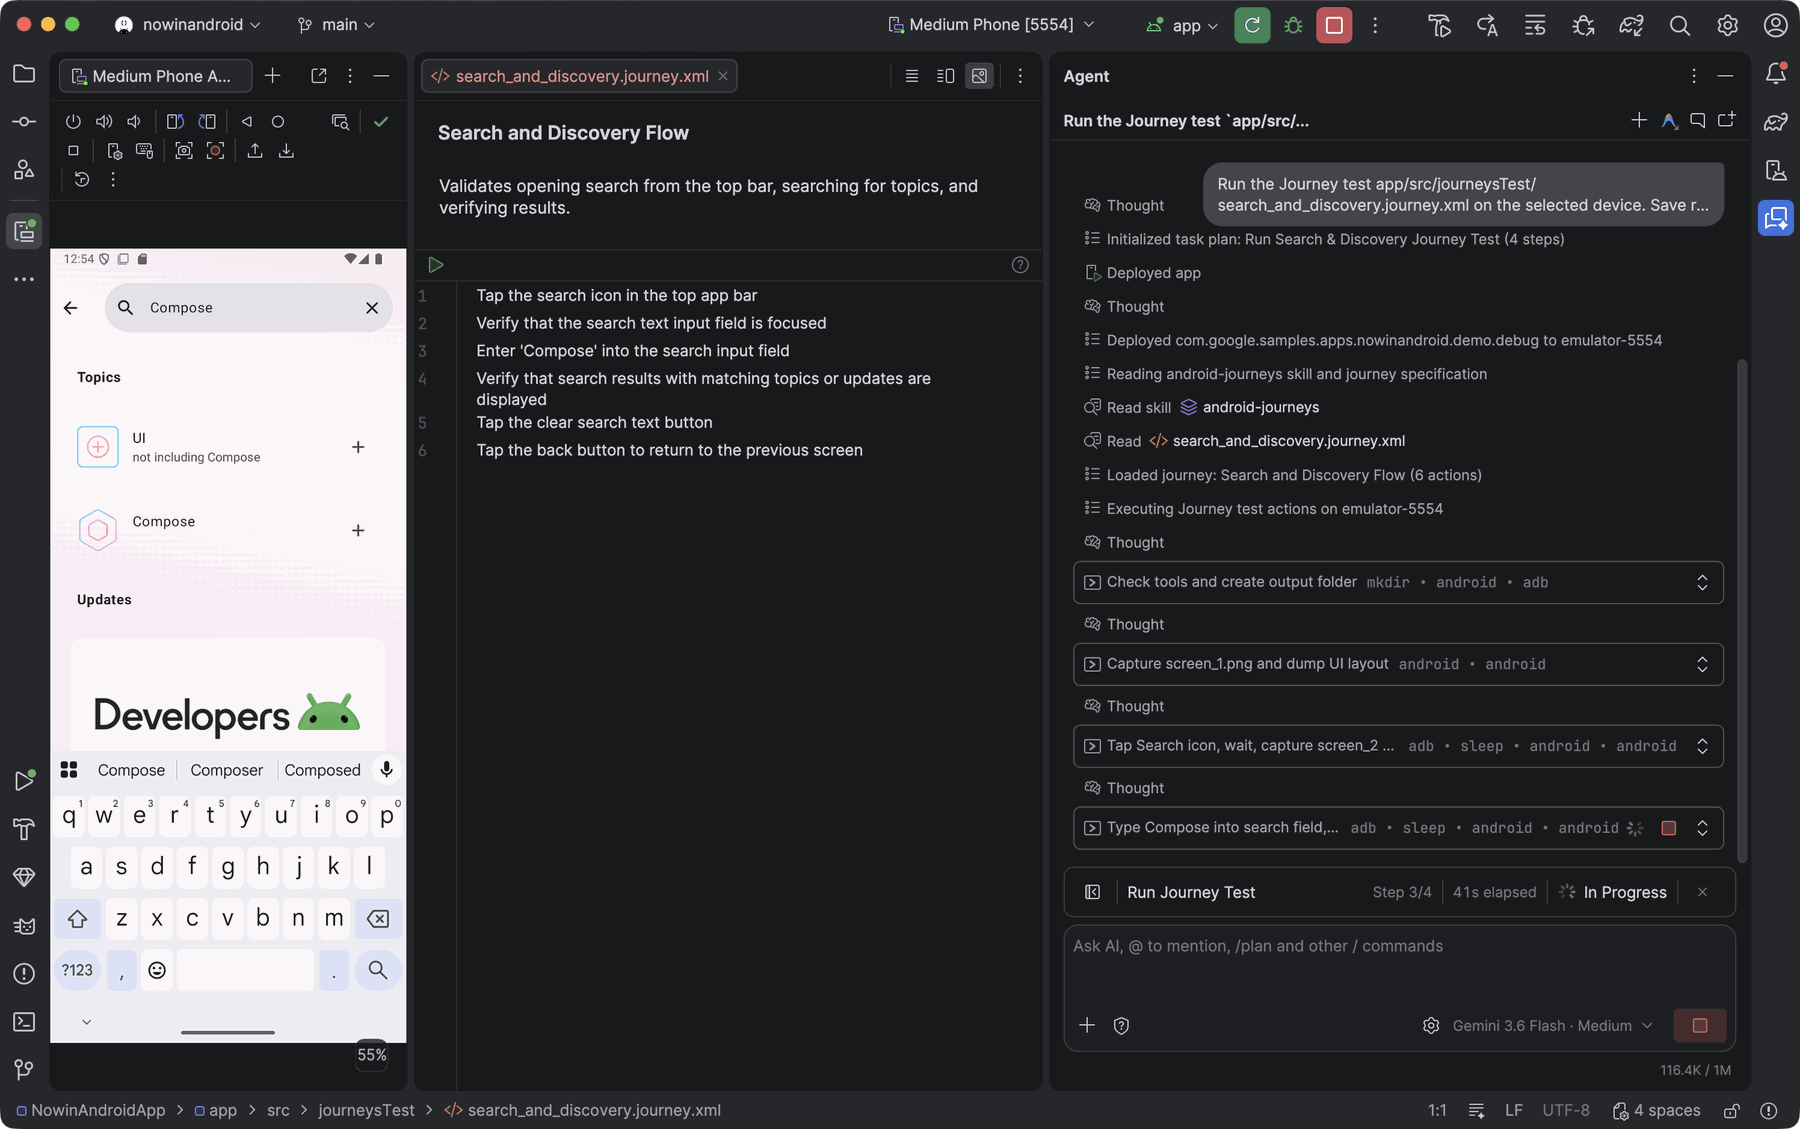
To run a journey, do one of the following:
- Open the journey file and click Run
 in the editor toolbar.
- In the Code or Split view, click Run
in the gutter next to the
<journey>tag. - In the Project panel, right-click a journey file and select Run Journey with Agent. To run several journeys, select more than one journey file, or a folder that contains journey files, and select Run Journeys with Agent.
- In the Agent window, ask the agent to run a journey.
Android Studio starts a new conversation in the Agent window using the agent you last selected, including other agents that you've connected in Settings > Tools > AI > Agents.
The agent runs the journey on the device that's selected in the main toolbar. If no device is running, the agent can launch an emulator for you. If you run more than one journey, or select more than one device, the agent shows a summary of the results when the runs are complete.
Run a journey from the command line
To run Journeys from the command line with any agent, use Android CLI.
View results
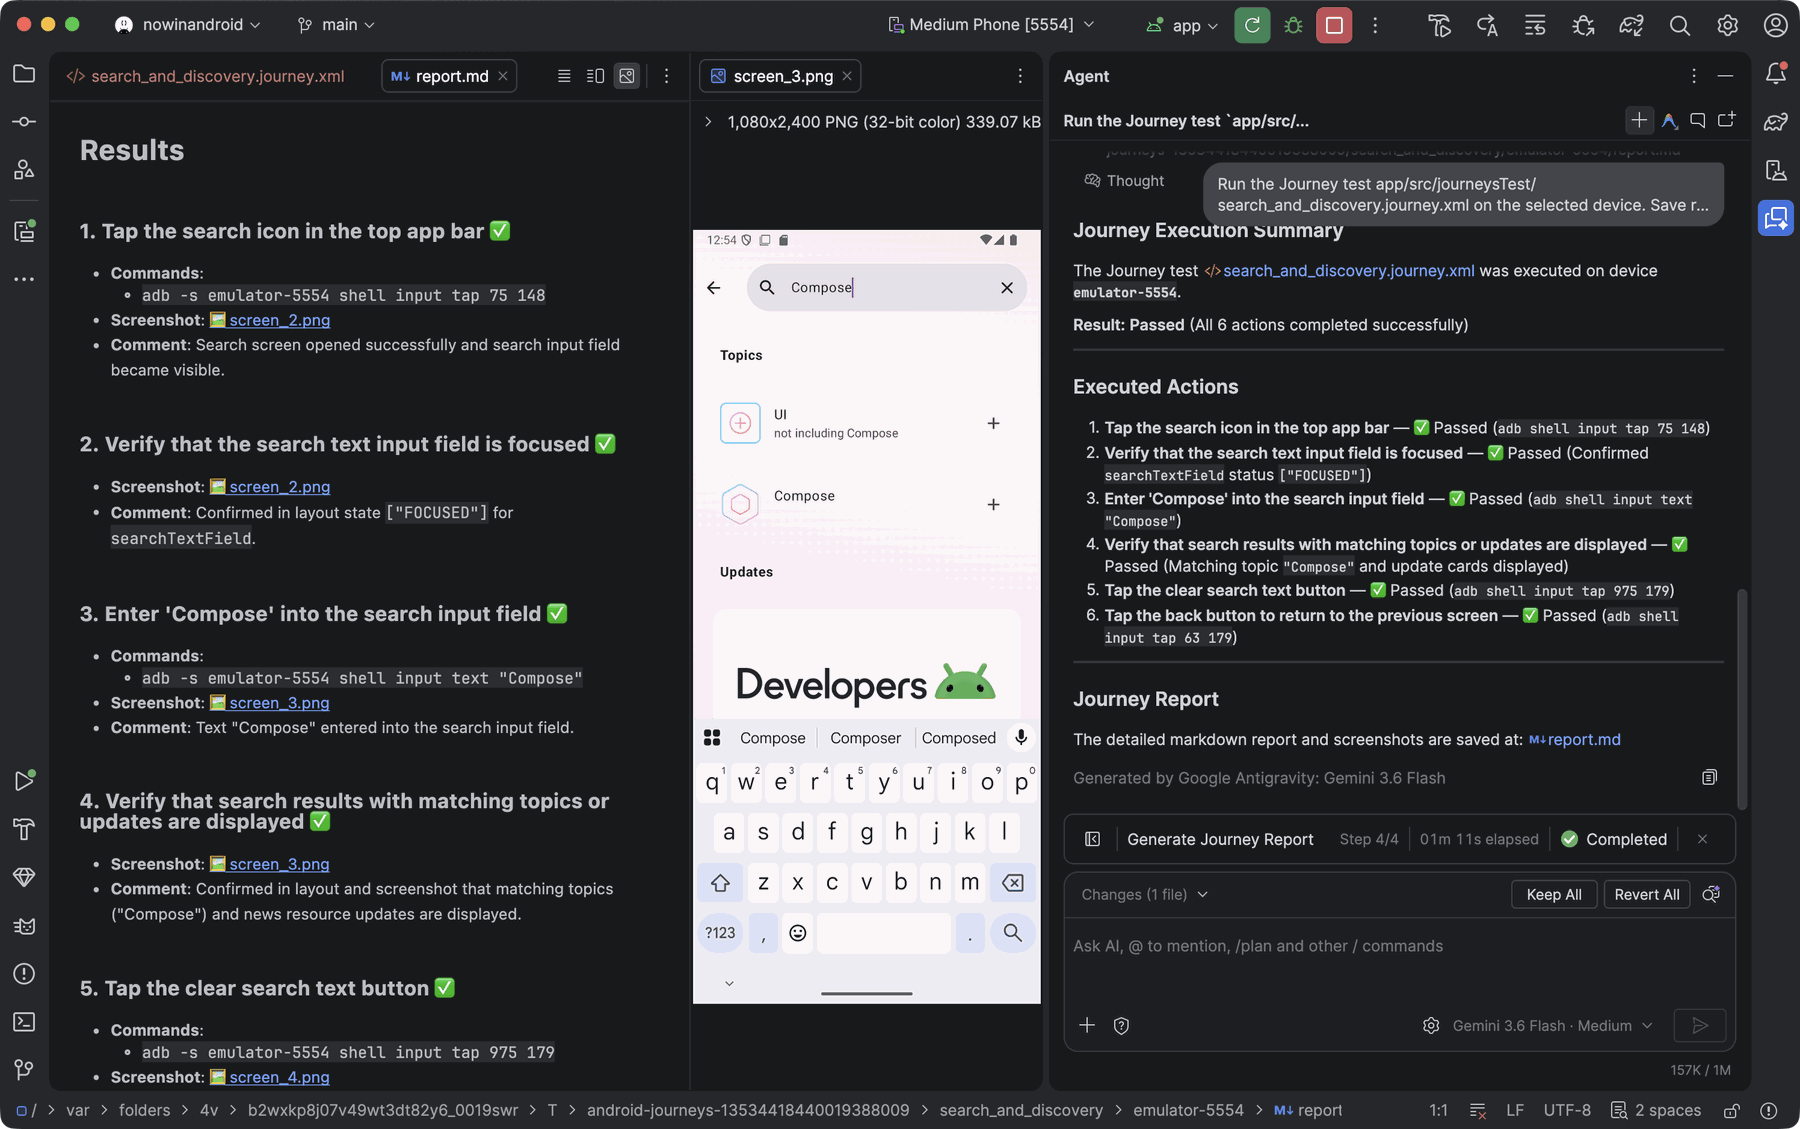
When the agent completes a journey, it reports whether the journey passed or failed, including any failing step, in the Agent window. It also provides a link to a report for the journey. The report includes the following:
- The overall result of the journey.
- Whether each step passed or failed.
- The commands that the agent ran on the device.
- The agent's comments about each step.
- Links to the screenshots that the agent captured.
Run journeys as AGP test suites
In Android Studio Rabbit 2 and earlier, Journeys is available as a Studio Labs feature that runs journeys as Android Gradle Plugin (AGP) test suites. To use it, do the following:
- Go to Studio Labs in the settings menu and enable Journeys.
- Make sure that your project uses AGP 9.0.0 or higher.
- In the Project panel, right-click your app module and select New > Journey Test. If it's the first time you're adding journeys to your project, Android Studio also adds AGP test suite support to your project.
- Open the journey file and, in the Design view, click Run Journey. Android Studio creates a Journeys Test run configuration, runs it on the selected device, and shows the results in the test results panel.
The test suite runs against the build variant that was active when you created
the journey. If you switch to a different build variant, add it to the
targetVariants property in the testSuites block of your module-level
build.gradle.kts file.