Bảng
Sử dụng bộ sưu tập để sắp xếp ngăn nắp các trang
Lưu và phân loại nội dung dựa trên lựa chọn ưu tiên của bạn.
TableLayout
là một ViewGroup
hiển thị các phần tử con View
trong hàng và cột.
Lưu ý: Để có hiệu suất và công cụ tốt hơn, bạn nên xây dựng bố cục bằng ConstraintLayout.

TableLayout
sắp xếp các tệp con thành hàng và cột. Vùng chứa TableLayout không hiển thị đường viền ở hàng, cột hoặc ô. Bảng này sẽ có nhiều cột nhất cũng như hàng chứa nhiều ô nhất. Một bảng có thể để trống các ô. Các ô có thể kéo dài nhiều cột như trong HTML. Bạn có thể mở rộng các cột bằng cách sử dụng trường span
trong lớp TableRow.LayoutParams
.
Lưu ý: Các ô không thể kéo dài nhiều hàng.
Đối tượng TableRow
là chế độ xem con của một LayoutsLayout (mỗi TableRow xác định một hàng trong bảng). Mỗi hàng có từ 0 ô trở lên, mỗi ô được xác định bởi bất kỳ Chế độ xem nào khác. Vì vậy, các ô trong một hàng có thể bao gồm nhiều đối tượng Chế độ xem, chẳng hạn như các đối tượng ImageView hoặc TextView. Một ô cũng có thể là một đối tượng ViewGroup (ví dụ: bạn có thể lồng một TableLayout khác làm ô).
Bố cục mẫu sau đây có hai hàng và mỗi hàng có hai ô. Ảnh chụp màn hình đi kèm cho thấy kết quả đường viền ô hiển thị dưới dạng đường chấm (được thêm vào để tạo hiệu ứng hình ảnh).
<?xml version="1.0" encoding="utf-8"?>
<TableLayout xmlns:android="http://schemas.android.com/apk/res/android"
android:layout_width="match_parent"
android:layout_height="match_parent"
android:stretchColumns="1">
<TableRow>
<TextView
android:text="@string/table_layout_4_open"
android:padding="3dip" />
<TextView
android:text="@string/table_layout_4_open_shortcut"
android:gravity="right"
android:padding="3dip" />
</TableRow>
<TableRow>
<TextView
android:text="@string/table_layout_4_save"
android:padding="3dip" />
<TextView
android:text="@string/table_layout_4_save_shortcut"
android:gravity="right"
android:padding="3dip" />
</TableRow>
</TableLayout>
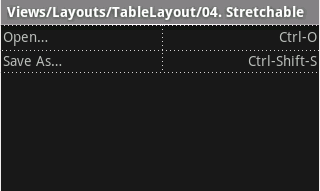
Các cột có thể bị ẩn, đánh dấu để kéo dài và lấp đầy không gian màn hình có sẵn, hoặc được đánh dấu có thể thu nhỏ để buộc cột thu nhỏ lại cho đến khi bảng vừa với màn hình. Hãy xem tài liệu TableLayout reference
để biết thêm thông tin chi tiết.
Ví dụ
- Bắt đầu một dự án mới có tên HelloTableLayout.
- Mở tệp
res/layout/main.xml
và chèn nội dung sau đây:
<?xml version="1.0" encoding="utf-8"?>
<TableLayout xmlns:android="http://schemas.android.com/apk/res/android"
android:layout_width="match_parent"
android:layout_height="match_parent"
android:stretchColumns="1">
<TableRow>
<TextView
android:layout_column="1"
android:text="Open..."
android:padding="3dip" />
<TextView
android:text="Ctrl-O"
android:gravity="right"
android:padding="3dip" />
</TableRow>
<TableRow>
<TextView
android:layout_column="1"
android:text="Save..."
android:padding="3dip" />
<TextView
android:text="Ctrl-S"
android:gravity="right"
android:padding="3dip" />
</TableRow>
<TableRow>
<TextView
android:layout_column="1"
android:text="Save As..."
android:padding="3dip" />
<TextView
android:text="Ctrl-Shift-S"
android:gravity="right"
android:padding="3dip" />
</TableRow>
<View
android:layout_height="2dip"
android:background="#FF909090" />
<TableRow>
<TextView
android:text="X"
android:padding="3dip" />
<TextView
android:text="Import..."
android:padding="3dip" />
</TableRow>
<TableRow>
<TextView
android:text="X"
android:padding="3dip" />
<TextView
android:text="Export..."
android:padding="3dip" />
<TextView
android:text="Ctrl-E"
android:gravity="right"
android:padding="3dip" />
</TableRow>
<View
android:layout_height="2dip"
android:background="#FF909090" />
<TableRow>
<TextView
android:layout_column="1"
android:text="Quit"
android:padding="3dip" />
</TableRow>
</TableLayout>
Lưu ý giao diện này trông giống như cấu trúc của bảng HTML. Phần tử TableLayout
giống phần tử HTML <table>
; TableRow
giống phần tử ><tr>>
; nhưng bạn có thể sử dụng bất kỳ loại phần tử View
nào đối với các ô. Ở ví dụ này, một TextView
được sử dụng cho mỗi ô. Ở giữa một số hàng, cũng có một View
cơ bản, dùng để vẽ một đường kẻ ngang.
- Đảm bảo hoạt động HelloTableLayout tải bố cục này trong phương thức
onCreate()
:
Kotlin
override fun onCreate(savedInstanceState: Bundle?) {
super.onCreate(savedInstanceState)
setContentView(R.layout.main)
}
Java
public void onCreate(Bundle savedInstanceState) {
super.onCreate(savedInstanceState);
setContentView(R.layout.main);
}
Phương thức setContentView(int)
tải tệp bố cục cho Activity
, được xác định theo mã tài nguyên R.layout.main
— tham chiếu đến tệp bố cục res/layout/main.xml
.
- Chạy ứng dụng.
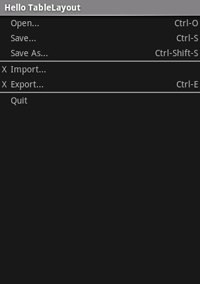
Bạn sẽ thấy những thông tin sau:
Nội dung và mã mẫu trên trang này phải tuân thủ các giấy phép như mô tả trong phần Giấy phép nội dung. Java và OpenJDK là nhãn hiệu hoặc nhãn hiệu đã đăng ký của Oracle và/hoặc đơn vị liên kết của Oracle.
Cập nhật lần gần đây nhất: 2025-07-27 UTC.
[[["Dễ hiểu","easyToUnderstand","thumb-up"],["Giúp tôi giải quyết được vấn đề","solvedMyProblem","thumb-up"],["Khác","otherUp","thumb-up"]],[["Thiếu thông tin tôi cần","missingTheInformationINeed","thumb-down"],["Quá phức tạp/quá nhiều bước","tooComplicatedTooManySteps","thumb-down"],["Đã lỗi thời","outOfDate","thumb-down"],["Vấn đề về bản dịch","translationIssue","thumb-down"],["Vấn đề về mẫu/mã","samplesCodeIssue","thumb-down"],["Khác","otherDown","thumb-down"]],["Cập nhật lần gần đây nhất: 2025-07-27 UTC."],[],[],null,["# Table\n\n[TableLayout](/reference/android/widget/TableLayout) is a [ViewGroup](/reference/android/view/ViewGroup) that\ndisplays child [View](/reference/android/view/View) elements in rows and columns.\n\n**Note:**\nFor better performance and tooling support, you should instead [build your layout with ConstraintLayout](/training/constraint-layout).\n\n\n[TableLayout](/reference/android/widget/TableLayout) positions its children into rows and\ncolumns. TableLayout containers do not display border lines for their rows,\ncolumns, or cells. The table will have as many columns as the row with the\nmost cells. A table can leave cells empty. Cells can span multiple columns,\nas they can in HTML. You can span columns by using the `span`\nfield in the [TableRow.LayoutParams](/reference/android/widget/TableRow.LayoutParams) class.\n\n\n**Note:** Cells cannot span multiple rows.\n\n\n[TableRow](/reference/android/widget/TableRow) objects are the child views of a TableLayout\n(each TableRow defines a single row in the table). Each row has zero or more\ncells, each of which is defined by any kind of other View. So, the cells of\na row may be composed of a variety of View objects, like ImageView or\nTextView objects. A cell may also be a ViewGroup object (for example, you\ncan nest another TableLayout as a cell).\n\n\nThe following sample layout has two rows and two cells in each. The\naccompanying screenshot shows the result, with cell borders displayed as\ndotted lines (added for visual effect). \n\n```xml\n\u003c?xml version=\"1.0\" encoding=\"utf-8\"?\u003e\n\u003cTableLayout xmlns:android=\"http://schemas.android.com/apk/res/android\"\n android:layout_width=\"match_parent\"\n android:layout_height=\"match_parent\"\n android:stretchColumns=\"1\"\u003e\n \u003cTableRow\u003e\n \u003cTextView\n android:text=\"@string/table_layout_4_open\"\n android:padding=\"3dip\" /\u003e\n \u003cTextView\n android:text=\"@string/table_layout_4_open_shortcut\"\n android:gravity=\"right\"\n android:padding=\"3dip\" /\u003e\n \u003c/TableRow\u003e\n\n \u003cTableRow\u003e\n \u003cTextView\n android:text=\"@string/table_layout_4_save\"\n android:padding=\"3dip\" /\u003e\n \u003cTextView\n android:text=\"@string/table_layout_4_save_shortcut\"\n android:gravity=\"right\"\n android:padding=\"3dip\" /\u003e\n \u003c/TableRow\u003e\n\u003c/TableLayout\u003e\n```\n\nColumns can be hidden, marked to stretch and fill the available screen space,\nor can be marked as shrinkable to force the column to shrink until the table\nfits the screen. See the [TableLayout reference](/reference/android/widget/TableLayout)\ndocumentation for more details.\n\nExample\n-------\n\n1. Start a new project named *HelloTableLayout*.\n2. Open the `res/layout/main.xml` file and insert the following: \n\n ```xml\n \u003c?xml version=\"1.0\" encoding=\"utf-8\"?\u003e\n \u003cTableLayout xmlns:android=\"http://schemas.android.com/apk/res/android\"\n android:layout_width=\"match_parent\"\n android:layout_height=\"match_parent\"\n android:stretchColumns=\"1\"\u003e\n\n \u003cTableRow\u003e\n \u003cTextView\n android:layout_column=\"1\"\n android:text=\"Open...\"\n android:padding=\"3dip\" /\u003e\n \u003cTextView\n android:text=\"Ctrl-O\"\n android:gravity=\"right\"\n android:padding=\"3dip\" /\u003e\n \u003c/TableRow\u003e\n\n \u003cTableRow\u003e\n \u003cTextView\n android:layout_column=\"1\"\n android:text=\"Save...\"\n android:padding=\"3dip\" /\u003e\n \u003cTextView\n android:text=\"Ctrl-S\"\n android:gravity=\"right\"\n android:padding=\"3dip\" /\u003e\n \u003c/TableRow\u003e\n\n \u003cTableRow\u003e\n \u003cTextView\n android:layout_column=\"1\"\n android:text=\"Save As...\"\n android:padding=\"3dip\" /\u003e\n \u003cTextView\n android:text=\"Ctrl-Shift-S\"\n android:gravity=\"right\"\n android:padding=\"3dip\" /\u003e\n \u003c/TableRow\u003e\n\n \u003cView\n android:layout_height=\"2dip\"\n android:background=\"#FF909090\" /\u003e\n\n \u003cTableRow\u003e\n \u003cTextView\n android:text=\"X\"\n android:padding=\"3dip\" /\u003e\n \u003cTextView\n android:text=\"Import...\"\n android:padding=\"3dip\" /\u003e\n \u003c/TableRow\u003e\n\n \u003cTableRow\u003e\n \u003cTextView\n android:text=\"X\"\n android:padding=\"3dip\" /\u003e\n \u003cTextView\n android:text=\"Export...\"\n android:padding=\"3dip\" /\u003e\n \u003cTextView\n android:text=\"Ctrl-E\"\n android:gravity=\"right\"\n android:padding=\"3dip\" /\u003e\n \u003c/TableRow\u003e\n\n \u003cView\n android:layout_height=\"2dip\"\n android:background=\"#FF909090\" /\u003e\n\n \u003cTableRow\u003e\n \u003cTextView\n android:layout_column=\"1\"\n android:text=\"Quit\"\n android:padding=\"3dip\" /\u003e\n \u003c/TableRow\u003e\n \u003c/TableLayout\u003e\n ```\n\n Notice how this resembles the structure of an HTML table. The [TableLayout](/reference/android/widget/TableLayout)\n element is like the HTML `\u003ctable\u003e` element; [TableRow](/reference/android/widget/TableRow) is like\n a `\u003e\u003ctr\u003e\u003e` element;\n but for the cells, you can use any kind of [View](/reference/android/view/View) element. In this example, a\n [TextView](/reference/android/widget/TextView) is used for each cell. In between some of the rows, there is also a\n basic [View](/reference/android/view/View), which is used to draw a horizontal line.\n3. Make sure your *HelloTableLayout* Activity loads this layout in the [onCreate()](/reference/android/app/Activity#onCreate(android.os.Bundle)) method: \n\n ### Kotlin\n\n ```kotlin\n override fun onCreate(savedInstanceState: Bundle?) {\n super.onCreate(savedInstanceState)\n setContentView(R.layout.main)\n }\n ```\n\n ### Java\n\n ```java\n public void onCreate(Bundle savedInstanceState) {\n super.onCreate(savedInstanceState);\n setContentView(R.layout.main);\n }\n ```\n\n The [setContentView(int)](/reference/android/app/Activity#setContentView(int)) method loads the\n layout file for the [Activity](/reference/android/app/Activity), specified by the resource\n ID --- `R.layout.main` refers to the `res/layout/main.xml` layout\n file.\n4. Run the application.\n\nYou should see the following:"]]