
Die meisten Android-Geräte haben integrierte Sensoren, die Bewegungen, Ausrichtung und verschiedene Umgebungsbedingungen messen. Diese Sensoren können Rohdaten mit hoher Präzision und Genauigkeit liefern und sind nützlich, wenn Sie dreidimensionale Gerätebewegungen oder ‑positionierungen überwachen oder Änderungen in der Umgebung in der Nähe eines Geräts erfassen möchten. Ein Spiel kann beispielsweise Messwerte des Schwerkraftsensors eines Geräts erfassen, um komplexe Nutzergesten und Bewegungen wie Neigen, Schütteln, Drehen oder Schwingen zu erkennen. Eine Wetter-App kann beispielsweise den Temperatur- und Feuchtigkeitssensor eines Geräts verwenden, um den Taupunkt zu berechnen und zu melden. Eine Reise-App kann den geomagnetischen Feldsensor und den Beschleunigungsmesser verwenden, um eine Kompassrichtung zu melden.
Weitere Informationen finden Sie in den folgenden Ressourcen:
Die Android-Plattform unterstützt drei große Kategorien von Sensoren:
- Bewegungssensoren
Diese Sensoren messen Beschleunigungs- und Rotationskräfte entlang von drei Achsen. Diese Kategorie umfasst Beschleunigungsmesser, Schwerkraftsensoren, Gyroskope und Sensoren für Rotationsvektoren.
- Umgebungssensoren
Diese Sensoren messen verschiedene Umgebungsparameter wie Umgebungstemperatur und -druck, Beleuchtung und Luftfeuchtigkeit. Diese Kategorie umfasst Barometer, Fotometer und Thermometer.
- Positionssensoren
Diese Sensoren messen die physische Position eines Geräts. Diese Kategorie umfasst Orientierungssensoren und Magnetometer.
Mit dem Android-Sensor-Framework können Sie auf die auf dem Gerät verfügbaren Sensoren zugreifen und Rohsensordaten erfassen. Das Sensor-Framework bietet mehrere Klassen und Schnittstellen, mit denen Sie eine Vielzahl von sensorbezogenen Aufgaben ausführen können. Sie können das Sensor-Framework beispielsweise für Folgendes verwenden:
- Ermitteln Sie, welche Sensoren auf einem Gerät verfügbar sind.
- Bestimmen Sie die Funktionen eines einzelnen Sensors, z. B. seine maximale Reichweite, den Hersteller, die Stromanforderungen und die Auflösung.
- Rohsensordaten erfassen und die Mindestrate für die Erfassung von Sensordaten definieren.
- Registrieren und Aufheben der Registrierung von Sensorereignis-Listenern, die Sensoränderungen überwachen.
In diesem Thema finden Sie einen Überblick über die auf der Android-Plattform verfügbaren Sensoren. Außerdem wird das Sensor-Framework vorgestellt.
Einführung in Sensoren
Das Android-Sensor-Framework ermöglicht den Zugriff auf viele Arten von Sensoren. Einige dieser Sensoren sind hardwarebasiert, andere softwarebasiert. Hardwarebasierte Sensoren sind physische Komponenten, die in ein Smartphone oder Tablet eingebaut sind. Sie leiten ihre Daten durch die direkte Messung bestimmter Umwelteigenschaften ab, z. B. Beschleunigung, geomagnetische Feldstärke oder Winkeländerung. Softwarebasierte Sensoren sind keine physischen Geräte, obwohl sie hardwarebasierte Sensoren nachahmen. Softwarebasierte Sensoren beziehen ihre Daten aus einem oder mehreren hardwarebasierten Sensoren und werden manchmal auch als virtuelle oder synthetische Sensoren bezeichnet. Der Sensor für lineare Beschleunigung und der Schwerkraftsensor sind Beispiele für softwarebasierte Sensoren. In Tabelle 1 sind die von der Android-Plattform unterstützten Sensoren zusammengefasst.
Nur wenige Android-Geräte haben alle Arten von Sensoren. Die meisten Smartphones und Tablets haben beispielsweise einen Beschleunigungsmesser und ein Magnetometer, aber weniger Geräte haben Barometer oder Thermometer. Außerdem kann ein Gerät mehrere Sensoren eines bestimmten Typs haben. Ein Gerät kann beispielsweise zwei Schwerkraftsensoren mit jeweils unterschiedlichen Messbereichen haben.
Tabelle 1 Von der Android-Plattform unterstützte Sensortypen.
| Sensor | Eingeben | Beschreibung | Übliche Anwendungsbereiche |
|---|---|---|---|
TYPE_ACCELEROMETER |
Hardware | Misst die Beschleunigungskraft in m/s2, die auf ein Gerät auf allen drei physischen Achsen (x, y und z) wirkt, einschließlich der Schwerkraft. | Bewegungserkennung (Schütteln, Neigen usw.) |
TYPE_AMBIENT_TEMPERATURE |
Hardware | Misst die Umgebungstemperatur im Raum in Grad Celsius (°C). Weitere Informationen finden Sie im Hinweis unten. | Lufttemperaturen überwachen |
TYPE_GRAVITY |
Software oder Hardware | Misst die Schwerkraft in m/s2, die auf ein Gerät auf allen drei physischen Achsen (x, y, z) wirkt. | Bewegungserkennung (Schütteln, Neigen usw.) |
TYPE_GYROSCOPE |
Hardware | Misst die Rotationsgeschwindigkeit eines Geräts in rad/s um jede der drei physischen Achsen (x, y und z). | Erkennung von Drehungen (Drehen, Wenden usw.) |
TYPE_LIGHT |
Hardware | Misst die Umgebungslichtstärke (Beleuchtung) in Lux. | Steuern der Bildschirmhelligkeit |
TYPE_LINEAR_ACCELERATION |
Software oder Hardware | Misst die Beschleunigungskraft in m/s2, die auf ein Gerät auf allen drei physischen Achsen (x, y und z) wirkt, ohne die Schwerkraft. | Beschleunigung entlang einer einzelnen Achse überwachen. |
TYPE_MAGNETIC_FIELD |
Hardware | Misst das umgebende geomagnetische Feld für alle drei physischen Achsen (x, y, z) in μT. | Kompass erstellen |
TYPE_ORIENTATION |
Software | Misst die Rotationsgrade, die ein Gerät um alle drei physischen Achsen (x, y, z) ausführt.
Ab API-Level 3 können Sie die Neigungsmatrix und die Rotationsmatrix für ein Gerät mithilfe des Schwerkraftsensors und des geomagnetischen Feldsensors in Verbindung mit der Methode getRotationMatrix() abrufen. |
Bestimmen der Geräteposition |
TYPE_PRESSURE |
Hardware | Misst den Luftdruck in hPa oder mbar. | Luftdruckänderungen überwachen |
TYPE_PROXIMITY |
Hardware | Misst die Nähe eines Objekts in Zentimetern relativ zum Bildschirm eines Geräts. Dieser Sensor wird in der Regel verwendet, um festzustellen, ob ein Mobilgerät an das Ohr einer Person gehalten wird. | Position des Smartphones während eines Anrufs. |
TYPE_RELATIVE_HUMIDITY |
Hardware | Misst die relative Luftfeuchtigkeit in Prozent (%). | Überwachung von Taupunkt, absoluter und relativer Luftfeuchtigkeit. |
TYPE_ROTATION_VECTOR |
Software oder Hardware | Misst die Ausrichtung eines Geräts, indem die drei Elemente des Rotationsvektors des Geräts bereitgestellt werden. | Bewegungs- und Rotationserkennung |
TYPE_TEMPERATURE |
Hardware | Misst die Temperatur des Geräts in Grad Celsius (°C). Die Implementierung dieses Sensors variiert je nach Gerät. Er wurde in API-Level 14 durch den TYPE_AMBIENT_TEMPERATURE-Sensor ersetzt. |
Temperaturen überwachen. |
Sensor-Framework
Sie können über das Android-Sensor-Framework auf diese Sensoren zugreifen und Rohsensordaten abrufen.
Das Sensor-Framework ist Teil des android.hardware-Pakets und umfasst die folgenden Klassen und Schnittstellen:
SensorManager- Mit dieser Klasse können Sie eine Instanz des Sensordienstes erstellen. Diese Klasse bietet verschiedene Methoden für den Zugriff auf und die Auflistung von Sensoren, die Registrierung und Deregistrierung von Listenern für Sensorereignisse sowie das Abrufen von Ausrichtungsinformationen. Diese Klasse bietet auch mehrere Sensorkonstanten, die zum Melden der Sensorgenauigkeit, zum Festlegen von Datenerfassungsraten und zum Kalibrieren von Sensoren verwendet werden.
Sensor- Mit dieser Klasse können Sie eine Instanz eines bestimmten Sensors erstellen. Diese Klasse bietet verschiedene Methoden, mit denen Sie die Funktionen eines Sensors ermitteln können.
SensorEvent- Das System verwendet diese Klasse, um ein Sensorereignisobjekt zu erstellen, das Informationen zu einem Sensorereignis enthält. Ein Sensorereignisobjekt enthält die folgenden Informationen: die Rohsensordaten, den Typ des Sensors, der das Ereignis generiert hat, die Genauigkeit der Daten und den Zeitstempel für das Ereignis.
SensorEventListener- Über diese Schnittstelle können Sie zwei Callback-Methoden erstellen, die Benachrichtigungen (Sensorereignisse) erhalten, wenn sich Sensorwerte oder die Sensorgenauigkeit ändern.
In einer typischen Anwendung verwenden Sie diese sensorbezogenen APIs für zwei grundlegende Aufgaben:
- Sensoren und Sensorfunktionen identifizieren
Das Ermitteln von Sensoren und Sensorfunktionen zur Laufzeit ist nützlich, wenn Ihre Anwendung Funktionen hat, die auf bestimmten Sensortypen oder ‑funktionen basieren. Sie können beispielsweise alle Sensoren auf einem Gerät identifizieren und alle Anwendungsfunktionen deaktivieren, die auf nicht vorhandenen Sensoren basieren. Möglicherweise möchten Sie auch alle Sensoren eines bestimmten Typs identifizieren, um die Sensorimplementierung mit der optimalen Leistung für Ihre Anwendung auszuwählen.
- Sensorereignisse überwachen
Durch das Monitoring von Sensorereignissen erhalten Sie Rohsensordaten. Ein Sensorereignis tritt jedes Mal auf, wenn ein Sensor eine Änderung der von ihm gemessenen Parameter erkennt. Ein Sensorereignis liefert vier Informationen: den Namen des Sensors, der das Ereignis ausgelöst hat, den Zeitstempel für das Ereignis, die Genauigkeit des Ereignisses und die Rohsensordaten, die das Ereignis ausgelöst haben.
Verfügbarkeit von Sensoren
Die Verfügbarkeit von Sensoren variiert nicht nur von Gerät zu Gerät, sondern auch zwischen Android-Versionen. Das liegt daran, dass die Android-Sensoren im Laufe mehrerer Plattform-Releases eingeführt wurden. Viele Sensoren wurden beispielsweise in Android 1.5 (API-Level 3) eingeführt, einige wurden jedoch erst in Android 2.3 (API-Level 9) implementiert und waren erst dann verfügbar. Ebenso wurden in Android 2.3 (API-Level 9) und Android 4.0 (API-Level 14) mehrere Sensoren eingeführt. Zwei Sensoren wurden eingestellt und durch neuere, bessere Sensoren ersetzt.
In Tabelle 2 ist die Verfügbarkeit der einzelnen Sensoren plattformweise zusammengefasst. Es werden nur vier Plattformen aufgeführt, da nur bei diesen Plattformen Änderungen an den Sensoren vorgenommen wurden. Sensoren, die als veraltet aufgeführt sind, sind weiterhin auf nachfolgenden Plattformen verfügbar (sofern der Sensor auf einem Gerät vorhanden ist). Dies entspricht der Richtlinie zur Vorwärtskompatibilität von Android.
Tabelle 2 Verfügbarkeit von Sensoren nach Plattform
| Sensor | Android 4.0 (API-Level 14) |
Android 2.3 (API-Level 9) |
Android 2.2 (API-Level 8) |
Android 1.5 (API-Level 3) |
|---|---|---|---|---|
TYPE_ACCELEROMETER |
Ja | Ja | Ja | Ja |
TYPE_AMBIENT_TEMPERATURE |
Ja | – | – | – |
TYPE_GRAVITY |
Ja | Ja | – | – |
TYPE_GYROSCOPE |
Ja | Ja | Nicht verfügbar1 | Nicht verfügbar1 |
TYPE_LIGHT |
Ja | Ja | Ja | Ja |
TYPE_LINEAR_ACCELERATION |
Ja | Ja | – | – |
TYPE_MAGNETIC_FIELD |
Ja | Ja | Ja | Ja |
TYPE_ORIENTATION |
Ja2 | Ja2 | Ja2 | Ja |
TYPE_PRESSURE |
Ja | Ja | Nicht verfügbar1 | Nicht verfügbar1 |
TYPE_PROXIMITY |
Ja | Ja | Ja | Ja |
TYPE_RELATIVE_HUMIDITY |
Ja | – | – | – |
TYPE_ROTATION_VECTOR |
Ja | Ja | – | – |
TYPE_TEMPERATURE |
Ja2 | Ja | Ja | Ja |
1 Dieser Sensortyp wurde in Android 1.5 (API-Level 3) hinzugefügt, konnte aber erst ab Android 2.3 (API-Level 9) verwendet werden.
2 Dieser Sensor ist verfügbar, wird aber nicht mehr unterstützt.
Sensoren und Sensorfunktionen identifizieren
Das Android-Sensor-Framework bietet mehrere Methoden, mit denen Sie zur Laufzeit ganz einfach ermitteln können, welche Sensoren auf einem Gerät vorhanden sind. Das API bietet auch Methoden, mit denen Sie die Funktionen der einzelnen Sensoren ermitteln können, z. B. den maximalen Bereich, die Auflösung und den Strombedarf.
Um die Sensoren auf einem Gerät zu identifizieren, müssen Sie zuerst eine Referenz zum Sensordienst abrufen. Dazu erstellen Sie eine Instanz der Klasse SensorManager, indem Sie die Methode getSystemService() aufrufen und das Argument SENSOR_SERVICE übergeben. Beispiel:
Kotlin
private lateinit var sensorManager: SensorManager
...
sensorManager = getSystemService(Context.SENSOR_SERVICE) as SensorManager
Java
private SensorManager sensorManager;
...
sensorManager = (SensorManager) getSystemService(Context.SENSOR_SERVICE);
Als Nächstes können Sie eine Liste aller Sensoren auf einem Gerät abrufen, indem Sie die Methode getSensorList() aufrufen und die Konstante TYPE_ALL verwenden. Beispiel:
Kotlin
val deviceSensors: List<Sensor> = sensorManager.getSensorList(Sensor.TYPE_ALL)
Java
List<Sensor> deviceSensors = sensorManager.getSensorList(Sensor.TYPE_ALL);
Wenn Sie alle Sensoren eines bestimmten Typs auflisten möchten, können Sie anstelle von TYPE_ALL eine andere Konstante verwenden, z. B. TYPE_GYROSCOPE, TYPE_LINEAR_ACCELERATION oder TYPE_GRAVITY.
Sie können auch ermitteln, ob ein bestimmter Sensortyp auf einem Gerät vorhanden ist. Verwenden Sie dazu die Methode getDefaultSensor() und übergeben Sie die Typkonstante für einen bestimmten Sensor. Wenn ein Gerät mehr als einen Sensor eines bestimmten Typs hat, muss einer der Sensoren als Standardsensor festgelegt werden. Wenn für einen bestimmten Sensortyp kein Standardsensor vorhanden ist, gibt der Methodenaufruf „null“ zurück. Das bedeutet, dass das Gerät diesen Sensortyp nicht hat. Mit dem folgenden Code wird beispielsweise geprüft, ob auf einem Gerät ein Magnetometer vorhanden ist:
Kotlin
private lateinit var sensorManager: SensorManager
...
sensorManager = getSystemService(Context.SENSOR_SERVICE) as SensorManager
if (sensorManager.getDefaultSensor(Sensor.TYPE_MAGNETIC_FIELD) != null) {
    // Success! There's a magnetometer.
} else {
    // Failure! No magnetometer.
}
Java
private SensorManager sensorManager;
...
sensorManager = (SensorManager) getSystemService(Context.SENSOR_SERVICE);
if (sensorManager.getDefaultSensor(Sensor.TYPE_MAGNETIC_FIELD) != null){
    // Success! There's a magnetometer.
} else {
    // Failure! No magnetometer.
}
Hinweis:Android schreibt Geräteherstellern nicht vor, bestimmte Sensortypen in ihre Android-Geräte einzubauen. Daher können Geräte eine Vielzahl von Sensorkonfigurationen haben.
Sie können nicht nur die Sensoren auf einem Gerät auflisten, sondern auch die öffentlichen Methoden der Klasse Sensor verwenden, um die Funktionen und Attribute einzelner Sensoren zu ermitteln. Das ist nützlich, wenn sich Ihre Anwendung je nach den auf einem Gerät verfügbaren Sensoren oder Sensorfunktionen unterschiedlich verhalten soll. Mit den Methoden getResolution() und getMaximumRange() können Sie beispielsweise die Auflösung und den maximalen Messbereich eines Sensors abrufen. Sie können auch die Methode getPower() verwenden, um die Stromanforderungen eines Sensors abzurufen.
Zwei der öffentlichen Methoden sind besonders nützlich, wenn Sie Ihre Anwendung für Sensoren verschiedener Hersteller oder verschiedene Versionen eines Sensors optimieren möchten. Wenn Ihre Anwendung beispielsweise Nutzergesten wie Neigen und Schütteln erfassen muss, können Sie einen Satz von Datenfilterregeln und Optimierungen für neuere Geräte mit dem Schwerkraftsensor eines bestimmten Anbieters und einen weiteren Satz von Datenfilterregeln und Optimierungen für Geräte ohne Schwerkraftsensor, die nur einen Beschleunigungsmesser haben, erstellen. Das folgende Codebeispiel zeigt, wie Sie die Methoden getVendor() und getVersion() verwenden können, um dies zu erreichen. In diesem Beispiel suchen wir nach einem Schwerkraftsensor, bei dem Google LLC als Anbieter angegeben ist und der die Versionsnummer 3 hat. Wenn dieser Sensor nicht auf dem Gerät vorhanden ist, versuchen wir, das Beschleunigungsmessgerät zu verwenden.
Kotlin
private lateinit var sensorManager: SensorManager
private var mSensor: Sensor? = null

...

sensorManager = getSystemService(Context.SENSOR_SERVICE) as SensorManager

if (sensorManager.getDefaultSensor(Sensor.TYPE_GRAVITY) != null) {
    val gravSensors: List<Sensor> = sensorManager.getSensorList(Sensor.TYPE_GRAVITY)
    // Use the version 3 gravity sensor.
    mSensor = gravSensors.firstOrNull { it.vendor.contains("Google LLC") && it.version == 3 }
}
if (mSensor == null) {
    // Use the accelerometer.
    mSensor = if (sensorManager.getDefaultSensor(Sensor.TYPE_ACCELEROMETER) != null) {
        sensorManager.getDefaultSensor(Sensor.TYPE_ACCELEROMETER)
    } else {
        // Sorry, there are no accelerometers on your device.
        // You can't play this game.
        null
    }
}
Java
private SensorManager sensorManager;
private Sensor mSensor;

...

sensorManager = (SensorManager) getSystemService(Context.SENSOR_SERVICE);
mSensor = null;

if (sensorManager.getDefaultSensor(Sensor.TYPE_GRAVITY) != null){
    List<Sensor> gravSensors = sensorManager.getSensorList(Sensor.TYPE_GRAVITY);
    for(int i=0; i<gravSensors.size(); i++) {
        if ((gravSensors.get(i).getVendor().contains("Google LLC")) &&
           (gravSensors.get(i).getVersion() == 3)){
            // Use the version 3 gravity sensor.
            mSensor = gravSensors.get(i);
        }
    }
}
if (mSensor == null){
    // Use the accelerometer.
    if (sensorManager.getDefaultSensor(Sensor.TYPE_ACCELEROMETER) != null){
        mSensor = sensorManager.getDefaultSensor(Sensor.TYPE_ACCELEROMETER);
    } else{
        // Sorry, there are no accelerometers on your device.
        // You can't play this game.
    }
}
Eine weitere nützliche Methode ist getMinDelay(), die das minimale Zeitintervall (in Mikrosekunden) zurückgibt, das ein Sensor zum Erfassen von Daten verwenden kann. Jeder Sensor, der für die Methode getMinDelay() einen Wert ungleich null zurückgibt, ist ein Streaming-Sensor. Streaming-Sensoren erfassen Daten in regelmäßigen Abständen. Sie wurden in Android 2.3 (API-Level 9) eingeführt. Wenn ein Sensor bei einem Aufruf der getMinDelay()-Methode null zurückgibt, ist er kein Streaming-Sensor, da er Daten nur meldet, wenn sich die erfassten Parameter ändern.
Die Methode getMinDelay() ist nützlich, da Sie damit die maximale Rate ermitteln können, mit der ein Sensor Daten erfassen kann. Wenn für bestimmte Funktionen in Ihrer Anwendung hohe Datenerfassungsraten oder ein Streaming-Sensor erforderlich sind, können Sie mit dieser Methode ermitteln, ob ein Sensor diese Anforderungen erfüllt, und die entsprechenden Funktionen in Ihrer Anwendung dann aktivieren oder deaktivieren.
Achtung:Die maximale Datenerfassungsrate eines Sensors ist nicht unbedingt die Rate, mit der das Sensor-Framework Sensordaten an Ihre Anwendung liefert. Das Sensor-Framework meldet Daten über Sensorereignisse. Die Häufigkeit, mit der Ihre Anwendung Sensorereignisse empfängt, hängt von mehreren Faktoren ab. Weitere Informationen finden Sie unter Sensorereignisse überwachen.
Sensorereignisse überwachen
Wenn Sie Rohsensordaten überwachen möchten, müssen Sie zwei Callback-Methoden implementieren, die über die SensorEventListener-Schnittstelle verfügbar sind: onAccuracyChanged() und onSensorChanged(). Das Android-System ruft diese Methoden auf, wenn Folgendes passiert:
- Die Genauigkeit eines Sensors ändert sich.
In diesem Fall ruft das System die Methode
onAccuracyChanged()auf und stellt Ihnen eine Referenz auf das geänderteSensor-Objekt und die neue Genauigkeit des Sensors zur Verfügung. Die Genauigkeit wird durch eine von vier Statuskonstanten dargestellt:SENSOR_STATUS_ACCURACY_LOW,SENSOR_STATUS_ACCURACY_MEDIUM,SENSOR_STATUS_ACCURACY_HIGHoderSENSOR_STATUS_UNRELIABLE. - Ein Sensor meldet einen neuen Wert.
In diesem Fall ruft das System die
onSensorChanged()-Methode auf und stellt Ihnen einSensorEvent-Objekt zur Verfügung. EinSensorEvent-Objekt enthält Informationen zu den neuen Sensordaten, darunter die Genauigkeit der Daten, den Sensor, der die Daten generiert hat, den Zeitstempel, zu dem die Daten generiert wurden, und die neuen Daten, die der Sensor aufgezeichnet hat.
Der folgende Code zeigt, wie Sie die Methode onSensorChanged() verwenden, um Daten vom Lichtsensor zu erfassen. In diesem Beispiel werden die Rohsensordaten in einem TextView angezeigt, das in der Datei „main.xml“ als sensor_data definiert ist.
Kotlin
class SensorActivity : Activity(), SensorEventListener {
    private lateinit var sensorManager: SensorManager
    private var mLight: Sensor? = null

    public override fun onCreate(savedInstanceState: Bundle?) {
        super.onCreate(savedInstanceState)
        setContentView(R.layout.main)

        sensorManager = getSystemService(Context.SENSOR_SERVICE) as SensorManager
        mLight = sensorManager.getDefaultSensor(Sensor.TYPE_LIGHT)
    }

    override fun onAccuracyChanged(sensor: Sensor, accuracy: Int) {
        // Do something here if sensor accuracy changes.
    }

    override fun onSensorChanged(event: SensorEvent) {
        // The light sensor returns a single value.
        // Many sensors return 3 values, one for each axis.
        val lux = event.values[0]
        // Do something with this sensor value.
    }

    override fun onResume() {
        super.onResume()
        mLight?.also { light ->
            sensorManager.registerListener(this, light, SensorManager.SENSOR_DELAY_NORMAL)
        }
    }

    override fun onPause() {
        super.onPause()
        sensorManager.unregisterListener(this)
    }
}
Java
public class SensorActivity extends Activity implements SensorEventListener {
    private SensorManager sensorManager;
    private Sensor mLight;

    @Override
    public final void onCreate(Bundle savedInstanceState) {
        super.onCreate(savedInstanceState);
        setContentView(R.layout.main);

        sensorManager = (SensorManager) getSystemService(Context.SENSOR_SERVICE);
        mLight = sensorManager.getDefaultSensor(Sensor.TYPE_LIGHT);
    }

    @Override
    public final void onAccuracyChanged(Sensor sensor, int accuracy) {
        // Do something here if sensor accuracy changes.
    }

    @Override
    public final void onSensorChanged(SensorEvent event) {
        // The light sensor returns a single value.
        // Many sensors return 3 values, one for each axis.
        float lux = event.values[0];
        // Do something with this sensor value.
    }

    @Override
    protected void onResume() {
        super.onResume();
        sensorManager.registerListener(this, mLight, SensorManager.SENSOR_DELAY_NORMAL);
    }

    @Override
    protected void onPause() {
        super.onPause();
        sensorManager.unregisterListener(this);
    }
}
In diesem Beispiel wird die Standarddatenverzögerung (SENSOR_DELAY_NORMAL) beim Aufrufen der Methode registerListener() angegeben. Mit der Datenverzögerung (oder Samplingrate) wird das Intervall gesteuert, in dem Sensorereignisse über die onSensorChanged()-Callback-Methode an Ihre Anwendung gesendet werden. Die Standardverzögerung ist für die Überwachung typischer Änderungen der Bildschirmausrichtung geeignet und beträgt 200.000 Mikrosekunden. Sie können auch andere Datenverzögerungen angeben, z. B. SENSOR_DELAY_GAME (20.000 Mikrosekunden Verzögerung), SENSOR_DELAY_UI (60.000 Mikrosekunden Verzögerung) oder SENSOR_DELAY_FASTEST (0 Mikrosekunden Verzögerung). Ab Android 3.0 (API-Level 11) können Sie die Verzögerung auch als absoluten Wert (in Mikrosekunden) angeben.
Die von Ihnen angegebene Verzögerung ist nur ein Vorschlag. Das Android-System und andere Anwendungen können diese Verzögerung ändern. Als Best Practice sollten Sie die größtmögliche Verzögerung angeben, da das System in der Regel eine kleinere Verzögerung als die von Ihnen angegebene verwendet. Das heißt, Sie sollten die langsamste Samplingrate auswählen, die die Anforderungen Ihrer Anwendung noch erfüllt. Bei einer längeren Verzögerung wird der Prozessor weniger belastet und es wird weniger Strom verbraucht.
Es gibt keine öffentliche Methode, um die Häufigkeit zu ermitteln, mit der das Sensor-Framework Sensorereignisse an Ihre Anwendung sendet. Sie können jedoch die Zeitstempel verwenden, die jedem Sensorereignis zugeordnet sind, um die Samplingrate über mehrere Ereignisse hinweg zu berechnen. Die Abtastrate (Verzögerung) sollte nach der Einrichtung nicht mehr geändert werden müssen. Wenn Sie die Verzögerung aus irgendeinem Grund ändern müssen, müssen Sie die Registrierung des Sensor-Listeners aufheben und ihn neu registrieren.
In diesem Beispiel werden die Callback-Methoden onResume() und onPause() verwendet, um den Listener für Sensorereignisse zu registrieren und die Registrierung aufzuheben. Als Best Practice sollten Sie immer Sensoren deaktivieren, die Sie nicht benötigen, insbesondere wenn Ihre Aktivität pausiert ist. Andernfalls kann der Akku in nur wenigen Stunden leer sein, da einige Sensoren einen erheblichen Strombedarf haben und schnell Akkuleistung verbrauchen können. Das System deaktiviert Sensoren nicht automatisch, wenn der Bildschirm ausgeschaltet wird.
Umgang mit verschiedenen Sensorkonfigurationen
Android gibt keine Standardsensorkonfiguration für Geräte vor. Das bedeutet, dass Gerätehersteller jede beliebige Sensorkonfiguration in ihre Android-Geräte einbauen können. Daher können Geräte eine Vielzahl von Sensoren in unterschiedlichen Konfigurationen enthalten. Wenn Ihre Anwendung auf einen bestimmten Sensortyp angewiesen ist, müssen Sie dafür sorgen, dass der Sensor auf einem Gerät vorhanden ist, damit Ihre App erfolgreich ausgeführt werden kann.
Sie haben zwei Möglichkeiten, um sicherzustellen, dass ein bestimmter Sensor auf einem Gerät vorhanden ist:
- Sensoren zur Laufzeit erkennen und Anwendungsfunktionen entsprechend aktivieren oder deaktivieren.
- Mit Google Play-Filtern können Sie Geräte mit bestimmten Sensorkonfigurationen ansprechen.
Die einzelnen Optionen werden in den folgenden Abschnitten erläutert.
Sensoren zur Laufzeit erkennen
Wenn Ihre Anwendung einen bestimmten Sensortyp verwendet, aber nicht darauf angewiesen ist, können Sie das Sensor-Framework verwenden, um den Sensor zur Laufzeit zu erkennen und dann Anwendungsfunktionen entsprechend zu deaktivieren oder zu aktivieren. Eine Navigations-App kann beispielsweise den Temperatursensor, den Drucksensor, den GPS-Sensor und den Sensor für das geomagnetische Feld verwenden, um die Temperatur, den Luftdruck, den Standort und die Kompassrichtung anzuzeigen. Wenn ein Gerät keinen Drucksensor hat, können Sie mit dem Sensor-Framework das Fehlen des Drucksensors zur Laufzeit erkennen und dann den Teil der Benutzeroberfläche Ihrer Anwendung deaktivieren, in dem der Druck angezeigt wird. Der folgende Code prüft beispielsweise, ob ein Gerät einen Drucksensor hat:
Kotlin
private lateinit var sensorManager: SensorManager
...
sensorManager = getSystemService(Context.SENSOR_SERVICE) as SensorManager

if (sensorManager.getDefaultSensor(Sensor.TYPE_PRESSURE) != null) {
    // Success! There's a pressure sensor.
} else {
    // Failure! No pressure sensor.
}
Java
private SensorManager sensorManager;
...
sensorManager = (SensorManager) getSystemService(Context.SENSOR_SERVICE);
if (sensorManager.getDefaultSensor(Sensor.TYPE_PRESSURE) != null){
    // Success! There's a pressure sensor.
} else {
    // Failure! No pressure sensor.
}
Google Play-Filter verwenden, um bestimmte Sensorkonfigurationen anzusprechen
Wenn Sie Ihre Anwendung bei Google Play veröffentlichen, können Sie das Element <uses-feature>
in Ihrer Manifestdatei verwenden, um Ihre Anwendung auf Geräten herauszufiltern, die nicht die entsprechende Sensorkonfiguration für Ihre Anwendung haben. Das <uses-feature>-Element hat mehrere Hardware-Deskriptoren, mit denen Sie Anwendungen nach dem Vorhandensein bestimmter Sensoren filtern können. Die Sensoren, die Sie auflisten können, sind: Beschleunigungsmesser, Barometer, Kompass (geomagnetisches Feld), Gyroskop, Licht und Näherungssensor. Hier ist ein Beispiel für einen Manifesteintrag, mit dem Apps ohne Beschleunigungsmesser herausgefiltert werden:
<uses-feature android:name="android.hardware.sensor.accelerometer"
              android:required="true" />
Wenn Sie dieses Element und den Deskriptor dem Manifest Ihrer Anwendung hinzufügen, sehen Nutzer Ihre Anwendung bei Google Play nur, wenn ihr Gerät einen Beschleunigungsmesser hat.
Sie sollten den Deskriptor nur dann auf android:required="true" festlegen, wenn Ihre Anwendung vollständig auf einen bestimmten Sensor angewiesen ist. Wenn Ihre Anwendung einen Sensor für bestimmte Funktionen verwendet, aber auch ohne den Sensor ausgeführt werden kann, sollten Sie den Sensor im <uses-feature>-Element auflisten, den Deskriptor aber auf android:required="false" festlegen. So wird sichergestellt, dass Ihre App auch auf Geräten installiert werden kann, die diesen Sensor nicht haben. Dies ist auch eine Best Practice für das Projektmanagement, mit der Sie den Überblick über die von Ihrer Anwendung verwendeten Funktionen behalten.
Wenn Ihre Anwendung einen bestimmten Sensor verwendet, aber auch ohne ihn ausgeführt werden kann, sollten Sie den Sensor zur Laufzeit erkennen und die Anwendungsfunktionen entsprechend deaktivieren oder aktivieren.
Sensorkoordinatensystem
Im Allgemeinen wird im Sensor-Framework ein standardmäßiges 3-Achsen-Koordinatensystem verwendet, um Datenwerte auszudrücken. Bei den meisten Sensoren wird das Koordinatensystem relativ zum Bildschirm des Geräts definiert, wenn das Gerät in seiner Standardausrichtung gehalten wird (siehe Abbildung 1). Wenn ein Gerät in seiner Standardausrichtung gehalten wird, ist die X-Achse horizontal und zeigt nach rechts, die Y-Achse ist vertikal und zeigt nach oben und die Z-Achse zeigt nach außen vom Display weg. In diesem System haben Koordinaten hinter dem Bildschirm negative Z-Werte. Dieses Koordinatensystem wird von den folgenden Sensoren verwendet:
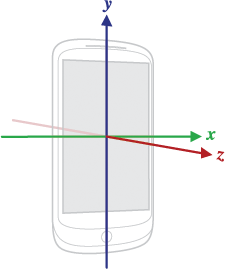
Abbildung 1: Koordinatensystem (relativ zu einem Gerät), das von der Sensor API verwendet wird.
- Beschleunigungssensor
- Schwerkraftsensor
- Gyroskop
- Sensor für lineare Beschleunigung
- Sensor für das geomagnetische Feld
Der wichtigste Punkt, den Sie über dieses Koordinatensystem wissen müssen, ist, dass die Achsen nicht getauscht werden, wenn sich die Bildschirmausrichtung des Geräts ändert. Das Koordinatensystem des Sensors ändert sich also nie, wenn sich das Gerät bewegt. Dieses Verhalten entspricht dem des OpenGL-Koordinatensystems.
Außerdem darf Ihre Anwendung nicht davon ausgehen, dass die natürliche (Standard-)Ausrichtung eines Geräts das Hochformat ist. Viele Tablets sind standardmäßig im Querformat ausgerichtet. Das Koordinatensystem des Sensors basiert immer auf der natürlichen Ausrichtung eines Geräts.
Wenn Ihre Anwendung Sensordaten mit der Bildschirmanzeige abgleicht, müssen Sie die Methode getRotation() verwenden, um die Bildschirmdrehung zu ermitteln, und dann die Methode remapCoordinateSystem(), um Sensorkoordinaten Bildschirmkoordinaten zuzuordnen. Das ist auch dann erforderlich, wenn in Ihrem Manifest nur die Ausrichtung im Hochformat angegeben ist.
Hinweis:Einige Sensoren und Methoden verwenden ein Koordinatensystem, das sich auf den Referenzrahmen der Welt bezieht (im Gegensatz zum Referenzrahmen des Geräts). Diese Sensoren und Methoden geben Daten zurück, die die Bewegung oder Position des Geräts relativ zur Erde darstellen. Weitere Informationen finden Sie unter getOrientation()-Methode, getRotationMatrix()-Methode, Orientierungssensor und Rotationsvektorsensor.
Ratenbegrenzung für Sensoren
Zum Schutz potenziell vertraulicher Nutzerinformationen wird die Aktualisierungsrate von Daten bestimmter Bewegungs- und Positionssensoren vom System begrenzt, wenn Ihre App auf Android 12 (API‑Level 31) oder höher ausgerichtet ist. Diese Daten umfassen Werte, die vom Beschleunigungsmesser, Gyroskop und Sensor für das geomagnetische Feld des Geräts aufgezeichnet wurden.
Das Aktualisierungsratenlimit hängt davon ab, wie Sie auf Sensordaten zugreifen:
- Wenn Sie die Methode
registerListener()aufrufen, um Sensorereignisse zu überwachen, ist die Sensor-Samplingrate auf 200 Hz begrenzt. Das gilt für alle überladenen Varianten derregisterListener()-Methode. - Wenn Sie die Klasse
SensorDirectChannelverwenden, ist die Sensorabtastrate aufRATE_NORMALbegrenzt, was in der Regel etwa 50 Hz entspricht.
Wenn Ihre App Bewegungsdaten mit einer höheren Rate erfassen muss, müssen Sie die Berechtigung HIGH_SAMPLING_RATE_SENSORS deklarieren, wie im folgenden Code-Snippet gezeigt. Wenn Ihre App versucht, Bewegungsdaten mit einer höheren Rate zu erfassen, ohne diese Berechtigung zu deklarieren, tritt ein SecurityException auf.
AndroidManifest.xml
<manifest ...>
    <uses-permission android:name="android.permission.HIGH_SAMPLING_RATE_SENSORS"/>
    <application ...>
        ...
    </application>
</manifest>
Best Practices für den Zugriff auf und die Verwendung von Sensoren
Achten Sie beim Entwerfen Ihrer Sensorimplementierung darauf, dass Sie die in diesem Abschnitt beschriebenen Richtlinien einhalten. Diese Richtlinien enthalten empfohlene Best Practices für alle, die das Sensor-Framework verwenden, um auf Sensoren zuzugreifen und Sensordaten zu erfassen.
Sensordaten nur im Vordergrund erfassen
Auf Geräten mit Android 9 (API-Level 28) oder höher gelten für Apps, die im Hintergrund ausgeführt werden, die folgenden Einschränkungen:
- Sensoren, die den Berichtsmodus continuous verwenden, z. B. Beschleunigungsmesser und Gyroskope, empfangen keine Ereignisse.
- Sensoren, die die Berichtsmodi on-change oder one-shot verwenden, empfangen keine Ereignisse.
Angesichts dieser Einschränkungen ist es am besten, Sensorereignisse zu erkennen, wenn sich Ihre App im Vordergrund befindet oder als Teil eines Vordergrunddienstes ausgeführt wird.
Registrierung von Sensor-Listenern aufheben
Registrieren Sie den Listener eines Sensors ab, wenn Sie den Sensor nicht mehr verwenden oder die Sensoraktivität pausiert wird. Wenn ein Sensor-Listener registriert ist und seine Aktivität pausiert wird, erfasst der Sensor weiterhin Daten und verbraucht Akkuressourcen, sofern Sie den Sensor nicht abmelden. Der folgende Code zeigt, wie Sie die Methode onPause() verwenden, um einen Listener zu deregistrieren:
Kotlin
private lateinit var sensorManager: SensorManager
...
override fun onPause() {
    super.onPause()
    sensorManager.unregisterListener(this)
}
Java
private SensorManager sensorManager;
...
@Override
protected void onPause() {
    super.onPause();
    sensorManager.unregisterListener(this);
}
Weitere Informationen finden Sie unter unregisterListener(SensorEventListener).
Mit dem Android-Emulator testen
Der Android-Emulator enthält eine Reihe virtueller Sensorsteuerungen, mit denen Sie Sensoren wie Beschleunigungsmesser, Umgebungstemperatur, Magnetometer, Näherungssensor und Lichtsensor testen können.
Der Emulator verwendet eine Verbindung mit einem Android-Gerät, auf dem die App SdkControllerSensor ausgeführt wird. Diese App ist nur auf Geräten mit Android 4.0 (API-Level 14) oder höher verfügbar. Wenn auf dem Gerät Android 4.0 ausgeführt wird, muss Revision 2 installiert sein. Die App SdkControllerSensor überwacht Änderungen an den Sensoren auf dem Gerät und überträgt sie an den Emulator. Der Emulator wird dann anhand der neuen Werte transformiert, die er von den Sensoren auf Ihrem Gerät empfängt.
Den Quellcode für die SdkControllerSensor-App finden Sie unter:
$ your-android-sdk-directory/tools/apps/SdkController
So übertragen Sie Daten zwischen Ihrem Gerät und dem Emulator:
- Prüfen Sie, ob auf Ihrem Gerät USB-Debugging aktiviert ist.
- Verbinden Sie Ihr Gerät über ein USB-Kabel mit Ihrem Entwicklercomputer.
- Starten Sie die App SdkControllerSensor auf Ihrem Gerät.
- Wählen Sie in der App die Sensoren aus, die Sie emulieren möchten.
Führen Sie den folgenden
adb-Befehl aus:- Starten Sie den Emulator. Sie sollten jetzt Transformationen auf den Emulator anwenden können, indem Sie Ihr Gerät bewegen.
$ adb forward tcp:1968 tcp:1968
Hinweis : Wenn die Bewegungen, die Sie auf Ihrem physischen Gerät ausführen, nicht auf den Emulator übertragen werden, führen Sie den Befehl adb aus Schritt 5 noch einmal aus.
Weitere Informationen finden Sie im Leitfaden zum Android-Emulator.
Blockieren Sie die Methode „onSensorChanged()“ nicht.
Sensordaten können sich schnell ändern. Das System ruft die onSensorChanged(SensorEvent)-Methode daher möglicherweise sehr oft auf. Als Best Practice empfehlen wir, in der onSensorChanged(SensorEvent)-Methode so wenig wie möglich zu tun, damit sie nicht blockiert wird. Wenn in Ihrer Anwendung Sensorinformationen gefiltert oder reduziert werden müssen, sollten Sie das außerhalb der Methode onSensorChanged(SensorEvent) tun.
Vermeiden Sie die Verwendung eingestellter Methoden oder Sensortypen.
Mehrere Methoden und Konstanten wurden eingestellt.
Insbesondere der Sensortyp TYPE_ORIENTATION wurde eingestellt. Verwenden Sie stattdessen die Methode getOrientation(), um Ausrichtungsdaten abzurufen. Ebenso wurde der Sensortyp TYPE_TEMPERATURE eingestellt. Verwenden Sie stattdessen den Sensortyp TYPE_AMBIENT_TEMPERATURE auf Geräten mit Android 4.0.
Sensoren vor der Verwendung überprüfen
Prüfen Sie immer, ob ein Sensor auf einem Gerät vorhanden ist, bevor Sie versuchen, Daten von ihm abzurufen. Gehen Sie nicht davon aus, dass ein Sensor vorhanden ist, nur weil er häufig verwendet wird. Gerätehersteller sind nicht verpflichtet, bestimmte Sensoren in ihren Geräten anzubieten.
Sensorverzögerungen sorgfältig auswählen
Wenn Sie einen Sensor mit der Methode registerListener() registrieren, wählen Sie eine Übertragungsrate aus, die für Ihre Anwendung oder Ihren Anwendungsfall geeignet ist. Sensoren können Daten mit sehr hoher Frequenz liefern. Wenn das System zusätzliche Daten sendet, die Sie nicht benötigen, werden Systemressourcen verschwendet und Akkuenergie verbraucht.