
使用者可透過清單功能,輕鬆在 Wear OS 裝置上從一組選項中選取所需項目。
Wearable UI 程式庫內含 WearableRecyclerView 類別,此為 RecyclerView 的實作成果,用來建立為穿戴式裝置進行最佳化調整的清單。只要建立新的 WearableRecyclerView 容器,即可在穿戴式應用程式中使用此介面。
如果是較長的簡單項目清單,例如應用程式啟動器或聯絡人清單,請使用 WearableRecyclerView。每個項目都可能有一個短字串和一個相關聯的圖示。此外,每個項目也可能只有一個字串或圖示。
注意:請避免使用複雜的版面配置,讓使用者能立即瞭解項目的用途,特別是螢幕尺寸有限的穿戴式裝置更應如此。
藉由擴充現有的 RecyclerView 類別,在預設狀態下,WearableRecyclerView API 會在直向清單中垂直顯示一系列可捲動的項目。此外,您也可以使用 WearableRecyclerView API,在穿戴式應用程式中導入曲線版面配置及圓形捲動手勢。
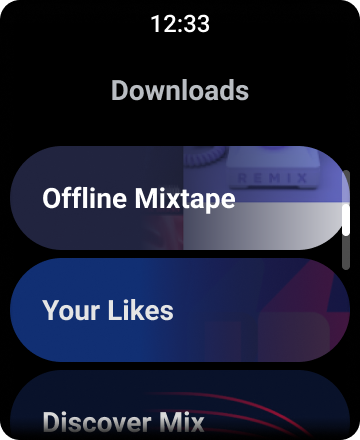
圖 1:Wear OS 的預設清單檢視畫面。
本指南將說明如何使用 WearableRecyclerView 類別在 Wear OS 應用程式中建立清單、如何為可捲動的項目選擇採用弧形版面配置,以及如何自訂捲動畫面時的子項外觀。
使用 XML 將 WearableRecyclerView 新增至活動
下列版面配置會將 WearableRecyclerView 新增至活動。
<androidx.wear.widget.WearableRecyclerView
    xmlns:android="http://schemas.android.com/apk/res/android"
    xmlns:tools="http://schemas.android.com/tools"
    android:id="@+id/recycler_launcher_view"
    android:layout_width="match_parent"
    android:layout_height="match_parent"
    android:scrollbars="vertical" />
以下範例為套用至活動的 WearableRecyclerView:
Kotlin
class MainActivity : Activity() {

    override fun onCreate(savedInstanceState: Bundle?) {
        super.onCreate(savedInstanceState)
        setContentView(R.layout.activity_main)
    }
    ...
}
Java
public class MainActivity extends Activity {
    @Override
    public void onCreate(Bundle savedInstanceState) {
        super.onCreate(savedInstanceState);
        setContentView(R.layout.activity_main);
    }
    ...
}
建立弧形版面配置

如要為穿戴式應用程式中的可捲動項目建立弧形版面配置,請按照下列步驟操作:
- 使用
WearableRecyclerView做為相關 XML 版面配置中的主要容器。 -
將
setEdgeItemsCenteringEnabled(boolean)方法設為true。這麼做會將清單中的第一個和最後一個項目在螢幕上垂直置中。 -
使用
WearableRecyclerView.setLayoutManager()方法設定螢幕項目的版面配置。
Kotlin
wearableRecyclerView.apply {
    // To align the edge children (first and last) with the center of the screen.
    isEdgeItemsCenteringEnabled = true
    ...
    layoutManager = WearableLinearLayoutManager(this@MainActivity)
}
Java
// To align the edge children (first and last) with the center of the screen.
wearableRecyclerView.setEdgeItemsCenteringEnabled(true);
...
wearableRecyclerView.setLayoutManager(
                new WearableLinearLayoutManager(this));
如果應用程式有自訂捲動時顯示的子項外觀的特定需求 (例如當項目因畫面捲動而離開畫面中心時,讓圖示和文字隨著畫面捲動縮放),請擴充
WearableLinearLayoutManager.LayoutCallback 類別並覆寫
onLayoutFinished 方法。
以下程式碼片段範例顯示如何擴充 WearableLinearLayoutManager.LayoutCallback 類別來自訂項目捲動方式,縮放遠離中心的項目:
Kotlin
/** How much icons should scale, at most.  */
private const val MAX_ICON_PROGRESS = 0.65f

class CustomScrollingLayoutCallback : WearableLinearLayoutManager.LayoutCallback() {

    private var progressToCenter: Float = 0f

    override fun onLayoutFinished(child: View, parent: RecyclerView) {
        child.apply {
            // Figure out % progress from top to bottom.
            val centerOffset = height.toFloat() / 2.0f / parent.height.toFloat()
            val yRelativeToCenterOffset = y / parent.height + centerOffset

            // Normalize for center.
            progressToCenter = Math.abs(0.5f - yRelativeToCenterOffset)
            // Adjust to the maximum scale.
            progressToCenter = Math.min(progressToCenter, MAX_ICON_PROGRESS)

            scaleX = 1 - progressToCenter
            scaleY = 1 - progressToCenter
        }
    }
}
Java
public class CustomScrollingLayoutCallback extends WearableLinearLayoutManager.LayoutCallback {
    /** How much icons should scale, at most. */
    private static final float MAX_ICON_PROGRESS = 0.65f;

    private float progressToCenter;

    @Override
    public void onLayoutFinished(View child, RecyclerView parent) {

        // Figure out % progress from top to bottom.
        float centerOffset = ((float) child.getHeight() / 2.0f) / (float) parent.getHeight();
        float yRelativeToCenterOffset = (child.getY() / parent.getHeight()) + centerOffset;

        // Normalize for center.
        progressToCenter = Math.abs(0.5f - yRelativeToCenterOffset);
        // Adjust to the maximum scale.
        progressToCenter = Math.min(progressToCenter, MAX_ICON_PROGRESS);

        child.setScaleX(1 - progressToCenter);
        child.setScaleY(1 - progressToCenter);
    }
}
Kotlin
wearableRecyclerView.layoutManager =
        WearableLinearLayoutManager(this, CustomScrollingLayoutCallback())
Java
CustomScrollingLayoutCallback customScrollingLayoutCallback =
                new CustomScrollingLayoutCallback();
wearableRecyclerView.setLayoutManager(
                new WearableLinearLayoutManager(this, customScrollingLayoutCallback));