
من المفترض أن تعمل تطبيقات Wear OS بشكل مستقل عن الهاتف. ومع ذلك، إذا كان تطبيق Wear OS يعتمد على تطبيق جوّال، يمكنك الاطّلاع على المعلومات التالية حول ربط ساعة محاكية أو ساعة فعلية بهاتف.
إقران الأجهزة بمحاكي ساعة
يمكنك إقران الأجهزة بساعة Android Virtual Device (AVD) أو المحاكي يدويًا أو باستخدام أداة مساعدة لإقران محاكي Wear OS.
استخدام أداة مساعدة إقران محاكي Wear OS
يسهّل مساعد إقران محاكي Wear OS عملية إدارة محاكيات Wear وربطها. يمكنك إقران أجهزة Wear متعددة بهاتف واحد افتراضي أو حقيقي. يحفظ "استوديو Android" الأجهزة التي تم إقرانها سابقًا ويعيد إقرانها عند تشغيلها.
لإقران جهازَين، اتّبِع الخطوات التالية:
أنشئ محاكي Wear إذا لم يسبق لك ذلك.
في إدارة الأجهزة، انقر على رمز قائمة الخيارات الإضافية بجانب الجهاز الذي تريد إقرانه، ثم اختَر إقران جهاز قابل للارتداء.
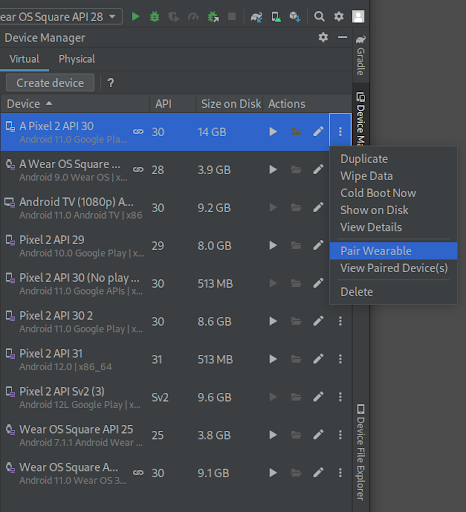
الشكل 1: قائمة الخيارات الإضافية لجهاز يمكن إقرانه بمحاكي Wear. يؤدي هذا الإجراء إلى تشغيل أداة مساعدة إقران محاكي Wear OS. إذا اخترت إقران جهاز قابل للارتداء في إدخال خاص بهاتف، ستظهر لك قائمة بأجهزة Wear المتاحة. إذا بدأت باستخدام جهاز Wear، ستظهر لك قائمة بالهواتف المتاحة. اختَر الجهاز الذي تريد إقرانه وانقر على التالي.
قد يستغرق تشغيل Android Studio وإعداد الأجهزة بضع دقائق. إذا لم يكن تطبيق Wear OS للأجهزة الجوّالة مثبَّتًا على هاتفك، اتّبِع التعليمات لتسجيل الدخول إلى "متجر Play" وتثبيت التطبيق وإعداده.
لإقران أجهزتك في تطبيق Wear OS على هاتفك، انقر على قائمة الخيارات الإضافية واختَر الإقران بمحاكي.
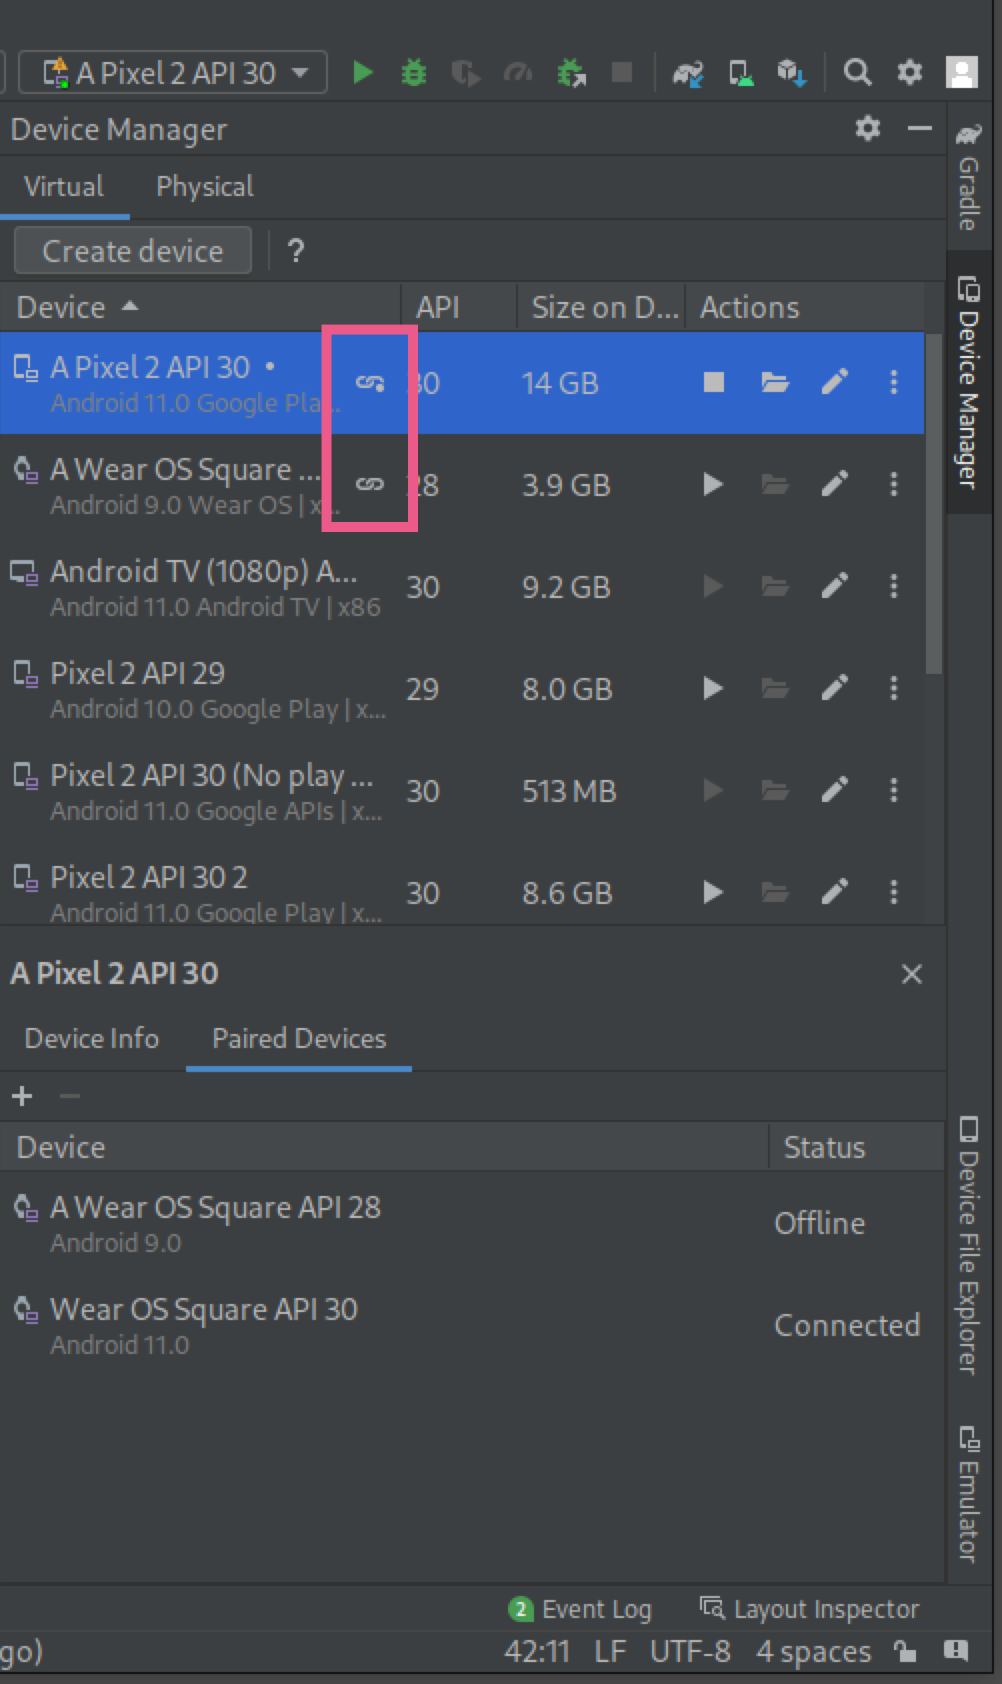
بعد إقران الأجهزة بنجاح، يعرض مدير الأجهزة رموزًا صغيرة بجانب الأجهزة المقترنة. يمكنك أيضًا النقر على القائمة المنسدلة الخاصة بقائمة الخيارات الإضافية واختيار عرض التفاصيل للاطّلاع على قائمة بالأجهزة المقترنة.
إقران هاتف بمحاكي جهاز Android الظاهري للساعة
لإضافة حساب Google إلى جهاز AVD للساعة لأغراض التطوير، عليك ربط هاتف بجهاز AVD للساعة ومزامنة حساب Google. ثم اتبع الخطوات التالية:
اتّبِع الخطوات لإعداد هاتف.
على الهاتف، فعِّل خيارات المطوّرين وتصحيح أخطاء الجهاز عبر USB.
وصِّل الهاتف بالكمبيوتر من خلال USB.
أعِد توجيه منفذ الاتصال الخاص بجهاز AVD إلى الهاتف المتصل في كل مرة يتم فيها توصيل الهاتف باستخدام الأمر التالي:
adb -d forward tcp:5601
tcp:5601
في تطبيق Wear OS المصاحب على الهاتف، ابدأ عملية الربط العادية. على سبيل المثال، في شاشة الترحيب، انقر على الزر إعداد. بدلاً من ذلك، إذا كانت هناك ساعة مقترنة حاليًا، انقر على إضافة ساعة جديدة.
في تطبيق Wear OS المصاحب على الهاتف، انقر على قائمة الخيارات الإضافية، ثم انقر على الإقران بالمحاكي.
انقر على رمز الإعدادات.
ضمن إعدادات الجهاز، انقر على المحاكي.
انقر على الحسابات واختَر حسابًا على Google. اتّبِع الخطوات الواردة في المعالج لمزامنة الحساب مع المحاكي. إذا لزم الأمر، أدخِل كلمة مرور قفل الشاشة وكلمة مرور حساب Google لبدء مزامنة الحساب.
ربط هاتف بأجهزة Wear OS متعددة
لربط جهاز Wear ثانٍ بهاتف افتراضي أو حقيقي، اتّبِع الخطوات نفسها التي تتّبعها عند إجراء عملية الإقران الأولية: ابحث عن الهاتف أو جهاز Wear الذي تريد إقرانه في إدارة الأجهزة، وانقر على رمز قائمة الخيارات الإضافية، ثم انقر على إقران جهاز Wear.
إعداد هاتف
يوضّح هذا القسم كيفية إعداد هاتف جوّال باستخدام تطبيق مصاحب على Wear OS.
استخدام إصدار Android من التطبيق المصاحب
على هاتف Android، انتقِل إلى بطاقة بيانات تطبيق ساعة Wear OS الذكية من Google. انقر على تحديث لتنزيل التطبيق وتثبيته. بعد التثبيت، تأكَّد من تحديد خيار التحديث التلقائي للتطبيق. يمكنك الاطّلاع على قسم "كيفية تحديث تطبيقات Android الفردية تلقائيًا" في مقالة تحديث التطبيقات التي تم تنزيلها. انقر على فتح لبدء تشغيل التطبيق.
إقران هاتف Android بساعة
بعد تثبيت التطبيق المصاحب على الهاتف، عليك إلغاء ربط أي أجهزة ساعة قديمة، إذا لزم الأمر. بعد ذلك، أقرِن الهاتف بساعة تمّت إعادة ضبطها. لإجراء ذلك، أكمِل الخطوات التالية:
على الهاتف، اختَر اسم جهاز الساعة من قائمة الأجهزة. يظهر رمز إقران على الهاتف والساعة. تأكَّد من تطابق الرموز.
انقر على إقران لمواصلة عملية الإقران. عند ربط الساعة بالهاتف، ستظهر رسالة تأكيد. بعد التأكيد، ستظهر قائمة بالحسابات على الهاتف.
اختَر حساب Google لإضافته ومزامنته مع ساعتك.
أكِّد قفل الشاشة وأدخِل كلمة المرور لبدء نسخ الحساب من الهاتف إلى الساعة.
اتّبِع التعليمات الواردة في المعالج لإنهاء عملية الإقران.