Wear OS 앱은 휴대전화와는 별도로 작동해야 합니다. 그러나 Wear OS 앱이 모바일 앱에 종속된 경우 에뮬레이션된 시계 또는 실제 시계를 휴대전화에 연결하는 방법에 관한 다음 정보를 참고하세요.
시계 에뮬레이터와 기기 페어링
직접 또는 Wear OS 에뮬레이터 페어링 어시스턴트를 사용하여 시계 Android Virtual Device(AVD) 또는 에뮬레이터에 기기를 페어링할 수 있습니다.
Wear OS 에뮬레이터 페어링 어시스턴트 사용
참고: Wear OS 에뮬레이터 페어링 어시스턴트를 사용하려면 휴대전화에서 Android 11(API 수준 30) 이상을 실행하고 Google Play 스토어가 설치되어 있어야 합니다. 또한 Wear 에뮬레이터가 API 수준 28 이상을 실행해야 최신 어시스턴트 기능을 사용할 수 있습니다. 에뮬레이션된 기기의 시스템 이미지를 업그레이드하려면 SDK Manager를 사용하세요.
Wear OS 에뮬레이터 페어링 어시스턴트를 사용하면 Wear 에뮬레이터를 더 쉽게 관리하고 연결할 수 있습니다. Wear 기기 여러 대를 가상 또는 실제 휴대전화 한 대와 페어링할 수 있습니다. 또한 Android 스튜디오는 이전에 페어링된 기기가 실행될 때 이를 기억하고 다시 페어링합니다.
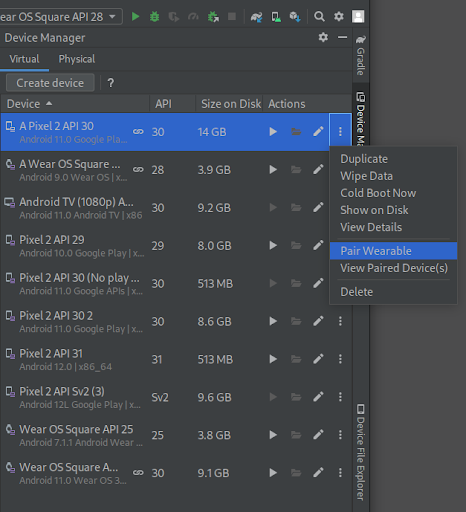
기기 관리도구에서 페어링하려는 기기 옆에 있는 더보기 메뉴 아이콘을 클릭하고 Pair Wearable을 선택합니다.
그림 1. Wear 에뮬레이터와 페어링할 수 있는 기기의 더보기 메뉴
그러면 Wear OS 에뮬레이터 페어링 어시스턴트가 실행됩니다. 휴대전화 항목에서 Pair Wearable을 선택했다면 사용 가능한 Wear 기기 목록이 표시됩니다. Wear 기기로 시작한 경우 사용 가능한 휴대전화 목록이 표시됩니다. 페어링할 기기를 선택하고 Next를 클릭합니다.
Android 스튜디오가 실행되고 기기를 준비하는 데 몇 분 정도 걸릴 수 있습니다. 휴대전화에 Wear OS 호환 앱이 설치되어 있지 않다면 표시되는 메시지에 따라 Play 스토어에 로그인하여 앱을 설치한 후 설정하세요.
휴대전화의 Wear OS 앱에서 기기를 페어링하려면 더보기 메뉴를 클릭하고 Pair with emulator를 선택합니다.
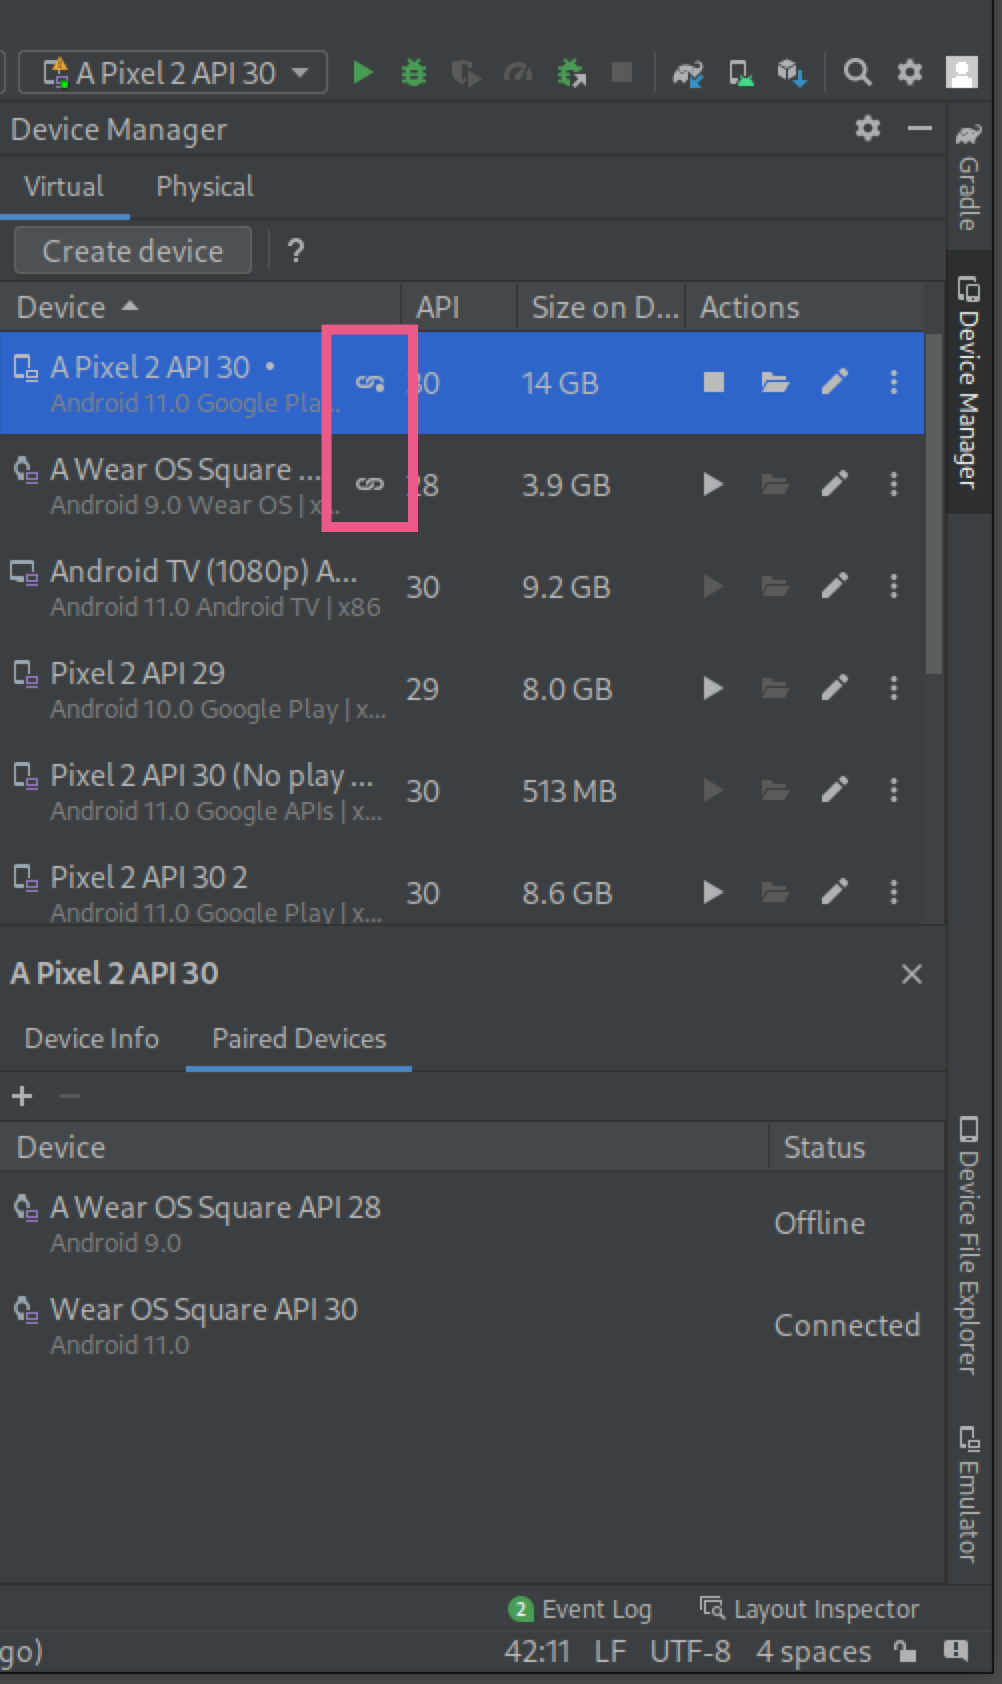
기기가 페어링되면 기기 관리도구에서 페어링된 기기 옆에 작은 아이콘이 표시됩니다. 더보기 드롭다운 메뉴를 클릭하고 View Details를 선택하여 페어링된 기기 목록을 확인할 수도 있습니다.
그림 2.Paired Devices 도구 창에 선택한 기기와 페어링된 기기가 표시됨
시계 AVD와 휴대전화 페어링
개발용 시계 AVD에서 Google 계정을 사용하려는 경우 다음을 실행하여 휴대전화를 시계 AVD와 페어링하고 Google 계정을 동기화할 수 있습니다.
다음 명령어를 사용하여 휴대전화가 연결될 때마다 연결된 휴대전화로 AVD의 통신 포트를 전달합니다. adb -d forward tcp:5601 tcp:5601
휴대전화의 Wear OS 호환 앱에서 표준 페어링 프로세스를 시작합니다. 예를 들어 시작 화면에서 설정 버튼을 탭합니다.
또는 기존 시계가 이미 페어링된 경우 왼쪽 상단 메뉴에서 새 시계 추가를 탭합니다.
휴대전화의 Wear OS 호환 앱에서 더보기 메뉴를 탭한 후 에뮬레이터와 페어링을 탭합니다.
설정 아이콘을 탭합니다.
기기 설정에서 에뮬레이터를 탭합니다.
계정을 탭하고 Google 계정을 선택합니다. 마법사의 단계에 따라 계정을 에뮬레이터와 동기화합니다. 필요한 경우, 화면 잠금 기기 비밀번호와 Google 계정 비밀번호를 입력하여 계정 동기화를 시작합니다.
여러 Wear 기기에 휴대전화 연결
두 번째 Wear 기기를 가상 또는 실제 휴대전화에 연결하려면 첫 번째 페어링에서 했던 것과 동일한 단계를 따릅니다. 기기 관리도구에서 페어링하려는 휴대전화나 Wear 기기를 찾고 더보기 메뉴 아이콘을 클릭하여 Pair Wearable을 클릭합니다.
휴대전화 설정
이 섹션에는 Wear OS 호환 앱을 사용하여 휴대전화를 설정하는 방법에 관한 정보가 포함되어 있습니다.
호환 앱의 Android 버전 사용
Android 휴대전화에서
Wear OS by Google 스마트시계 앱 등록정보로 이동합니다. 업데이트를 탭하여 앱을 다운로드하고 설치합니다. 설치 후에는 앱에 자동 업데이트가 선택되어 있는지 확인합니다. 다운로드한 앱 업데이트의 '개별 Android 앱을 자동으로 업데이트하는 방법' 섹션을 참고하세요. 열기를 탭하여 앱을 시작합니다.
시계와 Android 휴대전화 페어링
휴대전화에 호환 앱을 설치한 후 필요하다면 더 이상 사용하지 않는 시계를 페어링 해제합니다. 그런 다음 휴대전화를 새로운 이미지의 시계에 페어링합니다. 이렇게 하려면 다음 단계를 완료하세요.
휴대전화의 기기 목록에서 시계 기기 이름을 선택합니다. 페어링 코드가 휴대전화와 시계에 표시됩니다. 코드가 일치하는지 확인합니다.
페어링을 탭하여 페어링 절차를 계속합니다. 시계가 휴대전화에 연결되면 확인 메시지가 표시됩니다. 휴대전화에 휴대전화의 계정이 나열된 화면이 표시됩니다.
추가할 Google 계정을 선택하고 시계와 동기화합니다.
화면 잠금을 확인하고 비밀번호를 입력하여 휴대전화에서 시계로 계정 복사를 시작합니다.
마법사의 안내에 따라 페어링 절차를 완료합니다.
iPhone용 호환 앱
iOS 호환 앱은 iOS 8.2 이상을 실행하는 휴대전화에서 사용할 수 있습니다.
설치하려면 다음 단계를 따르세요.
Android 스튜디오에서 새 모듈의 파일을 만들고 동기화합니다.
Android 스튜디오는 Wear OS에 필요한 모든 종속 항목도 새 모듈의 빌드 파일에 추가합니다. 새 모듈이 화면 왼쪽의 Project 창에 나타납니다.
새 모듈의 폴더가 보이지 않으면 창에 Android 뷰가 표시되는지 확인합니다.
새 Wear OS 모듈의 build.gradle 파일에 다음을 포함합니다.
android 섹션에서 compileSdkVersion의 값을 33으로, targetSdkVersion의 값을 30으로 설정합니다.
이 페이지에 나와 있는 콘텐츠와 코드 샘플에는 콘텐츠 라이선스에서 설명하는 라이선스가 적용됩니다. 자바 및 OpenJDK는 Oracle 및 Oracle 계열사의 상표 또는 등록 상표입니다.
최종 업데이트: 2025-07-27(UTC)
[[["이해하기 쉬움","easyToUnderstand","thumb-up"],["문제가 해결됨","solvedMyProblem","thumb-up"],["기타","otherUp","thumb-up"]],[["필요한 정보가 없음","missingTheInformationINeed","thumb-down"],["너무 복잡함/단계 수가 너무 많음","tooComplicatedTooManySteps","thumb-down"],["오래됨","outOfDate","thumb-down"],["번역 문제","translationIssue","thumb-down"],["샘플/코드 문제","samplesCodeIssue","thumb-down"],["기타","otherDown","thumb-down"]],["최종 업데이트: 2025-07-27(UTC)"],[],[],null,["# Connect a watch to a phone\n\nWear OS apps should work independently of a phone. However, if your Wear OS app\ndepends on a mobile app, see the following information about connecting either\nan emulated watch or a physical watch to a phone.\n\nPair devices with a watch emulator\n----------------------------------\n\nYou can pair devices to your watch Android Virtual Device (AVD), or emulator, manually or by\nusing the Wear OS emulator pairing assistant.\n\n### Use the Wear OS emulator pairing assistant\n\n\n**Note:** Your phone must run Android 11 (API level 30) or\nhigher and have the Google Play Store installed to use the Wear OS\nemulator pairing assistant. Also, make sure your Wear emulators run API\nlevel 28 or higher to use the latest assistant features. To upgrade system\nimages for your emulated devices, use the\n[SDK Manager](/studio/intro/update#sdk-manager).\n\n\nThe Wear OS emulator pairing assistant makes it easier to manage and\nconnect Wear emulators. You can pair multiple Wear devices with a single\nvirtual or physical phone. Android Studio also remembers and re-pairs\npreviously paired devices when they're launched.\n\n\nTo pair two devices, follow these steps:\n\n1. If you haven't already, [create a Wear emulator](/training/wearables/get-started/creating#emulator).\n2. In the **Device Manager** , click the overflow menu icon\n next to a device you want to pair and select **Pair Wearable**.\n\n\n **Figure 1.** Overflow menu of a device that can be paired with a Wear emulator.\n\n \u003cbr /\u003e\n\n3. This launches the Wear OS emulator pairing assistant. If you selected **Pair Wearable** on the entry for a phone, you see a list of available Wear devices. If you started with a Wear device, you see a list of available phones. Select the device you want to pair and click **Next**.\n4. It might take a few minutes for Android Studio to launch and prepare the devices. If your phone doesn't have the Wear OS companion app installed, follow the prompts to log in to the Play Store, install it, and set it up.\n5. To pair your devices in the Wear OS app on your phone, click the overflow menu and select **Pair with emulator**.\n\n\nAfter your devices are successfully paired, the **Device Manager** shows small\nicons next to the paired devices. You can also click the overflow drop-down menu\nand select **View Details** to see a list of paired devices.\n**Figure 2.** The **Paired Devices** tool window shows devices paired with the selected device.\n\n### Pair a phone with the watch AVD\n\n\nIf you want a Google Account on the watch AVD for development,\nyou can pair a phone with the watch AVD and sync a Google Account by doing\nthe following:\n\n1. Follow the steps to [set up a phone](#setting-up-a-phone).\n2. On the phone, enable **Developer Options** and **USB\n Debugging**.\n3. Connect the phone to your computer through USB.\n4. Forward the AVD's communication port to the connected phone each time the phone is connected using this command: \n `adb -d forward tcp:5601 tcp:5601`\n5. In the Wear OS companion app on the phone, begin the standard pairing process. For example, on the Welcome screen, tap the **Set It Up** button. Alternatively, if an existing watch already is paired, tap **Add a New Watch** in the upper-left menu.\n6. In the Wear OS companion app on the phone, tap the overflow menu, and then tap **Pair with Emulator**.\n7. Tap the **Settings** icon.\n8. Under **Device Settings** , tap **Emulator**.\n9. Tap **Accounts** and select a Google Account. Follow the steps in the wizard to sync the account with the emulator. If necessary, type the screen-lock device password and Google Account password to start the account sync.\n\n### Connect a phone to multiple Wear devices\n\n\nTo connect a second Wear device to a virtual or physical phone, follow the same\nsteps you would for an initial pairing: locate the phone or Wear device you want\nto pair in the **Device Manager** , click the overflow menu icon, and\nclick **Pair Wearable**.\n\n\u003cbr /\u003e\n\nSet up a phone\n--------------\n\n\u003cbr /\u003e\n\n\nThis section contains information about setting up a mobile phone\nwith a Wear OS companion app.\n\n### Use the Android version of the companion app\n\n\nOn an Android phone, go to the [Wear OS by Google Smartwatch](https://play.google.com/store/apps/details?id=com.google.android.wearable.app) app listing. Tap **Update** to download and\ninstall the app. After installation, confirm that\n**Auto-update** is selected for the app. See\nthe \"How to update individual Android apps automatically\" section of [Update downloaded\napps](https://support.google.com/googleplay/answer/113412). Tap **Open** to start the app.\n\n#### Pair an Android phone to a watch\n\n\nAfter you install the companion app on a phone, unpair any obsolete watch pairings, if\nnecessary. Then pair the phone to a newly imaged watch. To do this, complete the following steps:\n\n1. On the phone, select your watch device name from the list of devices. A pairing code displays on the phone and on the watch. Check that the codes match.\n2. Tap **Pair** to continue the pairing process. When the watch connects to the phone, a confirmation message displays. On the phone, a screen displays that lists the accounts on the phone.\n3. Choose a Google account to add and sync to your watch.\n4. Confirm the screen lock and enter the password to start copying the account from the phone to the watch.\n5. Follow the instructions in the wizard to finish the pairing process.\n\n#### Companion app for iPhones\n\n\nAn iOS companion app is available for phones running iOS 8.2 or higher.\nTo install it, do the following:\n\n1. On your iPhone, visit the App Store and download and install the [Wear OS by Google](https://itunes.apple.com/us/app/android-wear/id986496028) companion app.\n2. Follow the instructions on the watch and on the phone to begin the pairing process. For additional information, see the page about [fixing setup issues with your watch](https://support.google.com/androidwear/answer/6057772?co=GENIE.Platform%3DiOS&oco=0).\n\nReuse code for a mobile app in a Wear OS module\n-----------------------------------------------\n\n\nYou can [add a module](/studio/projects/add-app-module) for a Wear OS device\nto your existing project in Android Studio to let you reuse code from your\nmobile app.\n\n### Create a Wear OS module in your existing project\n\n\nTo create a Wear OS module, open your existing Android Studio project and do the following:\n\n1. Click **File** \\\u003e **New** \\\u003e **New Module**.\n2. In the **New Module** window, select **Wear OS Module** and click **Next**.\n3. Under **Configure the new module** , enter the following:\n - **Application/Library Name**: the title of your app launcher icon for the new module\n - **Module Name**: the name of the folder for your source code and resource files\n - **Package Name** : the namespace for the code in your module. The string is added as the [`package`](/guide/topics/manifest/manifest-element#package) attribute in the module's [Android manifest file](/guide/topics/manifest/manifest-intro).\n - **Minimum SDK** : the lowest version of the platform that the app module supports. For example, select **API 26: Android 8.0** . This value sets the `minSdkVersion` attribute in the `build.gradle` file, which you can edit later.\n4. Click **Next** . You see multiple code template options. Select **Blank Wear OS Activity** and then click **Next**.\n5. In the **Configure Activity** window, enter or accept the default values for the **Activity Name** , **Layout Name** , and **Source Language** . Click **Finish**.\n\nAndroid Studio creates and syncs the files for the new module.\nAndroid Studio also adds any required dependencies for Wear OS\nto the new module's build file. The new module appears in\nthe **Project** window on the left side of the screen.\nIf you don't see the new module's folder, make sure the window is displaying the\n[Android view](/studio/projects#ProjectFiles).\n\nInclude the following in the `build.gradle` file for the new Wear OS module:\n\n- In the `android` section, set the values for `compileSdkVersion` to 33 and `targetSdkVersion` to 30.\n- Add the dependencies you need. For more information, see [Declaring dependencies](/jetpack/androidx/releases/wear#declaring_dependencies).\n- [Sync](/studio/build#sync-files) your Android Studio project. To run the code in the new module, see [Launch the\n emulator and run your Wear OS app](/training/wearables/get-started/creating#run-emulator)."]]