

Android Emulator を使用して、Android Automotive OS 上でアプリの動作をテストできます。
システム イメージを追加する
Android Automotive OS 仮想デバイスを作成するには、Android Studio SDK Manager を使用してシステム イメージを追加する必要があります。
Generic System Image を追加する
Android Studio には Android Automotive OS 用の Generic System Image も含まれています。これはアプリのテストに使用できるため、Google Play のスクリーンショットを撮影するときに使用する必要があります。これらの画像にはすべて、次のものが含まれています。
- Google Play 開発者サービス
- Google Automotive App Host (API 28 イメージを除く。ホストは API 29 以降を搭載したデバイスでのみ利用できるため)
| 名前 | API レベル | アーキテクチャ | 機能 | 対象 |
|---|---|---|---|---|
| Automotive Intel x86 Atom System Image | 28 | x86 | Google Play ストア |  Android Studio プレビュー Android Studio プレビュー |
| Automotive with Play Store Intel x86 Atom System Image | 29 | x86 | Google Play ストア | Android Studio プレビュー |
| Automotive with Play Store Intel x86_64 Atom System Image | 30 | x86 | Google Play ストア | Android Studio プレビュー |
| Automotive with Play Store ARM 64 v8a System Image | 32 | ARM | Google Play ストア | Android Studio プレビュー |
| Automotive with Play Store Intel x86_64 Atom System Image | 32 | x86 | Google Play ストア | Android Studio プレビュー |
| Automotive Distant Display with Google APIs arm64-v8a System Image | 32 | ARM | Android Studio プレビュー |
|
| Automotive Distant Display with Google APIs x86_64 System Image | 32 | x86 | Android Studio プレビュー |
|
| Automotive Distant Display with Google Play arm64-v8a System Image | 32 | ARM | Google Play ストア | Android Studio プレビュー |
| Automotive Distant Display with Google Play x86_64 System Image | 32 | x86 | Google Play ストア | Android Studio プレビュー |
| Android Automotive with Google APIs ARM 64 v8a System Image | 33 | ARM |  Android Studio 安定版 Android Studio 安定版 |
|
| Android Automotive with Google APIs Intel x86_64 Atom System Image | 33 | x86 | Android Studio 安定版 |
|
| Automotive Distant Display with Google Play arm64-v8a System Image | 33 | ARM | Google Play ストア | Android Studio 安定版 |
| Automotive Distant Display with Google Play x86_64 System Image | 33 | x86 | Google Play ストア | Android Studio 安定版 |
| Android Automotive with Google APIs arm64-v8a System Image | 34-ext9 | ARM | Android Studio 安定版 |
|
| Android Automotive with Google APIs x86_64 System Image | 34-ext9 | x86 | Android Studio 安定版 |
|
| Android Automotive with Google Play arm64-v8a System Image | 34-ext9 | ARM | Android Studio 安定版 |
|
| Android Automotive with Google Play x86_64 System Image | 34-ext9 | x86 | Android Studio 安定版 |
|
| Android Automotive with Google APIs arm64-v8a System Image | 35-ext15 | ARM |
|
Android Studio 安定版 |
| Android Automotive with Google APIs x86_64 System Image | 35-ext15 | x86 |
|
Android Studio 安定版 |
| Android Automotive with Google Play arm64-v8a System Image | 35-ext15 | ARM |
|
Android Studio 安定版 |
| Android Automotive with Google Play x86_64 System Image | 35-ext15 | x86 |
|
Android Studio 安定版 |
Generic System Image をインストールする手順は次のとおりです。
- Android Studio で、[Tools] > [SDK Manager] を選択します。
- [SDK Platforms] タブをクリックします。
- [Show Package Details] をクリックします。
- ダウンロードするイメージを選択します。詳しくは、上記の表をご覧ください。
- [Apply]、[OK] の順にクリックします。

OEM のシステム イメージを追加する
OEM 固有のシステム イメージを追加することもできます。OEM のデベロッパー サイトに記載されている手順に沿って行ってください(アルファベット順)。
車の AVD を作成してエミュレータを実行する
以下の手順に沿って、Android Automotive OS 搭載車を表す Android Virtual Device(AVD)を作成し、その AVD を使用してエミュレータを実行します。
- Android Studio で、[Tools] > [AVD Manager] を選択します。
- [Create Virtual Device] をクリックします。
- [Select Hardware] ダイアログで [Automotive] を選択し、ハードウェア プロファイルを選択します。[次へ] をクリックします。
- [Android 12L(Play Store の Automotive)] など、Automotive をターゲットとするシステム イメージを選択し、[Next] をクリックします。
- AVD に名前を付け、カスタマイズするその他のオプションを選択して、[Finish] をクリックします。
- ツール ウィンドウ バーから、デプロイのターゲットとして Android Automotive OS AVD を選択します。
- 実行アイコン
 をクリックします。
バンドルされたハードウェア プロファイルを使用する
AVD を作成する際は、Android Studio にバンドルされている次のハードウェア プロファイルを使用できます。
| 名前 | 解決策 | 構成可能 | 互換性 | 対象 |
|---|---|---|---|---|
| Automotive (1024p landscape) | 1024x768 | Google Play ストアを含む  API 28 ~ 32 のシステム イメージ API 28 ~ 32 のシステム イメージ |
Android Studio 安定版 |
|
| Automotive(1080p 横向き) | 1080x600 | ✔ | Google Play ストアが搭載されていない API 33 以降のシステム イメージ | Android Studio 安定版 |
|
Automotive(1408p 横向き)
API 34 イメージでの使用を推奨 |
1408x792 | Google Play ストアが搭載されていない API 33 以降のシステム イメージ | Android Studio 安定版 |
|
|
Automotive(1408p 横向き)with Google Play
API 34 イメージでの使用を推奨 |
1408x792 | Google Play ストアを搭載した API 33 以降のシステム イメージ |
Android Studio 安定版 |
|
| 自動車のポートレート | 800x1280 | Google Play ストアを含まない API 33 以降のシステム イメージ | Android Studio 安定版 |
|
| 自動車(縦向き、大) | 1280x1606 | ✔ | Google Play ストアが搭載されていない API 33 以降のシステム イメージ | Android Studio 安定版 |
| 自動車用ウルトラワイド | 3904x1320 | ✔ | Google Play ストアが搭載されていない API 33 以降のシステム イメージ | Android Studio 安定版 |
| 自動車の遠隔ディスプレイ | 1080x600 | Google Play ストアを含まない API 32 以降の遠隔ディスプレイ システム イメージ | Android Studio 安定版 |
|
| Google Play 搭載の自動車の遠隔ディスプレイ | 1080x600 | API 32 以降の遠隔ディスプレイ システム イメージ(Google Play ストア搭載) |
Android Studio 安定版 |
ハードウェア プロファイルを作成する
バンドルされているハードウェア プロファイルに含まれていないハードウェア構成をテストするには、Android Automotive OS エミュレータで使用するハードウェア プロファイルを作成します。これを行うには、作成フローでデバイスタイプとして [Android Automotive] を選択します。カスタム ハードウェア プロファイルは、Google Play ストアを含まないシステム イメージとのみ互換性があります。
エミュレータの拡張コントロールを使用する
他の Android Emulator で利用可能な標準の拡張コントロールの多くに加えて、Android Automotive OS Emulator 専用に作成された拡張コントロールもあります。
ハードウェアの状態をエミュレートする

標準の Android API を使用して読み取ることができる加速度計やジャイロスコープなどのセンサーに加えて、車両に固有の追加のハードウェア プロパティが、車両 Hardware Abstraction Layer(VHAL)を介して通信されます。これらのプロパティは、VehiclePropertyIds クラスによってモデル化されます。
エミュレータの実行中に、拡張コントロールの [Car data] 機能からこれらのプロパティの値を変更できます。たとえば、車両の現在の速度を設定するには、速度のプロパティ(VehiclePropertyIds.PERF_VEHICLE_SPEED)を見つけて、その値を変更します。
運転をシミュレーションする

運転をシミュレートするには、[Car speed] をゼロ以外の値に設定し、[Gear] を P(Park) 以外に設定する必要があります。駐車状態をシミュレートするには、ギアを P(駐車)に設定するだけで済みます。これは、[Car sensor data] タブのスライダーとセレクタを使用するか、前のセクションで説明したように VHAL プロパティを変更することで行えます。
ロータリー入力をテストする
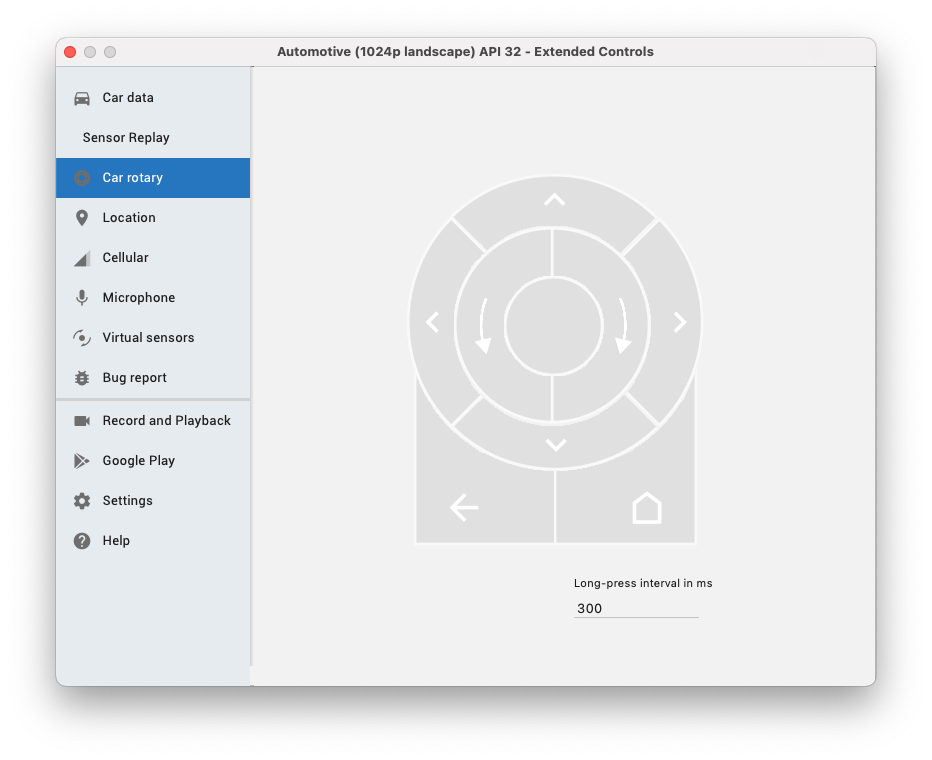
Android Automotive OS を搭載した自動車には、タッチスクリーンのほかに、ロータリー コントローラが搭載されているものもあります。これは、キーボード ナビゲーションと同じフォーカス API を使用して、ユーザーが画面に触れることなくアプリを操作できるようにするものです。拡張コントロール内の Car rotary ツールを使用して、アプリのロータリー入力のサポートをテストできます。
メディアアプリの実行構成を編集する
Automotive OS アプリのメディアアプリは、他の Android アプリとは異なります。Android Automotive OS は、明示的インテントを使用して、メディア ブラウザ サービスに呼び出しを送信することにより、メディアアプリと情報を交換します。
アプリをテストするには、アプリのマニフェストに起動アクティビティがないことを確認し、次の手順に沿って自動車モジュールがアクティビティで起動しないようにします。
Android Studio で、[Run] > [Edit Configurations] を選択します。

実行/デバッグ構成ダイアログ。 アプリのモジュールのリストから、自動車モジュールを選択します。
[Launch Options] > [Launch] で、[Nothing] を選択します。
[Apply]、[OK] の順にクリックします。
Android Automotive OS エミュレータに関する問題を報告する
Android Automotive OS エミュレータの使用中に問題が発生した場合や、機能リクエストがある場合は、Google Issue Tracker を使用して報告できます。問題テンプレートに必要な情報をすべて記入してください。新しい問題を報告する前に、その問題がすでに問題リスト内で報告されていないかご確認ください。Issue Tracker 内で各問題の横にあるスターアイコンをクリックすると、問題への登録と投票ができます。詳しくは、問題を登録する手順をご覧ください。