Profiler l'utilisation de la batterie avec Batterystats et Battery Historian
Restez organisé à l'aide des collections
Enregistrez et classez les contenus selon vos préférences.
Ce document présente les étapes et le workflow de configuration de base de l'outil Batterystats et du script Battery Historian. Pour savoir comment utiliser Battery Historian pour inspecter des modèles de consommation de batterie, consultez Analyser la consommation d'énergie avec Battery Historian.
Batterystats est un outil inclus dans le framework Android qui collecte les données sur la batterie de votre appareil. Vous pouvez utiliser adb pour vider les données de batterie collectées sur votre ordinateur de développement et créer un rapport que vous pouvez analyser à l'aide de Battery Historian. Battery Historian convertit le rapport de BatteryStats en un code HTML visualisable dans votre navigateur.
Batterystats et Battery Historian sont utiles pour :
vous montrer où et comment les processus utilisent la batterie ;
identifier les tâches dans votre application susceptibles d'être différées voire supprimées afin d'améliorer l'autonomie de la batterie.
Installer Battery Historian
Vous pouvez utiliser Docker pour installer Battery Historian. Pour connaître d'autres méthodes d'installation, y compris la compilation à partir de la source, consultez le fichier README sur la page GitHub du projet. Pour effectuer l'installation à l'aide de Docker, procédez comme suit :
Installez Docker en suivant les instructions du site Web de Docker. Tout type d'abonnement fonctionne, y compris un abonnement personnel gratuit.
Pour vérifier que Docker est correctement installé, ouvrez la ligne de commande et saisissez la commande suivante :
docker run hello-world
Si Docker est correctement installé, un résultat semblable à celui-ci s'affiche :
Unable to find image 'hello-world:latest' locally
latest: Pulling from library/hello-world
78445dd45222: Pull complete
Digest:
sha256:c5515758d4c5e1e838e9cd307f6c6a0d620b5e07e6f927b07d05f6d12a1ac8d7
Status: Downloaded newer image for hello-world:latest
Hello from Docker!
This message shows that your installation appears to be working correctly.
To generate this message, Docker took the following steps:
1. The Docker client contacted the Docker daemon.
2. The Docker daemon pulled the "hello-world" image from the Docker Hub.
3. The Docker daemon created a new container from that image which runs the
executable that produces the output you are currently reading.
4. The Docker daemon streamed that output to the Docker client, which sent it to your terminal
Lancez l'application Docker Desktop, qui est une interface IUG pour Docker, avant d'exécuter l'image Battery Historian. Cela initialise les outils Docker. Vous devez effectuer cette opération au moins une fois pour que Battery Historian s'exécute.
Exécutez Battery Historian à partir de la ligne de commande lors de sa première exécution. L'application Docker Desktop ne vous permet pas de spécifier le port sur lequel exécuter le serveur Web. Pour ce faire, vous devez utiliser la ligne de commande. Cependant, une fois que vous avez exécuté avec succès le conteneur à partir de la ligne de commande, une entrée est créée dans Docker Desktop. Vous pouvez ensuite lancer Battery Historian avec le même port d'écouteur depuis Docker Desktop.
Exécutez l'image de Battery Historian à l'aide de la commande suivante :
docker run -p port_number:9999 gcr.io/android-battery-historian/stable:3.1 --port 9999
Battery Historian utilise le port de votre choix, comme spécifié à l'aide de port_number.
Accédez à Battery Historian dans votre navigateur pour vérifier qu'il est en cours d'exécution. L'adresse varie en fonction de votre système d'exploitation :
Pour Linux et Mac
Battery Historian est disponible à l'adresse http://localhost:port_number.
Pour Windows
Lorsque vous démarrez Docker, l'adresse IP de la machine utilisée vous est indiquée. Par exemple, si l'adresse IP est 123.456.78.90, Battery Historian est disponible à l'adresse http://123.456.78.90:port_number.
Vous retrouverez alors la page d'accueil de Battery Historian, d'où vous pouvez importer et consulter des statistiques sur la batterie.
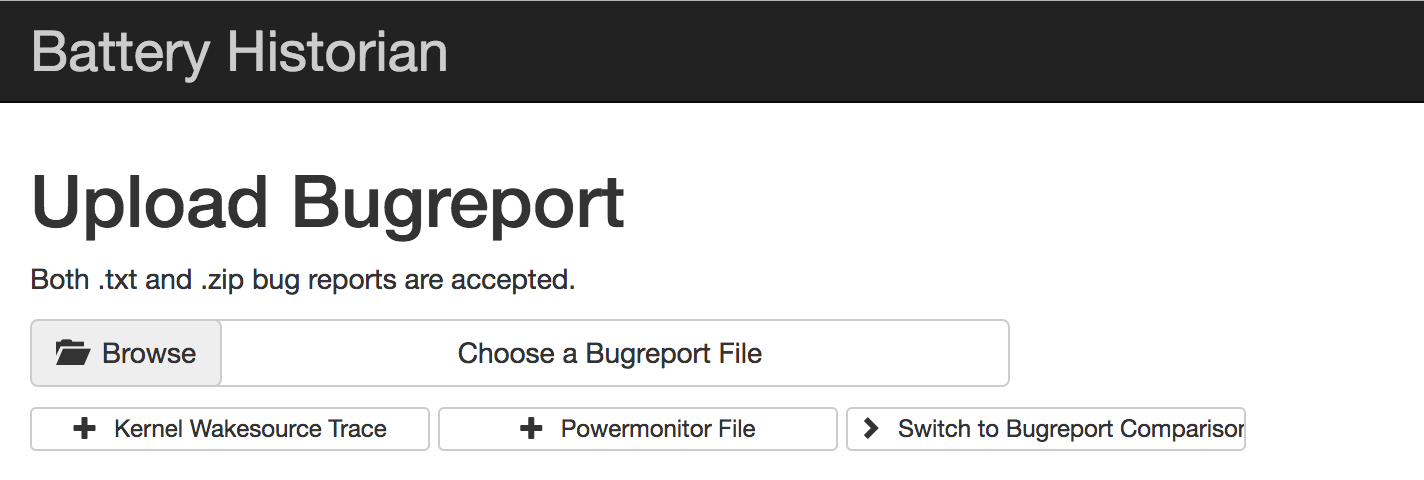
Figure 1. Page d'accueil de Battery Historian
Recueillir des données avec Batterystats
Pour collecter les données de votre appareil à l'aide de Batterystats et les ouvrir dans Battery Historian, procédez comme suit :
Connectez votre appareil mobile à votre ordinateur.
Dans une fenêtre de terminal, arrêtez le serveur adb en cours d'exécution en exécutant la commande suivante :
adb kill-server
Redémarrez adb et vérifiez les appareils connectés en exécutant la commande suivante :
adb devices
Elle liste votre appareil, comme dans l'exemple de résultat suivant :
Figure 2. Résultat d'adb devices, qui montre un appareil connecté
Si aucun appareil ne s'affiche, assurez-vous que votre téléphone est connecté et que le débogage USB est activé, puis arrêtez et redémarrez adb.
Réinitialisez la collecte des données de la batterie en exécutant la commande suivante :
adb shell dumpsys batterystats --reset
L'appareil collecte toujours les statistiques de batterie et d'autres informations de débogage en arrière-plan. La réinitialisation efface les précédentes données de collecte de la batterie. Si vous ne réinitialisez pas, le résultat peut être très volumineux.
Déconnectez votre appareil de votre ordinateur afin de n'utiliser que la batterie de l'appareil.
Utilisez votre application et effectuez les actions pour lesquelles vous souhaitez collecter des données. Par exemple, déconnectez-vous du Wi-Fi et envoyez des données dans le cloud.
Reconnectez votre téléphone.
Assurez-vous que votre téléphone est reconnu et exécutez la commande suivante :
adb devices
Videz toutes les données de la batterie en exécutant la commande suivante. Cette opération peut prendre quelques instants.
Le fichier batterystats.txt est créé dans le répertoire que vous indiquez à l'aide de l'argument de chemin facultatif. Si vous ne spécifiez pas de chemin d'accès, le fichier est créé dans votre répertoire d'accueil.
Créez un rapport à partir de données brutes.
Pour les appareils sous Android version 7.0 ou version ultérieure :
adb bugreport [path/]bugreport.zip
Pour les appareils sous Android version 6.0 ou version antérieure :
adb bugreport [path/]bugreport.txt
Bugreport peut prendre plusieurs minutes. Ne déconnectez pas votre appareil et n'annulez pas le processus tant qu'il n'est pas terminé.
Comme pour batterystats.txt, ces fichiers sont créés dans le répertoire que vous spécifiez à l'aide de l'argument facultatif path. Si vous ne spécifiez pas de chemin d'accès, ils sont créés dans votre répertoire d'accueil.
Si ce n'est pas déjà le cas, exécutez Battery Historian à l'aide de la commande suivante :
docker run -p port_number:9999 gcr.io/android-battery-historian/stable:3.1 --port 9999
Pour afficher vos données dans Battery Historian, ouvrez-le dans votre navigateur. Pour Mac et Linux, Battery Historian s'exécute sur http://localhost:port_number. Pour Windows, il s'exécute sur http://your_IP_address:port_number.
Cliquez sur Parcourir, puis sélectionnez le fichier bugreport que vous avez créé.
Cliquez sur Envoyer. Battery Historian ouvre un graphique créé à partir de vos données Batterystats.
Afficher des données avec des graphiques Battery Historian
Les graphiques Battery Historian représentent des événements et l'évolution de leur consommation d'énergie au fil du temps.
Chaque ligne affiche un segment de barre de couleur lorsqu'un composant système est actif et utilise donc l'énergie de la batterie. Le graphique n'indique pas la quantité de batterie utilisée par le composant, mais uniquement si l'application est active. Les graphiques sont organisés par catégorie, avec une barre pour chaque catégorie au fil du temps, comme indiqué sur l'axe X du graphique.
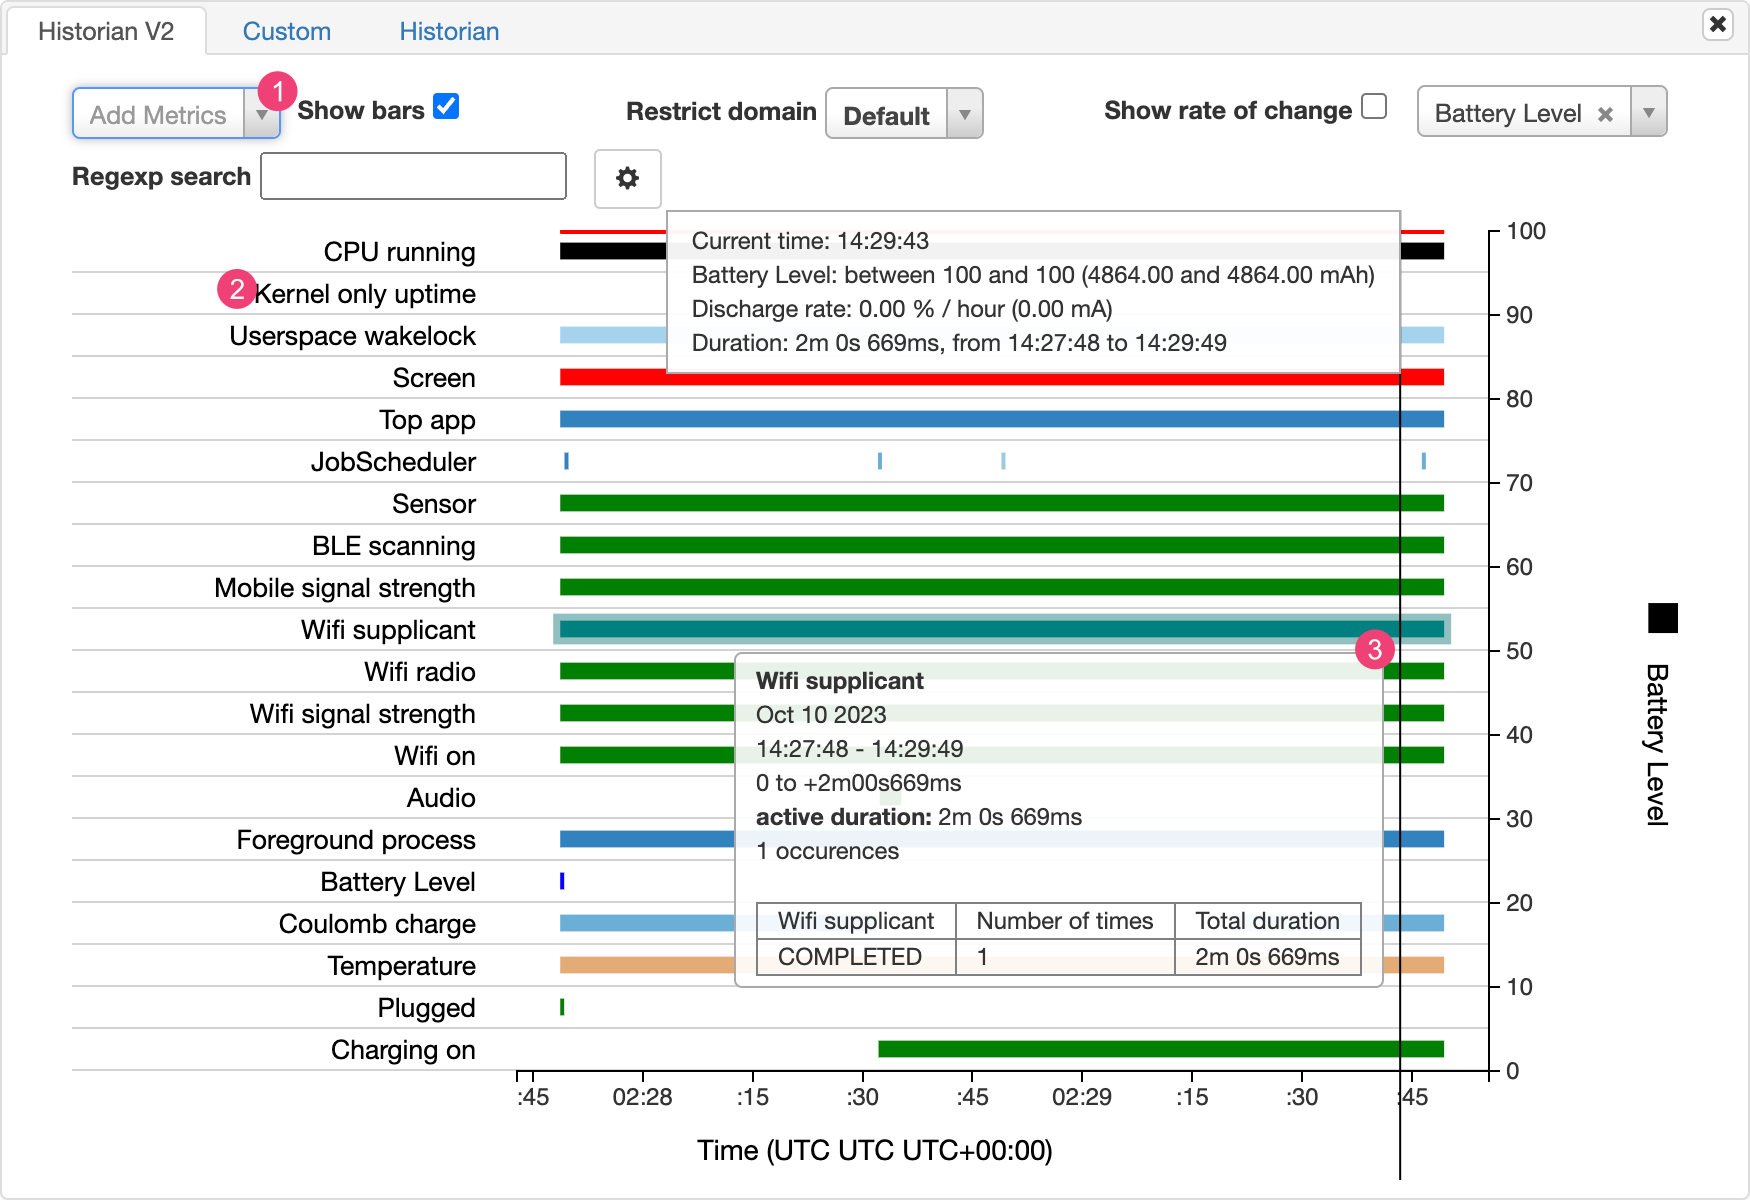
Figure 3. Exemple de graphique Battery Historian
Ajoutez des métriques supplémentaires à partir de la liste déroulante.
Maintenez le pointeur sur le nom d'une métrique pour afficher plus d'informations à son sujet, y compris une légende pour les couleurs utilisées dans le graphique.
Maintenez le pointeur sur une barre pour afficher plus de détails sur cette métrique et sur les statistiques de la batterie à un moment précis de la chronologie.
Résultats Batterystats supplémentaires
Vous pouvez afficher d'autres informations à partir du fichier batterystats.txt dans la section des statistiques après le graphique Battery Historian.
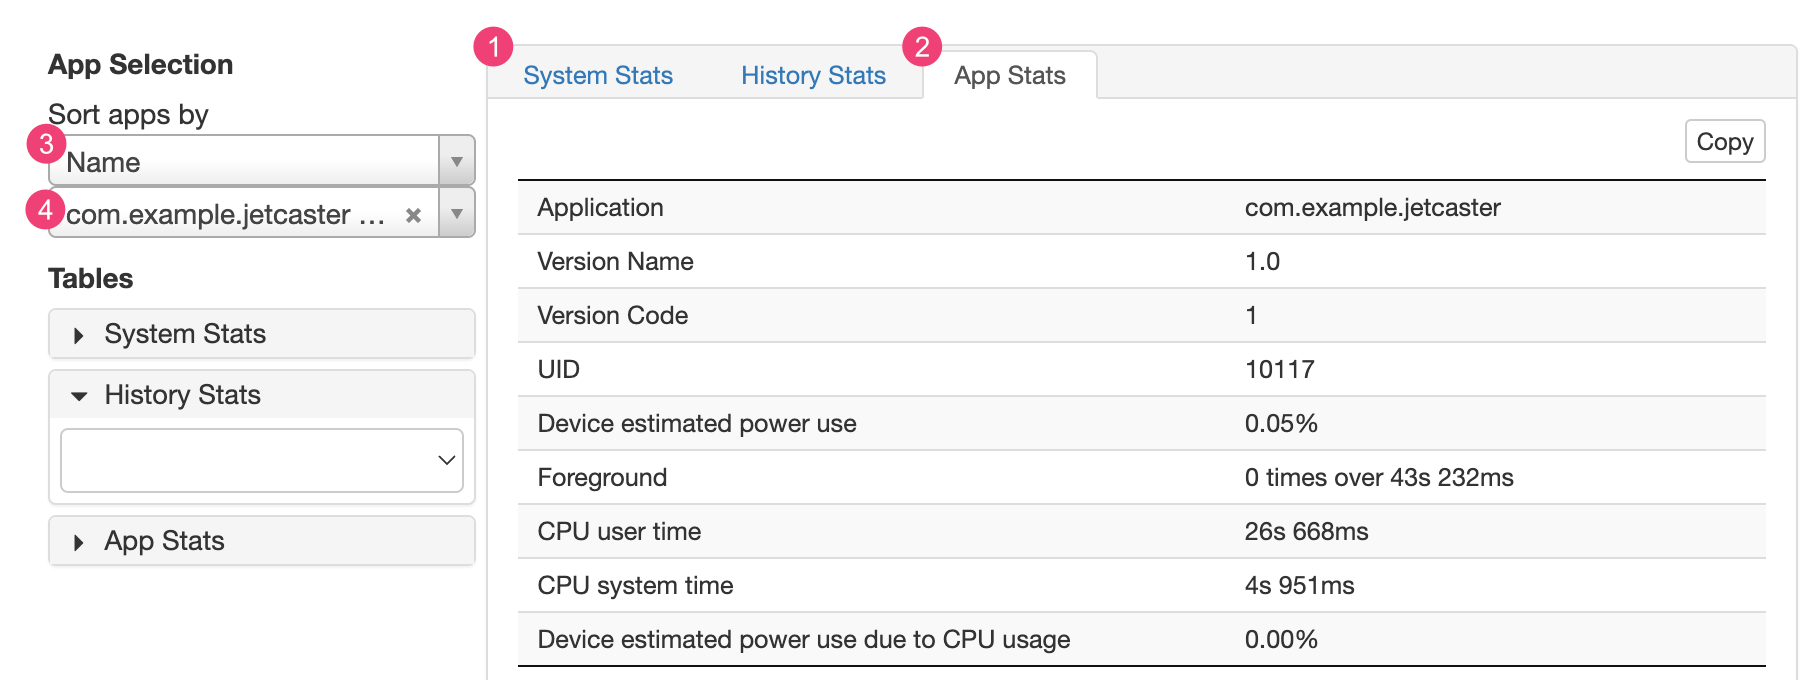
Figure 4. Section "Statistiques" de Battery Historian
L'onglet 1, System Stats (Statistiques système), inclut des statistiques relatives au système, telles que le niveau de signal cellulaire et la luminosité de l'écran. Ces informations offrent une vue d'ensemble de l'activité de l'appareil. Elles sont particulièrement utiles pour vous assurer qu'aucun événement externe n'affecte votre test.
L'onglet 2, App Stats (Statistiques de l'application), contient des informations sur des applications spécifiques. Triez la liste des applications à l'aide de la liste déroulante 3Sort apps by (Trier les applications par) du volet App Selection (Sélection des applications). Vous pouvez sélectionner une application spécifique pour afficher les statistiques correspondantes à l'aide de la liste déroulante 4.
Le contenu et les exemples de code de cette page sont soumis aux licences décrites dans la Licence de contenu. Java et OpenJDK sont des marques ou des marques déposées d'Oracle et/ou de ses sociétés affiliées.
Dernière mise à jour le 2025/07/27 (UTC).
[[["Facile à comprendre","easyToUnderstand","thumb-up"],["J'ai pu résoudre mon problème","solvedMyProblem","thumb-up"],["Autre","otherUp","thumb-up"]],[["Il n'y a pas l'information dont j'ai besoin","missingTheInformationINeed","thumb-down"],["Trop compliqué/Trop d'étapes","tooComplicatedTooManySteps","thumb-down"],["Obsolète","outOfDate","thumb-down"],["Problème de traduction","translationIssue","thumb-down"],["Mauvais exemple/Erreur de code","samplesCodeIssue","thumb-down"],["Autre","otherDown","thumb-down"]],["Dernière mise à jour le 2025/07/27 (UTC)."],[],[],null,["# Profile battery usage with Batterystats and Battery Historian\n\n| **Warning:** Battery Historian is no longer actively maintained; if possible, consider using [system tracing](/topic/performance/tracing), the [Macrobenchmark power metric](/topic/performance/benchmarking/macrobenchmark-metrics#power), or the [Power Profiler](/studio/profile/power-profiler) to get insights into battery performance.\n\nThis document shows the basic setup steps and workflow for the Batterystats tool\nand the Battery Historian script. To learn how to use Battery Historian to\ninspect battery consumption patterns, see [Analyze power use with Battery\nHistorian](/topic/performance/power/battery-historian).\n\nBatterystats is a tool included in the Android framework that collects battery\ndata on your device. You can use [`adb`](/studio/command-line/adb) to dump the\ncollected battery data to your development machine and create a report you can\nanalyze using Battery Historian. Battery Historian converts the report from\nBatterystats into an HTML visualization that you can view in your browser.\n\nBatterystats and Battery Historian are useful for the following:\n\n- Showing you where and how processes are drawing current from the battery.\n- Identifying tasks in your app that can be deferred or removed to improve battery life.\n\n| **Note:** To use Batterystats and Battery Historian, you need a mobile device with [USB debugging](/studio/debug/dev-options) enabled.\n\nInstall Battery Historian\n-------------------------\n\nYou can use Docker to install Battery Historian. For alternative installation\nmethods, including building from source, see the\n[README](https://github.com/google/battery-historian) on the\nproject's GitHub page. To install using Docker, do the following:\n\n1. Install Docker by following the instructions on the\n [Docker website](https://docs.docker.com/desktop). Any\n [subscription](https://docker.com/pricing) type works,\n including a free Personal subscription.\n\n2. To confirm Docker is correctly installed, open the command line and\n enter the following command:\n\n docker run hello-world\n\n If Docker is correctly installed, it displays an output like this: \n\n Unable to find image 'hello-world:latest' locally\n latest: Pulling from library/hello-world\n 78445dd45222: Pull complete\n Digest:\n sha256:c5515758d4c5e1e838e9cd307f6c6a0d620b5e07e6f927b07d05f6d12a1ac8d7\n Status: Downloaded newer image for hello-world:latest\n\n Hello from Docker!\n This message shows that your installation appears to be working correctly.\n\n To generate this message, Docker took the following steps:\n 1. The Docker client contacted the Docker daemon.\n 2. The Docker daemon pulled the \"hello-world\" image from the Docker Hub.\n 3. The Docker daemon created a new container from that image which runs the\n executable that produces the output you are currently reading.\n 4. The Docker daemon streamed that output to the Docker client, which sent it to your terminal\n\n3. Launch the Docker Desktop app---which is a GUI frontend for Docker---before\n you run the Battery Historian image. Running this initializes the Docker\n tools. Battery Historian doesn't run until you do this at least once.\n\n4. Run Battery Historian from the command line when running it for the first\n time. The Docker Desktop app doesn't let you specify the port to run the web\n server on. You can only do this from the command line. However, after you\n successfully run the container from the command line, an entry is created in\n Docker Desktop, and then you can launch it using the same listener port\n from Docker Desktop.\n\n5. Run the Battery Historian image using the following command:\n\n ```\n docker run -p port_number:9999 gcr.io/android-battery-historian/stable:3.1 --port 9999\n ```\n\n Battery Historian uses the port of your choice, as specified using\n \u003cvar translate=\"no\"\u003eport_number\u003c/var\u003e.\n | **Note:** If you're using a Windows machine, you might need to enable virtualization in your BIOS. Check the documentation for your motherboard for more information about how to enable virtualization. If you can run the [Android Emulator](/studio/run/emulator), then virtualization is already enabled.\n6. Navigate to Battery Historian in your browser to confirm it's running. The\n address varies depending on your operating system:\n\n For Linux and Mac\n : Battery Historian is available at\n `http://localhost:`\u003cvar translate=\"no\"\u003eport_number\u003c/var\u003e.\n\n For Windows\n : After you start Docker, it tells you the IP address of the machine it\n is using. For example, if the IP address is 123.456.78.90, Battery\n Historian is available at\n `http://123.456.78.90:`\u003cvar translate=\"no\"\u003eport_number\u003c/var\u003e.\n\n \u003cbr /\u003e\n\n It then displays the Battery Historian start page, where you can upload and\n view battery statistics.\n **Figure 1.** The start page for Battery Historian.\n\nGather data with Batterystats\n-----------------------------\n\nTo collect data from your device using Batterystats and open it in Battery\nHistorian, do the following:\n\n1. Connect your mobile device to your computer.\n\n2. From a Terminal window, shut down your running `adb` server by running the\n following command:\n\n adb kill-server\n\n3. Restart `adb` and check for connected devices by running the following\n command.\n\n adb devices\n\n It lists your device, similar to the following example output.\n **Figure 2.** The output of `adb devices`, showing one connected device\n\n If it doesn't list any devices, make sure your phone is connected and [USB\n debugging](/studio/debug/dev-options#Enable-debugging) is enabled, and then\n stop and restart `adb`.\n4. Reset battery data gathering by running the following command:\n\n adb shell dumpsys batterystats --reset\n\n The device is always collecting Batterystats and other debugging information\n in the background. Resetting erases previous battery collection data. If you\n don't reset, the output can be very large.\n5. Disconnect your device from your computer so that you are only drawing\n current from the device's battery.\n\n6. Use your app and perform actions for which you want to collect data for. For\n example, disconnect from Wi-Fi and send data to the cloud.\n\n7. Reconnect your phone.\n\n8. Make sure your phone is recognized and run the following command:\n\n adb devices\n\n9. Dump all battery data by running the following command. This can take a\n while.\n\n ```\n adb shell dumpsys batterystats \u003e [path/]batterystats.txt\n ```\n\n The `batterystats.txt` file is created in the directory you specify using\n the optional path argument. If you don't specify a path, the file is\n created in your home directory.\n10. Create a report from raw data.\n\n For devices running Android 7.0 and higher:\n :\n\n ```\n adb bugreport [path/]bugreport.zip\n ```\n\n For devices running Android 6.0 and lower:\n :\n\n ```\n adb bugreport [path/]bugreport.txt\n ```\n\n \u003cbr /\u003e\n\n Bugreport can take several minutes to complete. Don't disconnect your\n device or cancel the process until it's complete.\n\n As with `batterystats.txt`, these files are created in the directory you\n specify using the optional \u003cvar translate=\"no\"\u003epath\u003c/var\u003e argument. If you\n don't specify a path, they are created in your home directory.\n\n If it's not already running, run Battery Historian using the following\n command: \n\n ```\n docker run -p port_number:9999 gcr.io/android-battery-historian/stable:3.1 --port 9999\n ```\n11. To view your data in Battery Historian, open the Battery Historian in your\n browser. For Mac and Linux, Battery Historian runs at\n `http://localhost:`\u003cvar translate=\"no\"\u003eport_number\u003c/var\u003e. For Windows, Battery\n Historian runs at\n `http://`\u003cvar translate=\"no\"\u003eyour_IP_address\u003c/var\u003e`:`\u003cvar translate=\"no\"\u003eport_number\u003c/var\u003e.\n\n12. Click **Browse** and then choose the bugreport file you created.\n\n13. Click **Submit**. Battery Historian opens a chart created from your\n Batterystats data.\n\nView data with Battery Historian charts\n---------------------------------------\n\nThe Battery Historian chart graphs power-relevant events over time.\n\nEach row shows a colored bar segment when a system component is active and thus\ndrawing current from the battery. The chart doesn't show how much battery is\nused by the component---only whether the app is active. Charts are organized by\ncategory, showing a bar for each category over time, as displayed on the\n*x*-axis of the chart.\n**Figure 3.** Example of a Battery Historian chart.\n\n1. Add additional metrics from the drop-down list.\n2. Hold the pointer over the metric name to see more information about each metric, including a key for the colors used in the chart.\n3. Hold the pointer over a bar to see more detailed information about that metric and the battery stats at a specific point on the timeline.\n\nAdditional Batterystats output\n------------------------------\n\nYou can view additional information from the `batterystats.txt` file in the\nstats section after the Battery Historian chart.\n**Figure 4.** The stats section of Battery Historian.\n\nThe 1 **System Stats** tab includes system-wide\nstatistics, such as cell signal levels and screen brightness. This information\nprovides an overall picture of what's happening with the device. This is\nespecially useful to make sure no external events are affecting your test.\n\nThe 2 **App Stats** tab includes information about\nspecific apps. Sort the list of apps using the 3\n**Sort apps by** drop-down list in the **App Selection** pane. You\ncan select a specific app to view stats for using the\n4 apps drop-down list."]]