Membuat profil penggunaan baterai dengan Batterystats dan Battery Historian
Tetap teratur dengan koleksi
Simpan dan kategorikan konten berdasarkan preferensi Anda.
Dokumen ini menunjukkan langkah-langkah penyiapan dasar dan alur kerja untuk alat Batterystats
dan skrip Battery Historian. Untuk mempelajari cara menggunakan Battery Historian guna
memeriksa pola penggunaan baterai, baca
Menganalisis penggunaan daya dengan Battery Historian.
Batterystats adalah alat yang disertakan dalam framework Android yang mengumpulkan data
baterai di perangkat. Anda dapat menggunakan adb untuk menghapus
data baterai yang dikumpulkan ke mesin pengembangan dan membuat laporan yang dapat
dianalisis menggunakan Battery Historian. Battery Historian mengonversi laporan dari
Batterystats menjadi visualisasi dalam bentuk HTML yang dapat Anda lihat di browser.
Batterystats dan Battery Historian berguna untuk hal berikut:
Menunjukkan cara proses menggunakan daya dari baterai dan juga tempat berlangsungnya proses tersebut.
Mengidentifikasi tugas di aplikasi Anda yang dapat ditangguhkan atau dihapus untuk meningkatkan
daya tahan baterai.
Menginstal Battery Historian
Anda dapat menggunakan Docker untuk menginstal Battery Historian. Untuk metode penginstalan
alternatif, termasuk membangun dari sumber, lihat
README di
halaman GitHub project. Untuk menginstal menggunakan Docker, lakukan hal berikut:
Instal Docker dengan mengikuti petunjuk di
situs Docker. Semua
jenis langganan dapat digunakan,
termasuk langganan Personal yang gratis.
Untuk memastikan Docker telah terinstal dengan benar, buka command line dan
masukkan perintah berikut:
docker run hello-world
Jika Docker sudah terinstal dengan benar, Docker akan menampilkan output seperti ini:
Unable to find image 'hello-world:latest' locally
latest: Pulling from library/hello-world
78445dd45222: Pull complete
Digest:
sha256:c5515758d4c5e1e838e9cd307f6c6a0d620b5e07e6f927b07d05f6d12a1ac8d7
Status: Downloaded newer image for hello-world:latest
Hello from Docker!
This message shows that your installation appears to be working correctly.
To generate this message, Docker took the following steps:
1. The Docker client contacted the Docker daemon.
2. The Docker daemon pulled the "hello-world" image from the Docker Hub.
3. The Docker daemon created a new container from that image which runs the
executable that produces the output you are currently reading.
4. The Docker daemon streamed that output to the Docker client, which sent it to your terminal
Luncurkan aplikasi Docker Desktop—yang merupakan frontend GUI untuk Docker—sebelum
menjalankan image Battery Historian. Jika image Battery Historian dijalankan, alat Docker akan diinisialisasi. Battery Historian tidak akan berjalan sebelum Anda melakukannya setidaknya satu kali.
Jalankan Battery Historian dari command line saat menjalankannya untuk pertama
kali. Aplikasi Docker Desktop tidak mengizinkan Anda menentukan port yang akan digunakan untuk menjalankan server
web. Anda dapat melakukannya dari command line. Namun, setelah Anda
berhasil menjalankan container dari command line, entri akan dibuat di Docker Desktop. Kemudian, Anda dapat meluncurkannya menggunakan port pemroses yang sama
dari Desktop Docker.
Jalankan image Battery Historian menggunakan perintah berikut:
docker run -p port_number:9999 gcr.io/android-battery-historian/stable:3.1 --port 9999
Battery Historian menggunakan port pilihan Anda, seperti yang ditentukan dengan menggunakan
port_number.
Buka Battery Historian di browser Anda untuk memastikannya sedang berjalan atau tidak. Alamat
dapat bervariasi tergantung sistem operasi Anda:
Untuk Linux dan Mac
Battery Historian tersedia di
http://localhost:port_number.
Untuk Windows
Docker akan memberi tahu alamat IP dari mesin yang digunakannya setelah Docker
dimulai. Misalnya, jika alamat IP adalah 123.456.78.90, Battery
Historian akan tersedia di
http://123.456.78.90:port_number.
Kemudian, halaman awal Battery Historian akan ditampilkan, tempat Anda dapat mengupload dan
melihat statistik baterai.
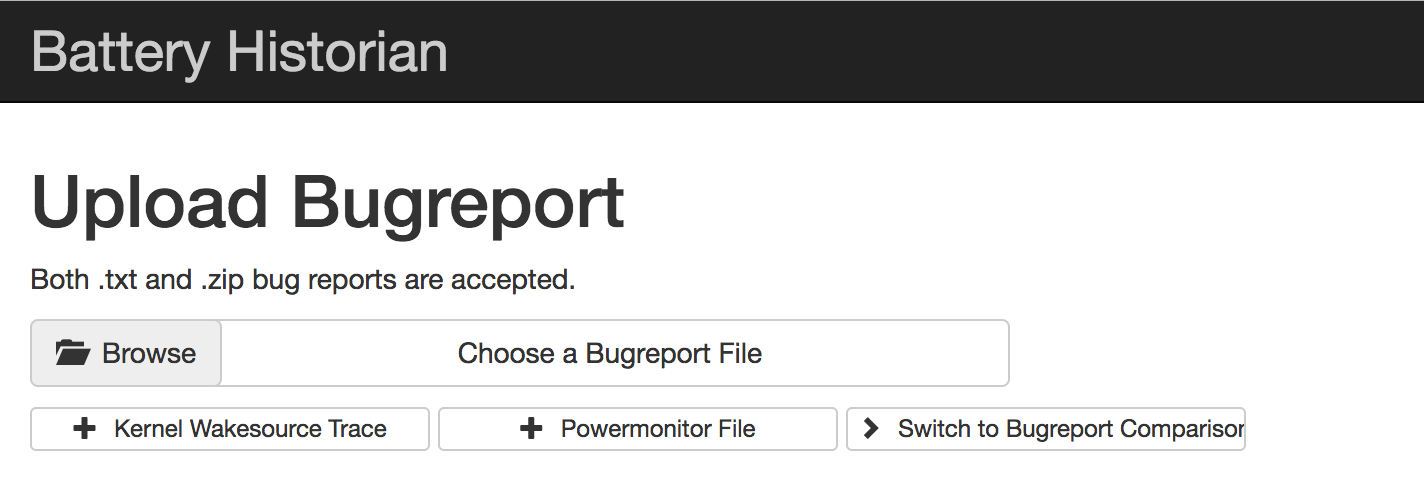
Gambar 1. Halaman awal Battery
Historian.
Mengumpulkan data dengan Batterystats
Untuk mengumpulkan data dari perangkat menggunakan Batterystats dan membukanya di Battery
Historian, lakukan hal berikut:
Hubungkan perangkat seluler ke komputer.
Dari jendela Terminal, matikan server adb yang sedang berjalan dengan menjalankan
perintah berikut:
adb kill-server
Mulai ulang adb dan periksa semua perangkat terhubung dengan menjalankan perintah
berikut.
adb devices
Perintah ini mencantumkan perangkat Anda, mirip dengan contoh output berikut.
Gambar 2. Output adb devices,
menunjukkan satu perangkat terhubung
Jika halaman tersebut tidak mencantumkan perangkat apa pun, pastikan ponsel terhubung dan proses debug
USB diaktifkan, lalu
hentikan dan mulai ulang adb.
Reset pengumpulan data baterai dengan menjalankan perintah berikut:
adb shell dumpsys batterystats --reset
Perangkat selalu mengumpulkan Batterystats dan informasi proses debug lainnya
di latar belakang. Reset akan menghapus data pengumpulan baterai sebelumnya. Jika Anda
tidak melakukan reset, outputnya dapat menjadi sangat besar.
Putuskan koneksi perangkat dari komputer sehingga Anda hanya menggunakan
daya dari baterai perangkat.
Gunakan aplikasi Anda dan lakukan tindakan yang datanya ingin Anda kumpulkan. Misalnya,
putuskan koneksi dari Wi-Fi dan kirim data ke cloud.
Hubungkan kembali ponsel Anda.
Pastikan ponsel Anda dikenali dan jalankan perintah berikut:
adb devices
Hapus semua data baterai dengan menjalankan perintah berikut. Proses ini mungkin memerlukan waktu
beberapa saat:
File batterystats.txt dibuat di direktori yang Anda tentukan menggunakan
argumen jalur opsional. Jika Anda tidak menentukan jalur, file akan
dibuat di direktori utama.
Buat laporan dari data mentah.
Untuk perangkat yang menjalankan Android 7.0 dan yang lebih baru:
adb bugreport [path/]bugreport.zip
Untuk perangkat yang menjalankan Android 6.0 dan yang lebih lama:
adb bugreport [path/]bugreport.txt
Laporan bug dapat memerlukan waktu beberapa menit untuk menyelesaikan prosesnya. Jangan memutuskan koneksi
perangkat atau membatalkan prosesnya, tunggu sampai selesai.
Seperti halnya batterystats.txt, file-file ini dibuat di direktori
yang Anda tentukan dengan menggunakan argumen path opsional. Jika Anda
tidak menentukan jalur, file akan dibuat di direktori utama.
Jika belum berjalan, jalankan Battery Historian menggunakan perintah
berikut:
docker run -p port_number:9999 gcr.io/android-battery-historian/stable:3.1 --port 9999
Untuk melihat data Anda di Battery Historian, buka Battery Historian di
browser. Untuk Mac dan Linux, Battery Historian berjalan di
http://localhost:port_number. Untuk Windows, Battery
Historian berjalan di
http://your_IP_address:port_number.
Klik Browse, lalu pilih file laporan bug yang Anda buat.
Klik Submit. Battery Historian membuka diagram yang dibuat dari
data Batterystats Anda.
Melihat data dengan diagram Battery Historian
Diagram Battery Historian menampilkan peristiwa yang terkait dengan daya dari waktu ke waktu.
Setiap baris menampilkan segmen batang berwarna ketika komponen sistem aktif dan
menggunakan daya dari baterai. Diagram tidak menunjukkan banyaknya daya baterai
yang digunakan oleh komponen tersebut—hanya menunjukan apakah aplikasi aktif atau tidak. Diagram disusun berdasarkan
kategori, dengan menampilkan batang untuk setiap kategori dari waktu ke waktu, seperti yang ditampilkan di
sumbu X diagram.
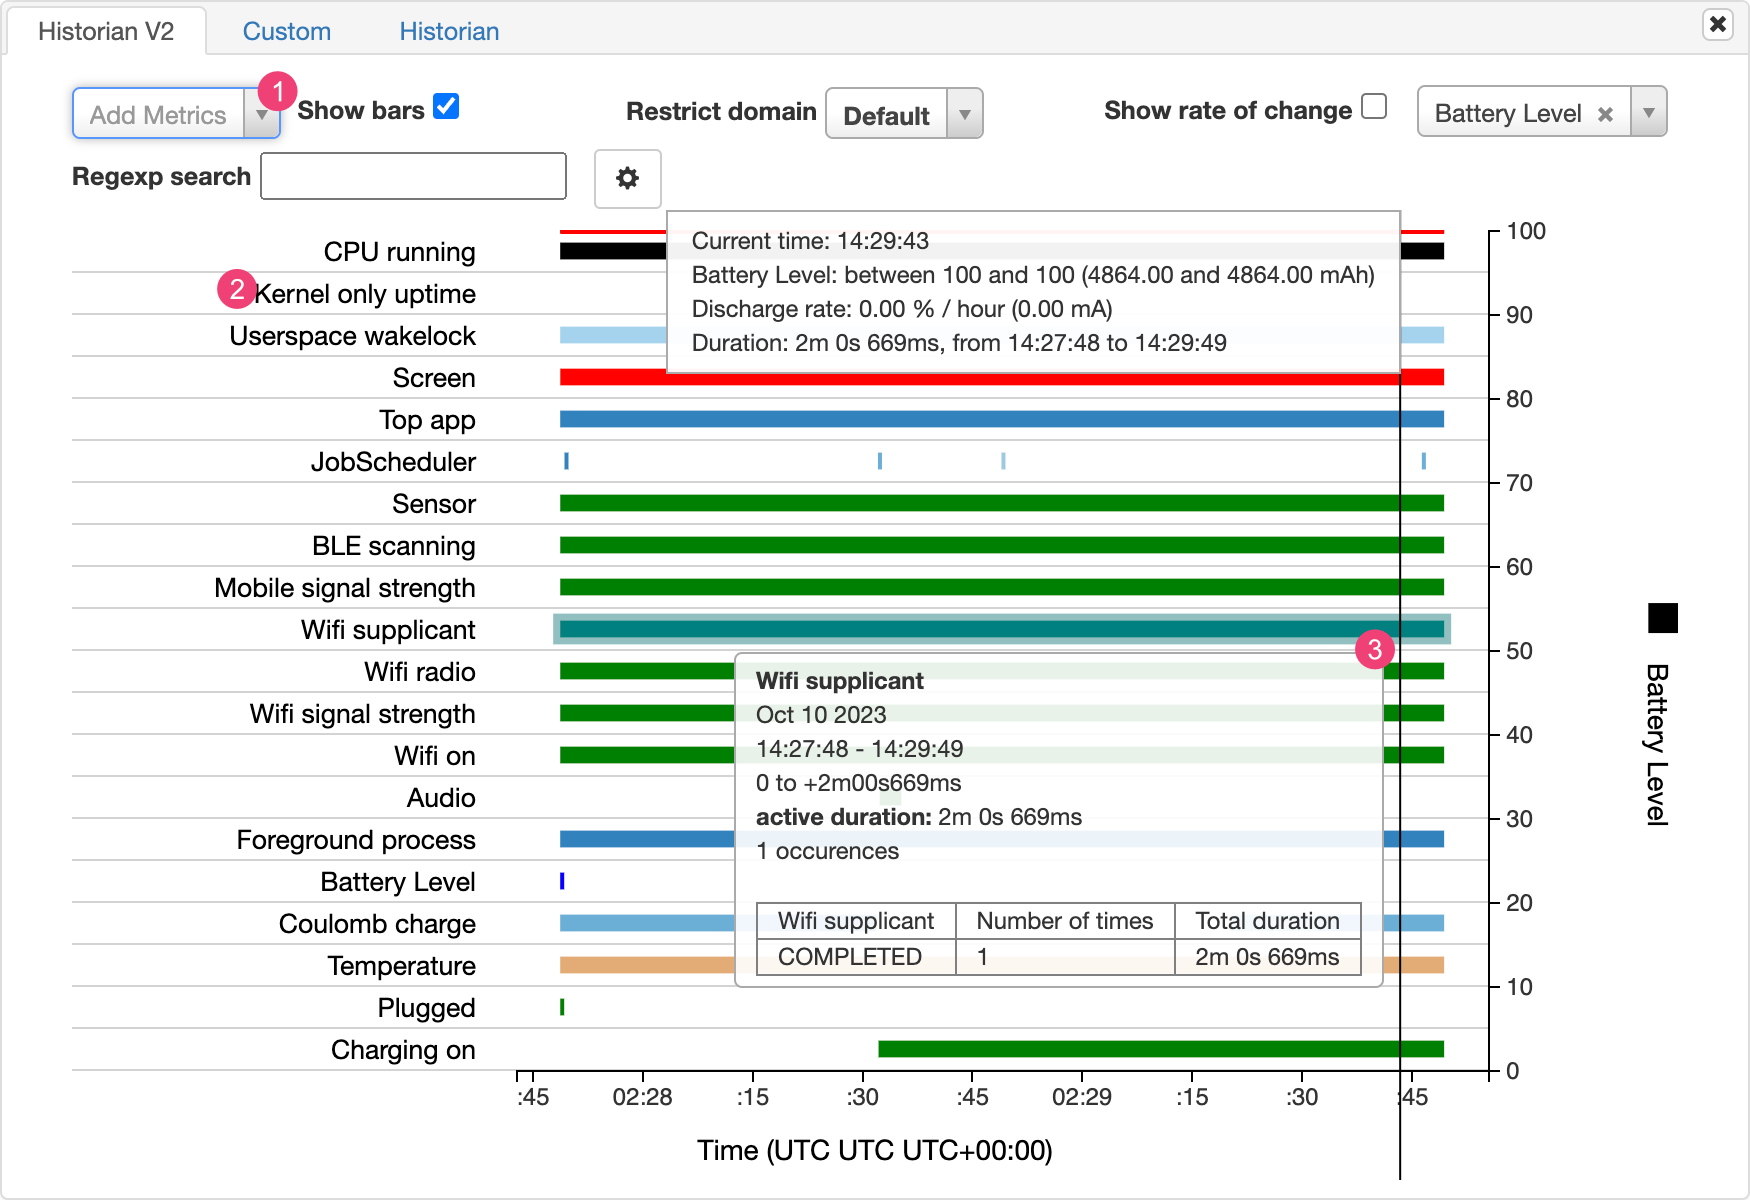
Gambar 3. Contoh diagram
Battery Historian.
Tambahkan metrik tambahan dari menu drop-down.
Tahan kursor ke nama metrik untuk melihat informasi selengkapnya tentang
setiap metrik, termasuk kunci untuk warna yang digunakan pada diagram.
Tahan kursor saat fokus pada batang untuk melihat informasi yang lebih mendetail tentang
metrik tersebut dan statistik baterainya di titik tertentu di linimasa.
Output Batterystats tambahan
Anda dapat melihat informasi tambahan dari file batterystats.txt di
bagian statistik di bawah diagram Battery Historian.
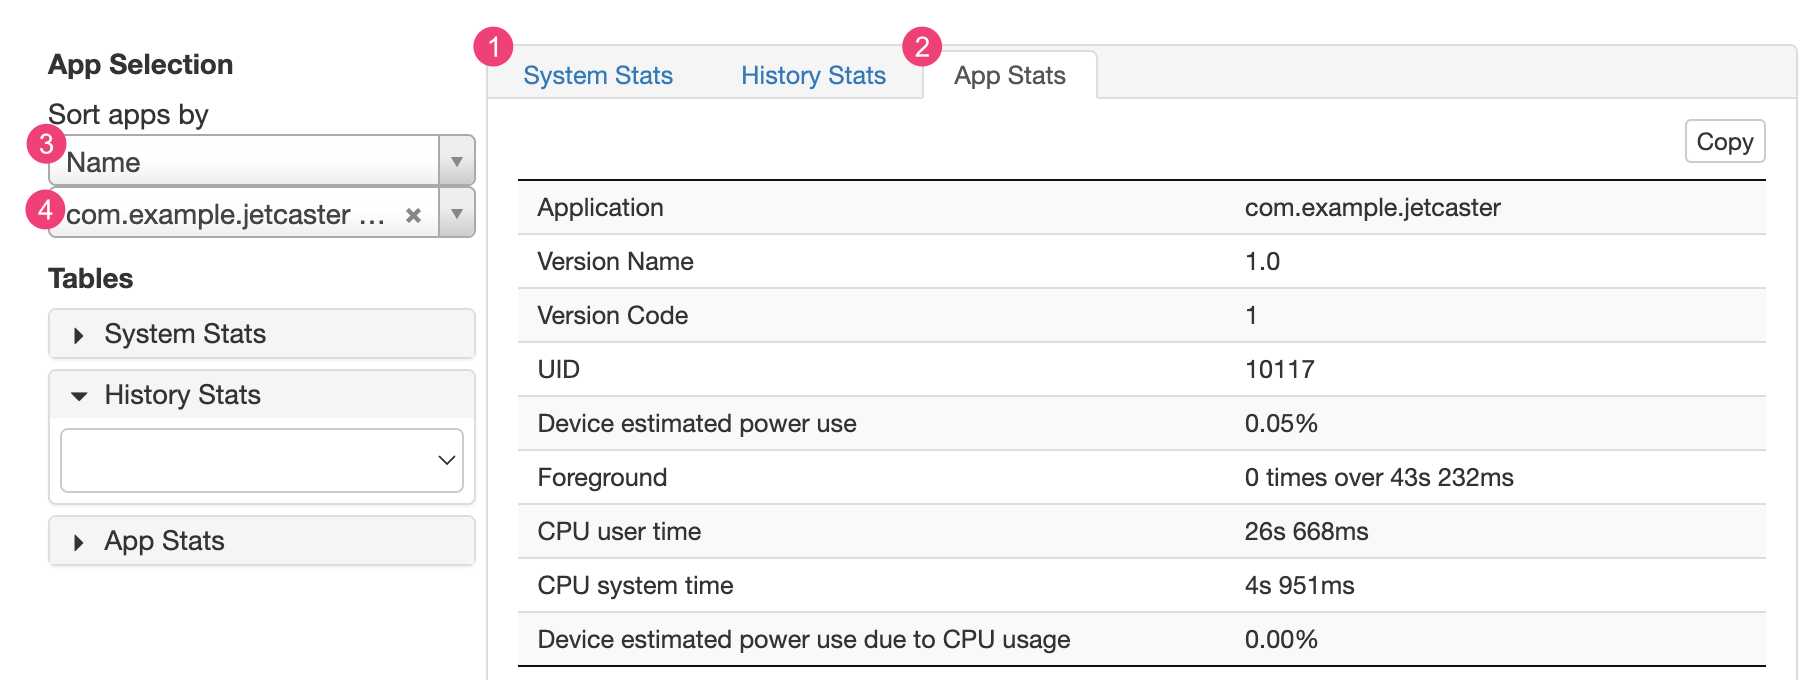
Gambar 4. Bagian statistik Battery
Historian.
Tab 1System Stats mencakup statistik
seluruh sistem, seperti tingkat sinyal seluler dan kecerahan layar. Informasi ini
memberikan gambaran keseluruhan tentang apa yang terjadi pada perangkat. Informasi tersebut
sangat berguna untuk memastikan tidak ada peristiwa eksternal yang memengaruhi pengujian Anda.
Tab 2App Stats mencakup informasi tentang
aplikasi tertentu. Urutkan daftar aplikasi menggunakan menu drop-down 3Sort apps by di panel App Selection. Anda
dapat memilih aplikasi tertentu untuk melihat statistiknya menggunakan
menu drop-down 4 aplikasi.
Konten dan contoh kode di halaman ini tunduk kepada lisensi yang dijelaskan dalam Lisensi Konten. Java dan OpenJDK adalah merek dagang atau merek dagang terdaftar dari Oracle dan/atau afiliasinya.
Terakhir diperbarui pada 2025-07-27 UTC.
[[["Mudah dipahami","easyToUnderstand","thumb-up"],["Memecahkan masalah saya","solvedMyProblem","thumb-up"],["Lainnya","otherUp","thumb-up"]],[["Informasi yang saya butuhkan tidak ada","missingTheInformationINeed","thumb-down"],["Terlalu rumit/langkahnya terlalu banyak","tooComplicatedTooManySteps","thumb-down"],["Sudah usang","outOfDate","thumb-down"],["Masalah terjemahan","translationIssue","thumb-down"],["Masalah kode / contoh","samplesCodeIssue","thumb-down"],["Lainnya","otherDown","thumb-down"]],["Terakhir diperbarui pada 2025-07-27 UTC."],[],[],null,["# Profile battery usage with Batterystats and Battery Historian\n\n| **Warning:** Battery Historian is no longer actively maintained; if possible, consider using [system tracing](/topic/performance/tracing), the [Macrobenchmark power metric](/topic/performance/benchmarking/macrobenchmark-metrics#power), or the [Power Profiler](/studio/profile/power-profiler) to get insights into battery performance.\n\nThis document shows the basic setup steps and workflow for the Batterystats tool\nand the Battery Historian script. To learn how to use Battery Historian to\ninspect battery consumption patterns, see [Analyze power use with Battery\nHistorian](/topic/performance/power/battery-historian).\n\nBatterystats is a tool included in the Android framework that collects battery\ndata on your device. You can use [`adb`](/studio/command-line/adb) to dump the\ncollected battery data to your development machine and create a report you can\nanalyze using Battery Historian. Battery Historian converts the report from\nBatterystats into an HTML visualization that you can view in your browser.\n\nBatterystats and Battery Historian are useful for the following:\n\n- Showing you where and how processes are drawing current from the battery.\n- Identifying tasks in your app that can be deferred or removed to improve battery life.\n\n| **Note:** To use Batterystats and Battery Historian, you need a mobile device with [USB debugging](/studio/debug/dev-options) enabled.\n\nInstall Battery Historian\n-------------------------\n\nYou can use Docker to install Battery Historian. For alternative installation\nmethods, including building from source, see the\n[README](https://github.com/google/battery-historian) on the\nproject's GitHub page. To install using Docker, do the following:\n\n1. Install Docker by following the instructions on the\n [Docker website](https://docs.docker.com/desktop). Any\n [subscription](https://docker.com/pricing) type works,\n including a free Personal subscription.\n\n2. To confirm Docker is correctly installed, open the command line and\n enter the following command:\n\n docker run hello-world\n\n If Docker is correctly installed, it displays an output like this: \n\n Unable to find image 'hello-world:latest' locally\n latest: Pulling from library/hello-world\n 78445dd45222: Pull complete\n Digest:\n sha256:c5515758d4c5e1e838e9cd307f6c6a0d620b5e07e6f927b07d05f6d12a1ac8d7\n Status: Downloaded newer image for hello-world:latest\n\n Hello from Docker!\n This message shows that your installation appears to be working correctly.\n\n To generate this message, Docker took the following steps:\n 1. The Docker client contacted the Docker daemon.\n 2. The Docker daemon pulled the \"hello-world\" image from the Docker Hub.\n 3. The Docker daemon created a new container from that image which runs the\n executable that produces the output you are currently reading.\n 4. The Docker daemon streamed that output to the Docker client, which sent it to your terminal\n\n3. Launch the Docker Desktop app---which is a GUI frontend for Docker---before\n you run the Battery Historian image. Running this initializes the Docker\n tools. Battery Historian doesn't run until you do this at least once.\n\n4. Run Battery Historian from the command line when running it for the first\n time. The Docker Desktop app doesn't let you specify the port to run the web\n server on. You can only do this from the command line. However, after you\n successfully run the container from the command line, an entry is created in\n Docker Desktop, and then you can launch it using the same listener port\n from Docker Desktop.\n\n5. Run the Battery Historian image using the following command:\n\n ```\n docker run -p port_number:9999 gcr.io/android-battery-historian/stable:3.1 --port 9999\n ```\n\n Battery Historian uses the port of your choice, as specified using\n \u003cvar translate=\"no\"\u003eport_number\u003c/var\u003e.\n | **Note:** If you're using a Windows machine, you might need to enable virtualization in your BIOS. Check the documentation for your motherboard for more information about how to enable virtualization. If you can run the [Android Emulator](/studio/run/emulator), then virtualization is already enabled.\n6. Navigate to Battery Historian in your browser to confirm it's running. The\n address varies depending on your operating system:\n\n For Linux and Mac\n : Battery Historian is available at\n `http://localhost:`\u003cvar translate=\"no\"\u003eport_number\u003c/var\u003e.\n\n For Windows\n : After you start Docker, it tells you the IP address of the machine it\n is using. For example, if the IP address is 123.456.78.90, Battery\n Historian is available at\n `http://123.456.78.90:`\u003cvar translate=\"no\"\u003eport_number\u003c/var\u003e.\n\n \u003cbr /\u003e\n\n It then displays the Battery Historian start page, where you can upload and\n view battery statistics.\n **Figure 1.** The start page for Battery Historian.\n\nGather data with Batterystats\n-----------------------------\n\nTo collect data from your device using Batterystats and open it in Battery\nHistorian, do the following:\n\n1. Connect your mobile device to your computer.\n\n2. From a Terminal window, shut down your running `adb` server by running the\n following command:\n\n adb kill-server\n\n3. Restart `adb` and check for connected devices by running the following\n command.\n\n adb devices\n\n It lists your device, similar to the following example output.\n **Figure 2.** The output of `adb devices`, showing one connected device\n\n If it doesn't list any devices, make sure your phone is connected and [USB\n debugging](/studio/debug/dev-options#Enable-debugging) is enabled, and then\n stop and restart `adb`.\n4. Reset battery data gathering by running the following command:\n\n adb shell dumpsys batterystats --reset\n\n The device is always collecting Batterystats and other debugging information\n in the background. Resetting erases previous battery collection data. If you\n don't reset, the output can be very large.\n5. Disconnect your device from your computer so that you are only drawing\n current from the device's battery.\n\n6. Use your app and perform actions for which you want to collect data for. For\n example, disconnect from Wi-Fi and send data to the cloud.\n\n7. Reconnect your phone.\n\n8. Make sure your phone is recognized and run the following command:\n\n adb devices\n\n9. Dump all battery data by running the following command. This can take a\n while.\n\n ```\n adb shell dumpsys batterystats \u003e [path/]batterystats.txt\n ```\n\n The `batterystats.txt` file is created in the directory you specify using\n the optional path argument. If you don't specify a path, the file is\n created in your home directory.\n10. Create a report from raw data.\n\n For devices running Android 7.0 and higher:\n :\n\n ```\n adb bugreport [path/]bugreport.zip\n ```\n\n For devices running Android 6.0 and lower:\n :\n\n ```\n adb bugreport [path/]bugreport.txt\n ```\n\n \u003cbr /\u003e\n\n Bugreport can take several minutes to complete. Don't disconnect your\n device or cancel the process until it's complete.\n\n As with `batterystats.txt`, these files are created in the directory you\n specify using the optional \u003cvar translate=\"no\"\u003epath\u003c/var\u003e argument. If you\n don't specify a path, they are created in your home directory.\n\n If it's not already running, run Battery Historian using the following\n command: \n\n ```\n docker run -p port_number:9999 gcr.io/android-battery-historian/stable:3.1 --port 9999\n ```\n11. To view your data in Battery Historian, open the Battery Historian in your\n browser. For Mac and Linux, Battery Historian runs at\n `http://localhost:`\u003cvar translate=\"no\"\u003eport_number\u003c/var\u003e. For Windows, Battery\n Historian runs at\n `http://`\u003cvar translate=\"no\"\u003eyour_IP_address\u003c/var\u003e`:`\u003cvar translate=\"no\"\u003eport_number\u003c/var\u003e.\n\n12. Click **Browse** and then choose the bugreport file you created.\n\n13. Click **Submit**. Battery Historian opens a chart created from your\n Batterystats data.\n\nView data with Battery Historian charts\n---------------------------------------\n\nThe Battery Historian chart graphs power-relevant events over time.\n\nEach row shows a colored bar segment when a system component is active and thus\ndrawing current from the battery. The chart doesn't show how much battery is\nused by the component---only whether the app is active. Charts are organized by\ncategory, showing a bar for each category over time, as displayed on the\n*x*-axis of the chart.\n**Figure 3.** Example of a Battery Historian chart.\n\n1. Add additional metrics from the drop-down list.\n2. Hold the pointer over the metric name to see more information about each metric, including a key for the colors used in the chart.\n3. Hold the pointer over a bar to see more detailed information about that metric and the battery stats at a specific point on the timeline.\n\nAdditional Batterystats output\n------------------------------\n\nYou can view additional information from the `batterystats.txt` file in the\nstats section after the Battery Historian chart.\n**Figure 4.** The stats section of Battery Historian.\n\nThe 1 **System Stats** tab includes system-wide\nstatistics, such as cell signal levels and screen brightness. This information\nprovides an overall picture of what's happening with the device. This is\nespecially useful to make sure no external events are affecting your test.\n\nThe 2 **App Stats** tab includes information about\nspecific apps. Sort the list of apps using the 3\n**Sort apps by** drop-down list in the **App Selection** pane. You\ncan select a specific app to view stats for using the\n4 apps drop-down list."]]