Sử dụng bộ sưu tập để sắp xếp ngăn nắp các trang
Lưu và phân loại nội dung dựa trên lựa chọn ưu tiên của bạn.
Đưa ra cho Gemini trong Android Studio các chỉ dẫn tuỳ chỉnh để làm theo bằng cách sử dụng một hoặc nhiều tệp AGENT.md. Các tệp AGENT.md được đặt cùng với các tệp khác trong cơ sở mã của bạn, vì vậy, bạn có thể dễ dàng kiểm tra các tệp này trong hệ thống kiểm soát phiên bản (VCS) và chia sẻ hướng dẫn dành riêng cho dự án, quy tắc về kiểu mã hoá và các hướng dẫn khác với toàn bộ nhóm của mình.
Để bắt đầu, hãy làm theo các bước sau:
Tạo một tệp AGENT.md ở bất kỳ đâu trong hệ thống tệp của dự án. Gemini sẽ quét thư mục hiện tại và tất cả các thư mục mẹ để tìm tệp AGENT.md khi bạn gửi một câu hỏi. Để biết thêm thông tin, hãy xem bài viết Cách hoạt động của tệp AGENT.md.
Thêm chỉ dẫn. Viết chỉ dẫn bằng Markdown. Để dễ đọc, hãy cân nhắc sử dụng tiêu đề và dấu đầu dòng cho các quy tắc khác nhau.
Xem hướng dẫn mẫu.
Lưu và xác nhận tệp vào VCS để chia sẻ với nhóm của bạn.
Quản lý tệp AGENT.md dưới dạng bối cảnh
Bạn có thể áp dụng hoặc xoá tệp AGENT.md làm bối cảnh cho một cụm từ tìm kiếm cụ thể bằng cách sử dụng ngăn Bối cảnh trong bảng điều khiển trò chuyện. Lựa chọn AGENT.md Tệp bao gồm tất cả các tệp AGENT.md trong thư mục hiện tại và các thư mục mẹ của thư mục đó.
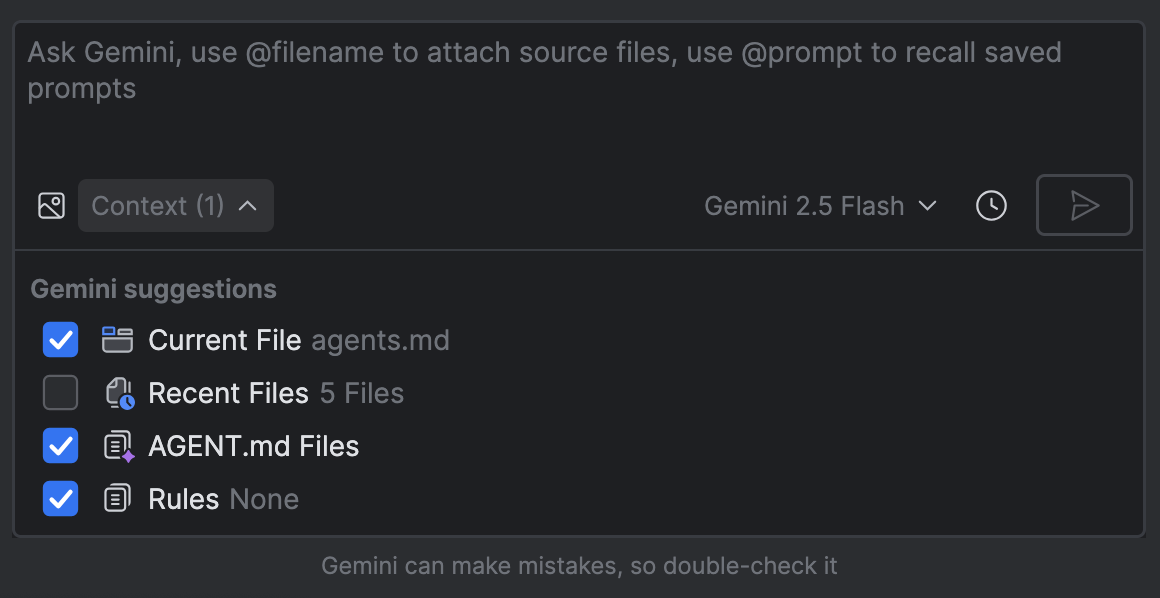
Hình 1. Quản lý các tệp AGENT.md dưới dạng bối cảnh.
Ví dụ về hướng dẫn
Bạn có thể dùng tệp AGENT.md để đưa ra chỉ dẫn cho tác nhân. Sau đây là một số ví dụ, nhưng hướng dẫn mà bạn cung cấp phải dành riêng cho dự án của bạn.
"Hoạt động chính là /path/to/MainActivity.kt."
"Mã hỗ trợ việc điều hướng giữa các màn hình là path/to/navigation/UiNavigation.kt"
"Mã xử lý các yêu cầu HTTP nằm ở <path>."
Cấu trúc dự án
"Đặt tất cả logic nghiệp vụ trong ViewModel."
"Luôn tuân theo các đề xuất chính thức về cấu trúc, bao gồm cả việc sử dụng cấu trúc phân lớp. Sử dụng luồng dữ liệu một chiều (UDF), ViewModel, bộ sưu tập trạng thái giao diện người dùng có nhận biết vòng đời và các đề xuất khác."
Thư viện ưu tiên: "Sử dụng thư viện <tên thư viện> để điều hướng."
Xác định tên giữ chỗ cho các dịch vụ API phổ biến hoặc thuật ngữ nội bộ: "Dịch vụ phụ trợ chính được gọi là "PhotoSift-API"."
Hướng dẫn về phong cách của công ty: "Tất cả các thành phần giao diện người dùng mới phải được xây dựng bằng Jetpack Compose. Đừng đề xuất bố cục dựa trên XML."
Chia nhỏ các tệp AGENT.md
Bạn có thể chia nhỏ các tệp AGENT.md lớn thành các tệp nhỏ hơn có thể được dùng lại trong nhiều bối cảnh:
Tách một bộ hướng dẫn và lưu chúng vào một tệp Markdown khác, chẳng hạn như style-guidance.md.
Tham chiếu các tệp Markdown nhỏ hơn trong tệp AGENT.md bằng cách sử dụng biểu tượng @, sau đó là đường dẫn đến tệp mà bạn muốn nhập. Các định dạng đường dẫn sau đây được hỗ trợ:
Đường dẫn tương đối:
@./file.md – Nhập từ cùng một thư mục
@../file.md – Nhập từ thư mục mẹ
@./subdirectory/file.md – Nhập từ thư mục con
Đường dẫn tuyệt đối: @/absolute/path/to/file.md
Ví dụ: tệp AGENT.md sau đây tham chiếu đến 2 tệp chỉ dẫn khác:
# My AGENT.md
You are an experienced Android app developer.
@./get-started.md
## Coding style
@./shared/style-guidance.md
Cách hoạt động của tệp AGENT.md
Gemini tự động quét thư mục hiện tại và thư mục mẹ để tìm các tệp AGENT.md rồi thêm nội dung của các tệp đó vào đầu mỗi câu lệnh dưới dạng phần mở đầu. Nếu bạn không mở tệp nào khi gửi truy vấn, thì tệp AGENT.md ở thư mục gốc của dự án (nếu có) sẽ được đưa vào theo mặc định.
Sự khác biệt giữa tệp AGENT.md và Quy tắc là gì?
Quy tắc cũng cho phép bạn xác định hướng dẫn và lựa chọn ưu tiên áp dụng cho tất cả các câu lệnh. Tuy nhiên, các quy tắc được xác định trong tệp IntelliJ /.idea/project.prompts.xml, trong khi các tệp AGENT.md được lưu bên cạnh mã nguồn và không phụ thuộc vào IDE. Bạn nên sử dụng tệp AGENT.md nếu một trong những mục đích chính là chia sẻ hướng dẫn với nhóm của bạn.
Nội dung và mã mẫu trên trang này phải tuân thủ các giấy phép như mô tả trong phần Giấy phép nội dung. Java và OpenJDK là nhãn hiệu hoặc nhãn hiệu đã đăng ký của Oracle và/hoặc đơn vị liên kết của Oracle.
Cập nhật lần gần đây nhất: 2025-08-22 UTC.
[[["Dễ hiểu","easyToUnderstand","thumb-up"],["Giúp tôi giải quyết được vấn đề","solvedMyProblem","thumb-up"],["Khác","otherUp","thumb-up"]],[["Thiếu thông tin tôi cần","missingTheInformationINeed","thumb-down"],["Quá phức tạp/quá nhiều bước","tooComplicatedTooManySteps","thumb-down"],["Đã lỗi thời","outOfDate","thumb-down"],["Vấn đề về bản dịch","translationIssue","thumb-down"],["Vấn đề về mẫu/mã","samplesCodeIssue","thumb-down"],["Khác","otherDown","thumb-down"]],["Cập nhật lần gần đây nhất: 2025-08-22 UTC."],[],[],null,["# Customize Gemini using AGENT.md files\n\nGive Gemini in Android Studio customized instructions to follow using one or\nmore `AGENT.md` files. `AGENT.md` files are placed alongside the other files in\nyour codebase, so it's straightforward to check them in to your version control\nsystem (VCS) and share project-specific instructions, coding style rules, and\nother guidance with your entire team.\n\nTo get started, follow these steps:\n\n1. Create an `AGENT.md` file anywhere in your project's file system. Gemini\n scans the current directory and all parent directories for `AGENT.md` files when\n you submit a query. For more details, see [How `AGENT.md` files work](#how-agent-files-work).\n\n | **Tip:** Use multiple instruction files across different directories for more granular control over different parts of your codebase. For example, you can have a global `AGENT.md` file at the project root and more specific `AGENT.md` files in subdirectories for different modules.\n2. Add your instructions. Write your instructions using Markdown. For\n readability, consider using headings and bullet points for different rules.\n [See example instructions](#example-instructions).\n\n3. Save and commit the file to your VCS to share it with your team.\n\nManage `AGENT.md` files as context\n----------------------------------\n\nYou can apply or remove `AGENT.md` files as context for a particular query\nusing the **Context** drawer in the chat panel. The **`AGENT.md` Files** options\nincludes all `AGENT.md` files in the current directory and its parent\ndirectories.\n**Figure 1.** Manage `AGENT.md` files as context.\n\nExample instructions\n--------------------\n\nYou can use the `AGENT.md` file to give instructions to the agent. The following\nare some examples, but the instructions that you provide should be specific to\nyour project.\n\n- \"The main activity is `/path/to/MainActivity.kt`.\"\n- \"The code to support navigating between screens is `path/to/navigation/UiNavigation.kt`\"\n- \"The code handling HTTP requests is at `\u003cpath\u003e`.\"\n- Project architecture\n - \"Place all business logic in ViewModels.\"\n - \"Always follow official architecture recommendations, including use of a layered architecture. Use a unidirectional data flow (UDF), ViewModels, lifecycle-aware UI state collection, and other recommendations.\"\n- Preferred libraries: \"Use the \\\u003clibrary name\\\u003e library for navigation.\"\n- Defining placeholder names for common API services or internal terminology: \"The primary backend service is referred to as 'PhotoSift-API'.\"\n- Company style guides: \"All new UI components must be built with Jetpack Compose. Don't suggest XML-based layouts.\"\n\nModularize your `AGENT.md` files\n--------------------------------\n\nYou can break down large `AGENT.md` files into smaller files that can be reused\nin different contexts:\n\n1. Separate out a set of instructions and save them in another Markdown file,\n such as `style-guidance.md`.\n\n2. Reference the smaller Markdown files in an `AGENT.md` file by using the `@`\n symbol followed by the path to the file you want to import. The following path\n formats are supported:\n\n - Relative paths:\n - `@./file.md` - Import from the same directory\n - `@../file.md` - Import from the parent directory\n - `@./subdirectory/file.md` - Import from a subdirectory\n - Absolute paths: `@/absolute/path/to/file.md`\n\nFor example, the following `AGENT.md` file references two other instruction\nfiles: \n\n # My AGENT.md\n\n You are an experienced Android app developer.\n\n @./get-started.md\n\n ## Coding style\n\n @./shared/style-guidance.md\n\nHow `AGENT.md` files work\n-------------------------\n\nGemini automatically scans the current directory and parent directories for\n`AGENT.md` files and adds their content to the beginning of every prompt as a\npreamble. If you don't have a file open when you submit a query, then the\n`AGENT.md` file at the project root (if there is one) is included by default.\n| **Note:** If you have a `GEMINI.md` file and `AGENT.md` file in the same directory, the `GEMINI.md` file takes precedence.\n\nWhat's the difference between `AGENT.md` files and Rules?\n---------------------------------------------------------\n\n[Rules](/studio/gemini/rules) also let you define instructions and preferences\nthat apply to all prompts. However, rules are defined in the IntelliJ file\n`/.idea/project.prompts.xml`, whereas `AGENT.md` files are saved next to your\nsource code and are IDE-neutral. We recommend using `AGENT.md` files if one of\nthe primary purposes is to share the instructions with your team.\n| **Note:** Gemini combines rules and instructions in `AGENT.md` files when processing your query."]]