
1. 시작하기 전에
이 Codelab에서는 자동차용 Android 앱 라이브러리를 사용하여 Android Auto 및 Android Automotive OS용 주의 분산 행동 최적화 앱을 빌드하는 방법을 알아봅니다. 먼저 Android Auto 지원을 추가하고 최소한의 추가 작업으로 Android Automotive OS에서 실행할 수 있는 앱의 변형을 만듭니다. 앱이 두 플랫폼에서 모두 실행되면 추가 화면과 기본 상호작용을 빌드합니다.
필요한 항목
- 최신 Android 스튜디오
- 기본적인 Kotlin 사용 경험
- Android 서비스에 관한 기본 지식
- Android Virtual Device를 생성하고 Android Emulator에서 실행한 경험
- Android 앱 모듈화에 관한 기본 지식
- Builder 디자인 패턴에 관한 기본 지식
빌드할 항목
Android Auto | Android Automotive OS |
|
|

학습할 내용
- 자동차 앱 라이브러리의 클라이언트-호스트 아키텍처가 작동하는 방식
- 자체
CarAppService,Session,Screen클래스를 작성하는 방법 - Android Auto와 Android Automotive OS에서 모두 구현을 공유하는 방법
- 데스크톱 헤드 유닛을 사용하여 개발 머신에서 Android Auto를 실행하는 방법
- Android Automotive OS 에뮬레이터를 실행하는 방법
2. 설정
코드 가져오기
- 이 Codelab의 코드는
car-codelabsGitHub 저장소의car-app-library-fundamentals디렉터리에서 찾을 수 있습니다. 코드를 클론하려면 다음 명령어를 실행합니다.
git clone https://github.com/android/car-codelabs.git
- 또는 저장소를 ZIP 파일로 다운로드할 수도 있습니다.
프로젝트 열기
- Android 스튜디오를 시작한 후
car-app-library-fundamentals/start디렉터리만 선택하여 프로젝트를 가져옵니다.car-app-library-fundamentals/end디렉터리에는 솔루션 코드가 포함되어 있습니다. 솔루션 코드는 도움이 필요한 경우 또는 전체 프로젝트를 살펴보고 싶을 때 언제든지 참조할 수 있습니다.
코드 숙지하기
- Android 스튜디오에서 프로젝트를 열고 시작 코드를 살펴봅니다.
앱의 시작 코드가 :app, :common:data라는 두 모듈로 나뉘어져 있습니다.

:app 모듈에는 모바일 앱의 UI와 로직이 포함되어 있고 :common:data 모듈에는 Place 모델 데이터 클래스와 Place 모델을 읽는 데 사용되는 저장소가 포함되어 있습니다. 편의상 저장소는 하드코딩된 목록에서 읽지만 실제 앱에서는 데이터베이스나 백엔드 서버에서 쉽게 읽을 수 있습니다.
:app 모듈에는 Place 모델의 목록을 읽고 표시할 수 있도록 :common:data 모듈의 종속 항목이 포함됩니다.
3. 자동차용 Android 앱 라이브러리 알아보기
자동차용 Android 앱 라이브러리는 개발자가 차량에서 사용할 앱을 빌드할 수 있도록 지원하는 Jetpack 라이브러리 세트입니다. 운전에 최적화된 사용자 인터페이스를 제공하면서 자동차에 있는 다양한 하드웨어 구성(예: 입력 방법, 화면 크기, 가로세로 비율)에도 적응할 수 있는 템플릿 프레임워크를 제공합니다. 이를 통해 개발자는 쉽게 앱을 빌드하고 Android Auto 및 Android Automotive OS를 모두 실행하는 다양한 차량에서 앱이 잘 작동할 것이라고 확신할 수 있습니다.
작동 방식 알아보기
자동차 앱 라이브러리를 사용하여 빌드된 앱은 Android Auto나 Android Automotive OS에서 직접 실행되지 않습니다. 대신 클라이언트 앱(개발자 앱)과 통신하고 클라이언트의 사용자 인터페이스를 대신 렌더링하는 호스트 앱을 사용합니다. Android Auto 자체가 호스트이고 Google Automotive 앱 호스트는 Google 탑재 Android Automotive OS 차량에서 사용되는 호스트입니다.
다음은 앱을 빌드할 때 확장해야 하는 자동차 앱 라이브러리의 주요 클래스입니다.
CarAppService
CarAppService는 Android Service 클래스의 서브클래스이며 호스트 애플리케이션이 클라이언트 앱(예: 이 Codelab에서 빌드하는 앱)과 통신하는 진입점 역할을 합니다. 기본 목적은 호스트 앱이 상호작용하는 Session 인스턴스를 만드는 것입니다.
세션
Session은 차량의 디스플레이에서 실행되는 클라이언트 앱의 인스턴스라고 보면 됩니다. 다른 Android 구성요소와 마찬가지로 자체 수명 주기가 있으며 이 수명 주기는 Session 인스턴스가 존재하는 동안 사용된 리소스를 초기화하고 해체하는 데 사용할 수 있습니다. CarAppService와 Session 간에는 일대다 관계가 있습니다. 예를 들어 하나의 CarAppService에는 Session 인스턴스 두 개가 있을 수 있습니다. 하나는 기본 디스플레이용이고 다른 하나는 계기판 디스플레이용이며 이는 계기판 화면을 지원하는 탐색 앱을 위한 것입니다.
Screen
Screen 인스턴스는 호스트 앱에서 렌더링된 사용자 인터페이스를 생성하는 역할을 담당합니다. 이러한 사용자 인터페이스는 각각 특정 유형의 레이아웃(예: 그리드 또는 목록)을 모델링하는 Template 클래스로 표현됩니다. 각 Session은 앱의 다양한 부분을 통한 사용자 플로우를 처리하는 Screen 인스턴스 스택을 관리합니다. Session과 마찬가지로 Screen에도 연결할 수 있는 자체 수명 주기가 있습니다.

이 Codelab의 CarAppService 작성 섹션에서 CarAppService, Session, Screen을 작성해 보면서 이러한 클래스의 세부사항을 알아봅니다.
4. 초기 구성 설정
시작하려면 CarAppService가 포함된 모듈을 설정하고 종속 항목을 선언합니다.
car-app-service 모듈 만들기
- Project 창에서
:common모듈이 선택된 상태에서 마우스 오른쪽 버튼을 클릭하고 New > Module 옵션을 선택합니다. - 모듈 마법사가 열리면 왼쪽 목록에서 Android Library 템플릿(다른 모듈에서 이 모듈을 종속 항목으로 사용할 수 있도록)을 선택한 후 다음 값을 사용합니다.
- Module name:
:common:car-app-service - Package name:
com.example.places.carappservice - Minimum SDK:
API 23: Android 6.0 (Marshmallow)
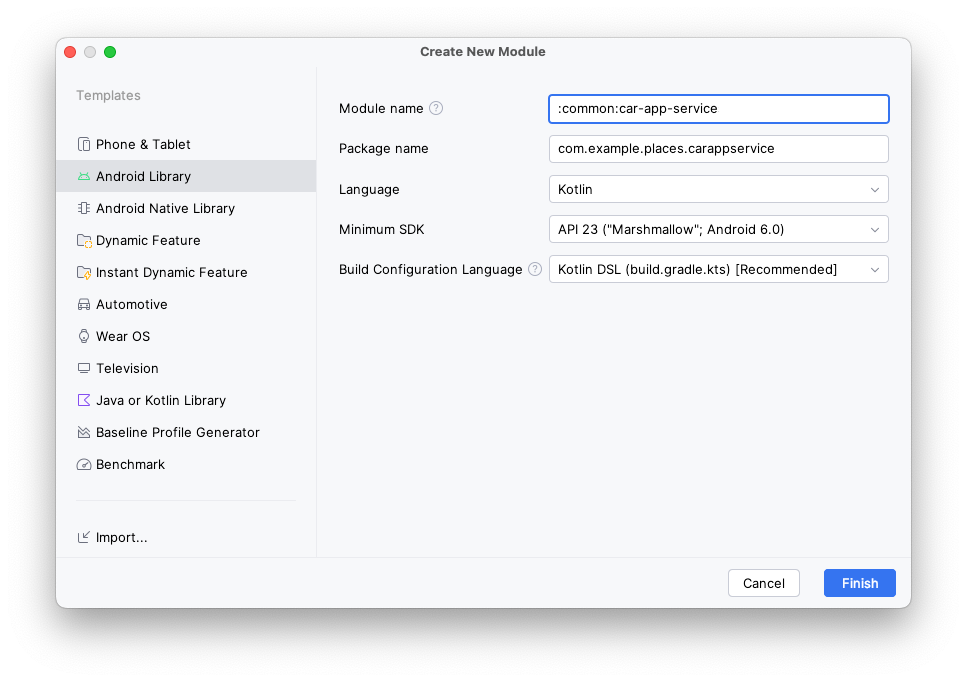
종속 항목 설정
libs.version.toml파일에서androidx.car.app:app아티팩트의 항목을 추가합니다.
libs.version.toml
[versions]
...
carApp = "1.7.0-rc01"

[libraries]
...
androidx-car-app = { group = "androidx.car.app", name = "app", version.ref = "carApp" }
- 이제
:common:car-app-service모듈의build.gradle.kts파일에 종속 항목을 두 개 추가합니다.
androidx.car.app:app. 자동차 앱 라이브러리의 기본 아티팩트이며 앱을 빌드할 때 사용되는 핵심 클래스가 모두 포함되어 있습니다. 라이브러리를 구성하는 다른 아티팩트가 세 개 있습니다. Android Auto 관련 기능용androidx.car.app:app-projected, Android Automotive OS 기능 코드용androidx.car.app:app-automotive, 단위 테스트에 유용한 도우미용androidx.car.app:app-testing입니다. Codelab의 후반부에서app-projected및app-automotive를 사용합니다.:common:data. 기존 모바일 앱에서 사용하는 동일한 데이터 모듈이며 모든 버전의 앱 환경에서 동일한 데이터 소스를 사용할 수 있도록 합니다.
build.gradle.kts(Module :common:car-app-service)
dependencies {
    ...
    implementation(libs.androidx.car.app)
    implementation(project(":common:data"))
    ...
}
이 변경사항을 적용하면 앱 자체 모듈의 종속 항목 그래프는 다음과 같습니다.

종속 항목을 설정했으므로 이제 CarAppService를 작성해 보겠습니다.
5. CarAppService 작성
- 먼저
:common:car-app-service모듈 내의carappservice패키지에서PlacesCarAppService.kt라는 파일을 만듭니다. - 이 파일 내에서
CarAppService를 확장하는PlacesCarAppService라는 클래스를 만듭니다.
PlacesCarAppService.kt
import androidx.car.app.CarAppService
import androidx.car.app.Session
import androidx.car.app.SessionInfo
import androidx.car.app.validation.HostValidator

...

class PlacesCarAppService : CarAppService() {

    override fun createHostValidator(): HostValidator {
        return HostValidator.ALLOW_ALL_HOSTS_VALIDATOR
    }

   override fun onCreateSession(sessionInfo: SessionInfo): Session {
        // PlacesSession will be an unresolved reference until the next step
        return PlacesSession()
    }
}
CarAppService 추상 클래스는 onBind, onUnbind와 같은 Service 메서드를 구현하고 이러한 메서드의 추가 재정의를 방지하여 호스트 애플리케이션과의 적절한 상호 운용성을 보장합니다. 개발자는 createHostValidator와 onCreateSession만 구현하면 됩니다.
createHostValidator에서 반환하는 HostValidator는 호스트를 신뢰할 수 있는지 호스트가 정의된 매개변수와 일치하지 않는 경우 바인딩이 실패하는지 확인하기 위해 CarAppService가 바인딩될 때 참조됩니다. 이 Codelab(및 일반적인 테스트)에서는 ALLOW_ALL_HOSTS_VALIDATOR를 사용하면 앱이 연결되어 있는지 쉽게 확인할 수 있지만 프로덕션에서는 사용하면 안 됩니다. 프로덕션 앱에서 이를 구성하는 방법에 관한 자세한 내용은 createHostValidator 문서를 참고하세요.
이처럼 단순한 앱의 경우 onCreateSession은 Session 인스턴스를 간단히 반환할 수 있습니다. 좀 더 복잡한 앱에서는 앱이 차량에서 실행되는 동안 사용되는 장기 지속 리소스(예: 측정항목, 로깅 클라이언트)를 여기에서 초기화하는 것이 좋습니다.
- 마지막으로
:common:car-app-service모듈의AndroidManifest.xml파일에서PlacesCarAppService에 상응하는<service>요소를 추가해야 합니다. 그러면 운영체제(및 더 나아가 호스트와 같은 다른 앱)에서 이것의 존재 사실을 알 수 있습니다.
AndroidManifest.xml(:common:car-app-service)
<?xml version="1.0" encoding="utf-8"?>
<manifest xmlns:android="http://schemas.android.com/apk/res/android">
    <!--
        This AndroidManifest.xml will contain all of the elements that should be shared across the
        Android Auto and Automotive OS versions of the app, such as the CarAppService <service> element
    -->

    <application>
        <service
            android:name="com.example.places.carappservice.PlacesCarAppService"
            android:exported="true">
            <intent-filter>
                <action android:name="androidx.car.app.CarAppService" />
                <category android:name="androidx.car.app.category.POI" />
            </intent-filter>
        </service>
    </application>
</manifest>
여기서는 다음과 같은 두 가지 중요한 사항이 있습니다.
<action>요소를 사용하면 호스트(및 런처) 애플리케이션이 앱을 찾을 수 있습니다.<category>요소는 앱의 카테고리(이 경우 관심 장소)를 선언하고 이는 앱이 충족해야 하는 앱 품질 기준을 결정합니다(나중에 자세히 설명함). 가능한 다른 값은 지원되는 앱 카테고리에 자세히 설명되어 있습니다.
PlacesSession 클래스 만들기
PlacesCarAppService.kt내에 다음 코드를 추가합니다.
PlacesCarAppService.kt
import android.content.Intent
import androidx.car.app.Screen

...

class PlacesSession : Session() {
    override fun onCreateScreen(intent: Intent): Screen {
        // MainScreen will be an unresolved reference until the next step
        return MainScreen(carContext)
    }
}
이와 같은 단순한 앱에서는 onCreateScreen에서 기본 화면을 반환하면 됩니다. 하지만 이 메서드는 Intent를 매개변수로 사용하므로 좀 더 기능이 많은 앱은 Intent에서 읽고 화면의 백 스택을 채우거나 다른 조건부 로직을 사용할 수도 있습니다.
MainScreen 클래스 만들기
이제 screen.이라는 새로운 패키지를 만듭니다.
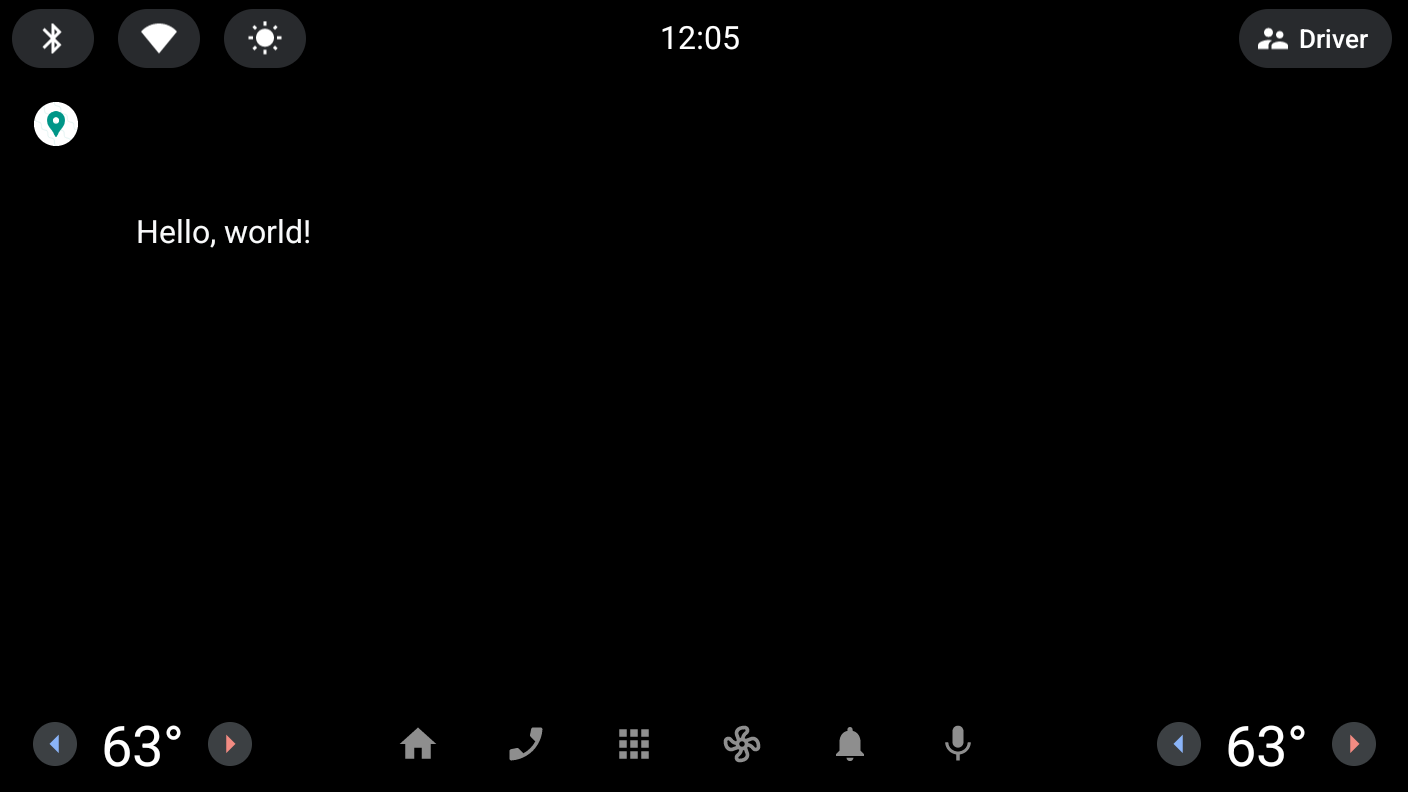
com.example.places.carappservice패키지를 마우스 오른쪽 버튼으로 클릭하고 New > Package(전체 패키지 이름은com.example.places.carappservice.screen임)를 선택합니다. 여기에 앱의Screen서브클래스를 모두 배치합니다.screen패키지에서MainScreen.kt라는 파일을 만들어Screen을 확장하는MainScreen클래스를 포함합니다. 지금은PaneTemplate을 사용하여 Hello, world!라는 단순한 메시지만 표시됩니다.
MainScreen.kt
import androidx.car.app.CarContext
import androidx.car.app.Screen
import androidx.car.app.model.Action
import androidx.car.app.model.Header
import androidx.car.app.model.Pane
import androidx.car.app.model.PaneTemplate
import androidx.car.app.model.Row
import androidx.car.app.model.Template

...

class MainScreen(carContext: CarContext) : Screen(carContext) {

    override fun onGetTemplate(): Template {
        val row = Row.Builder()
            .setTitle("Hello, world!")
            .build()

        val pane = Pane.Builder()
            .addRow(row)
            .build()

        return PaneTemplate.Builder(pane)
            .setHeader(
                Header.Builder()
                    .setStartHeaderAction(Action.APP_ICON)
                    .build()
            ).build()
    }
}
6. Android Auto 지원 추가
이제 앱이 실행되도록 하는 데 필요한 로직을 모두 구현했지만 Android Auto에서 앱을 실행하려면 두 가지 구성을 더 설정해야 합니다.
car-app-service 모듈의 종속 항목 추가
:app 모듈의 build.gradle.kts 파일에서 다음을 추가합니다.
build.gradle.kts(모듈 :app)
dependencies {
    ...
    implementation(project(":common:car-app-service"))
    ...
}
이 변경사항을 적용하면 앱 자체 모듈의 종속 항목 그래프는 다음과 같습니다.

이는 :common:car-app-service 모듈에서 방금 작성한 코드를 자동차 앱 라이브러리에 포함된 다른 구성요소(예: 제공된 권한 부여 활동)와 함께 번들로 묶습니다.
com.google.android.gms.car.application meta-data 선언
:common:car-app-service모듈을 마우스 오른쪽 버튼으로 클릭하고 New > Android Resource File 옵션을 선택한 후 다음 값을 재정의합니다.
- File name:
automotive_app_desc.xml - Resource type:
XML - Root element:
automotiveApp
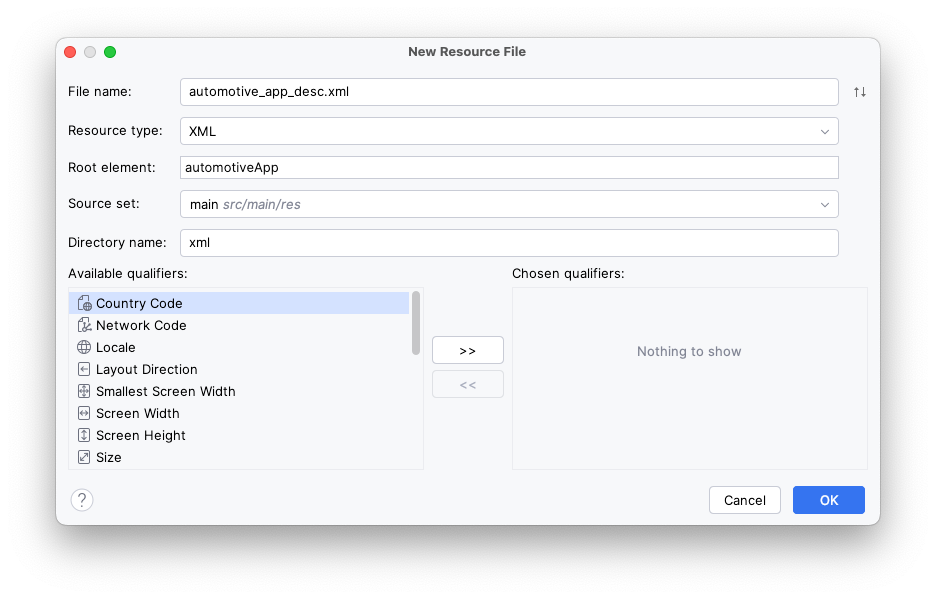
- 이 파일 내에서 다음
<uses>요소를 추가하여 앱이 자동차 앱 라이브러리에서 제공한 템플릿을 사용한다고 선언합니다.
automotive_app_desc.xml
<?xml version="1.0" encoding="utf-8"?>
<automotiveApp>
    <uses name="template"/>
</automotiveApp>
:app모듈의AndroidManifest.xml파일에서 방금 만든automotive_app_desc.xml파일을 참조하는 다음<meta-data>요소를 추가합니다.
AndroidManifest.xml(:app)
<application ...>

    <meta-data
        android:name="com.google.android.gms.car.application"
        android:resource="@xml/automotive_app_desc" />

    ...

</application>
이 파일은 Android Auto에서 읽으므로 앱에서 지원하는 기능을 알릴 수 있습니다. 여기서는 자동차 앱 라이브러리의 템플릿 시스템을 사용함을 알릴 수 있습니다. 그러면 이 정보는 Android Auto 런처에 앱을 추가하거나 알림에서 앱을 여는 등의 동작을 처리하는 데 사용됩니다.
선택사항: 프로젝션 변경사항 수신 대기
사용자의 기기가 자동차에 연결되어 있는지 알고 싶을 때가 있습니다. 이럴 때는 CarConnection API를 사용하면 됩니다. 이 API는 연결 상태를 확인할 수 있는 LiveData를 제공합니다.
CarConnectionAPI를 사용하려면 먼저androidx.car.app:app아티팩트의:app모듈에 종속 항목을 추가합니다.
build.gradle.kts(모듈 :app)
dependencies {
    ...
    implementation(libs.androidx.car.app)
    ...
}
- 예시용으로 현재 연결 상태를 표시하는 다음과 같은 간단한 Composable을 만들 수 있습니다. 실제 앱에서는 이 상태가 일부 로깅에서 캡처되거나 프로젝션하는 동안 휴대전화 화면의 일부 기능을 사용 중지하는 데 사용될 수도 있습니다.
MainActivity.kt
import androidx.car.app.connection.CarConnection

...

@Composable
fun ProjectionState(carConnectionType: Int, modifier: Modifier = Modifier) {
    val text = when (carConnectionType) {
        CarConnection.CONNECTION_TYPE_NOT_CONNECTED -> "Not projecting"
        CarConnection.CONNECTION_TYPE_NATIVE -> "Running on Android Automotive OS"
        CarConnection.CONNECTION_TYPE_PROJECTION -> "Projecting"
        else -> "Unknown connection type"
    }

    Text(
        text = text,
        style = MaterialTheme.typography.bodyMedium,
        modifier = modifier
    )
}
- 이제 데이터를 표시하고 읽고 Composable에 전달하는 방법이 있습니다(다음 스니펫 참고).
MainActivity.kt
import androidx.compose.runtime.getValue
import androidx.compose.runtime.livedata.observeAsState

...

setContent {
    val carConnectionType by CarConnection(this).type.observeAsState(initial = -1)
    PlacesTheme {
        // A surface container using the 'background' color from the theme
        Surface(
            modifier = Modifier.fillMaxSize(),
            color = MaterialTheme.colorScheme.background
        ) {
            Column {
                Text(
                    text = "Places",
                    style = MaterialTheme.typography.displayLarge,
                    modifier = Modifier.padding(8.dp)
                )
                ProjectionState(
                    carConnectionType = carConnectionType,
                    modifier = Modifier.padding(8.dp)
                )
                PlaceList(places = PlacesRepository().getPlaces())
            }
        }
    }
}
- 앱을 실행하면 Not projecting이 표시됩니다.
7. 데스크톱 헤드 유닛(DHU)으로 테스트
CarAppService를 구현하고 Android Auto 구성을 완료했으므로 이제 앱을 실행하여 어떻게 표시되는지 살펴보겠습니다.
- 휴대전화에 앱을 설치하고 안내를 따라 DHU를 설치하고 실행합니다.
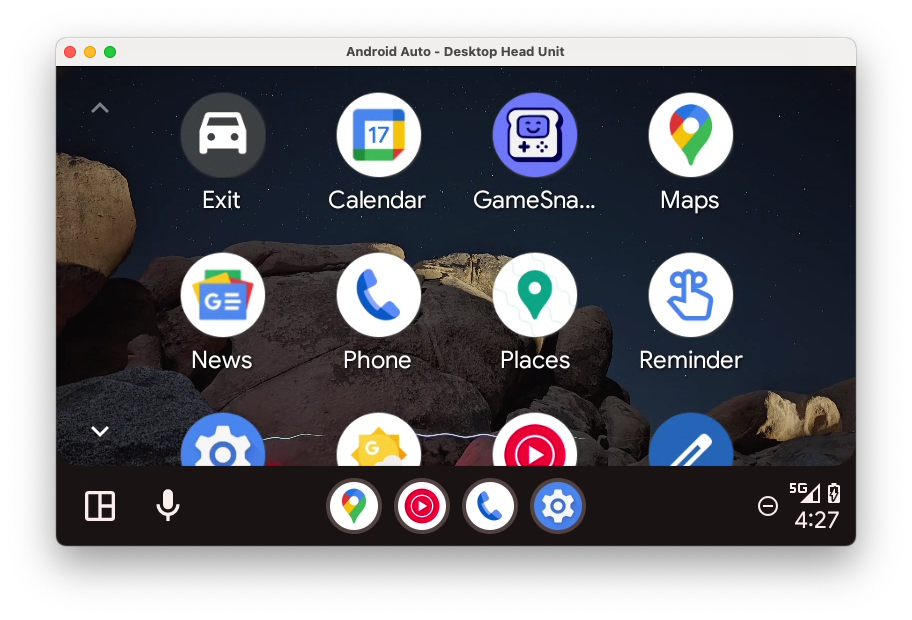
DHU가 실행되면 런처에 앱 아이콘이 표시됩니다(표시되지 않으면 이전 섹션의 모든 단계를 따랐는지 다시 한번 확인하고 터미널에서 DHU를 종료했다가 다시 시작합니다).
앱이 비정상 종료되었습니다.
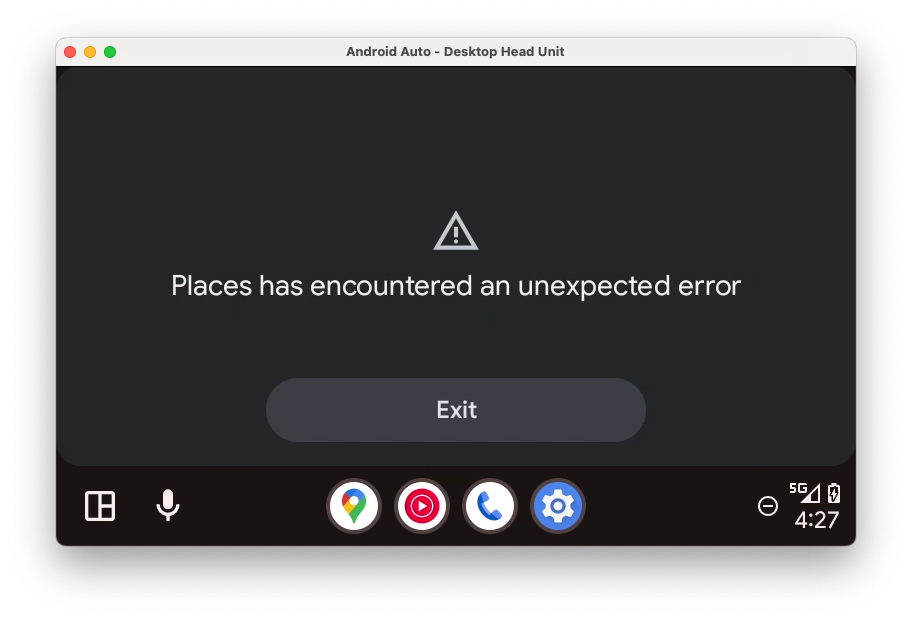
- 앱이 비정상 종료된 이유를 확인하려면 Android 스튜디오에서 Logcat을 확인합니다(
package:mine의 기본 Logcat 필터를 삭제하고is:error로 대체해야 할 수 있음).
Error: [type: null, cause: null, debug msg: java.lang.IllegalArgumentException: Min API level not declared in manifest (androidx.car.app.minCarApiLevel)
        at androidx.car.app.AppInfo.retrieveMinCarAppApiLevel(AppInfo.java:143)
        at androidx.car.app.AppInfo.create(AppInfo.java:91)
        at androidx.car.app.CarAppService.getAppInfo(CarAppService.java:380)
        at androidx.car.app.CarAppBinder.getAppInfo(CarAppBinder.java:255)
        at androidx.car.app.ICarApp$Stub.onTransact(ICarApp.java:182)
        at android.os.Binder.execTransactInternal(Binder.java:1285)
        at android.os.Binder.execTransact(Binder.java:1244)
]
로그를 보면 앱에서 지원하는 최소 API 수준에 관한 선언이 매니페스트에 누락된 것을 알 수 있습니다. 해당 항목을 추가하기 전에 이 선언이 필요한 이유를 이해하는 것이 좋습니다.
Android 자체와 마찬가지로, 자동차 앱 라이브러리에도 API 수준이라는 개념이 있습니다. 서로 통신하려면 호스트 애플리케이션과 클라이언트 애플리케이션 간에 계약이 있어야 하기 때문입니다. 호스트 애플리케이션은 특정 API 수준과 관련 기능을 지원합니다(이전 버전과의 호환성을 위해 이전 수준의 기능도 지원). 예를 들어 SignInTemplate은 API 수준 2 이상을 실행하는 호스트에서 사용할 수 있습니다. 하지만 API 수준 1만 지원하는 호스트에서 사용하려고 하면 호스트는 템플릿 유형을 알 수 없고 이를 사용하여 유의미한 작업도 할 수 없습니다.
호스트를 클라이언트에 바인딩하는 과정에서 지원되는 API 수준이 일부 중복되어야 바인딩이 성공합니다. 예를 들어 호스트가 API 수준 1만 지원하지만 클라이언트 앱이 API 수준 2의 기능 없이는 실행될 수 없는 경우(이 매니페스트 선언에서 표시됨) 클라이언트가 호스트에서 실행될 수 없으므로 앱은 연결되지 않아야 합니다. 따라서 클라이언트는 필요한 최소 API 수준을 매니페스트에서 선언하여 이를 지원할 수 있는 호스트만 바인딩되도록 해야 합니다.
- 지원되는 최소 API 수준을 설정하려면
:common:car-app-service모듈의AndroidManfiest.xml파일에 다음<meta-data>요소를 추가합니다.
AndroidManifest.xml(:common:car-app-service)
<application>
    <meta-data
        android:name="androidx.car.app.minCarApiLevel"
        android:value="1" />
    <service android:name="com.example.places.carappservice.PlacesCarAppService" ...>
        ...
    </service>
</application>
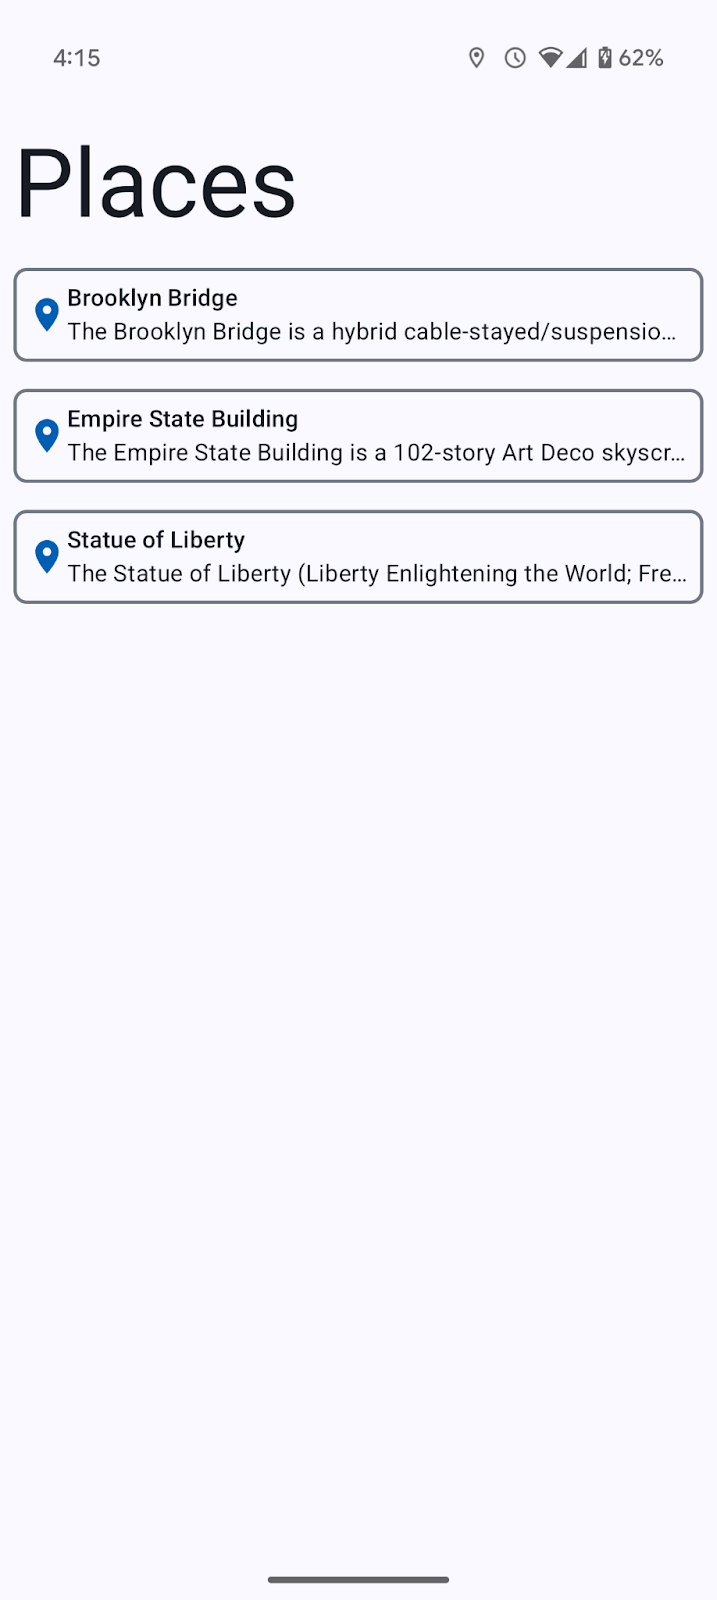
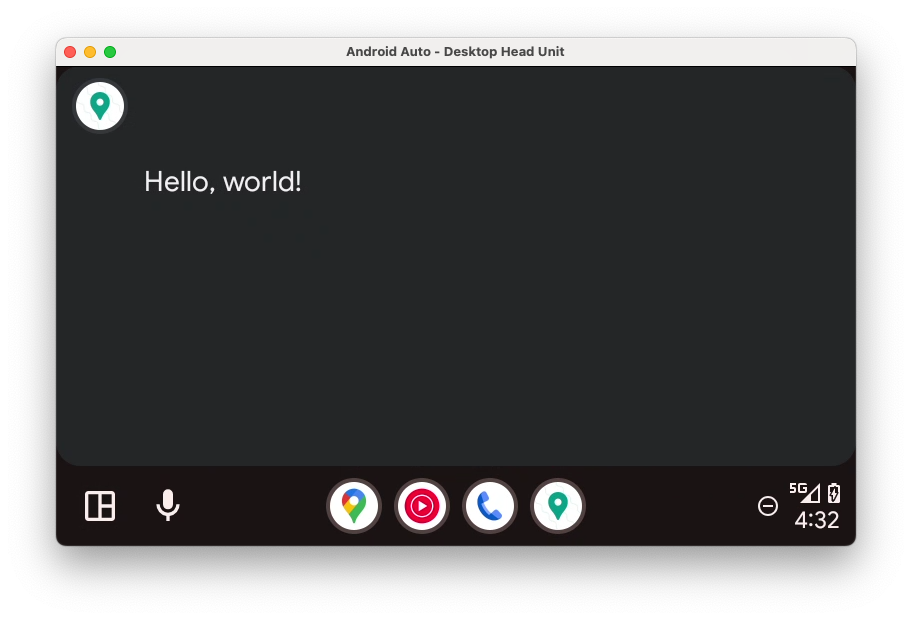
- 앱을 다시 설치하고 DHU에서 실행하면 다음과 같이 표시됩니다.
완전하게 하기 위해 minCarApiLevel을 큰 값(예: 100)으로 설정하여 호스트와 클라이언트가 호환되지 않는 경우 앱을 시작하려고 하면 어떤 일이 발생하는지 확인해 봐도 됩니다(힌트: 값을 설정하지 않은 때와 유사하게 비정상 종료됨).
Android 자체와 마찬가지로 호스트에서 필수 수준을 지원하는지 런타임에 확인하는 경우 선언된 최소 수준보다 높은 API의 기능을 사용할 수 있다는 점에 유의하세요.
선택사항: 프로젝션 변경사항 수신 대기
- 이전 단계에서
CarConnection리스너를 추가한 경우 DHU가 실행 중일 때 휴대전화에 상태 업데이트가 표시됩니다(아래 참고).
8. Android Automotive OS 지원 추가
Android Auto가 실행 중이므로 이제 추가로 Android Automotive OS도 지원해 보겠습니다.
:automotive 모듈 만들기
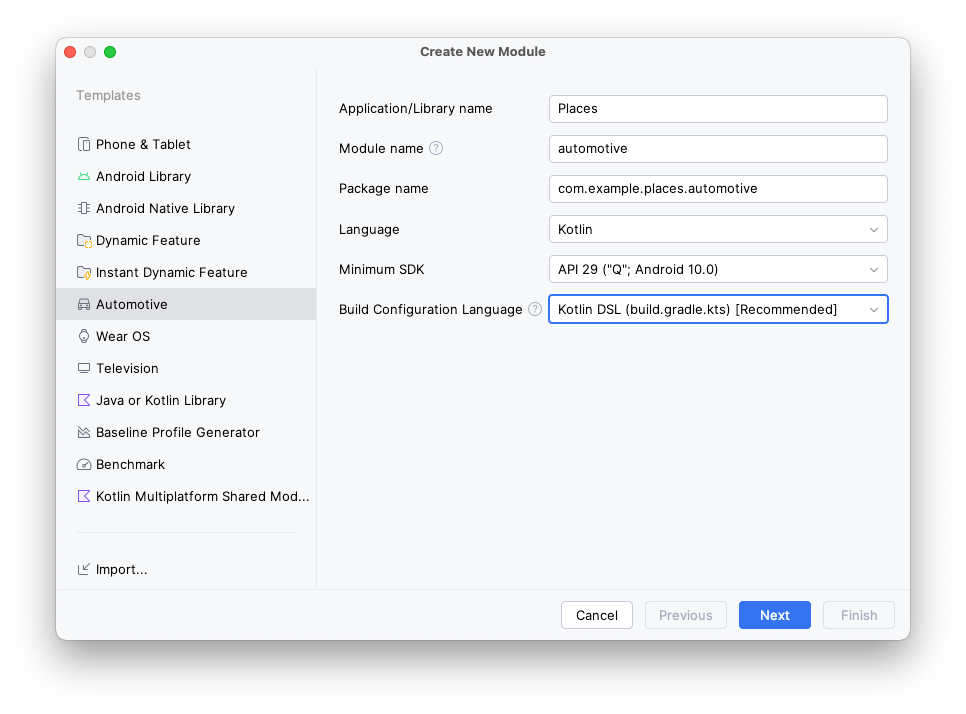
- Android Automotive OS 버전의 앱과 관련된 코드를 포함하는 모듈을 만들려면 Android 스튜디오에서 File > New > New Module...을 열고 왼쪽의 템플릿 유형 목록에서 Automotive 옵션을 선택한 후 다음 값을 사용합니다.
- Application/Library name:
Places(기본 앱과 같지만 원하는 경우 다른 이름을 선택해도 됨) - Module name:
automotive - Package name:
com.example.places.automotive - 언어:
Kotlin - Minimum SDK:
API 29: Android 10.0 (Q)– 자동차 앱 라이브러리 앱을 지원하는 모든 Android Automotive OS 차량은 API 29 이상을 실행합니다.
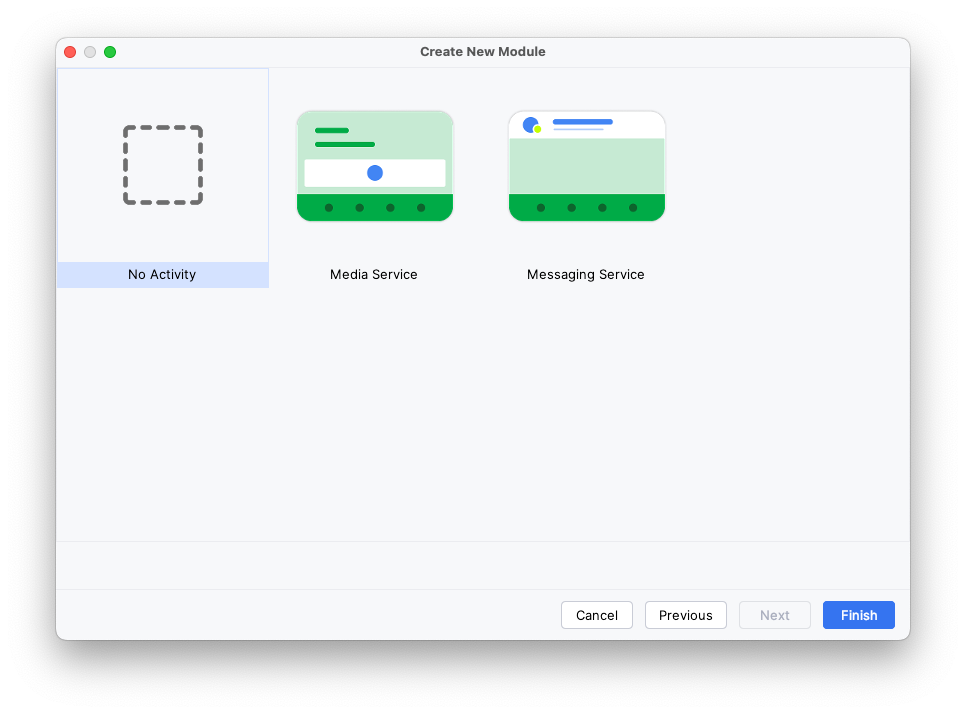
- Next를 클릭하고 다음 화면에서 No Activity를 선택한 후 Finish를 클릭합니다.
종속 항목 추가
Android Auto와 마찬가지로 :common:car-app-service 모듈의 종속 항목을 선언해야 합니다. 이렇게 하면 두 플랫폼에서 구현을 공유하게 됩니다.
또한 androidx.car.app:app-automotive 아티팩트의 종속 항목을 추가해야 합니다. Android Auto에 선택사항인 androidx.car.app:app-projected 아티팩트와 달리 이 종속 항목은 Android Automotive OS에 필수입니다. 앱을 실행하는 데 사용되는 CarAppActivity를 포함하고 있기 때문입니다.
- 먼저
libs.versions.toml에androidx.car.app:app-automotive아티팩트 항목을 추가합니다.
libs.version.toml
[libraries]
...
androidx-car-app-automotive = { group = "androidx.car.app", name = "app-automotive", version.ref = "carApp"}
- 종속 항목을 추가하려면
build.gradle.kts파일을 열고 다음 코드를 삽입합니다.
build.gradle.kts(모듈 :automotive)
dependencies {
    ...
    implementation(project(":common:car-app-service"))
    implementation(libs.androidx.car.app.automotive)
    ...
}
이 변경사항을 적용하면 앱 자체 모듈의 종속 항목 그래프는 다음과 같습니다.

매니페스트 설정
- 먼저 두 가지 기능인
android.hardware.type.automotive및android.software.car.templates_host를 필수인 것으로 선언해야 합니다.
android.hardware.type.automotive는 기기 자체가 차량임을 나타내는 시스템 기능입니다(자세한 내용은 FEATURE_AUTOMOTIVE 참고). 이 기능을 필수로 표시한 앱만 Play Console의 Automotive OS 트랙에 제출할 수 있습니다(다른 트랙에 제출된 앱에는 이 기능이 필수일 수 없음). android.software.car.templates_host는 템플릿 앱을 실행하는 데 필요한 템플릿 호스트를 보유한 차량에만 있는 시스템 기능입니다. 이 Codelab에서는 이러한 변경사항으로 충분합니다. 자체 앱을 빌드할 때는 앱이 Android Automotive OS의 Google Play 기능 요구사항을 모두 충족하는지 확인하세요.
AndroidManifest.xml(:automotive)
<manifest xmlns:android="http://schemas.android.com/apk/res/android">
    <uses-feature
        android:name="android.hardware.type.automotive"
        android:required="true" />
    <uses-feature
        android:name="android.software.car.templates_host"
        android:required="true" />
    ...
</manifest>
- 이제 Android Auto와 마찬가지로
automotive_app_desc.xml파일 참조를 추가해야 합니다.
이번에는 android:name 속성이 이전과 달리 com.google.android.gms.car.application이 아닌 com.android.automotive입니다. 이전과 마찬가지로 이는 :common:car-app-service 모듈의 automotive_app_desc.xml 파일을 참조합니다. 즉, Android Auto와 Android Automotive OS에서 모두 동일한 리소스가 사용됩니다. 또한 <meta-data> 요소는 <application> 요소 내에 있습니다(따라서 자동으로 닫히지 않도록 application 태그를 변경해야 함).
AndroidManifest.xml(:automotive)
<application>
    ...
    <meta-data android:name="com.android.automotive"
        android:resource="@xml/automotive_app_desc"/>
    ...
</application>
- 이제 라이브러리에 포함된
CarAppActivity의<activity>요소를 추가해야 합니다.
AndroidManifest.xml(:automotive)
<manifest xmlns:android="http://schemas.android.com/apk/res/android">
    ...
    <application ...>
        ...
        <activity
            android:name="androidx.car.app.activity.CarAppActivity"
            android:exported="true"
            android:launchMode="singleTask"
            android:theme="@android:style/Theme.DeviceDefault.NoActionBar">

            <intent-filter>
                <action android:name="android.intent.action.MAIN" />
                <category android:name="android.intent.category.LAUNCHER" />
            </intent-filter>

            <meta-data
                android:name="distractionOptimized"
                android:value="true" />
        </activity>
    </application>
</manifest>
다음은 각각 실행하는 작업입니다.
android:name은app-automotive패키지에 있는CarAppActivity클래스의 정규화된 클래스 이름을 나열합니다.android:exported는true로 설정됩니다. 이Activity를 그 자체가 아닌 다른 앱(런처)에서 실행할 수 있어야 하기 때문입니다.android:launchMode는singleTask로 설정되므로 한 번에CarAppActivity인스턴스가 하나만 있을 수 있습니다.android:theme은@android:style/Theme.DeviceDefault.NoActionBar로 설정되므로 앱이 사용할 수 있는 전체 화면 공간을 차지할 수 있습니다.- 인텐트 필터는 이것이 앱의 런처
Activity임을 나타냅니다. - 차량이 움직이는 경우와 같이 UX 제한이 있는 동안 앱을 사용할 수 있음을 시스템에 나타내는
<meta-data>요소가 있습니다.
선택사항: :app 모듈에서 런처 아이콘 복사
방금 :automotive 모듈을 만들었으므로 기본 녹색 Android 로고 아이콘이 있습니다.
- 원하는 경우
:app모듈에서mipmap리소스 디렉터리를 복사하여:automotive모듈로 붙여넣어 모바일 앱과 동일한 런처 아이콘을 사용합니다.
9. Android Automotive OS 에뮬레이터를 사용하여 테스트
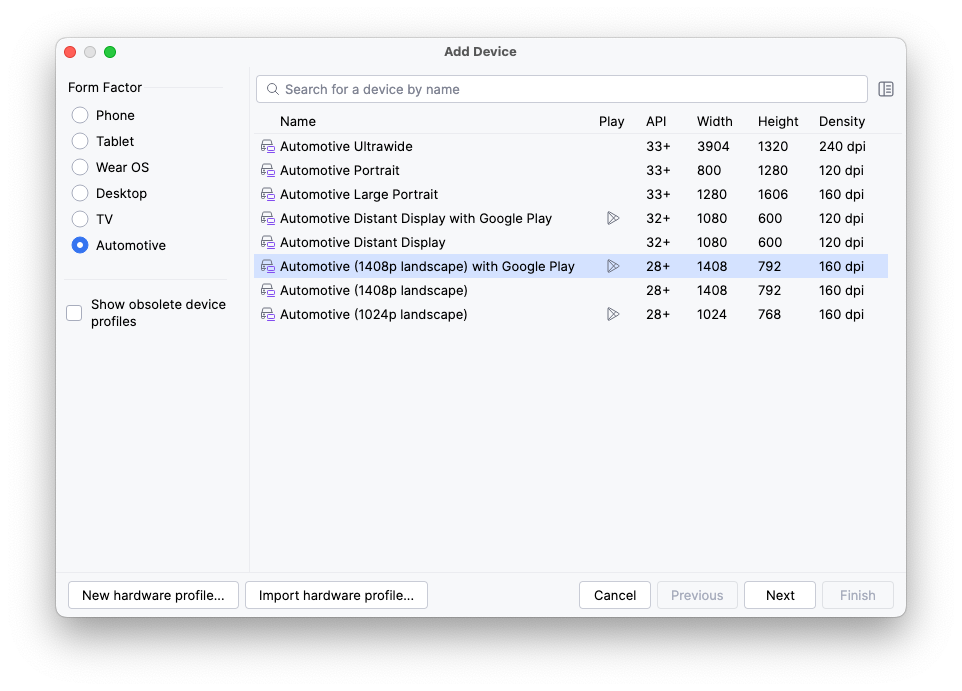
Android Automotive OS Android Virtual Device 만들기
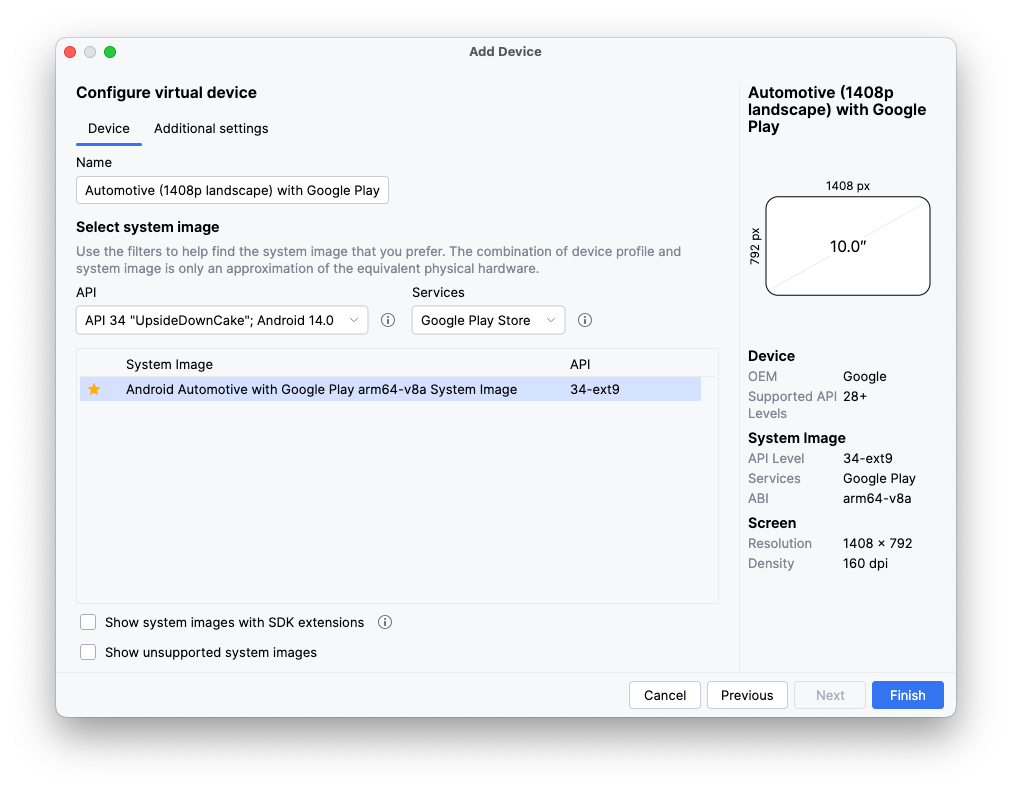
- 기기 관리도구를 열고 창 왼쪽의 Category 열에서 Automotive를 선택합니다. 그런 다음 목록에서 Automotive(1408p landscape) with Google Play 기기 정의를 선택하고 Next를 클릭합니다.
- 다음 페이지에서 API 34 시스템 이미지를 선택하고(아직 다운로드되지 않은 경우 다운로드됨) Finish를 클릭하여 AVD를 만듭니다.
앱 실행
automotive 실행 구성을 사용하여 방금 만든 에뮬레이터에서 앱을 실행합니다.

다음 단계에서는 :common:car-app-service 모듈을 변경하여 장소 목록을 표시하고 사용자가 다른 앱에서 선택된 위치로 탐색을 시작할 수 있도록 합니다.
10. 지도 및 세부정보 화면 추가
기본 화면에 지도 추가
- 시작하려면
MainScreen클래스의onGetTemplate메서드에 있는 코드를 다음 코드로 바꿉니다.
MainScreen.kt
import androidx.car.app.model.CarLocation
import androidx.car.app.model.Distance
import androidx.car.app.model.DistanceSpan
import androidx.car.app.model.ItemList
import androidx.car.app.model.Metadata
import androidx.car.app.model.Place
import androidx.car.app.model.PlaceListMapTemplate
import androidx.car.app.model.PlaceMarker
import com.example.places.data.PlacesRepository

...

override fun onGetTemplate(): Template {
    val placesRepository = PlacesRepository()
    val itemListBuilder = ItemList.Builder()
        .setNoItemsMessage("No places to show")

    placesRepository.getPlaces()
        .forEach {
            itemListBuilder.addItem(
                Row.Builder()
                    .setTitle(it.name)
                    // Each item in the list *must* have a DistanceSpan applied to either the title
                    // or one of its lines of text (to help drivers make decisions)
                    .addText(SpannableString(" ").apply {
                        setSpan(
                            DistanceSpan.create(
                                Distance.create(Math.random() * 100, Distance.UNIT_KILOMETERS)
                            ), 0, 1, Spannable.SPAN_INCLUSIVE_INCLUSIVE
                        )
                    })
                    .setOnClickListener { TODO() }
                    // Setting Metadata is optional, but is required to automatically show the
                    // item's location on the provided map
                    .setMetadata(
                        Metadata.Builder()
                            .setPlace(Place.Builder(CarLocation.create(it.latitude, it.longitude))
                                // Using the default PlaceMarker indicates that the host should
                                // decide how to style the pins it shows on the map/in the list
                                .setMarker(PlaceMarker.Builder().build())
                                .build())
                            .build()
                    ).build()
            )
        }

    return PlaceListMapTemplate.Builder()
        .setTitle("Places")
        .setItemList(itemListBuilder.build())
        .build()
}
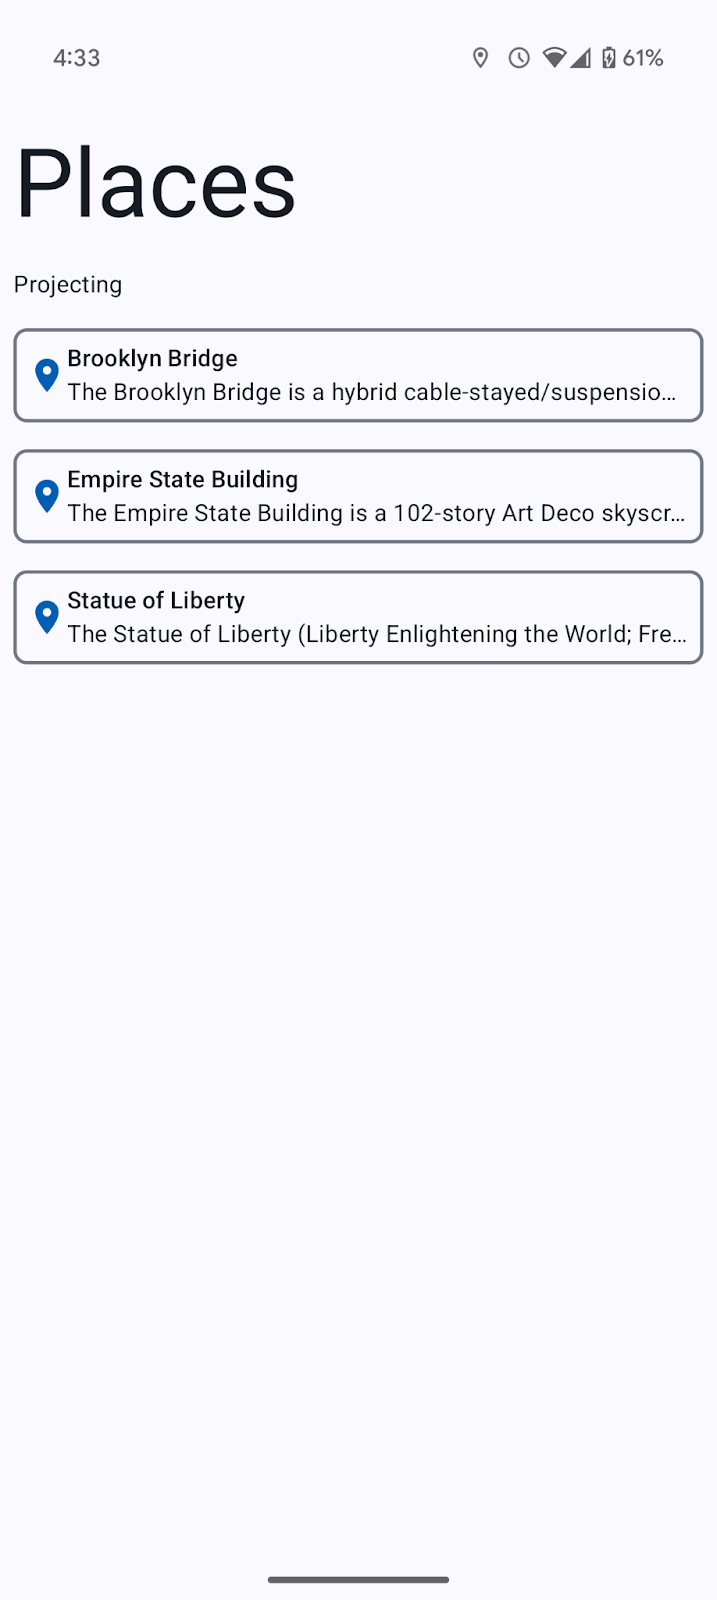
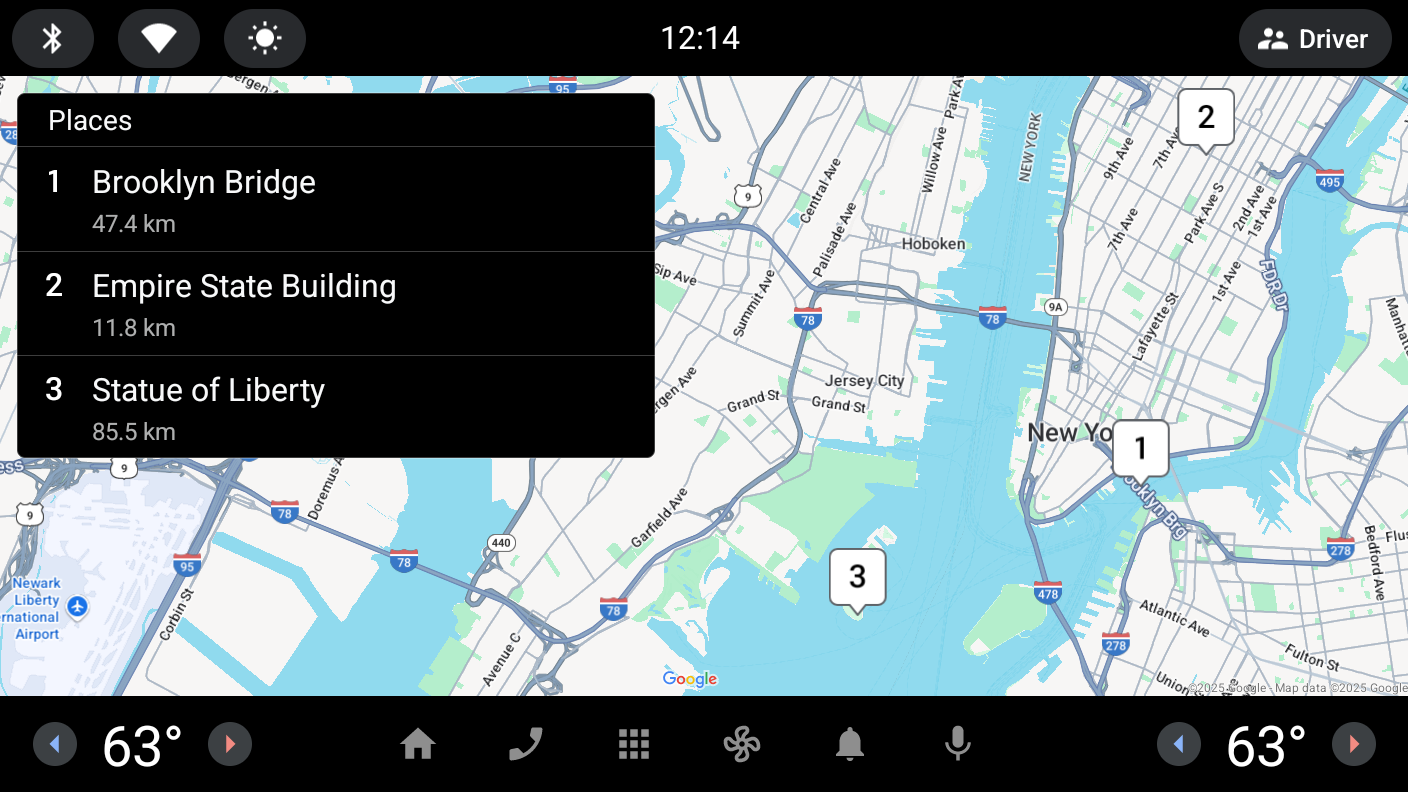
이 코드는 PlacesRepository에서 Place 인스턴스 목록을 읽고 PlaceListMapTemplate에서 표시한 ItemList에 추가할 Row로 각 인스턴스를 변환합니다.
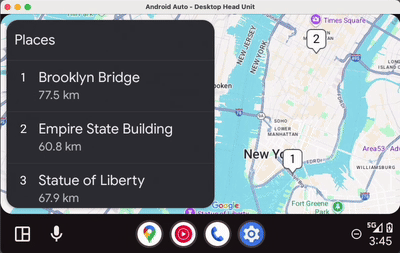
- 앱을 다시 실행하여(각 플랫폼 또는 두 플랫폼에서 모두) 결과를 확인합니다.
Android Auto | Android Automotive OS |
|
|
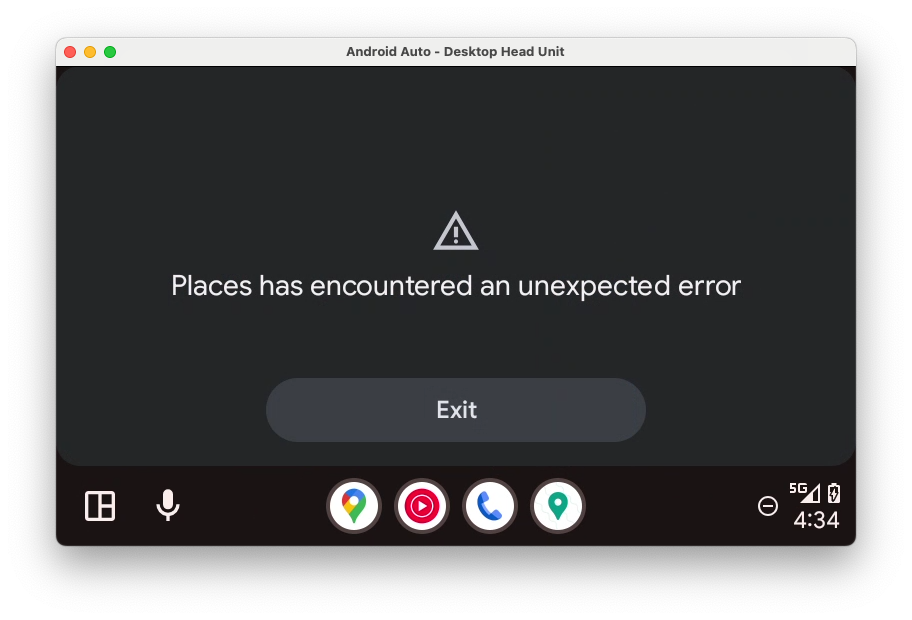
또 다른 오류가 발생했습니다. 권한이 누락된 것 같습니다.
java.lang.SecurityException: The car app does not have a required permission: androidx.car.app.MAP_TEMPLATES
        at android.os.Parcel.createExceptionOrNull(Parcel.java:2373)
        at android.os.Parcel.createException(Parcel.java:2357)
        at android.os.Parcel.readException(Parcel.java:2340)
        at android.os.Parcel.readException(Parcel.java:2282)
        ...
- 오류를 수정하려면
:common:car-app-service모듈의 매니페스트에 다음<uses-permission>요소를 추가합니다.
이 권한은 PlaceListMapTemplate을 사용하는 앱에서 선언해야 하며 선언하지 않으면 방금과 같이 앱이 비정상 종료됩니다. androidx.car.app.category.POI로 카테고리를 선언하는 앱만 이 템플릿을 사용할 수 있으며 결과적으로 이 권한도 사용할 수 있습니다.
AndroidManifest.xml(:common:car-app-service)
<manifest xmlns:android="http://schemas.android.com/apk/res/android">
    <uses-permission android:name="androidx.car.app.MAP_TEMPLATES" />
    ...
</manifest>
권한을 추가한 후 앱을 실행하면 각 플랫폼에서 다음과 같이 표시됩니다.
Android Auto | Android Automotive OS |
|
|
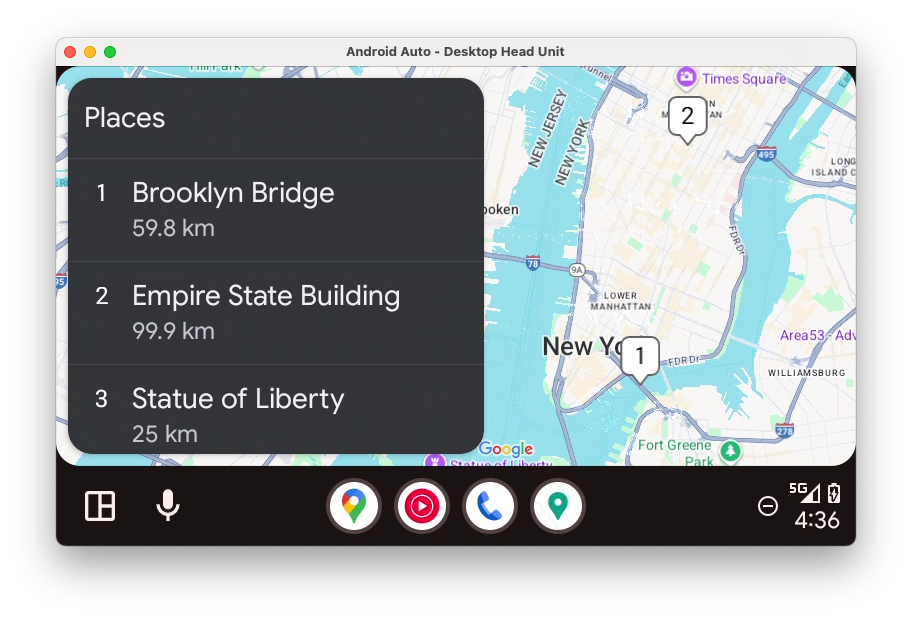
지도 렌더링은 필요한 Metadata를 제공하면 애플리케이션 호스트에서 처리됩니다.
세부정보 화면 추가
이제 세부정보 화면을 추가하여 사용자가 특정 위치에 관한 자세한 정보를 확인하고 선호하는 내비게이션 앱을 사용해 해당 위치로 이동하거나 다른 장소 목록으로 돌아갈 수 있도록 해 보겠습니다. 이 작업은 선택적 작업 버튼 옆에 최대 4행의 정보를 표시할 수 있는 PaneTemplate을 사용하면 됩니다.
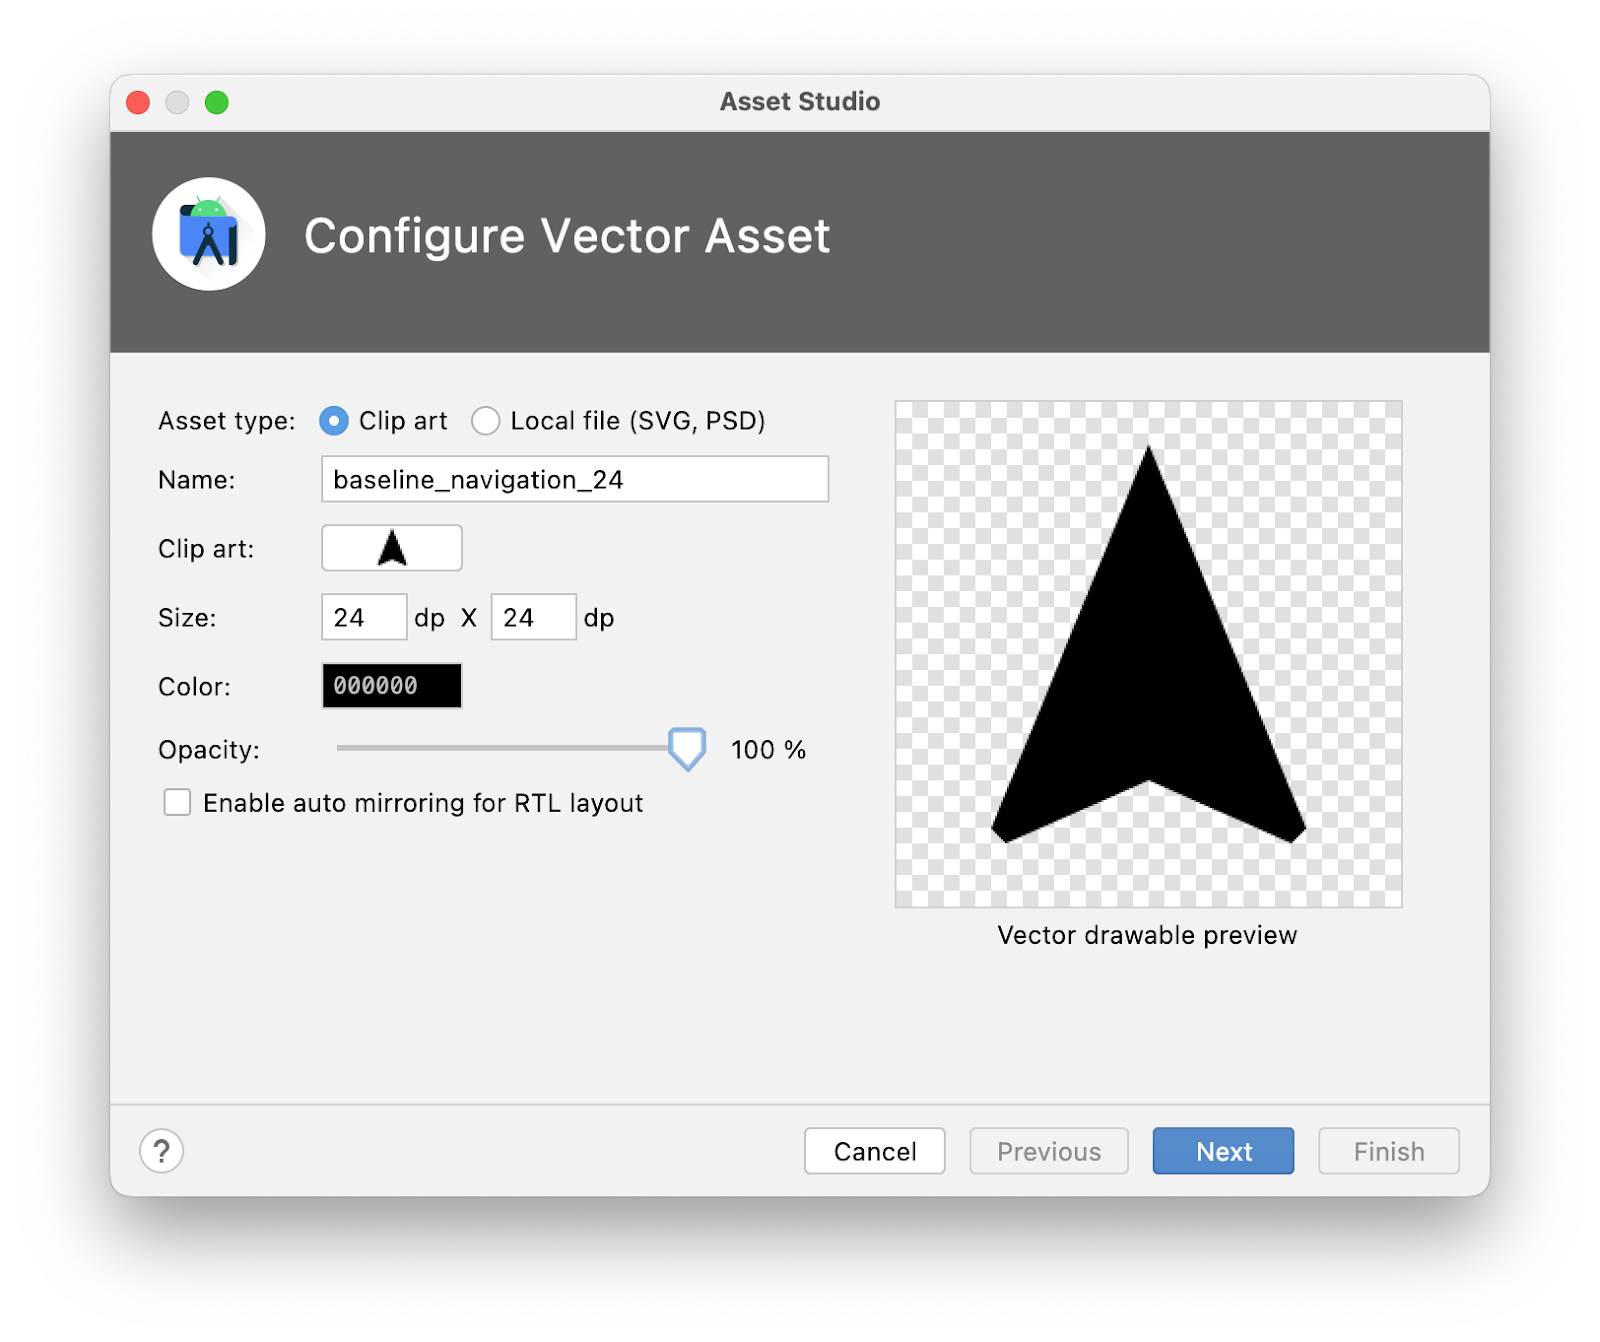
- 먼저
:common:car-app-service모듈의res디렉터리를 마우스 오른쪽 버튼으로 클릭하고 New > Vector Asset을 클릭한 후 다음 구성을 사용하여 탐색 아이콘을 만듭니다.
- Asset type:
Clip art - Clip art:
navigation - 이름:
baseline_navigation_24 - Size:
24dp x24dp - 색상:
#000000 - Opacity:
100%
- 그런 다음
screen패키지에서DetailScreen.kt라는 파일을 만들고(기존MainScreen.kt파일 옆에) 다음 코드를 추가합니다.
DetailScreen.kt
import android.graphics.Color
import androidx.car.app.CarContext
import androidx.car.app.Screen
import androidx.car.app.model.Action
import androidx.car.app.model.CarColor
import androidx.car.app.model.CarIcon
import androidx.car.app.model.Header
import androidx.car.app.model.MessageTemplate
import androidx.car.app.model.Pane
import androidx.car.app.model.PaneTemplate
import androidx.car.app.model.Row
import androidx.car.app.model.Template
import androidx.core.graphics.drawable.IconCompat
import com.example.android.cars.carappservice.R
import com.example.places.data.PlacesRepository
import com.example.places.data.model.toIntent
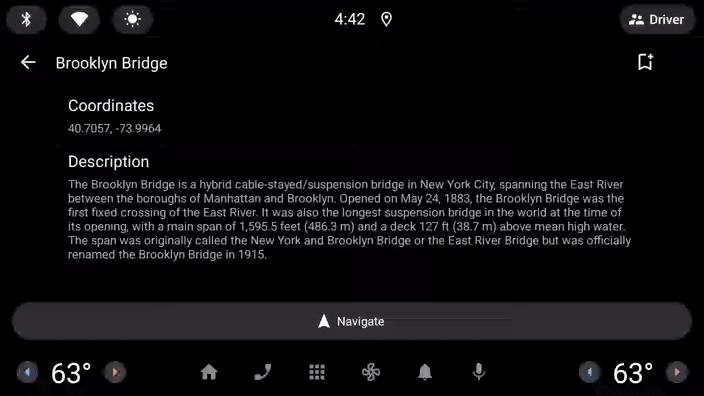
class DetailScreen(carContext: CarContext, private val placeId: Int) : Screen(carContext) {
private var isBookmarked = false
override fun onGetTemplate(): Template {
val place = PlacesRepository().getPlace(placeId)
?: return MessageTemplate.Builder("Place not found")
.setHeader(
Header.Builder()
.setStartHeaderAction(Action.BACK)
.build()
)
.build()
val navigateAction = Action.Builder()
.setTitle("Navigate")
.setIcon(
CarIcon.Builder(
IconCompat.createWithResource(
carContext,
R.drawable.baseline_navigation_24
)
).build()
)
// Only certain Intent actions are supported by `startCarApp`. Check its documentation
// for all of the details. To open another app that can handle navigating to a location
// you must use the CarContext.ACTION_NAVIGATE action and not Intent.ACTION_VIEW like
// you might on a phone.
.setOnClickListener { carContext.startCarApp(place.toIntent(CarContext.ACTION_NAVIGATE)) }
.build()
return PaneTemplate.Builder(
Pane.Builder()
.addAction(navigateAction)
.addRow(
Row.Builder()
.setTitle("Coordinates")
.addText("${place.latitude}, ${place.longitude}")
.build()
).addRow(
Row.Builder()
.setTitle("Description")
.addText(place.description)
.build()
).build()
).setHeader(
Header.Builder()
.setStartHeaderAction(Action.BACK)
.setTitle(place.name)
.build()
).build()
}
}
navigateAction이 빌드되는 방식에 특히 주의하세요. OnClickListener에서 startCarApp을 호출하는 것이 Android Auto 및 Android Automotive OS에서 다른 앱과 상호작용하는 데 가장 중요합니다.
화면 간 이동
이제 두 가지 유형의 화면이 있으므로 화면 간에 탐색을 추가해 보겠습니다. 자동차 앱 라이브러리의 탐색은 운전 중 완료하기에 적합한 간단한 작업 흐름에 이상적인 푸시 및 팝의 스택 모델을 사용합니다.

MainScreen의 목록 항목 중 하나에서 해당 항목의DetailScreen으로 이동하려면 다음 코드를 추가합니다.
MainScreen.kt
Row.Builder()
    ...
    .setOnClickListener { screenManager.push(DetailScreen(carContext, it.id)) }
    ...
DetailScreen에서 MainScreen으로 다시 이동하는 것은 이미 처리되었습니다. DetailScreen에 표시된 PaneTemplate을 빌드할 때 setHeaderAction(Action.BACK)이 호출되기 때문입니다. 헤더 작업을 사용자가 클릭하면 호스트는 스택에서 현재 화면을 삭제하는 작업을 처리하지만 이 동작은 원하는 경우 앱에서 재정의할 수 있습니다.
- 이제 앱을 실행하면
DetailScreen과 인앱 탐색이 작동합니다.
11. 화면의 콘텐츠 업데이트
개발자는 사용자가 화면과 상호작용하고 화면의 요소 상태를 변경할 수 있도록 하고 싶은 경우가 많습니다. 이렇게 하는 방법을 보여주기 위해 사용자가 DetailScreen에서 장소의 북마크를 추가하거나 삭제할 수 있는 기능을 빌드합니다.
- 먼저 상태를 보유하는 로컬 변수
isBookmarked을 추가합니다. 실제 앱에서는 데이터 레이어의 일부로 저장해야 하지만 예시용으로는 로컬 변수로도 충분합니다.
DetailScreen.kt
class DetailScreen(carContext: CarContext, private val placeId: Int) : Screen(carContext) {
    private var isBookmarked = false
    ...
}
- 이제
:common:car-app-service모듈의res디렉터리를 마우스 오른쪽 버튼으로 클릭하고 New > Vector Asset을 클릭한 후 다음 구성을 사용하여 북마크 아이콘 두 개를 만듭니다.
- Asset type:
Clip art - Name:
outline_bookmark_add_24,outline_bookmark_added_24 - Clip art:
bookmark,bookmark_added(Material Symbols Outlined 소스 세트) - Size:
24dp x24dp - 색상:
#000000 - Opacity:
100%
- 그런 다음
DetailsScreen.kt에서 북마크 기능의Action을 만듭니다.
DetailScreen.kt
val navigateAction = ...

val bookmarkAction = Action.Builder()
    .setIcon(
        CarIcon.Builder(
            IconCompat.createWithResource(
                carContext,
                if (isBookmarked) R.drawable.outline_bookmark_added_24 else R.drawable.outline_bookmark_add_24
            )
        ).build()
    )
    .setOnClickListener {
        isBookmarked = !isBookmarked
    }.build()

...
두 가지 사항에 유의해야 합니다.
CarIcon은 항목의 상태에 따라 색조가 조정됩니다.setOnClickListener는 사용자의 입력에 반응하여 북마크 상태를 전환하는 데 사용됩니다.
bookmarkAction을 실제로 사용하려면PaneTemplate.Builder에서addEndHeaderAction을 호출해야 합니다.
DetailScreen.kt
Header.Builder()
    ...
    .addEndHeaderAction(bookmarkAction)
    .build()
- 이제 앱을 실행하여 어떤 일이 일어나는지 확인합니다.
클릭은 수신되지만 아이콘은 변경되지 않습니다.
이는 자동차 앱 라이브러리에 새로고침이라는 개념이 있기 때문입니다. 운전자 주의 분산 행동을 제한하기 위해 화면의 콘텐츠를 새로고침하는 데는 특정 제한사항(표시되는 템플릿에 따라 다름)이 있고 각 새로고침은 Screen 클래스의 invalidate 메서드를 호출하여 자체 코드를 통해 명시적으로 요청해야 합니다. onGetTemplate에서 참조되는 일부 상태를 업데이트하는 것으로는 UI를 업데이트하기에 충분하지 않습니다.
- 이 문제를 수정하려면
bookmarkAction의OnClickListener를 다음과 같이 업데이트합니다.
DetailScreen.kt
.setOnClickListener {
    isBookmarked = !isBookmarked
    // Request that `onGetTemplate` be called again so that updates to the
    // screen's state can be picked up
    invalidate()
}
- 앱을 다시 실행하여 이제 클릭할 때 아이콘이 업데이트되는지 확인합니다.
이것으로 Android Auto 및 Android Automotive OS와 모두 잘 통합된 기본 앱을 완성했습니다.
12. 축하합니다
첫 번째 자동차 앱 라이브러리 앱을 성공적으로 빌드했습니다. 이제 배운 내용을 자체 앱에 적용해 보세요.
앞서 언급했듯이 현재 자동차 앱 라이브러리 앱을 사용하여 빌드된 특정 카테고리만 Play 스토어에 제출할 수 있습니다. 앱이 지원되는 카테고리 중 하나에 속한다면 지금 바로 빌드를 시작할 수 있습니다.
새 앱 카테고리가 매년 추가되고 있으므로 배운 내용을 바로 적용할 수 없더라도 나중에 다시 확인하면 그때는 앱을 자동차에 확장할 수도 있습니다.
시도해 볼 만한 작업
- OEM의 에뮬레이터를 설치하고 Android Automotive OS에서 자동차 앱 라이브러리 앱의 디자인과 분위기가 OEM 맞춤설정으로 어떻게 변하는지 확인합니다. 일부 OEM 에뮬레이터는 자동차 앱 라이브러리 앱을 지원하지 않습니다.
- 다양한 DHU 구성과 Android Automotive OS 에뮬레이터 하드웨어 프로필을 사용하여 호스트 앱이 다양한 디스플레이 크기에 맞게 앱을 조정하는 방식을 확인합니다.
- 자동차 앱 라이브러리의 전체 기능을 보여주는 Showcase 샘플 애플리케이션을 확인합니다.
추가 자료
- 자동차용 Android 앱 라이브러리 사용에서는 이 Codelab의 내용뿐 아니라 더 많은 내용을 다룹니다.
- 자동차용 Android 앱 라이브러리 디자인 가이드라인에서는 앱을 빌드할 때 따라야 할 모든 다양한 템플릿과 권장사항을 자세히 설명합니다.
- 자동차용 Android 앱 품질 페이지에서는 우수한 사용자 경험을 제공하고 Play 스토어 검토를 통과하기 위해 앱이 충족해야 하는 기준을 설명합니다.