
시계의 알림은 스마트폰의 알림과 동일한 API를 사용하고 구조도 동일합니다.
알림은 다음 두 가지 방법으로 시계에 표시할 수 있습니다.
- 모바일 앱에서 알림을 만들고 시스템은 이 알림을 시계에 자동으로 브리징합니다.
- 웨어러블 앱에서 알림을 만듭니다.
두 시나리오에서 모두 NotificationCompat.Builder 클래스를 사용하여 알림을 만듭니다. 빌더 클래스로 알림을 빌드하면 시스템에서는 알림을 올바르게 표시합니다. 예를 들어 모바일 앱에서 알림을 실행하면 각 알림은 알림 스트림에 카드로 표시됩니다.
다음 예를 검토하여 알림이 표시되는 방식을 확인하세요.
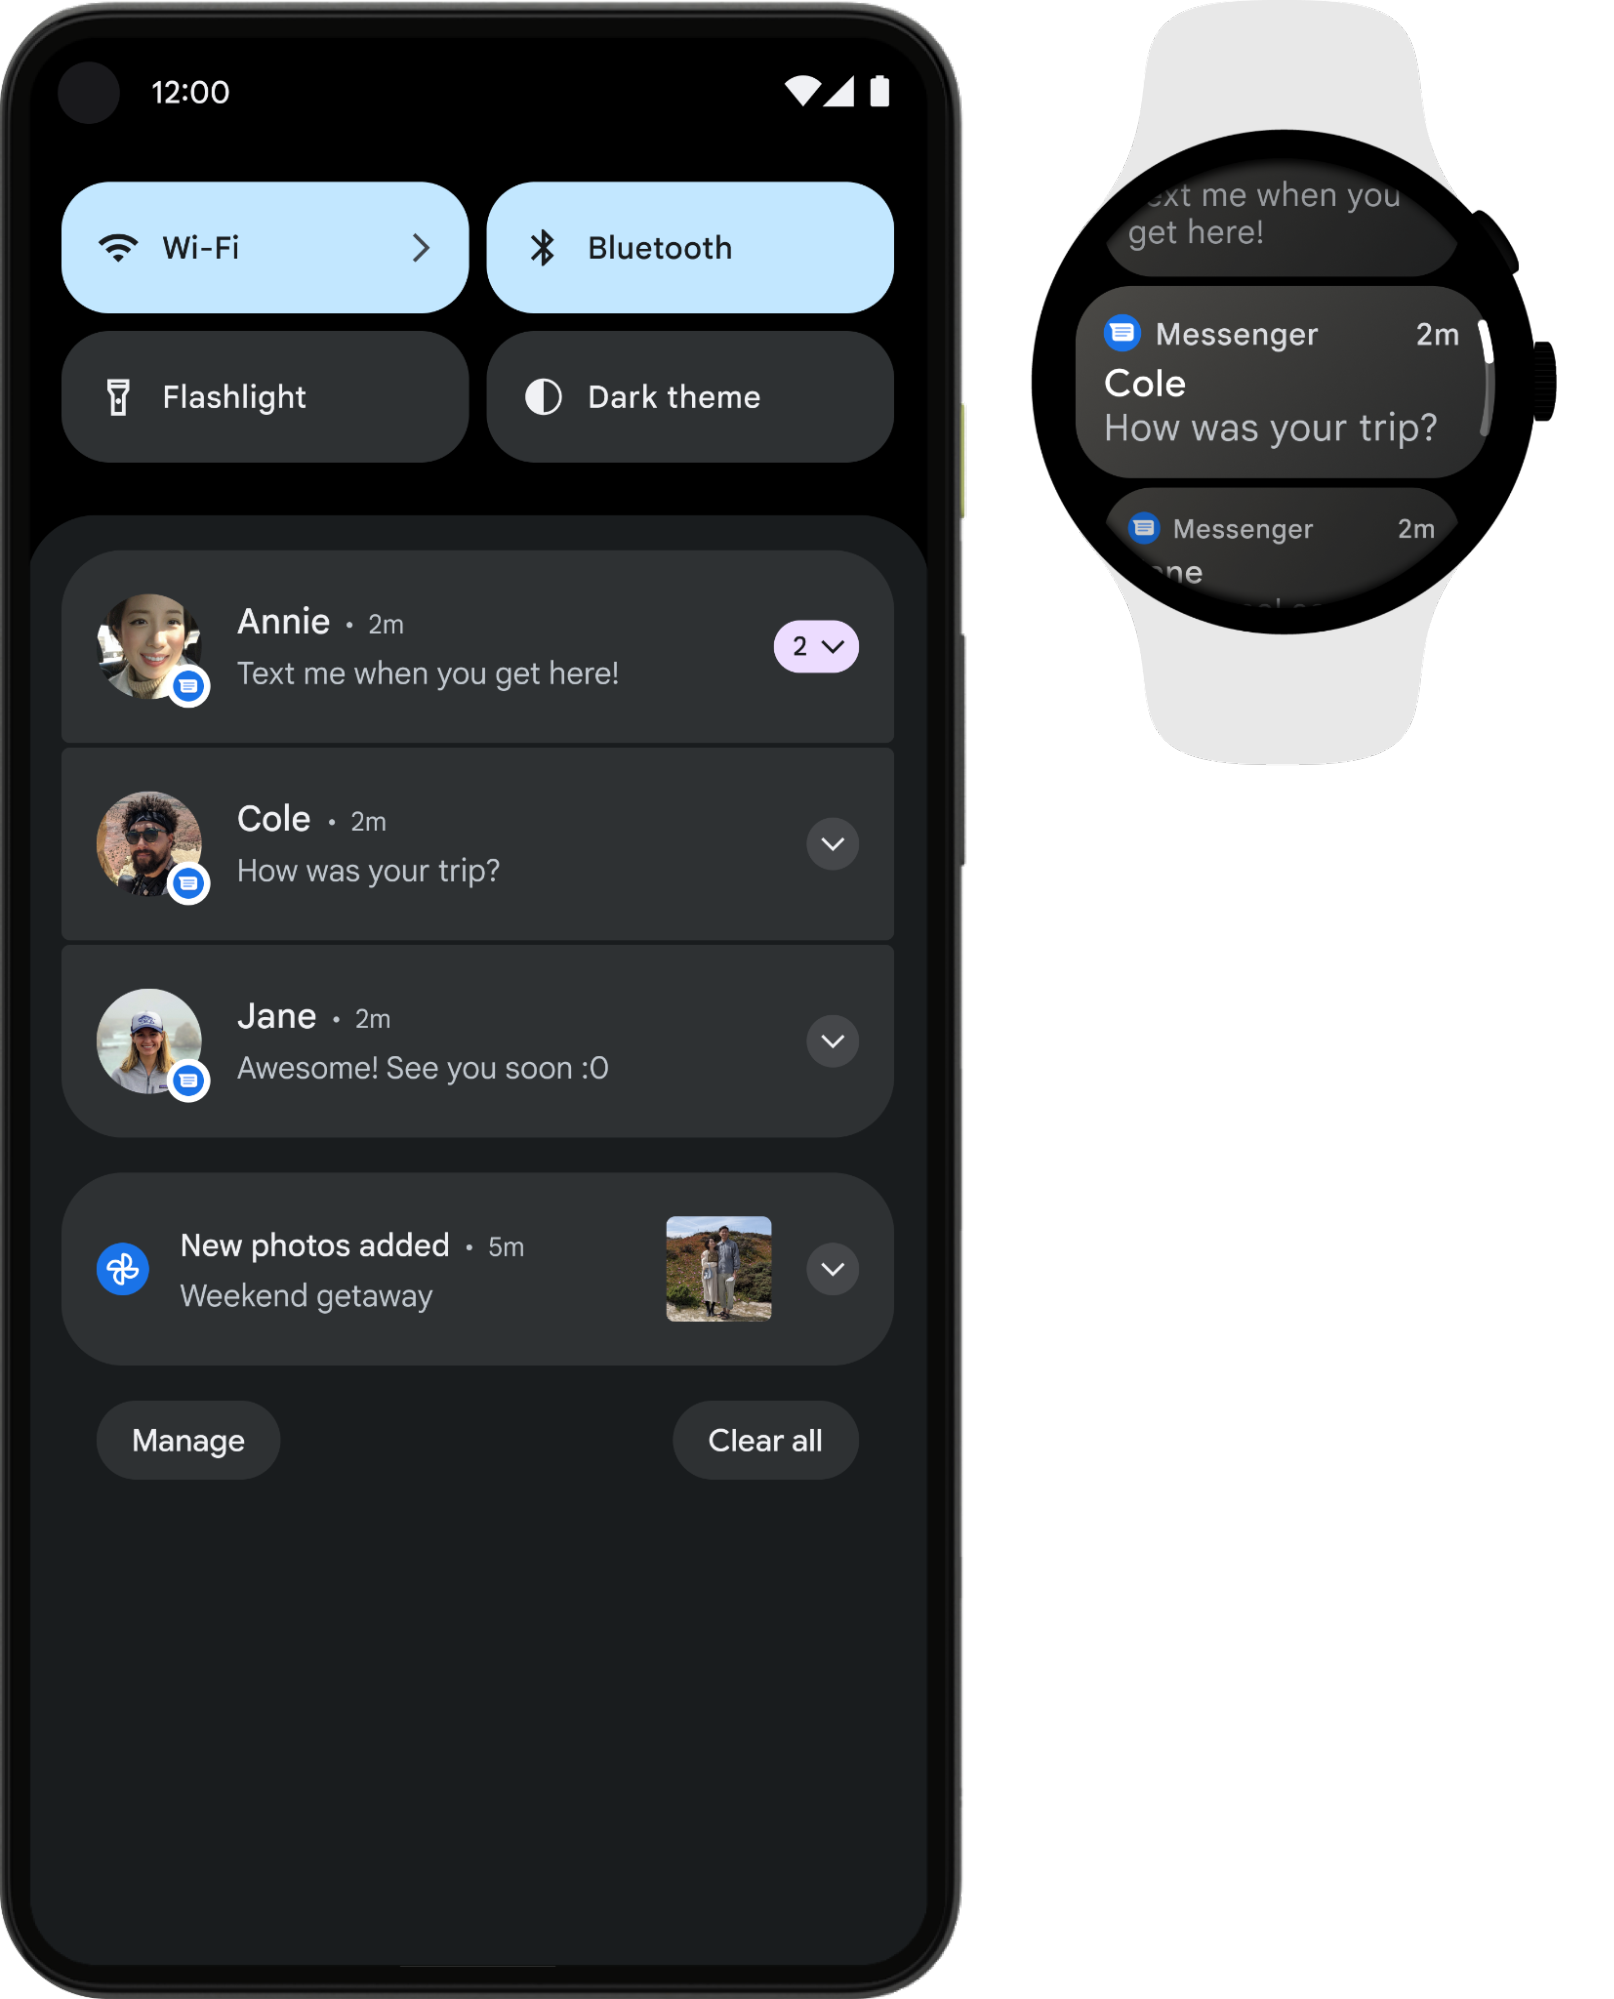
그림 1. 스마트폰과 시계에 표시된 동일한 알림
최상의 결과를 얻으려면 NotificationCompat.Style 서브클래스 중 하나를 사용하세요.
참고: RemoteViews를 사용하면 맞춤 레이아웃의 알림이 제거되며 웨어러블에는 텍스트와 아이콘만 표시됩니다.
웨어러블 기기를 위한 권장 알림
확장형 알림을 모든 알림의 시작점으로 사용하세요. 웨어러블 사용자의 참여를 유도하는 좋은 방법입니다. 축소된 상태는 한눈에 빠르게 파악할 수 있도록 알림 트레이에 표시됩니다. 사용자가 알림을 탭하면 알림이 확장되어 추가 콘텐츠 및 작업이 있는 몰입도 높고 스크롤 가능한 환경이 표시됩니다.
NotificationCompat.Style 서브클래스를 사용하여 휴대기기에서와 동일한 방식으로 확장 가능한 알림을 만들 수 있습니다. 예를 들어 NotificationCompat.MessagingStyle을 사용하는 표준 알림은 다음과 같습니다.
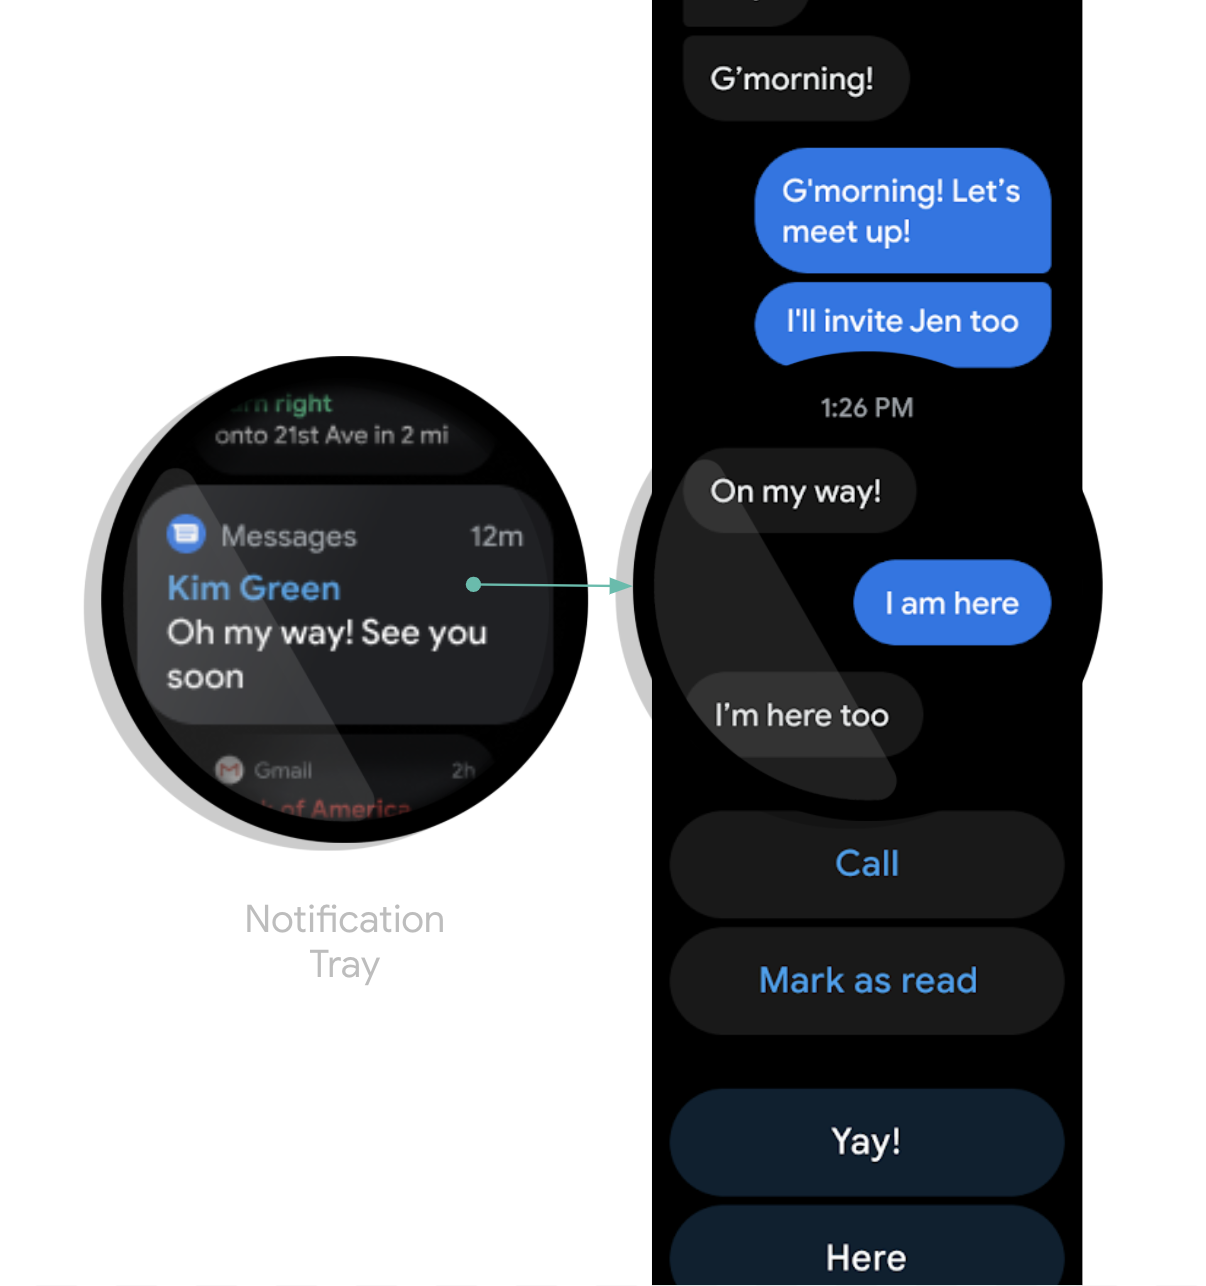
그림 2. Wear OS에서 MessagingStyle 알림의 예
알림의 확장된 상태 하단에 여러 작업이 스택되어 있는 것을 확인할 수 있습니다.
도움말: 알림에 '답장' 작업이 포함된 경우(예: 메시지 앱) 알림의 동작을 개선할 수 있습니다. 예를 들어 setChoices()를 사용하여 웨어러블 또는 사전 정의된 텍스트 응답에서 직접 음성 입력 답장을 사용 설정할 수 있습니다.
자세한 내용은 답장 버튼 추가를 참고하세요.
중복 알림 피하기
기본적으로 알림은 연결된 스마트폰 앱에서 페어링된 시계로 브리징됩니다. 이는 웨어러블 앱을 설치하지 않은 경우에 유용합니다.
그러나 독립형 시계 앱과 연결된 스마트폰 앱을 빌드하는 경우 이 두 앱이 중복 알림을 만듭니다.
Wear OS는 Bridging API를 통해 중복 알림을 중지하는 방법을 제공합니다. 이는 Wear OS 5 이상을 실행하는 기기의 앱에 특히 중요합니다. 휴대기기에서 닫을 수 있는 일부 알림은 Wear OS 기기에서 닫을 수 없기 때문입니다. 자세한 내용은 알림 브리징 옵션을 참고하세요.
알림에 웨어러블 관련 기능 추가
알림에 웨어러블 관련 기능을 추가해야 하는 경우
NotificationCompat.WearableExtender 클래스를 사용하여 옵션을 지정할 수 있습니다.
이 API를 사용하는 방법은 다음과 같습니다.
참고:
프레임워크의 NotificationManager를 사용하는 경우
NotificationCompat.WearableExtender의 일부 기능이 작동하지 않으므로
NotificationCompat를 사용해야 합니다.
이 예시에서는 알림에 Wear 전용 작업을 설정하고
종료 ID도 설정하는 방법을 보여줍니다. 알림이 닫히면 동일한 닫기 ID가 있는 다른 모든 알림도 시계 및 연결된 스마트폰에서 닫힙니다. 닫기 ID를 검색하려면
getDismissalId()를 사용하세요.
// This intent will be fired as a result of the user clicking the "Open on watch" action. // However, it executes on the phone, not on the watch. Typically, the Activity should then use // RemoteActivityHelper to then launch the correct activity on the watch. val intent = Intent(context, LaunchOnWearActivity::class.java) val wearPendingIntent = PendingIntent.getActivity( context, wearRequestCode, intent, PendingIntent.FLAG_UPDATE_CURRENT or PendingIntent.FLAG_IMMUTABLE ) val openOnWatchAction = NotificationCompat.Action.Builder( R.drawable.watch, "Open on watch", wearPendingIntent ) .build() val wearableExtender = NotificationCompat.WearableExtender() // This action will only be shown on the watch, not on the phone. // Actions added to the Notification builder directly will not be shown on the watch, // because one or more actions are defined in the WearableExtender. .addAction(openOnWatchAction) // This synchronizes dismissals between watch and phone. .setDismissalId(chatId) val notification = NotificationCompat.Builder(context, channelId) // ... set other fields ... .extend(wearableExtender) .build()
웨어러블 기기에서 전화 앱 실행
브리지 알림을 사용하는 경우 모든 알림에는 휴대전화에서 앱을 실행하는 버튼이 자동으로 포함됩니다. 하지만 시계에서 생성된 로컬 알림을 사용하는 경우 다음 단계에 따라 휴대전화에서 앱을 실행하는 버튼을 만드세요.
ConfirmationActivity를 확장하는 새Activity를 만듭니다.- 새
Activity에서RemoteActivityHelper을 사용하여 전화 앱을 실행합니다. - 알림에서
Activity을 실행하는Intent을 빌드할 때EXTRA_ANIMATION_TYPE추가를OPEN_ON_PHONE_ANIMATION로 설정합니다.
참고: BroadcastReceiver를 알림 작업의 타겟으로 사용할 수 없습니다.