
Pour montrer à un nouvel utilisateur comment tirer le meilleur parti de votre application, présentez-lui des informations d'intégration au démarrage de l'application. Voici quelques exemples d'informations d'intégration :
- Présentez des informations détaillées sur les chaînes disponibles lorsqu'un utilisateur accède pour la première fois à une application de chaîne.
- Mettez en avant les fonctionnalités remarquables de votre application.
- Illustrez toutes les étapes requises ou recommandées que les utilisateurs doivent suivre lorsqu'ils utilisent l'application pour la première fois.
La bibliothèque androidx.leanback fournit la classe OnboardingSupportFragment pour présenter les informations aux nouveaux utilisateurs. Ce guide explique comment utiliser la classe OnboardingSupportFragment pour présenter des informations d'introduction qui s'affichent lorsque l'application est lancée pour la première fois.
OnboardingSupportFragment utilise les bonnes pratiques de l'UI TV pour présenter les informations d'une manière qui correspond aux styles de l'UI TV et qui est facile à parcourir sur les appareils TV.
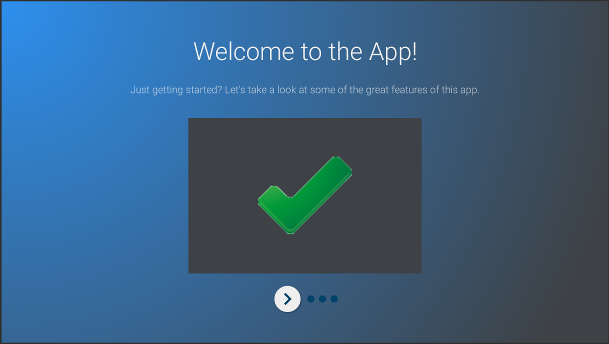
Figure 1 : Exemple : OnboardingSupportFragment.
OnboardingSupportFragment ne convient pas à tous les cas d'utilisation.
N'utilisez pas OnboardingSupportFragment lorsque vous devez inclure des éléments d'interface utilisateur qui nécessitent une saisie de l'utilisateur, tels que des boutons et des champs.
N'utilisez pas non plus OnboardingSupportFragment pour les tâches que l'utilisateur effectuera régulièrement. Enfin, si vous devez présenter une UI multipage qui nécessite une saisie de l'utilisateur, envisagez d'utiliser un GuidedStepSupportFragment.
Ajouter un OnboardingSupportFragment
Pour ajouter un OnboardingSupportFragment à votre application, implémentez une classe qui étend la classe OnboardingSupportFragment. Ajoutez ce fragment à une activité, soit en utilisant le code XML de mise en page de l'activité, soit de manière programmatique. Assurez-vous que l'activité ou le fragment utilise un thème dérivé de Theme_Leanback_Onboarding, comme décrit dans la section Personnaliser les thèmes.
Dans la méthode onCreate() de l'activité principale de votre application, appelez startActivity() avec un Intent qui pointe vers l'activité parente de votre OnboardingSupportFragment.
Cela permet de s'assurer que votre OnboardingSupportFragment s'affiche dès le démarrage de votre application.
Pour vous assurer que OnboardingSupportFragment ne s'affiche que la première fois que l'utilisateur démarre votre application, utilisez un objet SharedPreferences pour savoir si l'utilisateur a déjà vu OnboardingSupportFragment. Définissez une valeur booléenne qui passe à "true" lorsque l'utilisateur a terminé de regarder le OnboardingSupportFragment. Vérifiez cette valeur dans la méthode onCreate() de votre activité principale et ne démarrez l'activité parente OnboardingSupportFragment que si la valeur est "false".
L'exemple suivant montre un remplacement de onCreate() qui recherche une valeur SharedPreferences et, si elle n'est pas définie sur "true", appelle startActivity() pour afficher OnboardingSupportFragment :
Kotlin
override fun onCreate(savedInstanceState: Bundle?) {
    super.onCreate(savedInstanceState)
    setContentView(R.layout.activity_main)
    PreferenceManager.getDefaultSharedPreferences(this).apply {
        // Check if we need to display our OnboardingSupportFragment
        if (!getBoolean(MyOnboardingSupportFragment.COMPLETED_ONBOARDING_PREF_NAME, false)) {
            // The user hasn't seen the OnboardingSupportFragment yet, so show it
            startActivity(Intent(this@OnboardingActivity, OnboardingActivity::class.java))
        }
    }
}
Java
@Override
protected void onCreate(Bundle savedInstanceState) {
    super.onCreate(savedInstanceState);
    setContentView(R.layout.activity_main);
    SharedPreferences sharedPreferences =
            PreferenceManager.getDefaultSharedPreferences(this);
    // Check if we need to display our OnboardingSupportFragment
    if (!sharedPreferences.getBoolean(
            MyOnboardingSupportFragment.COMPLETED_ONBOARDING_PREF_NAME, false)) {
        // The user hasn't seen the OnboardingSupportFragment yet, so show it
        startActivity(new Intent(this, OnboardingActivity.class));
    }
}
Une fois que l'utilisateur a consulté le OnboardingSupportFragment, marquez-le comme consulté à l'aide de l'objet SharedPreferences. Pour ce faire, remplacez onFinishFragment() dans votre OnboardingSupportFragment et définissez la valeur de votre SharedPreferences sur "true", comme illustré dans l'exemple suivant :
Kotlin
override fun onFinishFragment() {
    super.onFinishFragment()
    // User has seen OnboardingSupportFragment, so mark our SharedPreferences
    // flag as completed so that we don't show our OnboardingSupportFragment
    // the next time the user launches the app
    PreferenceManager.getDefaultSharedPreferences(context).edit().apply {
        putBoolean(COMPLETED_ONBOARDING_PREF_NAME, true)
        apply()
    }
}
Java
@Override
protected void onFinishFragment() {
    super.onFinishFragment();
    // User has seen OnboardingSupportFragment, so mark our SharedPreferences
    // flag as completed so that we don't show our OnboardingSupportFragment
    // the next time the user launches the app
    SharedPreferences.Editor sharedPreferencesEditor =
            PreferenceManager.getDefaultSharedPreferences(getContext()).edit();
    sharedPreferencesEditor.putBoolean(
            COMPLETED_ONBOARDING_PREF_NAME, true);
    sharedPreferencesEditor.apply();
}
Ajouter des pages OnboardingSupportFragment
Un OnboardingSupportFragment affiche le contenu dans une série de pages ordonnées. Après avoir ajouté votre OnboardingSupportFragment, vous devez définir les pages d'intégration. Chaque page peut avoir un titre, une description et plusieurs sous-vues pouvant contenir des images ou des animations.
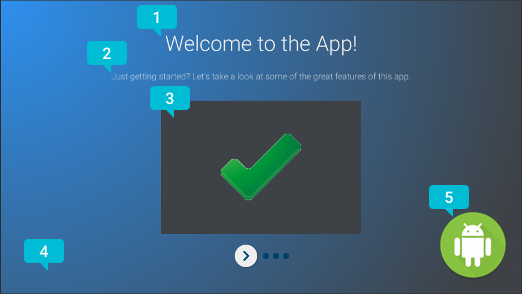
Figure 2. OnboardingSupportFragment
éléments de page.
La figure 2 montre un exemple de page avec des annotations marquant les éléments personnalisables que votre OnboardingSupportFragment peut fournir. Les éléments de la page sont les suivants :
- Titre de la page.
- Description de la page.
- La vue du contenu de la page, dans ce cas une simple coche verte dans une boîte grise. Cette vue est facultative. Utilisez cette vue pour illustrer les détails de la page. Par exemple, vous pouvez inclure une capture d'écran qui met en évidence la fonctionnalité de l'application décrite sur la page.
- Vue de l'arrière-plan de la page, dans ce cas un simple dégradé bleu. Cette vue s'affiche toujours derrière les autres vues de la page. Cette vue est facultative.
- Vue de premier plan de la page, ici un logo. Cette vue s'affiche toujours devant toutes les autres vues de la page. Cette vue est facultative.
Initialisez les informations de la page lorsque votre OnboardingSupportFragment est créé ou associé à l'activité parente pour la première fois, car le système demande les informations de la page lorsqu'il crée la vue du fragment. Vous pouvez initialiser les informations sur la page dans le constructeur de votre classe ou dans un remplacement de onAttach().
Remplacez chacune des méthodes suivantes, qui fournissent des informations sur la page au système :
getPageCount()renvoie le nombre de pages de votreOnboardingSupportFragment.getPageTitle()renvoie le titre du numéro de page demandé.getPageDescription()renvoie la description du numéro de page demandé.
Remplacez chacune des méthodes suivantes pour fournir des sous-vues facultatives permettant d'afficher des images ou des animations :
onCreateBackgroundView()renvoie unViewque vous créez pour servir de vue d'arrière-plan ou la valeur "null" si aucune vue d'arrière-plan n'est nécessaire.onCreateContentView()renvoie unViewque vous créez pour servir de vue de contenu ou null si aucune vue de contenu n'est nécessaire.onCreateForegroundView()renvoie unViewque vous créez pour servir de vue de premier plan ou la valeur "null" si aucune vue de premier plan n'est nécessaire.
Le système ajoute le View que vous créez à la mise en page. L'exemple suivant remplace onCreateContentView() et renvoie un ImageView :
Kotlin
private lateinit var contentView: ImageView
...
override fun onCreateContentView(inflater: LayoutInflater?, container: ViewGroup?): View? {
    return ImageView(context).apply {
        scaleType = ImageView.ScaleType.CENTER_INSIDE
        setImageResource(R.drawable.onboarding_content_view)
        setPadding(0, 32, 0, 32)
        contentView = this
    }
}
Java
private ImageView contentView;
...
@Override
protected View onCreateContentView(LayoutInflater inflater, ViewGroup container) {
    contentView = new ImageView(getContext());
    contentView.setScaleType(ImageView.ScaleType.CENTER_INSIDE);
    contentView.setImageResource(R.drawable.onboarding_content_view);
    contentView.setPadding(0, 32, 0, 32);
    return contentView;
}
Ajouter un écran de logo initial
Votre OnboardingSupportFragment peut commencer par un écran de logo facultatif qui présente votre application. Si vous souhaitez afficher un Drawable comme écran de logo, appelez setLogoResourceId() avec l'ID de votre Drawable dans la méthode onCreate() de votre OnboardingSupportFragment.
Le système affiche brièvement le Drawable, puis le fait disparaître avant d'afficher la première page de votre OnboardingSupportFragment.Drawable
Si vous souhaitez fournir une animation personnalisée pour l'écran de votre logo, au lieu d'appeler setLogoResourceId(), remplacez onCreateLogoAnimation() et renvoyez un objet Animator qui affiche votre animation personnalisée, comme illustré dans l'exemple suivant :
Kotlin
public override fun onCreateLogoAnimation(): Animator =
        AnimatorInflater.loadAnimator(context, R.animator.onboarding_logo_screen_animation)
Java
@Override
public Animator onCreateLogoAnimation() {
    return AnimatorInflater.loadAnimator(getContext(),
            R.animator.onboarding_logo_screen_animation);
}
Personnaliser les animations de page
Le système utilise des animations par défaut lorsqu'il affiche la première page de votre OnboardingSupportFragment et lorsque l'utilisateur accède à une autre page. Vous pouvez personnaliser ces animations en remplaçant les méthodes dans votre OnboardingSupportFragment.
Pour personnaliser l'animation qui s'affiche sur votre première page, remplacez onCreateEnterAnimation() et renvoyez un Animator.
L'exemple suivant crée un Animator qui met à l'échelle la vue du contenu horizontalement :
Kotlin
override fun onCreateEnterAnimation(): Animator =
    ObjectAnimator.ofFloat(contentView, View.SCALE_X, 0.2f, 1.0f)
            .setDuration(ANIMATION_DURATION)
Java
@Override
protected Animator onCreateEnterAnimation() {
    Animator startAnimator = ObjectAnimator.ofFloat(contentView,
            View.SCALE_X, 0.2f, 1.0f).setDuration(ANIMATION_DURATION);
    return startAnimator;
}
Pour personnaliser l'animation utilisée lorsque l'utilisateur accède à une autre page, remplacez onPageChanged().
Dans votre méthode onPageChanged(), créez des objets Animator qui suppriment la page précédente et affichent la page suivante, ajoutez-les à un AnimatorSet et lancez l'ensemble. L'exemple suivant utilise une animation de fondu sortant pour supprimer la page précédente, met à jour l'image de la vue de contenu et utilise une animation de fondu entrant pour afficher la page suivante :
Kotlin
override fun onPageChanged(newPage: Int, previousPage: Int) {
    // Create a fade-out animation for previousPage and, once
    // done, swap the contentView image with the next page's image
    val fadeOut = ObjectAnimator.ofFloat(mContentView, View.ALPHA, 1.0f, 0.0f)
            .setDuration(ANIMATION_DURATION)
            .apply {
                addListener(object : AnimatorListenerAdapter() {

                    override fun onAnimationEnd(animation: Animator) {
                        mContentView.setImageResource(pageImages[newPage])
                    }
                })
            }
    // Create a fade-in animation for nextPage
    val fadeIn = ObjectAnimator.ofFloat(mContentView, View.ALPHA, 0.0f, 1.0f)
            .setDuration(ANIMATION_DURATION)
    // Create AnimatorSet with fade-out and fade-in animators and start it
    AnimatorSet().apply {
        playSequentially(fadeOut, fadeIn)
        start()
    }
}
Java
@Override
protected void onPageChanged(final int newPage, int previousPage) {
    // Create a fade-out animation for previousPage and, once
    // done, swap the contentView image with the next page's image
    Animator fadeOut = ObjectAnimator.ofFloat(mContentView,
            View.ALPHA, 1.0f, 0.0f).setDuration(ANIMATION_DURATION);
    fadeOut.addListener(new AnimatorListenerAdapter() {
        @Override
        public void onAnimationEnd(Animator animation) {
            mContentView.setImageResource(pageImages[newPage]);
        }
    });
    // Create a fade-in animation for nextPage
    Animator fadeIn = ObjectAnimator.ofFloat(mContentView,
            View.ALPHA, 0.0f, 1.0f).setDuration(ANIMATION_DURATION);
    // Create AnimatorSet with fade-out and fade-in animators and start it
    AnimatorSet set = new AnimatorSet();
    set.playSequentially(fadeOut, fadeIn);
    set.start();
}
Pour en savoir plus sur la création d'objets Animator et AnimatorSet, consultez
Présentation de l'animation de propriétés.
Personnaliser les thèmes
Toute implémentation de OnboardingSupportFragment doit utiliser le thème Theme_Leanback_Onboarding ou un thème qui hérite de Theme_Leanback_Onboarding. Définissez le thème de votre OnboardingSupportFragment en effectuant l'une des opérations suivantes :
- Définissez l'activité parente de
OnboardingSupportFragmentpour utiliser le thème souhaité. L'exemple suivant montre comment définir une activité pour qu'elle utiliseTheme_Leanback_Onboardingdans le fichier manifeste de l'application :<activity android:name=".OnboardingActivity" android:enabled="true" android:exported="true" android:theme="@style/Theme.Leanback.Onboarding"> </activity>
-
Définissez le thème dans l'activité parente à l'aide de l'attribut
LeanbackOnboardingTheme_onboardingThemedans un thème d'activité personnalisé. Pointez cet attribut vers un autre thème personnalisé que seuls les objetsOnboardingSupportFragmentde votre activité utilisent. Utilisez cette approche si votre activité utilise déjà un thème personnalisé et que vous ne souhaitez pas appliquer de stylesOnboardingSupportFragmentà d'autres vues de l'activité. - Remplacez
onProvideTheme()et renvoyez le thème souhaité. Utilisez cette approche si plusieurs activités utilisent votreOnboardingSupportFragmentou si l'activité parente ne peut pas utiliser le thème souhaité. L'exemple suivant remplaceonProvideTheme()et renvoieTheme_Leanback_Onboarding:Kotlin
override fun onProvideTheme(): Int = R.style.Theme_Leanback_Onboarding
Java
@Override
public int onProvideTheme() {
   return R.style.Theme_Leanback_Onboarding;
}