
如要向初次使用者說明如何充分運用應用程式,請在應用程式啟動時顯示新手上路資訊。以下列舉一些新手指引資訊:
- 在使用者首次存取頻道應用程式時,顯示可用的頻道詳細資訊。
- 吸引使用者注意應用程式的特色功能。
- 說明使用者首次使用應用程式時,必須或建議執行的步驟。
androidx.leanback 程式庫提供 OnboardingSupportFragment 類別,用於顯示首次使用者資訊。本指南說明如何使用 OnboardingSupportFragment 類別,在應用程式首次啟動時顯示簡介資訊。
OnboardingSupportFragment 會採用電視使用者介面最佳做法呈現資訊,符合電視使用者介面樣式,且方便在電視裝置上瀏覽。
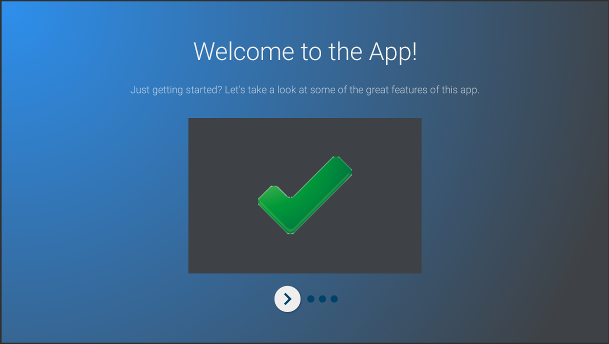
圖 1. 範例
OnboardingSupportFragment。
OnboardingSupportFragment 不適合所有用途。
如需加入需要使用者輸入內容的 UI 元素 (例如按鈕和欄位),請勿使用 OnboardingSupportFragment。此外,請勿對使用者會定期執行的工作使用 OnboardingSupportFragment。最後,如需呈現需要使用者輸入內容的多頁面 UI,建議使用 GuidedStepSupportFragment。
新增 OnboardingSupportFragment
如要在應用程式中新增 OnboardingSupportFragment,請實作擴充 OnboardingSupportFragment 類別的類別。使用活動的版面配置 XML 或以程式輔助方式,將這個片段新增至活動。請確認活動或片段使用衍生自 Theme_Leanback_Onboarding 的主題,如「自訂主題」一節所述。
在應用程式主要活動的 onCreate() 方法中,呼叫 startActivity(),並使用指向 OnboardingSupportFragment 父項活動的 Intent。這有助於確保應用程式啟動時會立即顯示 OnboardingSupportFragment。
如要確保 OnboardingSupportFragment 只會在使用者首次啟動應用程式時顯示,請使用 SharedPreferences 物件追蹤使用者是否已看過 OnboardingSupportFragment。定義布林值,使用者看完 OnboardingSupportFragment 時,該值會變更為 true。在主要活動的 onCreate() 方法中檢查這個值,且只有在值為 false 時,才啟動 OnboardingSupportFragment 父項活動。
以下範例顯示 onCreate() 的覆寫,會檢查 SharedPreferences 值,如果未設為 true,則呼叫 startActivity() 來顯示 OnboardingSupportFragment:
Kotlin
override fun onCreate(savedInstanceState: Bundle?) {
    super.onCreate(savedInstanceState)
    setContentView(R.layout.activity_main)
    PreferenceManager.getDefaultSharedPreferences(this).apply {
        // Check if we need to display our OnboardingSupportFragment
        if (!getBoolean(MyOnboardingSupportFragment.COMPLETED_ONBOARDING_PREF_NAME, false)) {
            // The user hasn't seen the OnboardingSupportFragment yet, so show it
            startActivity(Intent(this@OnboardingActivity, OnboardingActivity::class.java))
        }
    }
}
Java
@Override
protected void onCreate(Bundle savedInstanceState) {
    super.onCreate(savedInstanceState);
    setContentView(R.layout.activity_main);
    SharedPreferences sharedPreferences =
            PreferenceManager.getDefaultSharedPreferences(this);
    // Check if we need to display our OnboardingSupportFragment
    if (!sharedPreferences.getBoolean(
            MyOnboardingSupportFragment.COMPLETED_ONBOARDING_PREF_NAME, false)) {
        // The user hasn't seen the OnboardingSupportFragment yet, so show it
        startActivity(new Intent(this, OnboardingActivity.class));
    }
}
使用者查看 OnboardingSupportFragment 後,請使用 SharedPreferences 物件將其標示為已查看。如要執行這項操作,請在 OnboardingSupportFragment 中覆寫 onFinishFragment(),並將 SharedPreferences 值設為 true,如下列範例所示:
Kotlin
override fun onFinishFragment() {
    super.onFinishFragment()
    // User has seen OnboardingSupportFragment, so mark our SharedPreferences
    // flag as completed so that we don't show our OnboardingSupportFragment
    // the next time the user launches the app
    PreferenceManager.getDefaultSharedPreferences(context).edit().apply {
        putBoolean(COMPLETED_ONBOARDING_PREF_NAME, true)
        apply()
    }
}
Java
@Override
protected void onFinishFragment() {
    super.onFinishFragment();
    // User has seen OnboardingSupportFragment, so mark our SharedPreferences
    // flag as completed so that we don't show our OnboardingSupportFragment
    // the next time the user launches the app
    SharedPreferences.Editor sharedPreferencesEditor =
            PreferenceManager.getDefaultSharedPreferences(getContext()).edit();
    sharedPreferencesEditor.putBoolean(
            COMPLETED_ONBOARDING_PREF_NAME, true);
    sharedPreferencesEditor.apply();
}
新增 OnboardingSupportFragment 頁面
OnboardingSupportFragment 會在一系列排序的頁面中顯示內容。新增 OnboardingSupportFragment 後,您需要定義新手上路頁面。每個頁面都可以有標題、說明和多個可包含圖片或動畫的子檢視區塊。
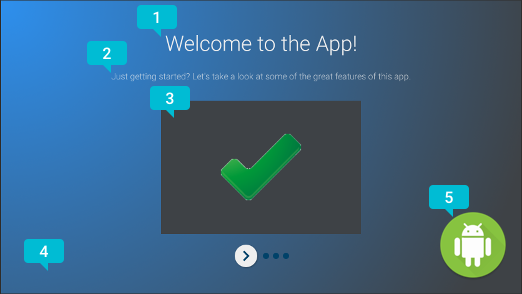
圖 2. OnboardingSupportFragment
網頁元素。
圖 2 顯示範例頁面,並以註解標示可自訂的頁面元素,供OnboardingSupportFragment
提供。頁面元素如下:
- 網頁標題。
- 頁面說明。
- 頁面內容檢視畫面,在本例中為灰色方塊中的簡單綠色勾號。 這個檢視畫面是選用的。這個檢視畫面可用於說明頁面詳細資料。舉例來說,您可以加入螢幕截圖,醒目顯示頁面說明的應用程式功能。
- 頁面背景檢視畫面,在本例中是簡單的藍色漸層。這個檢視區塊一律會顯示在網頁上其他檢視區塊的後方。這個檢視畫面為選用。
- 頁面的前景檢視畫面,在本例中為標誌。這個檢視畫面一律會顯示在網頁上所有其他檢視畫面前方。這個檢視畫面為選用。
首次建立 OnboardingSupportFragment 或附加至父項活動時,請初始化頁面資訊,因為系統會在建立片段的檢視區塊時要求頁面資訊。您可以在類別建構函式或 onAttach() 的覆寫中,初始化頁面資訊。
覆寫下列每個方法,向系統提供網頁資訊:
getPageCount()會傳回OnboardingSupportFragment中的頁數。getPageTitle()會傳回所要求頁碼的標題。getPageDescription()會傳回所要求頁碼的說明。
覆寫下列每個方法,提供要顯示圖片或動畫的選用子檢視區塊:
onCreateBackgroundView()會傳回您建立的View做為背景檢視區塊,如果不需要背景檢視區塊,則傳回空值。onCreateContentView()會傳回您建立的View,做為內容檢視區塊,或在不需要內容檢視區塊時傳回空值。onCreateForegroundView()傳回您建立的View,做為前景檢視區塊,或傳回 null (如不需要前景檢視區塊)。
系統會將您建立的 View 新增至頁面版面配置。以下範例會覆寫 onCreateContentView() 並傳回 ImageView:
Kotlin
private lateinit var contentView: ImageView
...
override fun onCreateContentView(inflater: LayoutInflater?, container: ViewGroup?): View? {
    return ImageView(context).apply {
        scaleType = ImageView.ScaleType.CENTER_INSIDE
        setImageResource(R.drawable.onboarding_content_view)
        setPadding(0, 32, 0, 32)
        contentView = this
    }
}
Java
private ImageView contentView;
...
@Override
protected View onCreateContentView(LayoutInflater inflater, ViewGroup container) {
    contentView = new ImageView(getContext());
    contentView.setScaleType(ImageView.ScaleType.CENTER_INSIDE);
    contentView.setImageResource(R.drawable.onboarding_content_view);
    contentView.setPadding(0, 32, 0, 32);
    return contentView;
}
新增初始標誌畫面
OnboardingSupportFragment 可以從選用的標誌畫面開始,介紹您的應用程式。如要將 Drawable 顯示為標誌畫面,請在 OnboardingSupportFragment 的 onCreate() 方法中,使用 Drawable 的 ID 呼叫 setLogoResourceId()。系統會淡入並短暫顯示 Drawable,然後淡出 Drawable,再顯示 OnboardingSupportFragment 的第一頁。
如要為標誌畫面提供自訂動畫,請覆寫 onCreateLogoAnimation() 並傳回 Animator 物件,而非呼叫 setLogoResourceId(),如以下範例所示:
Kotlin
public override fun onCreateLogoAnimation(): Animator =
        AnimatorInflater.loadAnimator(context, R.animator.onboarding_logo_screen_animation)
Java
@Override
public Animator onCreateLogoAnimation() {
    return AnimatorInflater.loadAnimator(getContext(),
            R.animator.onboarding_logo_screen_animation);
}
自訂頁面動畫
系統會在顯示 OnboardingSupportFragment 的第一頁時,以及使用者前往其他頁面時,使用預設動畫。如要自訂這些動畫,請覆寫 OnboardingSupportFragment 中的方法。
如要自訂第一頁顯示的動畫,請覆寫 onCreateEnterAnimation() 並傳回 Animator。下列範例會建立 Animator,水平縮放內容檢視畫面:
Kotlin
override fun onCreateEnterAnimation(): Animator =
    ObjectAnimator.ofFloat(contentView, View.SCALE_X, 0.2f, 1.0f)
            .setDuration(ANIMATION_DURATION)
Java
@Override
protected Animator onCreateEnterAnimation() {
    Animator startAnimator = ObjectAnimator.ofFloat(contentView,
            View.SCALE_X, 0.2f, 1.0f).setDuration(ANIMATION_DURATION);
    return startAnimator;
}
如要自訂使用者前往其他頁面時使用的動畫,請覆寫 onPageChanged()。在 onPageChanged() 方法中,建立 Animator 物件,移除前一頁並顯示下一頁,然後將這些物件新增至 AnimatorSet,並播放該集合。下列範例會使用淡出動畫移除前一頁、更新內容檢視畫面圖片,並使用淡入動畫顯示下一頁:
Kotlin
override fun onPageChanged(newPage: Int, previousPage: Int) {
    // Create a fade-out animation for previousPage and, once
    // done, swap the contentView image with the next page's image
    val fadeOut = ObjectAnimator.ofFloat(mContentView, View.ALPHA, 1.0f, 0.0f)
            .setDuration(ANIMATION_DURATION)
            .apply {
                addListener(object : AnimatorListenerAdapter() {

                    override fun onAnimationEnd(animation: Animator) {
                        mContentView.setImageResource(pageImages[newPage])
                    }
                })
            }
    // Create a fade-in animation for nextPage
    val fadeIn = ObjectAnimator.ofFloat(mContentView, View.ALPHA, 0.0f, 1.0f)
            .setDuration(ANIMATION_DURATION)
    // Create AnimatorSet with fade-out and fade-in animators and start it
    AnimatorSet().apply {
        playSequentially(fadeOut, fadeIn)
        start()
    }
}
Java
@Override
protected void onPageChanged(final int newPage, int previousPage) {
    // Create a fade-out animation for previousPage and, once
    // done, swap the contentView image with the next page's image
    Animator fadeOut = ObjectAnimator.ofFloat(mContentView,
            View.ALPHA, 1.0f, 0.0f).setDuration(ANIMATION_DURATION);
    fadeOut.addListener(new AnimatorListenerAdapter() {
        @Override
        public void onAnimationEnd(Animator animation) {
            mContentView.setImageResource(pageImages[newPage]);
        }
    });
    // Create a fade-in animation for nextPage
    Animator fadeIn = ObjectAnimator.ofFloat(mContentView,
            View.ALPHA, 0.0f, 1.0f).setDuration(ANIMATION_DURATION);
    // Create AnimatorSet with fade-out and fade-in animators and start it
    AnimatorSet set = new AnimatorSet();
    set.playSequentially(fadeOut, fadeIn);
    set.start();
}
如要進一步瞭解如何建立 Animator 物件和 AnimatorSet 物件,請參閱「
屬性動畫總覽」。
自訂主題
任何 OnboardingSupportFragment 實作項目都必須使用 Theme_Leanback_Onboarding 主題,或是從 Theme_Leanback_Onboarding 繼承的主題。如要設定 OnboardingSupportFragment 的主題,請執行下列任一操作:
- 將
OnboardingSupportFragment的父項活動設為使用所需主題。以下範例說明如何在應用程式資訊清單中,將活動設為使用Theme_Leanback_Onboarding:<activity android:name=".OnboardingActivity" android:enabled="true" android:exported="@;true" android:theme=&qu>o<t;style/T>heme.Leanback.Onboarding" /activity
-
在自訂活動主題中使用
LeanbackOnboardingTheme_onboardingTheme屬性,在父項活動中設定主題。將這個屬性指向另一個自訂主題,只有活動中的OnboardingSupportFragment物件會使用這個主題。如果您的活動已使用自訂主題,且您不想將OnboardingSupportFragment樣式套用至活動中的其他檢視區塊,請使用這個方法。 - 覆寫
onProvideTheme()並傳回所需主題。如果多個活動使用OnboardingSupportFragment,或父項活動無法使用所需主題,請採用這種做法。以下範例會覆寫onProvideTheme()並傳回Theme_Leanback_Onboarding:Kotlin
override fun onProvideTheme(): Int = R.style.Theme_Leanback_Onboarding
Java
@Override
public int onProvideTheme() {
   return R.style.Theme_Leanback_Onboarding;
}