Dùng Batterystats và Battery Historian để xem mức sử dụng pin của hồ sơ
Sử dụng bộ sưu tập để sắp xếp ngăn nắp các trang
Lưu và phân loại nội dung dựa trên lựa chọn ưu tiên của bạn.
Tài liệu này trình bày các bước và quy trình thiết lập cơ bản cho công cụ Batterystats và tập lệnh Battery Historian. Để tìm hiểu cách sử dụng Battery Historian cho việc kiểm tra quy trình tiêu thụ pin, vui lòng đọc bài viết Phân tích mức sử dụng năng lượng bằng Battery Historian.
Batterystats là một công cụ có trong khung Android thu thập dữ liệu pin trên thiết bị của bạn. Bạn có thể sử dụng adb để kết xuất dữ liệu pin đã thu thập vào máy phát triển và tạo một báo cáo mà bạn có thể phân tích bằng cách sử dụng Battery Historian. Battery Historian chuyển đổi báo cáo từ Batterystats thành hình ảnh HTML mà bạn có thể xem trong trình duyệt của mình.
Batterystats và Battery Historian hữu ích cho những trường hợp sau:
Cho bạn biết vị trí và cách các quy trình đang lấy nguồn điện từ pin.
Xác định những việc cần làm trong ứng dụng của bạn có thể bị trì hoãn hoặc xoá để cải thiện thời lượng pin.
Cài đặt Battery Historian
Bạn có thể sử dụng Docker để cài đặt Battery Historian. Để biết các phương thức cài đặt thay thế, bao gồm cả tạo từ nguồn, hãy xem tệp README trên trang GitHub của dự án. Để cài đặt bằng Docker, hãy làm như sau:
Cài đặt Docker bằng cách làm theo các hướng dẫn trên trang web Docker. Mọi loại gói thuê bao đều hoạt động, bao gồm cả gói thuê bao Cá nhân miễn phí.
Để xác nhận là Docker được cài đặt chính xác, hãy mở dòng lệnh và nhập lệnh sau:
docker run hello-world
Nếu Docker được cài đặt chính xác, bạn sẽ thấy kết quả như sau:
Unable to find image 'hello-world:latest' locally
latest: Pulling from library/hello-world
78445dd45222: Pull complete
Digest:
sha256:c5515758d4c5e1e838e9cd307f6c6a0d620b5e07e6f927b07d05f6d12a1ac8d7
Status: Downloaded newer image for hello-world:latest
Hello from Docker!
This message shows that your installation appears to be working correctly.
To generate this message, Docker took the following steps:
1. The Docker client contacted the Docker daemon.
2. The Docker daemon pulled the "hello-world" image from the Docker Hub.
3. The Docker daemon created a new container from that image which runs the
executable that produces the output you are currently reading.
4. The Docker daemon streamed that output to the Docker client, which sent it to your terminal
Chạy ứng dụng Docker Desktop (là một giao diện người dùng đồ hoạ của Docker) trước khi bạn chạy hình ảnh Battery Historian. Thao tác chạy lệnh này sẽ khởi động các công cụ của Docker. Battery Historian không chạy cho đến khi bạn làm việc này ít nhất một lần.
Chạy công cụ Battery Historian từ dòng lệnh trong lần chạy đầu tiên. Ứng dụng Docker Desktop không cho phép bạn chỉ định cổng để chạy máy chủ web. Bạn chỉ có thể thực hiện việc này từ dòng lệnh. Tuy nhiên, sau khi bạn chạy thành công vùng chứa từ dòng lệnh, một mục nhập sẽ được tạo trong Docker Desktop. Bạn có thể chạy mục nhập đó bằng cùng một cổng trình nghe trên Docker Desktop.
Chạy hình ảnh Battery Historian bằng cách dùng lệnh sau:
docker run -p port_number:9999 gcr.io/android-battery-historian/stable:3.1 --port 9999
Battery Historian sử dụng cổng mà bạn chọn, như đã chỉ định bằng port_number.
Hãy chuyển đến trang Battery Historian trong trình duyệt để xác nhận trang này đang chạy. Địa chỉ khác nhau tuỳ thuộc vào hệ điều hành của bạn:
Dành cho Linux và Mac
Battery Historian có tại http://localhost:port_number.
Dành cho Windows
Sau khi khởi động Docker, bạn sẽ biết được địa chỉ IP của máy mà Docker đang sử dụng. Ví dụ: nếu địa chỉ IP là 123.456.78.90, thì Battery Historian có tại http://123.456.78.90:port_number.
Khi đó, trang này sẽ hiển thị trang chủ của Battery Historian, nơi bạn có thể tải lên và xem số liệu thống kê về pin.
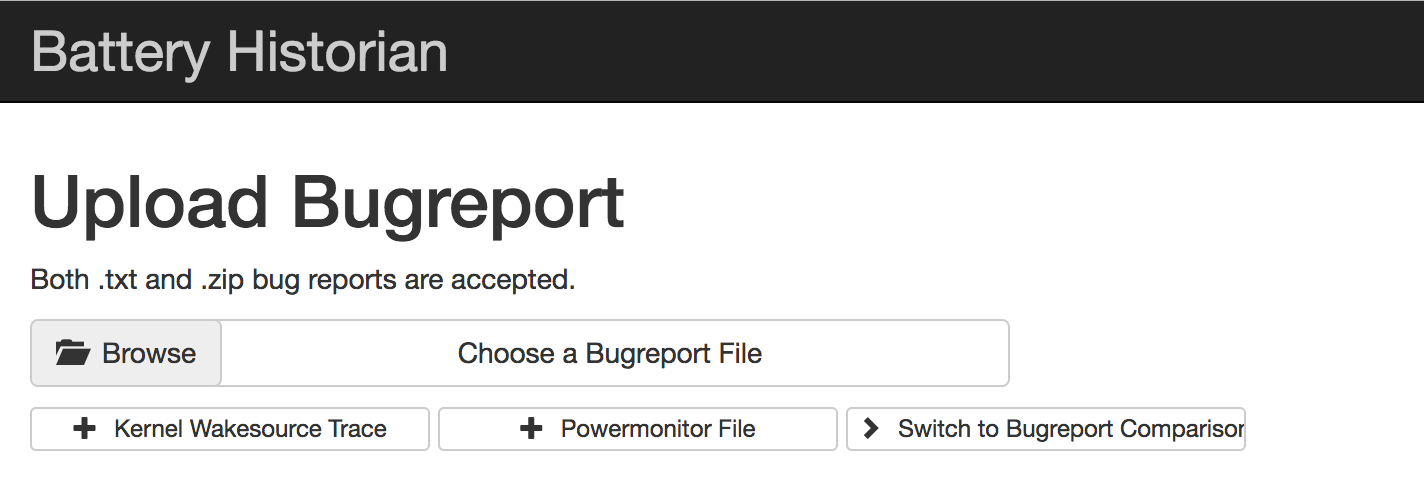
Hình 1. Trang chủ của Battery Historian.
Thu thập dữ liệu bằng Batterystats
Để thu thập dữ liệu từ thiết bị bằng Batterystats và mở thiết bị trong Battery Historian, hãy làm như sau:
Kết nối thiết bị di động với máy tính của bạn.
Từ cửa sổ dòng lệnh, hãy tắt máy chủ adb đang chạy bằng cách chạy lệnh sau:
adb kill-server
Khởi động lại adb rồi kiểm tra các thiết bị đã kết nối bằng cách chạy lệnh sau.
adb devices
Lệnh này liệt kê thiết bị của bạn, tương tự như kết quả trong ví dụ sau.
Hình 2. Kết quả về adb devices, cho thấy một thiết bị đã kết nối
Nếu lệnh này không liệt kê thiết bị nào, hãy đảm bảo điện thoại của bạn đã được kết nối và bật tính năng Gỡ lỗi qua USB, sau đó dừng và khởi động lại adb.
Đặt lại chế độ thu thập dữ liệu về pin bằng cách chạy lệnh sau:
adb shell dumpsys batterystats --reset
Thiết bị luôn thu thập Batterystats (số liệu thống kê về pin) và các thông tin gỡ lỗi khác ở chế độ nền. Thao tác đặt lại sẽ xoá dữ liệu về pin thu thập được trước đó. Nếu bạn không đặt lại, kết quả có thể rất lớn.
Ngắt kết nối thiết bị khỏi máy tính để bạn chỉ vẽ dòng điện từ pin của thiết bị.
Dùng ứng dụng của bạn và thực hiện các thao tác mà bạn muốn thu thập dữ liệu. Ví dụ: ngắt kết nối Wi-Fi và gửi dữ liệu lên đám mây.
Kết nối lại điện thoại.
Đảm bảo điện thoại của bạn được nhận dạng rồi chạy lệnh sau:
adb devices
Kết xuất tất cả dữ liệu về pin bằng cách chạy lệnh sau. Quá trình này sẽ mất một chút thời gian.
Tệp batterystats.txt được tạo trong thư mục bạn chỉ định bằng cách sử dụng đối số đường dẫn không bắt buộc. Nếu bạn không chỉ định đường dẫn, tệp này sẽ được tạo trong thư mục gốc của bạn.
Tạo báo cáo từ dữ liệu thô.
Đối với các thiết bị chạy Android 7.0 trở lên:
adb bugreport [path/]bugreport.zip
Đối với các thiết bị chạy Android 6.0 trở xuống:
adb bugreport [path/]bugreport.txt
Có thể mất vài phút để hoàn tất quá trình báo cáo lỗi. Đừng ngắt kết nối thiết bị hoặc huỷ quá trình này cho đến khi hoàn tất.
Cũng giống như với batterystats.txt, các tệp này được tạo trong thư mục mà bạn chỉ định bằng cách sử dụng đối số path không bắt buộc. Nếu bạn không chỉ định đường dẫn, các đường dẫn đó sẽ được tạo trong thư mục gốc của bạn.
Nếu Battery Historian chưa chạy, hãy chạy công cụ này bằng cách sử dụng lệnh sau:
docker run -p port_number:9999 gcr.io/android-battery-historian/stable:3.1 --port 9999
Để xem dữ liệu của bạn trong Battery Historian, hãy mở công cụ này trong trình duyệt. Đối với Mac và Linux, Battery Historian chạy tại http://localhost:port_number. Đối với Windows, Battery Historian chạy tại http://your_IP_address:port_number.
Nhấp vào Browse (Duyệt qua) rồi chọn tệp báo cáo lỗi mà bạn đã tạo ở trên.
Nhấp vào Submit (Gửi). Battery Historian mở một biểu đồ được tạo từ dữ liệu Batterystats của bạn.
Xem dữ liệu bằng biểu đồ Battery Historian
Biểu đồ Battery Historian vẽ đồ thị các sự kiện liên quan đến nguồn điện theo thời gian.
Mỗi hàng hiển thị một phân đoạn thanh màu khi một thành phần hệ thống đang hoạt động và theo đó vẽ dòng điện từ pin. Biểu đồ không cho biết mức sử dụng pin của thành phần đó mà chỉ cho biết liệu ứng dụng có đang hoạt động hay không. Các biểu đồ được sắp xếp theo danh mục, hiển thị một thanh cho từng danh mục theo thời gian, như biểu diễn trên trục x của biểu đồ.
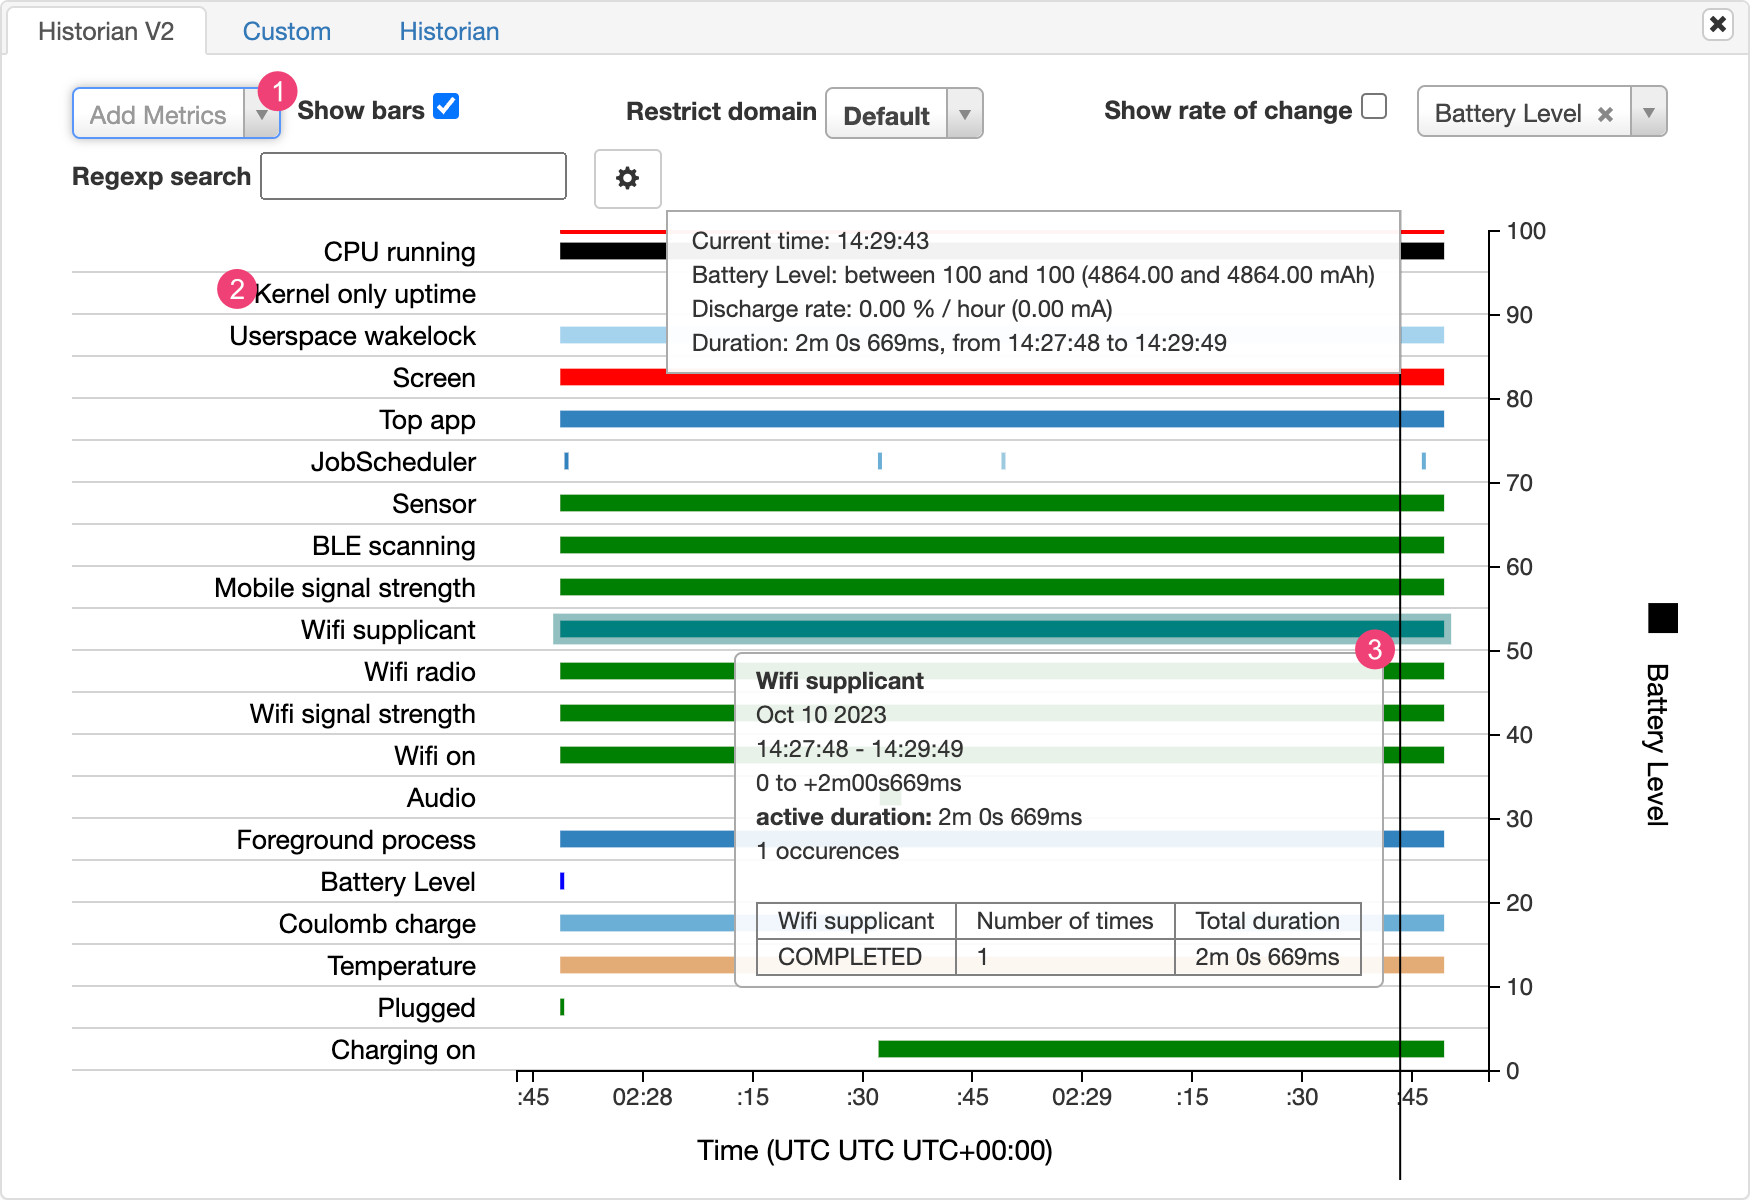
Hình 3. Ví dụ về biểu đồ Battery Historian.
Thêm các chỉ số khác trong danh sách thả xuống.
Giữ con trỏ trên tên chỉ số để xem thêm thông tin về từng chỉ số, bao gồm một khoá cho các màu được dùng trong biểu đồ.
Giữ con trỏ trên một thanh để xem thông tin chi tiết hơn về chỉ số đó và số liệu thống kê về pin tại một thời điểm cụ thể trên dòng thời gian.
Kết quả thống kê bổ sung về pin
Bạn có thể xem thêm thông tin từ tệp batterystats.txt trong phần số liệu thống kê bên dưới biểu đồ Battery Historian.
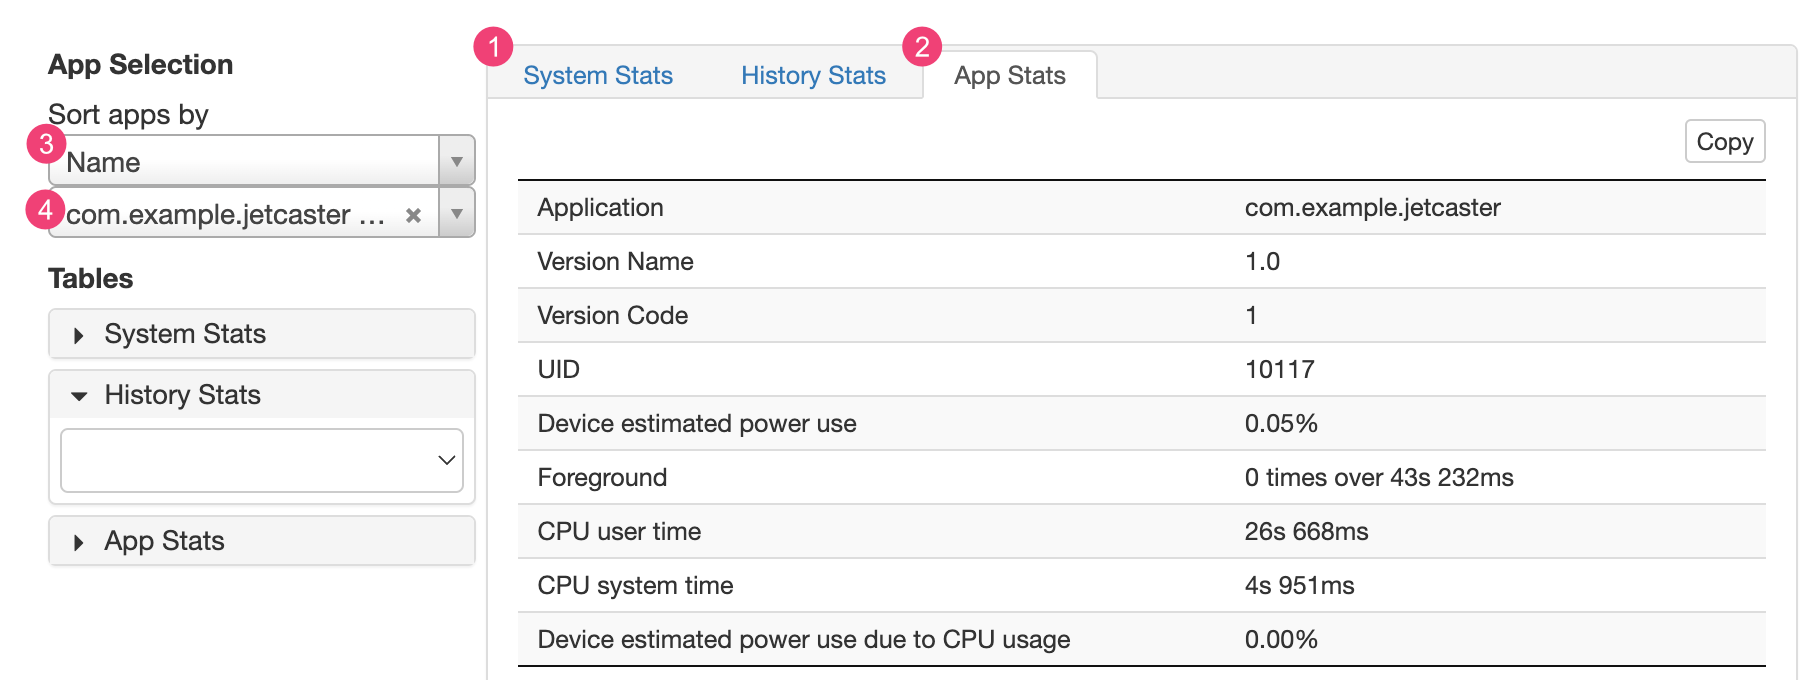
Hình 4. Phần số liệu thống kê trong Battery Historian.
Thẻ 1Thống kê hệ thống bao gồm số liệu thống kê trên toàn hệ thống, chẳng hạn như mức tín hiệu di động và độ sáng màn hình. Thông tin này cung cấp thông tin tổng quan về những gì đang xảy ra với thiết bị. Điều này đặc biệt hữu ích khi đảm bảo không có sự kiện bên ngoài nào đang ảnh hưởng đến thử nghiệm của bạn.
Thẻ 2Thống kê ứng dụng bao gồm thông tin về các ứng dụng cụ thể. Sắp xếp danh sách ứng dụng bằng các dùng danh sách thả xuống 3Sắp xếp ứng dụng theo trong ngăn Lựa chọn ứng dụng. Bạn có thể chọn một ứng dụng cụ thể để xem số liệu thống kê bằng cách dùng 4 danh sách thả xuống ứng dụng.
Nội dung và mã mẫu trên trang này phải tuân thủ các giấy phép như mô tả trong phần Giấy phép nội dung. Java và OpenJDK là nhãn hiệu hoặc nhãn hiệu đã đăng ký của Oracle và/hoặc đơn vị liên kết của Oracle.
Cập nhật lần gần đây nhất: 2025-07-27 UTC.
[[["Dễ hiểu","easyToUnderstand","thumb-up"],["Giúp tôi giải quyết được vấn đề","solvedMyProblem","thumb-up"],["Khác","otherUp","thumb-up"]],[["Thiếu thông tin tôi cần","missingTheInformationINeed","thumb-down"],["Quá phức tạp/quá nhiều bước","tooComplicatedTooManySteps","thumb-down"],["Đã lỗi thời","outOfDate","thumb-down"],["Vấn đề về bản dịch","translationIssue","thumb-down"],["Vấn đề về mẫu/mã","samplesCodeIssue","thumb-down"],["Khác","otherDown","thumb-down"]],["Cập nhật lần gần đây nhất: 2025-07-27 UTC."],[],[],null,["# Profile battery usage with Batterystats and Battery Historian\n\n| **Warning:** Battery Historian is no longer actively maintained; if possible, consider using [system tracing](/topic/performance/tracing), the [Macrobenchmark power metric](/topic/performance/benchmarking/macrobenchmark-metrics#power), or the [Power Profiler](/studio/profile/power-profiler) to get insights into battery performance.\n\nThis document shows the basic setup steps and workflow for the Batterystats tool\nand the Battery Historian script. To learn how to use Battery Historian to\ninspect battery consumption patterns, see [Analyze power use with Battery\nHistorian](/topic/performance/power/battery-historian).\n\nBatterystats is a tool included in the Android framework that collects battery\ndata on your device. You can use [`adb`](/studio/command-line/adb) to dump the\ncollected battery data to your development machine and create a report you can\nanalyze using Battery Historian. Battery Historian converts the report from\nBatterystats into an HTML visualization that you can view in your browser.\n\nBatterystats and Battery Historian are useful for the following:\n\n- Showing you where and how processes are drawing current from the battery.\n- Identifying tasks in your app that can be deferred or removed to improve battery life.\n\n| **Note:** To use Batterystats and Battery Historian, you need a mobile device with [USB debugging](/studio/debug/dev-options) enabled.\n\nInstall Battery Historian\n-------------------------\n\nYou can use Docker to install Battery Historian. For alternative installation\nmethods, including building from source, see the\n[README](https://github.com/google/battery-historian) on the\nproject's GitHub page. To install using Docker, do the following:\n\n1. Install Docker by following the instructions on the\n [Docker website](https://docs.docker.com/desktop). Any\n [subscription](https://docker.com/pricing) type works,\n including a free Personal subscription.\n\n2. To confirm Docker is correctly installed, open the command line and\n enter the following command:\n\n docker run hello-world\n\n If Docker is correctly installed, it displays an output like this: \n\n Unable to find image 'hello-world:latest' locally\n latest: Pulling from library/hello-world\n 78445dd45222: Pull complete\n Digest:\n sha256:c5515758d4c5e1e838e9cd307f6c6a0d620b5e07e6f927b07d05f6d12a1ac8d7\n Status: Downloaded newer image for hello-world:latest\n\n Hello from Docker!\n This message shows that your installation appears to be working correctly.\n\n To generate this message, Docker took the following steps:\n 1. The Docker client contacted the Docker daemon.\n 2. The Docker daemon pulled the \"hello-world\" image from the Docker Hub.\n 3. The Docker daemon created a new container from that image which runs the\n executable that produces the output you are currently reading.\n 4. The Docker daemon streamed that output to the Docker client, which sent it to your terminal\n\n3. Launch the Docker Desktop app---which is a GUI frontend for Docker---before\n you run the Battery Historian image. Running this initializes the Docker\n tools. Battery Historian doesn't run until you do this at least once.\n\n4. Run Battery Historian from the command line when running it for the first\n time. The Docker Desktop app doesn't let you specify the port to run the web\n server on. You can only do this from the command line. However, after you\n successfully run the container from the command line, an entry is created in\n Docker Desktop, and then you can launch it using the same listener port\n from Docker Desktop.\n\n5. Run the Battery Historian image using the following command:\n\n ```\n docker run -p port_number:9999 gcr.io/android-battery-historian/stable:3.1 --port 9999\n ```\n\n Battery Historian uses the port of your choice, as specified using\n \u003cvar translate=\"no\"\u003eport_number\u003c/var\u003e.\n | **Note:** If you're using a Windows machine, you might need to enable virtualization in your BIOS. Check the documentation for your motherboard for more information about how to enable virtualization. If you can run the [Android Emulator](/studio/run/emulator), then virtualization is already enabled.\n6. Navigate to Battery Historian in your browser to confirm it's running. The\n address varies depending on your operating system:\n\n For Linux and Mac\n : Battery Historian is available at\n `http://localhost:`\u003cvar translate=\"no\"\u003eport_number\u003c/var\u003e.\n\n For Windows\n : After you start Docker, it tells you the IP address of the machine it\n is using. For example, if the IP address is 123.456.78.90, Battery\n Historian is available at\n `http://123.456.78.90:`\u003cvar translate=\"no\"\u003eport_number\u003c/var\u003e.\n\n \u003cbr /\u003e\n\n It then displays the Battery Historian start page, where you can upload and\n view battery statistics.\n **Figure 1.** The start page for Battery Historian.\n\nGather data with Batterystats\n-----------------------------\n\nTo collect data from your device using Batterystats and open it in Battery\nHistorian, do the following:\n\n1. Connect your mobile device to your computer.\n\n2. From a Terminal window, shut down your running `adb` server by running the\n following command:\n\n adb kill-server\n\n3. Restart `adb` and check for connected devices by running the following\n command.\n\n adb devices\n\n It lists your device, similar to the following example output.\n **Figure 2.** The output of `adb devices`, showing one connected device\n\n If it doesn't list any devices, make sure your phone is connected and [USB\n debugging](/studio/debug/dev-options#Enable-debugging) is enabled, and then\n stop and restart `adb`.\n4. Reset battery data gathering by running the following command:\n\n adb shell dumpsys batterystats --reset\n\n The device is always collecting Batterystats and other debugging information\n in the background. Resetting erases previous battery collection data. If you\n don't reset, the output can be very large.\n5. Disconnect your device from your computer so that you are only drawing\n current from the device's battery.\n\n6. Use your app and perform actions for which you want to collect data for. For\n example, disconnect from Wi-Fi and send data to the cloud.\n\n7. Reconnect your phone.\n\n8. Make sure your phone is recognized and run the following command:\n\n adb devices\n\n9. Dump all battery data by running the following command. This can take a\n while.\n\n ```\n adb shell dumpsys batterystats \u003e [path/]batterystats.txt\n ```\n\n The `batterystats.txt` file is created in the directory you specify using\n the optional path argument. If you don't specify a path, the file is\n created in your home directory.\n10. Create a report from raw data.\n\n For devices running Android 7.0 and higher:\n :\n\n ```\n adb bugreport [path/]bugreport.zip\n ```\n\n For devices running Android 6.0 and lower:\n :\n\n ```\n adb bugreport [path/]bugreport.txt\n ```\n\n \u003cbr /\u003e\n\n Bugreport can take several minutes to complete. Don't disconnect your\n device or cancel the process until it's complete.\n\n As with `batterystats.txt`, these files are created in the directory you\n specify using the optional \u003cvar translate=\"no\"\u003epath\u003c/var\u003e argument. If you\n don't specify a path, they are created in your home directory.\n\n If it's not already running, run Battery Historian using the following\n command: \n\n ```\n docker run -p port_number:9999 gcr.io/android-battery-historian/stable:3.1 --port 9999\n ```\n11. To view your data in Battery Historian, open the Battery Historian in your\n browser. For Mac and Linux, Battery Historian runs at\n `http://localhost:`\u003cvar translate=\"no\"\u003eport_number\u003c/var\u003e. For Windows, Battery\n Historian runs at\n `http://`\u003cvar translate=\"no\"\u003eyour_IP_address\u003c/var\u003e`:`\u003cvar translate=\"no\"\u003eport_number\u003c/var\u003e.\n\n12. Click **Browse** and then choose the bugreport file you created.\n\n13. Click **Submit**. Battery Historian opens a chart created from your\n Batterystats data.\n\nView data with Battery Historian charts\n---------------------------------------\n\nThe Battery Historian chart graphs power-relevant events over time.\n\nEach row shows a colored bar segment when a system component is active and thus\ndrawing current from the battery. The chart doesn't show how much battery is\nused by the component---only whether the app is active. Charts are organized by\ncategory, showing a bar for each category over time, as displayed on the\n*x*-axis of the chart.\n**Figure 3.** Example of a Battery Historian chart.\n\n1. Add additional metrics from the drop-down list.\n2. Hold the pointer over the metric name to see more information about each metric, including a key for the colors used in the chart.\n3. Hold the pointer over a bar to see more detailed information about that metric and the battery stats at a specific point on the timeline.\n\nAdditional Batterystats output\n------------------------------\n\nYou can view additional information from the `batterystats.txt` file in the\nstats section after the Battery Historian chart.\n**Figure 4.** The stats section of Battery Historian.\n\nThe 1 **System Stats** tab includes system-wide\nstatistics, such as cell signal levels and screen brightness. This information\nprovides an overall picture of what's happening with the device. This is\nespecially useful to make sure no external events are affecting your test.\n\nThe 2 **App Stats** tab includes information about\nspecific apps. Sort the list of apps using the 3\n**Sort apps by** drop-down list in the **App Selection** pane. You\ncan select a specific app to view stats for using the\n4 apps drop-down list."]]