代理模式
透過集合功能整理內容
你可以依據偏好儲存及分類內容。
Android Studio 中的 Gemini 代理程式模式可處理複雜的多階段開發工作,這類工作無法透過與 Gemini 對話完成。您可以描述高階目標,代理程式就會建立及執行計畫、叫用必要的工具、跨多個檔案進行變更,並反覆修正錯誤。這項有專員輔助的工作流程可協助您解決複雜難題,加快開發程序。
開始使用
如要在 Android Studio 中開始使用代理程式模式,請按照下列步驟操作:
- 按一下側欄中的「Gemini」
 。如有需要,請登入並完成新手上路程序。
- 選取「代理人」分頁標籤。
- 說明您希望代理程式執行的工作。
當專員逐步完成工作時,您可以選擇查看並核准任何變更。
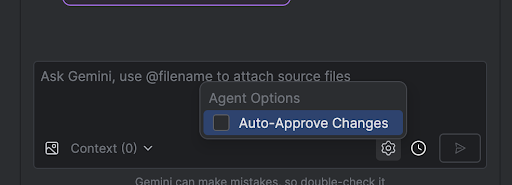
選用:如要自動核准變更,請依序選取「代理商選項」
 >「自動核准變更」。
用途
以下列舉幾個代理程式可協助處理的應用情境:
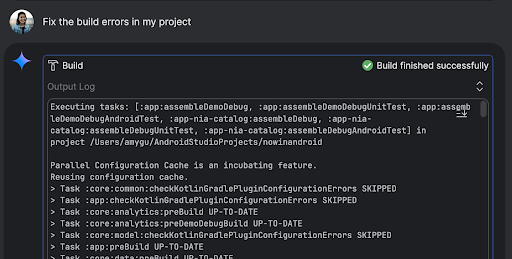
修正建構錯誤。當您使用「修正專案中的建構錯誤」等提示要求代理程式修正建構錯誤時,代理程式會套用建議的修正方式、建構專案來驗證解決方案,並反覆執行,直到問題解決為止。
代理程式模式可以自行新增或更新 UI 元素。舉例來說,要求代理程式「將使用者偏好設定中的深色模式設為預設模式」,代理程式就會搜尋相關檔案,並建議變更內容來完成這項工作。您可以在「Running devices」工具視窗中,立即預覽 UI 更新。
在製作應用程式原型和測試時,模擬資料很有幫助。您可以將建立虛假資料的工作交給代理程式,不必手動建立。這裡我們要求代理程式「在虛假資料中再新增兩個工作階段」。並在 mockSessions 清單中新增兩個事件。
其他建議提示詞:
- 「Write unit tests for <class> in <module>.」
- 「Generate documentation for the currently open file.」(為目前開啟的檔案產生文件)。
- 「將應用程式名稱從『<目前名稱>』變更為『<新名稱>』。」
- 「Resolve the null pointer exception.」
- 「Refactor my code by moving the <composable name> composable to a new file.
請確保所有匯入作業都已更新。」
- 「在應用程式主畫面新增名為『追蹤』的按鈕,點選後會前往主題清單。」
- 「在 <可組合函式名稱> 可組合函式中,減少 <修飾符名稱> 修飾符的邊框間距。」
- 「建立分享按鈕,以便分享至社群媒體。」
代理程式的運作方式
在代理程式模式中,系統會將提示連同可用工具清單傳送至 Gemini API。您可以將工具視為技能,包括搜尋檔案、讀取檔案、搜尋檔案中的文字、使用您設定的任何 MCP 伺服器等。
當您指派工作給代理程式時,代理程式會擬定計畫並找出所需工具。部分工具可能需要你授予權限,代理程式才能使用。授予權限後,代理程式會使用工具執行必要動作,並將結果傳回 Gemini API。Gemini 會處理動作結果,並生成其他回覆。這個行動和評估的循環會持續進行,直到工作完成為止。
這個頁面中的內容和程式碼範例均受《內容授權》中的授權所規範。Java 與 OpenJDK 是 Oracle 和/或其關係企業的商標或註冊商標。
上次更新時間:2025-08-05 (世界標準時間)。
[[["容易理解","easyToUnderstand","thumb-up"],["確實解決了我的問題","solvedMyProblem","thumb-up"],["其他","otherUp","thumb-up"]],[["缺少我需要的資訊","missingTheInformationINeed","thumb-down"],["過於複雜/步驟過多","tooComplicatedTooManySteps","thumb-down"],["過時","outOfDate","thumb-down"],["翻譯問題","translationIssue","thumb-down"],["示例/程式碼問題","samplesCodeIssue","thumb-down"],["其他","otherDown","thumb-down"]],["上次更新時間:2025-08-05 (世界標準時間)。"],[],[],null,["# Agent Mode\n\nGemini in Android Studio's Agent Mode is designed to handle complex, multi-stage\ndevelopment tasks that go beyond what you can experience by just chatting with\nGemini. You can describe a high-level goal, and the agent will create and\nexecute a plan, invoking the necessary [tools](#how-it-works), making changes\nacross multiple files, and iteratively fixing bugs. This agent-assisted workflow\nempowers you to tackle intricate challenges, accelerating your development\nprocess.\n\nGet started\n-----------\n\nTo get started in Agent Mode in Android Studio, follow these steps:\n\n1. Click **Gemini** in the side bar. Sign in and onboard if you need to.\n2. Select the **Agent** tab.\n3. Describe the task you want the agent to perform.\n4. As the agent goes through the steps to accomplish the task, you'll have the\n option to review and approve any changes.\n\n5. Optional: To automatically approve changes, select **Agent options\n \\\u003e Auto-approve changes**.\n\nUse cases\n---------\n\nHere are some examples of use cases that the agent can help you with:\n\n- Fix build errors. When you ask the agent to fix a build error using a prompt\n like \"Fix build errors in my project,\" it will apply a recommended fix, build\n the project to verify the solution, and iterate until the issue is resolved.\n\n- Agent Mode can add or update UI elements all on its own. For example, ask the\n agent to \"Make dark mode the default in user preferences\" and it'll search for\n the relevant files and suggest changes to accomplish the task. You can\n immediately preview the UI updates in the **Running devices** tool window.\n\n- It's helpful to have mock data when prototyping and testing your app. Instead\n of manually creating fake data yourself, you can give that task to the agent.\n Here we've asked the agent to \"Add two more sessions to the fake data.\" It\n finds the relevant file and adds two more events to the `mockSessions` list.\n\nSome other prompts to try:\n\n- \"Write unit tests for \\\u003cclass\\\u003e in \\\u003cmodule\\\u003e.\"\n- \"Generate documentation for the currently open file.\"\n- \"Change the app title from \\\u003ccurrent name\\\u003e to \\\u003cnew name\\\u003e.\"\n- \"Resolve the null pointer exception.\"\n- \"Refactor my code by moving the \\\u003ccomposable name\\\u003e composable to a new file. Ensure all imports are updated.\"\n- \"Add a new button to the app's home screen called 'Follow' that takes you to a list of topics.\"\n- \"In the \\\u003ccomposable name\\\u003e composable, reduce the padding of the \\\u003cmodifier name\\\u003e modifier.\"\n- \"Create a share button to share to social media.\"\n\nHow the agent works\n-------------------\n\nIn Agent Mode, your prompt is sent to the Gemini API with a list of *tools* that\nare available. You can think of tools as skills: they include the ability to\nsearch for files, read files, search the text within files, use any\n[MCP servers](/studio/gemini/add-mcp-server) you have configured, and more.\n\nWhen you give the agent a task, it comes up with a plan and figures out which\ntools are needed. Some of these tools might need you to grant permission before\nthe agent can use them. Once you grant permission, the agent uses the tool to\nperform the necessary action and sends the result back to the Gemini API. Gemini\nprocesses the result of the action and generates another response. This cycle of\naction and evaluation continues until the task is complete."]]