
하나 이상의 AGENTS.md 파일을 사용하여 Android 스튜디오의 Gemini에 따라야 할 맞춤 안내를 제공합니다. AGENTS.md 파일은 코드베이스의 다른 파일과 함께 배치되므로 버전 관리 시스템 (VCS)에 체크인하고 프로젝트별 안내, 코딩 스타일 규칙, 기타 가이드를 전체 팀과 공유하기가 간단합니다.
시작하려면 다음 단계를 따르세요.
프로젝트의 파일 시스템에 원하는 위치에
AGENTS.md파일을 만듭니다. Gemini는 쿼리를 제출할 때 현재 디렉터리와 모든 상위 디렉터리에서AGENTS.md파일을 검색합니다. 자세한 내용은AGENTS.md파일의 작동 방식을 참고하세요.요청 사항을 추가합니다. 마크다운을 사용하여 안내를 작성합니다. 가독성을 위해 다양한 규칙에 제목과 글머리 기호를 사용하는 것이 좋습니다. 예시 안내 보기
파일을 VCS에 저장하고 커밋하여 팀과 공유합니다.
AGENTS.md 파일을 컨텍스트로 관리
채팅 패널의 컨텍스트 드로어를 사용하여 특정 질문의 컨텍스트로 AGENTS.md 파일을 적용하거나 삭제할 수 있습니다. AGENTS.md 파일 옵션에는 현재 디렉터리와 상위 디렉터리의 모든 AGENTS.md 파일이 포함됩니다.
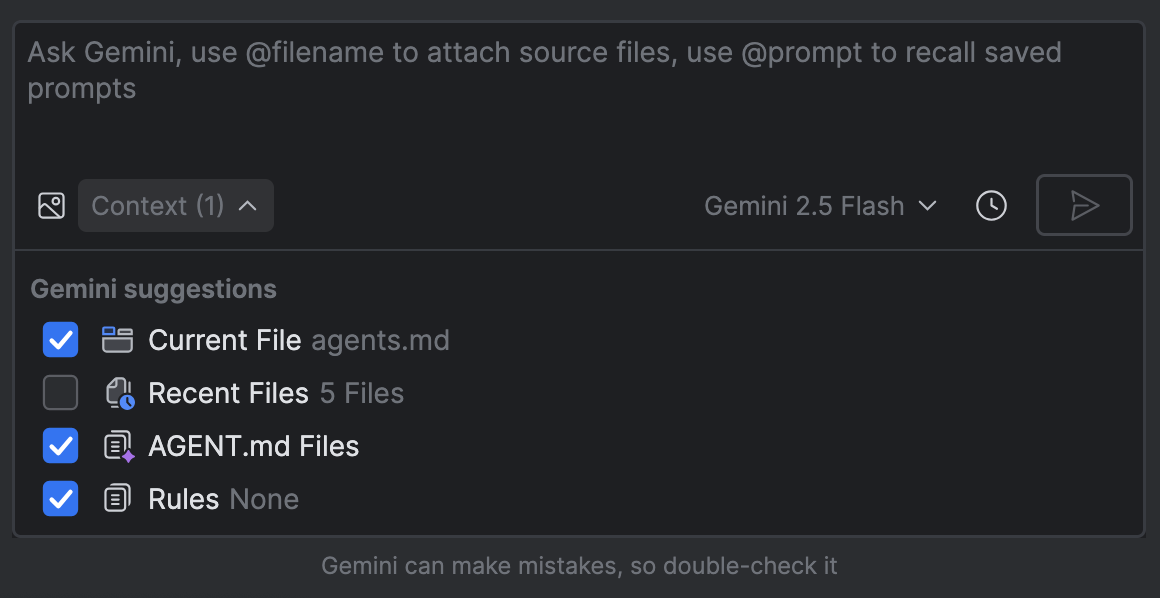
AGENTS.md 파일을 컨텍스트로 관리합니다.요청 사항 예시
AGENTS.md 파일을 사용하여 에이전트에게 지침을 제공할 수 있습니다. 다음은 몇 가지 예이지만, 제공하는 안내는 프로젝트에 따라 달라야 합니다.
- '기본 활동은
/path/to/MainActivity.kt입니다.' - '화면 간 이동을 지원하는 코드는
path/to/navigation/UiNavigation.kt입니다.' - 'HTTP 요청을 처리하는 코드는
<path>에 있습니다.' - 프로젝트 아키텍처
- '모든 비즈니스 로직을 ViewModel에 배치하세요.'
- '계층화된 아키텍처 사용을 비롯한 공식 아키텍처 권장사항을 항상 따르세요. 단방향 데이터 흐름 (UDF), ViewModel, 수명 주기 인식 UI 상태 컬렉션 및 기타 권장사항을 사용하세요.'
- 선호하는 라이브러리: '탐색에 <라이브러리 이름> 라이브러리를 사용해 줘.'
- 일반적인 API 서비스 또는 내부 용어의 자리표시자 이름 정의: '기본 백엔드 서비스는 'PhotoSift-API'라고 합니다.'
- 회사 스타일 가이드: '모든 새 UI 구성요소는 Jetpack Compose로 빌드해야 합니다. XML 기반 레이아웃을 추천하지 마세요.'
AGENTS.md 파일 모듈화
대용량 AGENTS.md 파일을 여러 컨텍스트에서 재사용할 수 있는 작은 파일로 분할할 수 있습니다.
일련의 안내를 분리하여
style-guidance.md와 같은 다른 마크다운 파일에 저장합니다.가져오려는 파일의 경로 뒤에
@기호를 사용하여AGENTS.md파일에서 더 작은 마크다운 파일을 참조합니다. 다음과 같은 경로 형식이 지원됩니다.- 상대 경로:
@./file.md- 동일한 디렉터리에서 가져오기@../file.md- 상위 디렉터리에서 가져오기@./subdirectory/file.md- 하위 디렉터리에서 가져오기
- 절대 경로:
@/absolute/path/to/file.md
- 상대 경로:
예를 들어 다음 AGENTS.md 파일은 다른 두 명령어 파일을 참조합니다.
# My AGENTS.md

You are an experienced Android app developer.

@./get-started.md

## Coding style {:#coding-style}

@./shared/style-guidance.md
AGENTS.md 파일 작동 방식
Gemini는 현재 디렉터리와 상위 디렉터리에서 AGENTS.md 파일을 자동으로 스캔하고 모든 프롬프트의 시작 부분에 콘텐츠를 서문으로 추가합니다. 쿼리를 제출할 때 열려 있는 파일이 없으면 프로젝트 루트의 AGENTS.md 파일 (있는 경우)이 기본적으로 포함됩니다.
AGENTS.md 파일과 규칙의 차이점은 무엇인가요?
규칙을 사용하면 모든 프롬프트에 적용되는 안내와 환경설정을 정의할 수도 있습니다. 하지만 규칙은 IntelliJ 파일 /.idea/project.prompts.xml에 정의되는 반면 AGENTS.md 파일은 소스 코드 옆에 저장되며 IDE에 구애받지 않습니다. 기본 목적 중 하나가 팀과 안내를 공유하는 것이라면 AGENTS.md 파일을 사용하는 것이 좋습니다.
AGENTS.md 파일과 스킬의 차이점은 무엇인가요?
스킬은 요청이 스킬 설명과 일치할 때 호출되는 주문형 전문성을 나타내며, AGENTS.md의 콘텐츠는 모든 프롬프트의 시작 부분에 추가됩니다. 특정 작업에는 스킬을 사용하고 AGENTS.md 파일을 사용하여 에이전트의 일반적인 동작에 영향을 주는 것이 좋습니다. 스킬에 관한 자세한 내용은 Android 스킬 개요를 참고하세요.