
सूचियों की मदद से, उपयोगकर्ता Wear OS डिवाइसों पर, विकल्पों के सेट में से आसानी से कोई आइटम चुन सकते हैं.
स्मार्टवॉच के यूज़र इंटरफ़ेस की लाइब्रेरी में,
WearableRecyclerView क्लास शामिल है. यह RecyclerView के लिए लागू की गई एक क्लास है, जिसका इस्तेमाल स्मार्टवॉच के लिए ऑप्टिमाइज़ की गई सूचियां बनाने के लिए किया जाता है. WearableRecyclerView कंटेनर बनाकर, स्मार्टवॉच ऐप्लिकेशन में इस इंटरफ़ेस का इस्तेमाल किया जा सकता है.
आसान आइटम की लंबी सूची के लिए, WearableRecyclerView का इस्तेमाल करें. जैसे, ऐप्लिकेशन लॉन्चर या संपर्कों की सूची. हर आइटम में एक छोटी स्ट्रिंग और उससे जुड़ा आइकॉन हो सकता है. इसके अलावा, हर आइटम में सिर्फ़ एक स्ट्रिंग या आइकॉन हो सकता है.
ध्यान दें: जटिल लेआउट का इस्तेमाल न करें. उपयोगकर्ताओं को किसी आइटम को एक नज़र में देखकर ही पता चल जाना चाहिए कि वह आइटम क्या है. खास तौर पर, पहने जाने वाले डिवाइसों की स्क्रीन का साइज़ सीमित होता है.
मौजूदा RecyclerView क्लास को बड़ा करके, WearableRecyclerView
एपीआई डिफ़ॉल्ट रूप से, आइटम की वर्टिकल स्क्रोल की जा सकने वाली सूची को सीधी सूची में दिखाते हैं. WearableRecyclerView एपीआई का इस्तेमाल करके, स्मार्टवॉच पर काम करने वाले ऐप्लिकेशन में, घुमावदार लेआउट और सर्कुलर स्क्रोलिंग जेस्चर के लिए ऑप्ट-इन किया जा सकता है.
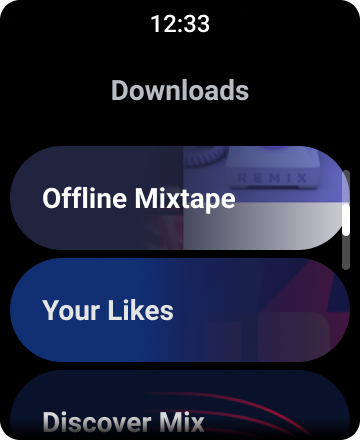
पहली इमेज. Wear OS पर डिफ़ॉल्ट सूची व्यू.
इस गाइड में, Wear OS ऐप्लिकेशन में सूचियां बनाने के लिए WearableRecyclerView क्लास का इस्तेमाल करने का तरीका बताया गया है. साथ ही, स्क्रोल किए जा सकने वाले आइटम के लिए, कर्व किए गए लेआउट के लिए ऑप्ट-इन करने का तरीका और स्क्रोल करते समय, बच्चों के दिखने के तरीके को पसंद के मुताबिक बनाने का तरीका भी बताया गया है.
एक्सएमएल का इस्तेमाल करके, किसी गतिविधि में WearableRecyclerView जोड़ना
यहां दिया गया लेआउट, किसी गतिविधि में WearableRecyclerView जोड़ता है:
<androidx.wear.widget.WearableRecyclerView
    xmlns:android="http://schemas.android.com/apk/res/android"
    xmlns:tools="http://schemas.android.com/tools"
    android:id="@+id/recycler_launcher_view"
    android:layout_width="match_parent"
    android:layout_height="match_parent"
    android:scrollbars="vertical" />
यहां दिए गए उदाहरण में, किसी गतिविधि पर लागू किया गया WearableRecyclerView
दिखाया गया है:
Kotlin
class MainActivity : Activity() {

    override fun onCreate(savedInstanceState: Bundle?) {
        super.onCreate(savedInstanceState)
        setContentView(R.layout.activity_main)
    }
    ...
}
Java
public class MainActivity extends Activity {
    @Override
    public void onCreate(Bundle savedInstanceState) {
        super.onCreate(savedInstanceState);
        setContentView(R.layout.activity_main);
    }
    ...
}
कर्व वाला लेआउट बनाना

स्मार्टवॉच ऐप्लिकेशन में स्क्रोल किए जा सकने वाले आइटम के लिए, कर्व वाला लेआउट बनाने के लिए, यह तरीका अपनाएं:
-
काम के एक्सएमएल लेआउट में,
WearableRecyclerViewका इस्तेमाल अपने मुख्य कंटेनर के तौर पर करें. -
setEdgeItemsCenteringEnabled(boolean)कोtrueपर सेट करें. इससे स्क्रीन पर, सूची के पहले और आखिरी आइटम को वर्टिकल तौर पर बीच में रखा जाता है. -
स्क्रीन पर मौजूद आइटम का लेआउट सेट करने के लिए,
WearableRecyclerView.setLayoutManager()तरीके का इस्तेमाल करें.
Kotlin
wearableRecyclerView.apply {
    // To align the edge children (first and last) with the center of the screen.
    isEdgeItemsCenteringEnabled = true
    ...
    layoutManager = WearableLinearLayoutManager(this@MainActivity)
}
Java
// To align the edge children (first and last) with the center of the screen.
wearableRecyclerView.setEdgeItemsCenteringEnabled(true);
...
wearableRecyclerView.setLayoutManager(
                new WearableLinearLayoutManager(this));
अगर आपके ऐप्लिकेशन में स्क्रोल करते समय, बच्चों के दिखने के तरीके को पसंद के मुताबिक बनाने के लिए खास ज़रूरतें हैं, तो
WearableLinearLayoutManager.LayoutCallback क्लास को बड़ा करें और
onLayoutFinished तरीके को बदलें. उदाहरण के लिए,
आइटम के बीच से स्क्रोल करते समय आइकॉन और टेक्स्ट को स्केल करना.
नीचे दिए गए कोड स्निपेट में, आइटम के स्क्रोलिंग को पसंद के मुताबिक बनाने का उदाहरण दिया गया है. इसके लिए, WearableLinearLayoutManager.LayoutCallback क्लास को बड़ा करके, आइटम को केंद्र से दूर स्केल किया गया है:
Kotlin
/** How much icons should scale, at most.  */
private const val MAX_ICON_PROGRESS = 0.65f

class CustomScrollingLayoutCallback : WearableLinearLayoutManager.LayoutCallback() {

    private var progressToCenter: Float = 0f

    override fun onLayoutFinished(child: View, parent: RecyclerView) {
        child.apply {
            // Figure out % progress from top to bottom.
            val centerOffset = height.toFloat() / 2.0f / parent.height.toFloat()
            val yRelativeToCenterOffset = y / parent.height + centerOffset

            // Normalize for center.
            progressToCenter = Math.abs(0.5f - yRelativeToCenterOffset)
            // Adjust to the maximum scale.
            progressToCenter = Math.min(progressToCenter, MAX_ICON_PROGRESS)

            scaleX = 1 - progressToCenter
            scaleY = 1 - progressToCenter
        }
    }
}
Java
public class CustomScrollingLayoutCallback extends WearableLinearLayoutManager.LayoutCallback {
    /** How much icons should scale, at most. */
    private static final float MAX_ICON_PROGRESS = 0.65f;

    private float progressToCenter;

    @Override
    public void onLayoutFinished(View child, RecyclerView parent) {

        // Figure out % progress from top to bottom.
        float centerOffset = ((float) child.getHeight() / 2.0f) / (float) parent.getHeight();
        float yRelativeToCenterOffset = (child.getY() / parent.getHeight()) + centerOffset;

        // Normalize for center.
        progressToCenter = Math.abs(0.5f - yRelativeToCenterOffset);
        // Adjust to the maximum scale.
        progressToCenter = Math.min(progressToCenter, MAX_ICON_PROGRESS);

        child.setScaleX(1 - progressToCenter);
        child.setScaleY(1 - progressToCenter);
    }
}
Kotlin
wearableRecyclerView.layoutManager =
        WearableLinearLayoutManager(this, CustomScrollingLayoutCallback())
Java
CustomScrollingLayoutCallback customScrollingLayoutCallback =
                new CustomScrollingLayoutCallback();
wearableRecyclerView.setLayoutManager(
                new WearableLinearLayoutManager(this, customScrollingLayoutCallback));