
在 Wear OS 裝置上,動態磚是由兩個主要元件算繪而成,且各自有獨立的版本。為確保應用程式動態磚在所有裝置上都能正常運作,請務必瞭解這項基礎架構。
- Jetpack 圖塊相關程式庫:這些程式庫 (包括 Wear Tiles 和 Wear ProtoLayout) 會嵌入應用程式中,而開發人員可以控管版本。應用程式會使用這些程式庫建構
TileBuilder.Tile物件 (代表動態磚的資料結構),以回應系統的onTileRequest()呼叫。 - ProtoLayout 算繪器:這個系統元件負責在螢幕上算繪
Tile物件,並處理使用者互動。應用程式開發人員無法控制轉譯器版本,且不同裝置的轉譯器版本可能不同,即使是硬體相同的裝置也不例外。
動態磚的外觀或行為會因應用程式的 Jetpack 動態磚程式庫版本,以及使用者裝置上的 ProtoLayout Renderer 版本而異。舉例來說,某裝置可能支援旋轉或顯示心率資料,另一裝置則可能不支援。
本文說明如何讓應用程式與不同版本的 Tiles 程式庫和 ProtoLayout Renderer 相容。並說明如何遷移至較高版本的 Jetpack 程式庫。
考慮相容性
如要建立可在各種裝置上正常運作的資訊方塊,請考慮支援不同功能。您可以透過兩種主要策略達成這個目標:在執行階段偵測轉譯器功能,以及提供內建的回溯機制。
偵測轉譯器功能
你可以根據特定裝置提供的功能,動態變更動態磚的版面配置。
偵測轉譯器版本
- 使用傳遞至
onTileRequest()方法的DeviceParameters物件的getRendererSchemaVersion()方法。這個方法會傳回裝置上 ProtoLayout Renderer 的主要和子版本號碼。 - 然後,您可以在
onTileRequest()實作中運用條件邏輯,根據偵測到的轉譯器版本調整動態磚的設計或行為。
@RequiresSchemaVersion 註解
- ProtoLayout 方法上的
@RequiresSchemaVersion註解,表示該方法如要按照文件所述運作,所需的最低算繪器結構定義版本 (範例)。- 呼叫的方法需要比裝置上可用的更高版本,雖然不會導致應用程式當機,但可能會導致內容未顯示或功能遭到忽略。
版本偵測範例
val rendererVersion = requestParams.deviceConfiguration.rendererSchemaVersion val arcElement = // DashedArcLine has the annotation @RequiresSchemaVersion(major = 1, minor = 500) // and so is supported by renderer versions 1.500 and greater if ( rendererVersion.major > 1 || (rendererVersion.major == 1 && rendererVersion.minor >= 500) ) { // Use DashedArcLine if the renderer supports it … DashedArcLine.Builder() .setLength(degrees(270f)) .setThickness(8f) .setLinePattern( LayoutElementBuilders.DashedLinePattern.Builder() .setGapSize(8f) .setGapInterval(10f) .build() ) .build() } else { // … otherwise use ArcLine. ArcLine.Builder().setLength(degrees(270f)).setThickness(dp(8f)).build() }
提供備援
部分資源可讓您直接在建構工具中定義備援。這通常比檢查轉譯器版本簡單,而且是可用的偏好做法。
常見用途是提供靜態圖片,做為 Lottie 動畫的備用圖片。如果裝置不支援 Lottie 動畫,系統會改為算繪靜態圖片。
val lottieImage = ResourceBuilders.ImageResource.Builder() .setAndroidLottieResourceByResId( ResourceBuilders.AndroidLottieResourceByResId.Builder(R.raw.lottie) .setStartTrigger(createOnVisibleTrigger()) .build() ) // Fallback if lottie is not supported .setAndroidResourceByResId( ResourceBuilders.AndroidImageResourceByResId.Builder() .setResourceId(R.drawable.lottie_fallback) .build() ) .build()
使用不同的算繪器版本進行測試
如要針對不同版本的算繪器測試動態磚,請將動態磚部署至不同版本的 Wear OS 模擬器。(在實體裝置上,ProtoLayout Renderer 更新會透過 Play 商店或系統更新提供。(無法強制安裝特定版本的轉譯器)。
Android Studio 的「動態磚預覽」功能會使用嵌入程式碼所依附 Jetpack ProtoLayout 程式庫的算繪器,因此測試動態磚的另一種做法是依附不同版本的 Jetpack 程式庫。
遷移至 Tiles 1.5 / ProtoLayout 1.3 (Material 3 Expressive)
請更新 Jetpack 圖塊程式庫,充分運用最新強化功能,包括 UI 變更,讓圖塊與系統完美整合。
Jetpack Tiles 1.5 和 Jetpack ProtoLayout 1.3 推出多項重大改善和異動。包括:
- 類似 Compose 的 API,用於說明 UI。
- Material 3 Expressive 元件,包括底部貼邊按鈕,以及支援強化視覺效果:Lottie 動畫、更多漸層類型和新的弧線樣式。注意:部分功能不需遷移至新版 API 也能使用。
建議
遷移動態磚時,請遵循下列建議:
- 同時遷移所有動態磚。請避免在應用程式中混用動態磚版本。雖然 Material 3 元件位於獨立構件 (
androidx.wear.protolayout:protolayout-material3) 中,因此技術上可以在同一個應用程式中同時使用 M2.5 和 M3 動態磚,但除非絕對必要 (例如應用程式有大量動態磚,無法一次全數遷移),否則我們強烈建議不要採取這種做法。 - 採用資訊方塊使用者體驗指南。由於資訊方塊的結構高度化且採用範本,請使用現有範例中的設計做為自有設計的起點。
- 測試各種螢幕和字型大小。方塊通常包含大量資訊,因此文字 (尤其是按鈕上的文字) 容易溢位和遭到裁剪。為盡量減少這種情況,請使用預先建構的元件,並避免進行大規模自訂。使用 Android Studio 的動態磚預覽功能,以及多部實體裝置進行測試。
遷移流程
如要遷移動態磚,請按照下列步驟操作:
更新依附元件
請先更新 build.gradle.kts 檔案。更新版本,並將 protolayout-material 依附元件變更為 protolayout-material3,如下所示:
// In build.gradle.kts

//val tilesVersion = "1.4.1"
//val protoLayoutVersion = "1.2.1"

// Use these versions for M3.
val tilesVersion = "1.5.0"
val protoLayoutVersion = "1.3.0"

 dependencies {
     // Use to implement support for wear tiles
     implementation("androidx.wear.tiles:tiles:$tilesVersion")

     // Use to utilize standard components and layouts in your tiles
     implementation("androidx.wear.protolayout:protolayout:$protoLayoutVersion")

     // Use to utilize components and layouts with Material Design in your tiles
     // implementation("androidx.wear.protolayout:protolayout-material:$protoLayoutVersion")
     implementation("androidx.wear.protolayout:protolayout-material3:$protoLayoutVersion")

     // Use to include dynamic expressions in your tiles
     implementation("androidx.wear.protolayout:protolayout-expression:$protoLayoutVersion")

     // Use to preview wear tiles in your own app
     debugImplementation("androidx.wear.tiles:tiles-renderer:$tilesVersion")

     // Use to fetch tiles from a tile provider in your tests
     testImplementation("androidx.wear.tiles:tiles-testing:$tilesVersion")
 }
TileService 幾乎沒有變動
這次遷移的主要變更會影響 UI 元件。因此,您的 TileService 實作 (包括任何資源載入機制) 應該只需要進行極少修改,甚至完全不需要修改。
主要例外狀況是資訊方塊活動追蹤:如果應用程式使用 onTileEnterEvent() 或 onTileLeaveEvent(),建議您遷移至 onRecentInteractionEventsAsync()。從 API 36 開始,系統會批次處理這些事件。
調整版面配置產生程式碼
在 ProtoLayout 1.2 (M2.5) 中,onTileRequest() 方法會傳回 TileBuilders.Tile。這個物件包含各種元素,包括 TimelineBuilders.Timeline,而後者又包含 LayoutElement,用於說明動態磚的 UI。
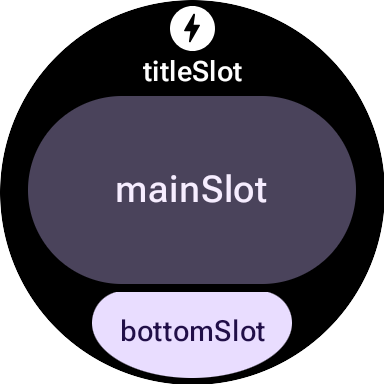
在 ProtoLayout 1.3 (M3) 中,雖然整體資料結構和流程沒有改變,但 LayoutElement 現在是採用以 Compose 為靈感的做法建構,並以定義的插槽為基礎配置版面 (從上到下依序為 titleSlot (選用;通常用於主要標題或標頭)、mainSlot (必要;用於核心內容) 和 bottomSlot (選用;通常用於動作,例如邊緣按鈕,或補充資訊,例如簡短文字)。這個版面配置是由 primaryLayout() 函式建構。
比較 M2.5 和 M3 版面配置函式
M2.5
fun myLayout( context: Context, deviceConfiguration: DeviceParametersBuilders.DeviceParameters ) = PrimaryLayout.Builder(deviceConfiguration) .setResponsiveContentInsetEnabled(true) .setContent( Text.Builder(context, "Hello World!") .setTypography(Typography.TYPOGRAPHY_BODY1) .build() ) .build()
M3
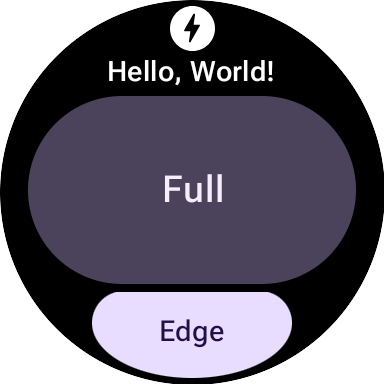
fun myLayout( context: Context, deviceConfiguration: DeviceParametersBuilders.DeviceParameters, ) = materialScope(context, deviceConfiguration) { primaryLayout(mainSlot = { text("Hello, World!".layoutString) }) }
如要強調主要差異,請按照下列步驟操作:
- 淘汰建構工具。Material UI 元件先前的建構工具模式,已替換為更具宣告性的 Compose 風格語法。(字串/顏色/修飾符等非 UI 元件也會取得新的 Kotlin 包裝函式)。
- 標準化的初始化和版面配置函式。M3 版面配置依賴標準化的初始化和結構函式:
materialScope()和primaryLayout()。這些必要函式會初始化 M3 環境 (主題設定、使用materialScope的元件範圍),並定義主要以插槽為基礎的版面配置 (使用primaryLayout)。每個版面配置都必須呼叫這兩個函式一次。
主題設定
Material 3 推出多項主題設定異動,包括動態色彩,以及擴充的字體排版和形狀選項。
顏色
Material 3 Expressive 的一大特色是「動態主題」:啟用這項功能 (預設為開啟) 的圖塊會以系統提供的主題顯示 (視使用者的裝置和設定而定)。
M3 的另一項變更,是擴充了顏色權杖的數量,從 4 個增加到 29 個。新的顏色符記位於 ColorScheme 類別中。
字體排版
與 M2.5 類似,M3 很大程度上依賴預先定義的字型大小常數,因此不建議直接指定字型大小。這些常數位於 Typography 類別中,提供稍微擴大的範圍,以及更多具表現力的選項。
如要查看完整詳細資料,請參閱字體排版說明文件。
圖案
大多數 M3 元件的形狀和顏色都可以變化。
形狀為 full 的 textButton (位於 mainSlot 中):
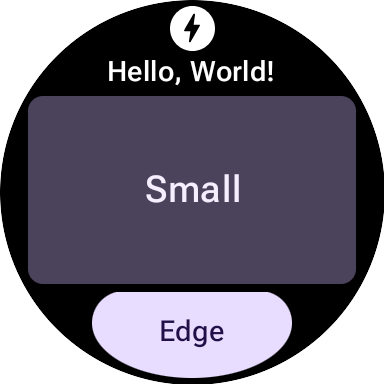
與形狀相同的文字按鈕 small:
元件
M3 元件比 M2.5 元件更具彈性,也更方便設定。M2.5 通常需要不同的元件,才能提供各種視覺處理方式,而 M3 則經常使用通用且高度可設定的基本元件,並提供良好的預設值。
這項原則也適用於根版面配置。在 M2.5 中,這可以是 PrimaryLayout 或 EdgeContentLayout。在 M3 中,建立單一頂層 MaterialScope 後,即可呼叫 primaryLayout() 函式。這個函式會直接傳回根版面配置 (不需要建構工具),並接受多個版位的 LayoutElements,例如 titleSlot、mainSlot 和 bottomSlot。您可以使用具體的 UI 元件 (例如 text()、button() 或 card() 傳回的元件),或版面配置結構 (例如 LayoutElementBuilders 中的 Row 或 Column),填入這些版位。
主題是 M3 的另一項重要強化功能。根據預設,UI 元素會自動遵循 M3 樣式規格,並支援動態主題。
| M2.5 | M3 |
|---|---|
| 互動式元素 | |
Button 或 Chip |
|
| Text | |
Text |
text() |
| 進度指標 | |
CircularProgressIndicator |
circularProgressIndicator() 或 segmentedCircularProgressIndicator() |
| 版面配置 | |
PrimaryLayout 或 EdgeContentLayout |
primaryLayout() |
| — | buttonGroup() |
| 圖片 | |
| — | icon()、avatarImage() 或 backgroundImage() |
修飾符
在 M3 中,您用來裝飾或擴增元件的 Modifiers 更像 Compose。這項變更會自動建構適當的內部型別,進而減少樣板。(這項變更與 M3 UI 元件的使用方式正交;如有需要,您可以搭配 M3 UI 元件使用 ProtoLayout 1.2 的建構工具樣式修飾符,反之亦然)。
M2.5
// Uses Builder-style modifier to set opacity fun myModifier(): ModifiersBuilders.Modifiers = ModifiersBuilders.Modifiers.Builder() .setOpacity(TypeBuilders.FloatProp.Builder(0.5F).build()) .build()
M3
// Uses Compose-like modifiers to set opacity fun myModifier(): LayoutModifier = LayoutModifier.opacity(0.5F)
您可以使用任一 API 樣式建構修飾符,也可以使用 toProtoLayoutModifiers() 擴充功能函式將 LayoutModifier 轉換為 ModifiersBuilders.Modifier。
輔助函式
雖然 ProtoLayout 1.3 允許使用 Compose 風格的 API 表示許多 UI 元件,但 LayoutElementBuilders 的基礎版面配置元素 (例如列和欄) 仍會使用建構工具模式。如要彌補這種風格差異,並提升與新版 M3 元件 API 的一致性,建議使用輔助函式。
不含輔助函式
primaryLayout( mainSlot = { Column.Builder() .setWidth(expand()) .setHeight(expand()) .addContent(text("A".layoutString)) .addContent(text("B".layoutString)) .addContent(text("C".layoutString)) .build() } )
With Helpers
// Function literal with receiver helper function fun column(builder: Column.Builder.() -> Unit) = Column.Builder().apply(builder).build() primaryLayout( mainSlot = { column { setWidth(expand()) setHeight(expand()) addContent(text("A".layoutString)) addContent(text("B".layoutString)) addContent(text("C".layoutString)) } } )
遷移至 Tiles 1.2 / ProtoLayout 1.0
自 1.2 版起,大多數的資訊方塊版面配置 API 都位於 androidx.wear.protolayout 命名空間中。如要使用最新的 API,請完成下列程式碼遷移步驟。
更新依附元件
在應用程式模組的建構檔案中進行下列變更:
Groovy
// Removeimplementation 'androidx.wear.tiles:tiles-material:version'// Include additional dependencies implementation "androidx.wear.protolayout:protolayout:1.4.1" implementation "androidx.wear.protolayout:protolayout-material:1.4.1" implementation "androidx.wear.protolayout:protolayout-expression:1.4.1" // Update implementation "androidx.wear.tiles:tiles:1.6.1"
Kotlin
// Removeimplementation("androidx.wear.tiles:tiles-material:version")// Include additional dependencies implementation("androidx.wear.protolayout:protolayout:1.4.1") implementation("androidx.wear.protolayout:protolayout-material:1.4.1") implementation("androidx.wear.protolayout:protolayout-expression:1.4.1") // Update implementation("androidx.wear.tiles:tiles:1.6.1")
更新命名空間
在應用程式的 Kotlin 和 Java 程式碼檔案中進行下列更新: 或者,您也可以執行這段命名空間重新命名指令碼。
- 將所有的
androidx.wear.tiles.material.*匯入項目替換為androidx.wear.protolayout.material.*。請同時為androidx.wear.tiles.material.layouts程式庫完成這個步驟。 將大多數其他
androidx.wear.tiles.*匯入項目替換為androidx.wear.protolayout.*。androidx.wear.tiles.EventBuilders、androidx.wear.tiles.RequestBuilders、androidx.wear.tiles.TileBuilders和androidx.wear.tiles.TileService的匯入項目應維持不變。重新命名 TileService 和 TileBuilder 類別的幾個已淘汰的方法:
TileBuilders:將getTimeline()重新命名為getTileTimeline()、setTimeline()重新命名為setTileTimeline()TileService:將onResourcesRequest()重新命名為onTileResourcesRequest()RequestBuilders.TileRequest:將getDeviceParameters()重新命名為getDeviceConfiguration()、setDeviceParameters()重新命名為setDeviceConfiguration()、getState()重新命名為getCurrentState(),以及setState()重新命名為setCurrentState()