
आम तौर पर, लोग टीवी देखने से पहले कम से कम इनपुट देना पसंद करते हैं. कॉन्टेंट. कई टीवी उपयोगकर्ताओं के लिए यह सबसे सही स्थिति है: बैठकर कॉन्टेंट देखें, चालू करें, और देखें. सबसे कम चरण आम तौर पर, उपयोगकर्ताओं को उनकी पसंद का कॉन्टेंट उपलब्ध कराया जाता है.
ध्यान दें: सुझाव देने के लिए, यहां बताए गए एपीआई का इस्तेमाल करें यह सुविधा, सिर्फ़ Android 7.1 (एपीआई लेवल 25) तक के Android वर्शन पर काम कर रहे ऐप्लिकेशन के लिए है. सप्लाई करने के लिए Android 8.0 (एपीआई लेवल 26) और उसके बाद के वर्शन पर काम करने वाले ऐप्लिकेशन के लिए सुझावों को स्वीकार करना ज़रूरी है. सुझावों के चैनल के बारे में जानें.
Android फ़्रेमवर्क, सुझाव वाली लाइन का इस्तेमाल करके, कम से कम इनपुट इंटरैक्शन में मदद करता है होम स्क्रीन पर. कॉन्टेंट के सुझाव इसके बाद टीवी की होम स्क्रीन पर पहली पंक्ति के तौर पर दिखते हैं पहली बार इस डिवाइस का इस्तेमाल किया जा सकता है. अपने ऐप्लिकेशन के कॉन्टेंट कैटलॉग से सुझावों का योगदान देने से आपको मदद मिल सकती है उपयोगकर्ताओं को अपने ऐप्लिकेशन पर वापस लाएं.
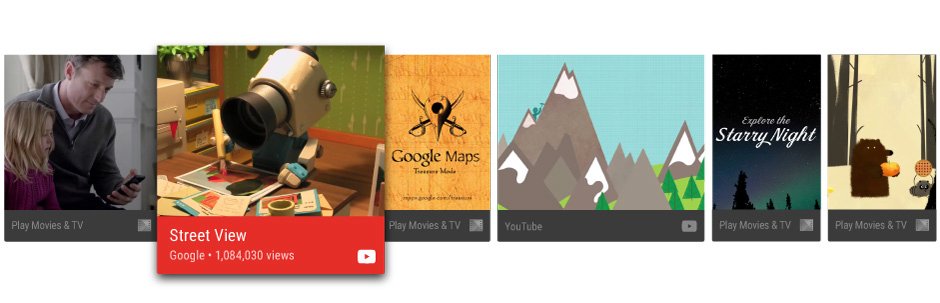
पहला डायग्राम. सुझावों वाली लाइन का एक उदाहरण.
इस गाइड से आपको सुझाव बनाने और उन्हें Android फ़्रेमवर्क पर उपलब्ध कराने का तरीका पता चलता है ताकि लोग आपके ऐप्लिकेशन के कॉन्टेंट को आसानी से खोज सकें और उसका आनंद ले सकें. इसमें, सैंपल लागू करने का तरीका भी देखें यह Leanback सैंपल ऐप्लिकेशन को अपनाएं.
सुझावों के लिए सबसे सही तरीके
सुझावों की मदद से, उपयोगकर्ता अपनी पसंद का कॉन्टेंट और ऐप्लिकेशन तुरंत ढूंढ सकते हैं. बनाई जा रही है अच्छी क्वालिटी वाले और लोगों के लिए काम के सुझाव होते हैं. टीवी ऐप्लिकेशन से शानदार उपयोगकर्ता अनुभव मिलता है. इसलिए, आपको इस बात पर विचार करना चाहिए कि सुझावों को लागू किया जा सकता है और उन्हें मैनेज किया जा सकता है.
अलग-अलग तरह के सुझाव
सुझाव तैयार करते समय, उपयोगकर्ताओं को वीडियो देखने से जुड़ी अधूरी गतिविधियों से जोड़ना चाहिए या आपको गतिविधियों से जुड़ी गतिविधियों का सुझाव देना चाहिए. यहाँ कुछ खास तरह के ये सुझाव ध्यान में रखें:
- अगले एपिसोड के लिए जारी रखने वाले कॉन्टेंट के सुझाव, ताकि उपयोगकर्ता उसे फिर से चला सकें कोई सीरीज़ देख रहे हैं. इसके अलावा, रोकी गई फ़िल्मों, टीवी शो या पॉडकास्ट के लिए, ऑडियो को जारी रखने के सुझावों का इस्तेमाल करें ताकि उपयोगकर्ता कुछ ही क्लिक में, रोके गए वीडियो को फिर से देख सकें.
- नए कॉन्टेंट के सुझाव. जैसे, पहली बार चलाए जाने वाले नए एपिसोड के लिए. ने दूसरी सीरीज़ देखी. साथ ही, अगर आपका ऐप्लिकेशन उपयोगकर्ताओं को सदस्यता लेने, फ़ॉलो करने या ट्रैक करने की सुविधा देता है ट्रैक की जाने वाली सामग्री की सूची में उन आइटम के लिए नई सामग्री के सुझावों का इस्तेमाल करें जिन्हें अब तक नहीं देखा गया है.
- उपयोगकर्ताओं की पसंद के हिसाब से, मिलते-जुलते कॉन्टेंट के सुझाव वीडियो देखने का पुराना तरीका.
बेहतरीन उपयोगकर्ता अनुभव देने के लिए, सुझाव कार्ड डिज़ाइन करने के बारे में ज़्यादा जानने के लिए, यहां देखें Android TV डिज़ाइन स्पेसिफ़िकेशन में, सुझाव वाली लाइन में.
वीडियो के सुझाव रीफ़्रेश करें
सुझावों को रीफ़्रेश करते समय, उन्हें हटाएं और फिर से पोस्ट न करें. ऐसा करने से सुझावों वाली लाइन के आखिर में दिखाएं. कॉन्टेंट आइटम के लिए, जैसे कि मूवी, चलाया जा चुका है, उसे सुझावों से हटा दें.
पसंद के मुताबिक सुझाव पाएं
यूज़र इंटरफ़ेस सेट करके, ब्रैंडिंग की जानकारी देने के लिए सुझाव कार्ड को पसंद के मुताबिक बनाया जा सकता है एलिमेंट, जैसे कि कार्ड का फ़ोरग्राउंड और बैकग्राउंड इमेज, रंग, ऐप्लिकेशन आइकॉन, टाइटल, और सबटाइटल. इस बारे में ज़्यादा जानने के लिए, यह देखें Android TV डिज़ाइन स्पेसिफ़िकेशन में, सुझाव वाली लाइन में.
ग्रुप के सुझाव
सुझाव के सोर्स के आधार पर, सुझावों को ग्रुप में बांटा जा सकता है. हालांकि, ऐसा करना ज़रूरी नहीं है. उदाहरण के लिए, आपका ऐप्लिकेशन सुझावों के दो ग्रुप मिल सकते हैं: ऐसे कॉन्टेंट के लिए सुझाव जिसकी सदस्यता ली गई है, और ऐसे नए ट्रेंडिंग कॉन्टेंट के सुझाव पाएं जिनके बारे में शायद लोगों को पता न हो.
ग्रुप बनाते या अपडेट करते समय, सिस्टम हर ग्रुप के लिए सुझावों को अलग-अलग रैंक और ऑर्डर करता है चुनें. सुझावों के लिए ग्रुप की जानकारी देने से, जो सुझाव आपके काम के नहीं हैं उनके हिसाब से ये सुझाव क्रम में नहीं दिखते.
इस्तेमाल की जाने वाली चीज़ें
किसी सुझाव की ग्रुप कुंजी स्ट्रिंग सेट करने के लिए NotificationCompat.Builder.setGroup(). इसके लिए
उदाहरण के लिए, किसी सुझाव को ऐसे ग्रुप से जुड़े के तौर पर मार्क करने के लिए जिसमें ट्रेंड में चल रहा नया कॉन्टेंट शामिल है,
आप setGroup("trending") को कॉल कर सकते हैं.
सुझाव देने वाली सेवा बनाएं
कॉन्टेंट के सुझाव, बैकग्राउंड प्रोसेसिंग की मदद से बनाए जाते हैं. आपके आवेदन के लिए सुझावों में योगदान दें, एक ऐसी सेवा बनाएं जो समय-समय पर आपके ऐप्लिकेशन के कैटलॉग से, सिस्टम के सुझावों की सूची पर ले जाएगी.
उदाहरण के तौर पर दिया गया यह कोड बताता है कि IntentService को कैसे बढ़ाएं
अपने ऐप्लिकेशन के लिए सुझाव सेवा बनाएं:
Kotlin
class UpdateRecommendationsService : IntentService("RecommendationService") {
    override protected fun onHandleIntent(intent: Intent) {
        Log.d(TAG, "Updating recommendation cards")
        val recommendations = VideoProvider.getMovieList()
        if (recommendations == null) return

        var count = 0

        try {
            val builder = RecommendationBuilder()
                    .setContext(applicationContext)
                    .setSmallIcon(R.drawable.videos_by_google_icon)

            for (entry in recommendations.entrySet()) {
                for (movie in entry.getValue()) {
                    Log.d(TAG, "Recommendation - " + movie.getTitle())

                    builder.setBackground(movie.getCardImageUrl())
                            .setId(count + 1)
                            .setPriority(MAX_RECOMMENDATIONS - count)
                            .setTitle(movie.getTitle())
                            .setDescription(getString(R.string.popular_header))
                            .setImage(movie.getCardImageUrl())
                            .setIntent(buildPendingIntent(movie))
                            .build()
                    if (++count >= MAX_RECOMMENDATIONS) {
                        break
                    }
                }
                if (++count >= MAX_RECOMMENDATIONS) {
                    break
                }
            }
        } catch (e: IOException) {
            Log.e(TAG, "Unable to update recommendation", e)
        }
    }

    private fun buildPendingIntent(movie: Movie): PendingIntent {
        val detailsIntent = Intent(this, DetailsActivity::class.java)
        detailsIntent.putExtra("Movie", movie)

        val stackBuilder = TaskStackBuilder.create(this)
        stackBuilder.addParentStack(DetailsActivity::class.java)
        stackBuilder.addNextIntent(detailsIntent)

        // Ensure a unique PendingIntents, otherwise all
        // recommendations end up with the same PendingIntent
        detailsIntent.setAction(movie.getId().toString())

        val intent = stackBuilder.getPendingIntent(0, PendingIntent.FLAG_UPDATE_CURRENT)
        return intent
    }

    companion object {
        private val TAG = "UpdateRecommendationsService"
        private val MAX_RECOMMENDATIONS = 3
    }
}
Java
public class UpdateRecommendationsService extends IntentService {
    private static final String TAG = "UpdateRecommendationsService";
    private static final int MAX_RECOMMENDATIONS = 3;

    public UpdateRecommendationsService() {
        super("RecommendationService");
    }

    @Override
    protected void onHandleIntent(Intent intent) {
        Log.d(TAG, "Updating recommendation cards");
        HashMap<String, List<Movie>> recommendations = VideoProvider.getMovieList();
        if (recommendations == null) return;

        int count = 0;

        try {
            RecommendationBuilder builder = new RecommendationBuilder()
                    .setContext(getApplicationContext())
                    .setSmallIcon(R.drawable.videos_by_google_icon);

            for (Map.Entry<String, List<Movie>> entry : recommendations.entrySet()) {
                for (Movie movie : entry.getValue()) {
                    Log.d(TAG, "Recommendation - " + movie.getTitle());

                    builder.setBackground(movie.getCardImageUrl())
                            .setId(count + 1)
                            .setPriority(MAX_RECOMMENDATIONS - count)
                            .setTitle(movie.getTitle())
                            .setDescription(getString(R.string.popular_header))
                            .setImage(movie.getCardImageUrl())
                            .setIntent(buildPendingIntent(movie))
                            .build();

                    if (++count >= MAX_RECOMMENDATIONS) {
                        break;
                    }
                }
                if (++count >= MAX_RECOMMENDATIONS) {
                    break;
                }
            }
        } catch (IOException e) {
            Log.e(TAG, "Unable to update recommendation", e);
        }
    }

    private PendingIntent buildPendingIntent(Movie movie) {
        Intent detailsIntent = new Intent(this, DetailsActivity.class);
        detailsIntent.putExtra("Movie", movie);

        TaskStackBuilder stackBuilder = TaskStackBuilder.create(this);
        stackBuilder.addParentStack(DetailsActivity.class);
        stackBuilder.addNextIntent(detailsIntent);
        // Ensure a unique PendingIntents, otherwise all
        // recommendations end up with the same PendingIntent
        detailsIntent.setAction(Long.toString(movie.getId()));

        PendingIntent intent = stackBuilder.getPendingIntent(0, PendingIntent.FLAG_UPDATE_CURRENT);
        return intent;
    }
}
इस सेवा की पहचान करने के लिए, सिस्टम इसे अपने ऐप्लिकेशन मेनिफ़ेस्ट फ़ाइल खोलें. नीचे दिया गया कोड स्निपेट बताता है कि इस क्लास को सेवा के तौर पर कैसे दर्ज किया जा सकता है:
<manifest ... >
  <application ... >
    ...

    <service
            android:name="com.example.android.tvleanback.UpdateRecommendationsService"
            android:enabled="true" />
  </application>
</manifest>
सुझाव तैयार करें
सुझाव देने वाली सेवा चालू होने पर, इसे सुझाव बनाए जाने चाहिए और उन्हें
Android फ़्रेमवर्क पर आधारित है. फ़्रेमवर्क को Notification ऑब्जेक्ट के तौर पर सुझाव मिलते हैं. ये किसी खास टेंप्लेट का इस्तेमाल करते हैं और जिन पर किसी खास टेंप्लेट का इस्तेमाल होता है
श्रेणी.
वैल्यू सेट करना
सुझाव कार्ड के लिए यूआई एलिमेंट की वैल्यू सेट करने के लिए, बिल्डर क्लास बनाएं. यह क्लास नीचे दी गई है बिल्डर पैटर्न को नीचे बताया गया है. सबसे पहले, आपको सुझाव कार्ड की वैल्यू सेट करनी होंगी एलिमेंट.
Kotlin
class RecommendationBuilder {
    ...

    fun setTitle(title: String): RecommendationBuilder {
        this.title = title
        return this
    }

    fun setDescription(description: String): RecommendationBuilder {
        this.description = description
        return this
    }

    fun setImage(uri: String): RecommendationBuilder {
        imageUri = uri
        return this
    }

    fun setBackground(uri: String): RecommendationBuilder {
        backgroundUri = uri
        return this
    }

...
Java
public class RecommendationBuilder {
    ...

    public RecommendationBuilder setTitle(String title) {
            this.title = title;
            return this;
        }

        public RecommendationBuilder setDescription(String description) {
            this.description = description;
            return this;
        }

        public RecommendationBuilder setImage(String uri) {
            imageUri = uri;
            return this;
        }

        public RecommendationBuilder setBackground(String uri) {
            backgroundUri = uri;
            return this;
        }
...
सूचना बनाएं
वैल्यू सेट करने के बाद, आपको बिल्डर में वैल्यू असाइन करते हुए नोटिफ़िकेशन बनाना होगा
क्लास डाउनलोड करें और NotificationCompat.Builder.build() पर कॉल करें.
साथ ही, कॉल करना न भूलें
setLocalOnly() अभी तक किसी भी व्यक्ति ने चेक इन नहीं किया है
इसलिए NotificationCompat.BigPictureStyle की सूचना नहीं दिखेगी
अन्य डिवाइसों पर.
नीचे दिया गया कोड उदाहरण, सुझाव बनाने का तरीका बताता है.
Kotlin
class RecommendationBuilder {
    ...

    @Throws(IOException::class)
    fun build(): Notification {
        ...

        val notification = NotificationCompat.BigPictureStyle(
        NotificationCompat.Builder(context)
                .setContentTitle(title)
                .setContentText(description)
                .setPriority(priority)
                .setLocalOnly(true)
                .setOngoing(true)
                .setColor(context.resources.getColor(R.color.fastlane_background))
                .setCategory(Notification.CATEGORY_RECOMMENDATION)
                .setLargeIcon(image)
                .setSmallIcon(smallIcon)
                .setContentIntent(intent)
                .setExtras(extras))
                .build()

        return notification
    }
}
Java
public class RecommendationBuilder {
    ...

    public Notification build() throws IOException {
        ...

        Notification notification = new NotificationCompat.BigPictureStyle(
                new NotificationCompat.Builder(context)
                        .setContentTitle(title)
                        .setContentText(description)
                        .setPriority(priority)
                        .setLocalOnly(true)
                        .setOngoing(true)
                        .setColor(context.getResources().getColor(R.color.fastlane_background))
                        .setCategory(Notification.CATEGORY_RECOMMENDATION)
                        .setLargeIcon(image)
                        .setSmallIcon(smallIcon)
                        .setContentIntent(intent)
                        .setExtras(extras))
                .build();

        return notification;
    }
}
सुझाव देने वाली सेवा चलाएं
आपके ऐप्लिकेशन की सुझाव सेवा समय-समय पर चलना चाहिए, ताकि मौजूदा
देखें. अपनी सेवा चलाने के लिए, एक ऐसी क्लास बनाएं जो टाइमर चलाती है और शुरू करती है
इसे नियमित अंतराल पर करते रहें. कोड के इस उदाहरण में, BroadcastReceiver क्लास को बढ़ाया गया है. इससे सुझाव की सेवा को समय-समय पर चालू किया जा सकेगा
हर आधे घंटे में:
Kotlin
class BootupActivity : BroadcastReceiver() {
    override fun onReceive(context: Context, intent: Intent) {
        Log.d(TAG, "BootupActivity initiated")
        if (intent.action.endsWith(Intent.ACTION_BOOT_COMPLETED)) {
            scheduleRecommendationUpdate(context)
        }
    }

    private fun scheduleRecommendationUpdate(context: Context) {
        Log.d(TAG, "Scheduling recommendations update")
        val alarmManager = context.getSystemService(Context.ALARM_SERVICE) as AlarmManager
        val recommendationIntent = Intent(context, UpdateRecommendationsService::class.java)
        val alarmIntent = PendingIntent.getService(context, 0, recommendationIntent, 0)
        alarmManager.setInexactRepeating(AlarmManager.ELAPSED_REALTIME_WAKEUP,
                INITIAL_DELAY,
                AlarmManager.INTERVAL_HALF_HOUR,
                alarmIntent
        )
    }

    companion object {
        private val TAG = "BootupActivity"
        private val INITIAL_DELAY:Long = 5000
    }
}
Java
public class BootupActivity extends BroadcastReceiver {
    private static final String TAG = "BootupActivity";

    private static final long INITIAL_DELAY = 5000;

    @Override
    public void onReceive(Context context, Intent intent) {
        Log.d(TAG, "BootupActivity initiated");
        if (intent.getAction().endsWith(Intent.ACTION_BOOT_COMPLETED)) {
            scheduleRecommendationUpdate(context);
        }
    }

    private void scheduleRecommendationUpdate(Context context) {
        Log.d(TAG, "Scheduling recommendations update");

        AlarmManager alarmManager = (AlarmManager) context.getSystemService(Context.ALARM_SERVICE);
        Intent recommendationIntent = new Intent(context, UpdateRecommendationsService.class);
        PendingIntent alarmIntent = PendingIntent.getService(context, 0, recommendationIntent, 0);

        alarmManager.setInexactRepeating(AlarmManager.ELAPSED_REALTIME_WAKEUP,
                INITIAL_DELAY,
                AlarmManager.INTERVAL_HALF_HOUR,
                alarmIntent);
    }
}
BroadcastReceiver क्लास को लागू करने की इस प्रक्रिया को शुरू होने के बाद ही चलाया जाना चाहिए
जहां वह इंस्टॉल किया गया है. इसे पूरा करने के लिए, इस क्लास को अपने ऐप्लिकेशन में रजिस्टर करें
मेनिफ़ेस्ट फ़िल्टर की मदद से, डिवाइस को चालू करने की प्रोसेस के पूरा होने पर ध्यान दें. कॉन्टेंट बनाने
नीचे दिया गया सैंपल कोड बताता है कि मेनिफ़ेस्ट में इस कॉन्फ़िगरेशन को कैसे जोड़ा जाता है:
<manifest ... >
  <application ... >
    <receiver android:name="com.example.android.tvleanback.BootupActivity"
              android:enabled="true"
              android:exported="false">
      <intent-filter>
        <action android:name="android.intent.action.BOOT_COMPLETED"/>
      </intent-filter>
    </receiver>
  </application>
</manifest>
अहम जानकारी: डिवाइस चालू होने की सूचना पाने के लिए, यह ज़रूरी है कि आपका ऐप्लिकेशन चालू हो
RECEIVE_BOOT_COMPLETED की अनुमति का अनुरोध करता है.
ज़्यादा जानकारी के लिए, ACTION_BOOT_COMPLETED देखें.
आपके सुझाव के लिए सेवा की क्लास में' onHandleIntent() अभी तक किसी भी व्यक्ति ने चेक इन नहीं किया है
तरीका, मैनेजर को सुझाव इस प्रकार पोस्ट करता है:
Kotlin
val notification = notificationBuilder.build()
notificationManager.notify(id, notification)
Java
Notification notification = notificationBuilder.build();
notificationManager.notify(id, notification);