Mit Sammlungen den Überblick behalten
Sie können Inhalte basierend auf Ihren Einstellungen speichern und kategorisieren.
Android Studio bietet vollständigen Support für Kotlin, sodass Sie
Kotlin-Dateien in Ihr Projekt und konvertieren den Java-Sprachcode in Kotlin.
Sie können dann alle vorhandenen Tools von Android Studio mit Ihrem Kotlin-Code verwenden.
einschließlich automatischer Vervollständigung, Lint-Prüfung, Refaktorierung, Fehlerbehebung und mehr.
Wenn Sie ein neues Projekt starten und Kotlin verwenden möchten, lesen Sie die folgenden Informationen:
Projekt erstellen
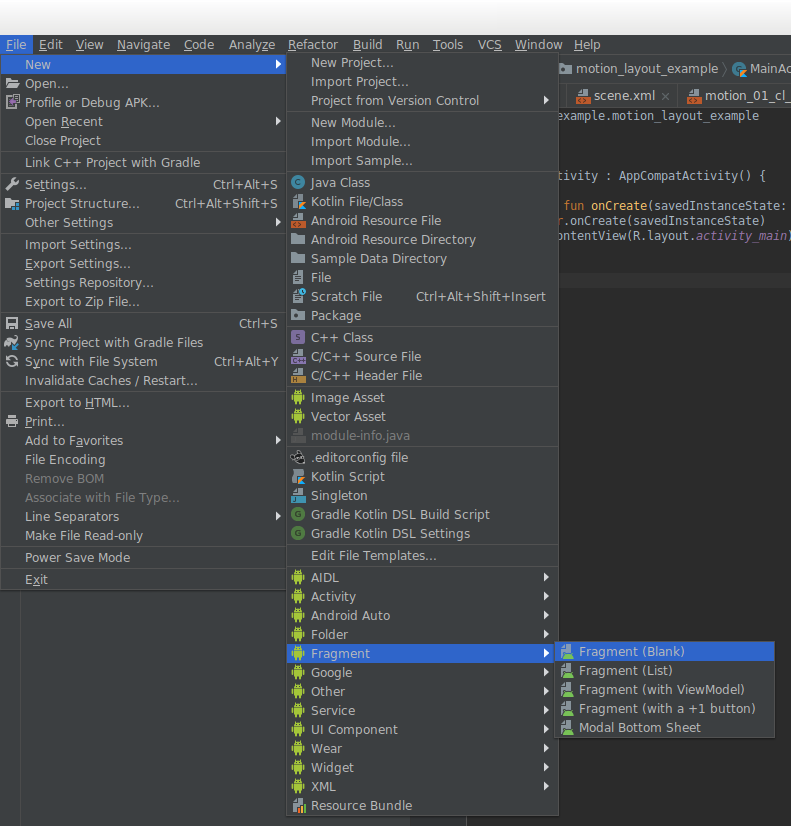
Klicken Sie auf Datei > Neu und wählen Sie eine der verschiedenen Android-Vorlagen aus, z. B.
als neues leeres Fragment, wie in Abbildung 1 dargestellt. Wenn Sie die Liste nicht sehen,
der Vorlagen auswählen, öffnen Sie zuerst das Fenster Projekt und wählen Sie
App-Modul.
<ph type="x-smartling-placeholder"></ph>
Abbildung 1. Wählen Sie eine der verfügbaren Vorlagen aus, z. B. „Fragment“.
oder Aktivitäten.
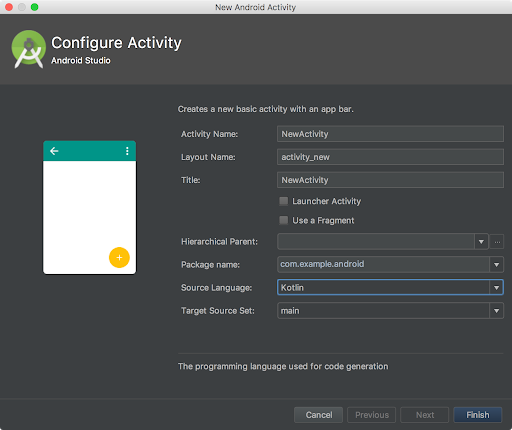
Wählen Sie im angezeigten Assistenten Kotlin als Quellsprache aus.
Abbildung 2 zeigt das Dialogfeld New Android Activity (Neue Android-Aktivität).
eine neue Aktivität zu erstellen.
<ph type="x-smartling-placeholder"></ph>
Abbildung 2. Das Dialogfeld Neue Android-Aktivität, in dem Sie
Wählen Sie Kotlin als Quellsprache aus.
Fahren Sie mit dem Assistenten fort.
Alternativ können Sie auf Datei > Neu > Kotlin-Datei/-Klasse zum Erstellen einer
Kotlin-Standarddatei. Wenn diese Option nicht angezeigt wird, öffnen Sie das Fenster Projekt und
Wählen Sie das Verzeichnis java aus. Im Fenster New Kotlin File/Class (Neue Kotlin-Datei/-Klasse) können Sie folgende Aktionen ausführen:
den Dateinamen definieren und bietet mehrere Auswahlmöglichkeiten für den Dateityp: Datei,
Class, Interface, Enum Class oder Object Ihre Entscheidung
legt das grundlegende Gerüst fest, das in der neuen Kotlin-Datei für Sie erstellt wird. Wenn Sie
Class auswählen, erstellt Android Studio eine neue Kotlin-Quelldatei mit den
Name und eine übereinstimmende Klassendefinition. Wenn Sie Interface (Schnittstelle) auswählen, wird eine Schnittstelle angezeigt,
in der Datei deklariert ist usw.
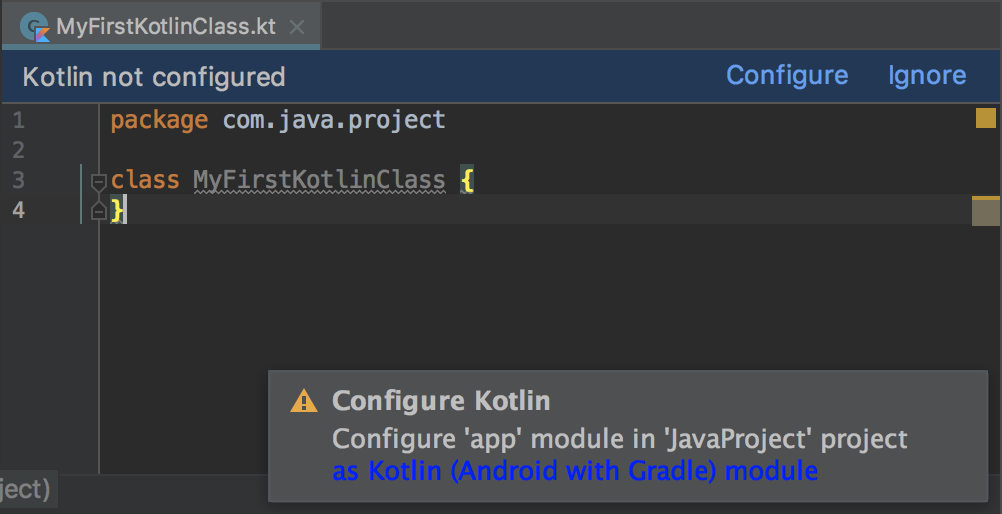
Wenn Sie zum ersten Mal eine neue Kotlin-Klasse oder -Datei zu Ihrem
direkt ein Projekt erstellen (ohne die Android-Vorlagen verwenden), zeigt Android Studio eine
Warnung, dass Kotlin nicht im Projekt konfiguriert ist (siehe Abbildung 3).
Sie können Kotlin konfigurieren, indem Sie oben rechts auf Konfigurieren
im Editor oder in der Ereignisprotokollbenachrichtigung unten rechts.
<ph type="x-smartling-placeholder"></ph>
Abbildung 3: Android Studio zeigt eine Warnung an, wenn Kotlin
nicht für Ihr Projekt konfiguriert ist.
Wählen Sie die Option zum Konfigurieren von Kotlin für Alle Module mit Kotlin aus.
Dateien, wenn Sie dazu aufgefordert werden, wie in Abbildung 4 gezeigt:
<ph type="x-smartling-placeholder"></ph>
Abbildung 4: Konfigurieren Sie Kotlin für alle Module, die folgenden Text enthalten:
Kotlin-Code.
Sobald Sie auf OK klicken, fügt Android Studio Kotlin zum Klassenpfad Ihres Projekts und
wendet das Kotlin-Android-Plug-in auf jedes Modul an, das Kotlin-Dateien enthält.
Ihre build.gradle-Dateien sollten in etwa so aussehen:
// Inside each module using kotlinplugins{...id'kotlin-android'}...dependencies{implementation'androidx.core:core-ktx:1.3.2'implementation"org.jetbrains.kotlin:kotlin-stdlib:$kotlin_version"}
Kotlin
// Inside each module using kotlinplugins{...kotlin("android")}...valkotlin_version:StringbyrootProject.extradependencies{implementation("androidx.core:core-ktx:1.3.2")implementation("org.jetbrains.kotlin:kotlin-stdlib:$kotlin_version")}
Quellorganisation
Neue Kotlin-Dateien werden standardmäßig in src/main/java/ gespeichert.
um sowohl Kotlin- als auch Java-Dateien an einem Ort zu sehen. Wenn Sie die Daten
Kotlin-Dateien aus Ihren Java-Dateien entfernen, können Sie
Stattdessen src/main/kotlin/. In diesem Fall müssen Sie auch
Verzeichnis in Ihrem sourceSets
wie unten dargestellt:
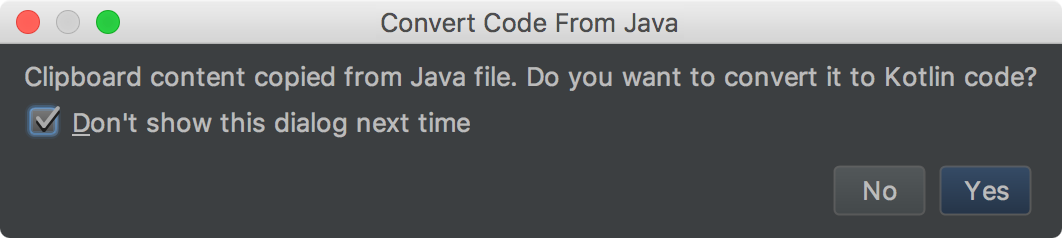
Um Java-Code in Kotlin zu konvertieren, öffnen Sie die Java-Datei in Android Studio und wählen Sie
Code > Java-Datei in Kotlin-Datei konvertieren Alternativ können Sie auch einen neuen Kotlin-Code erstellen
(File > New > Kotlin File/Class) (Datei > Neu > Kotlin-Datei/-Klasse) aus und fügen Sie dann Ihren Java-Code in
für diese Datei. Android Studio zeigt dann eine Aufforderung an und bietet an, Ihren Code zu konvertieren.
Kotlin-Code ein, wie in Abbildung 5 gezeigt. Klicken Sie zum Umwandeln auf Ja. Sie können optional
Klicken Sie auf das Kästchen Dieses Dialogfeld beim nächsten Mal nicht mehr anzeigen, weil dadurch zukünftige Conversions generiert werden.
automatisch.
<ph type="x-smartling-placeholder"></ph>
Abbildung 5: In Android Studio kann Java-Code in Kotlin konvertiert werden.
Codekonvertierung und Null-Zulässigkeit
Durch den Konvertierungsprozess von Android Studio wird funktionell äquivalenter Kotlin-Code erzeugt
das kompiliert und ausgeführt wird. Wahrscheinlich müssen Sie jedoch weitere
Optimierungen für den konvertierten Code vornehmen. Sie können beispielsweise optimieren, wie
verarbeitet der konvertierte Code Typen, für die Nullwerte zulässig sind.
In Android ist es üblich, die Initialisierung von View-Objekten und anderen
bis das Fragment oder die Aktivität, an die sie angehängt sind,
entsprechenden Lebenszyklusstatus. Vielleicht haben Sie einen Verweis auf eine
in einem Ihrer Fragmente einfügen, wie im folgenden Snippet gezeigt:
publicclassJavaFragmentextendsFragment{// Null until onCreateView.privateButtonbutton;@OverridepublicViewonCreateView(@NonNullLayoutInflaterinflater,ViewGroupcontainer,BundlesavedInstanceState){Viewroot=inflater.inflate(R.layout.fragment_content,container,false);// Get a reference to the button in the view, only after the root view is inflated.button=root.findViewById(R.id.button);returnroot;}@OverridepublicvoidonViewCreated(@NonNullViewview,@NullableBundlesavedInstanceState){super.onViewCreated(view,savedInstanceState);// Not null at this point of time when onViewCreated runsbutton.setOnClickListener(newView.OnClickListener(){@OverridepublicvoidonClick(Viewv){...}});}}
Auch wenn die Variable „button“ keine NULL-Werte enthält, ist sie für alle praktischen Zwecke
sollte niemals null sein, wenn es in diesem Beispiel verwendet wird. Da ihr Wert jedoch nicht
die bei der Erstellung zugewiesen wurden, behandelt der generierte Kotlin-Code Button.
als Typ, der Nullwerte zulässt, und verwendet den Nicht-Null-Assertion-Operator zum Entpacken der Schaltfläche
wenn Sie wie unten gezeigt einen Klick-Listener hinzufügen:
classJavaFragment:Fragment(){// Null until onCreateView.privatevarbutton:Button? =nulloverridefunonCreateView(inflater:LayoutInflater,container:ViewGroup?,savedInstanceState:Bundle?):View? {...// Get a reference to the button in the view, only after the root view is inflated.button=root.findViewById(R.id.button)...}overridefunonViewCreated(view:View,savedInstanceState:Bundle?){super.onViewCreated(view,savedInstanceState)// Not null at the point of time when onViewCreated fires // but force unwrapped nonethelessbutton!!.setOnClickListener{}}}
Diese Conversion ist in diesem Fall weniger ideal als die Verwendung von lateinit.
werden gezwungen, den Schaltflächenverweis mit einer Nicht-Null-Assertion oder einem Safe-Aufruf zu entpacken
und zwar an jedem Ort,
auf den er zugreifen kann.
In anderen Fällen ist null eine gültige Variablenzuweisung auf Grundlage Ihrer
Anwendungsfall der Anwendung, wobei ein Safe-Call-Operator (?.) mit einem beendenden Elvis verwendet wird
(?:) ist eine bessere Methode zum sicheren Entpacken des
Objekt, das Nullwerte zulässt, oder in einen sinnvollen Standardwert ungleich Null umgewandelt werden. Android Studio
haben nicht genügend Informationen, um dies während
Conversion-Prozess. Die Standardeinstellung ist zwar eine Assertion, die nicht null ist, Sie sollten aber
und den konvertierten Code nach Bedarf anpassen.
Weitere Informationen
Weitere Informationen zur Verwendung von Kotlin- und Java-Code in Ihrem Projekt finden Sie unter
Java-Code über Kotlin aufrufen
Informationen zu idiomatischen Kotlin-Wrappern für vorhandene Android APIs finden Sie unter
Android KTX
Alle Inhalte und Codebeispiele auf dieser Seite unterliegen den Lizenzen wie im Abschnitt Inhaltslizenz beschrieben. Java und OpenJDK sind Marken oder eingetragene Marken von Oracle und/oder seinen Tochtergesellschaften.
Zuletzt aktualisiert: 2025-07-27 (UTC).
[[["Leicht verständlich","easyToUnderstand","thumb-up"],["Mein Problem wurde gelöst","solvedMyProblem","thumb-up"],["Sonstiges","otherUp","thumb-up"]],[["Benötigte Informationen nicht gefunden","missingTheInformationINeed","thumb-down"],["Zu umständlich/zu viele Schritte","tooComplicatedTooManySteps","thumb-down"],["Nicht mehr aktuell","outOfDate","thumb-down"],["Problem mit der Übersetzung","translationIssue","thumb-down"],["Problem mit Beispielen/Code","samplesCodeIssue","thumb-down"],["Sonstiges","otherDown","thumb-down"]],["Zuletzt aktualisiert: 2025-07-27 (UTC)."],[],[],null,["# Add Kotlin to an existing app\n\nAndroid Studio provides [full support for Kotlin](/kotlin), enabling you to add\nKotlin files to your existing project and convert Java language code to Kotlin.\nYou can then use all of Android Studio's existing tools with your Kotlin code,\nincluding autocomplete, lint checking, refactoring, debugging, and more.\n\nIf you're starting a new project and want to use Kotlin, see\n[Create a project](/studio/projects/create-project).\n\nFor samples, check out our\n[Kotlin code samples](/samples/index?language=kotlin).\n\nAdd Kotlin to an existing project\n---------------------------------\n\nTo add Kotlin to your project, do the following:\n\n1. Click **File \\\u003e New** , and choose one of the various Android templates, such\n as a new blank **Fragment** , as shown in figure 1. If you don't see the list\n of templates in this menu, first open the **Project** window, and select your\n app module.\n\n Figure 1. Choose from the available templates, such as fragment or activity.\n2. In the wizard that appears, choose **Kotlin** for the **Source Language** .\n Figure 2 shows the **New Android Activity** dialog for when you want to\n create a new activity.\n\n Figure 2. A **New Android Activity** dialog where you can choose **Kotlin** as your **Source Language**.\n3. Continue through the wizard.\n\nAlternatively, you can click **File \\\u003e New \\\u003e Kotlin File/Class** to create a\nbasic Kotlin file. If you don't see this option, open the **Project** window and\nselect the **java** directory. The **New Kotlin File/Class** window lets you\ndefine the file name and provides several choices for the file type: **File** ,\n**Class** , **Interface** , **Enum Class** , or **Object** . The choice you make\ndetermines the basic scaffolding created for you in the new Kotlin file. If you\nchoose **Class** , Android Studio creates a new Kotlin source file with the given\nname and a matching class definition. If you choose **Interface**, an interface\nis declared in the file, and so on.\n\nIf this is the first time you have added a new Kotlin class or file to your\nproject directly (not using the Android templates), Android Studio displays a\nwarning that Kotlin is not configured in the project, as shown in figure 3.\nConfigure Kotlin by clicking **Configure** either in the upper right corner of\nthe editor or in the **event log alert** that pops up in the lower-right corner.\nFigure 3. Android Studio displays a warning dialog when Kotlin isn't configured for your project.\n\nChoose the option to configure Kotlin for **All modules containing Kotlin\nfiles** when prompted, as shown in figure 4:\nFigure 4. Choose to configure Kotlin for all modules that contain Kotlin code.\n\nOnce you click **OK** , Android Studio adds Kotlin to your project classpath and\napplies the Kotlin Android plugin to each module that contains Kotlin files.\nYour `build.gradle` files should look similar to the examples below: \n\n### Groovy\n\n```groovy\n// Project build.gradle file.\nbuildscript {\n ext.kotlin_version = '1.4.10'\n ...\n dependencies {\n classpath \"org.jetbrains.kotlin:kotlin-gradle-plugin:$kotlin_version\"\n }\n}\n```\n\n### Kotlin\n\n```kotlin\n// Project build.gradle.kts file.\nbuildscript {\n extra[\"kotlin_version\"] = \"1.4.10\"\n ...\n dependencies {\n classpath(\"org.jetbrains.kotlin:kotlin-gradle-plugin:$kotlin_version\")\n }\n}\n``` \n\n### Groovy\n\n```groovy\n// Inside each module using kotlin\nplugins {\n ...\n id 'kotlin-android'\n}\n\n...\n\ndependencies {\n implementation 'androidx.core:core-ktx:1.3.2'\n implementation \"org.jetbrains.kotlin:kotlin-stdlib:$kotlin_version\"\n}\n```\n\n### Kotlin\n\n```kotlin\n// Inside each module using kotlin\nplugins {\n ...\n kotlin(\"android\")\n}\n\n...\n\nval kotlin_version: String by rootProject.extra\n\ndependencies {\n implementation(\"androidx.core:core-ktx:1.3.2\")\n implementation(\"org.jetbrains.kotlin:kotlin-stdlib:$kotlin_version\")\n}\n```\n\nSource organization\n-------------------\n\nBy default, new Kotlin files are saved in `src/main/java/`, which makes it easy\nto see both Kotlin and Java files in one location. If you'd prefer to separate\nyour Kotlin files from your Java files, you can put Kotlin files under\n`src/main/kotlin/` instead. If you do this, then you also need to include this\ndirectory in your [`sourceSets`](/studio/build#sourcesets)\nconfiguration, as shown below: \n\n### Groovy\n\n```groovy\nandroid {\n sourceSets {\n main.java.srcDirs += 'src/main/kotlin'\n }\n}\n```\n\n### Kotlin\n\n```kotlin\nandroid {\n sourceSets {\n getByName(\"main\") {\n java.srcDir(\"src/main/kotlin\")\n }\n }\n}\n```\n\nConvert existing Java code to Kotlin code\n-----------------------------------------\n\nTo convert Java code to Kotlin, open the Java file in Android Studio, and select\n**Code \\\u003e Convert Java File to Kotlin File** . Alternatively, create a new Kotlin\nfile (**File \\\u003e New \\\u003e Kotlin File/Class** ), and then paste your Java code into\nthat file. Android Studio then displays a prompt and offers to convert your code\nto Kotlin, as shown in figure 5. Click **Yes** to convert. You can optionally\ncheck **Don't show this dialog next time**, which makes future conversions\nautomatic.\nFigure 5. Android Studio can convert Java code to Kotlin.\n\nCode conversion and nullability\n-------------------------------\n\nAndroid Studio's conversion process produces functionally-equivalent Kotlin code\nthat compiles and runs. However, it's likely that you need to make additional\noptimizations to the converted code. For example, you might want to refine how\nthe converted code handles nullable types.\n\nIn Android, it is common to delay initialization of `View` objects and other\ncomponents until the fragment or activity they are attached to reaches the\nappropriate lifecycle state. For example, you may have a reference to a\nbutton in one of your fragments, as demonstrated in the following snippet: \n\n public class JavaFragment extends Fragment {\n\n // Null until onCreateView.\n private Button button;\n\n @Override\n public View onCreateView(@NonNull LayoutInflater inflater, ViewGroup container,\n Bundle savedInstanceState) {\n View root = inflater.inflate(R.layout.fragment_content, container,false);\n\n // Get a reference to the button in the view, only after the root view is inflated.\n button = root.findViewById(R.id.button);\n\n return root;\n }\n\n @Override\n public void onViewCreated(@NonNull View view, @Nullable Bundle savedInstanceState) {\n super.onViewCreated(view, savedInstanceState);\n\n // Not null at this point of time when onViewCreated runs\n button.setOnClickListener(new View.OnClickListener() {\n @Override\n public void onClick(View v) {\n ...\n }\n });\n }\n }\n\nEven though the button variable is nullable, for all practical purposes it\nshould never be null when used in this example. However, since its value is not\nassigned at the point of construction, the generated Kotlin code treats `Button`\nas a nullable type and uses the non-null assertion operator to unwrap the button\nwhen adding a click listener, as shown below: \n\n class JavaFragment : Fragment() {\n\n // Null until onCreateView.\n private var button: Button? = null\n\n override fun onCreateView(inflater: LayoutInflater, container: ViewGroup?,\n savedInstanceState: Bundle?): View? {\n ...\n // Get a reference to the button in the view, only after the root view is inflated.\n button = root.findViewById(R.id.button)\n ...\n }\n\n override fun onViewCreated(view: View, savedInstanceState: Bundle?) {\n super.onViewCreated(view, savedInstanceState)\n\n // Not null at the point of time when onViewCreated fires \n // but force unwrapped nonetheless\n button!!.setOnClickListener { }\n }\n }\n\nThis conversion is less ideal than using `lateinit` for this case, because you\nare forced to unwrap the button reference with a non-null assertion or safe-call\noperator in every place it is accessed.\n| **Note:** This example doesn't mean that you should always avoid nullable types. Generally, this pattern of using `lateinit` applies to variables which are never expected to be `null` but cannot be initialized where they are defined, as is the case with `View` references inside of the fragment or activity in which they live.\n\nIn other cases, where `null` is a valid variable assignment based on your\napplication's use case, using a safe-call (?.) operator with a terminating elvis\noperator (?:) operator may be a more appropriate way to safely unwrap the\nnullable object or coerce to a sensible non-null default value. Android Studio\ndoes not have enough information to make this determination during the\nconversion process. While it defaults to the non-null assertion, you should\nfollow up and adjust the converted code as needed.\n\nMore information\n----------------\n\nFor more information about using both Kotlin and Java code in your project, see\n[Calling Java code from Kotlin](https://kotlinlang.org/docs/reference/java-interop.html).\n\nFor more information about using Kotlin in enterprise scenarios, see\n[Adopting Kotlin for large teams](/kotlin/adopt-for-large-teams).\n\nFor information about idiomatic Kotlin wrappers for existing Android APIs, see\n[Android KTX](/kotlin/ktx)."]]