
ارائه دهنده مخاطبین یک کامپوننت قدرتمند و انعطافپذیر اندروید است که مخزن مرکزی دادههای دستگاه در مورد افراد را مدیریت میکند. ارائه دهنده مخاطبین منبع دادههایی است که در برنامه مخاطبین دستگاه مشاهده میکنید و همچنین میتوانید به دادههای آن در برنامه خود دسترسی داشته باشید و دادهها را بین دستگاه و سرویسهای آنلاین منتقل کنید. این ارائه دهنده طیف گستردهای از منابع داده را در خود جای میدهد و سعی میکند تا حد امکان دادههای بیشتری را برای هر شخص مدیریت کند، در نتیجه سازمان آن پیچیده است. به همین دلیل، API ارائه دهنده شامل مجموعه گستردهای از کلاسهای قرارداد و رابطهایی است که بازیابی و اصلاح دادهها را تسهیل میکند.
این راهنما موارد زیر را شرح میدهد:
- ساختار ارائه دهنده اولیه.
- نحوه بازیابی اطلاعات از ارائه دهنده.
- نحوه تغییر دادهها در ارائهدهنده.
- نحوه نوشتن یک آداپتور همگامسازی برای همگامسازی دادهها از سرور شما با ارائهدهنده مخاطبین.
این راهنما فرض میکند که شما اصول اولیه ارائهدهندگان محتوای اندروید را میدانید. برای کسب اطلاعات بیشتر در مورد ارائهدهندگان محتوای اندروید، راهنمای اصول اولیه ارائهدهنده محتوا را مطالعه کنید.
اطلاعات تماس سازمان ارائه دهنده
ارائهدهندهی مخاطبین یک کامپوننت ارائهدهندهی محتوای اندروید است. این کامپوننت سه نوع داده در مورد یک شخص را نگهداری میکند که هر کدام مربوط به جدولی است که توسط ارائهدهنده ارائه میشود، همانطور که در شکل ۱ نشان داده شده است:
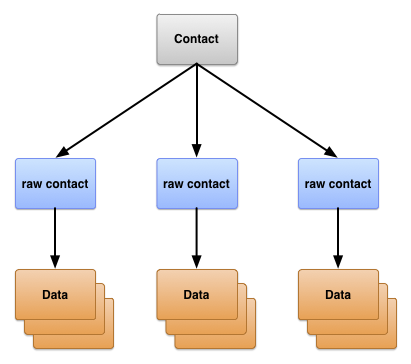
شکل ۱. ساختار جدول ارائهدهندگان اطلاعات تماس.
این سه جدول معمولاً با نام کلاسهای قراردادیشان شناخته میشوند. این کلاسها ثابتهایی را برای URIهای محتوا، نام ستونها و مقادیر ستون مورد استفاده جداول تعریف میکنند:
- جدول
ContactsContract.Contacts - ردیفهایی که افراد مختلف را نشان میدهند، بر اساس تجمیع ردیفهای خام مخاطبین.
- جدول
ContactsContract.RawContacts - ردیفهایی که شامل خلاصهای از دادههای یک شخص، مختص به یک حساب کاربری و نوع آن، هستند.
- جدول
ContactsContract.Data - ردیفهایی که حاوی جزئیات مربوط به مخاطبین خام، مانند آدرسهای ایمیل یا شماره تلفنها هستند.
جداول دیگری که توسط کلاسهای قرارداد در ContactsContract نمایش داده میشوند، جداول کمکی هستند که ارائهدهندهی اطلاعات تماس برای مدیریت عملیات خود یا پشتیبانی از عملکردهای خاص در مخاطبین دستگاه یا برنامههای تلفنی از آنها استفاده میکند.
مخاطبین خام
یک مخاطب خام، دادههای یک شخص را از یک نوع حساب و نام حساب واحد نشان میدهد. از آنجا که ارائهدهنده مخاطبین به بیش از یک سرویس آنلاین به عنوان منبع داده برای یک شخص اجازه میدهد، ارائهدهنده مخاطبین به چندین مخاطب خام برای یک شخص اجازه میدهد. چندین مخاطب خام همچنین به کاربر اجازه میدهند دادههای یک شخص را از بیش از یک حساب از یک نوع حساب ترکیب کند.
بیشتر دادههای یک مخاطب خام در جدول ContactsContract.RawContacts ذخیره نمیشوند. در عوض، در یک یا چند ردیف در جدول ContactsContract.Data ذخیره میشوند. هر ردیف داده دارای یک ستون Data.RAW_CONTACT_ID است که حاوی مقدار RawContacts._ID ردیف والد خود ContactsContract.RawContacts است.
ستونهای تماس خام مهم
ستونهای مهم در جدول ContactsContract.RawContacts در جدول ۱ فهرست شدهاند. لطفاً یادداشتهای بعد از جدول را مطالعه کنید:
جدول ۱. ستونهای تماس خام مهم.
| نام ستون | استفاده کنید | یادداشتها |
|---|---|---|
ACCOUNT_NAME | نام حساب برای نوع حسابی که منبع این مخاطب خام است. برای مثال، نام حساب یک حساب گوگل، یکی از آدرسهای جیمیل صاحب دستگاه است. برای اطلاعات بیشتر به ورودی بعدی برای ACCOUNT_TYPE مراجعه کنید. | قالب این نام مختص نوع حساب کاربری است. لزوماً یک آدرس ایمیل نیست. |
ACCOUNT_TYPE | نوع حسابی که منبع این مخاطب خام است. برای مثال، نوع حساب یک حساب گوگل com.google است. همیشه نوع حساب خود را با یک شناسه دامنه برای دامنهای که مالک یا کنترل میکنید، مشخص کنید. این کار تضمین میکند که نوع حساب شما منحصر به فرد است. | یک نوع حساب کاربری که دادههای مخاطبین را ارائه میدهد، معمولاً دارای یک آداپتور همگامسازی مرتبط است که با ارائهدهنده مخاطبین همگامسازی میشود. |
DELETED | پرچم «حذفشده» برای یک مخاطب خام. | این پرچم به ارائهدهندهی مخاطبین اجازه میدهد تا ردیف را به صورت داخلی حفظ کند تا زمانی که آداپتورهای همگامسازی بتوانند ردیف را از سرورهای خود حذف کنند و سپس در نهایت ردیف را از مخزن حذف کنند. |
یادداشتها
نکات مهم زیر در مورد جدول ContactsContract.RawContacts وجود دارد:
- نام یک مخاطب خام در ردیف خودش در
ContactsContract.RawContactsذخیره نمیشود. در عوض، در جدولContactsContract.Data، در ردیفContactsContract.CommonDataKinds.StructuredNameذخیره میشود. یک مخاطب خام فقط یک ردیف از این نوع در جدولContactsContract.Dataدارد. - احتیاط: برای استفاده از دادههای حساب کاربری خودتان در یک ردیف مخاطب خام، ابتدا باید آن را در
AccountManagerثبت کنید. برای انجام این کار، از کاربران بخواهید نوع حساب و نام حساب خود را به لیست حسابها اضافه کنند. اگر این کار را نکنید، ارائهدهنده مخاطبین به طور خودکار ردیف مخاطب خام شما را حذف میکند.برای مثال، اگر میخواهید برنامهتان دادههای مخاطبین را برای سرویس مبتنی بر وب شما با دامنه
com.example.dataserviceنگهداری کند، و حساب کاربری سرویس شماbecky.sharp@dataservice.example.comباشد، کاربر ابتدا باید "نوع" حساب (com.example.dataservice) و "نام" حساب (becky.smart@dataservice.example.com) را اضافه کند تا برنامه بتواند ردیفهای خام مخاطب را اضافه کند. میتوانید این الزام را در مستندات برای کاربر توضیح دهید، یا میتوانید از کاربر بخواهید که نوع و نام یا هر دو را اضافه کند. انواع حساب و نام حساب در بخش بعدی با جزئیات بیشتر توضیح داده شده است.
منابع دادههای خام مخاطبین
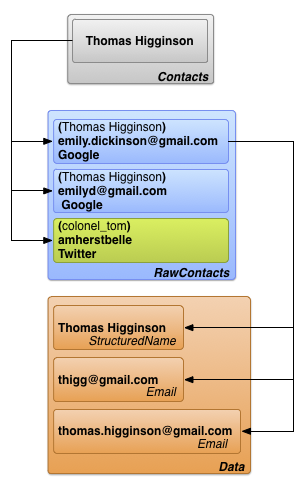
برای درک نحوهی کار مخاطبین خام، کاربر «امیلی دیکینسون» را در نظر بگیرید که سه حساب کاربری زیر را در دستگاه خود تعریف کرده است:
-
emily.dickinson@gmail.com -
emilyd@gmail.com - حساب توییتری «belle_of_amherst»
این کاربر همگامسازی مخاطبین را برای هر سه حساب کاربری خود در تنظیمات حسابها فعال کرده است.
فرض کنید امیلی دیکینسون یک پنجره مرورگر را باز میکند، با نام کاربری emily.dickinson@gmail.com وارد جیمیل میشود، بخش مخاطبین را باز میکند و "توماس هیگینسون" را اضافه میکند. بعداً، او با نام کاربری emilyd@gmail.com وارد جیمیل میشود و ایمیلی به "توماس هیگینسون" ارسال میکند که به طور خودکار او را به عنوان مخاطب اضافه میکند. او همچنین "colonel_tom" (شناسه توییتر توماس هیگینسون) را در توییتر دنبال میکند.
ارائهدهندهی مخاطبین در نتیجهی این کار، سه مخاطب خام ایجاد میکند:
- یک مخاطب خام برای "توماس هیگینسون" مرتبط با
emily.dickinson@gmail.com. نوع حساب کاربری گوگل است. - یک مخاطب خام دوم برای "توماس هیگینسون" مرتبط با
emilyd@gmail.com. نوع حساب کاربری نیز گوگل است. یک مخاطب خام دوم وجود دارد، اگرچه نام آن با نام قبلی یکسان است، زیرا این شخص برای یک حساب کاربری متفاوت اضافه شده است. - سومین اطلاعات تماس خام برای "توماس هیگینسون" مرتبط با "belle_of_amherst". نوع حساب کاربری توییتر است.
دادهها
همانطور که قبلاً اشاره شد، دادههای یک مخاطب خام در ردیف ContactsContract.Data ذخیره میشوند که به مقدار _ID مخاطب خام پیوند داده شده است. این امر به یک مخاطب خام اجازه میدهد تا چندین نمونه از دادههای مشابه مانند آدرسهای ایمیل یا شماره تلفن داشته باشد. به عنوان مثال، اگر "توماس هیگینسون" برای emilyd@gmail.com (ردیف مخاطب خام برای توماس هیگینسون مرتبط با حساب گوگل emilyd@gmail.com ) دارای یک آدرس ایمیل خانگی thigg@gmail.com و یک آدرس ایمیل کاری thomas.higginson@gmail.com باشد، ارائه دهنده مخاطبین دو ردیف آدرس ایمیل را ذخیره کرده و هر دو را به مخاطب خام پیوند میدهد.
توجه داشته باشید که انواع مختلفی از دادهها در این جدول واحد ذخیره میشوند. ردیفهای نام نمایشی، شماره تلفن، ایمیل، آدرس پستی، عکس و جزئیات وبسایت، همگی در جدول ContactsContract.Data یافت میشوند. برای کمک به مدیریت این امر، جدول ContactsContract.Data دارای برخی ستونها با نامهای توصیفی و برخی دیگر با نامهای عمومی است. محتوای یک ستون با نام توصیفی صرف نظر از نوع داده در ردیف، معنای یکسانی دارد، در حالی که محتوای یک ستون با نام عمومی بسته به نوع داده، معانی متفاوتی دارد.
نامهای توصیفی ستونها
چند نمونه از نامهای توصیفی ستونها عبارتند از:
-
RAW_CONTACT_ID - مقدار ستون
_IDمربوط به مخاطب خام برای این داده. -
MIMETYPE - نوع داده ذخیره شده در این ردیف، که به صورت یک نوع MIME سفارشی بیان میشود. ارائه دهنده مخاطبین از انواع MIME تعریف شده در زیرکلاسهای
ContactsContract.CommonDataKindsاستفاده میکند. این انواع MIME متن باز هستند و میتوانند توسط هر برنامه یا آداپتور همگامسازی که با ارائه دهنده مخاطبین کار میکند، مورد استفاده قرار گیرند. -
IS_PRIMARY - اگر این نوع ردیف داده بتواند بیش از یک بار برای یک مخاطب خام رخ دهد، ستون
IS_PRIMARYردیف دادهای را که حاوی دادههای اصلی برای آن نوع است، علامتگذاری میکند. برای مثال، اگر کاربر شماره تلفن یک مخاطب را برای مدت طولانی فشار دهد و گزینه Set default را انتخاب کند، آنگاه ردیفContactsContract.Dataحاوی آن شماره، ستونIS_PRIMARYخود را روی مقداری غیر صفر تنظیم میکند.
نامهای عمومی ستونها
۱۵ ستون عمومی با نامهای DATA1 تا DATA15 وجود دارد که به طور کلی در دسترس هستند و چهار ستون عمومی دیگر از SYNC1 تا SYNC4 که فقط باید توسط آداپتورهای همگامسازی استفاده شوند. ثابتهای نام ستون عمومی، صرف نظر از نوع دادهای که ردیف حاوی آن است، همیشه کار میکنند.
ستون DATA1 اندیسگذاری شده است. ارائهدهندهی اطلاعات تماس همیشه از این ستون برای دادههایی استفاده میکند که ارائهدهنده انتظار دارد بیشترین تکرار را در یک پرسوجو داشته باشند. برای مثال، در یک ردیف ایمیل، این ستون حاوی آدرس ایمیل واقعی است.
طبق قرارداد، ستون DATA15 برای ذخیره دادههای Binary Large Object (BLOB) مانند تصاویر کوچک عکس رزرو شده است.
نامهای ستون مختص نوع
برای تسهیل کار با ستونهای یک نوع خاص از ردیف، Contacts Provider همچنین ثابتهای نام ستون مختص به نوع را ارائه میدهد که در زیرکلاسهای ContactsContract.CommonDataKinds تعریف شدهاند. این ثابتها به سادگی یک نام ثابت متفاوت به همان نام ستون میدهند که به شما کمک میکند به دادههای یک ردیف از یک نوع خاص دسترسی داشته باشید.
برای مثال، کلاس ContactsContract.CommonDataKinds.Email ثابتهای نام ستون با نوع خاص را برای ردیف ContactsContract.Data که دارای نوع MIME Email.CONTENT_ITEM_TYPE است، تعریف میکند. این کلاس شامل ثابت ADDRESS برای ستون آدرس ایمیل است. مقدار واقعی ADDRESS برابر با "data1" است که همان نام عمومی ستون است.
احتیاط: دادههای سفارشی خود را با استفاده از ردیفی که یکی از انواع MIME از پیش تعریف شدهی ارائه دهنده را دارد، به جدول ContactsContract.Data اضافه نکنید. در این صورت، ممکن است دادهها را از دست بدهید یا باعث اختلال در عملکرد ارائه دهنده شوید. به عنوان مثال، نباید ردیفی با نوع MIME Email.CONTENT_ITEM_TYPE اضافه کنید که به جای آدرس ایمیل، حاوی نام کاربری در ستون DATA1 باشد. اگر از نوع MIME سفارشی خود برای ردیف استفاده میکنید، میتوانید نام ستونهای مختص به نوع خود را تعریف کنید و از ستونها به هر شکلی که میخواهید استفاده کنید.
شکل ۲ نشان میدهد که چگونه ستونهای توصیفی و ستونهای داده در یک ردیف ContactsContract.Data ظاهر میشوند، و چگونه نامهای ستونهای نوع-ویژه، نامهای ستونهای عمومی را "پوشش" میدهند.
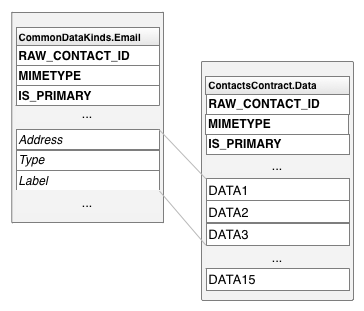
شکل ۲. نامهای ستون مختص نوع و نامهای ستون عمومی.
کلاسهای نام ستون مختص نوع
جدول 2 رایجترین کلاسهای نام ستون مختص نوع را فهرست میکند:
جدول ۲. کلاسهای نام ستون مختص نوع
| کلاس نقشه برداری | نوع داده | یادداشتها |
|---|---|---|
ContactsContract.CommonDataKinds.StructuredName | نام داده برای مخاطب خام مرتبط با این ردیف داده. | یک مخاطب خام فقط یکی از این ردیفها را دارد. |
ContactsContract.CommonDataKinds.Photo | عکس اصلی برای مخاطب خام مرتبط با این ردیف داده. | یک مخاطب خام فقط یکی از این ردیفها را دارد. |
ContactsContract.CommonDataKinds.Email | یک آدرس ایمیل برای مخاطب خام مرتبط با این ردیف داده. | یک مخاطب خام میتواند چندین آدرس ایمیل داشته باشد. |
ContactsContract.CommonDataKinds.StructuredPostal | یک آدرس پستی برای مخاطب خام مرتبط با این ردیف داده. | یک مخاطب خام میتواند چندین آدرس پستی داشته باشد. |
ContactsContract.CommonDataKinds.GroupMembership | شناسهای که مخاطب خام را به یکی از گروههای موجود در «ارائهدهنده مخاطبین» پیوند میدهد. | گروهها یک ویژگی اختیاری از نوع و نام حساب هستند. آنها با جزئیات بیشتر در بخش گروههای تماس توضیح داده شدهاند. |
مخاطبین
ارائهدهنده مخاطبین، ردیفهای خام مخاطبین را در تمام انواع حسابها و نامهای حسابها ترکیب میکند تا یک مخاطب تشکیل دهد. این امر نمایش و تغییر تمام دادههایی را که کاربر برای یک شخص جمعآوری کرده است، تسهیل میکند. ارائهدهنده مخاطبین، ایجاد ردیفهای جدید مخاطبین و تجمیع مخاطبین خام با یک ردیف مخاطب موجود را مدیریت میکند. نه برنامهها و نه آداپتورهای همگامسازی مجاز به اضافه کردن مخاطبین نیستند و برخی از ستونها در یک ردیف مخاطب فقط خواندنی هستند.
نکته: اگر سعی کنید با استفاده از insert() یک مخاطب را به Contacts Provider اضافه کنید، با خطای UnsupportedOperationException مواجه خواهید شد. اگر سعی کنید ستونی را که به عنوان "فقط خواندنی" فهرست شده است، بهروزرسانی کنید، بهروزرسانی نادیده گرفته میشود.
ارائهدهندهی مخاطبین، در پاسخ به اضافه شدن یک مخاطب خام جدید که با هیچ یک از مخاطبین موجود مطابقت ندارد، یک مخاطب جدید ایجاد میکند. همچنین، ارائهدهنده این کار را در صورتی انجام میدهد که دادههای یک مخاطب خام موجود به گونهای تغییر کند که دیگر با مخاطبی که قبلاً به آن متصل بوده است، مطابقت نداشته باشد. اگر یک برنامه یا آداپتور همگامسازی، یک مخاطب خام جدید ایجاد کند که با یک مخاطب موجود مطابقت داشته باشد ، مخاطب خام جدید با مخاطب موجود تجمیع میشود.
ارائهدهندهی اطلاعات تماس، یک ردیف اطلاعات تماس را با ستون _ID ردیف اطلاعات تماس در جدول Contacts به ردیفهای اطلاعات تماس خام آن پیوند میدهد. ستون CONTACT_ID از جدول اطلاعات تماس خام ContactsContract.RawContacts حاوی مقادیر _ID برای ردیف اطلاعات تماس مرتبط با هر ردیف اطلاعات تماس خام است.
جدول ContactsContract.Contacts همچنین دارای ستون LOOKUP_KEY است که یک پیوند "دائمی" به ردیف مخاطب است. از آنجا که ارائه دهنده مخاطبین به طور خودکار مخاطبین را نگهداری میکند، ممکن است مقدار _ID ردیف مخاطب را در پاسخ به یک تجمیع یا همگامسازی تغییر دهد. حتی اگر این اتفاق بیفتد، URI محتوا CONTENT_LOOKUP_URI همراه با LOOKUP_KEY مخاطب همچنان به ردیف مخاطب اشاره میکند، بنابراین میتوانید از LOOKUP_KEY برای نگهداری پیوندها به مخاطبین "مورد علاقه" و غیره استفاده کنید. این ستون فرمت خاص خود را دارد که با فرمت ستون _ID ارتباطی ندارد.
شکل 3 نحوه ارتباط سه جدول اصلی با یکدیگر را نشان میدهد.
شکل ۳. روابط جدول مخاطبین، مخاطبین خام و جزئیات.
احتیاط: اگر برنامه خود را در فروشگاه Google Play منتشر میکنید، یا اگر برنامه شما روی دستگاهی با سیستم عامل Android 10 (سطح API 29) یا بالاتر است، به خاطر داشته باشید که مجموعه محدودی از فیلدها و متدهای داده مخاطبین منسوخ شدهاند.
تحت شرایط ذکر شده، سیستم به صورت دورهای هر مقداری را که در این فیلدهای داده نوشته شده است، پاک میکند:
-
ContactsContract.ContactOptionsColumns.LAST_TIME_CONTACTED -
ContactsContract.ContactOptionsColumns.TIMES_CONTACTED -
ContactsContract.DataUsageStatColumns.LAST_TIME_USED -
ContactsContract.DataUsageStatColumns.TIMES_USED
API های مورد استفاده برای تنظیم فیلدهای داده فوق نیز منسوخ شده اند:
علاوه بر این، فیلدهای زیر دیگر مخاطبین پرتکرار را برنمیگردانند. توجه داشته باشید که برخی از این فیلدها فقط زمانی بر رتبهبندی مخاطبین تأثیر میگذارند که مخاطبین بخشی از یک نوع داده خاص باشند.
-
ContactsContract.Contacts.CONTENT_FREQUENT_URI -
ContactsContract.Contacts.CONTENT_STREQUENT_URI -
ContactsContract.Contacts.CONTENT_STREQUENT_FILTER_URI -
CONTENT_FILTER_URI(فقط انواع دادههای Email ، Phone ، Callable و Contactables را تحت تأثیر قرار میدهد) -
ENTERPRISE_CONTENT_FILTER_URI(فقط بر انواع دادههای Email ، Phone و Callable تأثیر میگذارد)
اگر برنامههای شما به این فیلدها یا APIها دسترسی دارند یا آنها را بهروزرسانی میکنند، از روشهای جایگزین استفاده کنید. به عنوان مثال، میتوانید با استفاده از ارائهدهندگان محتوای خصوصی یا سایر دادههای ذخیره شده در برنامه یا سیستمهای backend خود، موارد استفاده خاصی را برآورده کنید.
برای تأیید اینکه عملکرد برنامه شما تحت تأثیر این تغییر قرار نمیگیرد، میتوانید این فیلدهای داده را به صورت دستی پاک کنید. برای انجام این کار، دستور ADB زیر را روی دستگاهی که اندروید ۴.۱ (سطح API ۱۶) یا بالاتر دارد اجرا کنید:
adb shell content delete \
--uri content://com.android.contacts/contacts/delete_usage
دادهها از آداپتورهای همگامسازی
کاربران دادههای مخاطبین را مستقیماً وارد دستگاه میکنند، اما دادهها همچنین از طریق آداپتورهای همگامسازی ، که انتقال دادهها بین دستگاه و سرویسها را خودکار میکنند، از سرویسهای وب به ارائهدهنده مخاطبین نیز جریان مییابند. آداپتورهای همگامسازی در پسزمینه تحت کنترل سیستم اجرا میشوند و متدهای ContentResolver را برای مدیریت دادهها فراخوانی میکنند.
در اندروید، سرویس وبی که یک آداپتور همگامسازی با آن کار میکند، با یک نوع حساب کاربری مشخص میشود. هر آداپتور همگامسازی با یک نوع حساب کاربری کار میکند، اما میتواند از چندین نام حساب کاربری برای آن نوع پشتیبانی کند. انواع حسابها و نامهای حساب کاربری به طور خلاصه در بخش «منابع دادههای خام مخاطبین» توضیح داده شدهاند. تعاریف زیر جزئیات بیشتری را ارائه میدهند و نحوه ارتباط نوع و نام حساب کاربری با آداپتورها و سرویسهای همگامسازی را شرح میدهند.
- نوع حساب
- سرویسی را شناسایی میکند که کاربر در آن دادهها را ذخیره کرده است. اغلب اوقات، کاربر باید با سرویس احراز هویت کند. برای مثال، Google Contacts یک نوع حساب است که با کد
google.comشناسایی میشود. این مقدار با نوع حساب مورد استفادهAccountManagerمطابقت دارد. - نام حساب
- یک حساب کاربری یا نام کاربری خاص را برای یک نوع حساب کاربری مشخص میکند. حسابهای کاربری مخاطبین گوگل (Google Contacts) همانند حسابهای کاربری گوگل هستند که یک آدرس ایمیل به عنوان نام حساب کاربری دارند. سایر سرویسها ممکن است از نام کاربری تک کلمهای یا شناسه عددی استفاده کنند.
انواع حسابها لازم نیست منحصر به فرد باشند. یک کاربر میتواند چندین حساب مخاطبین گوگل را پیکربندی کند و دادههای آنها را در ارائهدهنده مخاطبین دانلود کند؛ این ممکن است در صورتی اتفاق بیفتد که کاربر یک مجموعه از مخاطبین شخصی برای نام حساب شخصی و مجموعه دیگری برای کار داشته باشد. نام حسابها معمولاً منحصر به فرد هستند. آنها با هم، یک جریان داده خاص بین ارائهدهنده مخاطبین و یک سرویس خارجی را مشخص میکنند.
اگر میخواهید دادههای سرویس خود را به Contacts Provider منتقل کنید، باید آداپتور همگامسازی خودتان را بنویسید. این موضوع با جزئیات بیشتر در بخش Contacts Provider sync adapters توضیح داده شده است.
شکل ۴ نشان میدهد که چگونه ارائهدهندهی مخاطبین در جریان دادههای مربوط به افراد قرار میگیرد. در کادری که با عنوان «همگامسازی آداپتورها» مشخص شده است، هر آداپتور بر اساس نوع حساب کاربریاش برچسبگذاری شده است.
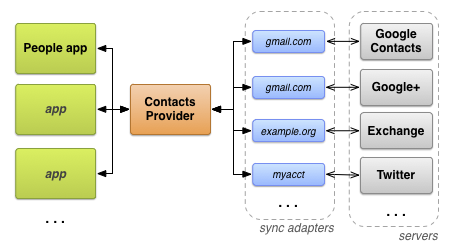
شکل ۴. جریان دادهی ارائهدهندهی اطلاعات تماس.
مجوزهای مورد نیاز
برنامههایی که میخواهند به Contacts Provider دسترسی داشته باشند، باید مجوزهای زیر را درخواست کنند:
- دسترسی خواندن به یک یا چند جدول
-
READ_CONTACTS، که درAndroidManifest.xmlبا عنصر<uses-permission>به صورت<uses-permission android:name="android.permission.READ_CONTACTS">مشخص شده است. - دسترسی نوشتن به یک یا چند جدول
-
WRITE_CONTACTS، که درAndroidManifest.xmlبا عنصر<uses-permission>به صورت<uses-permission android:name="android.permission.WRITE_CONTACTS">مشخص شده است.
این مجوزها شامل دادههای پروفایل کاربر نمیشوند. پروفایل کاربر و مجوزهای مورد نیاز آن در بخش بعدی، «پروفایل کاربر» مورد بحث قرار گرفته است.
به یاد داشته باشید که اطلاعات مخاطبین کاربر شخصی و حساس است. کاربران نگران حریم خصوصی خود هستند، بنابراین نمیخواهند برنامهها اطلاعات مربوط به آنها یا مخاطبینشان را جمعآوری کنند. اگر مشخص نباشد که چرا به مجوز دسترسی به اطلاعات مخاطبین آنها نیاز دارید، ممکن است به برنامه شما امتیاز کمی بدهند یا به سادگی از نصب آن خودداری کنند.
پروفایل کاربر
جدول ContactsContract.Contacts دارای یک ردیف واحد است که حاوی دادههای پروفایل برای کاربر دستگاه است. این دادهها، user دستگاه را به جای یکی از مخاطبین کاربر توصیف میکنند. ردیف مخاطبین پروفایل به یک ردیف مخاطبین خام برای هر سیستمی که از یک پروفایل استفاده میکند، مرتبط است. هر ردیف مخاطبین خام پروفایل میتواند چندین ردیف داده داشته باشد. ثابتهایی برای دسترسی به پروفایل کاربر در کلاس ContactsContract.Profile موجود است.
دسترسی به پروفایل کاربر نیاز به مجوزهای ویژه دارد. علاوه بر مجوزهای READ_CONTACTS و WRITE_CONTACTS که برای خواندن و نوشتن لازم هستند، دسترسی به پروفایل کاربر به ترتیب به مجوزهای android.Manifest.permission#READ_PROFILE و android.Manifest.permission#WRITE_PROFILE برای دسترسی خواندن و نوشتن نیاز دارد.
به یاد داشته باشید که باید پروفایل کاربر را حساس در نظر بگیرید. مجوز android.Manifest.permission#READ_PROFILE به شما امکان دسترسی به دادههای شناسایی شخصی کاربر دستگاه را میدهد. حتماً در توضیحات برنامه خود به کاربر بگویید که چرا به مجوزهای دسترسی به پروفایل کاربر نیاز دارید.
برای بازیابی ردیف مخاطب که شامل پروفایل کاربر است، ContentResolver.query() را فراخوانی کنید. URI محتوا را روی CONTENT_URI تنظیم کنید و هیچ معیار انتخابی ارائه ندهید. همچنین میتوانید از این URI محتوا به عنوان URI پایه برای بازیابی مخاطبین خام یا دادههای پروفایل استفاده کنید. به عنوان مثال، این قطعه کد دادههای پروفایل را بازیابی میکند:
کاتلین
// Sets the columns to retrieve for the user profile
projection = arrayOf(
        ContactsContract.Profile._ID,
        ContactsContract.Profile.DISPLAY_NAME_PRIMARY,
        ContactsContract.Profile.LOOKUP_KEY,
        ContactsContract.Profile.PHOTO_THUMBNAIL_URI
)

// Retrieves the profile from the Contacts Provider
profileCursor = contentResolver.query(
        ContactsContract.Profile.CONTENT_URI,
        projection,
        null,
        null,
        null
)
جاوا
// Sets the columns to retrieve for the user profile
projection = new String[]
    {
        Profile._ID,
        Profile.DISPLAY_NAME_PRIMARY,
        Profile.LOOKUP_KEY,
        Profile.PHOTO_THUMBNAIL_URI
    };

// Retrieves the profile from the Contacts Provider
profileCursor =
        getContentResolver().query(
                Profile.CONTENT_URI,
                projection ,
                null,
                null,
                null);
نکته: اگر چندین ردیف مخاطب را بازیابی میکنید و میخواهید مشخص کنید که آیا یکی از آنها نمایه کاربر است یا خیر، ستون IS_USER_PROFILE آن ردیف را بررسی کنید. اگر مخاطب، نمایه کاربر باشد، این ستون روی "1" تنظیم میشود.
اطلاعات تماس ارائه دهنده
ارائه دهنده مخاطبین، دادههایی را مدیریت میکند که وضعیت دادههای مخاطبین را در مخزن پیگیری میکند. این فرادادهها در مورد مخزن در مکانهای مختلفی از جمله ردیفهای جدول خام مخاطبین، دادهها و مخاطبین، جدول ContactsContract.Settings و جدول ContactsContract.SyncState ذخیره میشوند. جدول زیر تأثیر هر یک از این فرادادهها را نشان میدهد:
جدول ۳. فراداده در ارائهدهنده مخاطبین
| میز | ستون | ارزشها | معنی |
|---|---|---|---|
ContactsContract.RawContacts | DIRTY | "0" - از آخرین همگامسازی تغییر نکرده است. | مخاطبین خامی را که در دستگاه تغییر کردهاند و باید دوباره با سرور همگامسازی شوند، علامتگذاری میکند. این مقدار به طور خودکار توسط ارائهدهنده مخاطبین هنگام بهروزرسانی یک ردیف توسط برنامههای اندروید تنظیم میشود. آداپتورهای همگامسازی که جداول خام مخاطبین یا دادهها را تغییر میدهند، باید همیشه رشته |
| «۱» - از آخرین همگامسازی تغییر کرده است، باید دوباره با سرور همگامسازی شود. | |||
ContactsContract.RawContacts | VERSION | شماره نسخه این ردیف. | ارائه دهنده مخاطبین هر زمان که ردیف یا دادههای مرتبط با آن تغییر کند، به طور خودکار این مقدار را افزایش میدهد. |
ContactsContract.Data | DATA_VERSION | شماره نسخه این ردیف. | ارائه دهنده مخاطبین هر زمان که ردیف داده تغییر کند، این مقدار را به طور خودکار افزایش میدهد. |
ContactsContract.RawContacts | SOURCE_ID | یک مقدار رشتهای که به طور منحصر به فرد این مخاطب خام را به حسابی که در آن ایجاد شده است، مشخص میکند. | وقتی یک آداپتور همگامسازی یک مخاطب خام جدید ایجاد میکند، این ستون باید روی شناسه منحصر به فرد سرور برای مخاطب خام تنظیم شود. وقتی یک برنامه اندروید یک مخاطب خام جدید ایجاد میکند، برنامه باید این ستون را خالی بگذارد. این به آداپتور همگامسازی سیگنال میدهد که باید یک مخاطب خام جدید روی سرور ایجاد کند و مقداری برای SOURCE_ID دریافت کند.به طور خاص، شناسه منبع باید برای هر نوع حساب منحصر به فرد باشد و در همگامسازیها پایدار باشد:
|
ContactsContract.Groups | GROUP_VISIBLE | «0» - مخاطبین این گروه نباید در رابط کاربری برنامههای اندروید قابل مشاهده باشند. | این ستون برای سازگاری با سرورهایی است که به کاربر اجازه میدهند مخاطبین را در گروههای خاص پنهان کند. |
| «۱» - مخاطبین این گروه مجاز به مشاهده در رابط کاربری برنامه هستند. | |||
ContactsContract.Settings | UNGROUPED_VISIBLE | «0» - برای این حساب و نوع حساب، مخاطبینی که به گروهی تعلق ندارند، برای رابطهای کاربری برنامههای اندروید نامرئی هستند. | به طور پیشفرض، مخاطبین در صورتی که هیچ یک از مخاطبین خام آنها به گروهی تعلق نداشته باشد، نامرئی هستند (عضویت گروهی برای یک مخاطب خام توسط یک یا چند ردیف ContactsContract.CommonDataKinds.GroupMembership در جدول ContactsContract.Data نشان داده میشود). با تنظیم این پرچم در ردیف جدول ContactsContract.Settings برای یک نوع حساب و حساب، میتوانید مخاطبین بدون گروه را مجبور به قابل مشاهده بودن کنید. یکی از کاربردهای این پرچم، نمایش مخاطبین از سرورهایی است که از گروهها استفاده نمیکنند. |
| «۱» - برای این حساب و نوع حساب، مخاطبینی که به هیچ گروهی تعلق ندارند، برای رابطهای کاربری برنامه قابل مشاهده هستند. | |||
ContactsContract.SyncState | (همه) | از این جدول برای ذخیره ابرداده برای آداپتور همگامسازی خود استفاده کنید. | با استفاده از این جدول میتوانید وضعیت همگامسازی و سایر دادههای مرتبط با همگامسازی را به طور مداوم در دستگاه ذخیره کنید. |
دسترسی به ارائه دهنده اطلاعات تماس
این بخش دستورالعملهای دسترسی به دادهها از ارائهدهنده مخاطبین را با تمرکز بر موارد زیر شرح میدهد:
- پرسوجوهای مربوط به موجودیت.
- اصلاح دستهای.
- بازیابی و اصلاح با اهداف.
- یکپارچگی دادهها.
ایجاد تغییرات از طریق آداپتور همگامسازی، در بخش «آداپتورهای همگامسازی ارائهدهنده مخاطبین» نیز با جزئیات بیشتری پوشش داده شده است.
پرس و جو از موجودیتها
از آنجا که جداول Contacts Provider به صورت سلسله مراتبی سازماندهی شدهاند، اغلب بازیابی یک ردیف و تمام ردیفهای "فرزند" که به آن پیوند دارند مفید است. به عنوان مثال، برای نمایش تمام اطلاعات یک شخص، ممکن است بخواهید تمام ردیفهای ContactsContract.RawContacts را برای یک ردیف ContactsContract.Contacts یا تمام ردیفهای ContactsContract.CommonDataKinds.Email را برای یک ردیف ContactsContract.RawContacts بازیابی کنید. برای تسهیل این امر، Contacts Provider ساختارهای موجودیت را ارائه میدهد که مانند پیوند پایگاه داده بین جداول عمل میکنند.
یک موجودیت مانند جدولی است که از ستونهای انتخاب شده از جدول والد و جدول فرزند آن تشکیل شده است. وقتی از یک موجودیت پرس و جو میکنید، بر اساس ستونهای موجود در آن موجودیت، یک طرح و معیار جستجو ارائه میدهید. نتیجه یک Cursor است که شامل یک ردیف برای هر ردیف جدول فرزندی است که بازیابی شده است. به عنوان مثال، اگر از ContactsContract.Contacts.Entity برای نام یک مخاطب و تمام ردیفهای ContactsContract.CommonDataKinds.Email برای تمام مخاطبین خام آن نام پرس و جو کنید، یک Cursor حاوی یک ردیف برای هر ردیف ContactsContract.CommonDataKinds.Email دریافت خواهید کرد.
موجودیتها پرسوجوها را ساده میکنند. با استفاده از یک موجودیت، میتوانید تمام دادههای مخاطبین را برای یک مخاطب یا مخاطب خام به طور همزمان بازیابی کنید، به جای اینکه ابتدا برای دریافت شناسه از جدول والد پرسوجو کنید و سپس با آن شناسه از جدول فرزند پرسوجو کنید. همچنین، ارائهدهنده مخاطبین، پرسوجو را در برابر یک موجودیت در یک تراکنش واحد پردازش میکند، که تضمین میکند دادههای بازیابی شده از نظر داخلی سازگار باشند.
نکته: یک موجودیت معمولاً شامل تمام ستونهای جدول والد و فرزند نیست. اگر سعی کنید با نام ستونی کار کنید که در لیست ثابتهای نام ستون برای آن موجودیت نیست، با Exception مواجه خواهید شد.
قطعه کد زیر نحوه بازیابی تمام ردیفهای خام مخاطبین یک مخاطب را نشان میدهد. این قطعه کد بخشی از یک برنامه بزرگتر است که دارای دو اکتیویتی "main" و "detail" است. اکتیویتی اصلی لیستی از ردیفهای مخاطبین را نشان میدهد؛ وقتی کاربر یکی را انتخاب میکند، اکتیویتی شناسه آن را به اکتیویتی جزئیات ارسال میکند. اکتیویتی جزئیات از ContactsContract.Contacts.Entity برای نمایش تمام ردیفهای داده از تمام مخاطبین خام مرتبط با مخاطب انتخاب شده استفاده میکند.
این قطعه کد از فعالیت "detail" گرفته شده است:
کاتلین
...
    /*
     * Appends the entity path to the URI. In the case of the Contacts Provider, the
     * expected URI is content://com.google.contacts/#/entity (# is the ID value).
     */
    contactUri = Uri.withAppendedPath(
            contactUri,
            ContactsContract.Contacts.Entity.CONTENT_DIRECTORY
    )

    // Initializes the loader identified by LOADER_ID.
    loaderManager.initLoader(
            LOADER_ID,  // The identifier of the loader to initialize
            null,       // Arguments for the loader (in this case, none)
            this        // The context of the activity
    )

    // Creates a new cursor adapter to attach to the list view
    cursorAdapter = SimpleCursorAdapter(
            this,                       // the context of the activity
            R.layout.detail_list_item,  // the view item containing the detail widgets
            mCursor,                    // the backing cursor
            fromColumns,               // the columns in the cursor that provide the data
            toViews,                   // the views in the view item that display the data
            0)                          // flags

    // Sets the ListView's backing adapter.
    rawContactList.adapter = cursorAdapter
...
override fun onCreateLoader(id: Int, args: Bundle?): Loader<Cursor> {
    /*
     * Sets the columns to retrieve.
     * RAW_CONTACT_ID is included to identify the raw contact associated with the data row.
     * DATA1 contains the first column in the data row (usually the most important one).
     * MIMETYPE indicates the type of data in the data row.
     */
    val projection: Array<String> = arrayOf(
            ContactsContract.Contacts.Entity.RAW_CONTACT_ID,
            ContactsContract.Contacts.Entity.DATA1,
            ContactsContract.Contacts.Entity.MIMETYPE
    )

    /*
     * Sorts the retrieved cursor by raw contact id, to keep all data rows for a single raw
     * contact collated together.
     */
    val sortOrder = "${ContactsContract.Contacts.Entity.RAW_CONTACT_ID} ASC"

    /*
     * Returns a new CursorLoader. The arguments are similar to
     * ContentResolver.query(), except for the Context argument, which supplies the location of
     * the ContentResolver to use.
     */
    return CursorLoader(
            applicationContext, // The activity's context
            contactUri,        // The entity content URI for a single contact
            projection,         // The columns to retrieve
            null,               // Retrieve all the raw contacts and their data rows.
            null,               //
            sortOrder           // Sort by the raw contact ID.
    )
}
جاوا
...
    /*
     * Appends the entity path to the URI. In the case of the Contacts Provider, the
     * expected URI is content://com.google.contacts/#/entity (# is the ID value).
     */
    contactUri = Uri.withAppendedPath(
            contactUri,
            ContactsContract.Contacts.Entity.CONTENT_DIRECTORY);

    // Initializes the loader identified by LOADER_ID.
    getLoaderManager().initLoader(
            LOADER_ID,  // The identifier of the loader to initialize
            null,       // Arguments for the loader (in this case, none)
            this);      // The context of the activity

    // Creates a new cursor adapter to attach to the list view
    cursorAdapter = new SimpleCursorAdapter(
            this,                        // the context of the activity
            R.layout.detail_list_item,   // the view item containing the detail widgets
            mCursor,                     // the backing cursor
            fromColumns,                // the columns in the cursor that provide the data
            toViews,                    // the views in the view item that display the data
            0);                          // flags

    // Sets the ListView's backing adapter.
    rawContactList.setAdapter(cursorAdapter);
...
@Override
public Loader<Cursor> onCreateLoader(int id, Bundle args) {

    /*
     * Sets the columns to retrieve.
     * RAW_CONTACT_ID is included to identify the raw contact associated with the data row.
     * DATA1 contains the first column in the data row (usually the most important one).
     * MIMETYPE indicates the type of data in the data row.
     */
    String[] projection =
        {
            ContactsContract.Contacts.Entity.RAW_CONTACT_ID,
            ContactsContract.Contacts.Entity.DATA1,
            ContactsContract.Contacts.Entity.MIMETYPE
        };

    /*
     * Sorts the retrieved cursor by raw contact id, to keep all data rows for a single raw
     * contact collated together.
     */
    String sortOrder =
            ContactsContract.Contacts.Entity.RAW_CONTACT_ID +
            " ASC";

    /*
     * Returns a new CursorLoader. The arguments are similar to
     * ContentResolver.query(), except for the Context argument, which supplies the location of
     * the ContentResolver to use.
     */
    return new CursorLoader(
            getApplicationContext(),  // The activity's context
            contactUri,              // The entity content URI for a single contact
            projection,               // The columns to retrieve
            null,                     // Retrieve all the raw contacts and their data rows.
            null,                     //
            sortOrder);               // Sort by the raw contact ID.
}
وقتی بارگذاری تمام شد، LoaderManager یک فراخوانی برگشتی به onLoadFinished() فراخوانی میکند. یکی از آرگومانهای ورودی به این متد، یک Cursor با نتایج کوئری است. در برنامه خودتان، میتوانید دادهها را از این Cursor دریافت کنید تا آن را نمایش دهید یا با آن بیشتر کار کنید.
اصلاح دستهای
هر زمان که ممکن باشد، باید با ایجاد یک ArrayList از اشیاء ContentProviderOperation و فراخوانی applyBatch() ، دادهها را در Contacts Provider در "حالت دستهای" وارد، بهروزرسانی و حذف کنید. از آنجا که Contacts Provider تمام عملیات موجود در applyBatch() را در یک تراکنش واحد انجام میدهد، تغییرات شما هرگز مخزن مخاطبین را در حالت ناسازگار قرار نمیدهد. اصلاح دستهای همچنین درج همزمان یک مخاطب خام و دادههای جزئی آن را تسهیل میکند.
نکته: برای تغییر یک مخاطب خام، به جای مدیریت تغییر در برنامه خود، ارسال یک اینتنت به برنامه مخاطبین دستگاه را در نظر بگیرید. انجام این کار با جزئیات بیشتر در بخش بازیابی و تغییر با اینتنتها توضیح داده شده است.
امتیاز بازده
یک تغییر دستهای که شامل تعداد زیادی عملیات باشد، میتواند فرآیندهای دیگر را مسدود کند و در نتیجه یک تجربه کاربری کلی بد ایجاد کند. برای سازماندهی تمام تغییراتی که میخواهید در کمترین لیستهای جداگانه ممکن انجام دهید و در عین حال از مسدود شدن سیستم توسط آنها جلوگیری کنید، باید برای یک یا چند عملیات، نقاط تسلیم (yieldpoints) تعیین کنید. یک نقطه تسلیم، یک شیء ContentProviderOperation است که مقدار isYieldAllowed() آن روی true تنظیم شده است. هنگامی که ارائهدهنده مخاطبین با یک نقطه تسلیم مواجه میشود، کار خود را متوقف میکند تا به سایر فرآیندها اجازه اجرا دهد و تراکنش فعلی را میبندد. هنگامی که ارائهدهنده دوباره شروع به کار میکند، با عملیات بعدی در ArrayList ادامه میدهد و یک تراکنش جدید را شروع میکند.
نقاط تسلیم در هر فراخوانی تابع applyBatch() منجر به بیش از یک تراکنش میشوند. به همین دلیل، باید برای آخرین عملیات مربوط به مجموعهای از ردیفهای مرتبط، یک نقطه تسلیم تعیین کنید. به عنوان مثال، باید برای آخرین عملیات در مجموعهای که ردیفهای خام یک مخاطب و ردیفهای داده مرتبط با آن را اضافه میکند، یا آخرین عملیات برای مجموعهای از ردیفهای مربوط به یک مخاطب واحد، یک نقطه تسلیم تعیین کنید.
نقاط تسلیم همچنین یک واحد عملیات اتمیک هستند. تمام دسترسیهای بین دو نقطه تسلیم یا به عنوان یک واحد واحد موفق میشوند یا شکست میخورند. اگر هیچ نقطه تسلیمی تعیین نکنید، کوچکترین عملیات اتمیک، کل دسته عملیات است. اگر از نقاط تسلیم استفاده کنید، از کاهش عملکرد سیستم توسط عملیات جلوگیری میکنید، در عین حال اطمینان حاصل میکنید که زیرمجموعهای از عملیات اتمیک است.
ارجاعات اصلاحشده
وقتی یک ردیف مخاطب خام جدید و ردیفهای داده مرتبط با آن را به عنوان مجموعهای از اشیاء ContentProviderOperation وارد میکنید، باید ردیفهای داده را با وارد کردن مقدار _ID مخاطب خام به عنوان مقدار RAW_CONTACT_ID به ردیف مخاطب خام پیوند دهید. با این حال، این مقدار هنگام ایجاد ContentProviderOperation برای ردیف داده در دسترس نیست، زیرا هنوز ContentProviderOperation برای ردیف مخاطب خام اعمال نکردهاید. برای حل این مشکل، کلاس ContentProviderOperation.Builder دارای متد withValueBackReference() است. این متد به شما امکان میدهد ستونی را با نتیجه عملیات قبلی وارد یا اصلاح کنید.
متد withValueBackReference() دو آرگومان دارد:
-
key - کلید یک جفت کلید-مقدار. مقدار این آرگومان باید نام ستونی در جدولی باشد که در حال تغییر آن هستید.
-
previousResult - اندیس مبتنی بر 0 یک مقدار در آرایه اشیاء
ContentProviderResultازapplyBatch(). همزمان با اعمال عملیات دستهای، نتیجه هر عملیات در یک آرایه میانی از نتایج ذخیره میشود. مقدارpreviousResultاندیس یکی از این نتایج است که بازیابی و با مقدارkeyذخیره میشود. این به شما امکان میدهد یک رکورد تماس خام جدید وارد کنید و مقدار_IDآن را بازیابی کنید، سپس هنگام اضافه کردن ردیفContactsContract.Data، یک "ارجاع برگشتی" به مقدار ایجاد کنید.کل آرایه نتیجه هنگام اولین فراخوانی
applyBatch()ایجاد میشود، با اندازهای برابر با اندازهArrayListاشیاءContentProviderOperationکه ارائه میدهید. با این حال، تمام عناصر موجود در آرایه نتیجه رویnullتنظیم شدهاند و اگر سعی کنید برای عملیاتی که هنوز اعمال نشده است، به نتیجهای ارجاع معکوس دهید،withValueBackReference()یکExceptionایجاد میکند.
قطعه کدهای زیر نحوه درج یک مخاطب خام و دادههای جدید را به صورت دستهای نشان میدهند. این کدها شامل کدی هستند که یک نقطه تسلیم ایجاد میکند و از یک ارجاع به عقب استفاده میکند.
اولین قطعه کد، دادههای مخاطب را از رابط کاربری بازیابی میکند. در این مرحله، کاربر از قبل حسابی را که باید مخاطب خام جدید برای آن اضافه شود، انتخاب کرده است.
کاتلین
// Creates a contact entry from the current UI values, using the currently-selected account.
private fun createContactEntry() {
    /*
     * Gets values from the UI
     */
    val name = contactNameEditText.text.toString()
    val phone = contactPhoneEditText.text.toString()
    val email = contactEmailEditText.text.toString()

    val phoneType: String = contactPhoneTypes[mContactPhoneTypeSpinner.selectedItemPosition]

    val emailType: String = contactEmailTypes[mContactEmailTypeSpinner.selectedItemPosition]
جاوا
// Creates a contact entry from the current UI values, using the currently-selected account.
protected void createContactEntry() {
    /*
     * Gets values from the UI
     */
    String name = contactNameEditText.getText().toString();
    String phone = contactPhoneEditText.getText().toString();
    String email = contactEmailEditText.getText().toString();

    int phoneType = contactPhoneTypes.get(
            contactPhoneTypeSpinner.getSelectedItemPosition());

    int emailType = contactEmailTypes.get(
            contactEmailTypeSpinner.getSelectedItemPosition());
قطعه کد بعدی عملیاتی برای درج ردیف مخاطب خام در جدول ContactsContract.RawContacts ایجاد میکند:
کاتلین
    /*
     * Prepares the batch operation for inserting a new raw contact and its data. Even if
     * the Contacts Provider does not have any data for this person, you can't add a Contact,
     * only a raw contact. The Contacts Provider will then add a Contact automatically.
     */

    // Creates a new array of ContentProviderOperation objects.
    val ops = arrayListOf<ContentProviderOperation>()

    /*
     * Creates a new raw contact with its account type (server type) and account name
     * (user's account). Remember that the display name is not stored in this row, but in a
     * StructuredName data row. No other data is required.
     */
    var op: ContentProviderOperation.Builder =
            ContentProviderOperation.newInsert(ContactsContract.RawContacts.CONTENT_URI)
                    .withValue(ContactsContract.RawContacts.ACCOUNT_TYPE, selectedAccount.name)
                    .withValue(ContactsContract.RawContacts.ACCOUNT_NAME, selectedAccount.type)

    // Builds the operation and adds it to the array of operations
    ops.add(op.build())
جاوا
    /*
     * Prepares the batch operation for inserting a new raw contact and its data. Even if
     * the Contacts Provider does not have any data for this person, you can't add a Contact,
     * only a raw contact. The Contacts Provider will then add a Contact automatically.
     */

     // Creates a new array of ContentProviderOperation objects.
    ArrayList<ContentProviderOperation> ops =
            new ArrayList<ContentProviderOperation>();

    /*
     * Creates a new raw contact with its account type (server type) and account name
     * (user's account). Remember that the display name is not stored in this row, but in a
     * StructuredName data row. No other data is required.
     */
    ContentProviderOperation.Builder op =
            ContentProviderOperation.newInsert(ContactsContract.RawContacts.CONTENT_URI)
            .withValue(ContactsContract.RawContacts.ACCOUNT_TYPE, selectedAccount.getType())
            .withValue(ContactsContract.RawContacts.ACCOUNT_NAME, selectedAccount.getName());

    // Builds the operation and adds it to the array of operations
    ops.add(op.build());
در مرحله بعد، کد، ردیفهای داده را برای ردیفهای نام نمایشی، تلفن و ایمیل ایجاد میکند.
هر شیء سازنده عملیات از withValueBackReference() برای دریافت RAW_CONTACT_ID استفاده میکند. این ارجاع به شیء ContentProviderResult از اولین عملیات اشاره میکند، که ردیف مخاطب خام را اضافه میکند و مقدار _ID جدید آن را برمیگرداند. در نتیجه، هر ردیف داده به طور خودکار توسط RAW_CONTACT_ID خود به ردیف ContactsContract.RawContacts جدیدی که به آن تعلق دارد، پیوند داده میشود.
The ContentProviderOperation.Builder object that adds the email row is flagged with withYieldAllowed() , which sets a yield point:
کاتلین
    // Creates the display name for the new raw contact, as a StructuredName data row.
    op = ContentProviderOperation.newInsert(ContactsContract.Data.CONTENT_URI)
            /*
             * withValueBackReference sets the value of the first argument to the value of
             * the ContentProviderResult indexed by the second argument. In this particular
             * call, the raw contact ID column of the StructuredName data row is set to the
             * value of the result returned by the first operation, which is the one that
             * actually adds the raw contact row.
             */
            .withValueBackReference(ContactsContract.Data.RAW_CONTACT_ID, 0)

            // Sets the data row's MIME type to StructuredName
            .withValue(ContactsContract.Data.MIMETYPE,
                    ContactsContract.CommonDataKinds.StructuredName.CONTENT_ITEM_TYPE)

            // Sets the data row's display name to the name in the UI.
            .withValue(ContactsContract.CommonDataKinds.StructuredName.DISPLAY_NAME, name)

    // Builds the operation and adds it to the array of operations
    ops.add(op.build())

    // Inserts the specified phone number and type as a Phone data row
    op = ContentProviderOperation.newInsert(ContactsContract.Data.CONTENT_URI)
            /*
             * Sets the value of the raw contact id column to the new raw contact ID returned
             * by the first operation in the batch.
             */
            .withValueBackReference(ContactsContract.Data.RAW_CONTACT_ID, 0)

            // Sets the data row's MIME type to Phone
            .withValue(ContactsContract.Data.MIMETYPE,
                    ContactsContract.CommonDataKinds.Phone.CONTENT_ITEM_TYPE)

            // Sets the phone number and type
            .withValue(ContactsContract.CommonDataKinds.Phone.NUMBER, phone)
            .withValue(ContactsContract.CommonDataKinds.Phone.TYPE, phoneType)

    // Builds the operation and adds it to the array of operations
    ops.add(op.build())

    // Inserts the specified email and type as a Phone data row
    op = ContentProviderOperation.newInsert(ContactsContract.Data.CONTENT_URI)
            /*
             * Sets the value of the raw contact id column to the new raw contact ID returned
             * by the first operation in the batch.
             */
            .withValueBackReference(ContactsContract.Data.RAW_CONTACT_ID, 0)

            // Sets the data row's MIME type to Email
            .withValue(ContactsContract.Data.MIMETYPE,
                    ContactsContract.CommonDataKinds.Email.CONTENT_ITEM_TYPE)

            // Sets the email address and type
            .withValue(ContactsContract.CommonDataKinds.Email.ADDRESS, email)
            .withValue(ContactsContract.CommonDataKinds.Email.TYPE, emailType)

    /*
     * Demonstrates a yield point. At the end of this insert, the batch operation's thread
     * will yield priority to other threads. Use after every set of operations that affect a
     * single contact, to avoid degrading performance.
     */
    op.withYieldAllowed(true)

    // Builds the operation and adds it to the array of operations
    ops.add(op.build())
جاوا
    // Creates the display name for the new raw contact, as a StructuredName data row.
    op =
            ContentProviderOperation.newInsert(ContactsContract.Data.CONTENT_URI)
            /*
             * withValueBackReference sets the value of the first argument to the value of
             * the ContentProviderResult indexed by the second argument. In this particular
             * call, the raw contact ID column of the StructuredName data row is set to the
             * value of the result returned by the first operation, which is the one that
             * actually adds the raw contact row.
             */
            .withValueBackReference(ContactsContract.Data.RAW_CONTACT_ID, 0)

            // Sets the data row's MIME type to StructuredName
            .withValue(ContactsContract.Data.MIMETYPE,
                    ContactsContract.CommonDataKinds.StructuredName.CONTENT_ITEM_TYPE)

            // Sets the data row's display name to the name in the UI.
            .withValue(ContactsContract.CommonDataKinds.StructuredName.DISPLAY_NAME, name);

    // Builds the operation and adds it to the array of operations
    ops.add(op.build());

    // Inserts the specified phone number and type as a Phone data row
    op =
            ContentProviderOperation.newInsert(ContactsContract.Data.CONTENT_URI)
            /*
             * Sets the value of the raw contact id column to the new raw contact ID returned
             * by the first operation in the batch.
             */
            .withValueBackReference(ContactsContract.Data.RAW_CONTACT_ID, 0)

            // Sets the data row's MIME type to Phone
            .withValue(ContactsContract.Data.MIMETYPE,
                    ContactsContract.CommonDataKinds.Phone.CONTENT_ITEM_TYPE)

            // Sets the phone number and type
            .withValue(ContactsContract.CommonDataKinds.Phone.NUMBER, phone)
            .withValue(ContactsContract.CommonDataKinds.Phone.TYPE, phoneType);

    // Builds the operation and adds it to the array of operations
    ops.add(op.build());

    // Inserts the specified email and type as a Phone data row
    op =
            ContentProviderOperation.newInsert(ContactsContract.Data.CONTENT_URI)
            /*
             * Sets the value of the raw contact id column to the new raw contact ID returned
             * by the first operation in the batch.
             */
            .withValueBackReference(ContactsContract.Data.RAW_CONTACT_ID, 0)

            // Sets the data row's MIME type to Email
            .withValue(ContactsContract.Data.MIMETYPE,
                    ContactsContract.CommonDataKinds.Email.CONTENT_ITEM_TYPE)

            // Sets the email address and type
            .withValue(ContactsContract.CommonDataKinds.Email.ADDRESS, email)
            .withValue(ContactsContract.CommonDataKinds.Email.TYPE, emailType);

    /*
     * Demonstrates a yield point. At the end of this insert, the batch operation's thread
     * will yield priority to other threads. Use after every set of operations that affect a
     * single contact, to avoid degrading performance.
     */
    op.withYieldAllowed(true);

    // Builds the operation and adds it to the array of operations
    ops.add(op.build());
The last snippet shows the call to applyBatch() that inserts the new raw contact and data rows.
کاتلین
    // Ask the Contacts Provider to create a new contact
    Log.d(TAG, "Selected account: ${mSelectedAccount.name} (${mSelectedAccount.type})")
    Log.d(TAG, "Creating contact: $name")

    /*
     * Applies the array of ContentProviderOperation objects in batch. The results are
     * discarded.
     */
    try {
        contentResolver.applyBatch(ContactsContract.AUTHORITY, ops)
    } catch (e: Exception) {
        // Display a warning
        val txt: String = getString(R.string.contactCreationFailure)
        Toast.makeText(applicationContext, txt, Toast.LENGTH_SHORT).show()

        // Log exception
        Log.e(TAG, "Exception encountered while inserting contact: $e")
    }
}
جاوا
    // Ask the Contacts Provider to create a new contact
    Log.d(TAG,"Selected account: " + selectedAccount.getName() + " (" +
            selectedAccount.getType() + ")");
    Log.d(TAG,"Creating contact: " + name);

    /*
     * Applies the array of ContentProviderOperation objects in batch. The results are
     * discarded.
     */
    try {

            getContentResolver().applyBatch(ContactsContract.AUTHORITY, ops);
    } catch (Exception e) {

            // Display a warning
            Context ctx = getApplicationContext();

            CharSequence txt = getString(R.string.contactCreationFailure);
            int duration = Toast.LENGTH_SHORT;
            Toast toast = Toast.makeText(ctx, txt, duration);
            toast.show();

            // Log exception
            Log.e(TAG, "Exception encountered while inserting contact: " + e);
    }
}
Batch operations also allow you to implement optimistic concurrency control , a method of applying modification transactions without having to lock the underlying repository. To use this method, you apply the transaction and then check for other modifications that may have been made at the same time. If you find an inconsistent modification has occurred, you roll back your transaction and retry it.
Optimistic concurrency control is useful for a mobile device, where there's only one user at a time, and simultaneous accesses to a data repository are rare. Because locking isn't used, no time is wasted on setting locks or waiting for other transactions to release their locks.
To use optimistic concurrency control while updating a single ContactsContract.RawContacts row, follow these steps:
- Retrieve the raw contact's
VERSIONcolumn along with the other data you retrieve. - Create a
ContentProviderOperation.Builderobject suitable for enforcing a constraint, using the methodnewAssertQuery(Uri). For the content URI, useRawContacts.CONTENT_URIwith the raw contact's_IDappended to it. - For the
ContentProviderOperation.Builderobject, callwithValue()to compare theVERSIONcolumn to the version number you just retrieved. - For the same
ContentProviderOperation.Builder, callwithExpectedCount()to ensure that only one row is tested by this assertion. - Call
build()to create theContentProviderOperationobject, then add this object as the first object in theArrayListthat you pass toapplyBatch(). - Apply the batch transaction.
If the raw contact row is updated by another operation between the time you read the row and the time you attempt to modify it, the "assert" ContentProviderOperation will fail, and the entire batch of operations will be backed out. You can then choose to retry the batch or take some other action.
The following snippet demonstrates how to create an "assert" ContentProviderOperation after querying for a single raw contact using a CursorLoader :
کاتلین
/*
 * The application uses CursorLoader to query the raw contacts table. The system calls this method
 * when the load is finished.
 */
override fun onLoadFinished(loader: Loader<Cursor>, cursor: Cursor) {
    // Gets the raw contact's _ID and VERSION values
    rawContactID = cursor.getLong(cursor.getColumnIndex(BaseColumns._ID))
    mVersion = cursor.getInt(cursor.getColumnIndex(SyncColumns.VERSION))
}

...

// Sets up a Uri for the assert operation
val rawContactUri: Uri = ContentUris.withAppendedId(
        ContactsContract.RawContacts.CONTENT_URI,
        rawContactID
)

// Creates a builder for the assert operation
val assertOp: ContentProviderOperation.Builder =
        ContentProviderOperation.newAssertQuery(rawContactUri).apply {
            // Adds the assertions to the assert operation: checks the version
            withValue(SyncColumns.VERSION, mVersion)

            // and count of rows tested
            withExpectedCount(1)
        }

// Creates an ArrayList to hold the ContentProviderOperation objects
val ops = arrayListOf<ContentProviderOperation>()

ops.add(assertOp.build())

// You would add the rest of your batch operations to "ops" here

...

// Applies the batch. If the assert fails, an Exception is thrown
try {
    val results: Array<ContentProviderResult> = contentResolver.applyBatch(AUTHORITY, ops)
} catch (e: OperationApplicationException) {
    // Actions you want to take if the assert operation fails go here
}
جاوا
/*
 * The application uses CursorLoader to query the raw contacts table. The system calls this method
 * when the load is finished.
 */
public void onLoadFinished(Loader<Cursor> loader, Cursor cursor) {

    // Gets the raw contact's _ID and VERSION values
    rawContactID = cursor.getLong(cursor.getColumnIndex(BaseColumns._ID));
    mVersion = cursor.getInt(cursor.getColumnIndex(SyncColumns.VERSION));
}

...

// Sets up a Uri for the assert operation
Uri rawContactUri = ContentUris.withAppendedId(RawContacts.CONTENT_URI, rawContactID);

// Creates a builder for the assert operation
ContentProviderOperation.Builder assertOp = ContentProviderOperation.newAssertQuery(rawContactUri);

// Adds the assertions to the assert operation: checks the version and count of rows tested
assertOp.withValue(SyncColumns.VERSION, mVersion);
assertOp.withExpectedCount(1);

// Creates an ArrayList to hold the ContentProviderOperation objects
ArrayList ops = new ArrayList<ContentProviderOperation>;

ops.add(assertOp.build());

// You would add the rest of your batch operations to "ops" here

...

// Applies the batch. If the assert fails, an Exception is thrown
try
    {
        ContentProviderResult[] results =
                getContentResolver().applyBatch(AUTHORITY, ops);

    } catch (OperationApplicationException e) {

        // Actions you want to take if the assert operation fails go here
    }
Retrieval and modification with intents
Sending an intent to the device's contacts application allows you to access the Contacts Provider indirectly. The intent starts the device's contacts application UI, in which users can do contacts-related work. With this type of access, users can:
- Pick a contact from a list and have it returned to your app for further work.
- Edit an existing contact's data.
- Insert a new raw contact for any of their accounts.
- Delete a contact or contacts data.
If the user is inserting or updating data, you can collect the data first and send it as part of the intent.
When you use intents to access the Contacts Provider via the device's contacts application, you don't have to write your own UI or code for accessing the provider. You also don't have to request permission to read or write to the provider. The device's contacts application can delegate read permission for a contact to you, and because you're making modifications to the provider through another application, you don't have to have write permissions.
The general process of sending an intent to access a provider is described in detail in the Content Provider basics guide in the section "Data access via intents." The action, MIME type, and data values you use for the available tasks are summarized in Table 4, while the extras values you can use with putExtra() are listed in the reference documentation for ContactsContract.Intents.Insert :
Table 4. Contacts Provider Intents.
| وظیفه | اکشن | دادهها | MIME type | یادداشتها |
|---|---|---|---|---|
| Pick a contact from a list | ACTION_PICK | One of:
| Not used | Displays a list of raw contacts or a list of data from a raw contact, depending on the content URI type you supply. Call |
| Insert a new raw contact | Insert.ACTION | ناموجود | RawContacts.CONTENT_TYPE , MIME type for a set of raw contacts. | Displays the device's contacts application's Add Contact screen. The extras values you add to the intent are displayed. If sent with startActivityForResult() , the content URI of the newly-added raw contact is passed back to your activity's onActivityResult() callback method in the Intent argument, in the "data" field. To get the value, call getData() . |
| ویرایش یک مخاطب | ACTION_EDIT | CONTENT_LOOKUP_URI for the contact. The editor activity will allow the user to edit any of the data associated with this contact. | Contacts.CONTENT_ITEM_TYPE , a single contact. | Displays the Edit Contact screen in the contacts application. The extras values you add to the intent are displayed. When the user clicks Done to save the edits, your activity returns to the foreground. |
| Display a picker that can also add data. | ACTION_INSERT_OR_EDIT | ناموجود | CONTENT_ITEM_TYPE | This intent always displays the contacts app's picker screen. The user can either pick a contact to edit, or add a new contact. Either the edit or the add screen appears, depending on the user's choice, and the extras data you pass in the intent is displayed. If your app displays contact data such as an email or phone number, use this intent to allow the user to add the data to an existing contact. contact, Note: There's no need to send a name value in this intent's extras, because the user always picks an existing name or adds a new one. Moreover, if you send a name, and the user chooses to do an edit, the contacts app will display the name you send, overwriting the previous value. If the user doesn't notice this and saves the edit, the old value is lost. |
The device's contacts app doesn't allow you to delete a raw contact or any of its data with an intent. Instead, to delete a raw contact, use ContentResolver.delete() or ContentProviderOperation.newDelete() .
The following snippet shows how to construct and send an intent that inserts a new raw contact and data:
کاتلین
// Gets values from the UI
val name = contactNameEditText.text.toString()
val phone = contactPhoneEditText.text.toString()
val email = contactEmailEditText.text.toString()

val company = companyName.text.toString()
val jobtitle = jobTitle.text.toString()

/*
 * Demonstrates adding data rows as an array list associated with the DATA key
 */

// Defines an array list to contain the ContentValues objects for each row
val contactData = arrayListOf<ContentValues>()

/*
 * Defines the raw contact row
 */

// Sets up the row as a ContentValues object
val rawContactRow = ContentValues().apply {
    // Adds the account type and name to the row
    put(ContactsContract.RawContacts.ACCOUNT_TYPE, selectedAccount.type)
    put(ContactsContract.RawContacts.ACCOUNT_NAME, selectedAccount.name)
}

// Adds the row to the array
contactData.add(rawContactRow)

/*
 * Sets up the phone number data row
 */

// Sets up the row as a ContentValues object
val phoneRow = ContentValues().apply {
    // Specifies the MIME type for this data row (all data rows must be marked by their type)
    put(ContactsContract.Data.MIMETYPE,ContactsContract.CommonDataKinds.Phone.CONTENT_ITEM_TYPE)

    // Adds the phone number and its type to the row
    put(ContactsContract.CommonDataKinds.Phone.NUMBER, phone)
}

// Adds the row to the array
contactData.add(phoneRow)

/*
 * Sets up the email data row
 */

// Sets up the row as a ContentValues object
val emailRow = ContentValues().apply {
    // Specifies the MIME type for this data row (all data rows must be marked by their type)
    put(ContactsContract.Data.MIMETYPE, ContactsContract.CommonDataKinds.Email.CONTENT_ITEM_TYPE)

    // Adds the email address and its type to the row
    put(ContactsContract.CommonDataKinds.Email.ADDRESS, email)
}

// Adds the row to the array
contactData.add(emailRow)

// Creates a new intent for sending to the device's contacts application
val insertIntent = Intent(ContactsContract.Intents.Insert.ACTION).apply {
    // Sets the MIME type to the one expected by the insertion activity
    type = ContactsContract.RawContacts.CONTENT_TYPE

    // Sets the new contact name
    putExtra(ContactsContract.Intents.Insert.NAME, name)

    // Sets the new company and job title
    putExtra(ContactsContract.Intents.Insert.COMPANY, company)
    putExtra(ContactsContract.Intents.Insert.JOB_TITLE, jobtitle)

    /*
    * Adds the array to the intent's extras. It must be a parcelable object in order to
    * travel between processes. The device's contacts app expects its key to be
    * Intents.Insert.DATA
    */
    putParcelableArrayListExtra(ContactsContract.Intents.Insert.DATA, contactData)
}

// Send out the intent to start the device's contacts app in its add contact activity.
startActivity(insertIntent)
جاوا
// Gets values from the UI
String name = contactNameEditText.getText().toString();
String phone = contactPhoneEditText.getText().toString();
String email = contactEmailEditText.getText().toString();

String company = companyName.getText().toString();
String jobtitle = jobTitle.getText().toString();

// Creates a new intent for sending to the device's contacts application
Intent insertIntent = new Intent(ContactsContract.Intents.Insert.ACTION);

// Sets the MIME type to the one expected by the insertion activity
insertIntent.setType(ContactsContract.RawContacts.CONTENT_TYPE);

// Sets the new contact name
insertIntent.putExtra(ContactsContract.Intents.Insert.NAME, name);

// Sets the new company and job title
insertIntent.putExtra(ContactsContract.Intents.Insert.COMPANY, company);
insertIntent.putExtra(ContactsContract.Intents.Insert.JOB_TITLE, jobtitle);

/*
 * Demonstrates adding data rows as an array list associated with the DATA key
 */

// Defines an array list to contain the ContentValues objects for each row
ArrayList<ContentValues> contactData = new ArrayList<ContentValues>();


/*
 * Defines the raw contact row
 */

// Sets up the row as a ContentValues object
ContentValues rawContactRow = new ContentValues();

// Adds the account type and name to the row
rawContactRow.put(ContactsContract.RawContacts.ACCOUNT_TYPE, selectedAccount.getType());
rawContactRow.put(ContactsContract.RawContacts.ACCOUNT_NAME, selectedAccount.getName());

// Adds the row to the array
contactData.add(rawContactRow);

/*
 * Sets up the phone number data row
 */

// Sets up the row as a ContentValues object
ContentValues phoneRow = new ContentValues();

// Specifies the MIME type for this data row (all data rows must be marked by their type)
phoneRow.put(
        ContactsContract.Data.MIMETYPE,
        ContactsContract.CommonDataKinds.Phone.CONTENT_ITEM_TYPE
);

// Adds the phone number and its type to the row
phoneRow.put(ContactsContract.CommonDataKinds.Phone.NUMBER, phone);

// Adds the row to the array
contactData.add(phoneRow);

/*
 * Sets up the email data row
 */

// Sets up the row as a ContentValues object
ContentValues emailRow = new ContentValues();

// Specifies the MIME type for this data row (all data rows must be marked by their type)
emailRow.put(
        ContactsContract.Data.MIMETYPE,
        ContactsContract.CommonDataKinds.Email.CONTENT_ITEM_TYPE
);

// Adds the email address and its type to the row
emailRow.put(ContactsContract.CommonDataKinds.Email.ADDRESS, email);

// Adds the row to the array
contactData.add(emailRow);

/*
 * Adds the array to the intent's extras. It must be a parcelable object in order to
 * travel between processes. The device's contacts app expects its key to be
 * Intents.Insert.DATA
 */
insertIntent.putParcelableArrayListExtra(ContactsContract.Intents.Insert.DATA, contactData);

// Send out the intent to start the device's contacts app in its add contact activity.
startActivity(insertIntent);
Data integrity
Because the contacts repository contains important and sensitive data that users expect to be correct and up-to-date, the Contacts Provider has well-defined rules for data integrity. It's your responsibility to conform to these rules when you modify contacts data. The important rules are listed here:
- Always add a
ContactsContract.CommonDataKinds.StructuredNamerow for everyContactsContract.RawContactsrow you add. - A
ContactsContract.RawContactsrow without aContactsContract.CommonDataKinds.StructuredNamerow in theContactsContract.Datatable may cause problems during aggregation. - Always link new
ContactsContract.Datarows to their parentContactsContract.RawContactsrow. - A
ContactsContract.Datarow that isn't linked to aContactsContract.RawContactswon't be visible in the device's contacts application, and it might cause problems with sync adapters. - Change data only for those raw contacts that you own.
- Remember that the Contacts Provider is usually managing data from several different account types/online services. You need to ensure that your application only modifies or deletes data for rows that belong to you, and that it only inserts data with an account type and name that you control.
- Always use the constants defined in
ContactsContractand its subclasses for authorities, content URIs, URI paths, column names, MIME types, andTYPEvalues. - Using these constants helps you to avoid errors. You'll also be notified with compiler warnings if any of the constants is deprecated.
Custom data rows
By creating and using your own custom MIME types, you can insert, edit, delete, and retrieve your own data rows in the ContactsContract.Data table. Your rows are limited to using the column defined in ContactsContract.DataColumns , although you can map your own type-specific column names to the default column names. In the device's contacts application, the data for your rows is displayed but can't be edited or deleted, and users can't add additional data. To allow users to modify your custom data rows, you must provide an editor activity in your own application.
To display your custom data, provide a contacts.xml file containing a <ContactsAccountType> element and one or more of its <ContactsDataKind> child elements. This is described in more detail in the section <ContactsDataKind> element .
To learn more about custom MIME types, read the Create a Content Provider guide.
Contacts Provider sync adapters
The Contacts Provider is specifically designed for handling synchronization of contacts data between a device and an online service. This allows users to download existing data to a new device and upload existing data to a new account. Synchronization also ensures that users have the latest data at hand, regardless of the source of additions and changes. Another advantage of synchronization is that it makes contacts data available even when the device is not connected to the network.
Although you can implement synchronization in a variety of ways, the Android system provides a plug-in synchronization framework that automates the following tasks:
- Checking network availability.
- Scheduling and executing synchronization, based on user preferences.
- Restarting synchronizations that have stopped.
To use this framework, you supply a sync adapter plug-in. Each sync adapter is unique to a service and content provider, but can handle multiple account names for the same service. The framework also allows multiple sync adapters for the same service and provider.
Sync adapter classes and files
You implement a sync adapter as a subclass of AbstractThreadedSyncAdapter and install it as part of an Android application. The system learns about the sync adapter from elements in your application manifest, and from a special XML file pointed to by the manifest. The XML file defines the account type for the online service and the authority for the content provider, which together uniquely identify the adapter. The sync adapter does not become active until the user adds an account for the sync adapter's account type and enables synchronization for the content provider the sync adapter syncs with. At that point, the system starts managing the adapter, calling it as necessary to synchronize between the content provider and the server.
Note: Using an account type as part of the sync adapter's identification allows the system to detect and group together sync adapters that access different services from the same organization. For example, sync adapters for Google online services all have the same account type com.google . When users add a Google Account to their devices, all of the installed sync adapters for Google services are listed together; each sync adapter listed syncs with a different content provider on the device.
Because most services require users to verify their identity before accessing data, the Android system offers an authentication framework that is similar to, and often used in conjunction with, the sync adapter framework. The authentication framework uses plug-in authenticators that are subclasses of AbstractAccountAuthenticator . An authenticator verifies the user's identity in the following steps:
- Collects the user's name, password or similar information (the user's credentials ).
- Sends the credentials to the service
- Examines the service's reply.
If the service accepts the credentials, the authenticator can store the credentials for later use. Because of the plug-in authenticator framework, the AccountManager can provide access to any authtokens an authenticator supports and chooses to expose, such as OAuth2 authtokens.
Although authentication is not required, most contacts services use it. However, you're not required to use the Android authentication framework to do authentication.
Sync adapter implementation
To implement a sync adapter for the Contacts Provider, you start by creating an Android application that contains the following:
- A
Servicecomponent that responds to requests from the system to bind to the sync adapter. - When the system wants to run a synchronization, it calls the service's
onBind()method to get anIBinderfor the sync adapter. This allows the system to do cross-process calls to the adapter's methods. - The actual sync adapter, implemented as a concrete subclass of
AbstractThreadedSyncAdapter. - This class does the work of downloading data from the server, uploading data from the device, and resolving conflicts. The main work of the adapter is done in the method
onPerformSync(). This class must be instantiated as a singleton. - A subclass of
Application. - This class acts as a factory for the sync adapter singleton. Use the
onCreate()method to instantiate the sync adapter, and provide a static "getter" method to return the singleton to theonBind()method of the sync adapter's service. - Optional: A
Servicecomponent that responds to requests from the system for user authentication. -
AccountManagerstarts this service to begin the authentication process. The service'sonCreate()method instantiates an authenticator object. When the system wants to authenticate a user account for the application's sync adapter, it calls the service'sonBind()method to get anIBinderfor the authenticator. This allows the system to do cross-process calls to the authenticator's methods.. - Optional: A concrete subclass of
AbstractAccountAuthenticatorthat handles requests for authentication. - This class provides methods that the
AccountManagerinvokes to authenticate the user's credentials with the server. The details of the authentication process vary widely, based on the server technology in use. You should refer to the documentation for your server software to learn more about authentication. - XML files that define the sync adapter and authenticator to the system.
- The sync adapter and authenticator service components described previously are defined in
< service >elements in the application manifest. These elements contain< meta-data >child elements that provide specific data to the system:- The
< meta-data >element for the sync adapter service points to the XML fileres/xml/syncadapter.xml. In turn, this file specifies a URI for the web service that will be synchronized with the Contacts Provider, and an account type for the web service. - Optional: The
< meta-data >element for the authenticator points to the XML fileres/xml/authenticator.xml. In turn, this file specifies the account type that this authenticator supports, as well as UI resources that appear during the authentication process. The account type specified in this element must be the same as the account type specified for the sync adapter.
- The
Social stream data
The android.provider.ContactsContract.StreamItems and android.provider.ContactsContract.StreamItemPhotos tables manage incoming data from social networks. You can write a sync adapter that adds stream data from your own network to these tables, or you can read stream data from these tables and display it in your own application, or both. With these features, your social networking services and applications can be integrated into Android's social networking experience.
Social stream text
Stream items are always associated with a raw contact. The android.provider.ContactsContract.StreamItemsColumns#RAW_CONTACT_ID links to the _ID value for the raw contact. The account type and account name of the raw contact are also stored in the stream item row.
Store the data from your stream in the following columns:
- android.provider.ContactsContract.StreamItemsColumns#ACCOUNT_TYPE
- Required. The user's account type for the raw contact associated with this stream item. Remember to set this value when you insert a stream item.
- android.provider.ContactsContract.StreamItemsColumns#ACCOUNT_NAME
- Required. The user's account name for the raw contact associated with this stream item. Remember to set this value when you insert a stream item.
- Identifier columns
- Required. You must insert the following identifier columns when you insert a stream item:
- android.provider.ContactsContract.StreamItemsColumns#CONTACT_ID: The android.provider.BaseColumns#_ID value of the contact that this stream item is associated with.
- android.provider.ContactsContract.StreamItemsColumns#CONTACT_LOOKUP_KEY: The android.provider.ContactsContract.ContactsColumns#LOOKUP_KEY value of the contact this stream item is associated with.
- android.provider.ContactsContract.StreamItemsColumns#RAW_CONTACT_ID: The android.provider.BaseColumns#_ID value of the raw contact that this stream item is associated with.
- android.provider.ContactsContract.StreamItemsColumns#COMMENTS
- Optional. Stores summary information that you can display at the beginning of a stream item.
- android.provider.ContactsContract.StreamItemsColumns#TEXT
- The text of the stream item, either the content that was posted by the source of the item, or a description of some action that generated the stream item. This column can contain any formatting and embedded resource images that can be rendered by
fromHtml(). The provider may truncate or ellipsize long content, but it will try to avoid breaking tags. - android.provider.ContactsContract.StreamItemsColumns#TIMESTAMP
- A text string containing the time the stream item was inserted or updated, in the form of milliseconds since epoch. Applications that insert or update stream items are responsible for maintaining this column; it is not automatically maintained by the Contacts Provider.
To display identifying information for your stream items, use the android.provider.ContactsContract.StreamItemsColumns#RES_ICON, android.provider.ContactsContract.StreamItemsColumns#RES_LABEL, and android.provider.ContactsContract.StreamItemsColumns#RES_PACKAGE to link to resources in your application.
The android.provider.ContactsContract.StreamItems table also contains the columns android.provider.ContactsContract.StreamItemsColumns#SYNC1 through android.provider.ContactsContract.StreamItemsColumns#SYNC4 for the exclusive use of sync adapters.
Social stream photos
The android.provider.ContactsContract.StreamItemPhotos table stores photos associated with a stream item. The table's android.provider.ContactsContract.StreamItemPhotosColumns#STREAM_ITEM_ID column links to values in the _ID column of android.provider.ContactsContract.StreamItems table. Photo references are stored in the table in these columns:
- android.provider.ContactsContract.StreamItemPhotos#PHOTO column (a BLOB).
- A binary representation of the photo, resized by the provider for storage and display. This column is available for backwards compatibility with previous versions of the Contacts Provider that used it for storing photos. However, in the current version you should not use this column to store photos. Instead, use either android.provider.ContactsContract.StreamItemPhotosColumns#PHOTO_FILE_ID or android.provider.ContactsContract.StreamItemPhotosColumns#PHOTO_URI (both of which are described in the following points) to store photos in a file. This column now contains a thumbnail of the photo, which is available for reading.
- android.provider.ContactsContract.StreamItemPhotosColumns#PHOTO_FILE_ID
- A numeric identifier of a photo for a raw contact. Append this value to the constant
DisplayPhoto.CONTENT_URIto get a content URI pointing to a single photo file, and then callopenAssetFileDescriptor()to get a handle to the photo file. - android.provider.ContactsContract.StreamItemPhotosColumns#PHOTO_URI
- A content URI pointing directly to the photo file for the photo represented by this row. Call
openAssetFileDescriptor()with this URI to get a handle to the photo file.
Using the social stream tables
These tables work the same as the other main tables in the Contacts Provider, except that:
- These tables require additional access permissions. To read from them, your application must have the permission android.Manifest.permission#READ_SOCIAL_STREAM. To modify them, your application must have the permission android.Manifest.permission#WRITE_SOCIAL_STREAM.
- For the android.provider.ContactsContract.StreamItems table, the number of rows stored for each raw contact is limited. Once this limit is reached, the Contacts Provider makes space for new stream item rows by automatically deleting the rows having the oldest android.provider.ContactsContract.StreamItemsColumns#TIMESTAMP. To get the limit, issue a query to the content URI android.provider.ContactsContract.StreamItems#CONTENT_LIMIT_URI. You can leave all the arguments other than the content URI set to
null. The query returns a Cursor containing a single row, with the single column android.provider.ContactsContract.StreamItems#MAX_ITEMS.
The class android.provider.ContactsContract.StreamItems.StreamItemPhotos defines a sub-table of android.provider.ContactsContract.StreamItemPhotos containing the photo rows for a single stream item.
Social stream interactions
The social stream data managed by the Contacts Provider, in conjunction with the device's contacts application, offers a powerful way to connect your social networking system with existing contacts. The following features are available:
- By syncing your social networking service to the Contacts Provider with a sync adapter, you can retrieve recent activity for a user's contacts and store it in the android.provider.ContactsContract.StreamItems and android.provider.ContactsContract.StreamItemPhotos tables for later use.
- Besides regular synchronization, you can trigger your sync adapter to retrieve additional data when the user selects a contact to view. This allows your sync adapter to retrieve high-resolution photos and the most recent stream items for the contact.
- By registering a notification with the device's contacts application and the Contacts Provider, you can receive an intent when a contact is viewed, and at that point update the contact's status from your service. This approach may be faster and use less bandwidth than doing a full sync with a sync adapter.
- Users can add a contact to your social networking service while looking at the contact in the device's contacts application. You enable this with the "invite contact" feature, which you enable with a combination of an activity that adds an existing contact to your network, and an XML file that provides the device's contacts application and the Contacts Provider with the details of your application.
Regular synchronization of stream items with the Contacts Provider is the same as other synchronizations. To learn more about synchronization, see the section Contacts Provider sync adapters . Registering notifications and inviting contacts are covered in the next two sections.
Registering to handle social networking views
To register your sync adapter to receive notifications when the user views a contact that's managed by your sync adapter:
- Create a file named
contacts.xmlin your project'sres/xml/directory. If you already have this file, you can skip this step. - In this file, add the element
<ContactsAccountType xmlns:android="http://schemas.android.com/apk/res/android">. If this element already exists, you can skip this step. - To register a service that is notified when the user opens a contact's detail page in the device's contacts application, add the attribute
viewContactNotifyService=" serviceclass "to the element, whereserviceclassis the fully-qualified classname of the service that should receive the intent from the device's contacts application. For the notifier service, use a class that extendsIntentService, to allow the service to receive intents. The data in the incoming intent contains the content URI of the raw contact the user clicked. From the notifier service, you can bind to and then call your sync adapter to update the data for the raw contact.
To register an activity to be called when the user clicks on a stream item or photo or both:
- Create a file named
contacts.xmlin your project'sres/xml/directory. If you already have this file, you can skip this step. - In this file, add the element
<ContactsAccountType xmlns:android="http://schemas.android.com/apk/res/android">. If this element already exists, you can skip this step. - To register one of your activities to handle the user clicking on a stream item in the device's contacts application, add the attribute
viewStreamItemActivity=" activityclass "to the element, whereactivityclassis the fully-qualified classname of the activity that should receive the intent from the device's contacts application. - To register one of your activities to handle the user clicking on a stream photo in the device's contacts application, add the attribute
viewStreamItemPhotoActivity=" activityclass "to the element, whereactivityclassis the fully-qualified classname of the activity that should receive the intent from the device's contacts application.
The <ContactsAccountType> element is described in more detail in the section <ContactsAccountType> element .
The incoming intent contains the content URI of the item or photo that the user clicked. To have separate activities for text items and for photos, use both attributes in the same file.
Interacting with your social networking service
Users don't have to leave the device's contacts application to invite a contact to your social networking site. Instead, you can have the device's contacts app send an intent for inviting the contact to one of your activities. To set this up:
- Create a file named
contacts.xmlin your project'sres/xml/directory. If you already have this file, you can skip this step. - In this file, add the element
<ContactsAccountType xmlns:android="http://schemas.android.com/apk/res/android">. If this element already exists, you can skip this step. - Add the following attributes:
-
inviteContactActivity=" activityclass " -
inviteContactActionLabel="@string/ invite_action_label "
activityclassvalue is the fully-qualified classname of the activity that should receive the intent. Theinvite_action_labelvalue is a text string that's displayed in the Add Connection menu in the device's contacts application. -
Note: ContactsSource is a deprecated tag name for ContactsAccountType .
contacts.xml reference
The file contacts.xml contains XML elements that control the interaction of your sync adapter and application with the contacts application and the Contacts Provider. These elements are described in the following sections.
<ContactsAccountType> element
The <ContactsAccountType> element controls the interaction of your application with the contacts application. It has the following syntax:
<ContactsAccountType
        xmlns:android="http://schemas.android.com/apk/res/android"
        inviteContactActivity="activity_name"
        inviteContactActionLabel="invite_command_text"
        viewContactNotifyService="view_notify_service"
        viewGroupActivity="group_view_activity"
        viewGroupActionLabel="group_action_text"
        viewStreamItemActivity="viewstream_activity_name"
        viewStreamItemPhotoActivity="viewphotostream_activity_name">
contained in:
res/xml/contacts.xml
can contain:
<ContactsDataKind>
شرح:
Declares Android components and UI labels that allow users to invite one of their contacts to a social network, notify users when one of their social networking streams is updated, and so forth.
Notice that the attribute prefix android: is not necessary for the attributes of <ContactsAccountType> .
Attributes:
-
inviteContactActivity - The fully-qualified class name of the activity in your application that you want to activate when the user selects Add connection from the device's contacts application.
-
inviteContactActionLabel - A text string that is displayed for the activity specified in
inviteContactActivity, in the Add connection menu. For example, you can use the string "Follow in my network". You can use a string resource identifier for this label. -
viewContactNotifyService - The fully-qualified class name of a service in your application that should receive notifications when the user views a contact. This notification is sent by the device's contacts application; it allows your application to postpone data-intensive operations until they're needed. For example, your application can respond to this notification by reading in and displaying the contact's high-resolution photo and most recent social stream items. This feature is described in more detail in the section Social stream interactions .
-
viewGroupActivity - The fully-qualified class name of an activity in your application that can display group information. When the user clicks the group label in the device's contacts application, the UI for this activity is displayed.
-
viewGroupActionLabel - The label that the contacts application displays for a UI control that allows the user to look at groups in your application.
A string resource identifier is allowed for this attribute.
-
viewStreamItemActivity - The fully-qualified class name of an activity in your application that the device's contacts application launches when the user clicks a stream item for a raw contact.
-
viewStreamItemPhotoActivity - The fully-qualified class name of an activity in your application that the device's contacts application launches when the user clicks a photo in the stream item for a raw contact.
<ContactsDataKind> element
The <ContactsDataKind> element controls the display of your application's custom data rows in the contacts application's UI. It has the following syntax:
<ContactsDataKind
        android:mimeType="MIMEtype"
        android:icon="icon_resources"
        android:summaryColumn="column_name"
        android:detailColumn="column_name">
contained in:
<ContactsAccountType>شرح:
Use this element to have the contacts application display the contents of a custom data row as part of the details of a raw contact. Each <ContactsDataKind> child element of <ContactsAccountType> represents a type of custom data row that your sync adapter adds to the ContactsContract.Data table. Add one <ContactsDataKind> element for each custom MIME type you use. You don't have to add the element if you have a custom data row for which you don't want to display data.
Attributes:
-
android:mimeType - The custom MIME type you've defined for one of your custom data row types in the
ContactsContract.Datatable. For example, the valuevnd.android.cursor.item/vnd.example.locationstatuscould be a custom MIME type for a data row that records a contact's last known location. -
android:icon - An Android drawable resource that the contacts application displays next to your data. Use this to indicate to the user that the data comes from your service.
-
android:summaryColumn - The column name for the first of two values retrieved from the data row. The value is displayed as the first line of the entry for this data row. The first line is intended to be used as a summary of the data, but that is optional. See also android:detailColumn .
-
android:detailColumn - The column name for the second of two values retrieved from the data row. The value is displayed as the second line of the entry for this data row. See also
android:summaryColumn.
Additional Contacts Provider features
Besides the main features described in previous sections, the Contacts Provider offers these useful features for working with contacts data:
- Contact groups
- Photo features
Contact groups
The Contacts Provider can optionally label collections of related contacts with group data. If the server associated with a user account wants to maintain groups, the sync adapter for the account's account type should transfer groups data between the Contacts Provider and the server. When users add a new contact to the server and then put this contact in a new group, the sync adapter must add the new group to the ContactsContract.Groups table. The group or groups a raw contact belongs to are stored in the ContactsContract.Data table, using the ContactsContract.CommonDataKinds.GroupMembership MIME type.
If you're designing a sync adapter that will add raw contact data from server to the Contacts Provider, and you aren't using groups, then you need to tell the Provider to make your data visible. In the code that is executed when a user adds an account to the device, update the ContactsContract.Settings row that the Contacts Provider adds for the account. In this row, set the value of the Settings.UNGROUPED_VISIBLE column to 1. When you do this, the Contacts Provider will always make your contacts data visible, even if you don't use groups.
Contact photos
The ContactsContract.Data table stores photos as rows with MIME type Photo.CONTENT_ITEM_TYPE . The row's CONTACT_ID column is linked to the _ID column of the raw contact to which it belongs. The class ContactsContract.Contacts.Photo defines a sub-table of ContactsContract.Contacts containing photo information for a contact's primary photo, which is the primary photo of the contact's primary raw contact. Similarly, the class ContactsContract.RawContacts.DisplayPhoto defines a sub-table of ContactsContract.RawContacts containing photo information for a raw contact's primary photo.
The reference documentation for ContactsContract.Contacts.Photo and ContactsContract.RawContacts.DisplayPhoto contain examples of retrieving photo information. There is no convenience class for retrieving the primary thumbnail for a raw contact, but you can send a query to the ContactsContract.Data table, selecting on the raw contact's _ID , the Photo.CONTENT_ITEM_TYPE , and the IS_PRIMARY column to find the raw contact's primary photo row.
Social stream data for a person may also include photos. These are stored in the android.provider.ContactsContract.StreamItemPhotos table, which is described in more detail in the section Social stream photos .