Tabelle
Mit Sammlungen den Überblick behalten
Sie können Inhalte basierend auf Ihren Einstellungen speichern und kategorisieren.
TableLayout
ist eine ViewGroup
, die
zeigt untergeordnete View
-Elemente in Zeilen und Spalten an.
Hinweis:
Für eine bessere Leistung und Unterstützung für Tools sollten Sie stattdessen Ihr Layout mit ConstraintLayout erstellen.
TableLayout
positioniert seine untergeordneten Elemente in Zeilen und
Spalten. TableLayout-Container zeigen keine Rahmenlinien
für ihre Zeilen an,
Spalten oder Zellen. Die Tabelle hat so viele Spalten wie die Zeile mit dem
in den meisten Zellen. Eine Tabelle kann Zellen leer lassen. Zellen können sich
über mehrere Spalten erstrecken,
wie in HTML. Sie können sich über Spalten erstrecken, indem Sie den span
verwenden
in der Klasse TableRow.LayoutParams
.
Hinweis:Zellen können nicht mehrere Zeilen umfassen.
TableRow
-Objekte sind die untergeordneten Ansichten eines TableLayout
(jede TableRow definiert eine einzelne Zeile in der Tabelle.) Jede Zeile enthält null oder mehr
Zellen, die jeweils durch eine andere Ansicht definiert werden. Die Zellen von
kann eine Zeile aus verschiedenen View-Objekten bestehen, wie ImageView oder
TextView-Objekte. Eine Zelle kann auch ein ViewGroup-Objekt sein (zum Beispiel Sie
können Sie ein anderes TableLayout als Zelle verschachteln).
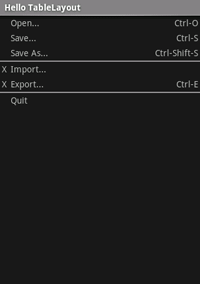
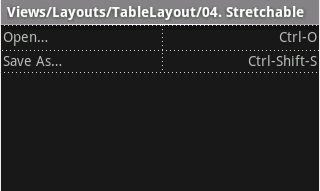
Das folgende Beispiellayout enthält jeweils zwei Zeilen und zwei Zellen. Die
Der zugehörige Screenshot zeigt das Ergebnis, wobei die Zellrahmen folgendermaßen aussehen:
gepunktete Linien (für einen visuellen Effekt hinzugefügt)
<?xml version="1.0" encoding="utf-8"?>
<TableLayout xmlns:android="http://schemas.android.com/apk/res/android"
android:layout_width="match_parent"
android:layout_height="match_parent"
android:stretchColumns="1">
<TableRow>
<TextView
android:text="@string/table_layout_4_open"
android:padding="3dip" />
<TextView
android:text="@string/table_layout_4_open_shortcut"
android:gravity="right"
android:padding="3dip" />
</TableRow>
<TableRow>
<TextView
android:text="@string/table_layout_4_save"
android:padding="3dip" />
<TextView
android:text="@string/table_layout_4_save_shortcut"
android:gravity="right"
android:padding="3dip" />
</TableRow>
</TableLayout>
Spalten können ausgeblendet, markiert,
gestreckt werden und den verfügbaren Platz auf dem Bildschirm ausfüllen,
oder als verkleinerbar gekennzeichnet werden, um das Verkleinern der Spalte zu erzwingen, bis die Tabelle verkleinert wird.
Bildschirm passt. Siehe TableLayout reference
in der Dokumentation.
Beispiel
- Starten Sie ein neues Projekt mit dem Namen HelloTableLayout.
- Öffnen Sie die Datei
res/layout/main.xml
und fügen Sie Folgendes ein:
<?xml version="1.0" encoding="utf-8"?>
<TableLayout xmlns:android="http://schemas.android.com/apk/res/android"
android:layout_width="match_parent"
android:layout_height="match_parent"
android:stretchColumns="1">
<TableRow>
<TextView
android:layout_column="1"
android:text="Open..."
android:padding="3dip" />
<TextView
android:text="Ctrl-O"
android:gravity="right"
android:padding="3dip" />
</TableRow>
<TableRow>
<TextView
android:layout_column="1"
android:text="Save..."
android:padding="3dip" />
<TextView
android:text="Ctrl-S"
android:gravity="right"
android:padding="3dip" />
</TableRow>
<TableRow>
<TextView
android:layout_column="1"
android:text="Save As..."
android:padding="3dip" />
<TextView
android:text="Ctrl-Shift-S"
android:gravity="right"
android:padding="3dip" />
</TableRow>
<View
android:layout_height="2dip"
android:background="#FF909090" />
<TableRow>
<TextView
android:text="X"
android:padding="3dip" />
<TextView
android:text="Import..."
android:padding="3dip" />
</TableRow>
<TableRow>
<TextView
android:text="X"
android:padding="3dip" />
<TextView
android:text="Export..."
android:padding="3dip" />
<TextView
android:text="Ctrl-E"
android:gravity="right"
android:padding="3dip" />
</TableRow>
<View
android:layout_height="2dip"
android:background="#FF909090" />
<TableRow>
<TextView
android:layout_column="1"
android:text="Quit"
android:padding="3dip" />
</TableRow>
</TableLayout>
Beachten Sie, dass dies der Struktur einer HTML-Tabelle ähnelt. Das TableLayout
ist wie das HTML-<table>
-Element. TableRow
ist wie
ein ><tr>>
-Element;
Für die Zellen können Sie jedoch ein beliebiges View
-Element verwenden. In diesem Beispiel
Für jede Zelle wird TextView
verwendet. Zwischen einigen Zeilen befindet sich auch ein
Basis-View
zum Zeichnen einer horizontalen Linie
- Stellen Sie sicher, dass Ihre HelloTableLayout-Aktivität dieses Layout im
Methode
onCreate()
:
Kotlin
override fun onCreate(savedInstanceState: Bundle?) {
super.onCreate(savedInstanceState)
setContentView(R.layout.main)
}
Java
public void onCreate(Bundle savedInstanceState) {
super.onCreate(savedInstanceState);
setContentView(R.layout.main);
}
Die Methode setContentView(int)
lädt den
Layoutdatei für die Activity
, die von der Ressource angegeben wird
ID – R.layout.main
bezieht sich auf das Layout res/layout/main.xml
-Datei.
- Führen Sie die Anwendung aus.
Sie sollten Folgendes sehen:
Alle Inhalte und Codebeispiele auf dieser Seite unterliegen den Lizenzen wie im Abschnitt Inhaltslizenz beschrieben. Java und OpenJDK sind Marken oder eingetragene Marken von Oracle und/oder seinen Tochtergesellschaften.
Zuletzt aktualisiert: 2025-07-27 (UTC).
[[["Leicht verständlich","easyToUnderstand","thumb-up"],["Mein Problem wurde gelöst","solvedMyProblem","thumb-up"],["Sonstiges","otherUp","thumb-up"]],[["Benötigte Informationen nicht gefunden","missingTheInformationINeed","thumb-down"],["Zu umständlich/zu viele Schritte","tooComplicatedTooManySteps","thumb-down"],["Nicht mehr aktuell","outOfDate","thumb-down"],["Problem mit der Übersetzung","translationIssue","thumb-down"],["Problem mit Beispielen/Code","samplesCodeIssue","thumb-down"],["Sonstiges","otherDown","thumb-down"]],["Zuletzt aktualisiert: 2025-07-27 (UTC)."],[],[],null,["# Table\n\n[TableLayout](/reference/android/widget/TableLayout) is a [ViewGroup](/reference/android/view/ViewGroup) that\ndisplays child [View](/reference/android/view/View) elements in rows and columns.\n\n**Note:**\nFor better performance and tooling support, you should instead [build your layout with ConstraintLayout](/training/constraint-layout).\n\n\n[TableLayout](/reference/android/widget/TableLayout) positions its children into rows and\ncolumns. TableLayout containers do not display border lines for their rows,\ncolumns, or cells. The table will have as many columns as the row with the\nmost cells. A table can leave cells empty. Cells can span multiple columns,\nas they can in HTML. You can span columns by using the `span`\nfield in the [TableRow.LayoutParams](/reference/android/widget/TableRow.LayoutParams) class.\n\n\n**Note:** Cells cannot span multiple rows.\n\n\n[TableRow](/reference/android/widget/TableRow) objects are the child views of a TableLayout\n(each TableRow defines a single row in the table). Each row has zero or more\ncells, each of which is defined by any kind of other View. So, the cells of\na row may be composed of a variety of View objects, like ImageView or\nTextView objects. A cell may also be a ViewGroup object (for example, you\ncan nest another TableLayout as a cell).\n\n\nThe following sample layout has two rows and two cells in each. The\naccompanying screenshot shows the result, with cell borders displayed as\ndotted lines (added for visual effect). \n\n```xml\n\u003c?xml version=\"1.0\" encoding=\"utf-8\"?\u003e\n\u003cTableLayout xmlns:android=\"http://schemas.android.com/apk/res/android\"\n android:layout_width=\"match_parent\"\n android:layout_height=\"match_parent\"\n android:stretchColumns=\"1\"\u003e\n \u003cTableRow\u003e\n \u003cTextView\n android:text=\"@string/table_layout_4_open\"\n android:padding=\"3dip\" /\u003e\n \u003cTextView\n android:text=\"@string/table_layout_4_open_shortcut\"\n android:gravity=\"right\"\n android:padding=\"3dip\" /\u003e\n \u003c/TableRow\u003e\n\n \u003cTableRow\u003e\n \u003cTextView\n android:text=\"@string/table_layout_4_save\"\n android:padding=\"3dip\" /\u003e\n \u003cTextView\n android:text=\"@string/table_layout_4_save_shortcut\"\n android:gravity=\"right\"\n android:padding=\"3dip\" /\u003e\n \u003c/TableRow\u003e\n\u003c/TableLayout\u003e\n```\n\nColumns can be hidden, marked to stretch and fill the available screen space,\nor can be marked as shrinkable to force the column to shrink until the table\nfits the screen. See the [TableLayout reference](/reference/android/widget/TableLayout)\ndocumentation for more details.\n\nExample\n-------\n\n1. Start a new project named *HelloTableLayout*.\n2. Open the `res/layout/main.xml` file and insert the following: \n\n ```xml\n \u003c?xml version=\"1.0\" encoding=\"utf-8\"?\u003e\n \u003cTableLayout xmlns:android=\"http://schemas.android.com/apk/res/android\"\n android:layout_width=\"match_parent\"\n android:layout_height=\"match_parent\"\n android:stretchColumns=\"1\"\u003e\n\n \u003cTableRow\u003e\n \u003cTextView\n android:layout_column=\"1\"\n android:text=\"Open...\"\n android:padding=\"3dip\" /\u003e\n \u003cTextView\n android:text=\"Ctrl-O\"\n android:gravity=\"right\"\n android:padding=\"3dip\" /\u003e\n \u003c/TableRow\u003e\n\n \u003cTableRow\u003e\n \u003cTextView\n android:layout_column=\"1\"\n android:text=\"Save...\"\n android:padding=\"3dip\" /\u003e\n \u003cTextView\n android:text=\"Ctrl-S\"\n android:gravity=\"right\"\n android:padding=\"3dip\" /\u003e\n \u003c/TableRow\u003e\n\n \u003cTableRow\u003e\n \u003cTextView\n android:layout_column=\"1\"\n android:text=\"Save As...\"\n android:padding=\"3dip\" /\u003e\n \u003cTextView\n android:text=\"Ctrl-Shift-S\"\n android:gravity=\"right\"\n android:padding=\"3dip\" /\u003e\n \u003c/TableRow\u003e\n\n \u003cView\n android:layout_height=\"2dip\"\n android:background=\"#FF909090\" /\u003e\n\n \u003cTableRow\u003e\n \u003cTextView\n android:text=\"X\"\n android:padding=\"3dip\" /\u003e\n \u003cTextView\n android:text=\"Import...\"\n android:padding=\"3dip\" /\u003e\n \u003c/TableRow\u003e\n\n \u003cTableRow\u003e\n \u003cTextView\n android:text=\"X\"\n android:padding=\"3dip\" /\u003e\n \u003cTextView\n android:text=\"Export...\"\n android:padding=\"3dip\" /\u003e\n \u003cTextView\n android:text=\"Ctrl-E\"\n android:gravity=\"right\"\n android:padding=\"3dip\" /\u003e\n \u003c/TableRow\u003e\n\n \u003cView\n android:layout_height=\"2dip\"\n android:background=\"#FF909090\" /\u003e\n\n \u003cTableRow\u003e\n \u003cTextView\n android:layout_column=\"1\"\n android:text=\"Quit\"\n android:padding=\"3dip\" /\u003e\n \u003c/TableRow\u003e\n \u003c/TableLayout\u003e\n ```\n\n Notice how this resembles the structure of an HTML table. The [TableLayout](/reference/android/widget/TableLayout)\n element is like the HTML `\u003ctable\u003e` element; [TableRow](/reference/android/widget/TableRow) is like\n a `\u003e\u003ctr\u003e\u003e` element;\n but for the cells, you can use any kind of [View](/reference/android/view/View) element. In this example, a\n [TextView](/reference/android/widget/TextView) is used for each cell. In between some of the rows, there is also a\n basic [View](/reference/android/view/View), which is used to draw a horizontal line.\n3. Make sure your *HelloTableLayout* Activity loads this layout in the [onCreate()](/reference/android/app/Activity#onCreate(android.os.Bundle)) method: \n\n ### Kotlin\n\n ```kotlin\n override fun onCreate(savedInstanceState: Bundle?) {\n super.onCreate(savedInstanceState)\n setContentView(R.layout.main)\n }\n ```\n\n ### Java\n\n ```java\n public void onCreate(Bundle savedInstanceState) {\n super.onCreate(savedInstanceState);\n setContentView(R.layout.main);\n }\n ```\n\n The [setContentView(int)](/reference/android/app/Activity#setContentView(int)) method loads the\n layout file for the [Activity](/reference/android/app/Activity), specified by the resource\n ID --- `R.layout.main` refers to the `res/layout/main.xml` layout\n file.\n4. Run the application.\n\nYou should see the following:"]]