
Service 是一种可在后台执行长时间运行的操作的应用组件。它不提供界面。服务启动后,即使用户切换到其他应用,也可能会继续运行一段时间。此外,组件可以绑定到服务以与之交互,甚至执行进程间通信 (IPC)。例如,服务可以在后台处理网络事务、播放音乐、执行文件 I/O 或与 content provider 交互。
注意:服务会在其托管进程的主线程中运行;除非您另行指定,否则服务不会创建自己的线程,也不会在单独的进程中运行。您应在服务内的单独线程上运行任何阻塞操作,以避免应用无响应 (ANR) 错误。
服务类型
以下是三种不同的服务类型:
- 前景
-
前台服务会执行一些对用户明显可见的操作。例如,音频应用会使用前台服务播放音轨。前台服务必须显示通知。 即使用户未与应用互动,前台服务也会继续运行。
使用前台服务时,您必须显示通知,以便用户主动了解该服务正在运行。除非停止运行服务或将其从前台移除,否则无法关闭此通知。
详细了解如何在应用中配置前台服务。
注意: WorkManager API 提供了一种灵活的任务调度方式,并且能够在需要时以前台服务的形式运行这些作业。在许多情况下,使用 WorkManager 比直接使用前台服务更可取。
- 背景
- 后台服务执行的操作不会直接被用户注意到。例如,如果应用使用服务来压缩其存储空间,该服务通常是后台服务。
注意:如果您的应用以 API 级别 26 或更高版本为目标平台,当应用本身不在前台时,系统会对正在运行的后台服务施加限制。例如,在大多数情况下,您不应在后台访问位置信息。而是使用 WorkManager 调度任务。
- 已绑定
- 当应用组件通过调用
bindService()绑定到服务时,该服务处于绑定状态。绑定服务提供客户端-服务器接口,让组件能够与服务交互、发送请求、接收结果,甚至通过进程间通信 (IPC) 跨进程执行这些操作。绑定服务仅在其他应用组件绑定到它时运行。多个组件可以同时绑定到服务,但当所有这些组件解除绑定时,服务会被销毁。
虽然本文档通常会分别讨论已启动的服务和已绑定的服务,但您的服务可以同时采用这两种方式,即可以启动(无限期运行),也可以允许绑定。只需实现两个回调方法即可:onStartCommand() 用于允许组件启动它,onBind() 用于允许绑定。
无论您的服务是启动还是绑定(或二者兼有),任何应用组件都可以使用该服务(即使是从单独的应用中),就像任何组件可以使用 activity 一样,即通过 Intent 启动它。不过,您可以在清单文件中将该服务声明为专用,并阻止其他应用访问。如需了解详情,请参阅在清单中声明服务部分。
在服务和线程之间进行选择
服务只是一种可以在后台运行的组件,即使用户未与您的应用互动,也能正常运行,因此,您应仅在需要时创建服务。
如果您必须在主线程之外执行工作,但仅在用户与您的应用互动时执行,则应改为在其他应用组件上下文中创建新线程。例如,如果您想播放一些音乐,但仅在 activity 运行时播放,则可以在 onCreate() 中创建线程,在 onStart() 中开始运行该线程,并在 onStop() 中停止该线程。此外,还可以考虑使用 java.util.concurrent 软件包中的线程池和执行器,或 Kotlin 协程,而不是传统的 Thread 类。如需详细了解如何将执行移至后台线程,请参阅 Android 上的线程文档。
请注意,如果您使用服务,它仍然会默认在应用的主线程中运行,因此,如果服务执行密集型或阻塞型操作,您仍然应在服务中创建新线程。
基础知识
如需创建服务,您必须创建 Service 的子类或使用其现有子类之一。在实现中,您必须替换一些用于处理服务生命周期关键方面的回调方法,并提供一种机制(如果适用),以允许组件绑定到服务。以下是您应替换的最重要的回调方法:
onStartCommand()- 当其他组件(例如 activity)请求启动服务时,系统会通过调用
startService()来调用此方法。执行此方法时,系统会启动服务,并且该服务可以在后台无限期运行。如果您实现了此功能,则有责任在服务完成工作后通过调用stopSelf()或stopService()来停止服务。如果您只想提供绑定,则无需实现此方法。 onBind()- 当其他组件想要与服务绑定(例如执行 RPC)时,系统会通过调用
bindService()来调用此方法。在实现此方法时,您必须提供一个接口,以便客户端通过返回IBinder与服务进行通信。您必须始终实现此方法;不过,如果您不想允许绑定,则应返回 null。 onCreate()- 系统会在服务首次创建时(在调用
onStartCommand()或onBind()之前)调用此方法来执行一次性设置过程。如果服务已在运行,系统不会调用此方法。 onDestroy()- 当服务不再使用且被销毁时,系统会调用此方法。您的服务应实现此方法,以清理线程、已注册的监听器或接收器等任何资源。这是服务接收的最后一个调用。
如果某个组件通过调用 startService()(这会导致调用 onStartCommand())启动服务,则该服务会继续运行,直到其通过 stopSelf() 自行停止,或其他组件通过调用 stopService() 停止它。
如果组件调用 bindService() 来创建服务,并且未调用 onStartCommand(),则只有在组件绑定到该服务时,该服务才会运行。当服务与所有客户端之间的绑定全部取消后,系统会销毁该服务。
Android 系统仅在内存不足且必须为具有用户焦点的 activity 恢复系统资源时才会停止服务。如果服务绑定到具有用户焦点的 activity,则不太可能被终止;如果服务声明为在前台运行,则很少被终止。如果服务已启动且处于长时间运行状态,系统会随着时间的推移降低其在后台任务列表中的位置,并且该服务很容易被终止。如果您的服务已启动,您必须将其设计为妥善处理系统的重启。如果系统终止您的服务,则会在资源可用时立即重启该服务,但这也取决于您从 onStartCommand() 返回的值。如需详细了解系统何时可能会销毁服务,请参阅进程和线程文档。
在以下部分中,您将了解如何创建 startService() 和 bindService() 服务方法,以及如何从其他应用组件使用这些方法。
使用清单文件声明服务
您必须在应用的清单文件中声明所有服务,就像声明 activity 和其他组件一样。
如需声明您的服务,请将 <service> 元素添加为 <application> 元素的子元素。示例如下:
<manifest ... >
  ...
  <application ... >
      <service android:name=".ExampleService" />
      ...
  </application>
</manifest>
如需详细了解如何在清单中声明服务,请参阅 <service> 元素参考。
您还可以在 <service> 元素中添加其他属性,以定义启动服务所需的权限以及服务应在其中运行的进程等属性。android:name 属性是唯一一个必需的属性,用于指定服务的类名称。发布应用后,请勿更改此名称,以免因依赖于显式 intent 来启动或绑定服务而导致代码破坏(请参阅博文不可更改的内容)。
注意:为确保您的应用安全无虞,请务必在启动 Service 时使用显式 intent,并且不要为您的服务声明 intent 过滤器。使用隐式 intent 启动服务存在安全隐患,因为您无法确定响应该 intent 的服务,并且用户无法看到哪项服务会启动。从 Android 5.0(API 级别 21)开始,如果使用隐式 intent 调用 bindService(),系统会抛出异常。
您可以通过添加 android:exported 属性并将其设置为 false,确保您的服务仅供您的应用使用。这样可以有效阻止其他应用启动您的服务,即使使用显式 intent 也是如此。
注意:用户可以查看设备上正在运行哪些服务。如果用户看到不认识或不信任的服务,可以停止该服务。为避免用户意外停止您的服务,您需要将 android:description 属性添加到应用清单中的 <service> 元素。在说明中,用简短的句子说明服务的用途和提供的好处。
创建启动服务
已启动的服务是指其他组件通过调用 startService() 启动的服务,这会导致调用服务的 onStartCommand() 方法。
服务启动后,其生命周期独立于启动它的组件。该服务可以在后台无限期运行,即使启动它的组件被销毁也是如此。因此,服务应在其作业完成后通过调用 stopSelf() 自行停止,或者其他组件可以通过调用 stopService() 停止它。
应用组件(例如 activity)可以通过调用 startService() 并传递一个 Intent 来启动服务,该 Intent 用于指定服务并包含服务要使用的任何数据。服务在 onStartCommand() 方法中接收此 Intent。
例如,假设某个 activity 需要将一些数据保存到在线数据库。activity 可以通过将 intent 传递给 startService() 来启动配套服务,并将要保存的数据传递给该服务。该服务会在 onStartCommand() 中接收 intent,连接到互联网,然后执行数据库事务。事务完成后,服务会自行停止并被销毁。
注意:服务默认在声明它的应用的同一进程中运行,并在该应用的主线程中运行。如果您的服务在用户与同一应用中的 activity 互动时执行密集或阻塞操作,则会降低 activity 性能。为避免影响应用性能,请在服务内启动新线程。
Service 类是所有服务的基类。扩展此类时,请务必创建一个新线程,以便服务在其中完成所有工作;该服务默认使用应用的主线程,这可能会降低应用正在运行的任何 activity 的性能。
Android 框架还提供了 Service 的 IntentService 子类,该子类使用工作器线程一次处理所有启动请求。不建议在新应用中使用此类,因为从 Android 8 Oreo 开始,由于引入了后台执行限制,此类将无法正常运行。此外,从 Android 11 开始,它已废弃。您可以使用 JobIntentService 替换与较新版本的 Android 兼容的 IntentService。
以下部分介绍了如何实现您自己的自定义服务,但对于大多数用例,您应该强烈考虑改用 WorkManager。请参阅 Android 后台处理指南,看看是否有适合您的解决方案。
扩展服务类
您可以扩展 Service 类以处理每个传入 intent。基本实现可能如下所示:
Kotlin
class HelloService : Service() {

    private var serviceLooper: Looper? = null
    private var serviceHandler: ServiceHandler? = null

    // Handler that receives messages from the thread
    private inner class ServiceHandler(looper: Looper) : Handler(looper) {

        override fun handleMessage(msg: Message) {
            // Normally we would do some work here, like download a file.
            // For our sample, we just sleep for 5 seconds.
            try {
                Thread.sleep(5000)
            } catch (e: InterruptedException) {
                // Restore interrupt status.
                Thread.currentThread().interrupt()
            }

            // Stop the service using the startId, so that we don't stop
            // the service in the middle of handling another job
            stopSelf(msg.arg1)
        }
    }

    override fun onCreate() {
        // Start up the thread running the service.  Note that we create a
        // separate thread because the service normally runs in the process's
        // main thread, which we don't want to block.  We also make it
        // background priority so CPU-intensive work will not disrupt our UI.
        HandlerThread("ServiceStartArguments", Process.THREAD_PRIORITY_BACKGROUND).apply {
            start()

            // Get the HandlerThread's Looper and use it for our Handler
            serviceLooper = looper
            serviceHandler = ServiceHandler(looper)
        }
    }

    override fun onStartCommand(intent: Intent, flags: Int, startId: Int): Int {
        Toast.makeText(this, "service starting", Toast.LENGTH_SHORT).show()

        // For each start request, send a message to start a job and deliver the
        // start ID so we know which request we're stopping when we finish the job
        serviceHandler?.obtainMessage()?.also { msg ->
            msg.arg1 = startId
            serviceHandler?.sendMessage(msg)
        }

        // If we get killed, after returning from here, restart
        return START_STICKY
    }

    override fun onBind(intent: Intent): IBinder? {
        // We don't provide binding, so return null
        return null
    }

    override fun onDestroy() {
        Toast.makeText(this, "service done", Toast.LENGTH_SHORT).show()
    }
}
Java
public class HelloService extends Service {
  private Looper serviceLooper;
  private ServiceHandler serviceHandler;

  // Handler that receives messages from the thread
  private final class ServiceHandler extends Handler {
      public ServiceHandler(Looper looper) {
          super(looper);
      }
      @Override
      public void handleMessage(Message msg) {
          // Normally we would do some work here, like download a file.
          // For our sample, we just sleep for 5 seconds.
          try {
              Thread.sleep(5000);
          } catch (InterruptedException e) {
              // Restore interrupt status.
              Thread.currentThread().interrupt();
          }
          // Stop the service using the startId, so that we don't stop
          // the service in the middle of handling another job
          stopSelf(msg.arg1);
      }
  }

  @Override
  public void onCreate() {
    // Start up the thread running the service. Note that we create a
    // separate thread because the service normally runs in the process's
    // main thread, which we don't want to block. We also make it
    // background priority so CPU-intensive work doesn't disrupt our UI.
    HandlerThread thread = new HandlerThread("ServiceStartArguments",
            Process.THREAD_PRIORITY_BACKGROUND);
    thread.start();

    // Get the HandlerThread's Looper and use it for our Handler
    serviceLooper = thread.getLooper();
    serviceHandler = new ServiceHandler(serviceLooper);
  }

  @Override
  public int onStartCommand(Intent intent, int flags, int startId) {
      Toast.makeText(this, "service starting", Toast.LENGTH_SHORT).show();

      // For each start request, send a message to start a job and deliver the
      // start ID so we know which request we're stopping when we finish the job
      Message msg = serviceHandler.obtainMessage();
      msg.arg1 = startId;
      serviceHandler.sendMessage(msg);

      // If we get killed, after returning from here, restart
      return START_STICKY;
  }

  @Override
  public IBinder onBind(Intent intent) {
      // We don't provide binding, so return null
      return null;
  }

  @Override
  public void onDestroy() {
    Toast.makeText(this, "service done", Toast.LENGTH_SHORT).show();
  }
}
示例代码会在 onStartCommand() 中处理所有传入调用,并将工作发布到在后台线程上运行的 Handler。它就像 IntentService 一样工作,并会依次串行处理所有请求。例如,如果您想同时运行多个请求,可以更改代码以在线程池中运行工作。
请注意,onStartCommand() 方法必须返回一个整数。整数是一个值,用于描述系统在终止服务时应如何继续服务。onStartCommand() 的返回值必须是以下常量之一:
START_NOT_STICKY- 如果系统在
onStartCommand()返回后终止服务,请不要重新创建服务,除非有待传递的待处理 intent。这是最安全的选项,可避免在不需要时运行服务,以及在应用可以简单地重启所有未完成的作业时运行服务。 START_STICKY- 如果系统在
onStartCommand()返回后终止服务,请重新创建服务并调用onStartCommand(),但不要重新传递上一个 intent。相反,除非有待处理的 intent 用于启动服务,否则系统会使用 null intent 调用onStartCommand()。在这种情况下,系统会传递这些 intent。这适用于未执行命令但无限期运行并等待作业的媒体播放器(或类似服务)。 START_REDELIVER_INTENT- 如果系统在
onStartCommand()返回后终止服务,请重新创建服务,并使用传递给服务的最后一个 intent 调用onStartCommand()。系统会依次传送所有待处理 intent。这适用于正在积极执行应立即恢复的作业的服务,例如下载文件。
如需详细了解这些返回值,请参阅每个常量的关联参考文档。
启动服务
您可以通过将 Intent 传递给 startService() 或 startForegroundService(),从 activity 或其他应用组件启动服务。Android 系统会调用服务的 onStartCommand() 方法,并将 Intent 传递给该方法,以指定要启动哪项服务。
注意:如果您的应用以 API 级别 26 或更高级别为目标平台,则系统会对使用或创建后台服务施加限制,除非应用本身位于前台。如果应用需要创建前台服务,则应调用 startForegroundService()。该方法会创建后台服务,但该方法会向系统发出信号,指明该服务将将自身提升到前台。创建服务后,服务必须在五秒内调用其 startForeground() 方法。
例如,activity 可以使用带有 startService() 的显式 intent 启动上一部分中的示例服务 (HelloService),如下所示:
Kotlin
startService(Intent(this, HelloService::class.java))
Java
startService(new Intent(this, HelloService.class));
startService() 方法会立即返回,然后 Android 系统会调用服务的 onStartCommand() 方法。如果服务尚未运行,系统会先调用 onCreate(),然后调用 onStartCommand()。
如果服务也不提供绑定,则随 startService() 传送的 intent 是应用组件与服务之间的唯一通信模式。不过,如果您希望服务发回结果,启动服务的客户端可以为广播创建 PendingIntent(使用 getBroadcast()),并在启动服务的 Intent 中将其传递给服务。然后,该服务可以使用广播来传递结果。
对服务发出多次启动请求会导致对服务的 onStartCommand() 进行多次相应调用。不过,只需发出一次停止服务的请求(使用 stopSelf() 或 stopService())即可停止服务。
停止服务
已启动的服务必须管理自己的生命周期。也就是说,除非系统必须恢复系统内存,否则不会停止或销毁服务,并且服务会在 onStartCommand() 返回后继续运行。服务必须通过调用 stopSelf() 自行停止,或者其他组件可以通过调用 stopService() 停止它。
系统会在收到使用 stopSelf() 或 stopService() 发出的停止请求后尽快销毁服务。
如果您的服务同时处理多个对 onStartCommand() 的请求,则不应在处理完启动请求后停止服务,因为您可能已收到新的启动请求(在第一个请求结束时停止会终止第二个请求)。为避免此问题,您可以使用 stopSelf(int) 确保停止服务的请求始终基于最近的启动请求。也就是说,调用 stopSelf(int) 时,您需要传递与停止请求对应的开始请求的 ID(传递给 onStartCommand() 的 startId)。然后,如果服务在您能够调用 stopSelf(int) 之前收到新的启动请求,则 ID 不匹配,并且服务不会停止。
注意:为避免浪费系统资源和耗用电池电量,请确保您的应用在完成工作后停止其服务。如有必要,其他组件可以通过调用 stopService() 来停止服务。即使您为服务启用了绑定,如果服务收到 onStartCommand() 调用,您也必须始终自行停止该服务。
如需详细了解服务的生命周期,请参阅下文中有关管理服务的生命周期的部分。
创建绑定服务
绑定服务允许应用组件通过调用 bindService() 来创建长期连接,从而与其绑定。它通常不允许组件通过调用 startService() 来启动它。
如果您想通过应用中的 activity 和其他组件与服务交互,或者想通过进程间通信 (IPC) 将应用的部分功能公开给其他应用,请创建绑定服务。
如需创建绑定服务,请实现 onBind() 回调方法,以返回一个 IBinder,用于定义与服务通信的接口。然后,其他应用组件可以调用 bindService() 来检索接口,并开始调用服务的方法。该服务仅用于为绑定到它的应用组件提供服务,因此当没有组件绑定到该服务时,系统会销毁该服务。与通过 onStartCommand() 启动服务时一样,您无需以相同的方式停止绑定的服务。
如需创建绑定服务,您必须定义一个接口,用于指定客户端如何与服务通信。服务与客户端之间的此接口必须是 IBinder 的实现,并且您的服务必须从 onBind() 回调方法返回此接口。客户端收到 IBinder 后,便可以开始通过该接口与服务进行交互。
多个客户端可以同时绑定到该服务。当客户端与服务完成交互后,会调用 unbindService() 以取消绑定。如果没有绑定到服务的客户端,则系统会销毁该服务。
实现绑定服务的方法有多种,并且实现方式比已启动服务更复杂。因此,绑定服务的讨论会出现在另一个关于绑定服务的文档中。
向用户发送通知
动作条通知是一种消息,只会在当前窗口界面上显示一小会儿,然后便会消失。状态栏通知会在状态栏中提供带有消息的图标,用户可以选择该图标以执行操作(例如启动 activity)。
通常,当文件下载等后台工作完成且用户可以执行操作时,状态栏通知是最佳方式。当用户从展开后的视图中选择通知时,通知可以启动 activity(例如,显示下载的文件)。
管理服务的生命周期
服务的生命周期比 activity 的生命周期要简单得多。不过,更重要的是,您需要密切关注服务的创建和销毁方式,因为服务可以在用户不知情的情况下在后台运行。
服务生命周期(从创建到销毁)可以遵循以下任一路径:
- 已启动的服务
当其他组件调用
startService()时,系统会创建该服务。然后,该服务会无限期运行,并且必须通过调用stopSelf()自行停止。其他组件也可以通过调用stopService()来停止服务。服务停止后,系统会将其销毁。 - 绑定服务
当其他组件(客户端)调用
bindService()时,系统会创建该服务。然后,客户端通过IBinder接口与服务进行通信。客户端可以通过调用unbindService()来关闭连接。多个客户端可以绑定到同一服务,当所有客户端解除绑定时,系统会销毁该服务。服务无需自行停止。
这两条路径并非完全分开。您可以绑定到已使用 startService() 启动的服务。例如,您可以通过使用标识要播放的音乐的 Intent 调用 startService() 来启动背景音乐服务。稍后,当用户想要对播放器执行一些控制操作或获取当前歌曲的相关信息时,activity 可以通过调用 bindService() 来绑定到该服务。在这种情况下,stopService() 或 stopSelf() 实际上不会在所有客户端解除绑定之前停止服务。
实现生命周期回调
与 activity 一样,服务也具有生命周期回调方法,您可以通过实现这些方法来监控服务状态的变化,并在适当的时间执行工作。以下框架服务演示了每个生命周期方法:
Kotlin
class ExampleService : Service() { private var startMode: Int = 0 // indicates how to behave if the service is killed private var binder: IBinder? = null // interface for clients that bind private var allowRebind: Boolean = false // indicates whether onRebind should be used override funonCreate() { // The service is being created } override funonStartCommand(intent: Intent?, flags: Int, startId: Int): Int { // The service is starting, due to a call to startService() return startMode } override funonBind(intent: Intent): IBinder? { // A client is binding to the service with bindService() return binder } override funonUnbind(intent: Intent): Boolean { // All clients have unbound with unbindService() return allowRebind } override funonRebind(intent: Intent) { // A client is binding to the service with bindService(), // after onUnbind() has already been called } override funonDestroy() { // The service is no longer used and is being destroyed } }
Java
public class ExampleService extends Service { int startMode; // indicates how to behave if the service is killed IBinder binder; // interface for clients that bind boolean allowRebind; // indicates whether onRebind should be used @Override public voidonCreate() { // The service is being created } @Override public intonStartCommand(Intent intent, int flags, int startId) { // The service is starting, due to a call tostartService()return startMode; } @Override public IBinderonBind(Intent intent) { // A client is binding to the service withbindService()return binder; } @Override public booleanonUnbind(Intent intent) { // All clients have unbound withunbindService()return allowRebind; } @Override public voidonRebind(Intent intent) { // A client is binding to the service withbindService(), // after onUnbind() has already been called } @Override public voidonDestroy() { // The service is no longer used and is being destroyed } }
注意:与 activity 生命周期回调方法不同,您无需调用这些回调方法的父类实现。
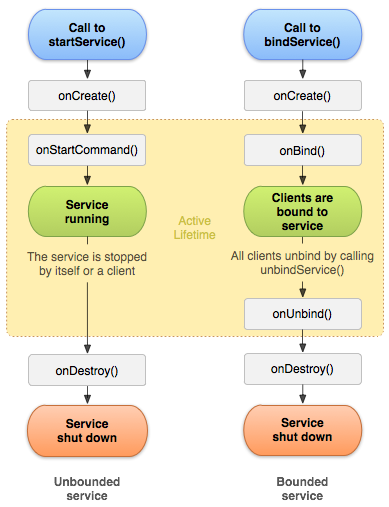
图 2. 服务生命周期。左侧的图显示了使用 startService() 创建服务时的生命周期,右侧的图显示了使用 bindService() 创建服务时的生命周期。
图 2 展示了服务的典型回调方法。虽然该图将由 startService() 创建的服务与由 bindService() 创建的服务区分开来,但请注意,任何服务(无论其启动方式如何)都可能会允许客户端绑定到它。最初使用 onStartCommand()(通过客户端调用 startService())启动的服务仍可接收对 onBind() 的调用(当客户端调用 bindService() 时)。
通过实现这些方法,您可以监控服务生命周期的以下两个嵌套循环:
- 服务的整个生命周期发生在调用
onCreate()到onDestroy()返回之间。与 activity 一样,服务会在onCreate()中进行初始设置,并在onDestroy()中释放所有剩余资源。例如,音乐播放服务可以在onCreate()中创建用于播放音乐的线程,然后在onDestroy()中停止该线程。注意:系统会针对所有服务调用
onCreate()和onDestroy()方法,无论这些服务是由startService()还是bindService()创建的。 - 服务的有效生命周期从对
onStartCommand()或onBind()的调用开始。每个方法都会传递传递给startService()或bindService()的Intent。如果服务已启动,则有效生命周期会在整个生命周期结束时结束(即使
onStartCommand()返回后,服务仍处于有效状态)。如果服务已绑定,则在返回onUnbind()时结束有效生命周期。
注意:虽然已启动的服务会通过调用 stopSelf() 或 stopService() 而停止,但该服务没有相应的回调(没有 onStop() 回调)。除非服务已绑定到客户端,否则系统会在服务停止时销毁它,并且 onDestroy() 是收到的唯一回调。
如需详细了解如何创建提供绑定的服务,请参阅绑定服务文档,其中的管理绑定服务的生命周期部分详细介绍了 onRebind() 回调方法。