
Halaman ini menjelaskan cara SDK pihak ketiga dapat mengintegrasikan penginstalan inline, fitur pengujian baru untuk Google Play yang menampilkan detail produk aplikasi Google Play dalam antasan setengah sheet. Penginstalan inline memungkinkan pengguna merasakan alur penginstalan aplikasi yang lancar tanpa meninggalkan konteks aplikasi.
Developer SDK pihak ketiga dapat mengintegrasikan fitur penginstalan inline ke dalam SDK mereka untuk memungkinkan developer aplikasi yang menggunakan SDK tersebut mengakses penginstalan inline untuk aplikasi mereka.
Persyaratan
Agar antarmuka setengah sheet penginstalan inline muncul di aplikasi:
- Versi Google Play minimum harus 40.4.
- Level API Android harus 23 atau yang lebih tinggi.
Arsitektur proses
Arsitektur proses penginstalan inline ditampilkan dalam gambar berikut:
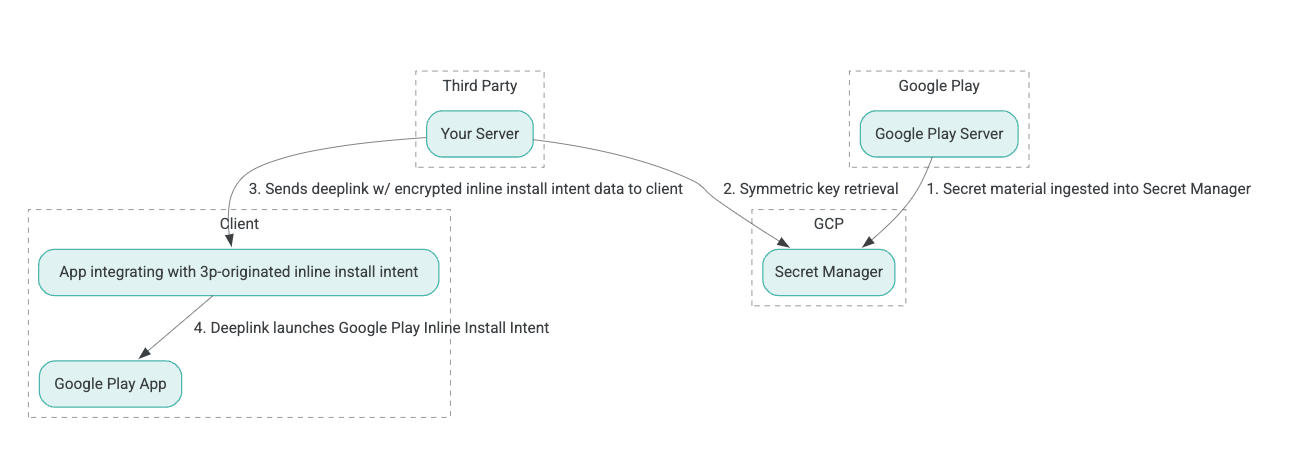
- Server Google Play membuat kunci enkripsi Authenticated Encryption with Associated Data (AEAD) dan memasukkan kunci ke dalam instance Secret Manager Google Cloud Platform (GCP).
- Integrator pihak ketiga mengambil kunci AEAD dari Secret Manager GCP.
- Integrator pihak ketiga mengenkripsi data
Intentpenginstalan inline, membuat ciphertext yang diteruskan dalam deep link yang digunakan untuk memanggil intent penginstalan inline, dan mengirim deep link ke klien dalam respons. - Saat deep link diikuti, aplikasi Google Play akan menangani intent.
Untuk mengonfigurasi SDK pihak ketiga agar menggunakan proses penginstalan inline, selesaikan langkah-langkah berikut.
Membuat akun layanan di Project Google Cloud
Pada langkah ini, Anda akan menyiapkan akun layanan menggunakan Google Cloud Konsol.
- Siapkan Project Google Cloud:
- Buat organisasi Google Cloud. Saat Anda membuat akun Google Workspace atau Cloud Identity dan mengaitkannya dengan nama domain, resource organisasi akan otomatis dibuat. Untuk mengetahui detailnya, lihat Membuat dan mengelola resource organisasi.
- Login ke Konsol GCP menggunakan akun Google Cloud yang dibuat pada langkah sebelumnya, lalu buat project Google Cloud. Untuk mengetahui detailnya, lihat Membuat project Google Cloud.
- Buat akun layanan di project Google Cloud yang dibuat. Akun layanan digunakan sebagai Google Cloud Identity untuk mengakses kunci simetris atas nama server Anda. Untuk mengetahui detailnya, lihat Membuat akun layanan.
- Gunakan ID Pelanggan Google Workspace (GWCID) / ID Dasher yang sama yang dimasukkan pada formulir minat.
- Buat dan download kunci pribadi akun layanan tersebut.
- Buat kunci untuk akun layanan tersebut. Untuk mengetahui detailnya, lihat Membuat kunci akun layanan.
- Download kunci akun layanan dan pastikan kunci tersebut dapat diakses di server Anda, karena kunci tersebut digunakan untuk autentikasi guna mengakses resource Google Cloud untuk kunci simetris. Untuk mengetahui detailnya, lihat Mendapatkan kunci akun layanan.
Mengambil kredensial
Pada langkah ini, Anda akan mengambil kunci simetris dari Secret Manager dan menyimpannya dengan aman (misalnya, dalam file JSON) di penyimpanan server Anda sendiri. Kunci ini digunakan untuk membuat ciphertext data penginstalan inline.
Nilai secret_id/secretId merujuk ke nama secret di dalam Secret Manager; nama ini dibuat dengan menambahkan awalan hsdp-3p-key- ke nilai sdk_id yang disediakan Play. Misalnya, jika sdk_id adalah abc, nama secret
-nya adalah hsdp-3p-key-abc.
Versi secret diperbarui setiap minggu pada hari Selasa pukul 14.00 UTC. Kunci kedua terbaru akan terus berfungsi hingga rotasi berikutnya, dan materi kunci harus diambil dan disimpan setiap minggu.
Contoh Python
Contoh kode berikut menggunakan token akses yang disimpan dalam file JSON untuk mengakses materi kunci di Secret Manager GCP dan mencetaknya ke konsol.
#!/usr/bin/env python3
# Import the Secret Manager client library.
from google.cloud import secretmanager
from google.oauth2 import service_account
import google_crc32c

# Create a service account key file.
service_account_key_file = "<json key file of the service account>"
credentials = service_account.Credentials.from_service_account_file(service_account_key_file)

# Create the Secret Manager client.
client = secretmanager.SecretManagerServiceClient(
  credentials=credentials
)

# Build the resource name of the secret version.
name = f"projects/prod-play-hsdp-3p-caller-auth/secrets/<secret_id>/versions/latest"

# Access the secret version.
response = client.access_secret_version(request={"name": name})

# Verify payload checksum.
crc32c = google_crc32c.Checksum()
crc32c.update(response.payload.data)
if response.payload.data_crc32c != int(crc32c.hexdigest(), 16):
    print("Data corruption detected.")

# A keyset created with "tinkey create-keyset --key-template=AES256_GCM". Note
# that this keyset has the secret key information in cleartext.
keyset = response.payload.data.decode("UTF-8")

# WARNING: Do not print the secret in a production environment. Please store it
# in a secure storage.
with open('<key file name>', 'w') as f:
    f.write(keyset)
Contoh Java
Contoh kode berikut menggunakan token akses yang disimpan dalam file JSON untuk mengakses materi kunci di Secret Manager GCP dan menuliskannya ke file JSON.
import static java.nio.charset.StandardCharsets.UTF_8;
import com.google.api.gax.core.CredentialsProvider;
import com.google.api.gax.core.FixedCredentialsProvider;
import com.google.auth.oauth2.ServiceAccountCredentials;
import com.google.cloud.secretmanager.v1.AccessSecretVersionResponse;
import com.google.cloud.secretmanager.v1.SecretManagerServiceClient;
import com.google.cloud.secretmanager.v1.SecretManagerServiceSettings;
import com.google.cloud.secretmanager.v1.SecretVersionName;
import java.io.FileInputStream;
import java.io.IOException;
import java.io.PrintWriter;
import java.nio.file.Files;
import java.nio.file.Paths;
import java.util.zip.CRC32C;
import java.util.zip.Checksum;

/** */
final class ThirdPartySecretAccessGuide {

  private ThirdPartySecretAccessGuide() {}

  public static void main(String[] args) throws IOException {
    accessSecretVersion();
  }

  public static void accessSecretVersion() throws IOException {
    // TODO(developer): Replace these variables before running the sample.
    String projectId = "projectId";
    String secretId = "secretId";
    String versionId = "versionId";
    String accessTokenPrivateKeyPath = "path/to/credentials.json";
    String secretMaterialOutputPath = "path/to/secret.json";
    accessSecretVersion(
        projectId, secretId, versionId, accessTokenPrivateKeyPath, secretMaterialOutputPath);
  }

  // Access the payload for the given secret version if one exists. The version
  // can be a version number as a string (e.g. "5") or an alias (e.g. "latest").
  public static void accessSecretVersion(
      String projectId,
      String secretId,
      String versionId,
      String accessTokenPrivateKeyPath,
      String secretMaterialOutputPath)
      throws IOException {

    // We can explicitly instantiate the SecretManagerServiceClient (below) from a json file if we:
    // 1. Create a CredentialsProvider from a FileInputStream of the JSON file,
    CredentialsProvider credentialsProvider =
        FixedCredentialsProvider.create(
            ServiceAccountCredentials.fromStream(new FileInputStream(accessTokenPrivateKeyPath)));

    // 2. Build a SecretManagerService Settings object from that credentials provider, and
    SecretManagerServiceSettings secretManagerServiceSettings =
        SecretManagerServiceSettings.newBuilder()
            .setCredentialsProvider(credentialsProvider)
            .build();

    // 3. Initialize client that will be used to send requests by passing the settings object to
    // create(). This client only needs to be created once, and can be reused for multiple requests.
    // After completing all of your requests, call the "close" method on the client to safely clean
    // up any remaining background resources.
    try (SecretManagerServiceClient client =
        SecretManagerServiceClient.create(secretManagerServiceSettings)) {
      SecretVersionName secretVersionName = SecretVersionName.of(projectId, secretId, versionId);

      // Access the secret version.
      AccessSecretVersionResponse response = client.accessSecretVersion(secretVersionName);

      // Verify checksum. The used library is available in Java 9+.
      // If using Java 8, you may use the following:
      // https://github.com/google/guava/blob/e62d6a0456420d295089a9c319b7593a3eae4a83/guava/src/com/google/common/hash/Hashing.java#L395
      byte[] data = response.getPayload().getData().toByteArray();
      Checksum checksum = new CRC32C();
      checksum.update(data, 0, data.length);
      if (response.getPayload().getDataCrc32C() != checksum.getValue()) {
        System.out.printf("Data corruption detected.");
        return;
      }

      String payload = response.getPayload().getData().toStringUtf8();
      // Print the secret payload.
      //
      // WARNING: Do not print the secret in a production environment - this
      // snippet is showing how to access the secret material.
      System.out.printf("Plaintext: %s\n", payload);

      // Write the JSON secret material payload to a json file
      try (PrintWriter out =
          new PrintWriter(Files.newBufferedWriter(Paths.get(secretMaterialOutputPath), UTF_8))) {
        out.write(payload);
      } catch (Exception e) {
        e.printStackTrace();
      }
    }
  }
}
Menetapkan Kredensial Default Aplikasi
Jika Anda tidak ingin menggunakan CredentialsProvider untuk meneruskan kunci pribadi ke file JSON dalam implementasi Java, Anda dapat mengubah implementasi dengan menetapkan Kredensial Default Aplikasi (ADC):
- Beri tahu library klien tempat menemukan kunci akun layanan.
- Tambahkan dependensi Maven ke project Java.
- Panggil
SecretManagerServiceClient.create(), yang akan mengambil autentikasi secara otomatis (karena langkah 1).
Langkah-langkah ini mengubah implementasi Java dengan:
- Menghilangkan kebutuhan untuk membuat objek
CredentialsProviderdanSecretManagerServiceSettings. - Mengubah panggilan ke
SecretManagerServiceClient.create()agar tidak menyertakan argumen.
Membuat ciphertext dan menghasilkan deep link
Pada langkah ini, Anda akan menggunakan library kriptografi Tink untuk membuat enifd (ciphertext InlineInstallData) dari objek protobuf InlineInstallData.
Proto InlineInstallData didefinisikan sebagai berikut:
syntax = "proto2";
package hsdpexperiments;
option java_package = "com.google.hsdpexperiments";
option java_multiple_files = true;

// InlineInstallData is used by 3p auth callers to generate "encrypted inline
// flow data" (enifd) which is decrypted in PGS to verify authenticity and
// freshness.
message InlineInstallData {
  // The timestamp which indicates the time encrypted data is generated.
  // Used to validate freshness (i.e. generation time in past 4 hours).
  // Required.
  optional int64 timestamp_ms = 1;

  // The docid of the app that we want to open inline install page for.
  // This is the package name.
  // Required.
  optional string target_package_name = 2;

  // This is the name of the app requesting the ad from Google Ad Serving
  // system.
  // Required.
  optional string caller_package_name = 3;

  // This is the advertising id that will be collected by 3P Ad SDKs.
  // Optional.
  optional string advertising_id = 4;

  // This is used to indicate the network from where the inline install was
  // requested.
  // Required.
  optional string ad_network_id = 5;
}
Pada langkah ini, Anda juga akan membuat URL deep link menggunakan parameter berikut:
| Kolom | Deskripsi | Wajib |
|---|---|---|
| id | Nama paket aplikasi yang akan diinstal. | Ya |
| inline | Tetapkan ke true jika setengah sheet penginstalan inline diminta; jika
false, deep link intent akan mengarah ke Google Play. |
Ya |
| enifd | ID terenkripsi untuk SDK pihak ketiga. | Ya |
| lft | ID internal. | Ya |
| 3pAuthCallerId | ID SDK. | Ya |
| listing | Parameter opsional untuk menentukan target untuk listingan toko kustom. | Tidak |
| referrer | String pelacakan perujuk opsional. | Tidak |
Contoh Python
Perintah berikut menghasilkan kode Python dari InlineInstallData.proto:
protoc InlineInstallData.proto --python_out=.
Contoh kode Python berikut membuat InlineInstallData dan mengenkripsinya dengan kunci simetris untuk membuat ciphertext:
#!/usr/bin/env python3

# Import the Secret Manager client library.
import base64
import time
import inline_install_data_pb2 as InlineInstallData
import tink
from tink import aead
from tink import cleartext_keyset_handle

# Read the stored symmetric key.
with open("example3psecret.json", "r") as f:
  keyset = f.read()

"""Encrypt and decrypt using AEAD."""
# Register the AEAD key managers. This is needed to create an Aead primitive later.
aead.register()

# Create a keyset handle from the cleartext keyset in the previous
# step. The keyset handle provides abstract access to the underlying keyset to
# limit access of the raw key material. WARNING: In practice, it is unlikely
# you will want to use a cleartext_keyset_handle, as it implies that your key
# material is passed in cleartext, which is a security risk.
keyset_handle = cleartext_keyset_handle.read(tink.JsonKeysetReader(keyset))

# Retrieve the Aead primitive we want to use from the keyset handle.
primitive = keyset_handle.primitive(aead.Aead)

inlineInstallData = InlineInstallData.InlineInstallData()
inlineInstallData.timestamp_ms = int(time.time() * 1000)
inlineInstallData.target_package_name = "x.y.z"
inlineInstallData.caller_package_name = "a.b.c"
inlineInstallData.ad_network_id = "<sdk_id>"

# Use the primitive to encrypt a message. In this case the primary key of the
# keyset will be used (which is also the only key in this example).
ciphertext = primitive.encrypt(inlineInstallData.SerializeToString(), b'<sdk_id>')
print(f"InlineInstallData Ciphertext: {ciphertext}")

# Base64 Encoded InlineInstallData Ciphertext
enifd = base64.urlsafe_b64encode(ciphertext).decode('utf-8')
print(enifd)

# Deeplink
print(f"https://play.google.com/d?id={inlineInstallData.target_package_name}\&inline=true\&enifd={enifd}\&lft=1\&3pAuthCallerId={inlineInstallData.ad_network_id}")
Jalankan skrip Python dengan menjalankan perintah berikut:
python <file_name>.py
Contoh Java
Perintah berikut menghasilkan kode Java dari InlineInstallData.proto:
protoc InlineInstallData.proto --java_out=.
Contoh kode Java berikut membuat InlineInstallData dan mengenkripsinya dengan kunci simetris untuk membuat ciphertext:
package com.google.hsdpexperiments;

import static com.google.common.io.BaseEncoding.base64Url;
import static java.nio.charset.StandardCharsets.UTF_8;

import com.google.common.flags.Flag;
import com.google.common.flags.FlagSpec;
import com.google.common.flags.Flags;
import com.google.crypto.tink.Aead;
import com.google.crypto.tink.InsecureSecretKeyAccess;
import com.google.crypto.tink.KeysetHandle;
import com.google.crypto.tink.TinkJsonProtoKeysetFormat;
import com.google.crypto.tink.aead.AeadConfig;
import java.nio.file.Files;
import java.nio.file.Path;
import java.nio.file.Paths;
import java.security.Security;
import java.time.Duration;
import org.conscrypt.Conscrypt;

/** info on encryption in https://github.com/google/tink#learn-more */
final class ThirdPartyEnifdGuide {

  @FlagSpec(
      name = "third_party_id",
      help = "the identifier associated with the 3p for which to generate the enifd")
  private static final Flag<String> thirdPartyAuthCallerId = Flag.value("");

  @FlagSpec(name = "package_name", help = "the package name of the target app")
  private static final Flag<String> packageName = Flag.value("");


  @FlagSpec(name = "caller_package_name", help = "the package name of the caller app")
  private static final Flag<String> callerPackageName = Flag.value("");

  @FlagSpec(name = "secret_filename", help = "the path to the json file with the secret material")
  private static final Flag<String> secretFilename = Flag.value("");

  private ThirdPartyEnifdGuide() {}

  public static void main(String[] args) throws Exception {
    // parse flags
    Flags.parse(args);

    // File keyFile = new File(args[0]);
    Path keyFile = Paths.get(secretFilename.get());

    // Create structured inline flow data
    InlineInstallData idrp =
        InlineInstallData.newBuilder()
            .setTargetPackageName(packageName.get())
            .setCallerPackageName(callerPackageName.get())
            .setTimestampMs(System.currentTimeMillis())
            .setAdNetworkId(thirdPartyAuthCallerId.get())
            .build();

    // we can print this out here to make sure it's well formatted, this will help debug
    System.out.println(idrp.toString());

    // Register all AEAD key types with the Tink runtime.
    Conscrypt.checkAvailability();
    Security.addProvider(Conscrypt.newProvider());
    AeadConfig.register();

    // Read AEAD key downloaded from secretmanager into keysethandle
    KeysetHandle handle =
        TinkJsonProtoKeysetFormat.parseKeyset(
            new String(Files.readAllBytes(keyFile), UTF_8), InsecureSecretKeyAccess.get());

    // Generate enifd using tink library
    Aead aead = handle.getPrimitive(Aead.class);
    byte[] plaintext = idrp.toByteArray();
    byte[] ciphertext = aead.encrypt(plaintext, thirdPartyAuthCallerId.get().getBytes(UTF_8));
    String enifd = base64Url().omitPadding().encode(ciphertext);

    // Build deeplink, escaping ampersands (TODO: verify this is necessary while testing e2e)
    String deeplink =
        "https://play.google.com/d?id="
            + packageName.get()
            + "\\&inline=true\\&enifd="
            + enifd
            + "\\&lft=1\\&3pAuthCallerId="
            + thirdPartyAuthCallerId.get();

    System.out.println(deeplink);
  }
}
Terakhir, buat program Java ke biner dan panggil menggunakan kode berikut:
path/to/binary/ThirdPartyEnifdGuide --secret_filename=path/to/jsonfile/example3psecret.json --package_name=<package_name_of_target_app> --third_party_id=<3p_caller_auth_id>
- Flag
secret_filenamemenentukan jalur ke file JSON yang berisi materi secret. - Flag
package_nameadalah ID dokumen aplikasi target. - Flag
third_party_iddigunakan untuk menentukan ID autentikasi pemanggil pihak ketiga (yaitu,<sdk_id>).
Meluncurkan intent Penginstalan Inline
Untuk menguji deep link yang dihasilkan selama langkah sebelumnya, hubungkan perangkat Android (pastikan USB debugging diaktifkan) ke workstation yang telah menginstal ADB dan jalankan perintah berikut:
adb shell am start "<output_from_the_previous_python_or_java_code>"
Dalam kode klien, kirim intent menggunakan salah satu metode berikut (Kotlin atau Java).
Kotlin
val intent = Intent(Intent.ACTION_VIEW)
val deepLinkUrl = "<output_from_the_previous_python_or_java_code>"
intent.setPackage("com.android.vending")
intent.data = Uri.parse(deepLinkUrl)
val packageManager = context.getPackageManager()
if (intent.resolveActivity(packageManager) != null) {
  startActivityForResult(intent, 0)
} else {
  // Fallback to deep linking to full Play Store.
}
Java
Intent intent = new Intent(Intent.ACTION_VIEW);
String id = "exampleAppToBeInstalledId";
String deepLinkUrl = "<output_from_the_previous_python_or_java_code>";
intent.setPackage("com.android.vending");
intent.setData(Uri.parse(deepLinkUrl));
PackageManager packageManager = context.getPackageManager();
if (intent.resolveActivity(packageManager) != null) {
  startActivityForResult(intent, 0);
} else {
  // Fallback to deep linking to full Play Store.
}
Lampiran
Bagian berikut memberikan panduan tambahan tentang kasus penggunaan tertentu.
Menyiapkan lingkungan Python
Untuk menjalankan kode contoh Python, siapkan lingkungan Python di workstation Anda dan instal dependensi yang diperlukan.
Siapkan lingkungan Python:
Instal python3.11 (jika sudah diinstal, lewati langkah ini):
sudo apt install python3.11Instal pip:
sudo apt-get install pipInstal
virtualenv:sudo apt install python3-virtualenvBuat lingkungan virtual (diperlukan untuk dependensi Tink):
virtualenv inlineinstall --python=/usr/bin/python3.11
Masukkan lingkungan virtual:
source inlineinstall/bin/activateUpdate pip:
python -m pip install --upgrade pipInstal dependensi yang diperlukan:
Instal Tink:
pip install tinkInstal Google crc32c:
pip install google-crc32cInstal Secret Manager:
pip install google-cloud-secret-managerInstal compiler protobuf:
sudo apt install protobuf-compiler
Pembuatan enifd C++
Berikut adalah contoh C++ yang telah kami tulis dan validasi secara internal untuk membuat enifd.
Pembuatan enifd dapat dilakukan menggunakan kode C++ sebagai berikut:
// A command-line example for using Tink AEAD w/ key template aes128gcmsiv to
// encrypt an InlineInstallData proto.
#include <chrono>
#include <iostream>
#include <memory>
#include <string>

#include "<path_to_protoc_output>/inline_install_data.proto.h"
#include "absl/flags/flag.h"
#include "absl/flags/parse.h"
#include "absl/strings/escaping.h"
#include "absl/strings/string_view.h"
#include "tink/cc/aead.h"
#include "tink/cc/aead_config.h"
#include "tink/cc/aead_key_templates.h"
#include "tink/cc/config/global_registry.h"
#include "tink/cc/examples/util/util.h"
#include "tink/cc/keyset_handle.h"
#include "tink/cc/util/status.h"
#include "tink/cc/util/statusor.h"

ABSL_FLAG(std::string, keyset_filename, "",
          "Keyset file (downloaded from secretmanager) in JSON format");
ABSL_FLAG(std::string, associated_data, "",
          "Associated data for AEAD (default: empty");

namespace {

using ::crypto::tink::Aead;
using ::crypto::tink::AeadConfig;
using ::crypto::tink::KeysetHandle;
using ::crypto::tink::util::Status;
using ::crypto::tink::util::StatusOr;

}  // namespace

namespace tink_cc_examples {

// AEAD example CLI implementation.
void AeadCli(const std::string& keyset_filename,
             absl::string_view associated_data) {
  Status result = AeadConfig::Register();
  if (!result.ok()) {
    std::clog << "Failed to register AeadConfig";
    return;
  }

  // Read the keyset from file.
  StatusOr<std::unique_ptr<KeysetHandle>> keyset_handle =
      ReadJsonCleartextKeyset(keyset_filename);
  if (!keyset_handle.ok()) {
    std::clog << "Failed to read json keyset";
    return;
  }

  // Get the primitive.
  StatusOr<std::unique_ptr<Aead>> aead =
      (*keyset_handle)
          ->GetPrimitive<crypto::tink::Aead>(
              crypto::tink::ConfigGlobalRegistry());
  if (!aead.ok()) {
    std::clog << "Failed to get primitive";
    return;
  }

  // Instantiate the enifd.
  hsdpexperiments::InlineInstallData iid;

  iid.set_timestamp_ms(std::chrono::duration_cast<std::chrono::milliseconds>(
                           std::chrono::system_clock::now().time_since_epoch())
                           .count());
  iid.set_target_package_name("<TARGET_PACKAGE_NAME>");
  iid.set_caller_package_name("<CALLER_PACKAGE_NAME>");
  iid.set_ad_network_id("<SDK_ID>");

  // Compute the output.
  StatusOr<std::string> encrypt_result =
      (*aead)->Encrypt(iid.SerializeAsString(), associated_data);
  if (!encrypt_result.ok()) {
    std::clog << "Failed to encrypt Inline Install Data";
    return;
  }
  const std::string& output = encrypt_result.value();

  std::string enifd;
  absl::WebSafeBase64Escape(output, &enifd);

  std::clog << "enifd: " << enifd << '\n';
}

}  // namespace tink_cc_examples

int main(int argc, char** argv) {
  absl::ParseCommandLine(argc, argv);

  std::string keyset_filename = absl::GetFlag(FLAGS_keyset_filename);
  std::string associated_data = absl::GetFlag(FLAGS_associated_data);

  std::clog << "Using keyset from file " << keyset_filename
            << " to AEAD-encrypt inline install data with associated data '"
            << associated_data << "'." << '\n';

  tink_cc_examples::AeadCli(keyset_filename, associated_data);
  return 0;
}
Kode ini telah diadaptasi dari contoh yang dapat ditemukan dalam dokumen Tink.