
En esta página, se describe cómo los SDKs de terceros pueden integrar la instalación integrada, una nueva función de prueba para Google Play que presenta los detalles del producto de la app de Google Play en una interfaz de hoja inferior. La instalación integrada permite a los usuarios experimentar un flujo de instalación de la app sin problemas sin salir del contexto de la app.
Los desarrolladores de SDKs de terceros pueden integrar la función de instalación integrada en sus SDKs para permitir que los desarrolladores de apps que usan esos SDKs accedan a las instalaciones integradas para sus apps.
Requisitos
Para que la interfaz de hoja inferior de instalación integrada aparezca en una app, se deben cumplir los siguientes requisitos:
- La versión mínima de Google Play debe ser 40.4.
- El nivel de API de Android debe ser 23 o superior.
Arquitectura del proceso
La arquitectura del proceso de instalación integrada se muestra en la siguiente figura:
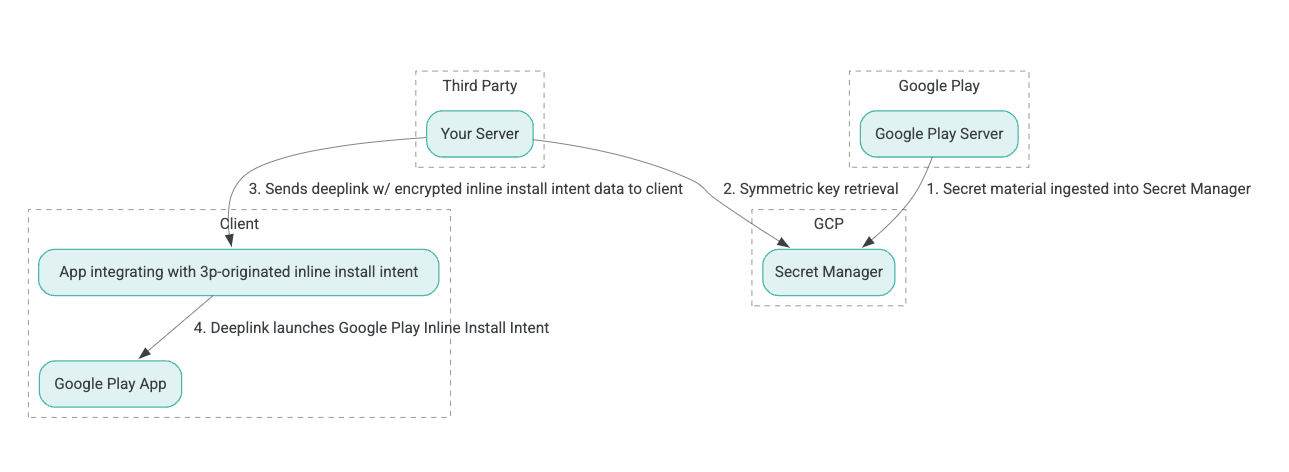
- Los servidores de Google Play generan claves de encriptación de encriptación autenticada con datos asociados (AEAD) y las incorporan a una instancia de Secret Manager de Google Cloud Platform (GCP).
- El integrador externo recupera la clave AEAD de Secret Manager de GCP.
- El integrador externo encripta los datos
Intentde instalación integrada, genera el texto cifrado que se pasa en el vínculo directo que se usa para invocar el intent de instalación integrada y envía vínculos directos al cliente en las respuestas. - Cuando se sigue el vínculo directo, la app de Google Play controla el intent.
Para configurar un SDK de terceros para usar el proceso de instalación integrada, completa los siguientes pasos.
Crea cuentas de servicio en el proyecto de Google Cloud
En este paso, configurarás una cuenta de servicio con la consola de Google Cloud.
- Configura un proyecto de Google Cloud:
- Crea una organización de Google Cloud. Cuando creas una cuenta de Google Workspace o Cloud Identity y la asocias con tu nombre de dominio, el recurso de la organización se crea automáticamente. Para obtener más detalles, consulta Crea y administra recursos de la organización.
- Accede a la consola de GCP con la cuenta de Google Cloud que creaste en el paso anterior y, luego, crea un proyecto de Google Cloud. Para obtener más detalles, consulta Crea un proyecto de Google Cloud.
- Crea una cuenta de servicio en el proyecto de Google Cloud creado. La cuenta de servicio se usa como una identidad de Google Cloud para acceder a la clave simétrica en nombre de tus servidores. Para obtener más detalles, consulta Crea una cuenta de servicio.
- Usa el mismo ID de cliente de Google Workspace (GWCID) o ID de Dasher que se ingresó en el formulario de interés.
- Crea y descarga la clave privada de esa cuenta de servicio.
- Crea una clave para esa cuenta de servicio. Para obtener más detalles, consulta Crea una clave de cuenta de servicio.
- Descarga la clave de la cuenta de servicio y mantenla accesible en tu servidor, ya que se usa para la autenticación para acceder a los recursos de Google Cloud para las claves simétricas. Para obtener más detalles, consulta Obtén una clave de cuenta de servicio.
Recupera credenciales
En este paso, recuperarás la clave simétrica de Secret Manager y la almacenarás de forma segura (por ejemplo, en un archivo JSON) en tu propio almacenamiento del servidor. Esta clave se usa para generar el texto cifrado de datos de instalación integrada.
Los valores secret_id/secretId hacen referencia al nombre secreto dentro de Secret Manager. Este nombre se genera agregando el prefijo hsdp-3p-key- al valor sdk_id proporcionado por Play. Por ejemplo, si el sdk_id es abc, el nombre secreto
es hsdp-3p-key-abc.
Las versiones secretas se actualizan semanalmente los martes a las 14:00 UTC. Las segundas claves más recientes seguirán funcionando hasta la próxima rotación, y el material de claves se debe recuperar y almacenar de forma semanal.
Ejemplo de Python
En el siguiente ejemplo de código, se usa un token de acceso almacenado en un archivo JSON para acceder al material de claves en Secret Manager de GCP y, luego, se imprime en la consola.
#!/usr/bin/env python3
# Import the Secret Manager client library.
from google.cloud import secretmanager
from google.oauth2 import service_account
import google_crc32c

# Create a service account key file.
service_account_key_file = "<json key file of the service account>"
credentials = service_account.Credentials.from_service_account_file(service_account_key_file)

# Create the Secret Manager client.
client = secretmanager.SecretManagerServiceClient(
  credentials=credentials
)

# Build the resource name of the secret version.
name = f"projects/prod-play-hsdp-3p-caller-auth/secrets/<secret_id>/versions/latest"

# Access the secret version.
response = client.access_secret_version(request={"name": name})

# Verify payload checksum.
crc32c = google_crc32c.Checksum()
crc32c.update(response.payload.data)
if response.payload.data_crc32c != int(crc32c.hexdigest(), 16):
    print("Data corruption detected.")

# A keyset created with "tinkey create-keyset --key-template=AES256_GCM". Note
# that this keyset has the secret key information in cleartext.
keyset = response.payload.data.decode("UTF-8")

# WARNING: Do not print the secret in a production environment. Please store it
# in a secure storage.
with open('<key file name>', 'w') as f:
    f.write(keyset)
Ejemplo de Java
En el siguiente ejemplo de código, se usa un token de acceso almacenado en un archivo JSON para acceder al material de claves en Secret Manager de GCP y, luego, se escribe en un archivo JSON.
import static java.nio.charset.StandardCharsets.UTF_8;
import com.google.api.gax.core.CredentialsProvider;
import com.google.api.gax.core.FixedCredentialsProvider;
import com.google.auth.oauth2.ServiceAccountCredentials;
import com.google.cloud.secretmanager.v1.AccessSecretVersionResponse;
import com.google.cloud.secretmanager.v1.SecretManagerServiceClient;
import com.google.cloud.secretmanager.v1.SecretManagerServiceSettings;
import com.google.cloud.secretmanager.v1.SecretVersionName;
import java.io.FileInputStream;
import java.io.IOException;
import java.io.PrintWriter;
import java.nio.file.Files;
import java.nio.file.Paths;
import java.util.zip.CRC32C;
import java.util.zip.Checksum;

/** */
final class ThirdPartySecretAccessGuide {

  private ThirdPartySecretAccessGuide() {}

  public static void main(String[] args) throws IOException {
    accessSecretVersion();
  }

  public static void accessSecretVersion() throws IOException {
    // TODO(developer): Replace these variables before running the sample.
    String projectId = "projectId";
    String secretId = "secretId";
    String versionId = "versionId";
    String accessTokenPrivateKeyPath = "path/to/credentials.json";
    String secretMaterialOutputPath = "path/to/secret.json";
    accessSecretVersion(
        projectId, secretId, versionId, accessTokenPrivateKeyPath, secretMaterialOutputPath);
  }

  // Access the payload for the given secret version if one exists. The version
  // can be a version number as a string (e.g. "5") or an alias (e.g. "latest").
  public static void accessSecretVersion(
      String projectId,
      String secretId,
      String versionId,
      String accessTokenPrivateKeyPath,
      String secretMaterialOutputPath)
      throws IOException {

    // We can explicitly instantiate the SecretManagerServiceClient (below) from a json file if we:
    // 1. Create a CredentialsProvider from a FileInputStream of the JSON file,
    CredentialsProvider credentialsProvider =
        FixedCredentialsProvider.create(
            ServiceAccountCredentials.fromStream(new FileInputStream(accessTokenPrivateKeyPath)));

    // 2. Build a SecretManagerService Settings object from that credentials provider, and
    SecretManagerServiceSettings secretManagerServiceSettings =
        SecretManagerServiceSettings.newBuilder()
            .setCredentialsProvider(credentialsProvider)
            .build();

    // 3. Initialize client that will be used to send requests by passing the settings object to
    // create(). This client only needs to be created once, and can be reused for multiple requests.
    // After completing all of your requests, call the "close" method on the client to safely clean
    // up any remaining background resources.
    try (SecretManagerServiceClient client =
        SecretManagerServiceClient.create(secretManagerServiceSettings)) {
      SecretVersionName secretVersionName = SecretVersionName.of(projectId, secretId, versionId);

      // Access the secret version.
      AccessSecretVersionResponse response = client.accessSecretVersion(secretVersionName);

      // Verify checksum. The used library is available in Java 9+.
      // If using Java 8, you may use the following:
      // https://github.com/google/guava/blob/e62d6a0456420d295089a9c319b7593a3eae4a83/guava/src/com/google/common/hash/Hashing.java#L395
      byte[] data = response.getPayload().getData().toByteArray();
      Checksum checksum = new CRC32C();
      checksum.update(data, 0, data.length);
      if (response.getPayload().getDataCrc32C() != checksum.getValue()) {
        System.out.printf("Data corruption detected.");
        return;
      }

      String payload = response.getPayload().getData().toStringUtf8();
      // Print the secret payload.
      //
      // WARNING: Do not print the secret in a production environment - this
      // snippet is showing how to access the secret material.
      System.out.printf("Plaintext: %s\n", payload);

      // Write the JSON secret material payload to a json file
      try (PrintWriter out =
          new PrintWriter(Files.newBufferedWriter(Paths.get(secretMaterialOutputPath), UTF_8))) {
        out.write(payload);
      } catch (Exception e) {
        e.printStackTrace();
      }
    }
  }
}
Configura las credenciales predeterminadas de la aplicación
Si no deseas usar CredentialsProvider para pasar la clave privada a un archivo JSON en la implementación de Java, puedes modificar la implementación configurando las credenciales predeterminadas de la aplicación (ADC):
- Indica a las bibliotecas cliente dónde encontrar la clave de la cuenta de servicio.
- Agrega dependencias de Maven al proyecto de Java.
- Llama a
SecretManagerServiceClient.create(), que selecciona la autenticación automáticamente (debido al paso 1).
Estos pasos modifican la implementación de Java de la siguiente manera:
- Elimina la necesidad de crear los objetos
CredentialsProviderySecretManagerServiceSettings. - Cambia la llamada a
SecretManagerServiceClient.create()para que no incluya argumentos.
Crea texto cifrado y genera un vínculo directo
En este paso, usarás la biblioteca de criptografía de Tink para crear el enifd (texto cifrado de InlineInstallData) a partir del objeto protobuf InlineInstallData.
El proto InlineInstallData se define de la siguiente manera:
syntax = "proto2";
package hsdpexperiments;
option java_package = "com.google.hsdpexperiments";
option java_multiple_files = true;

// InlineInstallData is used by 3p auth callers to generate "encrypted inline
// flow data" (enifd) which is decrypted in PGS to verify authenticity and
// freshness.
message InlineInstallData {
  // The timestamp which indicates the time encrypted data is generated.
  // Used to validate freshness (i.e. generation time in past 4 hours).
  // Required.
  optional int64 timestamp_ms = 1;

  // The docid of the app that we want to open inline install page for.
  // This is the package name.
  // Required.
  optional string target_package_name = 2;

  // This is the name of the app requesting the ad from Google Ad Serving
  // system.
  // Required.
  optional string caller_package_name = 3;

  // This is the advertising id that will be collected by 3P Ad SDKs.
  // Optional.
  optional string advertising_id = 4;

  // This is used to indicate the network from where the inline install was
  // requested.
  // Required.
  optional string ad_network_id = 5;
}
En este paso, también construirás la URL del vínculo directo con estos parámetros:
| Campos | Descripción | Obligatorio |
|---|---|---|
| id | Es el nombre de paquete de la app que se instalará. | Sí |
| en línea | Se establece en true si se solicita la hoja inferior de instalación integrada. Si
false, el intent se vincula directamente a Google Play. |
Sí |
| enifd | Es el identificador encriptado para los SDKs de terceros. | Sí |
| lft | Es un identificador interno. | Sí |
| 3pAuthCallerId | Es el identificador del SDK. | Sí |
| ficha | Es un parámetro opcional para especificar el destino de una ficha de Play Store personalizada. | No |
| referente | Es una cadena de seguimiento de referentes opcional. | No |
Ejemplo de Python
El siguiente comando genera código de Python a partir de InlineInstallData.proto:
protoc InlineInstallData.proto --python_out=.
El siguiente código de muestra de Python construye InlineInstallData y lo encripta con la clave simétrica para crear el texto cifrado:
#!/usr/bin/env python3

# Import the Secret Manager client library.
import base64
import time
import inline_install_data_pb2 as InlineInstallData
import tink
from tink import aead
from tink import cleartext_keyset_handle

# Read the stored symmetric key.
with open("example3psecret.json", "r") as f:
  keyset = f.read()

"""Encrypt and decrypt using AEAD."""
# Register the AEAD key managers. This is needed to create an Aead primitive later.
aead.register()

# Create a keyset handle from the cleartext keyset in the previous
# step. The keyset handle provides abstract access to the underlying keyset to
# limit access of the raw key material. WARNING: In practice, it is unlikely
# you will want to use a cleartext_keyset_handle, as it implies that your key
# material is passed in cleartext, which is a security risk.
keyset_handle = cleartext_keyset_handle.read(tink.JsonKeysetReader(keyset))

# Retrieve the Aead primitive we want to use from the keyset handle.
primitive = keyset_handle.primitive(aead.Aead)

inlineInstallData = InlineInstallData.InlineInstallData()
inlineInstallData.timestamp_ms = int(time.time() * 1000)
inlineInstallData.target_package_name = "x.y.z"
inlineInstallData.caller_package_name = "a.b.c"
inlineInstallData.ad_network_id = "<sdk_id>"

# Use the primitive to encrypt a message. In this case the primary key of the
# keyset will be used (which is also the only key in this example).
ciphertext = primitive.encrypt(inlineInstallData.SerializeToString(), b'<sdk_id>')
print(f"InlineInstallData Ciphertext: {ciphertext}")

# Base64 Encoded InlineInstallData Ciphertext
enifd = base64.urlsafe_b64encode(ciphertext).decode('utf-8')
print(enifd)

# Deeplink
print(f"https://play.google.com/d?id={inlineInstallData.target_package_name}\&inline=true\&enifd={enifd}\&lft=1\&3pAuthCallerId={inlineInstallData.ad_network_id}")
Ejecuta la secuencia de comandos de Python con el siguiente comando:
python <file_name>.py
Ejemplo de Java
El siguiente comando genera código de Java a partir de InlineInstallData.proto:
protoc InlineInstallData.proto --java_out=.
El siguiente código de muestra de Java construye InlineInstallData y lo encripta con la clave simétrica para crear el texto cifrado:
package com.google.hsdpexperiments;

import static com.google.common.io.BaseEncoding.base64Url;
import static java.nio.charset.StandardCharsets.UTF_8;

import com.google.common.flags.Flag;
import com.google.common.flags.FlagSpec;
import com.google.common.flags.Flags;
import com.google.crypto.tink.Aead;
import com.google.crypto.tink.InsecureSecretKeyAccess;
import com.google.crypto.tink.KeysetHandle;
import com.google.crypto.tink.TinkJsonProtoKeysetFormat;
import com.google.crypto.tink.aead.AeadConfig;
import java.nio.file.Files;
import java.nio.file.Path;
import java.nio.file.Paths;
import java.security.Security;
import java.time.Duration;
import org.conscrypt.Conscrypt;

/** info on encryption in https://github.com/google/tink#learn-more */
final class ThirdPartyEnifdGuide {

  @FlagSpec(
      name = "third_party_id",
      help = "the identifier associated with the 3p for which to generate the enifd")
  private static final Flag<String> thirdPartyAuthCallerId = Flag.value("");

  @FlagSpec(name = "package_name", help = "the package name of the target app")
  private static final Flag<String> packageName = Flag.value("");


  @FlagSpec(name = "caller_package_name", help = "the package name of the caller app")
  private static final Flag<String> callerPackageName = Flag.value("");

  @FlagSpec(name = "secret_filename", help = "the path to the json file with the secret material")
  private static final Flag<String> secretFilename = Flag.value("");

  private ThirdPartyEnifdGuide() {}

  public static void main(String[] args) throws Exception {
    // parse flags
    Flags.parse(args);

    // File keyFile = new File(args[0]);
    Path keyFile = Paths.get(secretFilename.get());

    // Create structured inline flow data
    InlineInstallData idrp =
        InlineInstallData.newBuilder()
            .setTargetPackageName(packageName.get())
            .setCallerPackageName(callerPackageName.get())
            .setTimestampMs(System.currentTimeMillis())
            .setAdNetworkId(thirdPartyAuthCallerId.get())
            .build();

    // we can print this out here to make sure it's well formatted, this will help debug
    System.out.println(idrp.toString());

    // Register all AEAD key types with the Tink runtime.
    Conscrypt.checkAvailability();
    Security.addProvider(Conscrypt.newProvider());
    AeadConfig.register();

    // Read AEAD key downloaded from secretmanager into keysethandle
    KeysetHandle handle =
        TinkJsonProtoKeysetFormat.parseKeyset(
            new String(Files.readAllBytes(keyFile), UTF_8), InsecureSecretKeyAccess.get());

    // Generate enifd using tink library
    Aead aead = handle.getPrimitive(Aead.class);
    byte[] plaintext = idrp.toByteArray();
    byte[] ciphertext = aead.encrypt(plaintext, thirdPartyAuthCallerId.get().getBytes(UTF_8));
    String enifd = base64Url().omitPadding().encode(ciphertext);

    // Build deeplink, escaping ampersands (TODO: verify this is necessary while testing e2e)
    String deeplink =
        "https://play.google.com/d?id="
            + packageName.get()
            + "\\&inline=true\\&enifd="
            + enifd
            + "\\&lft=1\\&3pAuthCallerId="
            + thirdPartyAuthCallerId.get();

    System.out.println(deeplink);
  }
}
Por último, compila el programa de Java en un archivo binario y, luego, invócalo con el siguiente código:
path/to/binary/ThirdPartyEnifdGuide --secret_filename=path/to/jsonfile/example3psecret.json --package_name=<package_name_of_target_app> --third_party_id=<3p_caller_auth_id>
- La marca
secret_filenameespecifica la ruta de acceso al archivo JSON que contiene el material secreto. - La marca
package_namees el ID del documento de la app de destino. - La marca
third_party_idse usa para especificar el ID de autenticación de la persona que llama externa (es decir, el<sdk_id>).
Inicia el intent de instalación integrada
Para probar el vínculo directo que se genera durante el paso anterior, conecta un dispositivo Android (asegúrate de que la depuración por USB esté habilitada) a una estación de trabajo que tenga ADB instalado y ejecuta el siguiente comando:
adb shell am start "<output_from_the_previous_python_or_java_code>"
En el código del cliente, envía el intent con uno de los siguientes métodos (Kotlin o Java).
Kotlin
val intent = Intent(Intent.ACTION_VIEW)
val deepLinkUrl = "<output_from_the_previous_python_or_java_code>"
intent.setPackage("com.android.vending")
intent.data = Uri.parse(deepLinkUrl)
val packageManager = context.getPackageManager()
if (intent.resolveActivity(packageManager) != null) {
  startActivityForResult(intent, 0)
} else {
  // Fallback to deep linking to full Play Store.
}
Java
Intent intent = new Intent(Intent.ACTION_VIEW);
String id = "exampleAppToBeInstalledId";
String deepLinkUrl = "<output_from_the_previous_python_or_java_code>";
intent.setPackage("com.android.vending");
intent.setData(Uri.parse(deepLinkUrl));
PackageManager packageManager = context.getPackageManager();
if (intent.resolveActivity(packageManager) != null) {
  startActivityForResult(intent, 0);
} else {
  // Fallback to deep linking to full Play Store.
}
Apéndice
En las siguientes secciones, se proporciona orientación adicional sobre ciertos casos de uso.
Prepara el entorno de Python
Para ejecutar el código de muestra de Python, configura el entorno de Python en tu estación de trabajo y, luego, instala las dependencias requeridas.
Configura el entorno de Python:
Instala python3.11 (si ya está instalado, omite este paso):
sudo apt install python3.11Instala pip:
sudo apt-get install pipInstala
virtualenv:sudo apt install python3-virtualenvCrea un entorno virtual (obligatorio para la dependencia de Tink):
virtualenv inlineinstall --python=/usr/bin/python3.11
Ingresa al entorno virtual:
source inlineinstall/bin/activateActualiza pip:
python -m pip install --upgrade pipInstala las dependencias requeridas:
Instala Tink:
pip install tinkInstala Google crc32c:
pip install google-crc32cInstala Secret Manager:
pip install google-cloud-secret-managerInstala el compilador de protobuf:
sudo apt install protobuf-compiler
Generación de enifd de C++
A continuación, se muestra un ejemplo de C++ que escribimos y validamos internamente para generar el enifd.
La generación del enifd se puede llevar a cabo con código C++ de la siguiente manera:
// A command-line example for using Tink AEAD w/ key template aes128gcmsiv to
// encrypt an InlineInstallData proto.
#include <chrono>
#include <iostream>
#include <memory>
#include <string>

#include "<path_to_protoc_output>/inline_install_data.proto.h"
#include "absl/flags/flag.h"
#include "absl/flags/parse.h"
#include "absl/strings/escaping.h"
#include "absl/strings/string_view.h"
#include "tink/cc/aead.h"
#include "tink/cc/aead_config.h"
#include "tink/cc/aead_key_templates.h"
#include "tink/cc/config/global_registry.h"
#include "tink/cc/examples/util/util.h"
#include "tink/cc/keyset_handle.h"
#include "tink/cc/util/status.h"
#include "tink/cc/util/statusor.h"

ABSL_FLAG(std::string, keyset_filename, "",
          "Keyset file (downloaded from secretmanager) in JSON format");
ABSL_FLAG(std::string, associated_data, "",
          "Associated data for AEAD (default: empty");

namespace {

using ::crypto::tink::Aead;
using ::crypto::tink::AeadConfig;
using ::crypto::tink::KeysetHandle;
using ::crypto::tink::util::Status;
using ::crypto::tink::util::StatusOr;

}  // namespace

namespace tink_cc_examples {

// AEAD example CLI implementation.
void AeadCli(const std::string& keyset_filename,
             absl::string_view associated_data) {
  Status result = AeadConfig::Register();
  if (!result.ok()) {
    std::clog << "Failed to register AeadConfig";
    return;
  }

  // Read the keyset from file.
  StatusOr<std::unique_ptr<KeysetHandle>> keyset_handle =
      ReadJsonCleartextKeyset(keyset_filename);
  if (!keyset_handle.ok()) {
    std::clog << "Failed to read json keyset";
    return;
  }

  // Get the primitive.
  StatusOr<std::unique_ptr<Aead>> aead =
      (*keyset_handle)
          ->GetPrimitive<crypto::tink::Aead>(
              crypto::tink::ConfigGlobalRegistry());
  if (!aead.ok()) {
    std::clog << "Failed to get primitive";
    return;
  }

  // Instantiate the enifd.
  hsdpexperiments::InlineInstallData iid;

  iid.set_timestamp_ms(std::chrono::duration_cast<std::chrono::milliseconds>(
                           std::chrono::system_clock::now().time_since_epoch())
                           .count());
  iid.set_target_package_name("<TARGET_PACKAGE_NAME>");
  iid.set_caller_package_name("<CALLER_PACKAGE_NAME>");
  iid.set_ad_network_id("<SDK_ID>");

  // Compute the output.
  StatusOr<std::string> encrypt_result =
      (*aead)->Encrypt(iid.SerializeAsString(), associated_data);
  if (!encrypt_result.ok()) {
    std::clog << "Failed to encrypt Inline Install Data";
    return;
  }
  const std::string& output = encrypt_result.value();

  std::string enifd;
  absl::WebSafeBase64Escape(output, &enifd);

  std::clog << "enifd: " << enifd << '\n';
}

}  // namespace tink_cc_examples

int main(int argc, char** argv) {
  absl::ParseCommandLine(argc, argv);

  std::string keyset_filename = absl::GetFlag(FLAGS_keyset_filename);
  std::string associated_data = absl::GetFlag(FLAGS_associated_data);

  std::clog << "Using keyset from file " << keyset_filename
            << " to AEAD-encrypt inline install data with associated data '"
            << associated_data << "'." << '\n';

  tink_cc_examples::AeadCli(keyset_filename, associated_data);
  return 0;
}
Este código se adaptó de una muestra que se puede encontrar en la documentación de Tink.