
1. Before you begin
Prerequisites
- Knowledge of how to build Jetpack Compose apps.
- Experience with Kotlin.
- Basic understanding of Swift syntax.
What you need
- The latest stable version of Android Studio (Meerkat or higher).
- A macOS system with Xcode 16.1 and iPhone simulator with iOS 16.0 or higher.
What you will learn
- Understand the basics of Kotlin Multiplatform.
- How to share code across platforms.
- How to connect the shared code on Android and iOS.
2. Get set up
To get started, follow these steps:
- Clone the GitHub repository:
$ git clone https://github.com/android/codelab-android-kmp.git
Alternatively, you can download the repository as a zip file:
- In Android Studio, open the
get-startedproject, which contains the following branches:
main: Contains the starter code for this project, where you make changes to complete the codelab.end: Contains the solution code for this codelab.
This codelab begins with the main branch. You can follow the codelab step-by-step at your own pace.
- If you want to see the solution code, run this command:
$ git clone -b end https://github.com/android/codelab-android-kmp.git
Alternatively, you can download the solution code:
Install Xcode
To build and run the iOS part of this codelab, you need Xcode and an iOS simulator:
- If you haven't done so, you might need to create an Apple account.
- Install Xcode from the Mac App Store (for this you need an Apple account).
- Once installed, launch Xcode.
- A dialog will be presented that indicates which components are built-in, and which you need to download.
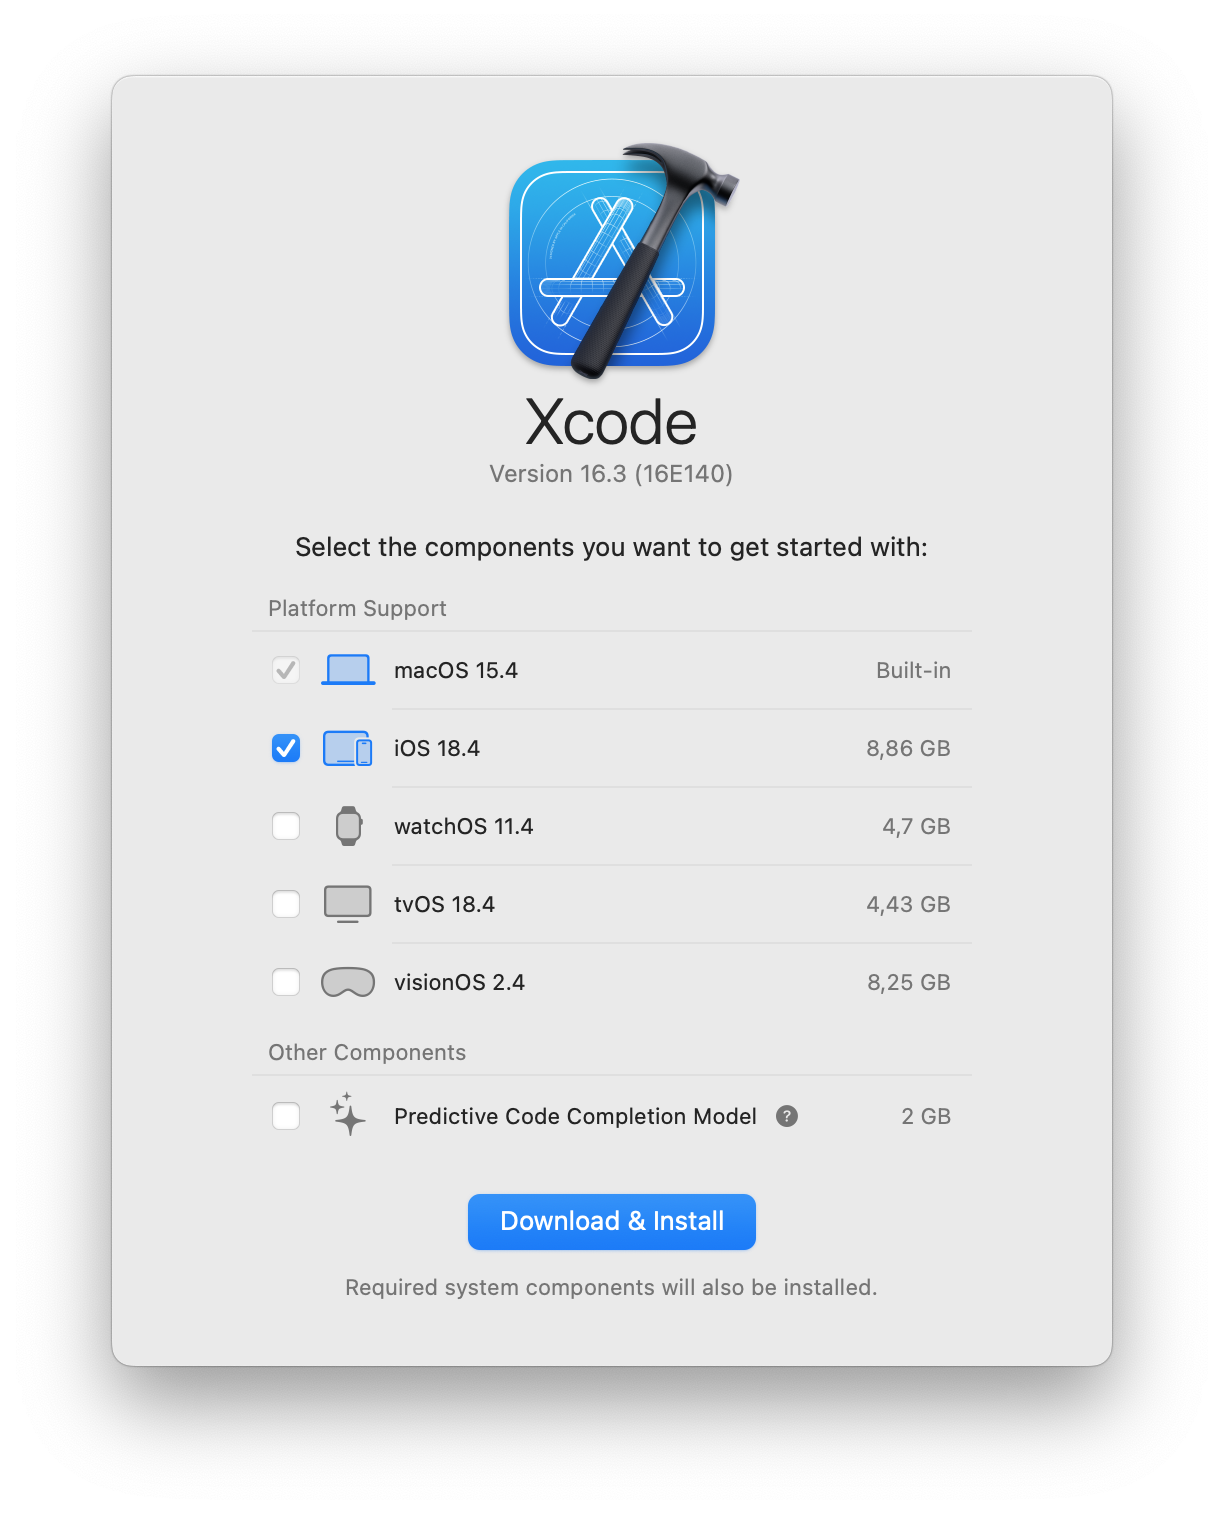
- Check the iOS 18.4 (or newer).
- Click Download & Install.
- Wait until the components are installed.
This codelab was tested with Xcode 16.3. If you use any other Xcode version, and if you're running into issues, then we recommend downloading the exact version as mentioned in this codelab.
The sample app
This codebase contains both an Android app built with Jetpack Compose and an iOS app built with SwiftUI. The Android project is located in the androidApp/ folder, whereas the iOS project is located in the iosApp/ folder that also contains the KMPGetStartedCodelab.xcodeproj to run with Xcode.
3. Introduction to Kotlin Multiplatform
Kotlin Multiplatform (KMP) allows you to write code once and share it across multiple target platforms, such as Android, iOS, Web, and Desktop. By leveraging KMP, you can minimize code duplication, maintain consistency, and significantly reduce development time and effort.
KMP doesn't dictate how much or what parts of your codebase you need to share. It is up to you to decide which parts of the code are worth sharing.
Deciding on what to share
This shared code enables you to maintain consistency and reduce duplication across platforms. Many mobile teams start by sharing a discrete set of business logic (e.g., database access, network access, etc.) and the associated tests, and then sharing additional code over time.
Many Android Jetpack libraries have support for KMP. Jetpack libraries that have been made multiplatform offer multiple tiers of support depending on the target platform. For the full list of libraries and their support levels, see the documentation.
For example, one of the supported libraries, the Room database library, supports both Android, iOS & Desktop. This allows you to port the database creation and related database logic to a common KMP shared module while preserving the other native code on both platforms.
A possible next step after migrating the database would be to share other domain logic. Then, you may also consider using the ViewModel multiplatform library from Android Jetpack.
How to write platform-specific code
Kotlin Multiplatform introduces new techniques for implementing platform-specific functionality.
Expect and actual declarations
The expect actual Kotlin language feature is designed to support Kotlin multiplatform codebase with full IDE support.
This approach is ideal when the platform-specific behavior can be encapsulated in a single function or class. It's a flexible and powerful mechanism. For example, a common expect class can have platform-specific actual counterparts with more open visibility modifiers, additional super types, or different parameter types or modifiers. These kinds of variations wouldn't be possible with a strict interface API. Moreover, expect actual is statically resolved, meaning the platform-specific implementation is enforced at compile time.
Interface and Implementations in Kotlin
If both platforms need to follow similar APIs but with different implementations, you can define an interface in shared code as an alternative to expected and actual declarations.This approach enables you to use different testing implementations, or switch to a different implementation at runtime.
Additionally, interfaces require no Kotlin-specific knowledge, making this option approachable for developers familiar with interfaces in other languages.
Interface in common shared code, implementation in native code (Android or Swift).
In some cases you need to write code that isn't available from KMP code. In this situation you can define an interface in shared code, implement it for Android in Kotlin, and provide an iOS counterpart in Swift. Typically, the native implementations are then injected into the shared code, either by dependency injection or directly. This strategy allows for a customized experience on each platform while maintaining a common interface for shared code.
4. Open the Xcode project from Android Studio
Once Xcode is installed, you should make sure that you can run the iOS app.
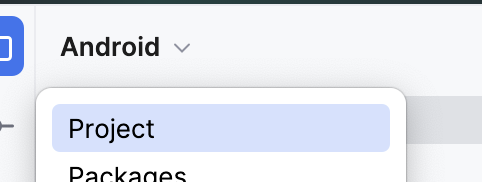
You can open the iOS project directly from Android Studio.
- Switch the Project pane to use the Project View
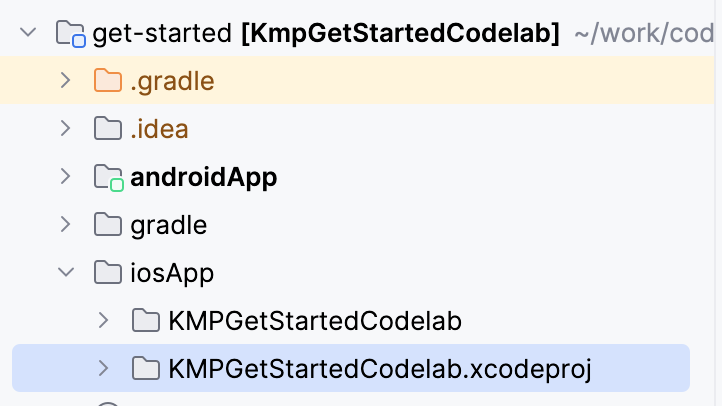
- Find the KmpGetStartedCodelab.xcodeproj file in [root]/iosApp/ folder
- Right-click the file and select Open In and Open in Associated Application. This will open the iOS app in Xcode.
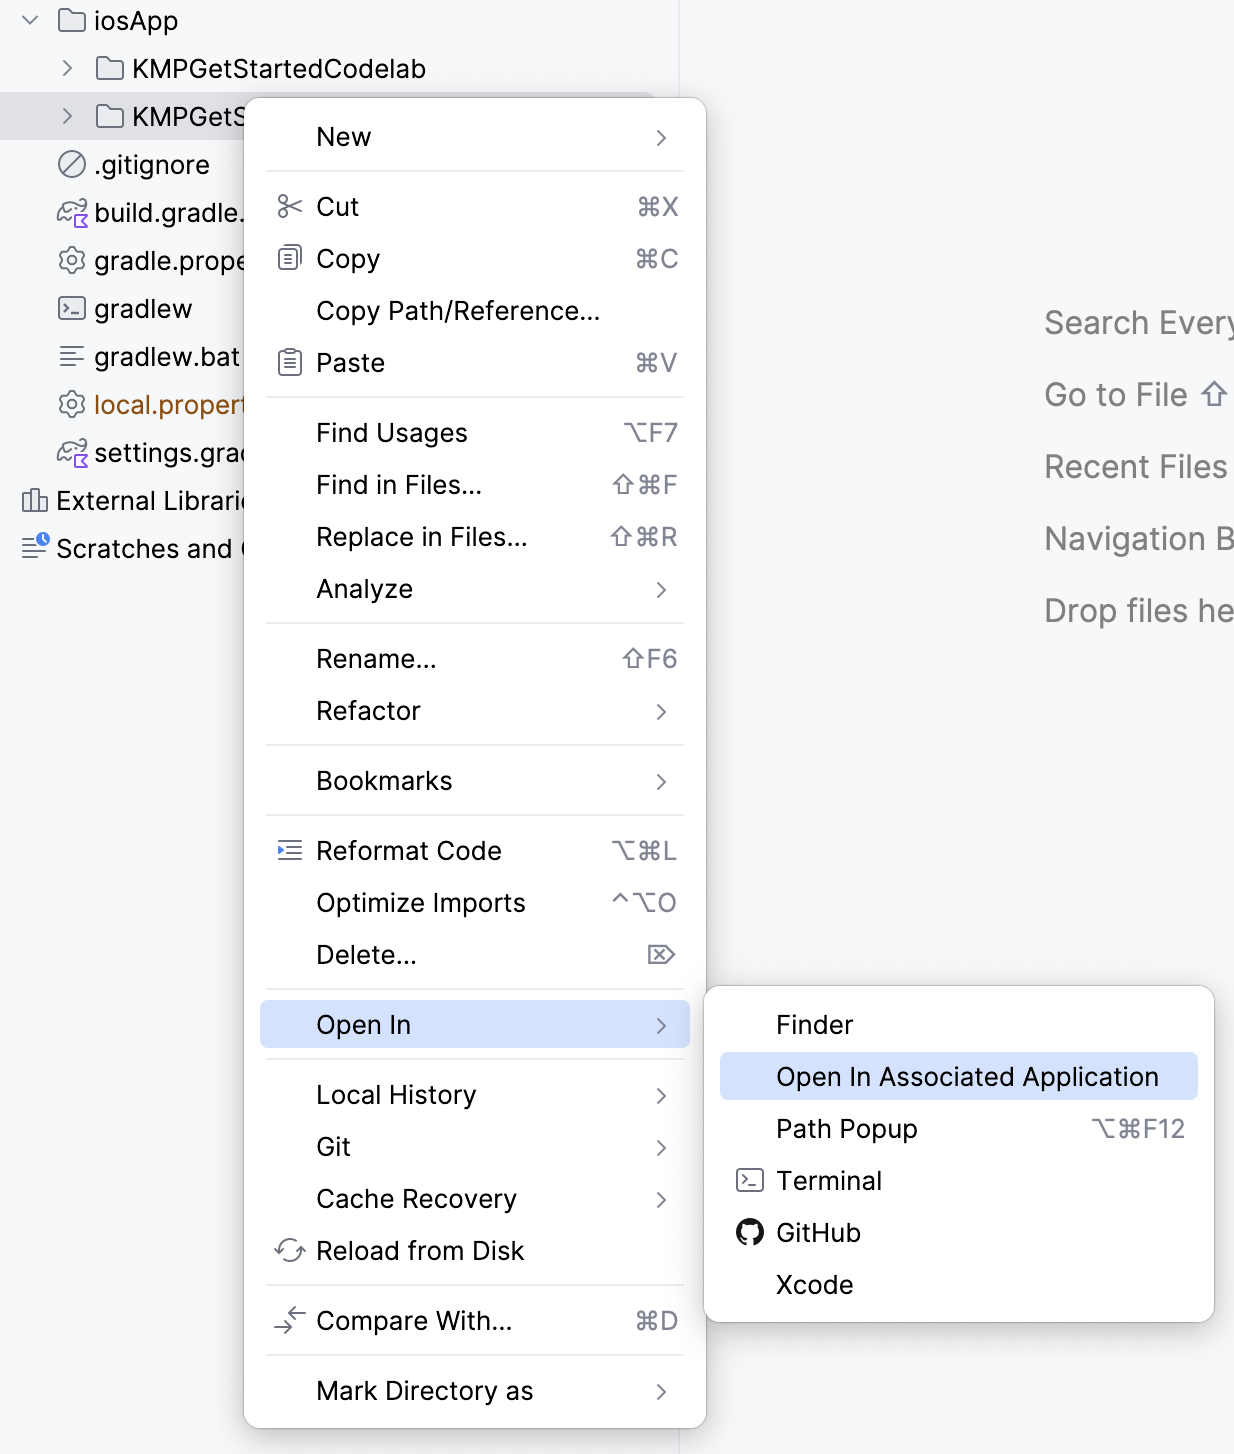
- Run the project in Xcode by clicking ⌘+R or navigating to Product menu and select Run
 .
.
5. Add a KMP module
To add KMP support to your project, first create a shared module for the code that will be reused across platforms (Android, iOS).
Android Studio provides a way to add a Kotlin Multiplatform module using its KMP Shared module template.
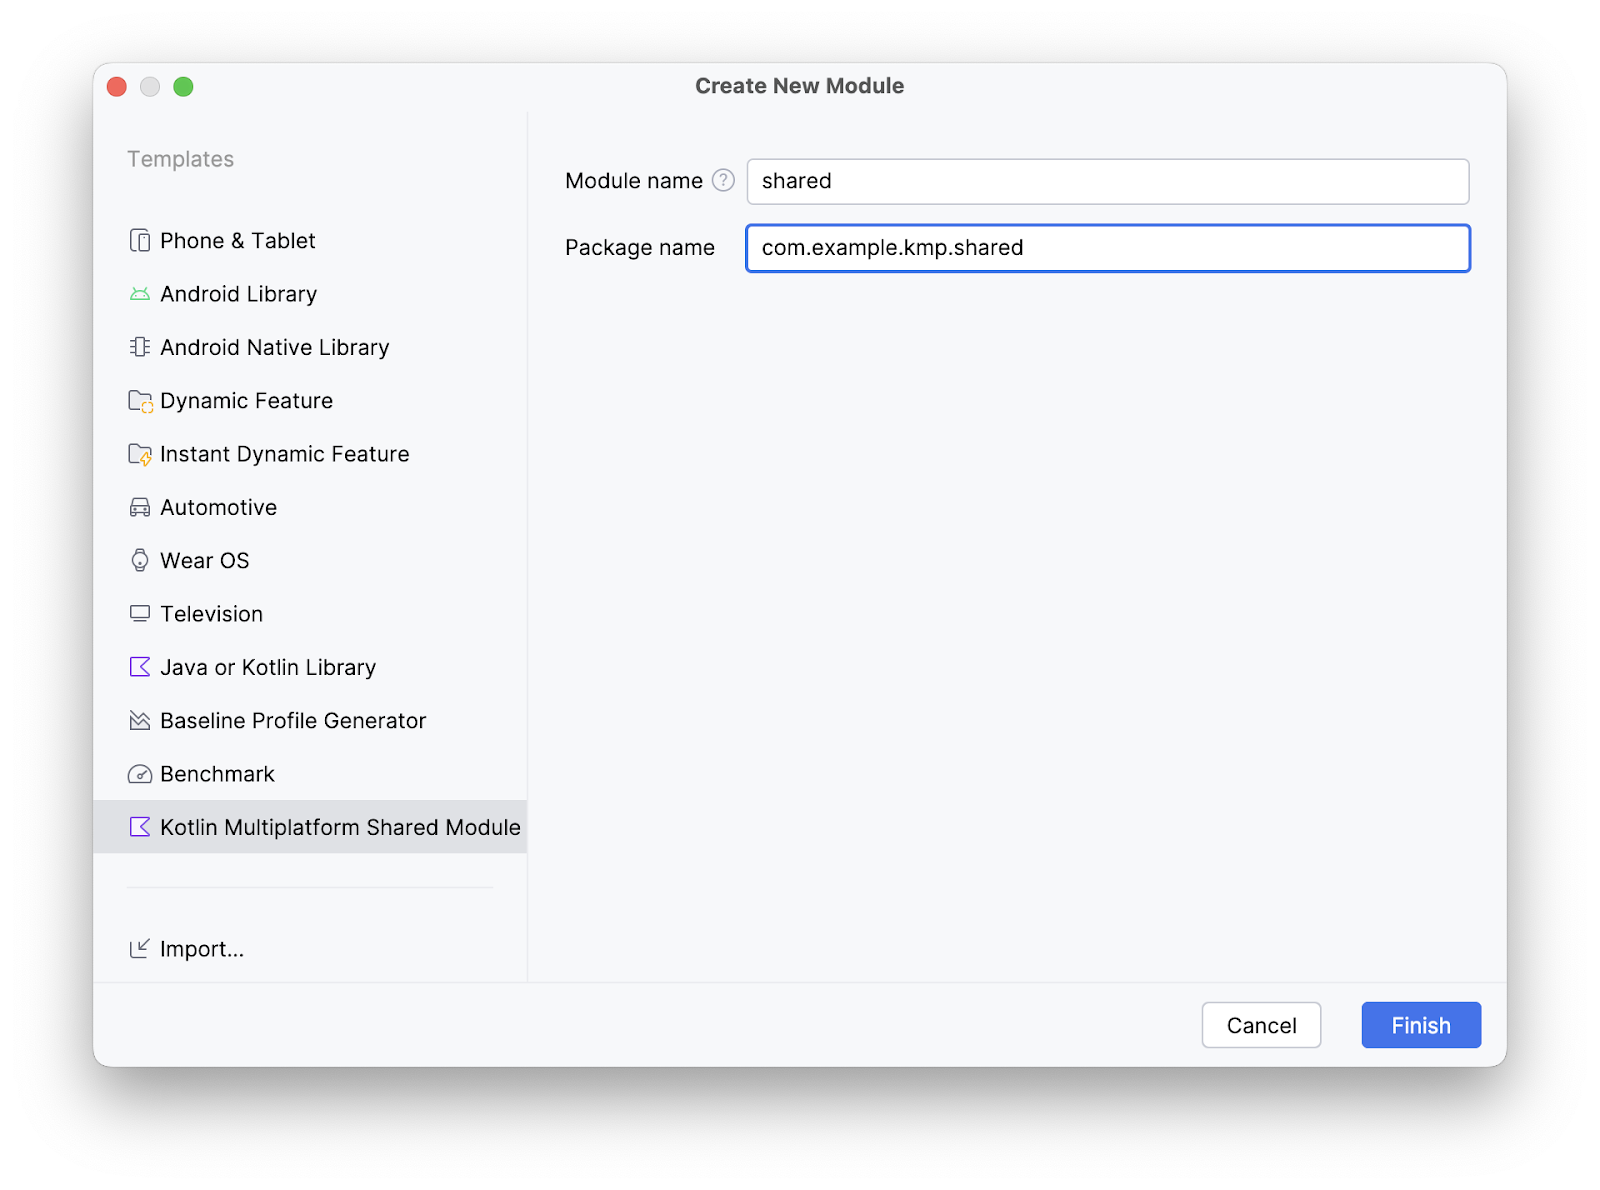
To create the KMP module, in Android Studio:
- Navigate to File > New > New Module > Kotlin Multiplatform Shared Module
- Change the package to
com.example.kmp.shared - Click Finish
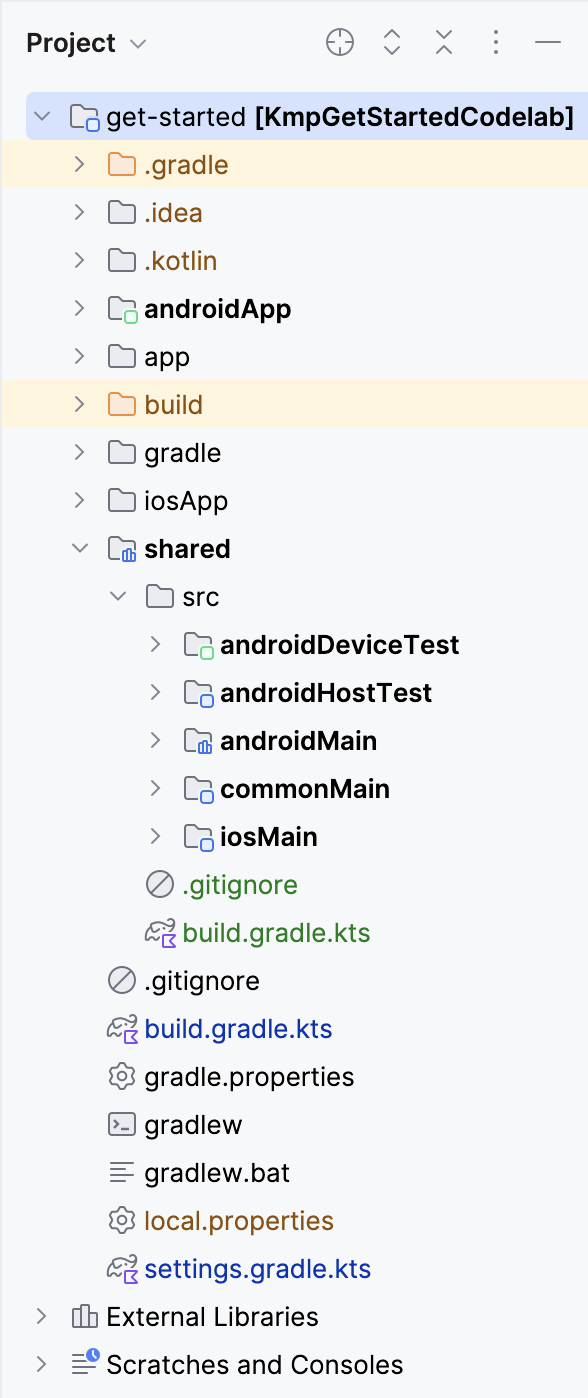
- Once the module creation completes and Gradle finishes syncing, a new
sharedmodule will appear in the project. To see the view shown below, you may need to switch from Android View to Project View.
The shared module generated by the KMP Shared module template includes some basic placeholder functions and tests. These placeholders ensure that the module compiles and runs successfully from the start.
Important: Keep in mind the difference between the iosApp folder and the iosMain folder. The iosApp folder contains the standalone iOS app code whereas the iosMain is part of the KMP shared module that you just added. iosApp contains Swift code while iosMain contains iOS platform-specific KMP code.
Link the shared module to the Android app
First, you need to link the new shared module as a dependency in the :androidApp Gradle module to enable the app to use the shared code:
- Open the
androidApp/build.gradle.ktsfile - Add the
sharedmodule dependency in the dependencies block as follows
dependencies {
    ...
    implementation(projects.shared)
}
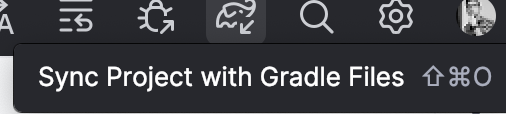
- Sync the project with its Gradle files
Verify code access to the shared module
To verify that the Android app can access code from the shared module, we'll make a simple update to the app.
- In the KMPGetStartedCodelab project, open the
MainActivityfile atandroidApp/src/main/java/com/example/kmp/getstarted/android/MainActivity.kt - Modify the content
Textcomposable to include theplatform()information in the displayed string.
Text(
  "Hello ${platform()}",
)
- Click
⌥(option)+returnon your keyboard and selectImport function 'platform'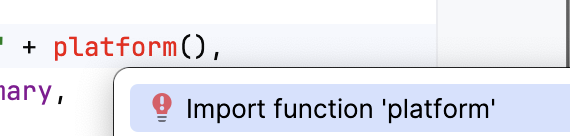
- Build and run the app on an Android device or emulator.
This update checks whether the app can call the platform() function from the shared module, which should return "Android" when running on the Android platform.

6. Set up the shared module to the iOS app
Swift can't use Kotlin modules directly like the Android apps do, and requires a compiled binary framework (XCFramework bundle) to be produced. An XCFramework bundle is a binary package that includes the frameworks and libraries necessary to build for multiple Apple platforms.
How the shared library is distributed
The new module template in Android Studio already configured the shared module to produce a framework for each of the iOS architectures. You can find the following code in the shared module's build.gradle.kts file.
val xcfName = "sharedKit"

iosX64 {
  binaries.framework {
    baseName = xcfName
  }
}

iosArm64 {
  binaries.framework {
    baseName = xcfName
  }
}

iosSimulatorArm64 {
  binaries.framework {
    baseName = xcfName
  }
}
Link the shared library in the iOS project
This step involves setting up Xcode to run a script to generate the Kotlin framework, and calling the platform() function in the iOS app.
For consuming the shared library, you need to connect the Kotlin framework to the iOS project with the following steps:
- Open the iOS project (the
iosAppdirectory mentioned previously) in Xcode and open the project settings by double-clicking the project name in the project navigator
- On the Build Phases tab of the project settings, click + and select New Run Script Phase. This adds a new "Run script" phase after all other phases.
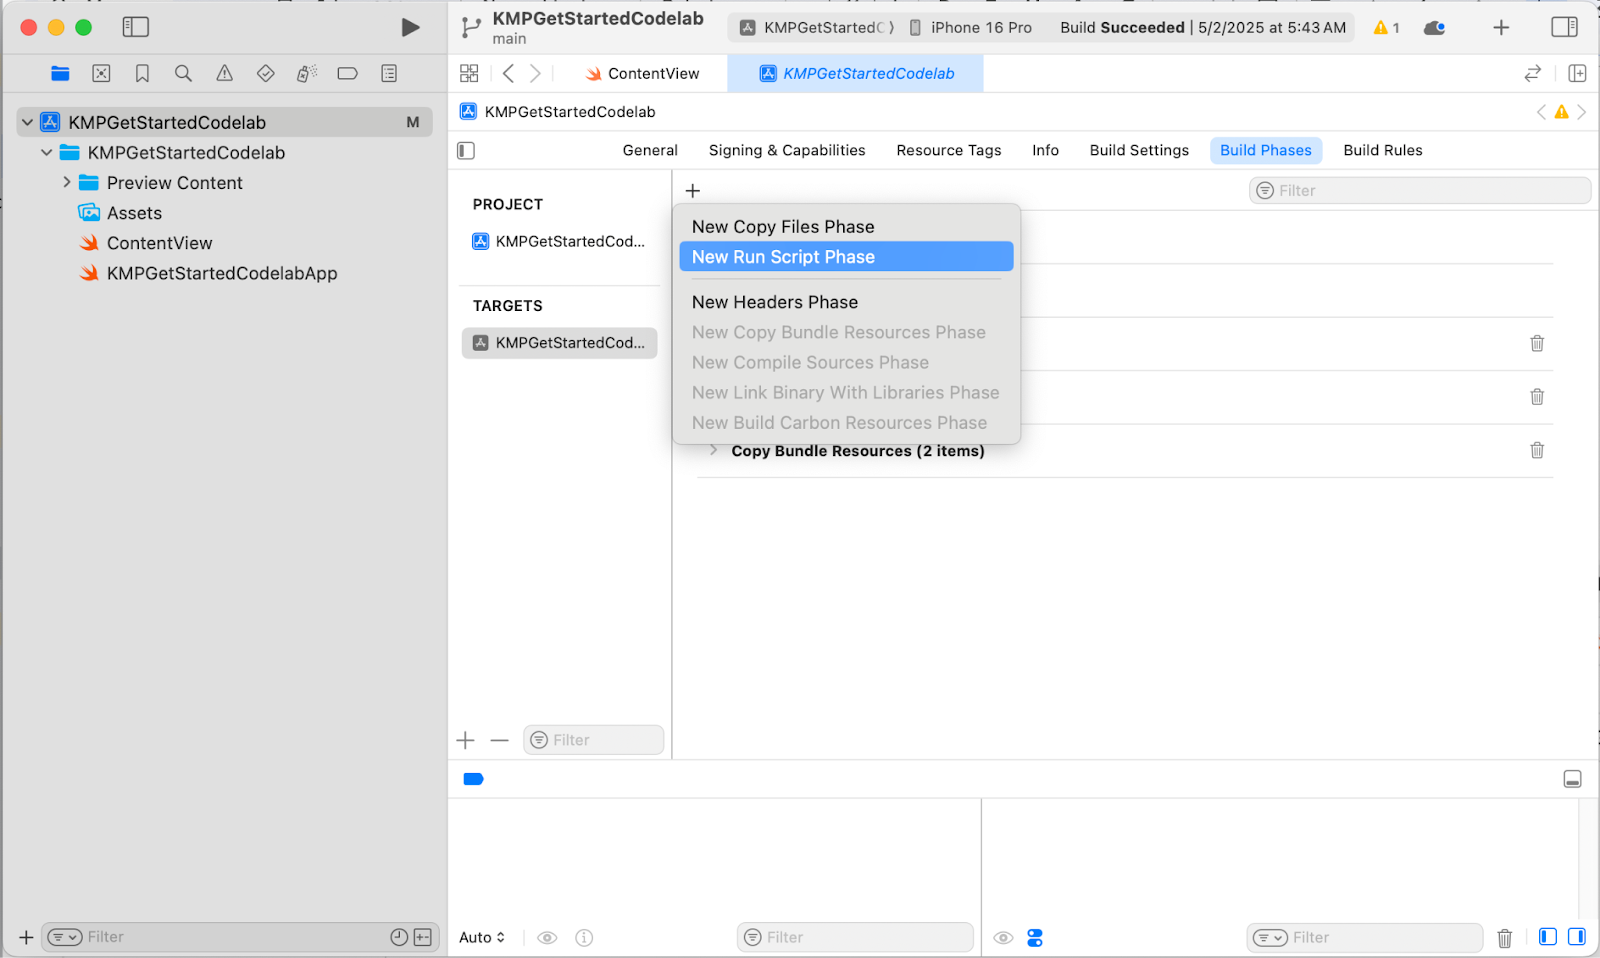
- Double-click the Run Script title to rename it. Change the default Run Script name to Compile Kotlin Framework so it's understandable what this phase does.
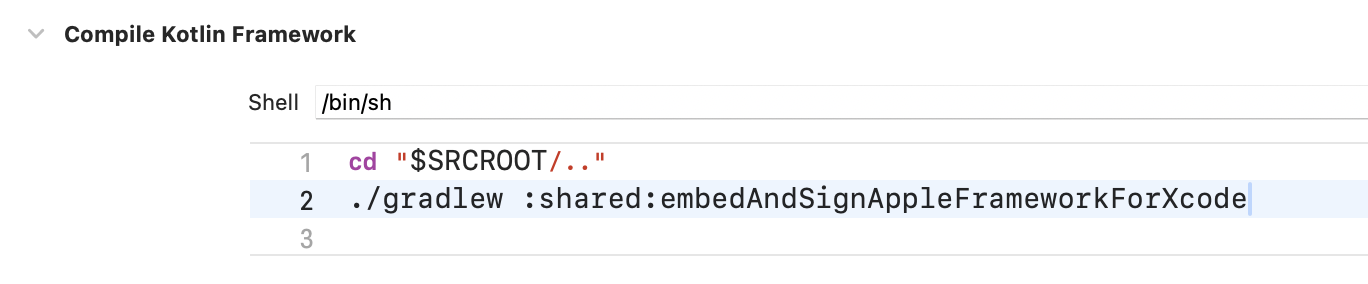
- Unfold the build phase, and in the text field below Shell, enter the script code:
cd "$SRCROOT/.."
./gradlew :shared:embedAndSignAppleFrameworkForXcode
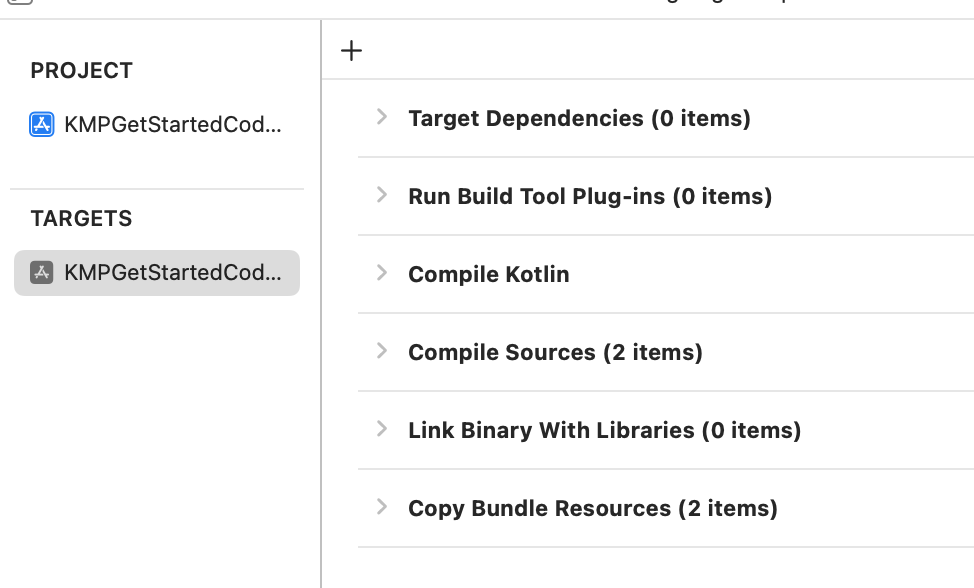
- Drag the Compile Kotlin Framework phase before the Compile Sources phase.
- Build the project in Xcode by clicking ⌘+B or navigating to Product menu and select Build. Note that the build progress is shown on top of Xcode.

If everything is set up correctly, the project will successfully build.
Setting the run script build phase this way allows you to compile your iOS project from Xcode without the need to switch to a different tool to compile the shared module.
Verify code access to the shared module
To verify that the iOS app can successfully access code from the shared module, you'll make the same simple update to the app that you made for the Android app.
- In the iOS project, in Xcode, open the
ContentView.swiftfile at:Sources/View/ContentView.swift - Add
import sharedKitat the top of the file. - Modify the
Textview to include thePlatform_iosKt.platform()information in the displayed string with\(Platform_iosKt.platform()).
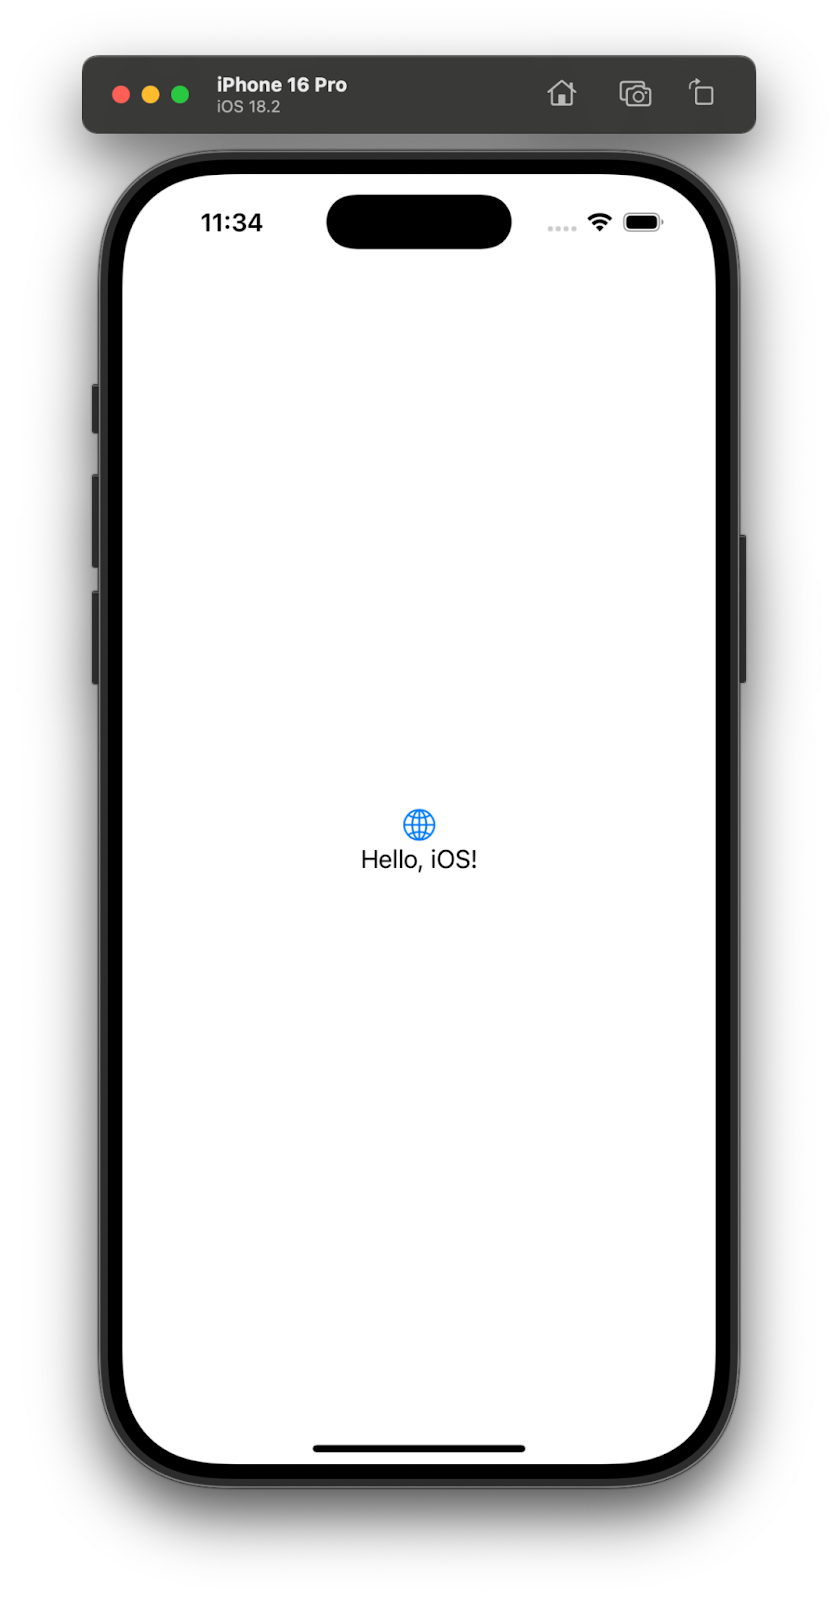
Here is the final result of the file:
import SwiftUI
import sharedKit

struct ContentView: View {
    var body: some View {
        VStack {
            Image(systemName: "globe")
                .imageScale(.large)
                .foregroundStyle(.tint)

            Text("Hello, \(Platform_iosKt.platform())!")
        }
        .padding()
    }
}
- Run the app either by clicking ⌘+R, or navigate to the Product menu and click Run.
This update checks whether the iOS app can call the platform() function from the shared module, which should return "iOS" when running on the iOS platform.
7. Add Swift/Kotlin Interface Enhancer (SKIE)
By default the native interface Kotlin produces is an Objective-C header. Swift is directly compatible with Objective-C, but Objective-C doesn't include all the modern features of Swift or Kotlin.
This is also the reason why in the previous example, you couldn't use the platform() call directly in the Swift code – KMP can't generate a global function, because Objective-C doesn't support global functions, only static functions encapsulated in a class, which is why you need to add Platform_iosKt.
To make the interface more Swift-friendly, you can use the Swift/Kotlin Interface Enhancer (SKIE) tool to improve the Swift interface of the :shared module.
The common features of SKIE are:
- Better support for default arguments
- Better support for sealed hierarchies (
sealed class,sealed interface) - Better support for
enum classwith exhaustive handling inswitchstatements - Interoperability between
FlowtoAsyncSequence - Interoperability between
suspend funandasync func
- Add
co.touchlab.skieGradle plugin to thelibs.versions.tomlfile:
[versions]
skie = "0.10.1"

[plugins]
skie = { id = "co.touchlab.skie", version.ref = "skie" }
- Add the plugin to the root
build.gradle.ktsfile
plugins {
   ...
   alias(libs.plugins.skie) apply false
}
- Add the plugin to the
:sharedmodulebuild.gradle.ktsfile:
plugins {
   ...
   alias(libs.plugins.skie)
}
- Gradle sync the project
Remove the static function call
Now when you rebuild the iOS app, you might not notice anything immediately, but you can remove the Platform_iosKt prefix and let the platform() function act as a global function.
Text("Hello, KMP! \(platform())")
This works, because SKIE (among other features) leverages the Swift API Notes, which adds information about APIs to better consume it from Swift code.
8. Congratulations
Congratulations, you've added the first shared Kotlin Multiplatform code to Android and iOS projects. While this is only a minimal starting point, you're now able to start discovering more advanced features and use cases for sharing code with KMP.
What's next?
Learn to use Jetpack Room to share a data layer between Android and iOS in the next codelab.
Learn more
- Learn which Jetpack libraries support KMP
- Check the official Kotlin Multiplatform documentation