1. Introduction
Last Updated: Jan 4, 2023
What is Play Integrity?
The Play Integrity API helps protect your apps and games from potentially risky and fraudulent interactions. You can use the Play Integrity API to obtain integrity verdicts about your app and device, which can help you respond with appropriate actions to reduce attacks and abuse such as fraud, cheating, and unauthorized access.
Previous solutions
The Play Integrity API replaces two previous solutions: the App Licensing library and the SafetyNet Attestation API. Play Integrity is recommended for new applications. Existing applications using the previous solutions should consider updating to use Play Integrity.
Choosing a path
Play Integrity includes library options for different kinds of apps:
- Games or other apps written in C/C++
- Apps written in the Kotlin or Java programming language
- Games developed with the Unity engine
This codelab includes paths for all three options. You can choose the paths that are relevant to your development needs. The codelab involves building and deploying a backend server. This server is shared across all three app types.
What you'll build
In this codelab, you're going to integrate Play Integrity into a sample app and use the API to check device and app integrity. You'll deploy a small backend server application that is used to support the integrity check process.
What you'll learn
- How to integrate the Play Integrity library into an app
- How to use the Play Integrity API to perform an integrity check
- How to securely process an integrity verdict using a server
- How to interpret integrity verdict results
This codelab is focused on Play Integrity. Non-relevant concepts and code blocks aren't explained in detail and are provided for you to simply copy and paste.
What you'll need
- A Google account with an active Android Developer registration, access to the Play Console, and access to the Google Cloud Console.
- For the C++ or Kotlin paths, Android Studio 2021.1.1 or higher.
- For the Unity path, Unity 2020 LTS or higher.
- An Android-powered device, connected to your computer, that has Developer options and USB debugging enabled.
This codelab includes links to resources on signing and uploading builds to the Play Console, but assumes some familiarity with this process.
2. Get the code
The codelab projects are available in a Git repo. In the parent directory of the repo are four directories:
- The
serverdirectory contains the code for the example server you will be deploying. - The
cppdirectory contains an Android Studio project for adding Play Integrity to a C++ game or app. - The
kotlindirectory contains an Android Studio project for adding Play Integrity to a standard Android app. - The
unitydirectory contains a project created with the 2020 LTS version of the Unity engine for adding Play Integrity to a Unity project.
In each of the client sample directories are two subdirectories:
- The
startdirectory, which has the version of the project we will be modifying for this codelab. - The
finaldirectory, which has a version of the project matching what the project should look like upon completion of the codelab.
Cloning the repo
From the command line, change to the directory you wish to contain the root add-play-integrity-codelab directory, and then clone the project from GitHub using the following syntax:
git clone https://github.com/android/add-play-integrity-codelab.git
Adding dependencies (C++ only)
If you intend to use the C++ path, you need to initialize the repository submodules to set up the Dear ImGui library, which is used for the user interface. To do this, from the command line:
- Change the working directory to:
add-play-integrity-codelab/cpp/start/third-party git submodule update --init
3. Understand the client and server functions
A key element of the Play Integrity security model is moving validation operations off the device and onto a secure server that you control. Performing these operations on the server guards against scenarios such as a compromised device attempting to deploy a replay attack or tampering with message contents.
The codelab sample server is intended as an example, and for simplicity does not contain many features that would be desirable in a production environment. Its list of generated values are stored only in memory and not backed by persistent storage. The server endpoints are not configured to require authentication.
The performCommand endpoint
The server provides a /performCommand endpoint accessed via a HTTP POST request. The request body is expected to be a JSON payload with the following key/value pairs:
{
   "commandString": "command-here",
   "tokenString": "token-here"
}
The /performCommand endpoint returns a JSON payload with the following key/value pairs:
{
   "commandSuccess": true/false,
   "diagnosticMessage": "summary text",
   "expressToken": "token-here"
}
The actual contents of the commandString parameter don't matter. The server validates the integrity of the commandString when using Play Integrity, but does not use the command value. All client versions use the value "TRANSFER FROM alice TO bob CURRENCY gems QUANTITY 1000".
The value of the tokenString parameter must be either:
- A token generated by the Play Integrity API
- An express token returned by a previous successful call to
/performCommand
The server decrypts and validates the token provided by the Play Integrity API. The result of the decryption is a JSON payload of integrity signals. Depending on the value of the signals, the server can choose to approve or reject the command. If the token is successfully decrypted, a summary description of the signals is returned in diagnosticMessage. You wouldn't normally return this information to the client in a production application, but it is used by the codelab clients to display the result of your operation without having to look at server logs. If an error condition occurs while processing the token, the error is returned in diagnosticMessage.
Nonce generation
Making a Play Integrity request requires generating a nonce and associating it with the request. The nonce is used to help ensure an integrity request is unique and only processed once. The nonce is also used to verify the message contents associated with the integrity request haven't been tampered with. For more information about Play Integrity nonces, see the documentation.
In this codelab, the nonce is generated by combining two values:
- A 128-bit random number generated by a cryptographically-secure random number generator
- A SHA-256 hash of the
commandStringvalue
The Play Integrity API expects the nonce to be a URL-encoded non-padded Base64 string. To create the nonce string, this codelab converts the byte arrays of the random number and hash values into hex strings and concatenates them. The resulting string is a valid Base64 string, but it is not encoded or decoded as such.
The codelab clients retrieve the random number by calling a /getRandom endpoint on the server with a HTTP GET request. This is the most secure method of random generation, as the server can verify it was the source of the random number used in the command request. However, this does involve an additional roundtrip to the server. Clients can eliminate this roundtrip by generating the random number themselves, at some tradeoff against security.
Express token
Because calling the PIA is expensive, the server also provides an express token, an alternative method for authentication that provides lower security at less cost. An express token is returned in the expressToken field by a successful call to /serverCommand with a passing integrity check. Calling the Play Integrity API is computationally expensive and is intended to be used to protect high-value operations. By returning the express token, the server provides a lower-security authentication for performing operations that may be less important or occur too often to justify full validation with the Play Integrity API. An express token may be used instead of a Play Integrity token when calling /serverCommand. Each express token is single use. Successful calls to /serverCommand using a valid express token return a new express token.
In the codelab implementation, since the express token is uniquely generated on the server, the commands are still protected against replay attacks. However, express tokens are less secure, as they omit the hashing protection against command modification and they cannot detect device modifications that occurred after the initial call to the Play Integrity API.
Codelab server architecture
For this codelab, you can instantiate a server by using the included sample server program written in Kotlin using the Ktor framework. The project includes configuration files to deploy it to Google Cloud App Engine. The instructions in this codelab cover building and deploying to App Engine. If you use a different cloud provider, Ktor has deployment instructions for multiple cloud services. You can modify the project accordingly and deploy to your preferred service. Deploying to your own local server instance is an additional option.
Using the sample code for your server is not required. If you have a preferred web application framework, you can implement the /getRandom and /performCommand endpoints in your own framework using the codelab sample server as a guide.
Client design
All three client versions, C++, Kotlin and Unity engine, present a similar user interface.
The Request random button calls the /getRandom endpoint on the server. The result is displayed in a text field. This can be used to verify server connection and function before you add the Play Integrity integration.
The Call server with integrity check button does nothing at the start of the codelab. You will follow steps to add code for the following operations:
- Call
/getRandomto get a random number - Generate a nonce
- Create a Play Integrity request using the nonce
- Call
/performCommandusing the token generated by the Play Integrity request - Display the results of the
/performCommand
The results of the command are displayed in a text field. For a successful command, this is a summary of the device verdict information returned by the Play Integrity check.
The Call server with express token button appears after a successful Call server with integrity check operation. It calls /performCommand using the express token from the previous /performCommand. A text field is used to display the success or failure of the command. The value of a returned express token is displayed in the text field used for random numbers.
Play Integrity API functions that report errors do so by returning an error code. For more details about these error codes, see the Play Integrity documentation. Some errors may be caused by environmental conditions, such as an unstable Internet connection or an overloaded device. For such errors, consider including a retry option with exponential backoff. In this codelab, Play Integrity errors are printed into Logcat.
4. Setting up Google Cloud App Engine
To use Google Cloud, perform the following steps:
- Register in Google Cloud Platform. Use the same Google account that is registered to the Play Console.
- Create a billing account.
- Install and initialize the Google Cloud SDK.
Use the newly installed Google Cloud CLI to run the following commands:
- Install the App Engine extension for Java:
gcloud components install app-engine-java - Create a new Cloud project, replacing
$yournamein the following command with some unique identifier:gcloud projects create $yourprojectname --set-as-default - Create an App Engine application in the Cloud project:
gcloud app create
5. Deploy the server
Set the application package name
In this step you will add the application package name to the server code. In a text editor, open the ValidateCommand.kt source file. It is located in the following directory:
add-play-integrity-codelab/server/src/main/kotlin/com/google/play/integrity/codelab/server/util
Find the following line and replace the placeholder text with a unique package identifier, and then save the file:
const val APPLICATION_PACKAGE_IDENTIFIER = "com.your.app.package"
You will later set this identifier in your client project before uploading the app to the Play Console.
Build the server and deploy to App Engine
Use the Google Cloud CLI to run the following command from the add-play-integrity/server directory to build and deploy the server:
On Linux or macOS:
./gradlew appengineDeploy
On Microsoft Windows:
gradlew.bat appengineDeploy
Make a note of the Deployed service location in the output from a successful deployment. You will need this URL to configure the client to talk to the server.
Verify deployment
You can use the Google Cloud CLI to run the following command to verify the server is working correctly:
gcloud app browse
This command will open a web browser and open the root URL. The sample server should display a Hello World! message when accessed from the root URL.
6. Configure the app in the Play Console
Configure App Integrity in the Play Console
If you have an existing app entry in the Play Console, you can use it for this codelab. Alternatively, follow the steps to create a new app in the Play Console. After selecting or creating the app in the Play Console, you need to configure App Integrity. From the left-hand menu of the Play Console, go to App integrity in the Release section.
Create and link the Google Cloud project
Click the Link Cloud project button. Select the Google Cloud project you used with the server and click the Link project button.
Google Cloud access for your server
Your backend server must decrypt the integrity token generated on the client by the Play Integrity API. Play Integrity offers two choices for key management: Keys generated and managed by Google or developer-provided keys. This codelab uses the recommended default behavior of Google-managed keys.
With Google-managed keys, your backend server passes the encrypted integrity token to the Google Play servers for decryption. The codelab server uses the Google API Client Library to perform the communication with the Google Play servers.
Now that the server is up and running, and you have configured the app in the Play Console, you can begin customizing the client or clients corresponding to your chosen platforms. All the steps for a given platform are grouped together, so you can skip over the instructions for platforms you aren't using.
7. Build and run the client (C++)
Run Android Studio. From the Welcome to Android Studio window, click the Open button and open the Android Studio project located at add-play-integrity-codelab/cpp/start.
Update the application ID
Before uploading a build to Google Play, you need to change the application ID from the default to something unique. Perform the following steps:
- From the Project pane in Android Studio, find the
build.gradlefile understart/appand open it. - Find the
applicationIdstatement. - Change
com.google.play.integrity.codelab.cppto the package name you chose when deploying the server, and then save the file. - At the top of the file, a banner will appear informing you that the Gradle files have changed. Click Sync Now to reload and resync the file.
- From the Project pane in Android Studio, open the
AndroidManifest.xmlfile understart/app/src/main. - Find the
package="com.example.google.codelab.playintegritycpp"statement. - Replace
com.example.google.codelab.playintegritycppwith your unique package name, and then save the file. - From the Project pane in Android Studio, open the
PlayIntegrityCodelabActivityfile understart/app/src/main/java/com.example.google.codelab.playintegritycpp. - Find the
package com.example.google.codelab.playintegritycppstatement. - Replace
com.example.google.codelab.playintegritycppwith your unique package name. - Right-click on the new package name, and choose Show Context Actions.
- Choose Move to (your new package name).
- If present, choose the Sync Now button at the top of the file.
Update the server URLs
The project needs to be updated to point to the URL locations where you deployed the server.
- From the Project pane in Android Studio, open the
server_urls.hppfile understart/app/src/main/cpp. - Add the root URL displayed when you deployed the server to the
GET_RANDOM_URLandPERFORM_COMMAND_URLdefinitions, and then save the file.
The result should resemble:
constexpr char GET_RANDOM_URL[] = "https://your-play-integrity-server.uc.r.appspot.com/getRandom";
constexpr char PERFORM_COMMAND_URL[] = "https://your-play-integrity-server.uc.r.appspot.com/performCommand";
The specific URL will vary depending on your project name and the Google Cloud region you used to deploy your server.
Build and run
Connect an Android device configured for development. In Android Studio, build the project and run it on the connected device. The app should appear as follows:
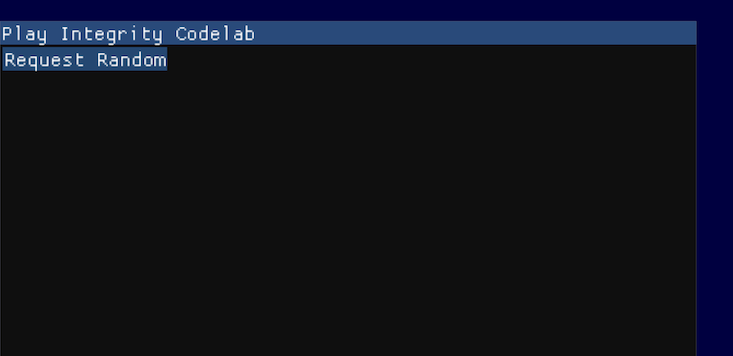
Touch the Request Random button to execute code that makes an HTTP request to your server to request a random number. After a brief delay, you should see the random number on screen:
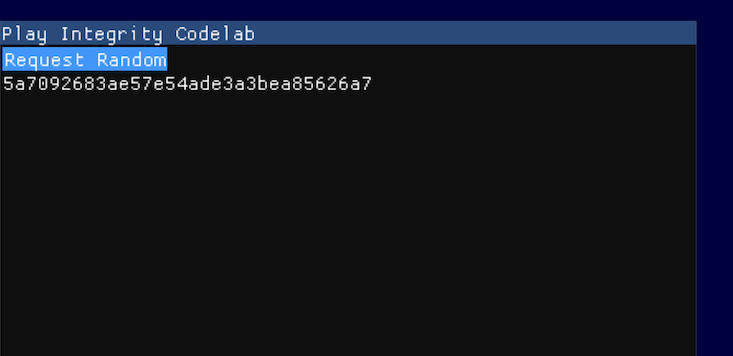
If an error message is displayed, the Logcat pane output might contain more details.
After verifying you are communicating with the server by successfully retrieving a random value, you are ready to begin integrating the Play Integrity API.
8. Add Play Integrity to the project (C++)
Download the SDK
You will need to download and extract the Play Core SDK. Perform the following steps:
- Download the Play Core SDK packaged in a .zip file from the Play Core Native SDK page.
- Extract the zip file.
- Ensure the newly extracted directory is named
play-core-native-sdkand copy or move it into theadd-play-integrity-codelab/cpp/startdirectory.
Update build.gradle
In Android Studio, from the Project pane, open the module-level build.gradle file in the start/app directory.
Add the following line below the apply plugin: 'com.android.application' line:
def playcoreDir = file("../play-core-native-sdk")
Locate the externalNativeBuild block in the defaultConfig block and change the arguments statement inside the cmake block to match the following:
                arguments "-DANDROID_STL=c++_shared",
                          "-DPLAYCORE_LOCATION=$playcoreDir"
Add the following inside the android block at the end:
    buildTypes {
        release {
            proguardFiles getDefaultProguardFile("proguard-android.txt"),
                          "proguard-rules.pro",
                          "$playcoreDir/proguard/common.pgcfg",
                          "$playcoreDir/proguard/integrity.pgcfg"
        }
    }
Add this line inside the dependencies block at the end:
implementation files("$playcoreDir/playcore.aar")
Save your changes. At the top of the file, a banner will appear informing you that the Gradle files have changed. Click Sync Now to reload and resync the file.
Update CMakeList.txt
In Android Studio, from the Project pane, open the CMakeLists.txt file in the start/app/src/main/cpp directory.
Add the following lines below the find_package commands:
include("${PLAYCORE_LOCATION}/playcore.cmake")
add_playcore_static_library()
Locate the target_include_directories(game PRIVATE line and add the following line below it:
${PLAYCORE_LOCATION}/include
Locate the target_link_libraries(game line and add the following line below it:
playcore
Save the file. At the top of the file, a banner will appear informing you that external build files have changed. Click Sync Now to reload and resync the file.
Choose Make Project from the Build menu, and verify that the project builds successfully.
9. Make an integrity request (C++)
Your app obtains integrity information by using the Play Integrity API to request a token, which you then send to your server for decryption and verification. You will now add code to the project to initialize the Play Integrity API and use it to make an integrity request.
Add a command button
In a real-world app or game, you might perform an integrity check before specific activities, such as making a store purchase or joining a multiplayer gaming session. In this codelab, we will add a button to our UI to manually trigger an integrity check and call the server, passing the generated Play Integrity token.
The codelab project contains a ClientManager class, defined in the client_manager.cpp and client_manager.hpp source files. For convenience, this file has already been added to the project, but is lacking implementation code which you will now add.
To add the UI button, begin by opening the demo_scene.cpp file from the Android Studio Project pane, in the start/app/src/main/cpp directory. First, locate the empty DemoScene::GenerateCommandIntegrity() function and add the following code:
    const auto commandResult =
            NativeEngine::GetInstance()->GetClientManager()->GetOperationResult();
    if (commandResult != ClientManager::SERVER_OPERATION_PENDING) {
        if (ImGui::Button("Call server with integrity check")) {
            DoCommandIntegrity();
        }
    }
Next, locate the empty DemoScene::DoCommandIntegrity() function. Add the following code.
    ClientManager *clientManager = NativeEngine::GetInstance()->GetClientManager();
    clientManager->StartCommandIntegrity();
    mServerRandom = clientManager->GetCurrentRandomString();
Save the file. You will now update the sample's ClientManager class to add the actual Play Integrity functionality.
Update the manager header file
Open the client_manager.hpp file from the Android Studio Project pane, in the start/app/src/main/cpp directory.
Include the header file for the Play Integrity API by adding the following line below the #include "util.hpp" line:
#include "play/integrity.h"
The ClientManager class will need to hold references to IntegrityTokenRequest and IntegrityTokenResponse objects. Add the following lines to the bottom of the ClientManager class definition:
    IntegrityTokenRequest *mTokenRequest;
    IntegrityTokenResponse *mTokenResponse;
Save the file.
Initialize and shutdown Play Integrity
From the Android Studio Project pane, open the client_manager.cpp file in the start/app/src/main/cpp directory.
Find the ClientManager::ClientManager() constructor. Replace the mInitialized = false; statement with the following code:
    mTokenRequest = nullptr;
    mTokenResponse = nullptr;

    const android_app *app = NativeEngine::GetInstance()->GetAndroidApp();
    const IntegrityErrorCode errorCode = IntegrityManager_init(app->activity->vm,
                                                               app->activity->javaGameActivity);
    if (errorCode == INTEGRITY_NO_ERROR) {
        mInitialized = true;
    } else {
        mInitialized = false;
        ALOGE("Play Integrity initialization failed with error: %d", errorCode);
        ALOGE("Fatal Error: Play Integrity is unavailable and cannot be used.");
    }
Add the following code to the ClientManager::~ClientManager() destructor:
    if (mInitialized) {
        IntegrityManager_destroy();
        mInitialized = false;
    }
Request an integrity token
Requesting an integrity token from the Play Integrity API is an asynchronous operation. You will need to create a token request object, assign a nonce value to it, and make the token request. To do this, add the following code to the empty ClientManager::StartCommandIntegrity() function:
    // Only one request can be in-flight at a time
    if (mStatus != CLIENT_MANAGER_REQUEST_TOKEN) {
        mResult = SERVER_OPERATION_PENDING;
        // Request a fresh random
        RequestRandom();
        if (mValidRandom) {
            GenerateNonce();
            IntegrityTokenRequest_create(&mTokenRequest);
            IntegrityTokenRequest_setNonce(mTokenRequest, mCurrentNonce.c_str());

            const IntegrityErrorCode errorCode =
                    IntegrityManager_requestIntegrityToken(mTokenRequest, &mTokenResponse);
            if (errorCode != INTEGRITY_NO_ERROR) {
                // Log the error, in a real application, for potentially
                // transient errors such as network connectivity, you should
                // add retry with an exponential backoff
                ALOGE("Play Integrity returned error: %d", errorCode);
                CleanupRequest();
                mStatus = CLIENT_MANAGER_IDLE;
            } else {
                mStatus = CLIENT_MANAGER_REQUEST_TOKEN;
            }
        }
    }
Since the token request operates asynchronously, you will need to check for its completion. The ClientManager class has an Update() function, which is called as part of the app update loop. Add the following code to the ClientManager::Update() function to check the status of the token request, and process the result once it completes:
    if (mStatus == CLIENT_MANAGER_REQUEST_TOKEN) {
        IntegrityResponseStatus responseStatus = INTEGRITY_RESPONSE_UNKNOWN;
        const IntegrityErrorCode errorCode =
                IntegrityTokenResponse_getStatus(mTokenResponse, &responseStatus);
        if (errorCode != INTEGRITY_NO_ERROR) {
            // Log the error, in a real application, for potentially
            // transient errors such as network connectivity, you should
            // add retry with an exponential backoff
            ALOGE("Play Integrity returned error: %d", errorCode);
            CleanupRequest();
            mStatus = CLIENT_MANAGER_IDLE;
        } else if (responseStatus == INTEGRITY_RESPONSE_COMPLETED) {
            std::string tokenString = IntegrityTokenResponse_getToken(mTokenResponse);
            SendCommandToServer(tokenString);
            CleanupRequest();
            mStatus = CLIENT_MANAGER_RESPONSE_AVAILABLE;
        }
    }
Cleanup the request objects
You need to tell the Play Integrity API when you are done with token request and response objects, so it can destroy them and reclaim their resources. Add the following code to the ClientManager::CleanupRequest() function:
    if (mTokenResponse != nullptr) {
        IntegrityTokenResponse_destroy(mTokenResponse);
        mTokenResponse = nullptr;
    }
    if (mTokenRequest != nullptr) {
        IntegrityTokenRequest_destroy(mTokenRequest);
        mTokenRequest = nullptr;
    }
Choose Make Project from the Build menu and verify that the project builds successfully.
10. Send the token to the server (C++)
You will now add code to send a command to your server that includes the integrity token. You'll also add code to process the result.
Add the following code to the ClientManager::SendCommandToServer() function:
// Note that for simplicity, we are doing HTTP operations as
// synchronous blocking instead of managing them from a
// separate network thread
HTTPClient client;
std::string errorString;

// Manually construct the json payload for ServerCommand
std::string payloadString = COMMAND_JSON_PREFIX;
payloadString += TEST_COMMAND;
payloadString += COMMAND_JSON_TOKEN;
payloadString += token;
payloadString += COMMAND_JSON_SUFFIX;

auto result = client.Post(PERFORM_COMMAND_URL, payloadString, &errorString);
if (!result) {
   ALOGE("SendCommandToServer Curl reported error: %s", errorString.c_str());
   mResult = SERVER_OPERATION_NETWORK_ERROR;
} else {
   ALOGI("SendCommandToServer result: %s", (*result).c_str())
   // Preset to success, ParseResult will set a failure result if the parsing
   // errors.
   mResult = SERVER_OPERATION_SUCCESS;
   ParseResult(*result);
}
Add the following code to the ClientManager::ParseResult() function:
    bool validJson = false;
    JsonLookup jsonLookup;
    if (jsonLookup.ParseJson(resultJson)) {
        // Look for all of our needed fields in the returned json
        auto commandSuccess = jsonLookup.GetBoolValueForKey(COMMANDSUCCESS_KEY);
        if (commandSuccess) {
            auto diagnosticString = jsonLookup.GetStringValueForKey(DIAGNOSTICMESSAGE_KEY);
            if (diagnosticString) {
                auto expressString = jsonLookup.GetStringValueForKey(EXPRESSTOKEN_KEY);
                if (expressString) {
                    if (*commandSuccess) {
                        // Express token only valid if the server reports the command succeeded
                        mValidExpressToken = true;
                    } else {
                        mValidExpressToken = false;
                        mResult = SERVER_OPERATION_REJECTED_VERDICT;
                    }
                    mCurrentSummary = *diagnosticString;
                    mCurrentExpressToken = *expressString;
                    validJson = true;
                }
            }
        }
    }
    if (!validJson) {
        mResult = SERVER_OPERATION_INVALID_RESULT;
    }
You will now generate a signed app bundle and upload it to the Play Console to test the app.
11. Build and upload (C++)
Create and setup a keystore for the app
Android requires that all apps are digitally signed with a certificate before they are installed or updated on a device.
We'll create a Keystore for the app in this codelab. If you're publishing an update to an existing game, reuse the same Keystore as you did for releasing previous versions of the app.
Create a keystore and build a release App Bundle
Follow the steps at Keystore with Android Studio to create a keystore, and then use it to generate a signed release build of the game. In Android Studio, choose Generate Signed Bundle / APK from the Build menu to start the build process. Choose the App Bundle option when prompted to select an Android App Bundle or APK. At the end of the process, you will have an .aab file that is suitable for uploading to the Google Play Console.
Upload to the Play Console
After creating an App Bundle file, upload it to the Play Console. Using the internal test track is recommended to facilitate quickly accessing your build.
Run the test build
You should now download and run the test build from the Play Store. For the moment, there is a placeholder success code in the function that will send the integrity token to your server, so starting an integrity check should succeed and result in the following display:
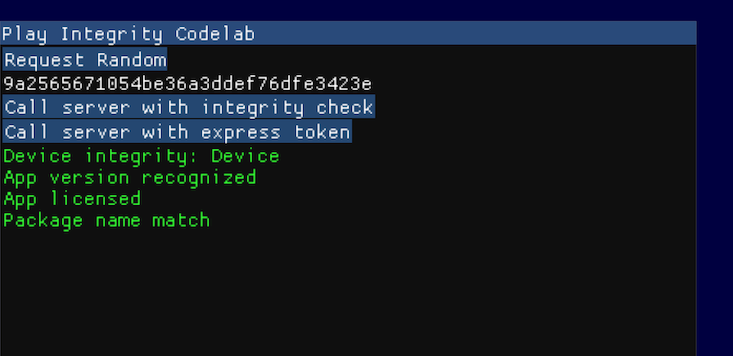
Congratulations, you have integrated Play Integrity into a C++ application! Continue to any other client examples, or skip to the end of this codelab.
12. Build and run the client (Unity)
The codelab Unity project was created using Unity 2020 LTS (2020.3.31f1), but should be compatible with higher versions of Unity. The Play Integrity plugin for Unity is compatible with Unity 2018 LTS and higher.
Project setup
Perform the following steps:
- From the Unity Hub or Unity Editor, open the Unity project located in
add-play-integrity-codelab/unity/start. - Once the project loads, select Build Settings... from the Unity File menu.
- In the Build Settings window, change the platform to Android.
- In the Build Settings window, click the Player Settings... button.
- In the Project Settings window, with the Player category selected, find the Settings for Android section. Expand the Other Settings list.
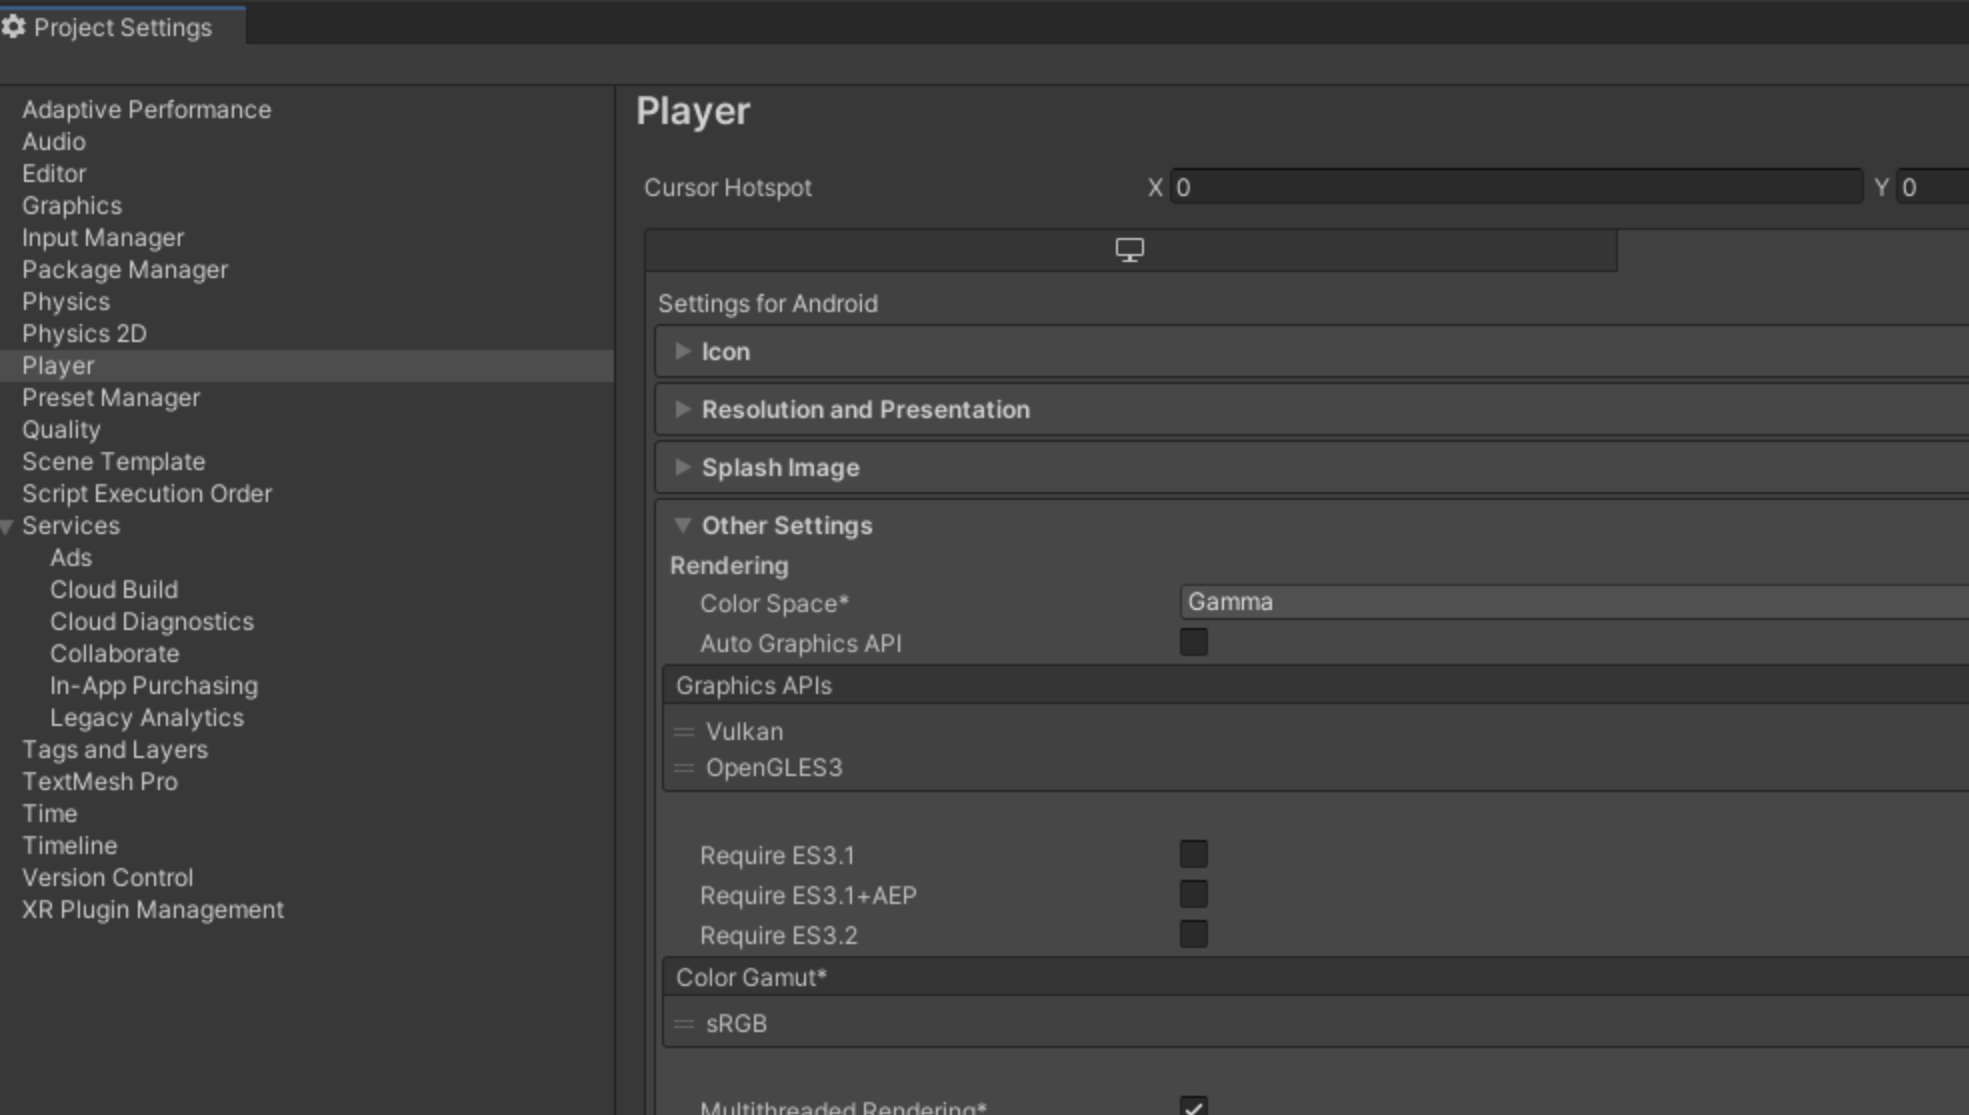
- Find the Package Name entry under Identification.

- Change the package name to the identifier you chose when deploying the server.
- Close the Project Settings window.
- Select Save Project from the Unity File menu.
Update server URLs
The project needs to be updated to point to the URL locations where you deployed the server. To do this, perform the following steps:
- Open the
PlayIntegrityController.csfile from theScriptsfolder in an IDE or text editor. - Change the values of the
URL_GETRANDOMandURL_PERFORMCOMMANDvariables to point to your server. - Save the file.
The result should resemble:
    private readonly string URL_GETRANDOM = "https://your-play-integrity-server.uc.r.appspot.com/getRandom";
    private readonly string URL_PERFORMCOMMAND = "https://your-play-integrity-server.uc.r.appspot.com/performCommand";
The specific URL will vary depending on your project name and the Google Cloud region you used to deploy your server.
Test server functionality
You can test the server functionality by running the project in the Unity editor. Perform the following steps:
- Open the
SampleScenescene file located in theScenesfolder. - Click the Play button in the editor.
- Click the Request Random button in the Game display.
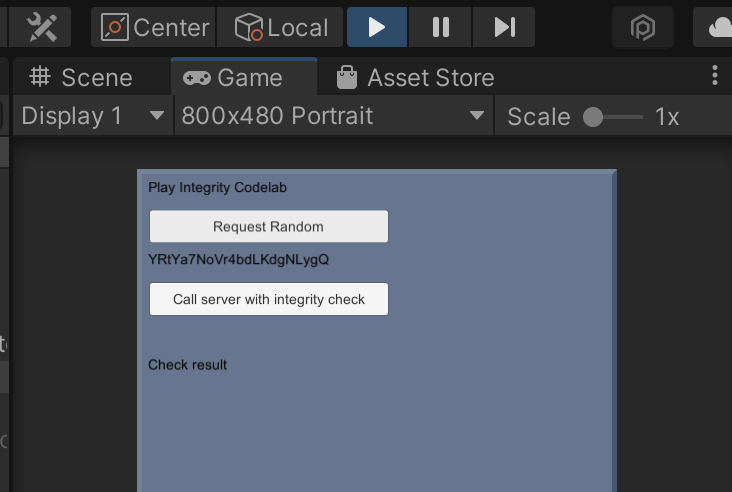
After a brief delay, the random value should be displayed on screen, resembling the following:
13. Add the Play Integrity plugin to the project (Unity)
Download the plugin
In a web browser, open the releases page for the Play Unity Plugins GitHub repository. Use the most recent release of the plugins. Download the com.google.play.integrity-<version>.unitypackage file for Play Integrity in the Assets list.
Install the plugin
From the Unity editor menu bar, select Assets -> Import Package -> Custom Package... and open the .unitypackage file you downloaded. Click the Import button after the Import Unity Package window appears.
The plugin includes the External Dependency Manager for Unity (EDM4U). EDM4U implements automatic dependency resolution for the Java components required to use Play Integrity. When you are prompted to enable auto dependency resolution, click the Enable button.
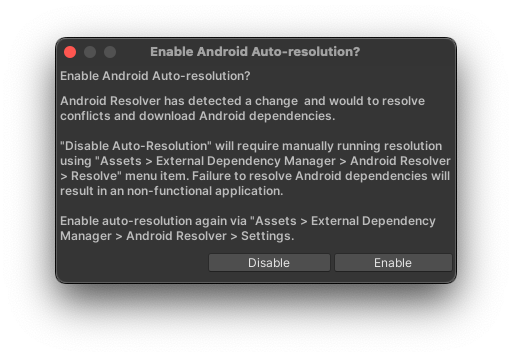
You are highly recommended to use auto-resolution. Dependency problems can result in your project failing to build or run.
14. Make an integrity request (Unity)
Create an integrity request
To create an integrity request, perform the following steps.
- Open the
PlayIntegrityController.csfile from theScriptsfolder in an IDE or text editor. - Add the following line to the block of
usingstatements at the top of the file:
using Google.Play.Integrity;
- Locate the
RunIntegrityCommand()function and replace theyield return null;statement with the following code:
        // Call our server to retrieve a random number.
        yield return GetRandomRequest();
        if (!string.IsNullOrEmpty(_randomString))
        {
            // Create an instance of an integrity manager.
            var integrityManager = new IntegrityManager();

            // Request the integrity token by providing a nonce.
            var tokenRequest = new IntegrityTokenRequest(GenerateNonceString(_randomString,
                TEST_COMMAND));
            var requestIntegrityTokenOperation =
                integrityManager.RequestIntegrityToken(tokenRequest);

            // Wait for PlayAsyncOperation to complete.
            yield return requestIntegrityTokenOperation;

            // Check the resulting error code.
            if (requestIntegrityTokenOperation.Error != IntegrityErrorCode.NoError)
            {
                // Log the error, in a real application, for potentially
                // transient errors such as network connectivity, you should
                // add retry with an exponential backoff
                Debug.Log($@"IntegrityAsyncOperation failed with error:
                    {requestIntegrityTokenOperation.Error.ToString()}");
                yield break;
            }

            // Get the response.
            var tokenResponse = requestIntegrityTokenOperation.GetResult();

            // Send the command to our server with a POST request, including the
            // token, which will be decrypted and verified on the server.
            yield return PostServerCommand(tokenResponse.Token);
        }
Send the command to the server
Continue to edit the PlayIntegrityController.cs file by locating the PostServerCommand() function and replacing the yield return null; statement with the following code:
        // Start a HTTP POST request to the performCommand URL, sending it the
        // command and integrity token data provided by Play Integrity.
        var serverCommand = new ServerCommand(TEST_COMMAND, tokenResponse);
        var commandRequest = new UnityWebRequest(URL_PERFORMCOMMAND, "POST");
        string commandJson = JsonUtility.ToJson(serverCommand);
        byte[] jsonBuffer = Encoding.UTF8.GetBytes(commandJson);
        commandRequest.uploadHandler = new UploadHandlerRaw(jsonBuffer);
        commandRequest.downloadHandler = new DownloadHandlerBuffer();
        commandRequest.SetRequestHeader(CONTENT_TYPE, JSON_CONTENT);
        yield return commandRequest.SendWebRequest();

        if (commandRequest.result == UnityWebRequest.Result.Success)
        {
            // Parse the command result Json
            var commandResult = JsonUtility.FromJson<CommandResult>(
                commandRequest.downloadHandler.text);
            if (commandResult != null)
            {
                resultLabel.text = commandResult.diagnosticMessage;
                _expressToken = commandResult.expressToken;
                if (commandResult.commandSuccess)
                {
                    resultLabel.color = Color.green;
                    expressButton.SetActive(true);
                }
                else
                {
                    resultLabel.color = Color.black;
                    expressButton.SetActive(false);
                }
            }
            else
            {
                Debug.Log("Invalid CommandResult json");
            }
        }
        else
        {
            Debug.Log($"Web request error on processToken: {commandRequest.error}");
        }
Save the file.
15. Build and upload (Unity)
Use the Unity editor Android Keystore Manager to configure your build to be signed for uploading to the Play Console.
After configuring signing information, perform the following steps:
- Select Build -> Build Settings... from the Unity File menu.
- Make sure the
SampleSceneis included in the Scenes in Build list. - Make sure the Build App Bundle (Google Play) box is checked.
- Click the Build button and name your export file.
After creating an App Bundle file, upload it to the Play Console. Using the internal test track is recommended to facilitate quickly accessing your build.
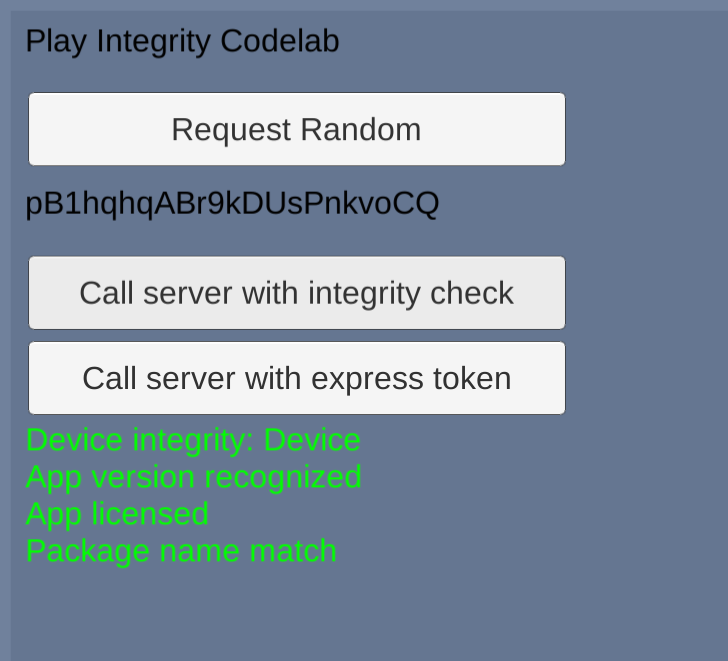
You can now download and install your build to run an integrity check. The results should resemble the following:
Congratulations, you have integrated Play Integrity into a Unity engine project! Continue to any other client examples, or skip to the end of this codelab.
16. Build and run the project (Kotlin)
Run Android Studio. From the Welcome to Android Studio window, click the Open button and open the Android Studio project located at add-play-integrity-codelab/kotlin/start.
Update the application ID
Before uploading a build to Google Play, you need to change the application ID from the default to something unique. Perform the following steps:
- From the Project pane in Android Studio, open the
build.gradlefile for the modulePlayIntegrityCodelab.app. - Find the
applicationIdstatement. - Change
com.example.google.codelab.playintegritykotlinto the identifier you chose when deploying the server and save the file. - At the top of the file, a banner will appear informing you that the Gradle files have changed. Click Sync Now to reload and resync the file.
Update the server URLs
The project needs to be updated to point to the URL location where you deployed the server. To do this, perform the following steps:
- From the Project pane in Android Studio, open the
IntegrityServerfile understart/app/src/main/java/com.example.google.codelab.playintegritykotlin/integrity. - Change the URL from
‘https://your.play-integrity.server.com'to the base URL of your server, and save the file.
The result should resemble:
private val SERVER_URL: String = "https://your-play-integrity-server.uc.r.appspot.com"
The specific URL will vary depending on your project name and the Google Cloud region you used to deploy your server.
Build and run
Connect an Android device configured for development. In Android Studio, build the project and run it on the connected device. The app should appear as follows:
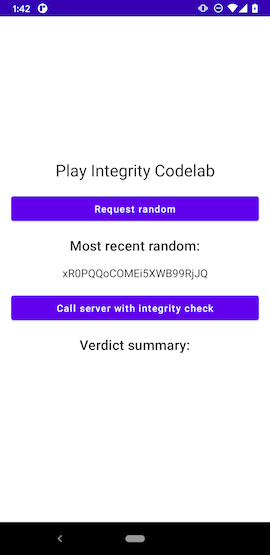
On startup, the app calls the getRandom endpoint on your server and displays the result. If an error occurs, such as an incorrect URL or the server is not functioning, an error dialog will be displayed. You can select the Request Random button to retrieve a new random number from the server. The Call server with integrity check button doesn't do anything yet. You will add that functionality in the following sections.
17. Add Play Integrity to the project (Kotlin)
To add the Play Integrity library and supporting dependencies to the project, perform the following steps:
- From the Project pane in Android Studio, open the
build.gradlefile understart/app. - Find the
dependenciesblock at the bottom of the file. - Add the following lines to the bottom of the
dependenciesblock:
    implementation "com.google.android.play:integrity:1.0.1"
    implementation "org.jetbrains.kotlinx:kotlinx-coroutines-play-services:1.6.1"
- Save the file.
- At the top of the file, a banner will appear informing you that the Gradle files have changed. Click Sync Now to reload and resync the file.
The Kotlin sample uses coroutines. The kotlinx-coroutines-play-services library adds extensions that facilitate working with Play Integrity asynchronous Task objects from inside Kotlin coroutines.
18. Make an integrity request (Kotlin)
From the Project pane in Android Studio, open the IntegrityServer file under start/app/src/main/java/com.example.google.codelab.playintegritykotlin/integrity. At the bottom of the file is an empty integrityCommand function. The UI calls this function when the Call server with integrity check button is pressed.
You will add code to the integrityCommand function to perform the following operations:
- Retrieve a fresh random number from the server to use when constructing a nonce to associate with the integrity check
- Call the Play Integrity API to make an integrity request, and receive an integrity token containing the results
- Send the command and integrity token to your server using an HTTP
POSTrequest - Process and display the results
Add the following code to the empty integrityCommand function:
        // Set our state to working to trigger a switch to the waiting UI
        _serverState.emit(ServerState(
            ServerStatus.SERVER_STATUS_WORKING))
        // Request a fresh random from the server as part
        // of the nonce we will generate for the request
        var integrityRandom = IntegrityRandom("", 0U)
        try {
            val returnedRandom = httpClient.get<IntegrityRandom>(
                SERVER_URL + "/getRandom")
            integrityRandom = returnedRandom
        } catch (t: Throwable) {
            Log.d(TAG, "getRandom exception " + t.message)
            _serverState.emit(ServerState(ServerStatus.SERVER_STATUS_UNREACHABLE,
                IntegrityRandom("", 0U)))
        }

        // If we have a random, we are ready to request an integrity token
        if (!integrityRandom.random.isNullOrEmpty()) {
            val nonceString = GenerateNonce.GenerateNonceString(TEST_COMMAND,
                integrityRandom.random)
            // Create an instance of an IntegrityManager
            val integrityManager = IntegrityManagerFactory.create(context)

            // Use the nonce to configure a request for an integrity token
            try {
                val integrityTokenResponse: Task<IntegrityTokenResponse> =
                    integrityManager.requestIntegrityToken(
                        IntegrityTokenRequest.builder()
                            .setNonce(nonceString)
                            .build()
                    )
                // Wait for the integrity token to be generated
                integrityTokenResponse.await()
                if (integrityTokenResponse.isSuccessful && integrityTokenResponse.result != null) {
                    // Post the received token to our server
                    postCommand(integrityTokenResponse.result!!.token(), integrityRandom)
                } else {
                    Log.d(TAG, "requestIntegrityToken failed: " +
                            integrityTokenResponse.result.toString())
                    _serverState.emit(ServerState(ServerStatus.SERVER_STATUS_FAILED_TO_GET_TOKEN))
                }
            } catch (t: Throwable) {
                Log.d(TAG, "requestIntegrityToken exception " + t.message)
                _serverState.emit(ServerState(ServerStatus.SERVER_STATUS_FAILED_TO_GET_TOKEN))
            }
        }
The code to POST the command to your server has been broken out into a separate postCommand function. Add the following code to the empty postCommand function:
        try {
            val commandResult = httpClient.post<CommandResult>(
                SERVER_URL + "/performCommand") {
                contentType(ContentType.Application.Json)
                body = ServerCommand(TEST_COMMAND, tokenString)
            }
            _serverState.emit(ServerState(ServerStatus.SERVER_STATUS_REACHABLE,
                integrityRandom,
                commandResult.diagnosticMessage,
                commandResult.commandSuccess,
                commandResult.expressToken))
        } catch (t: Throwable) {
            Log.d(TAG, "performCommand exception " + t.message)
            _serverState.emit(ServerState(ServerStatus.SERVER_STATUS_UNREACHABLE))
        }
Resolve any missing imports and save the file.
19. Display the results (Kotlin)
Update the UI with the verdict summary
The UI currently displays placeholder text for the integrity verdict summary. To replace the placeholder with the actual summary, perform the following steps:
- From the Project pane in Android Studio, open the
MainView.ktfile understart/app/src/main/java/com.example.google.codelab.playintegritykotlin/ui/main. - Go to the end of the MainUI function, find the
text = "None",statement, and replace it with this code:
text = state.serverState.serverVerdict,
- Resolve any missing imports and save the file.
20. Build and upload (Kotlin)
Create and setup a keystore for the app
Android requires that all apps are digitally signed with a certificate before they are installed or updated on a device.
We'll create a Keystore for the app in this codelab. If you're publishing an update to an existing game, reuse the same Keystore as you did for releasing previous versions of the app.
Create a keystore and build a release App Bundle
Follow the steps at Keystore with Android Studio to create a keystore, and then use it to generate a signed release build of the game. In Android Studio, choose Generate Signed Bundle / APK from the Build menu to start the build process. Choose the App Bundle option when prompted to select an Android App Bundle or APK. At the end of the process, you will have an .aab file that is suitable for uploading to the Google Play Console.
Upload to the Play Console
After creating an App Bundle file, upload it to the Play Console. Using the internal test track is recommended to facilitate quickly accessing your build.
Run the test build
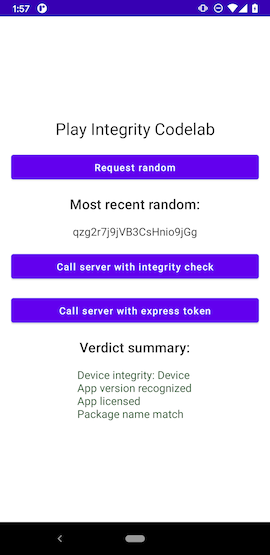
You should now download and run the test build from the Play Store. Selecting the Call server with integrity check button should succeed and result in the following display:
21. Congratulations
Congratulations, you've successfully added Play Integrity to an Android application!
