เลย์เอาต์ของแอป
จัดทุกอย่างให้เป็นระเบียบอยู่เสมอด้วยคอลเล็กชัน
บันทึกและจัดหมวดหมู่เนื้อหาตามค่ากำหนดของคุณ
ลองใช้วิธีเขียน
Jetpack Compose ใน Wear OS เป็นชุดเครื่องมือ UI ที่แนะนำสำหรับ Wear OS
หลังจากทำความเข้าใจวิธีจัดการรูปร่างต่างๆ ของนาฬิกาแล้ว ให้ตัดสินใจว่าต้องการใช้แพลตฟอร์มใด
เลย์เอาต์แอปที่พบได้ทั่วไปมีดังนี้
-
หน้าจอเดียว (ง่ายที่สุด): องค์ประกอบ UI จะแสดงเฉพาะสิ่งที่มองเห็นได้พร้อมกันโดยไม่ต้องเลื่อน
-
คอนเทนเนอร์แนวตั้ง (พบบ่อยที่สุด): เนื้อหาอยู่นอกส่วนที่มองเห็นได้ของหน้าจอและเข้าถึงได้โดยเลื่อน
-
ตัวเลือกอื่นๆ ได้แก่ รายการ การเลื่อนหน้า หรือการปัด 2 มิติ
เราได้อธิบายประเภทเลย์เอาต์เหล่านี้ไว้ในส่วนต่อไปนี้
คุณใช้เลย์เอาต์หลายประเภทผสมผสานกันได้หากต้องการใช้หน้าจอหลายหน้าจอ
หมายเหตุ: สำหรับกิจกรรม ให้รับค่าจาก ComponentActivity
หรือ FragmentActivity
(หากใช้ข้อมูลโค้ด)
กิจกรรมประเภทอื่นๆ ใช้องค์ประกอบ UI สำหรับอุปกรณ์เคลื่อนที่โดยเฉพาะซึ่งคุณไม่จําเป็นต้องใช้ใน Wear OS
หน้าจอเดียว
ผู้ใช้จะเห็นองค์ประกอบทั้งหมดในหน้าจอเดียวโดยไม่ต้องเลื่อน ซึ่งหมายความว่าคุณใส่องค์ประกอบได้เพียงไม่กี่รายการ
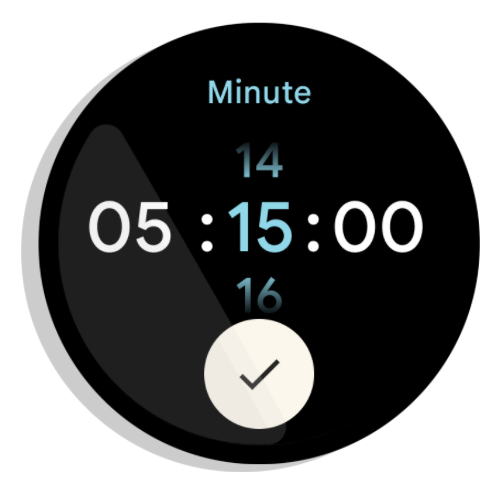
รูปที่ 1 ตัวอย่างเลย์เอาต์หน้าจอเดียว
หน้าจอเดียวเหมาะที่จะใช้ร่วมกับ
BoxInsetLayout
ร่วมกับ
ConstraintLayout
เพื่อจัดเรียงองค์ประกอบ
คอนเทนเนอร์แนวตั้ง
คอนเทนเนอร์แนวตั้งเป็นเลย์เอาต์แอปประเภทที่พบบ่อยที่สุด เนื้อหาบางอย่างอาจไม่แสดงบนหน้าจอ แต่เข้าถึงได้โดยเลื่อน
รูปที่ 2 แสดงเลย์เอาต์แอปที่สมบูรณ์หลายรายการ ซึ่งจะเห็นเนื้อหาเพียงบางส่วนบนหน้าจอทรงกลมของนาฬิกา ในตัวอย่างนี้ เนื้อหาหลักจะอยู่ในส่วนด้านบนของคอนเทนเนอร์ และเส้นทางของผู้ใช้ที่สําคัญ (CUJ) และการตั้งค่าอื่นๆ จะอยู่ที่ด้านล่าง ซึ่งเป็นแนวทางปฏิบัติแนะนำสำหรับการจัดวางเนื้อหา
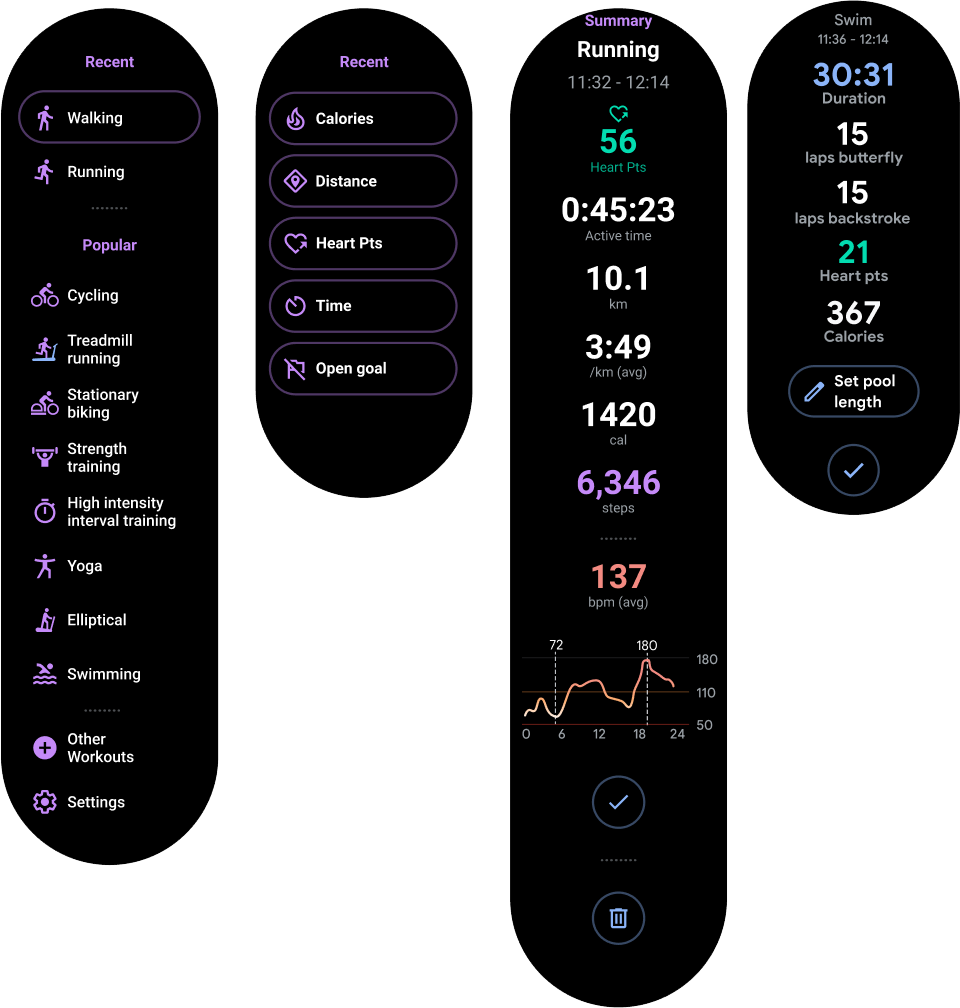
รูปที่ 2 ตัวอย่างเลย์เอาต์คอนเทนเนอร์แนวตั้ง
อย่าใช้ BoxInsetLayout
ซึ่งต่างจากเลย์เอาต์แอปแบบหน้าจอเดียว แต่ให้ใช้ ConstraintLayout
ใน NestedScrollView
แทน
วางวิดเจ็ตที่เหมาะกับแอปของคุณมากที่สุดใน ConstraintLayout
วิธีนี้ช่วยให้คุณใช้ประโยชน์จากพื้นที่ว่างด้านข้างของจอแสดงผลแบบวงกลมได้
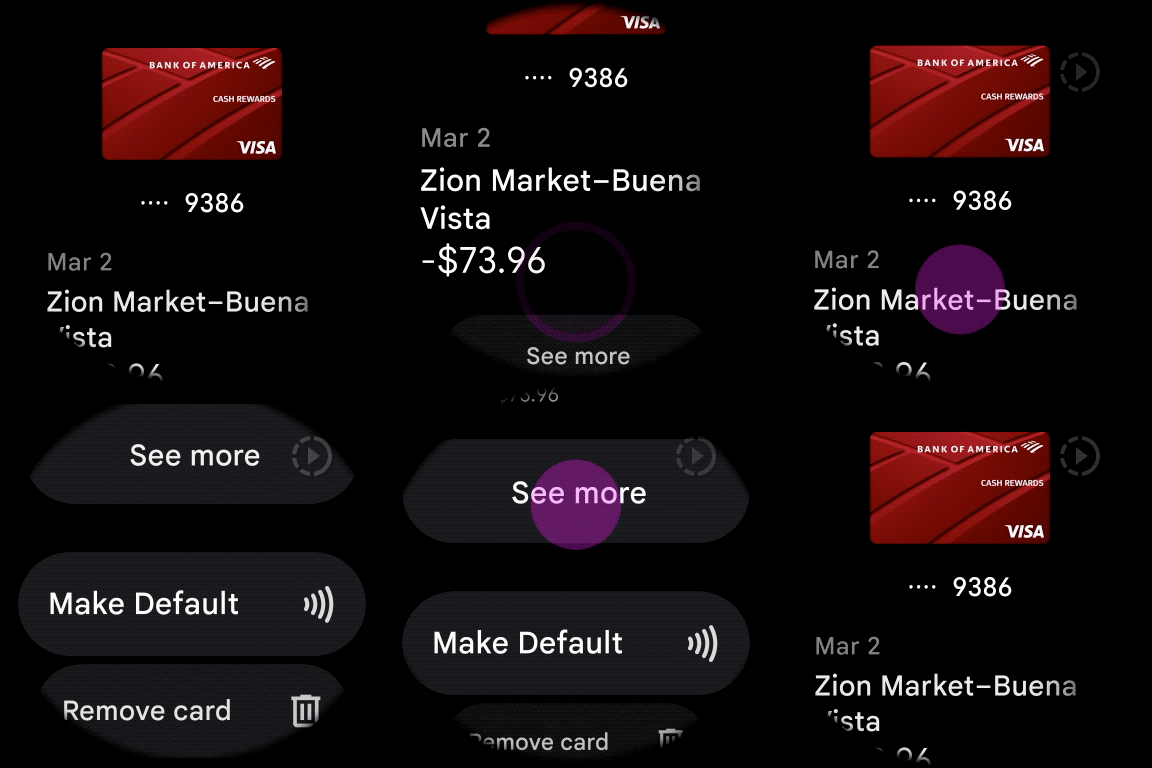
รูปที่ 3 เนื้อหาใน ConstraintLayout
ภายใน NestedScrollView
ตรวจสอบว่าเนื้อหาที่ด้านบนและด้านล่างของคอนเทนเนอร์แนวตั้งมีขนาดเล็กพอที่จะใส่ที่ด้านบนและด้านล่างของจอแสดงผลแบบวงกลมได้ ดังตัวอย่างในรูปที่ 3
หมายเหตุ:
หากเป็นไปได้ ให้เพิ่มตัวบ่งชี้การเลื่อนลงใน NestedScrollView
โดยการตั้งค่า android:scrollbars="vertical"
ใน XML วิธีนี้ช่วยให้ผู้ใช้ทราบว่ามีเนื้อหาเพิ่มเติมให้รับชมและช่วยให้ผู้ใช้ทราบว่ากำลังดูเนื้อหาส่วนใดอยู่
ตัวเลือกอื่นๆ สำหรับเลย์เอาต์แอป
-
รายการ: แสดงชุดข้อมูลขนาดใหญ่ด้วยวิดเจ็ต
WearableRecyclerView
ที่ปรับให้เหมาะกับแพลตฟอร์มอุปกรณ์ที่สวมใส่ได้ ดูข้อมูลเพิ่มเติมได้ที่สร้างรายการใน Wear OS
-
การเลื่อนแนวนอน: สำหรับกรณีการใช้งานที่มีหน้าจอพี่น้องหลายหน้าจอ ให้ใช้การปัดแนวนอน หากใช้การเลื่อนหน้าแนวนอน คุณต้องรองรับการปัดเพื่อปิดที่ขอบด้านซ้าย
-
การเลื่อน 2 มิติ: สำหรับกรณีการใช้งานอย่างแผนที่ ผู้ใช้สามารถลากเพื่อเลื่อนไปยังทิศทางต่างๆ ได้ เปิดใช้การปัดเพื่อปิดหากกิจกรรมของคุณกินพื้นที่ทั้งหน้าจอ
ตัวอย่างเนื้อหาและโค้ดในหน้าเว็บนี้ขึ้นอยู่กับใบอนุญาตที่อธิบายไว้ในใบอนุญาตการใช้เนื้อหา Java และ OpenJDK เป็นเครื่องหมายการค้าหรือเครื่องหมายการค้าจดทะเบียนของ Oracle และ/หรือบริษัทในเครือ
อัปเดตล่าสุด 2025-07-26 UTC
[[["เข้าใจง่าย","easyToUnderstand","thumb-up"],["แก้ปัญหาของฉันได้","solvedMyProblem","thumb-up"],["อื่นๆ","otherUp","thumb-up"]],[["ไม่มีข้อมูลที่ฉันต้องการ","missingTheInformationINeed","thumb-down"],["ซับซ้อนเกินไป/มีหลายขั้นตอนมากเกินไป","tooComplicatedTooManySteps","thumb-down"],["ล้าสมัย","outOfDate","thumb-down"],["ปัญหาเกี่ยวกับการแปล","translationIssue","thumb-down"],["ตัวอย่าง/ปัญหาเกี่ยวกับโค้ด","samplesCodeIssue","thumb-down"],["อื่นๆ","otherDown","thumb-down"]],["อัปเดตล่าสุด 2025-07-26 UTC"],[],[],null,["# App layouts\n\nTry the Compose way \nJetpack Compose on Wear OS is the recommended UI toolkit for Wear OS. \n[Handle different screen sizes using Compose on Wear OS →](/training/wearables/compose/screen-size) \n\n\nAfter you understand how to\n[handle different watch shapes](/training/wearables/apps/layouts),\ndecide which surface you want to use.\n\n\nCommon app layouts include the following:\n\n- Single screen (simplest): UI elements are limited to what is visible at one time without scrolling.\n- Vertical container (most common): content exists beyond the viewable portion of the screen and is accessible by scrolling.\n- Other options: lists, paging, or 2D panning.\n\nThese layout types are described in the sections that follow.\nYou can use a combination of layout types if you need multiple screens.\n\n\n**Note:** For your activity, inherit from either a\n`ComponentActivity` or, if you use fragments, a `FragmentActivity`.\nThe other activity types use mobile-specific UI elements that you don't need for Wear OS.\n\nSingle screen\n-------------\n\n\nThe user sees all elements in a single screen without scrolling. This means you can include only\na small number of elements.\n\n\n**Figure 1.** An example of a single screen layout.\n\n\nSingle screens work well with a\n[BoxInsetLayout](/reference/androidx/wear/widget/BoxInsetLayout)\nin combination with a\n[ConstraintLayout](/reference/androidx/constraintlayout/widget/ConstraintLayout)\nto arrange your elements.\n\nVertical container\n------------------\n\n\nA vertical container is the most common type of app layout. Some content isn't\nvisible on the screen, but it is accessible by scrolling.\n\n\nFigure 2 shows several complete app layouts in which only a portion of the\ncontent can be seen on the circular screen of a watch. In these examples, the main\ncontent is in the top\nportion of the container, and other Critical User Journeys (CUJs) and settings are\nat the bottom. This is a best practice for laying out content.\n\n\n**Figure 2.** Examples of vertical container layouts.\n\nUnlike in a single screen app layout, don't use `BoxInsetLayout`. Instead, use\na `ConstraintLayout` inside a\n[NestedScrollView](/reference/androidx/core/widget/NestedScrollView).\nInside the `ConstraintLayout`, place whatever widgets make the most sense for\nyour app. This lets you take advantage of the extra space on the sides of a circular display.\n\n\n**Figure 3.** Content in a `ConstraintLayout` inside a\n`NestedScrollView`.\n\n\nMake sure the content at the top and bottom of your vertical container is small enough to fit in\nthe top and bottom of a circular display, as in the example in figure 3.\n\n**Note:**\nWhen possible, add a scroll indicator to your `NestedScrollView` by setting\n`android:scrollbars=\"vertical\"` in the XML. This helps users identify that there is\nmore content available and helps them see where they are in relation to all the content.\n\nOther options for app layouts\n-----------------------------\n\n- **Lists** : display large sets of data with the `WearableRecyclerView` widget optimized for Wearable surfaces. For more information, see [Create lists on Wear OS](/training/wearables/apps/lists).\n- **Horizontal paging** : for use cases with multiple sibling screens, use a [horizontal swipe](/guide/navigation/navigation-swipe-view-2). If you use horizontal paging, you must support swipe-to-dismiss for the left edge.\n- **2D Panning** : for use cases like maps, users can [drag to pan](/training/gestures/scale#pan) in different directions. Enable [swipe-to-dismiss](/training/wearables/apps/exit#swipe-to-dismiss) if your activity takes up the entire screen."]]