طرح بندی برنامه ها
با مجموعهها، منظم بمانید
ذخیره و طبقهبندی محتوا براساس اولویتهای شما.
روش Compose را امتحان کنید
Jetpack Compose on Wear OS جعبه ابزار UI توصیه شده برای Wear OS است.
بعد از اینکه نحوه برخورد با اشکال مختلف ساعت را فهمیدید، تصمیم بگیرید که از کدام سطح استفاده کنید.
طرح بندی برنامه های رایج شامل موارد زیر است:
- تک صفحه (ساده ترین): عناصر رابط کاربری محدود به مواردی هستند که در یک زمان بدون پیمایش قابل مشاهده است.
- ظرف عمودی (متداول ترین): محتوا فراتر از قسمت قابل مشاهده صفحه وجود دارد و با پیمایش قابل دسترسی است.
- گزینههای دیگر: فهرستها، صفحهبندی، یا حرکت دوبعدی.
این انواع چیدمان در بخش های بعدی توضیح داده شده است. در صورت نیاز به چند صفحه نمایش می توانید از ترکیبی از انواع طرح بندی استفاده کنید.
توجه: برای فعالیت خود، از یک ComponentActivity
یا اگر از Fragment استفاده می کنید، از یک FragmentActivity
ارث ببرید. سایر انواع فعالیتها از عناصر رابط کاربری مخصوص موبایل استفاده میکنند که برای Wear OS به آنها نیاز ندارید.
تک صفحه نمایش
کاربر تمام عناصر را در یک صفحه بدون پیمایش می بیند. این به این معنی است که شما می توانید فقط تعداد کمی از عناصر را وارد کنید.
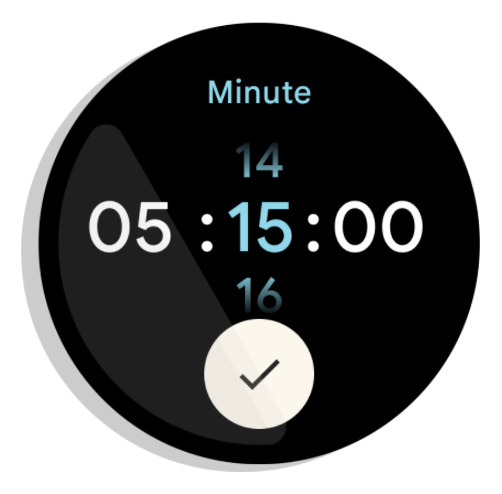
شکل 1. نمونه ای از طرح بندی تک صفحه.
صفحههای منفرد با BoxInsetLayout
در ترکیب با ConstraintLayout
به خوبی کار میکنند تا عناصر شما را مرتب کنند.
ظرف عمودی
ظرف عمودی رایج ترین نوع طرح بندی برنامه است. برخی از محتواها روی صفحه نمایش قابل مشاهده نیستند، اما با پیمایش قابل دسترسی هستند.
شکل 2 چندین طرح بندی کامل اپلیکیشن را نشان می دهد که در آن تنها بخشی از محتوا را می توان در صفحه دایره ای ساعت مشاهده کرد. در این مثالها، محتوای اصلی در قسمت بالای کانتینر است و سایر سفرهای کاربر حیاتی (CUJ) و تنظیمات در پایین هستند. این بهترین روش برای چیدمان محتوا است.
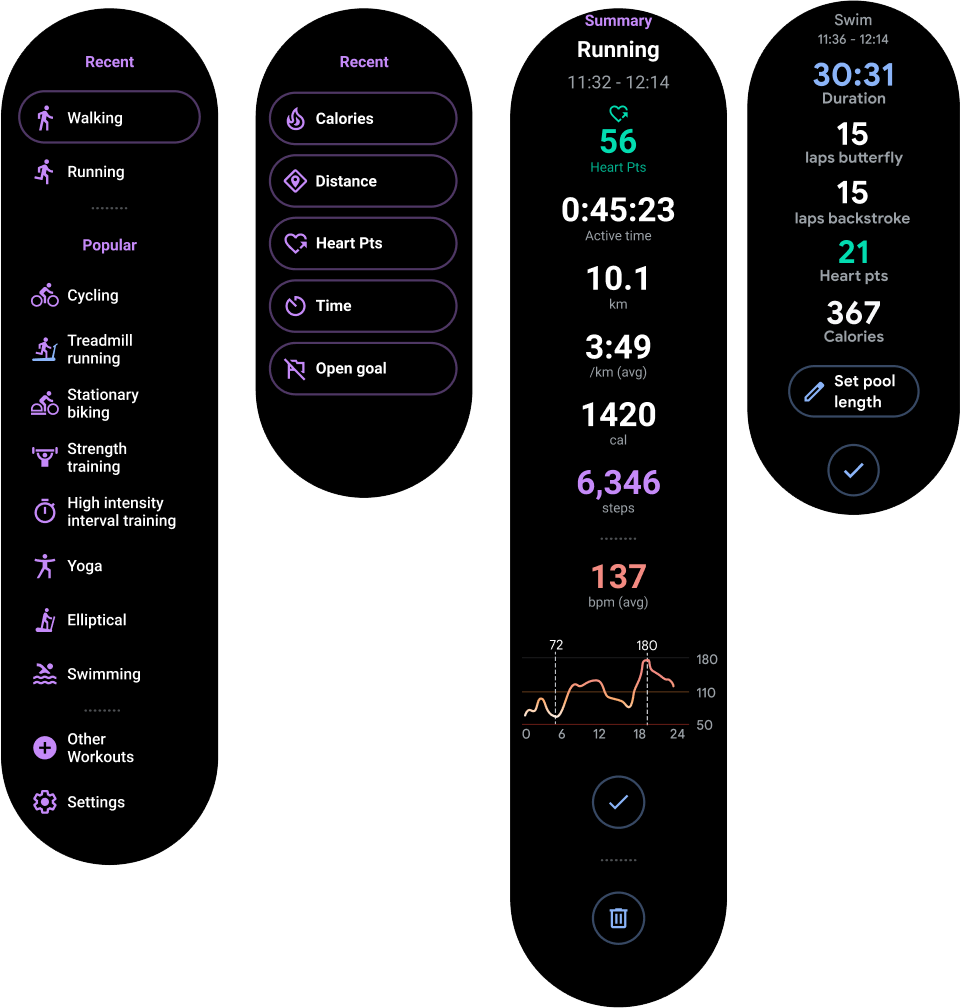
شکل 2. نمونه هایی از طرح بندی ظروف عمودی.
برخلاف طرحبندی برنامههای تک صفحه، از BoxInsetLayout
استفاده نکنید. در عوض، از یک ConstraintLayout
در داخل NestedScrollView
استفاده کنید. در داخل ConstraintLayout
، ویجتهایی را قرار دهید که بیشترین حس را برای برنامه شما دارند. این به شما امکان می دهد از فضای اضافی در کناره های یک صفحه نمایش دایره ای استفاده کنید.
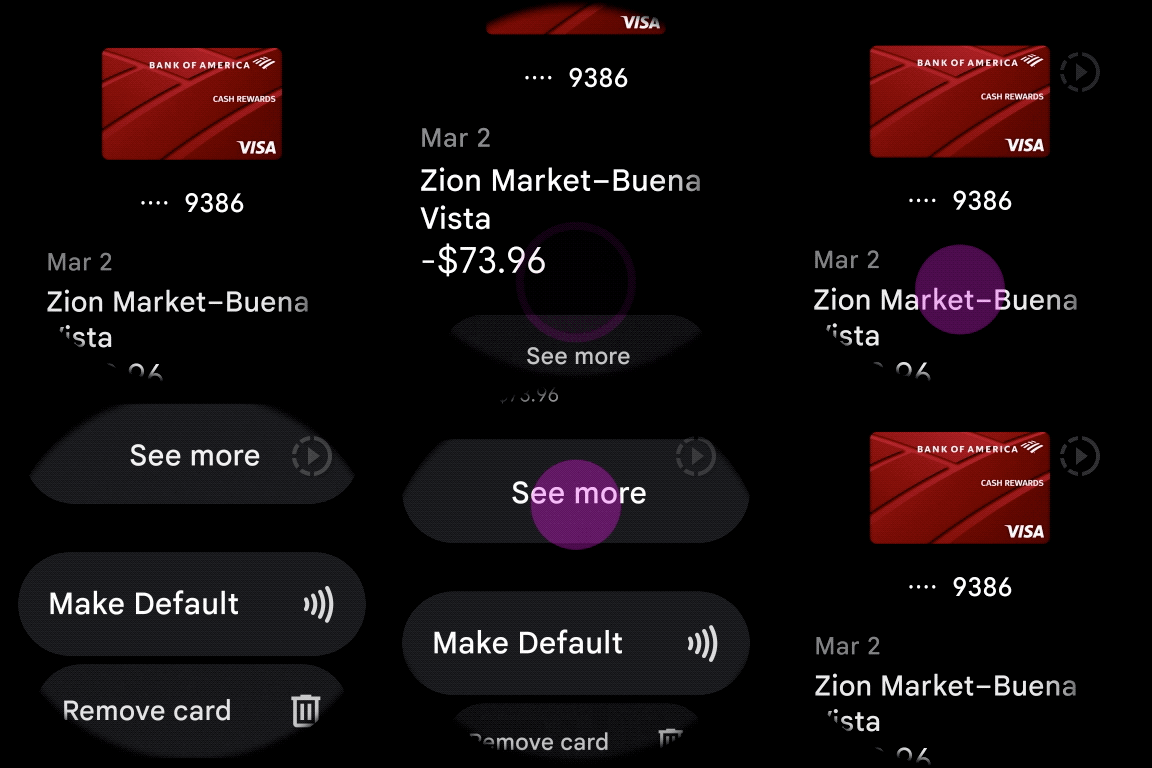
شکل 3. محتوا در یک ConstraintLayout
در داخل NestedScrollView
.
اطمینان حاصل کنید که محتوای بالا و پایین ظرف عمودی شما به اندازه کافی کوچک است که در بالا و پایین یک نمایشگر دایره ای قرار گیرد، مانند مثال در شکل 3.
توجه: در صورت امکان، با تنظیم android:scrollbars="vertical"
در XML، یک نشانگر اسکرول به NestedScrollView
خود اضافه کنید. این به کاربران کمک میکند بفهمند که محتوای بیشتری در دسترس است و به آنها کمک میکند ببینند در رابطه با همه محتوا کجا هستند.
گزینه های دیگر برای طرح بندی برنامه ها
- فهرستها : مجموعههای بزرگی از دادهها را با ویجت
WearableRecyclerView
بهینهسازی شده برای سطوح پوشیدنی نمایش میدهد. برای اطلاعات بیشتر، به ایجاد لیست در Wear OS مراجعه کنید. - صفحهبندی افقی : برای موارد استفاده با صفحهنمایش خواهر و برادر متعدد، از کش رفتن افقی استفاده کنید. اگر از صفحهبندی افقی استفاده میکنید، باید از Swipe to Dimiss برای لبه چپ پشتیبانی کنید.
- پاننگ دو بعدی : برای موارد استفاده مانند نقشه ها، کاربران می توانند برای حرکت در جهات مختلف بکشند . اگر فعالیت شما کل صفحه را اشغال می کند ، تند کشیدن برای رد کردن را فعال کنید.
محتوا و نمونه کدها در این صفحه مشمول پروانههای توصیفشده در پروانه محتوا هستند. جاوا و OpenJDK علامتهای تجاری یا علامتهای تجاری ثبتشده Oracle و/یا وابستههای آن هستند.
تاریخ آخرین بهروزرسانی 2025-07-29 بهوقت ساعت هماهنگ جهانی.
[[["درک آسان","easyToUnderstand","thumb-up"],["مشکلم را برطرف کرد","solvedMyProblem","thumb-up"],["غیره","otherUp","thumb-up"]],[["اطلاعاتی که نیاز دارم وجود ندارد","missingTheInformationINeed","thumb-down"],["بیشازحد پیچیده/ مراحل بسیار زیاد","tooComplicatedTooManySteps","thumb-down"],["قدیمی","outOfDate","thumb-down"],["مشکل ترجمه","translationIssue","thumb-down"],["مشکل کد / نمونهها","samplesCodeIssue","thumb-down"],["غیره","otherDown","thumb-down"]],["تاریخ آخرین بهروزرسانی 2025-07-29 بهوقت ساعت هماهنگ جهانی."],[],[],null,["# App layouts\n\nTry the Compose way \nJetpack Compose on Wear OS is the recommended UI toolkit for Wear OS. \n[Handle different screen sizes using Compose on Wear OS →](/training/wearables/compose/screen-size) \n\n\nAfter you understand how to\n[handle different watch shapes](/training/wearables/apps/layouts),\ndecide which surface you want to use.\n\n\nCommon app layouts include the following:\n\n- Single screen (simplest): UI elements are limited to what is visible at one time without scrolling.\n- Vertical container (most common): content exists beyond the viewable portion of the screen and is accessible by scrolling.\n- Other options: lists, paging, or 2D panning.\n\nThese layout types are described in the sections that follow.\nYou can use a combination of layout types if you need multiple screens.\n\n\n**Note:** For your activity, inherit from either a\n`ComponentActivity` or, if you use fragments, a `FragmentActivity`.\nThe other activity types use mobile-specific UI elements that you don't need for Wear OS.\n\nSingle screen\n-------------\n\n\nThe user sees all elements in a single screen without scrolling. This means you can include only\na small number of elements.\n\n\n**Figure 1.** An example of a single screen layout.\n\n\nSingle screens work well with a\n[BoxInsetLayout](/reference/androidx/wear/widget/BoxInsetLayout)\nin combination with a\n[ConstraintLayout](/reference/androidx/constraintlayout/widget/ConstraintLayout)\nto arrange your elements.\n\nVertical container\n------------------\n\n\nA vertical container is the most common type of app layout. Some content isn't\nvisible on the screen, but it is accessible by scrolling.\n\n\nFigure 2 shows several complete app layouts in which only a portion of the\ncontent can be seen on the circular screen of a watch. In these examples, the main\ncontent is in the top\nportion of the container, and other Critical User Journeys (CUJs) and settings are\nat the bottom. This is a best practice for laying out content.\n\n\n**Figure 2.** Examples of vertical container layouts.\n\nUnlike in a single screen app layout, don't use `BoxInsetLayout`. Instead, use\na `ConstraintLayout` inside a\n[NestedScrollView](/reference/androidx/core/widget/NestedScrollView).\nInside the `ConstraintLayout`, place whatever widgets make the most sense for\nyour app. This lets you take advantage of the extra space on the sides of a circular display.\n\n\n**Figure 3.** Content in a `ConstraintLayout` inside a\n`NestedScrollView`.\n\n\nMake sure the content at the top and bottom of your vertical container is small enough to fit in\nthe top and bottom of a circular display, as in the example in figure 3.\n\n**Note:**\nWhen possible, add a scroll indicator to your `NestedScrollView` by setting\n`android:scrollbars=\"vertical\"` in the XML. This helps users identify that there is\nmore content available and helps them see where they are in relation to all the content.\n\nOther options for app layouts\n-----------------------------\n\n- **Lists** : display large sets of data with the `WearableRecyclerView` widget optimized for Wearable surfaces. For more information, see [Create lists on Wear OS](/training/wearables/apps/lists).\n- **Horizontal paging** : for use cases with multiple sibling screens, use a [horizontal swipe](/guide/navigation/navigation-swipe-view-2). If you use horizontal paging, you must support swipe-to-dismiss for the left edge.\n- **2D Panning** : for use cases like maps, users can [drag to pan](/training/gestures/scale#pan) in different directions. Enable [swipe-to-dismiss](/training/wearables/apps/exit#swipe-to-dismiss) if your activity takes up the entire screen."]]